After our recent trip to Meathop Fell it was time to say goodbye to an old friend. We have had our leisure battery since 2011 and for 11 years it has given us great service. For the last year or so I have thought hard about converting over to Lithium and drew up plans for a high capacity charging link between the tow vehicle and caravan and converting the caravan over to a Victron based system. However I think that for this caravan it would not be worth it.
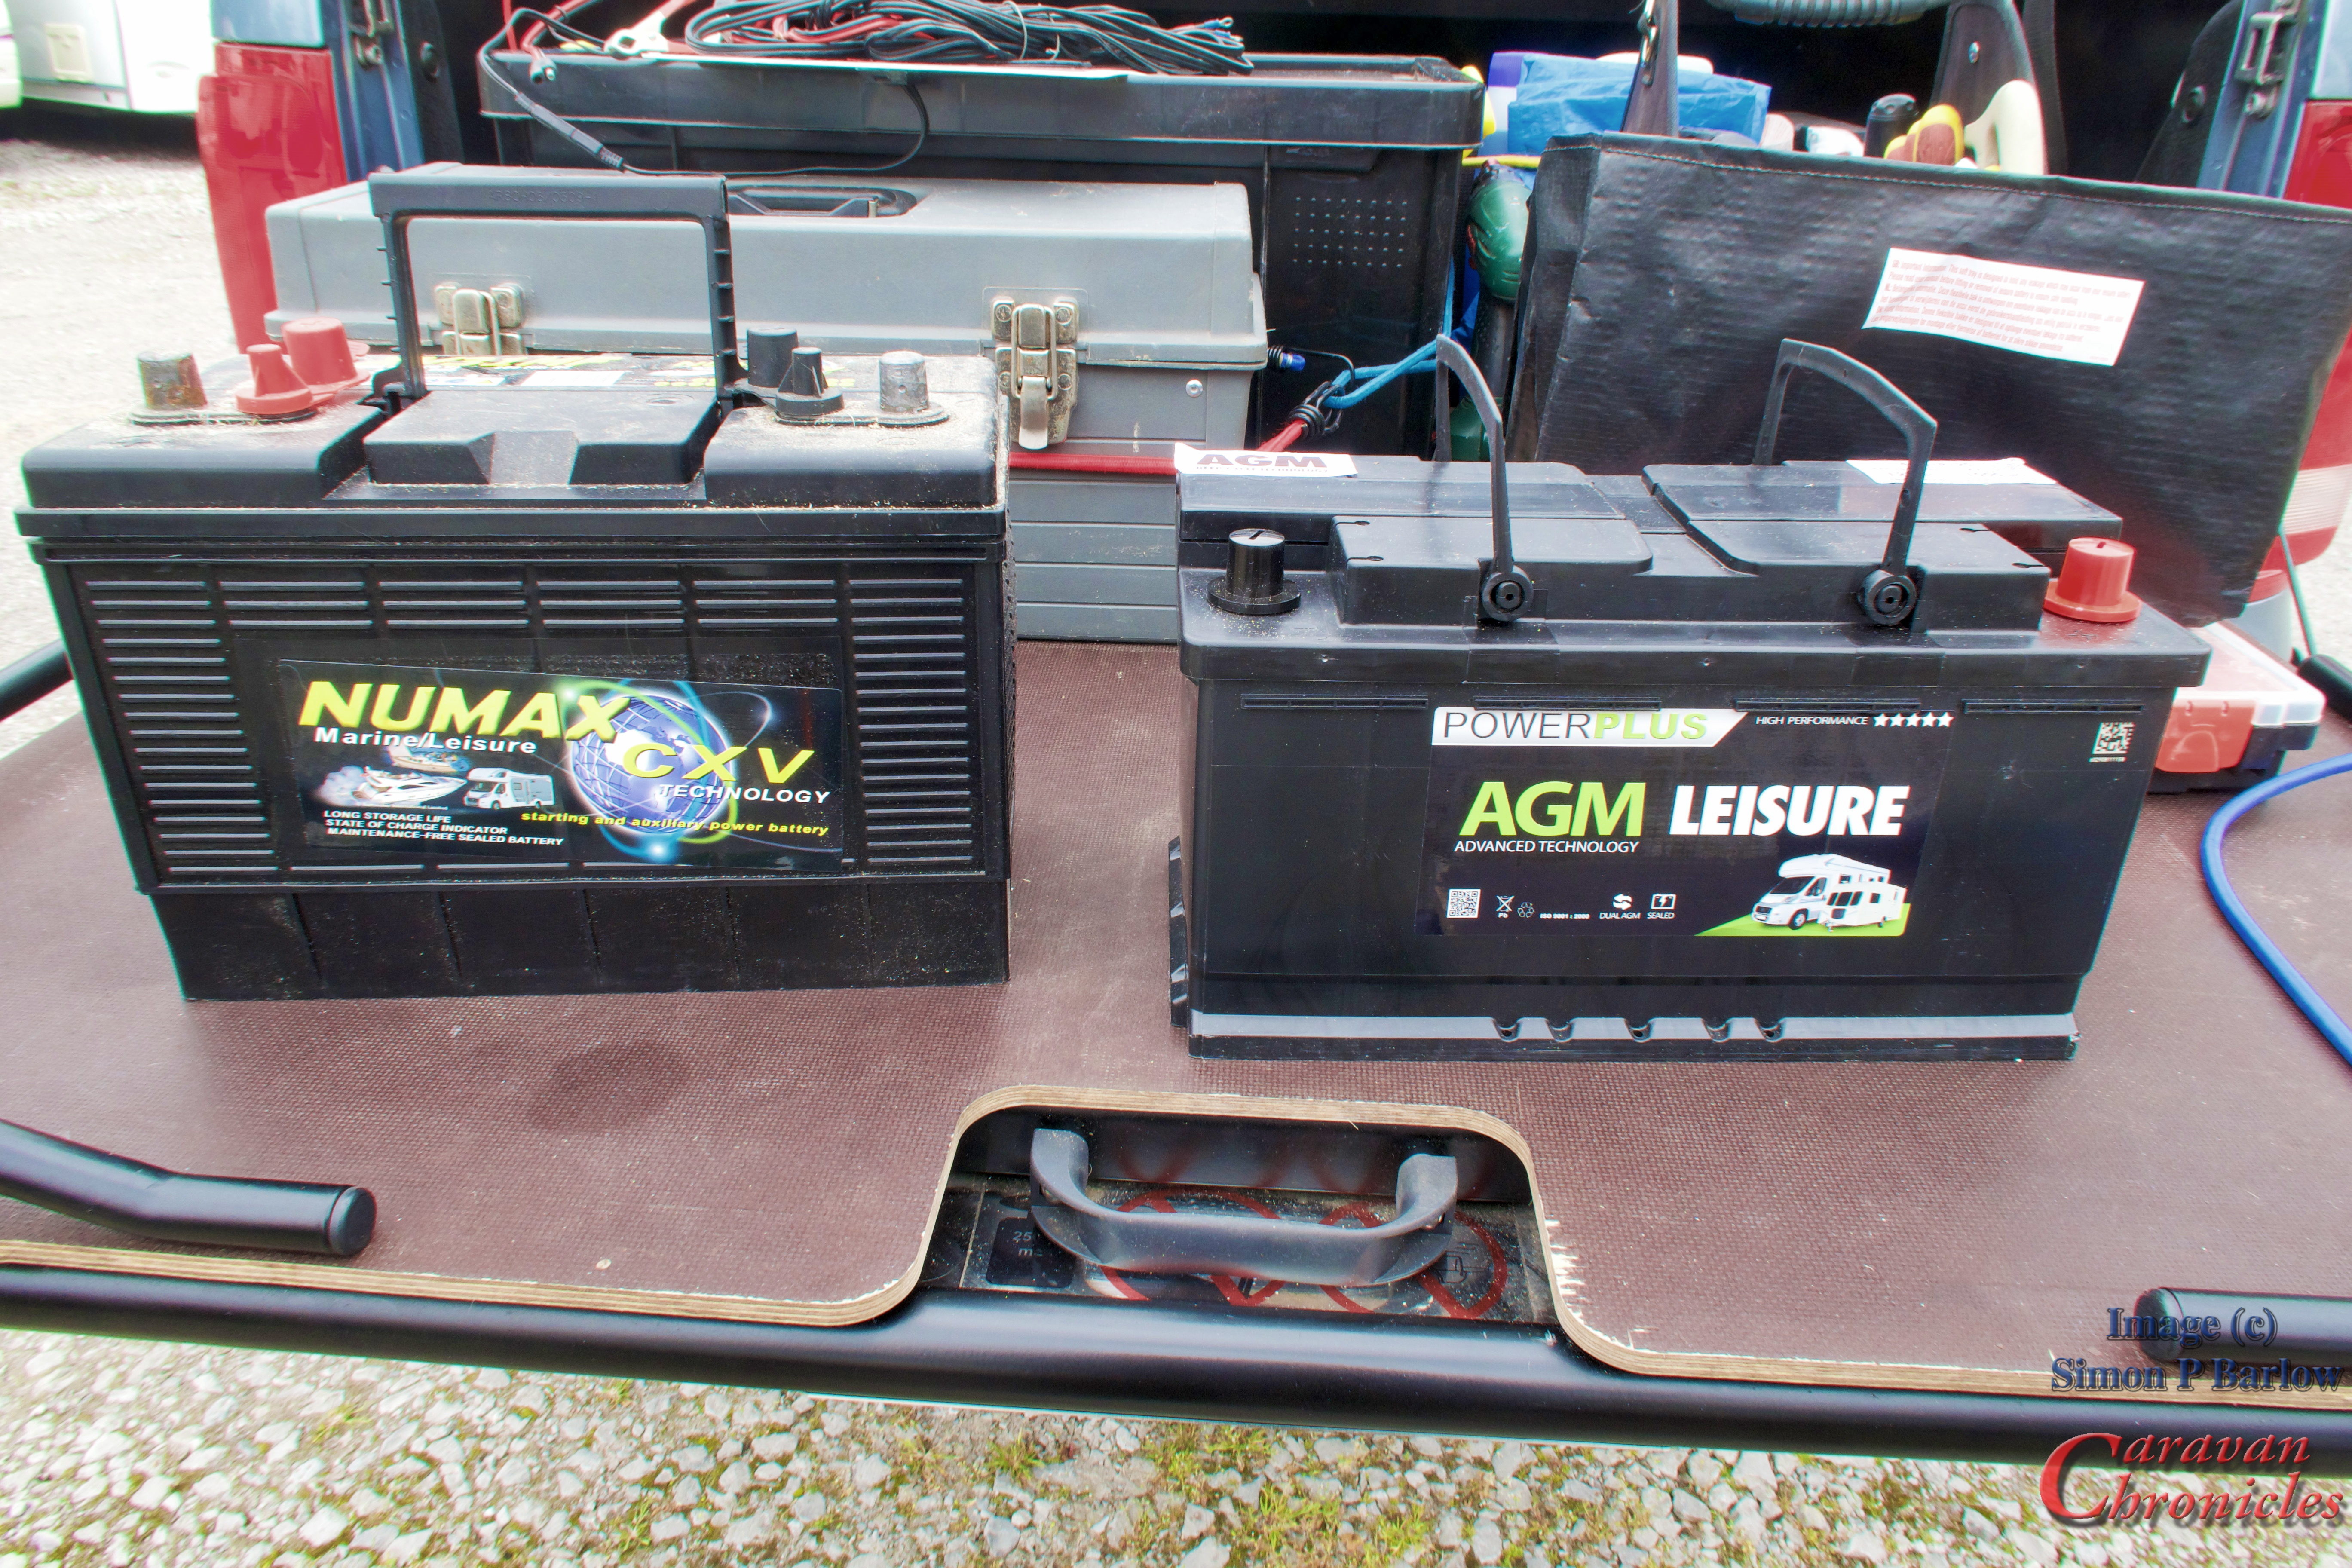
We had bought a 120Ah Numax battery (left one above) from ABS and it had worked well, even now it still hold a charge and is sitting in my workshop on trickle charge waiting for a project to come along. I went back to Advanced Battery Supplies and opted to go for a 120Ah AGM. It wasn’t too expensive and hopefully it will give us years of service like it’s predecessor. I’ve used ABS for batteries a number of times over the past 12 or so years and can recommend them. I’m not sponsored by them and I paid for the battery but I have found that for me they give sensible advice and great service. That’s why I’m happy to mention them. You can call in personally or they do ship overnight ordering from their website – https://advancedbatterysupplies.co.uk
Battery taken care of now it was time to head into the workshop for a bit of construction….
Henry’s Conveyance Contrivance…
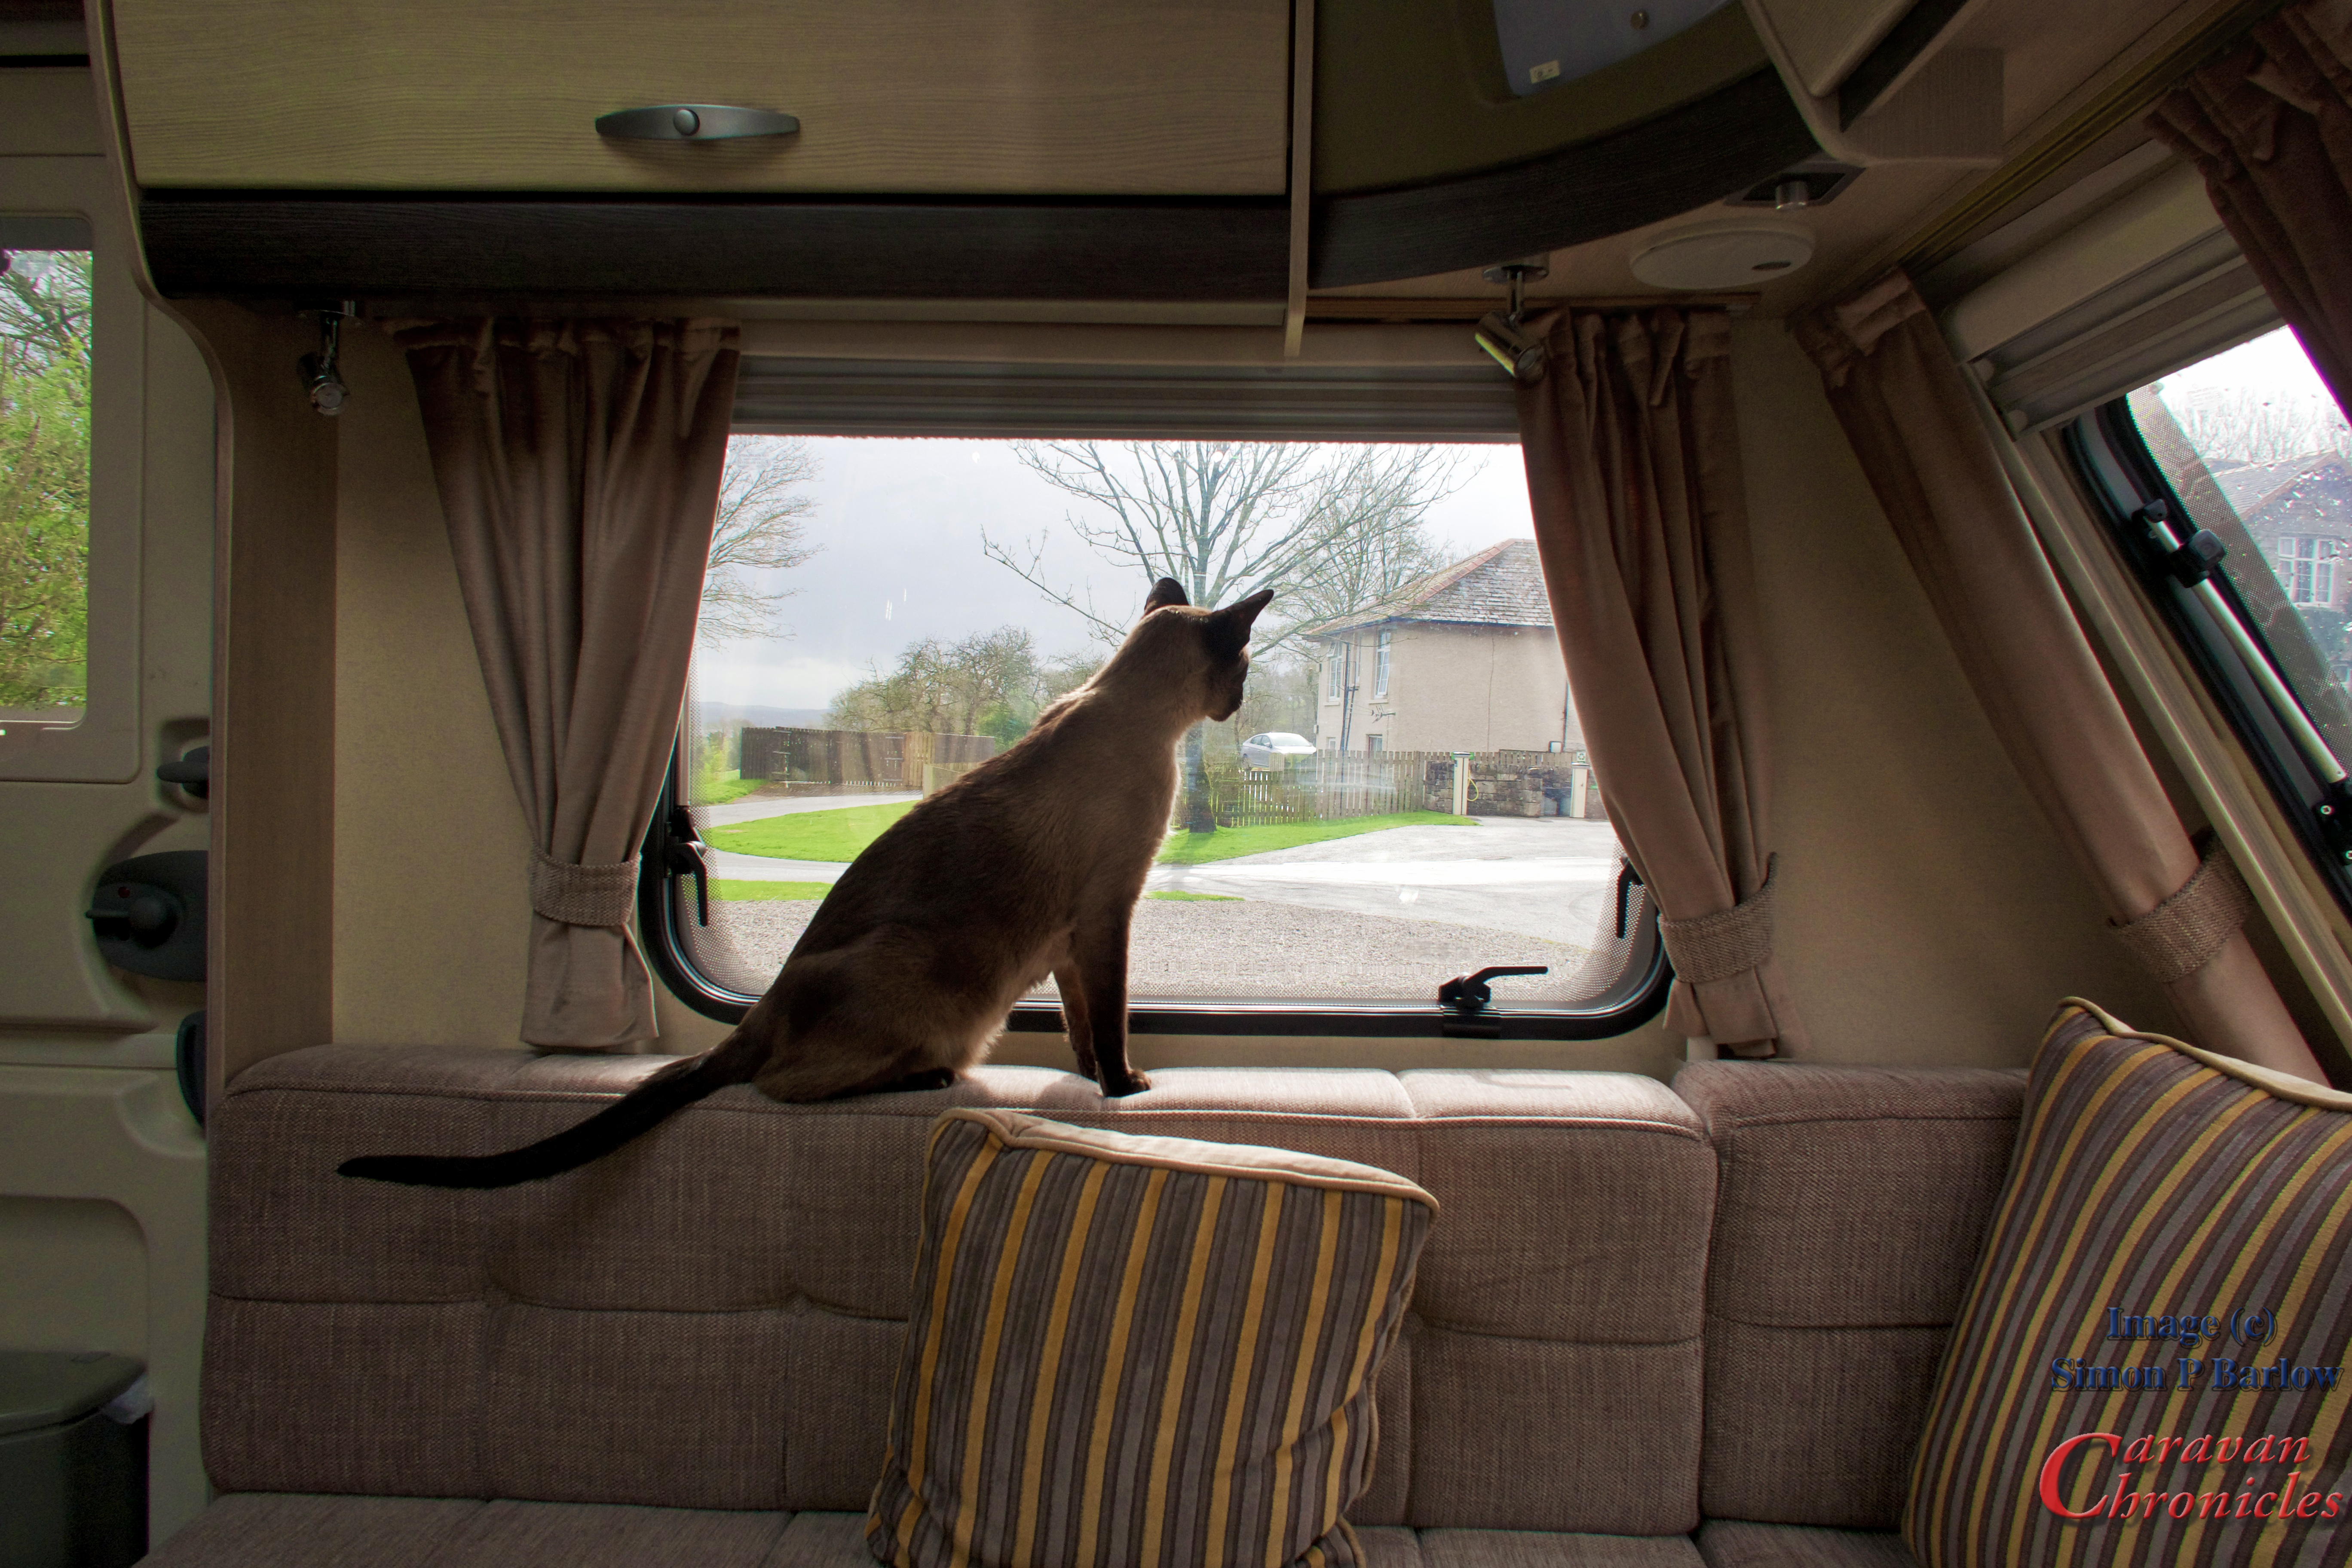
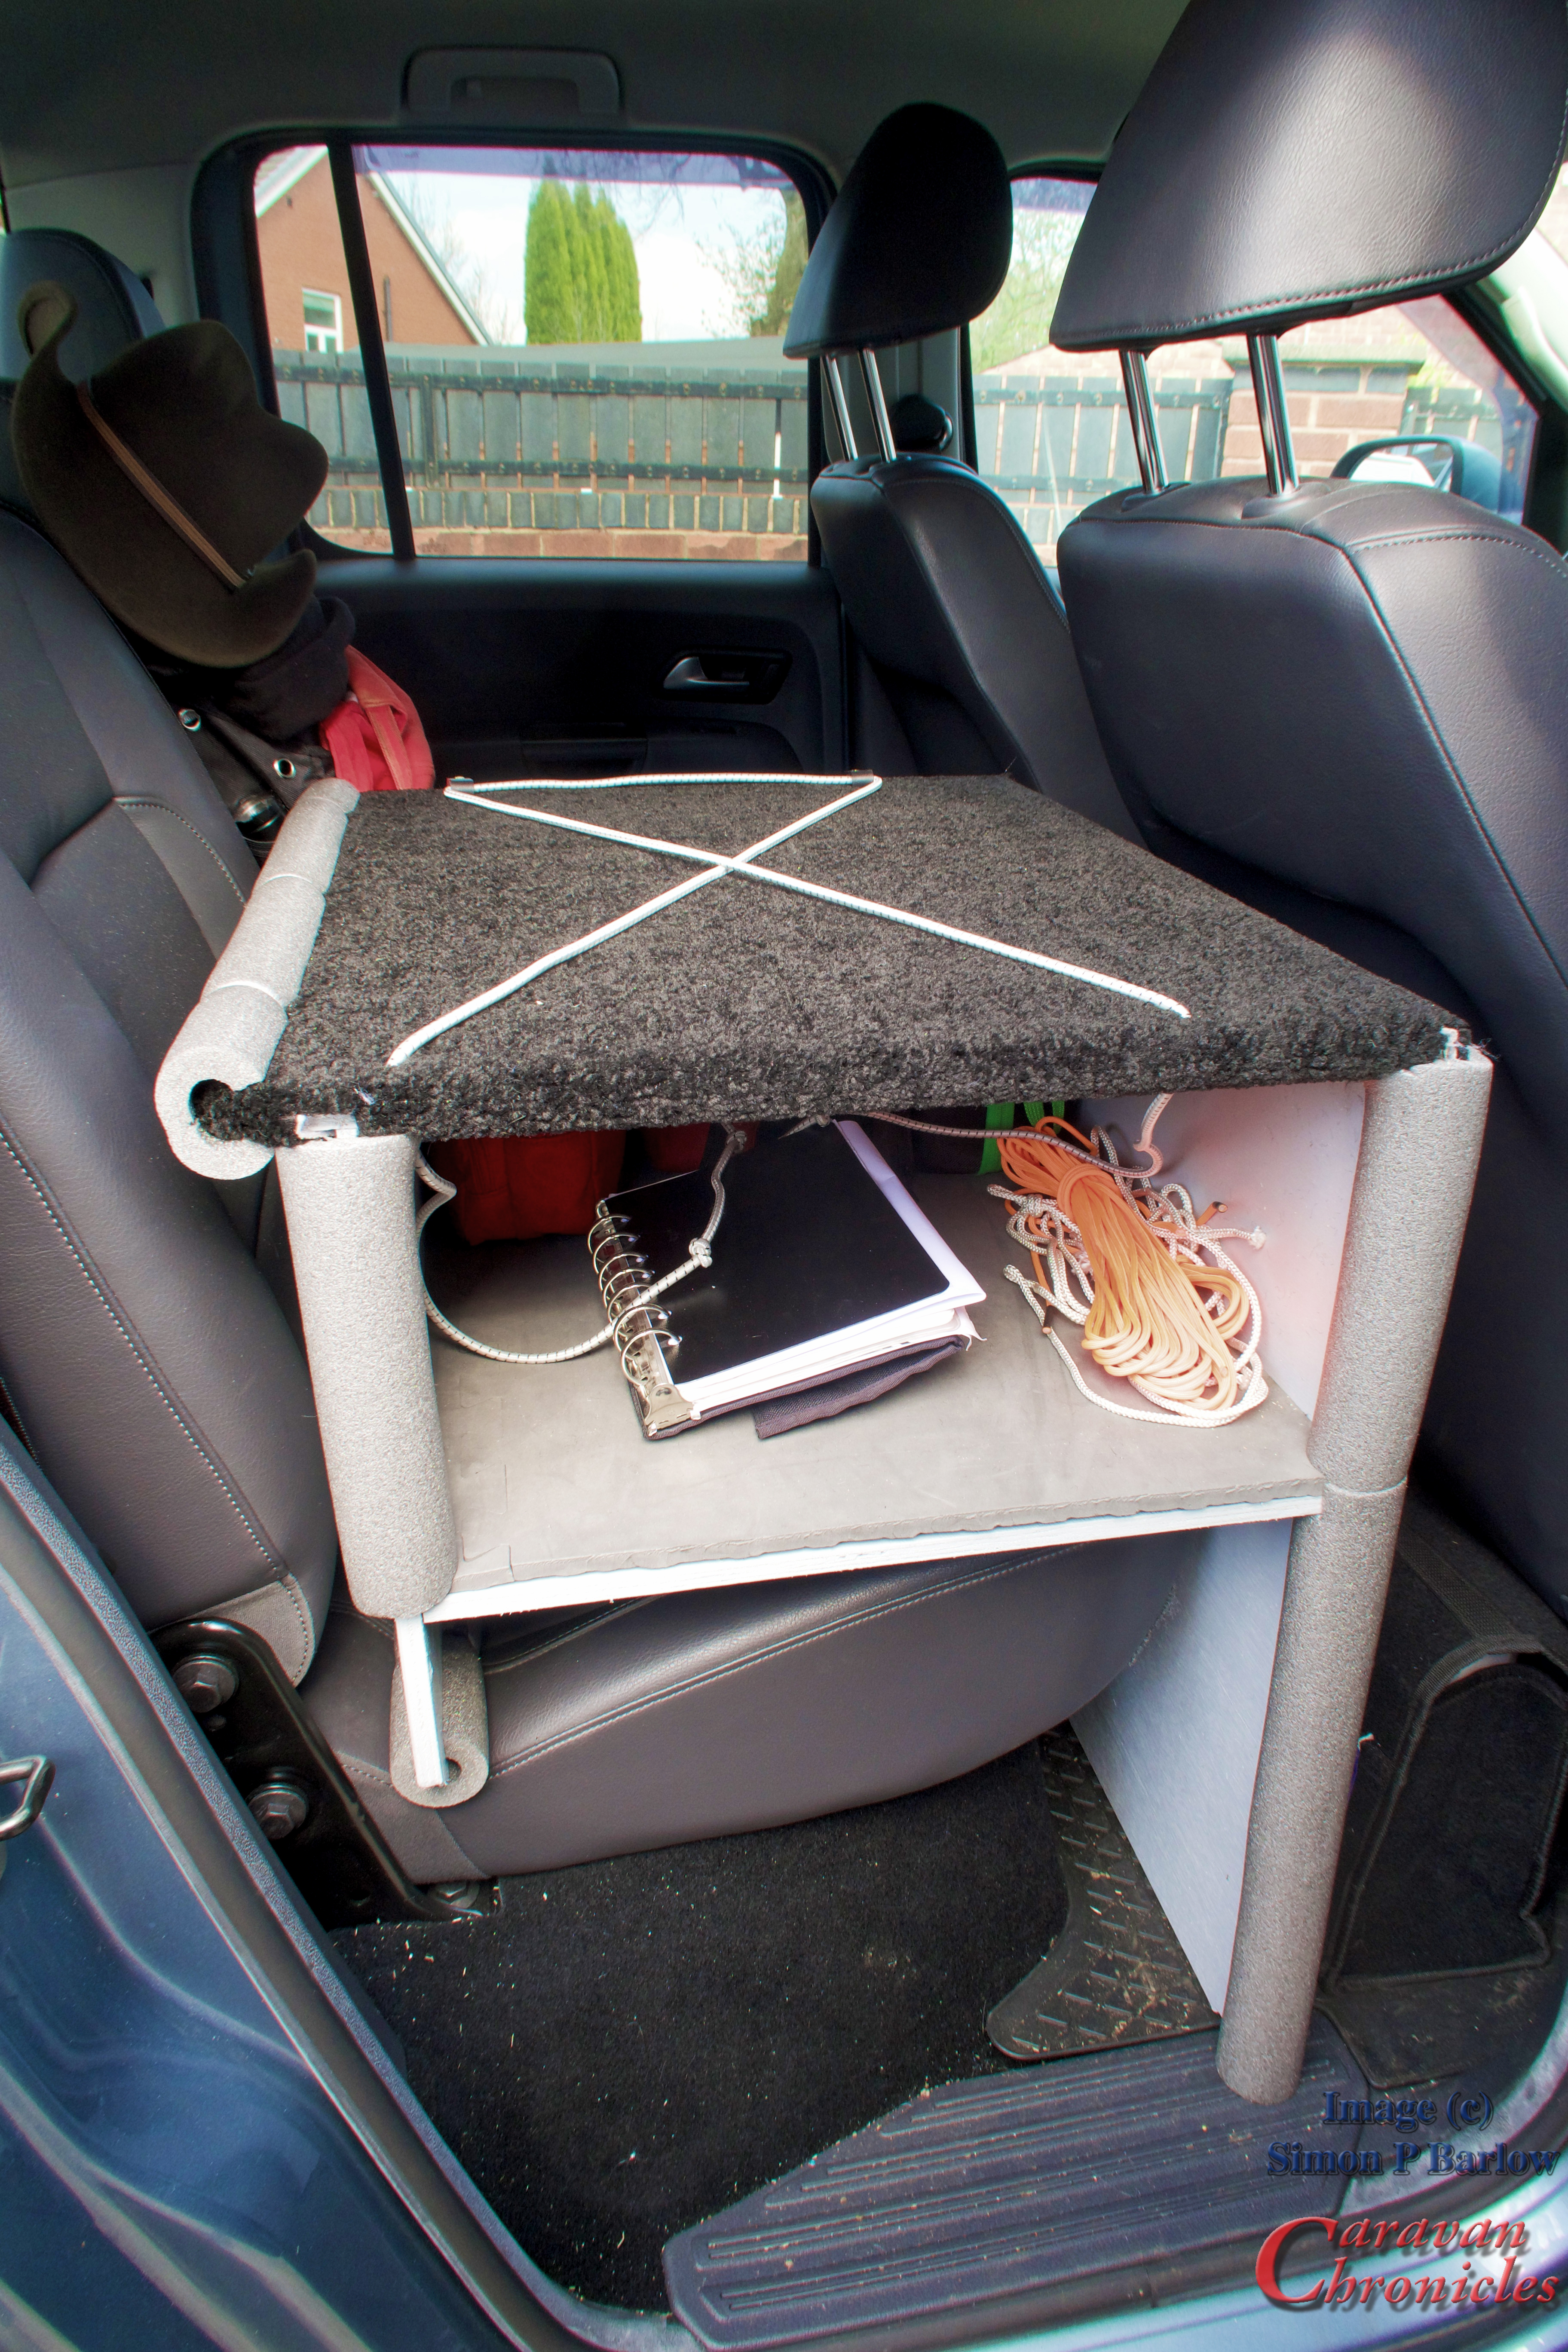
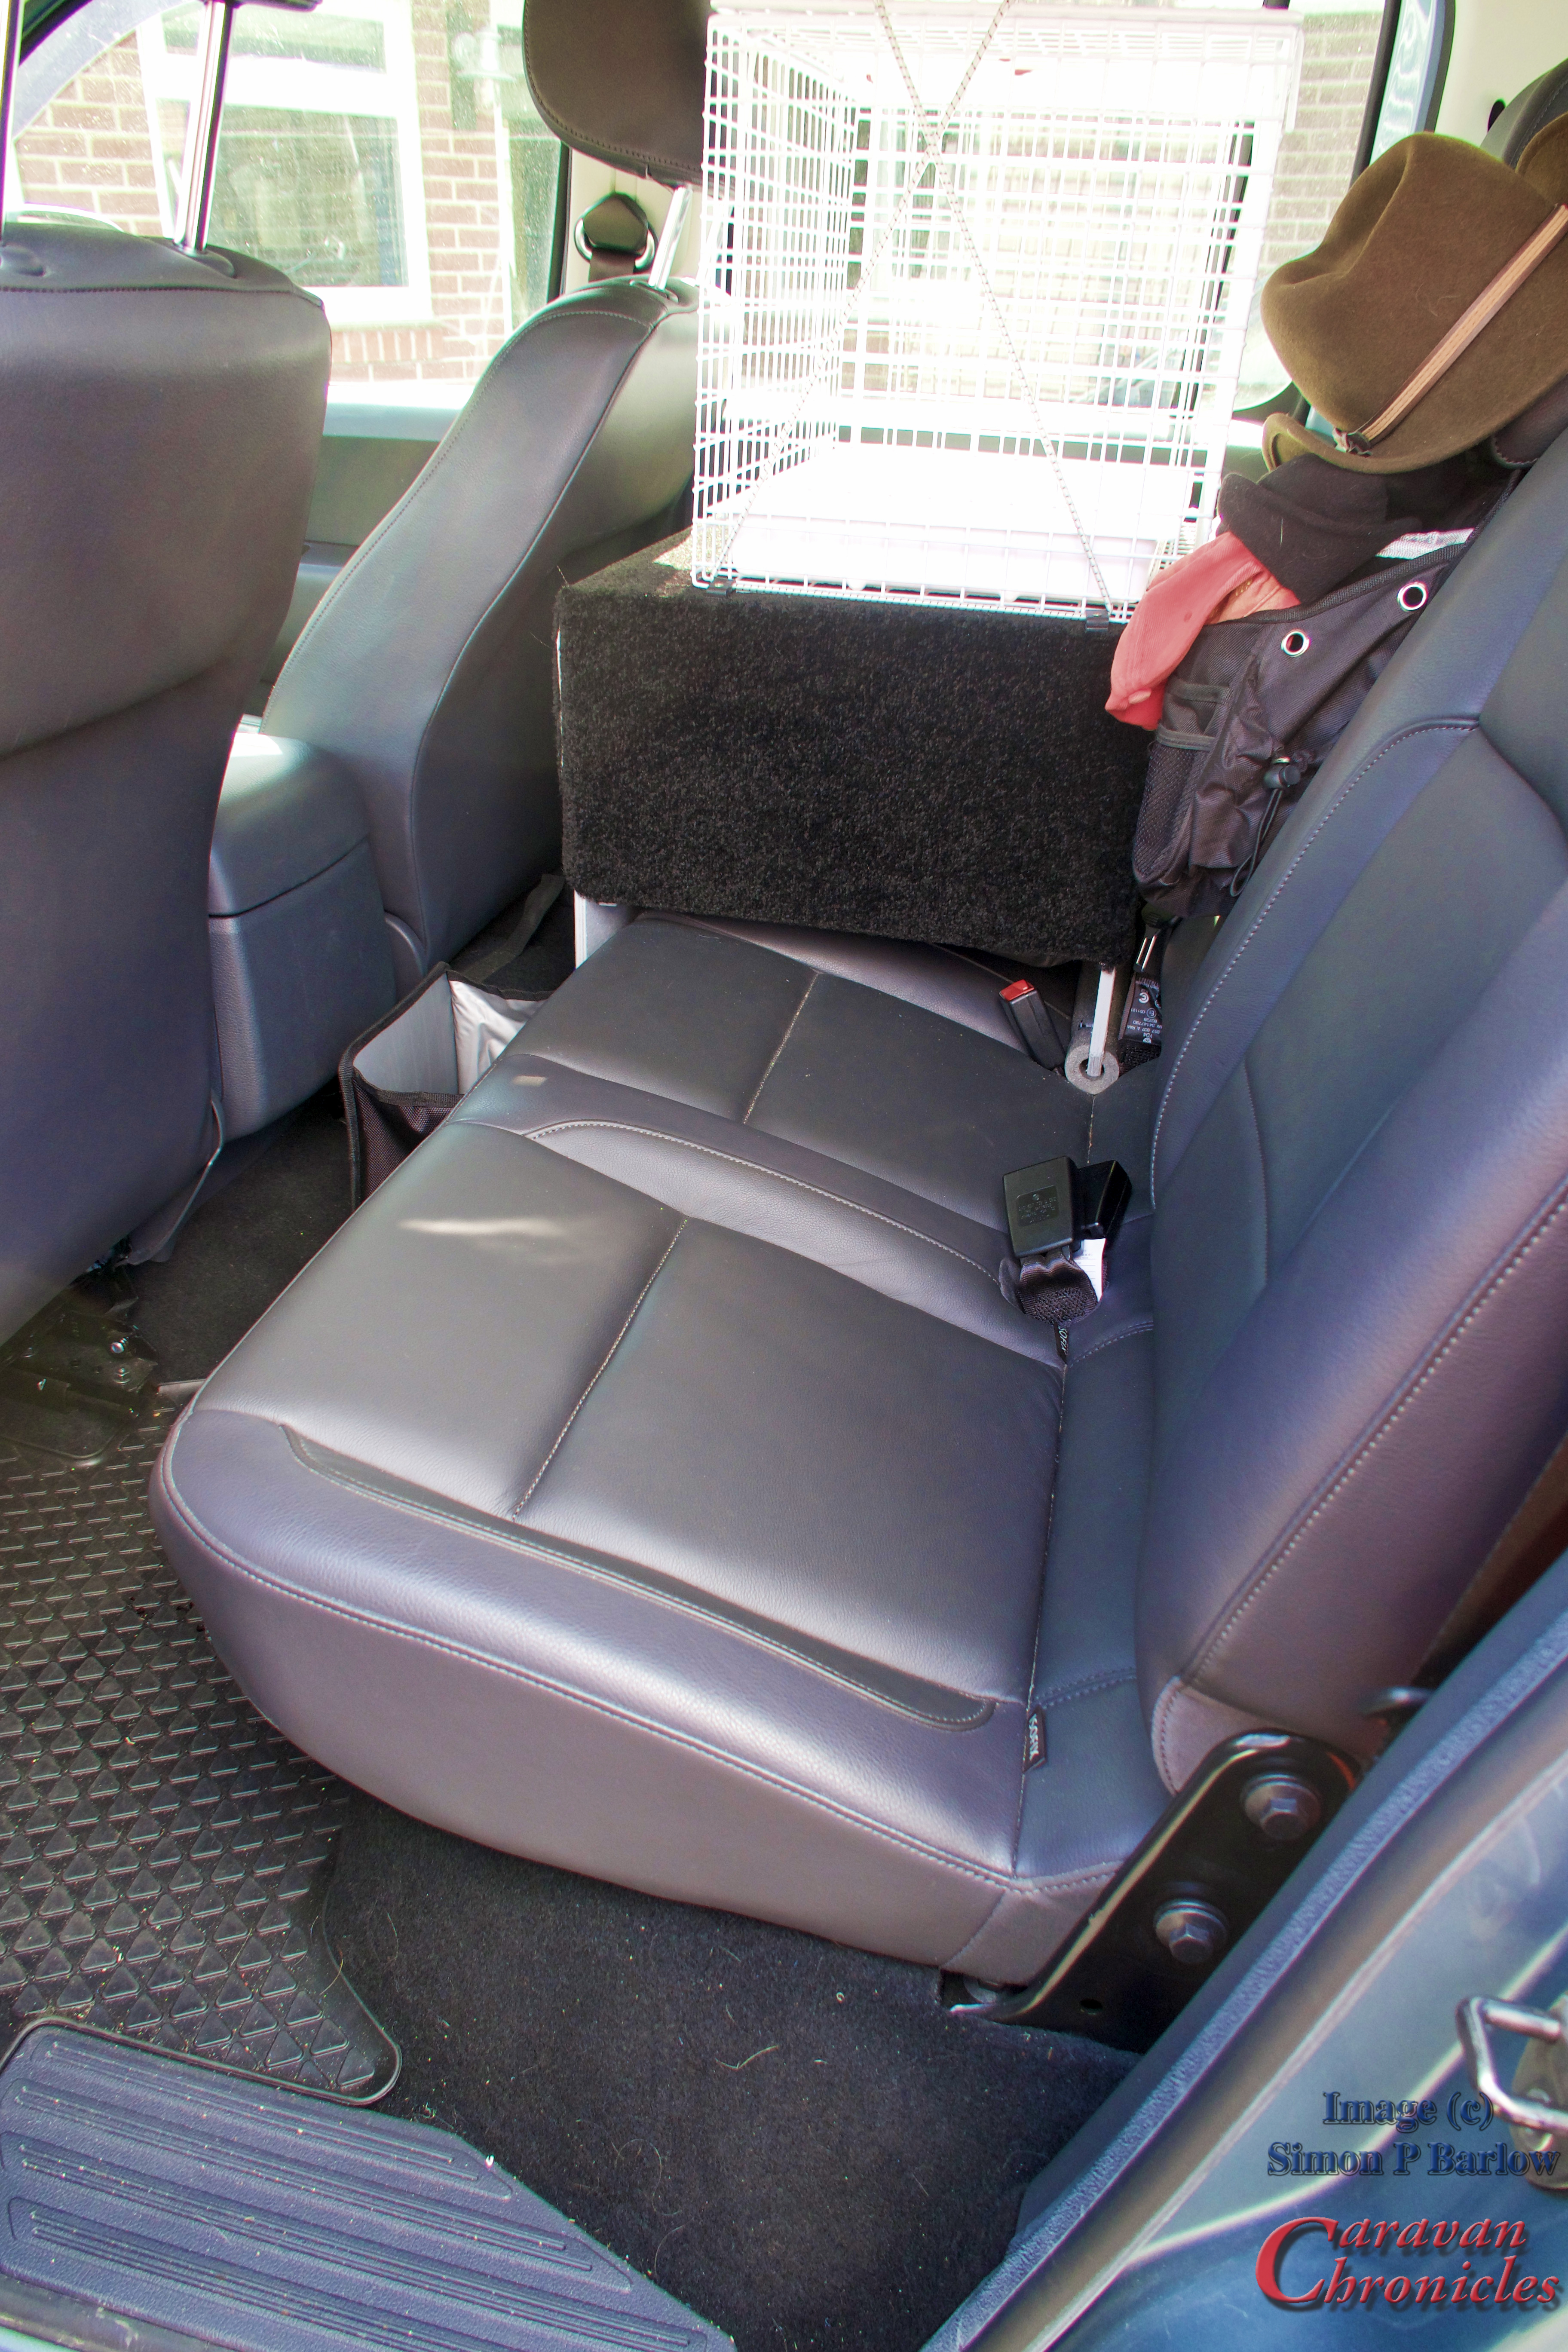
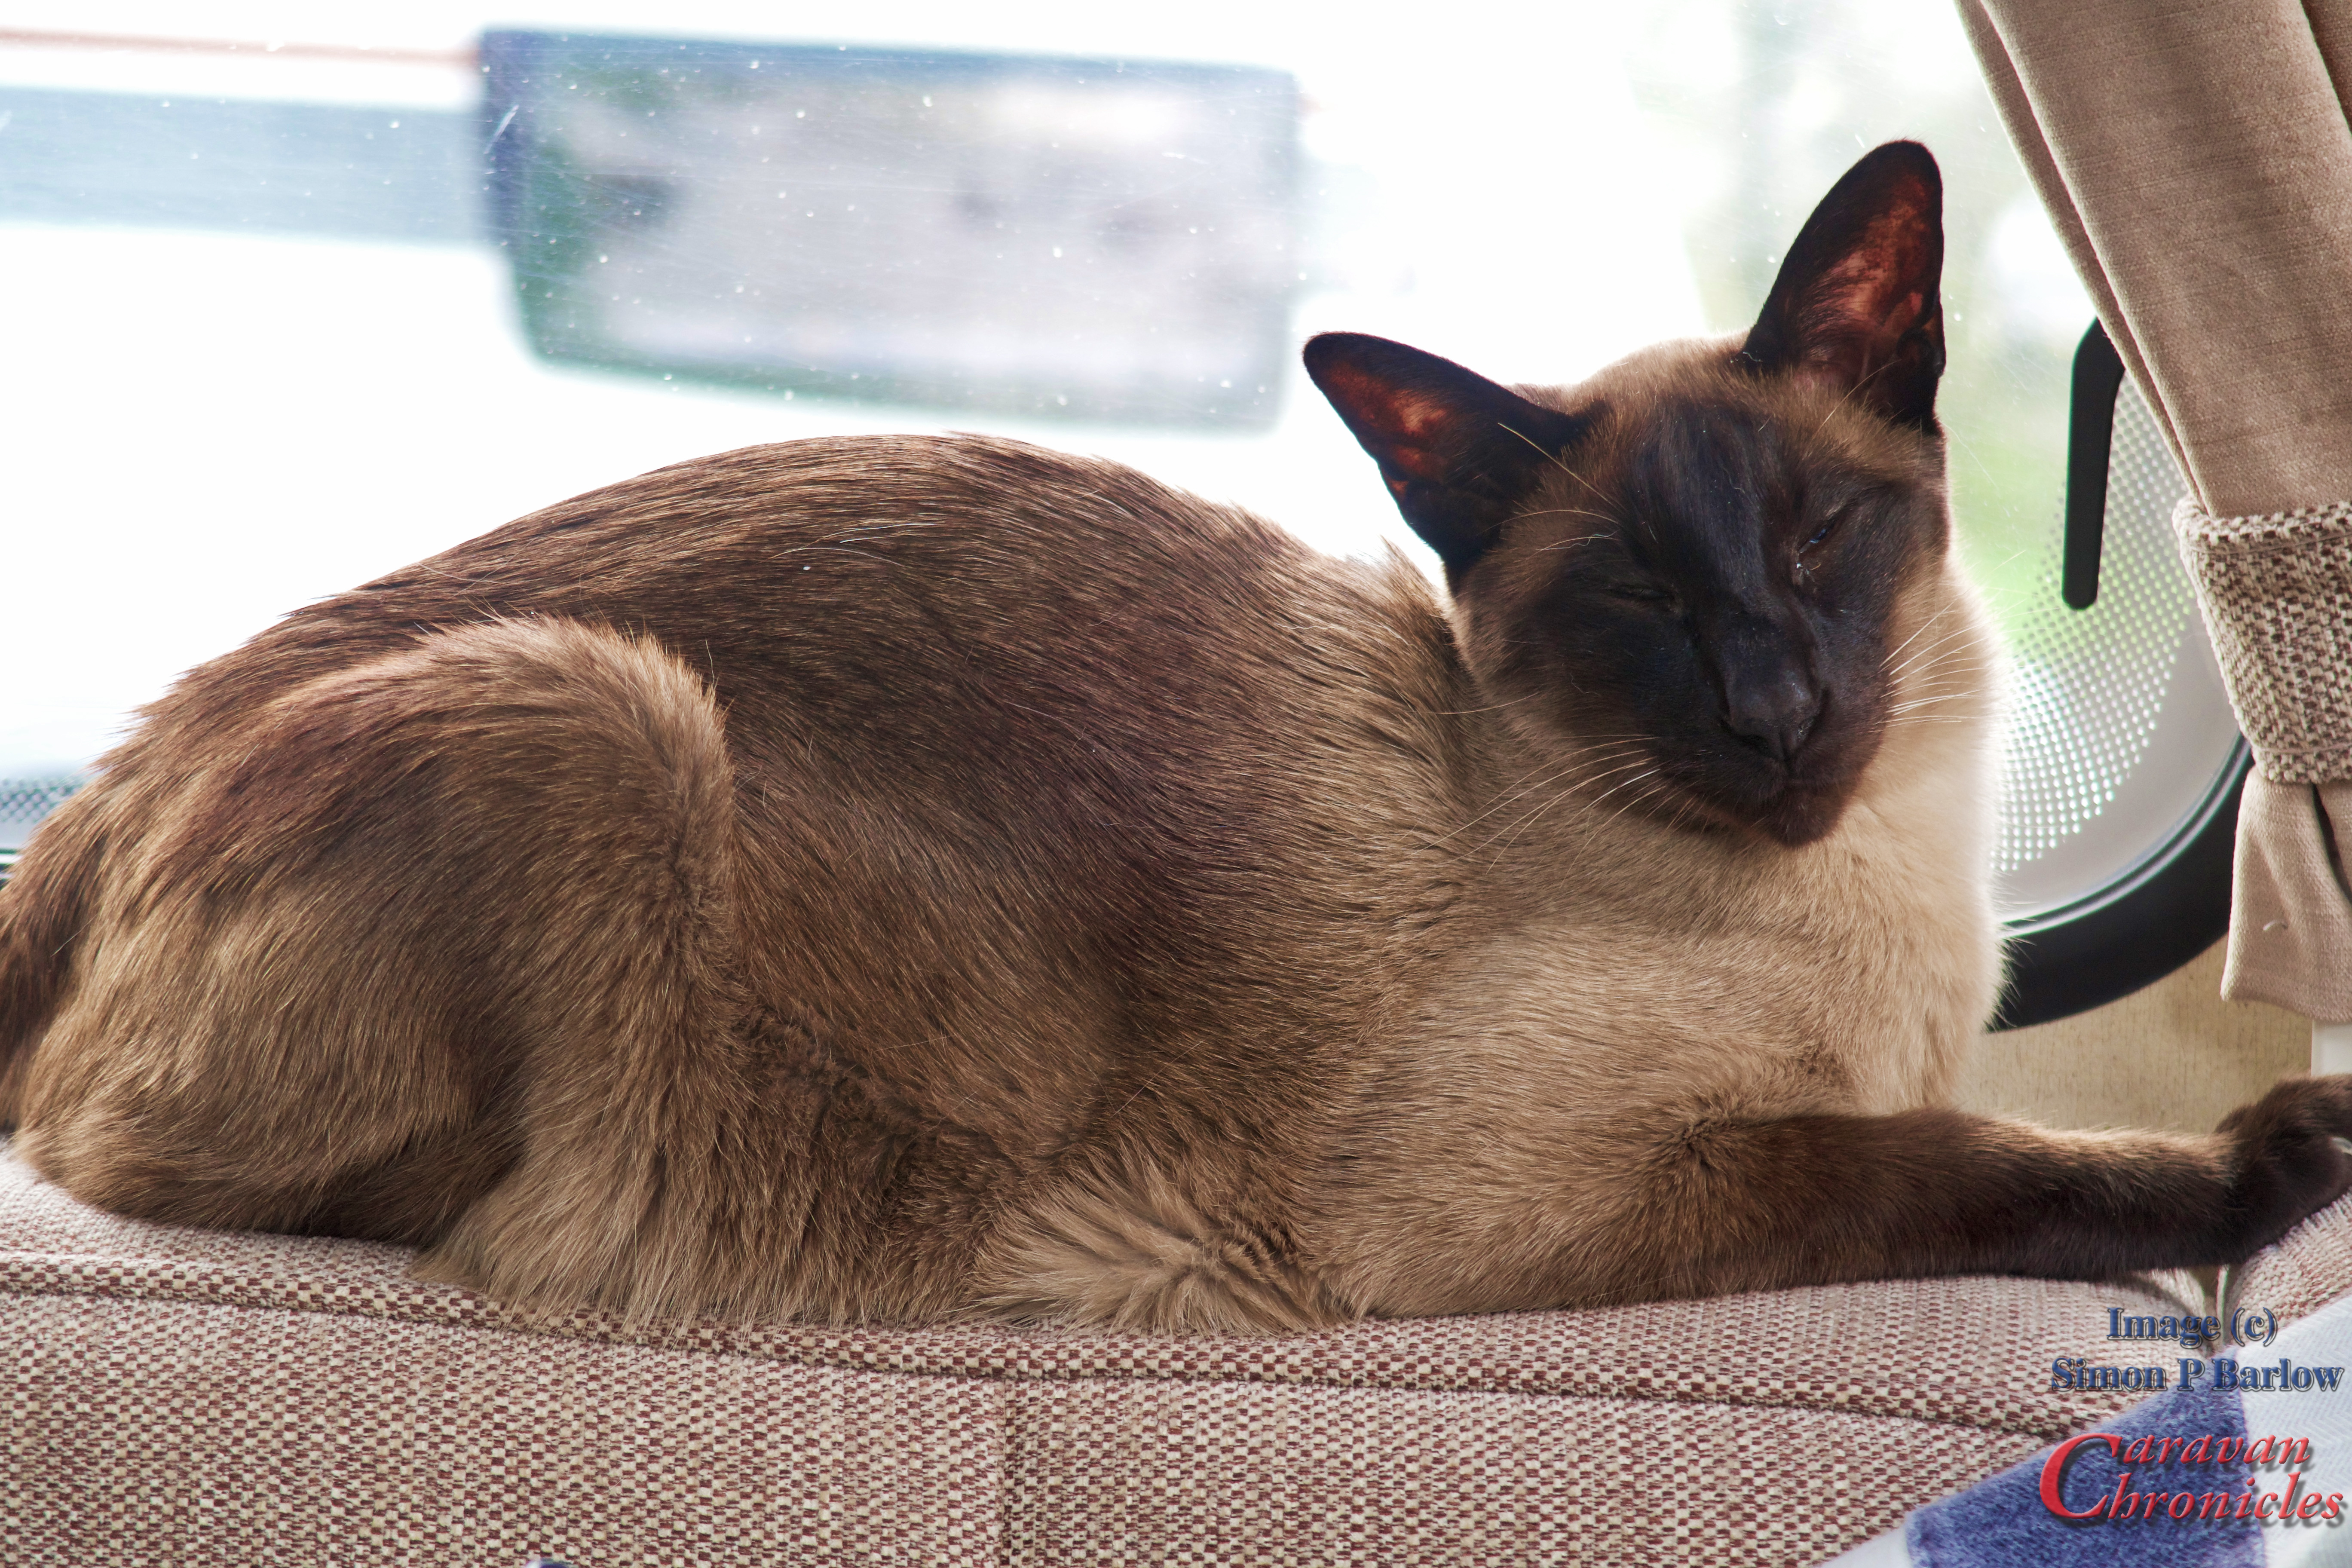
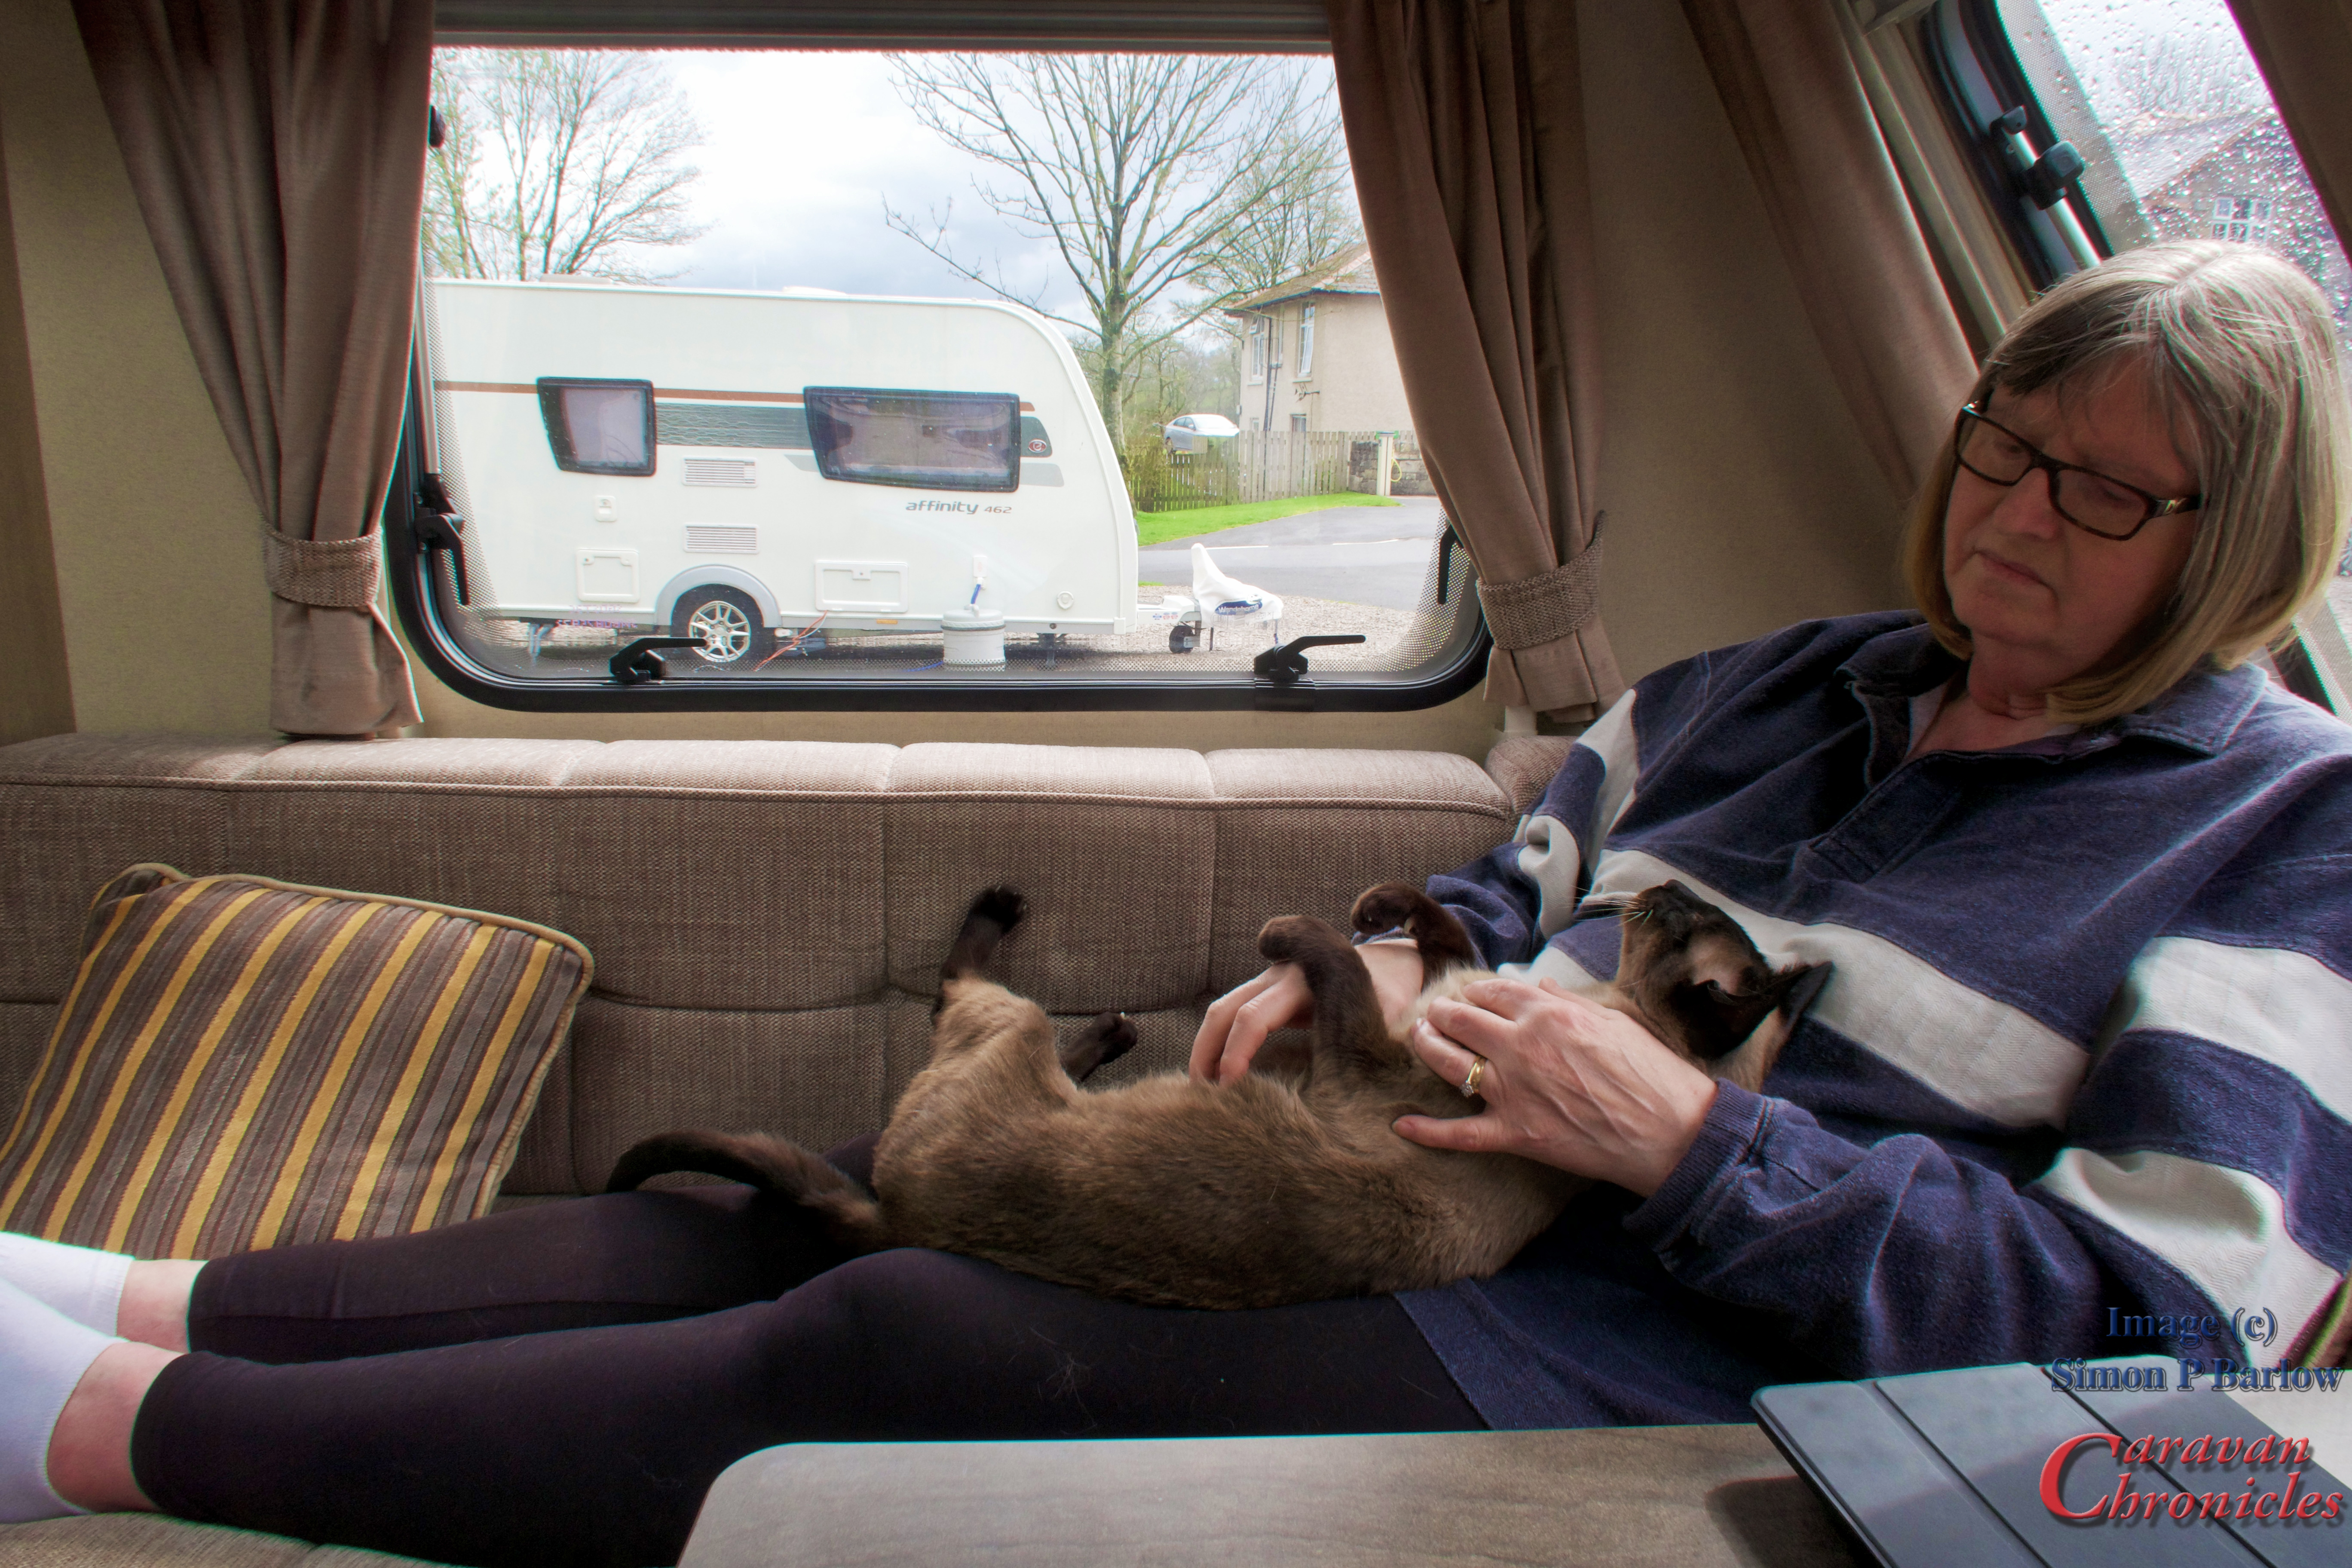
If you have read any of my posts over the last few years you will know that we have Siamese cats…. well sadly Oscar our health and safety officer passed away a while ago leaving us with just his brother Henry. Up to this point we have always had a cat sitter whenever we were away but June has now retired and honestly we could not face the thought of leaving Henry in a cattery or on his own with another cat sitter. So, a couple of exploratory trips up to the caravan for an hour just to let him sit in it and explore round lead us to a two night stay at Burrs Country Park…. only about thirty minutes away from home, that went well and so did the next trip to Meathop Fell. It was now time to build Henry a suitable transport platform for the vehicle.
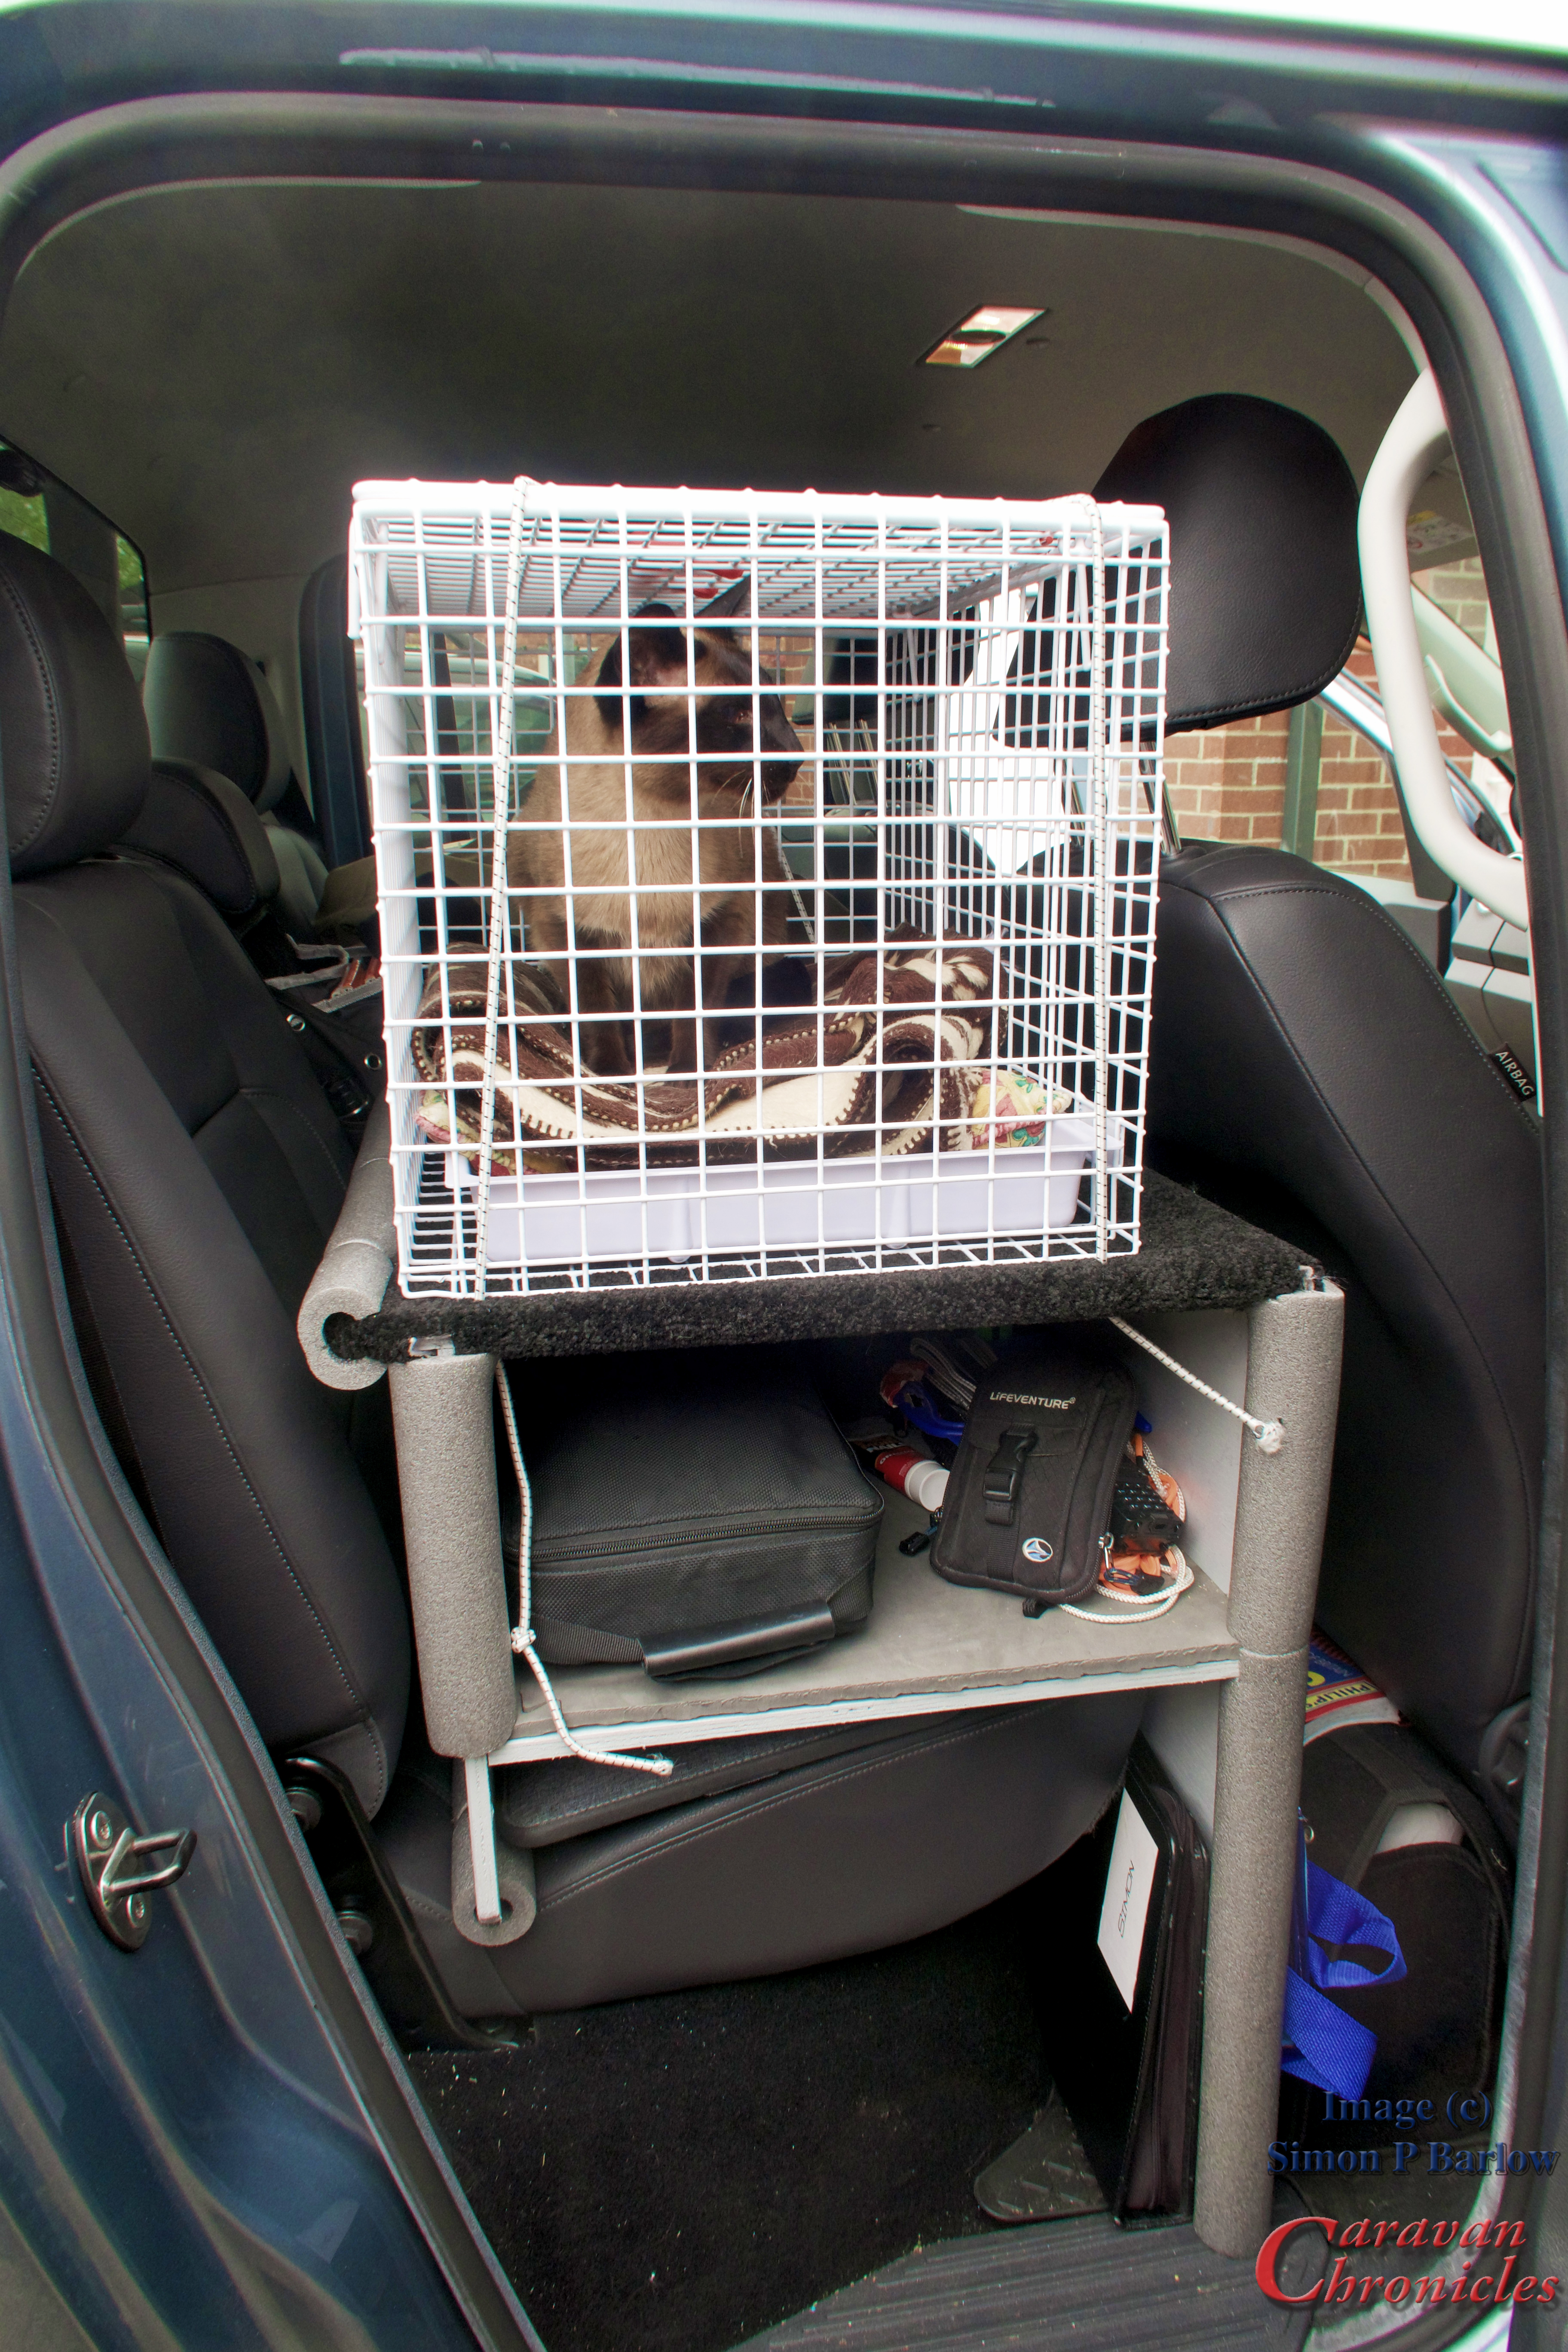
Henry keeping an eye on the goings on at Meathop Fell
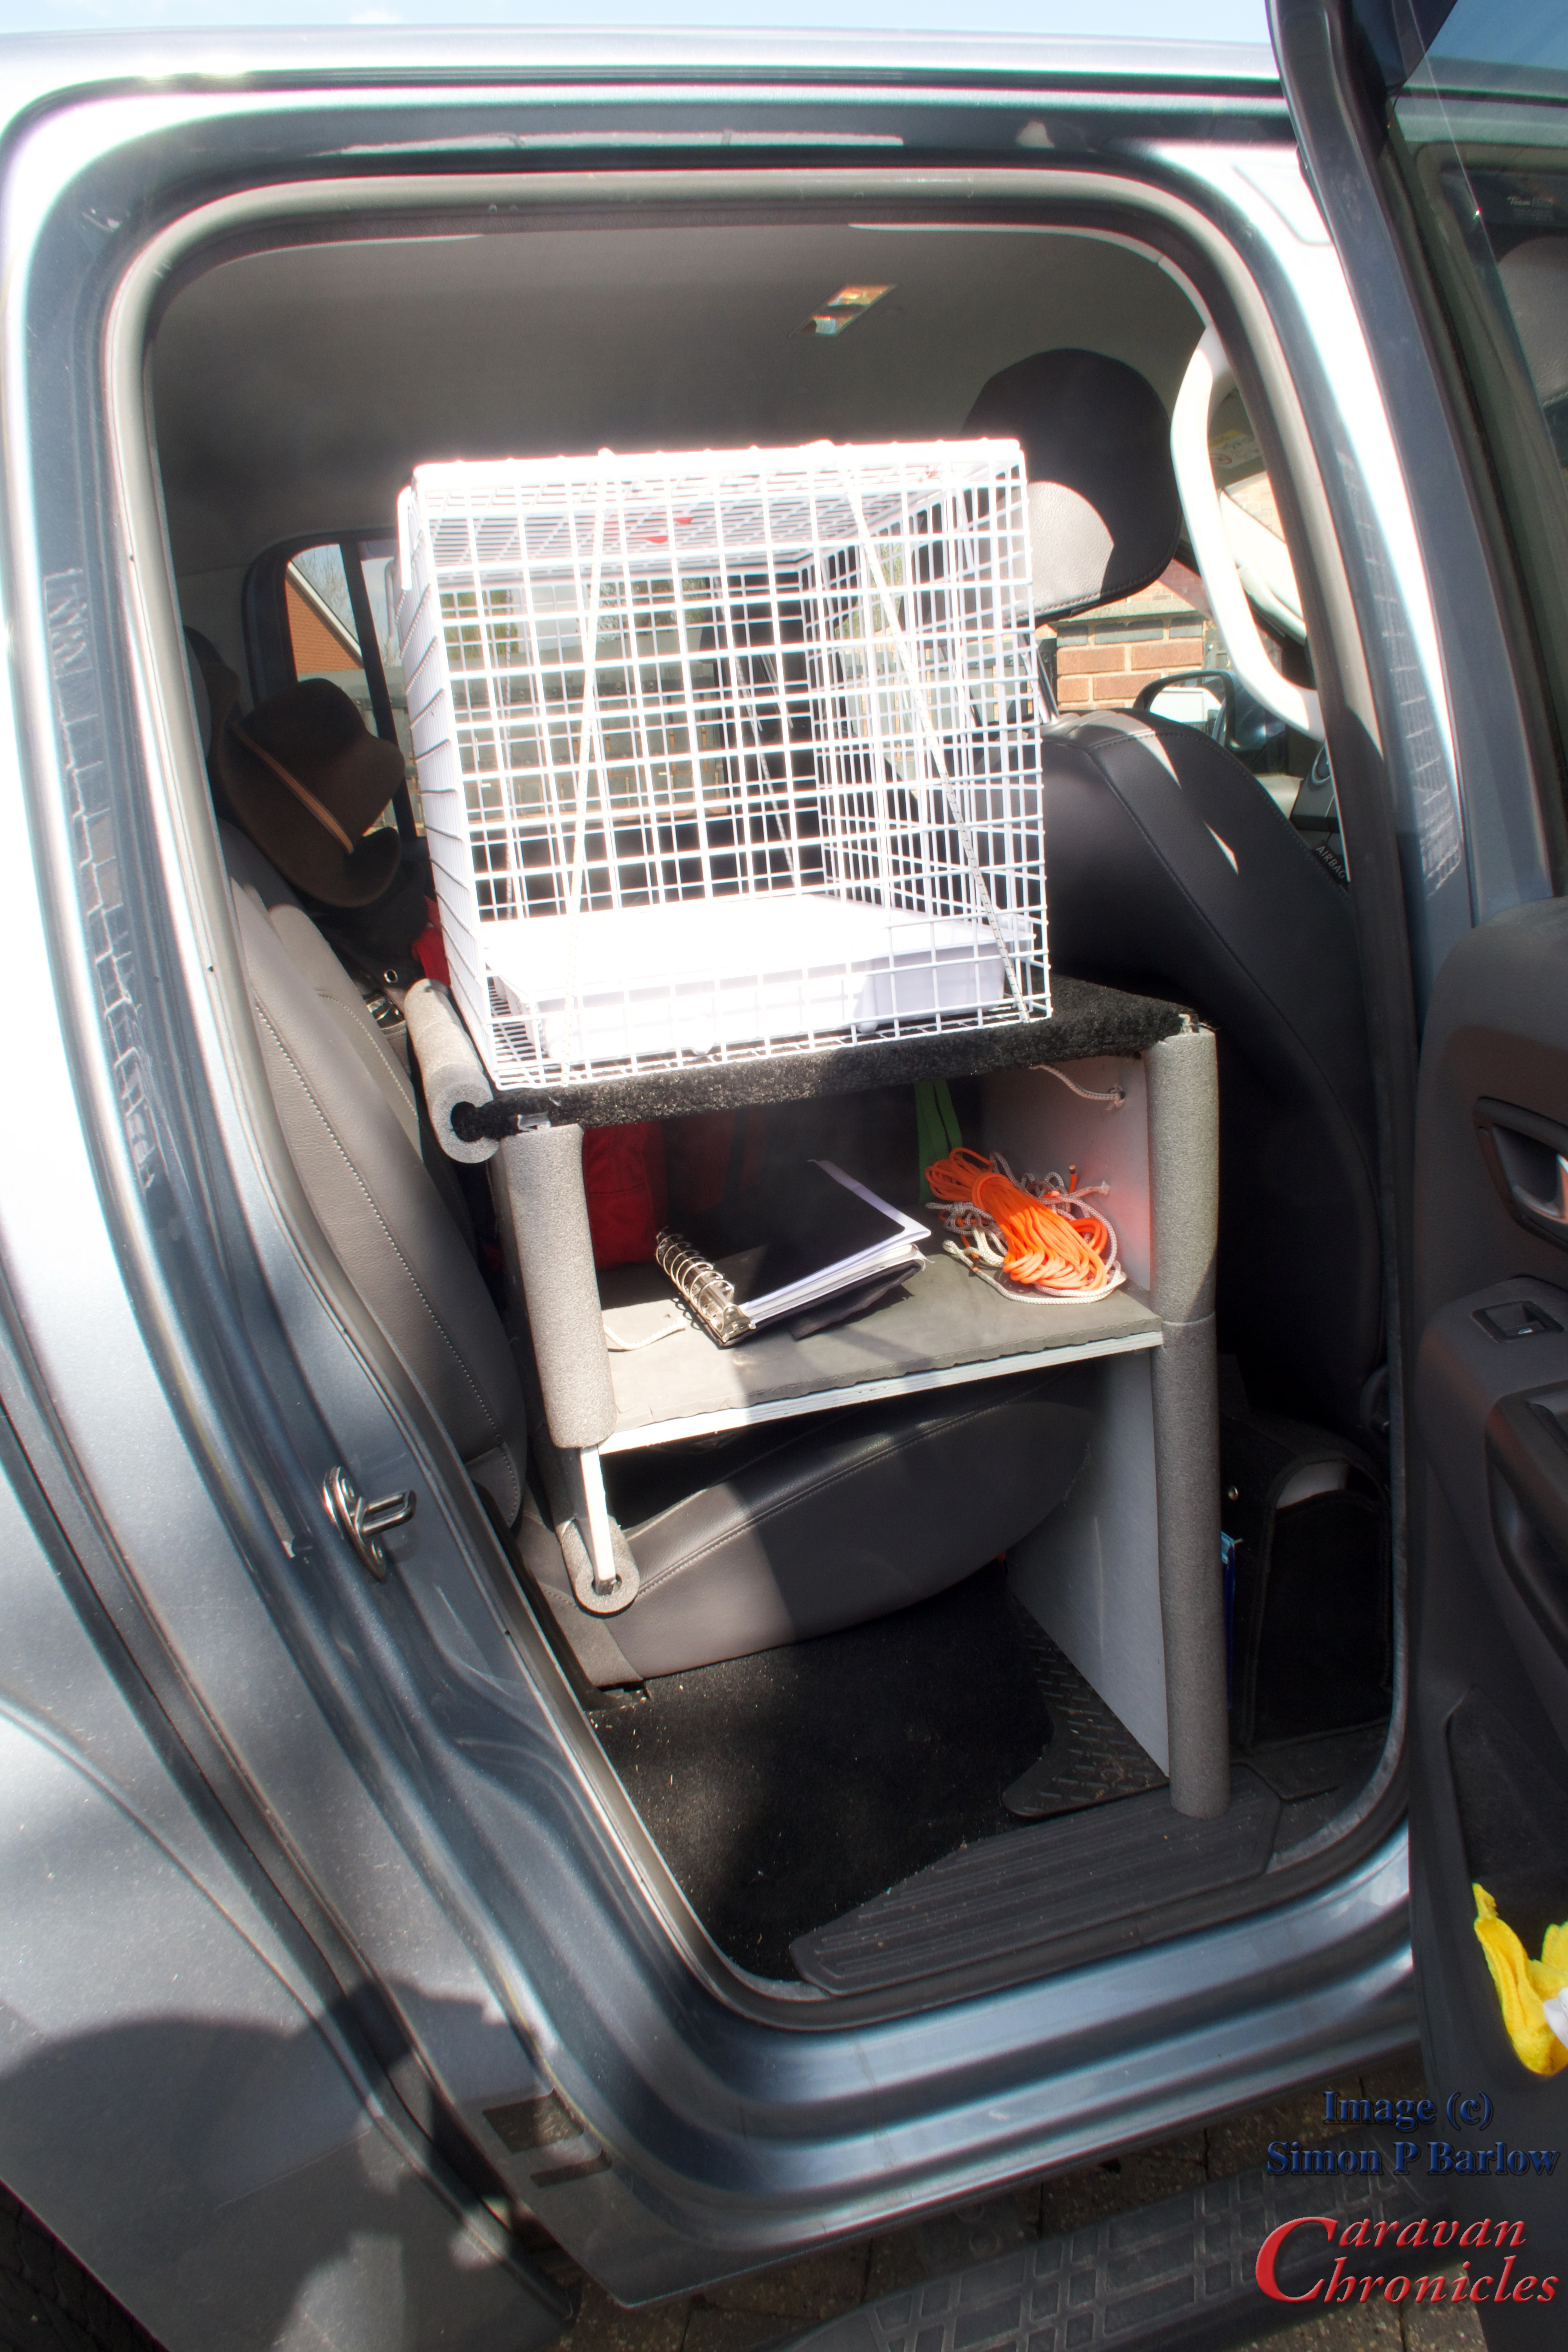
After a bit of head scratching I came up with this….
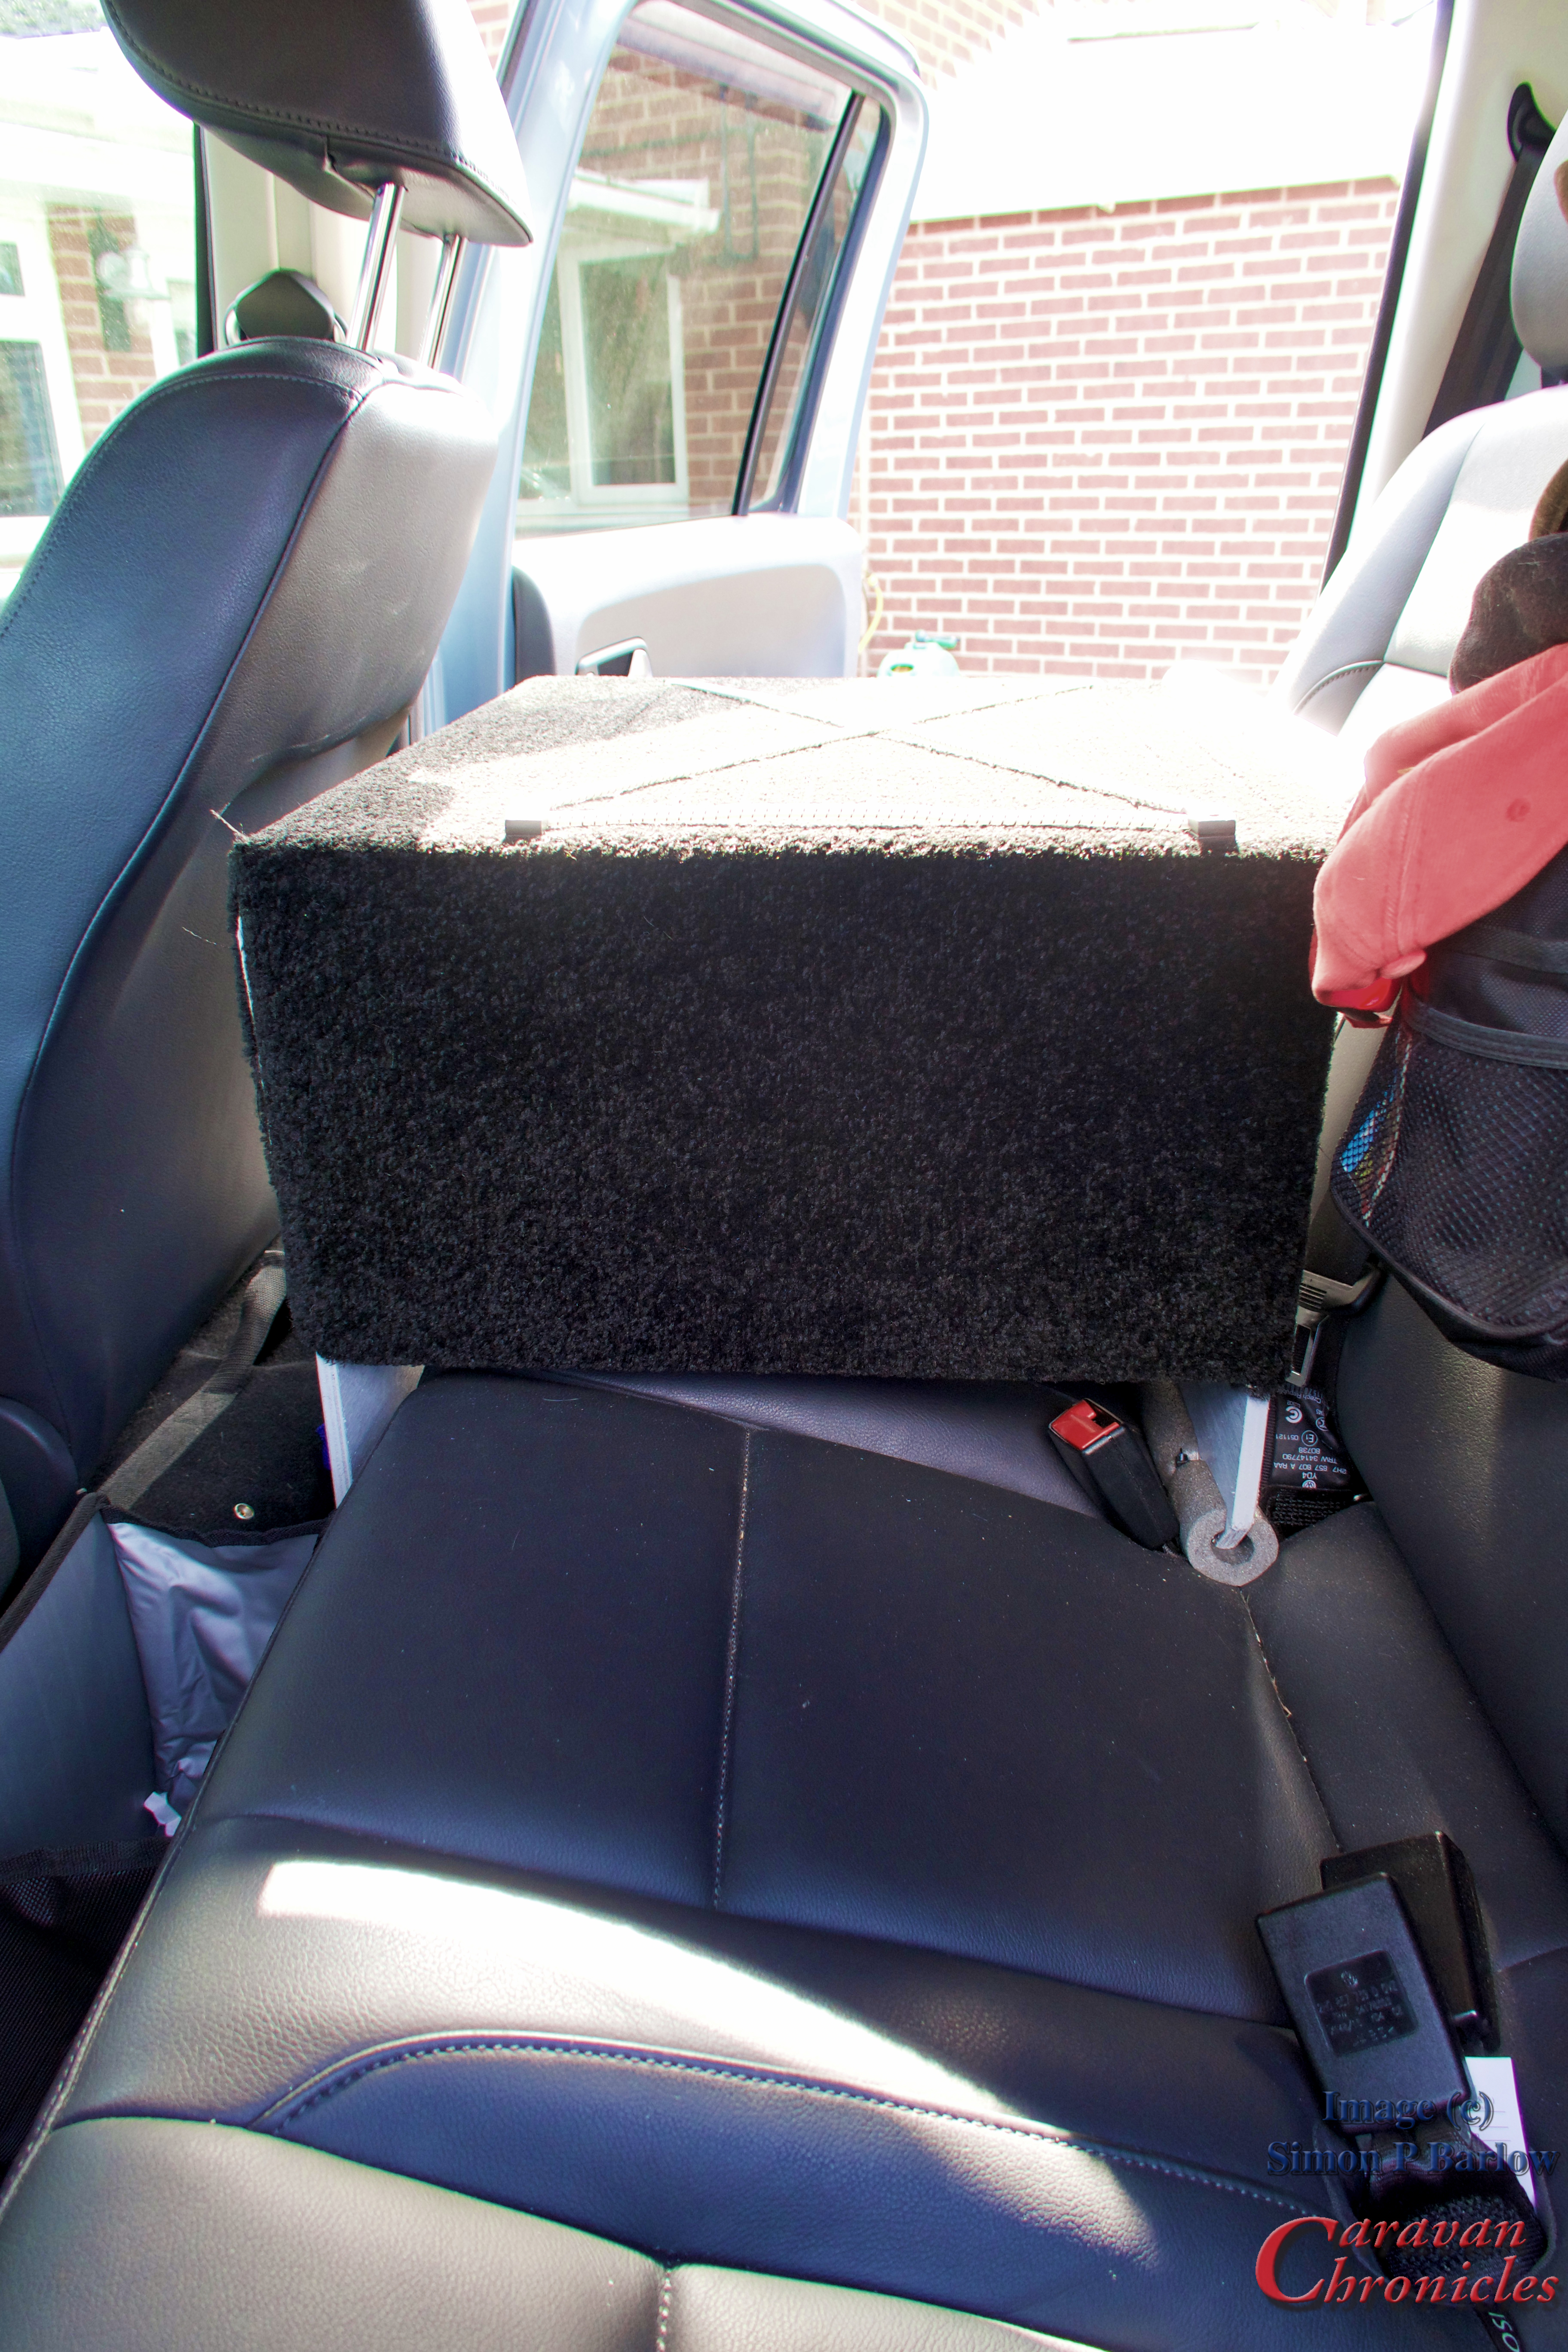
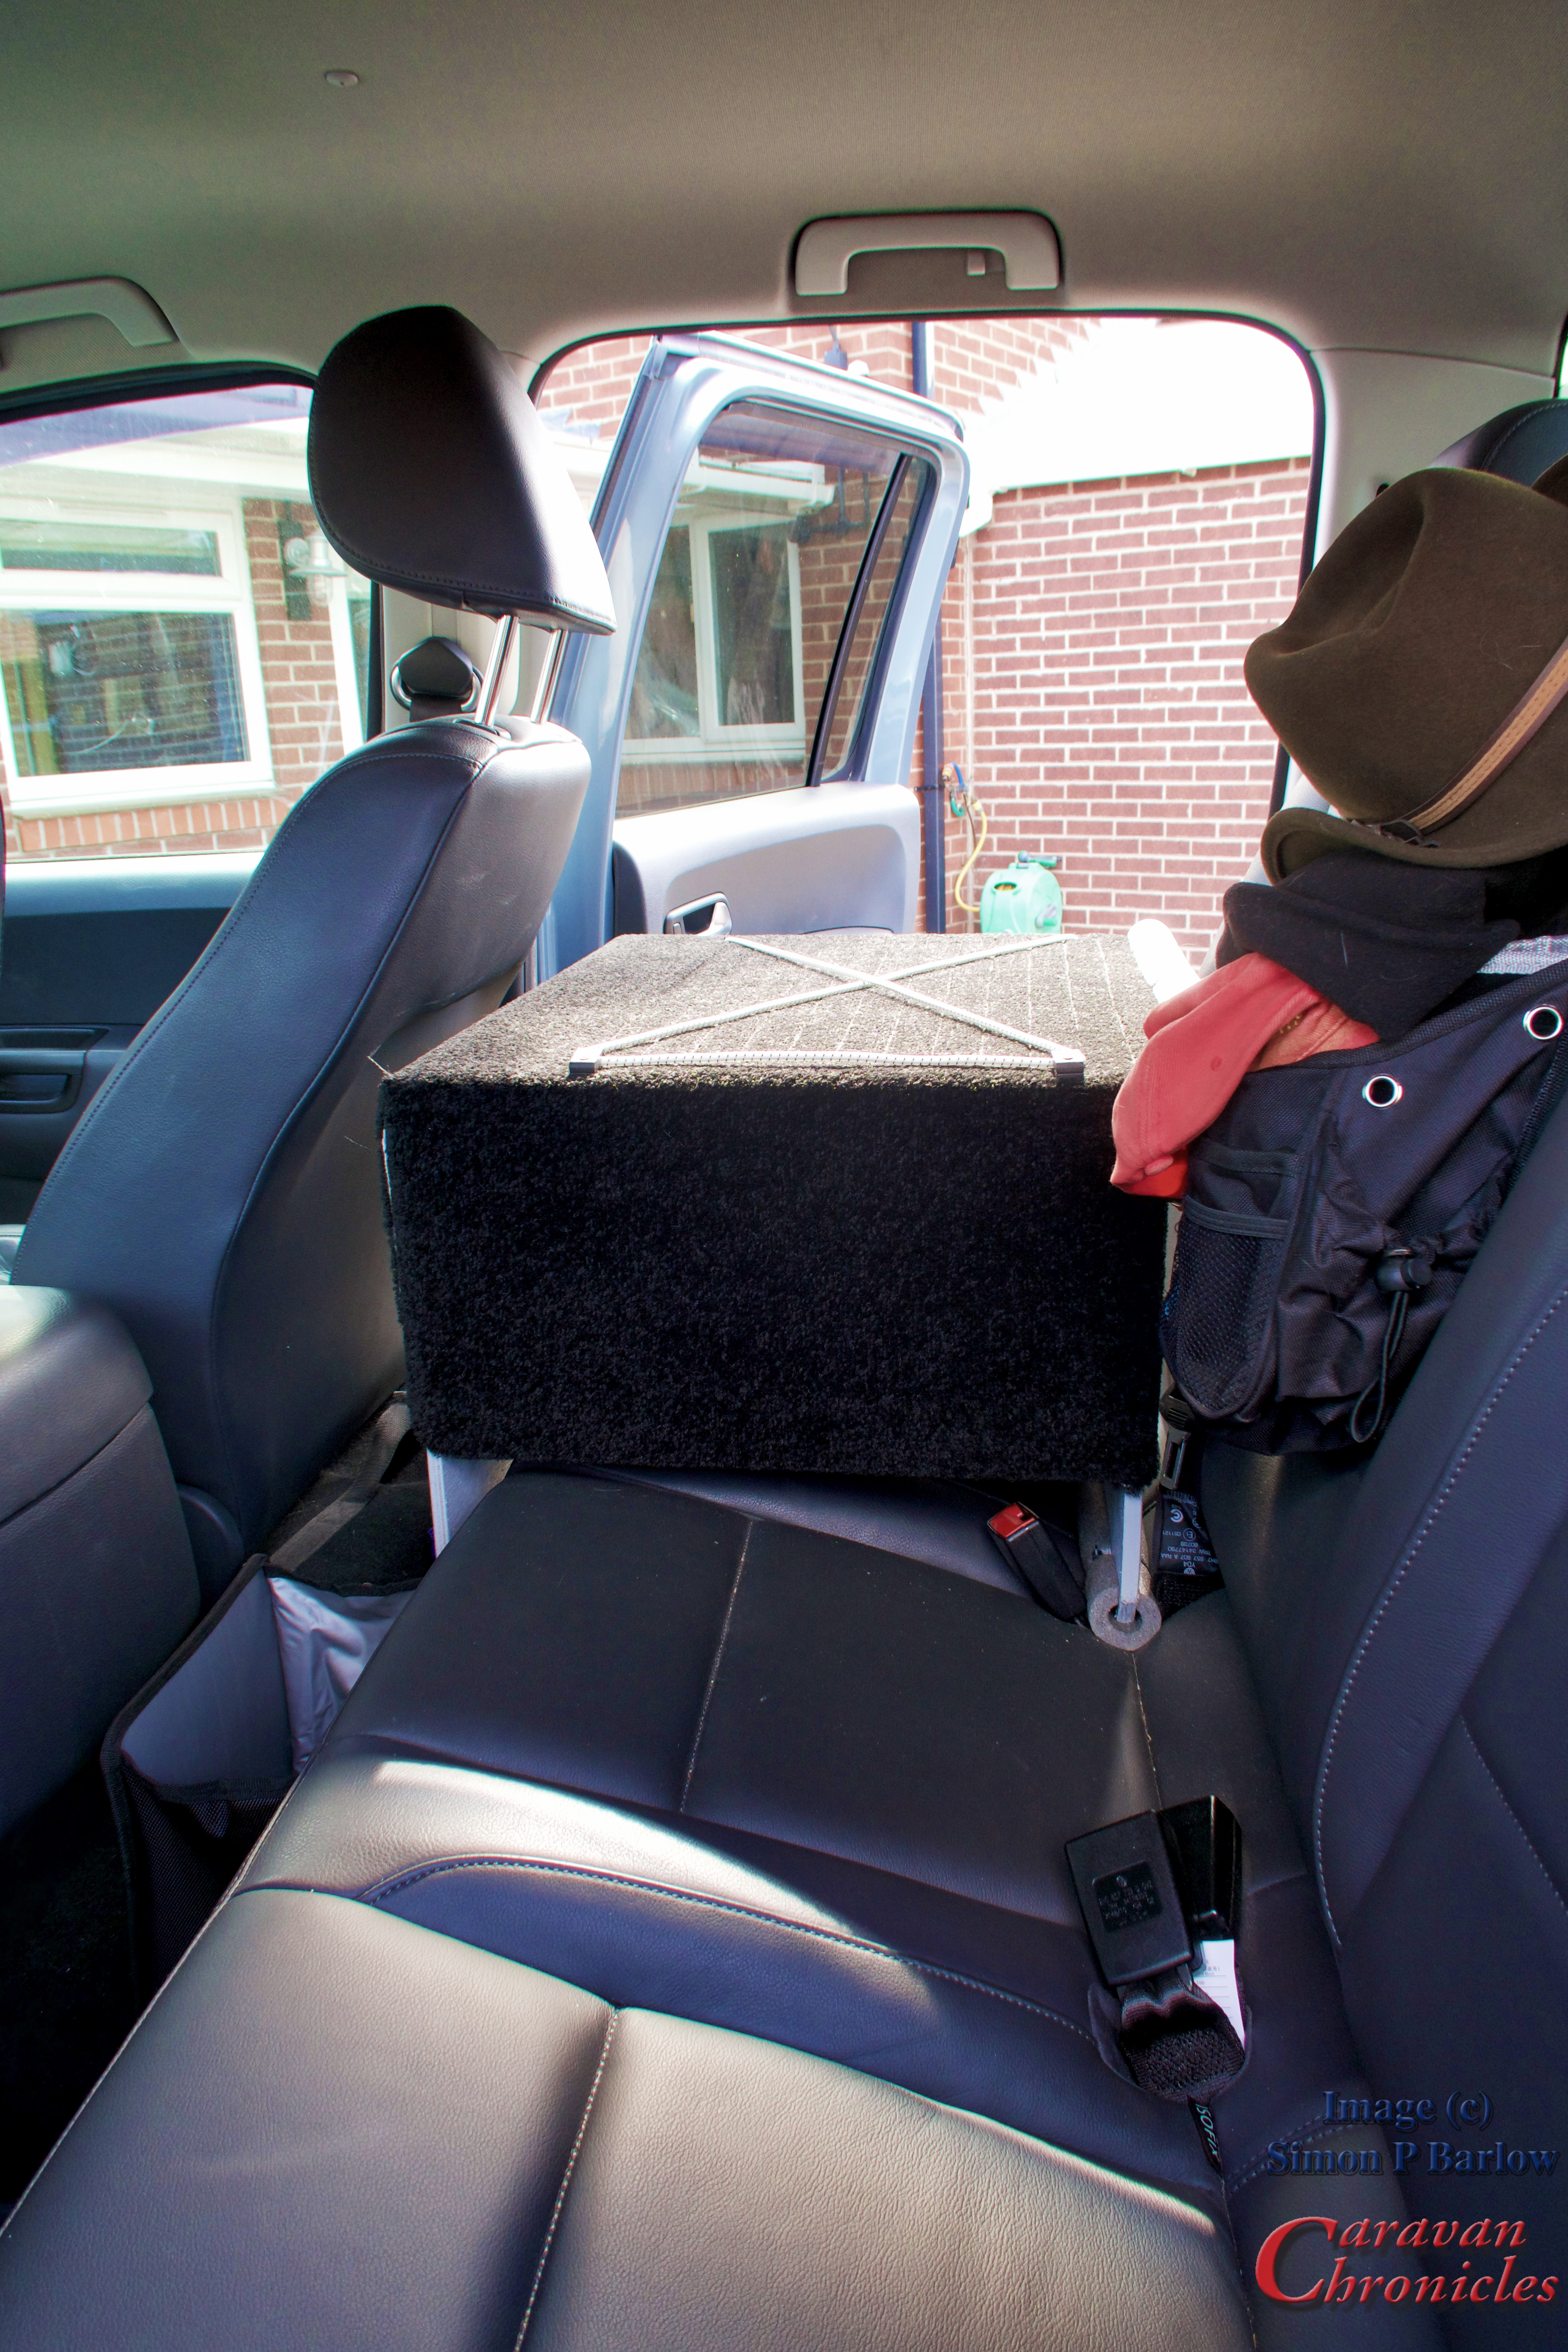
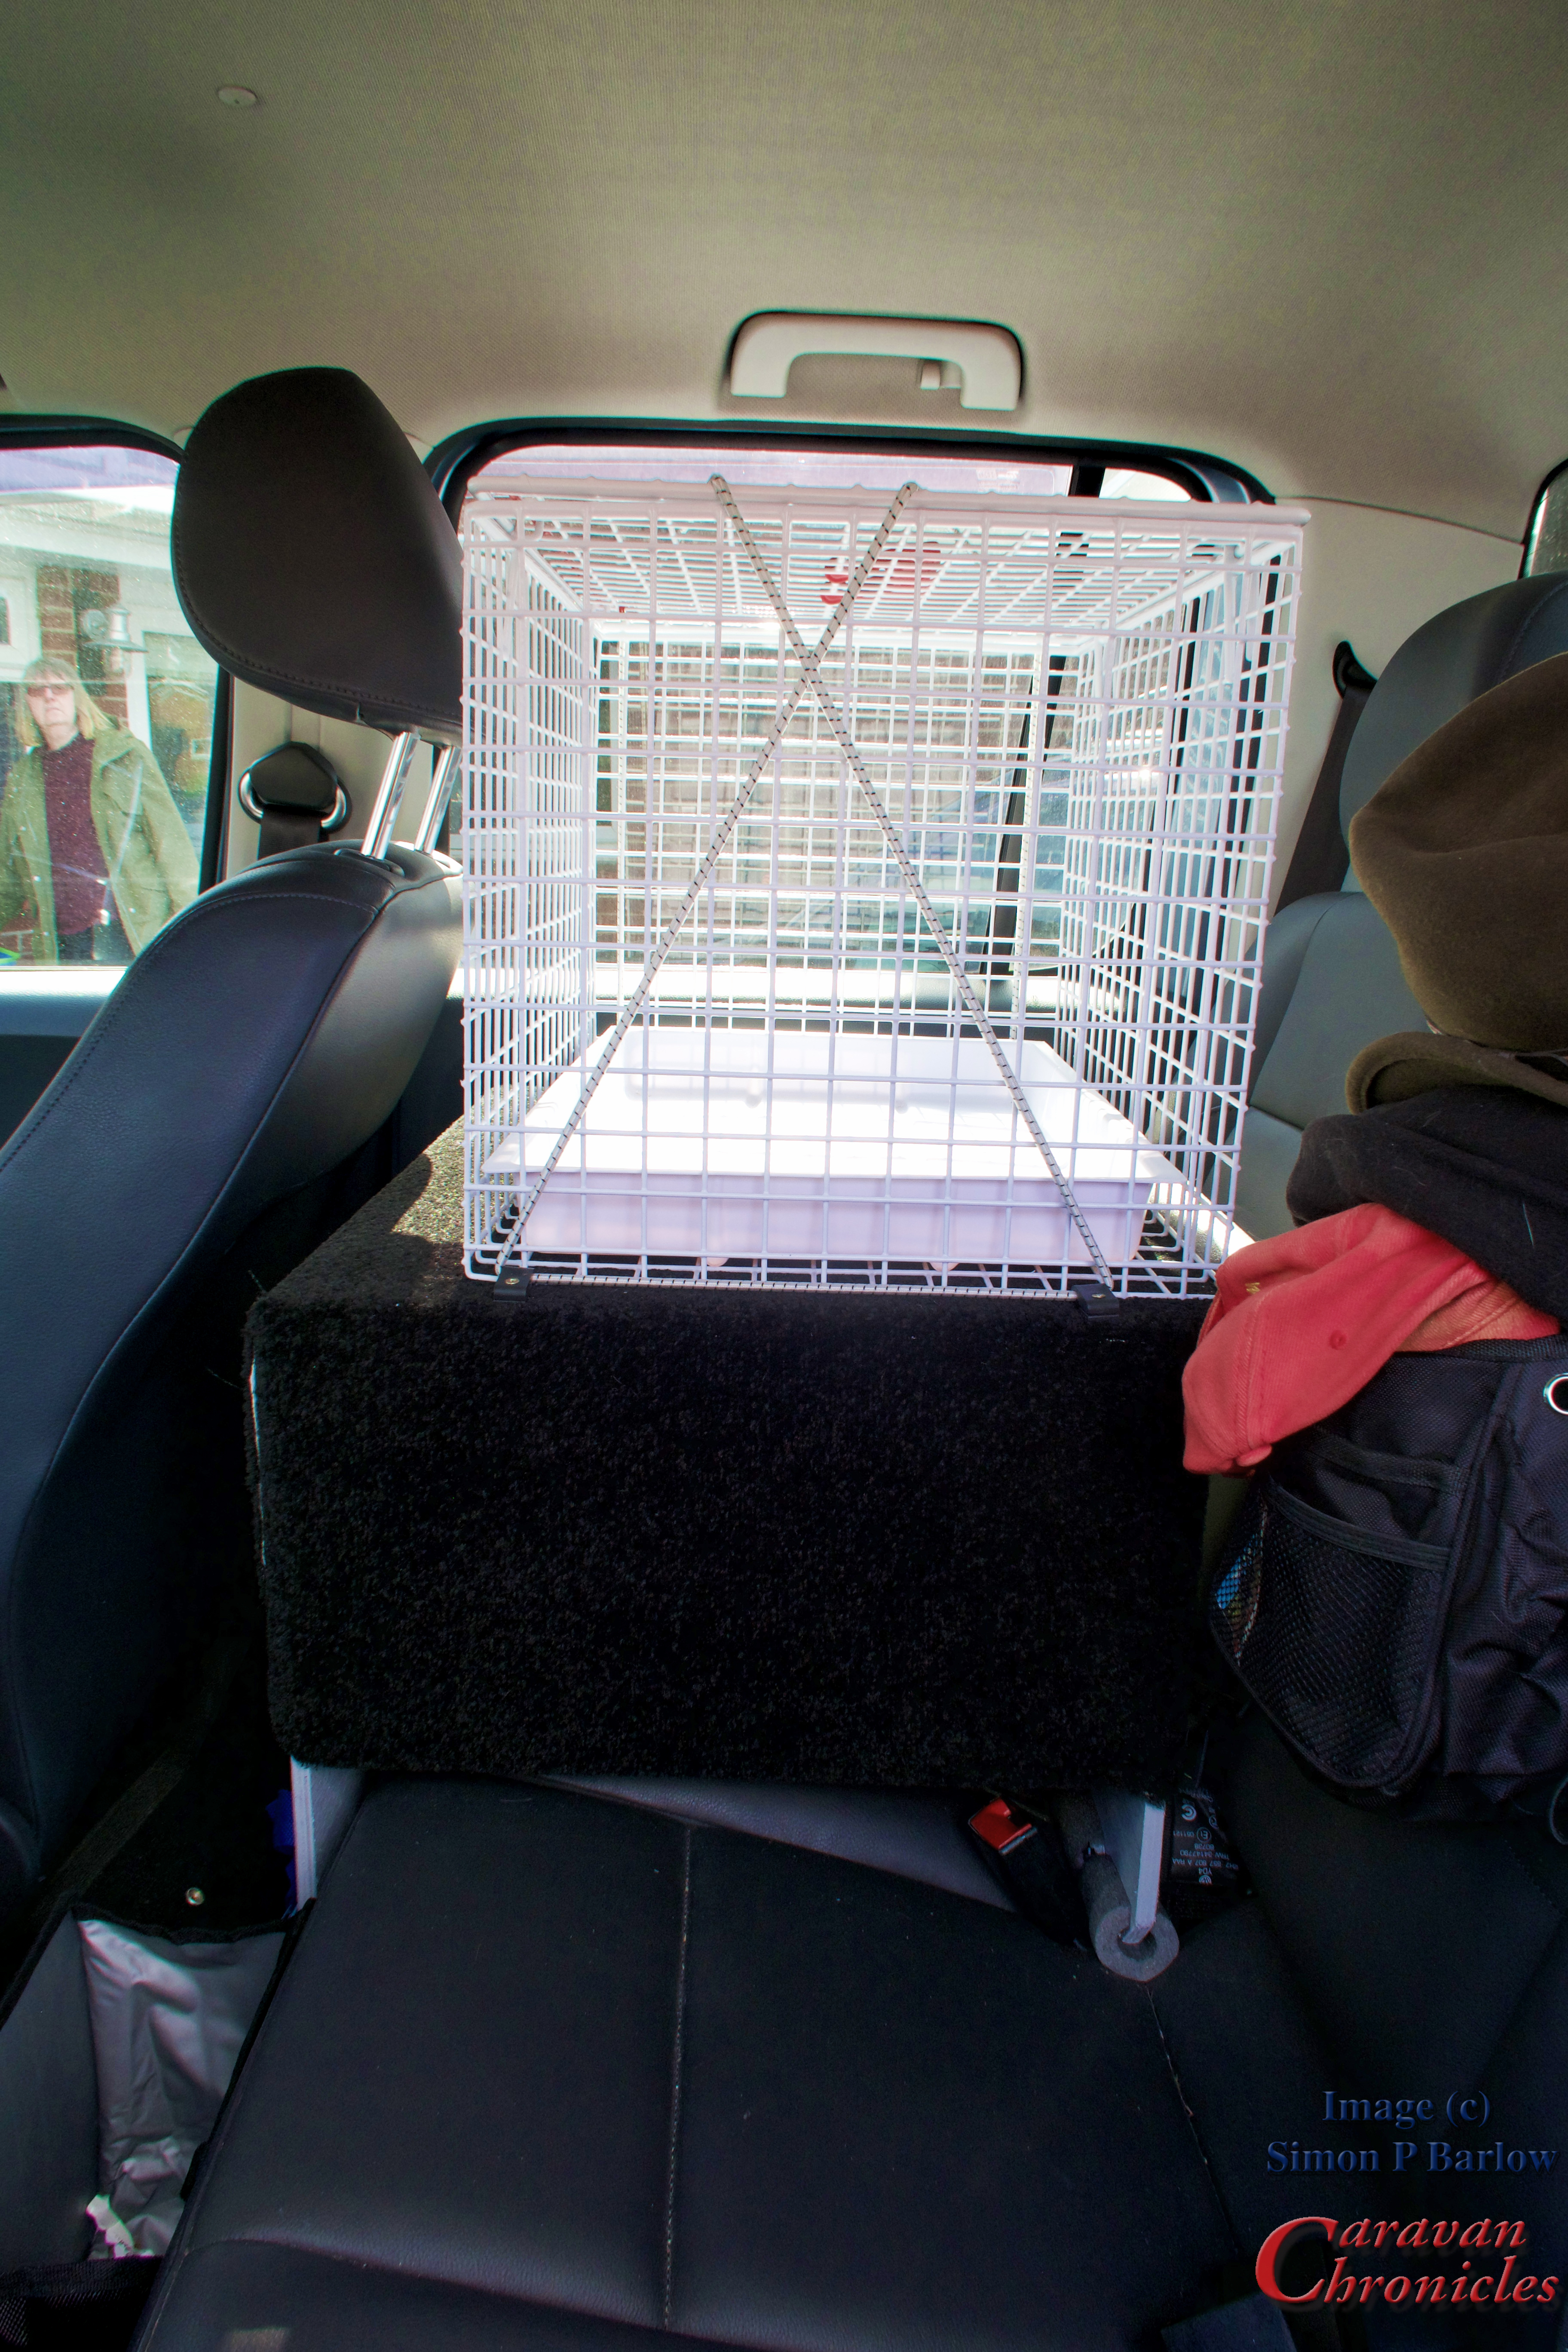
I built it out of 12mm Ply and painted it grey. I used an off cut of black car carpet to cover the top and sides and a couple of lengths of pipe insulation on the edges where it comes into contact with the car seat and door. To secure it I used the ISO FIX points and it takes less than 30 seconds to remove or install. Without Henrys carrying cage it’s a handy place to put things and the space underneath come in super handy for all my bits that I normally have rolling around on the floor behind the drivers seat. It’s high enough for Henry to be able to see out around in all directions and there is still enough space for two people to sit on the back seat and use the seatbelts if required.
We have used it for two trips now and Henry seems to like it. The rear windows are heavily tinted in our Amarok which will cut the heat from the sun and we can open the rear window for fresh air as required. We are looking round for one of the stick on baby sun screen thingy’s if we think the sun is going to be too strong. Of course we would never leave Henry in the vehicle unattended for more than a couple of minutes… the only time we have done this is while we were hitching up the caravan. If you know Siamese then you know they can be noisy talkative beings…. so far he’s not had anything to say about it. Is that a good sign?
Tempting Fate…
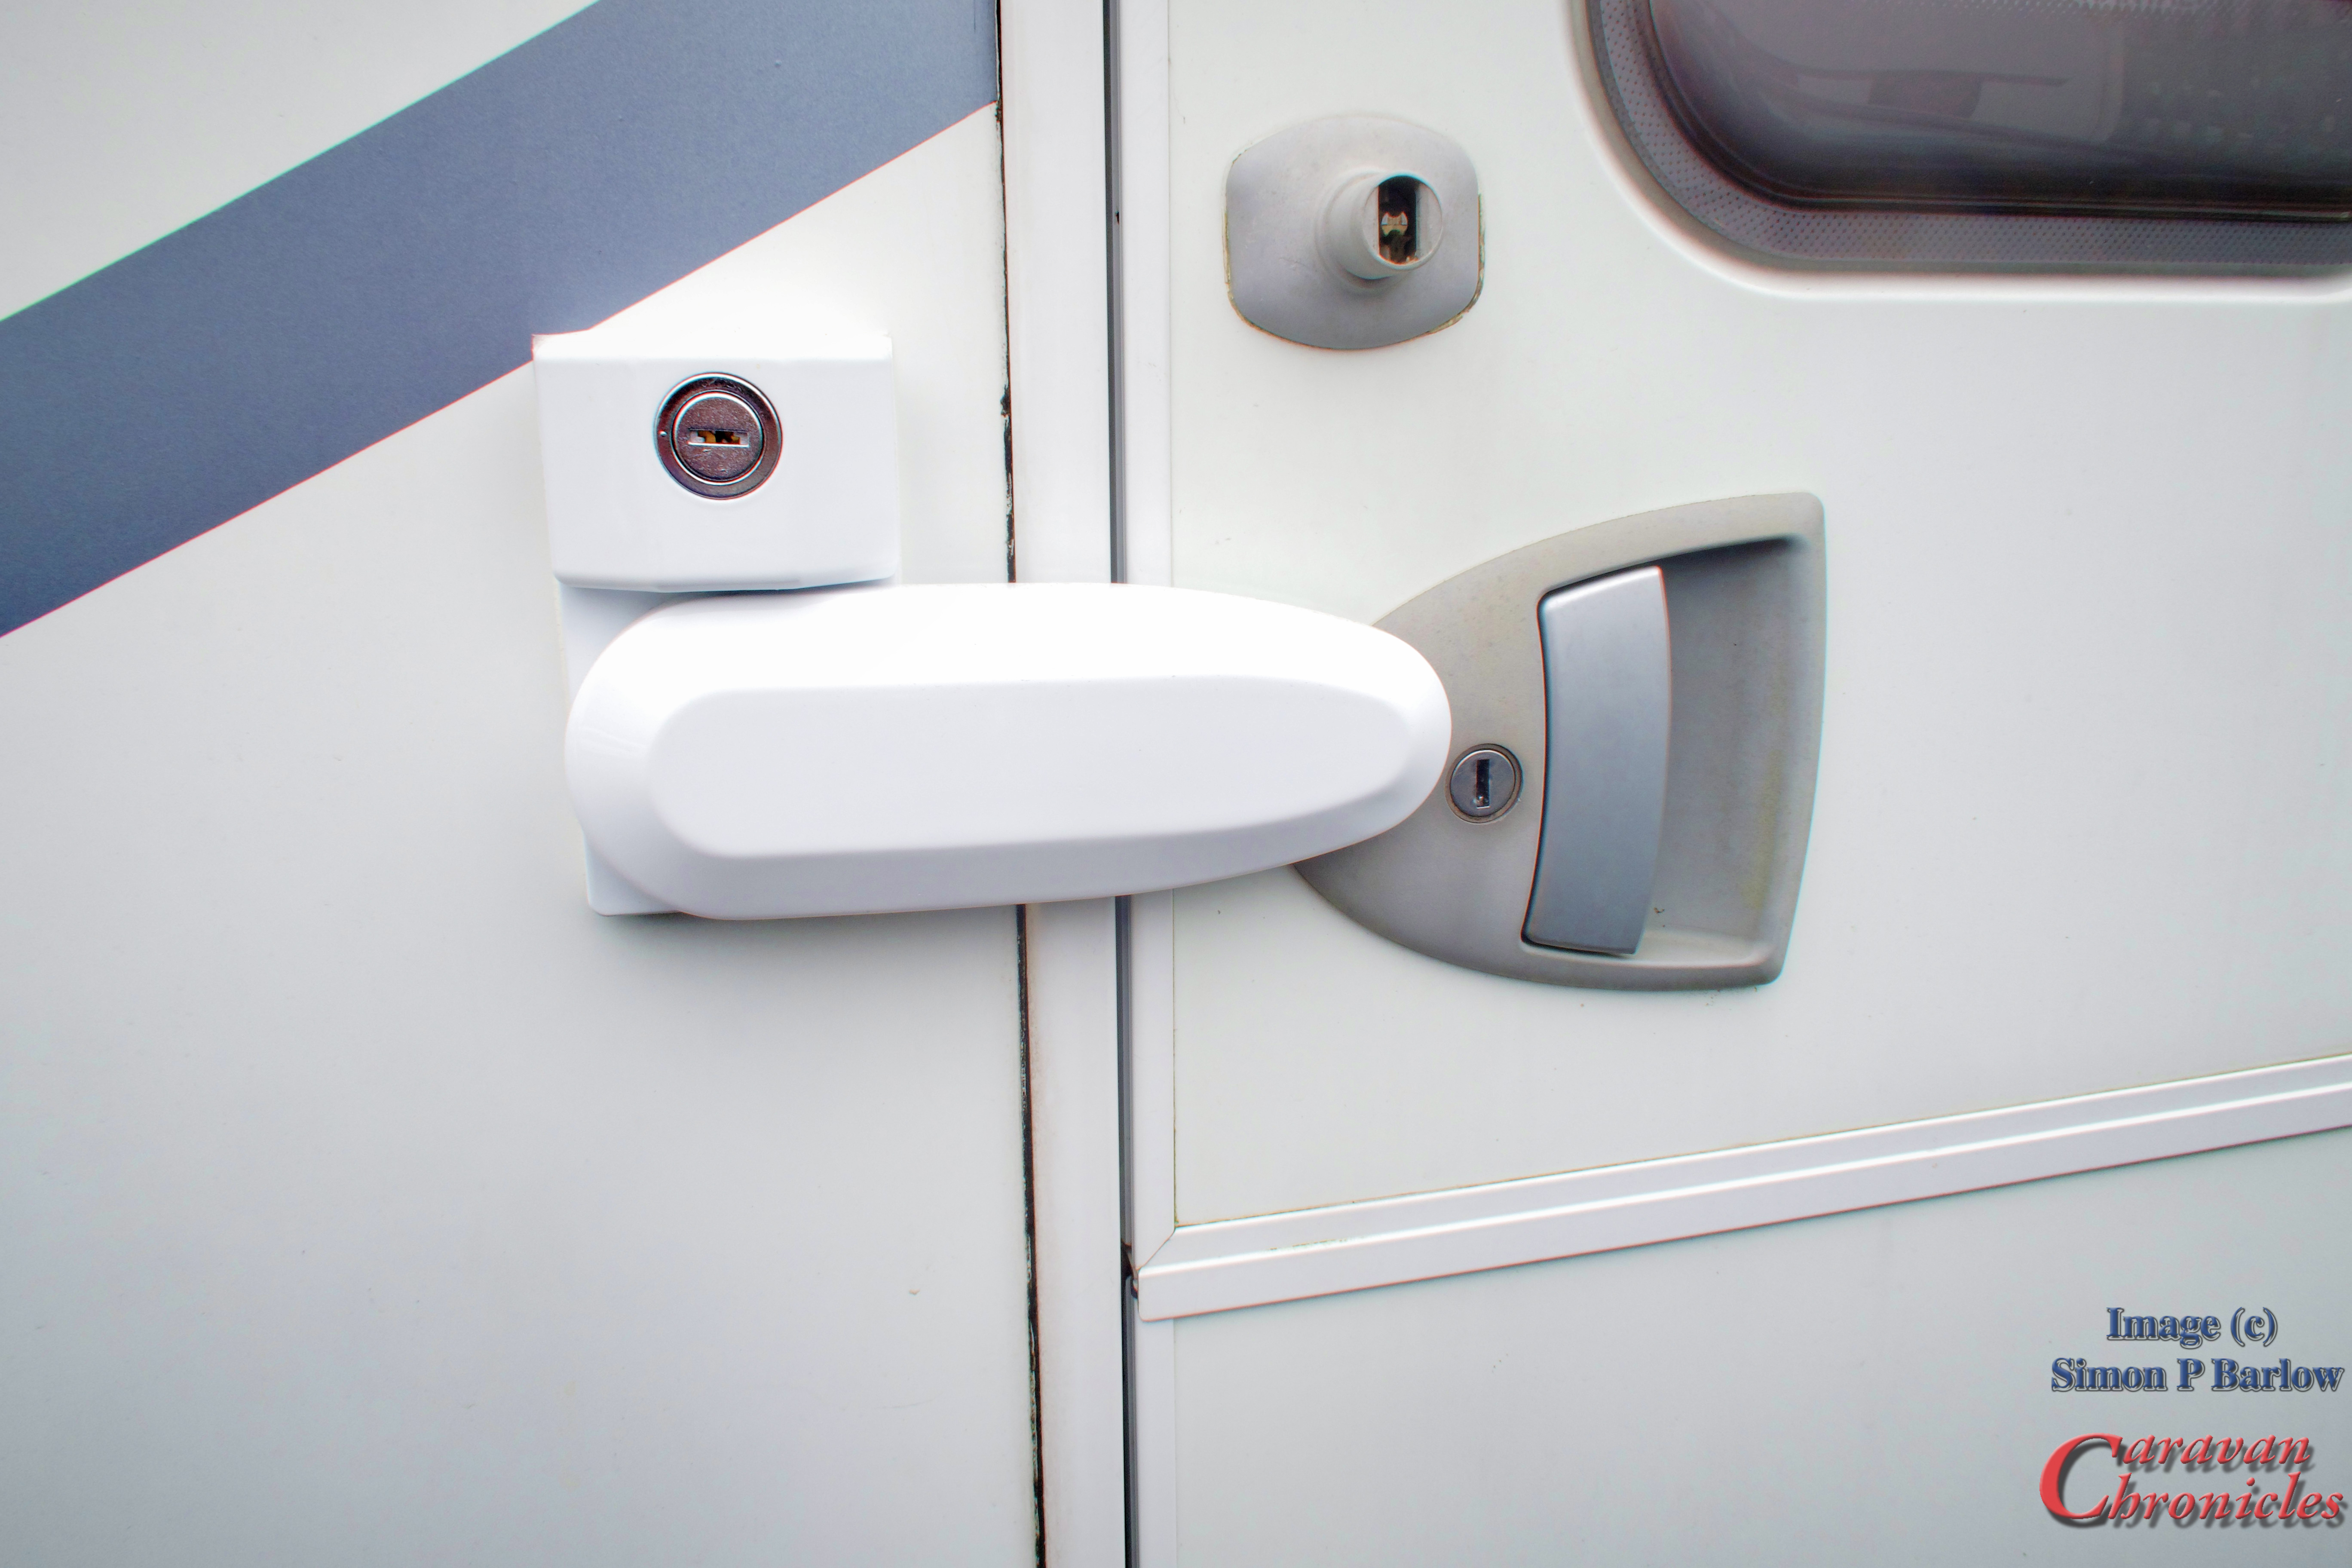
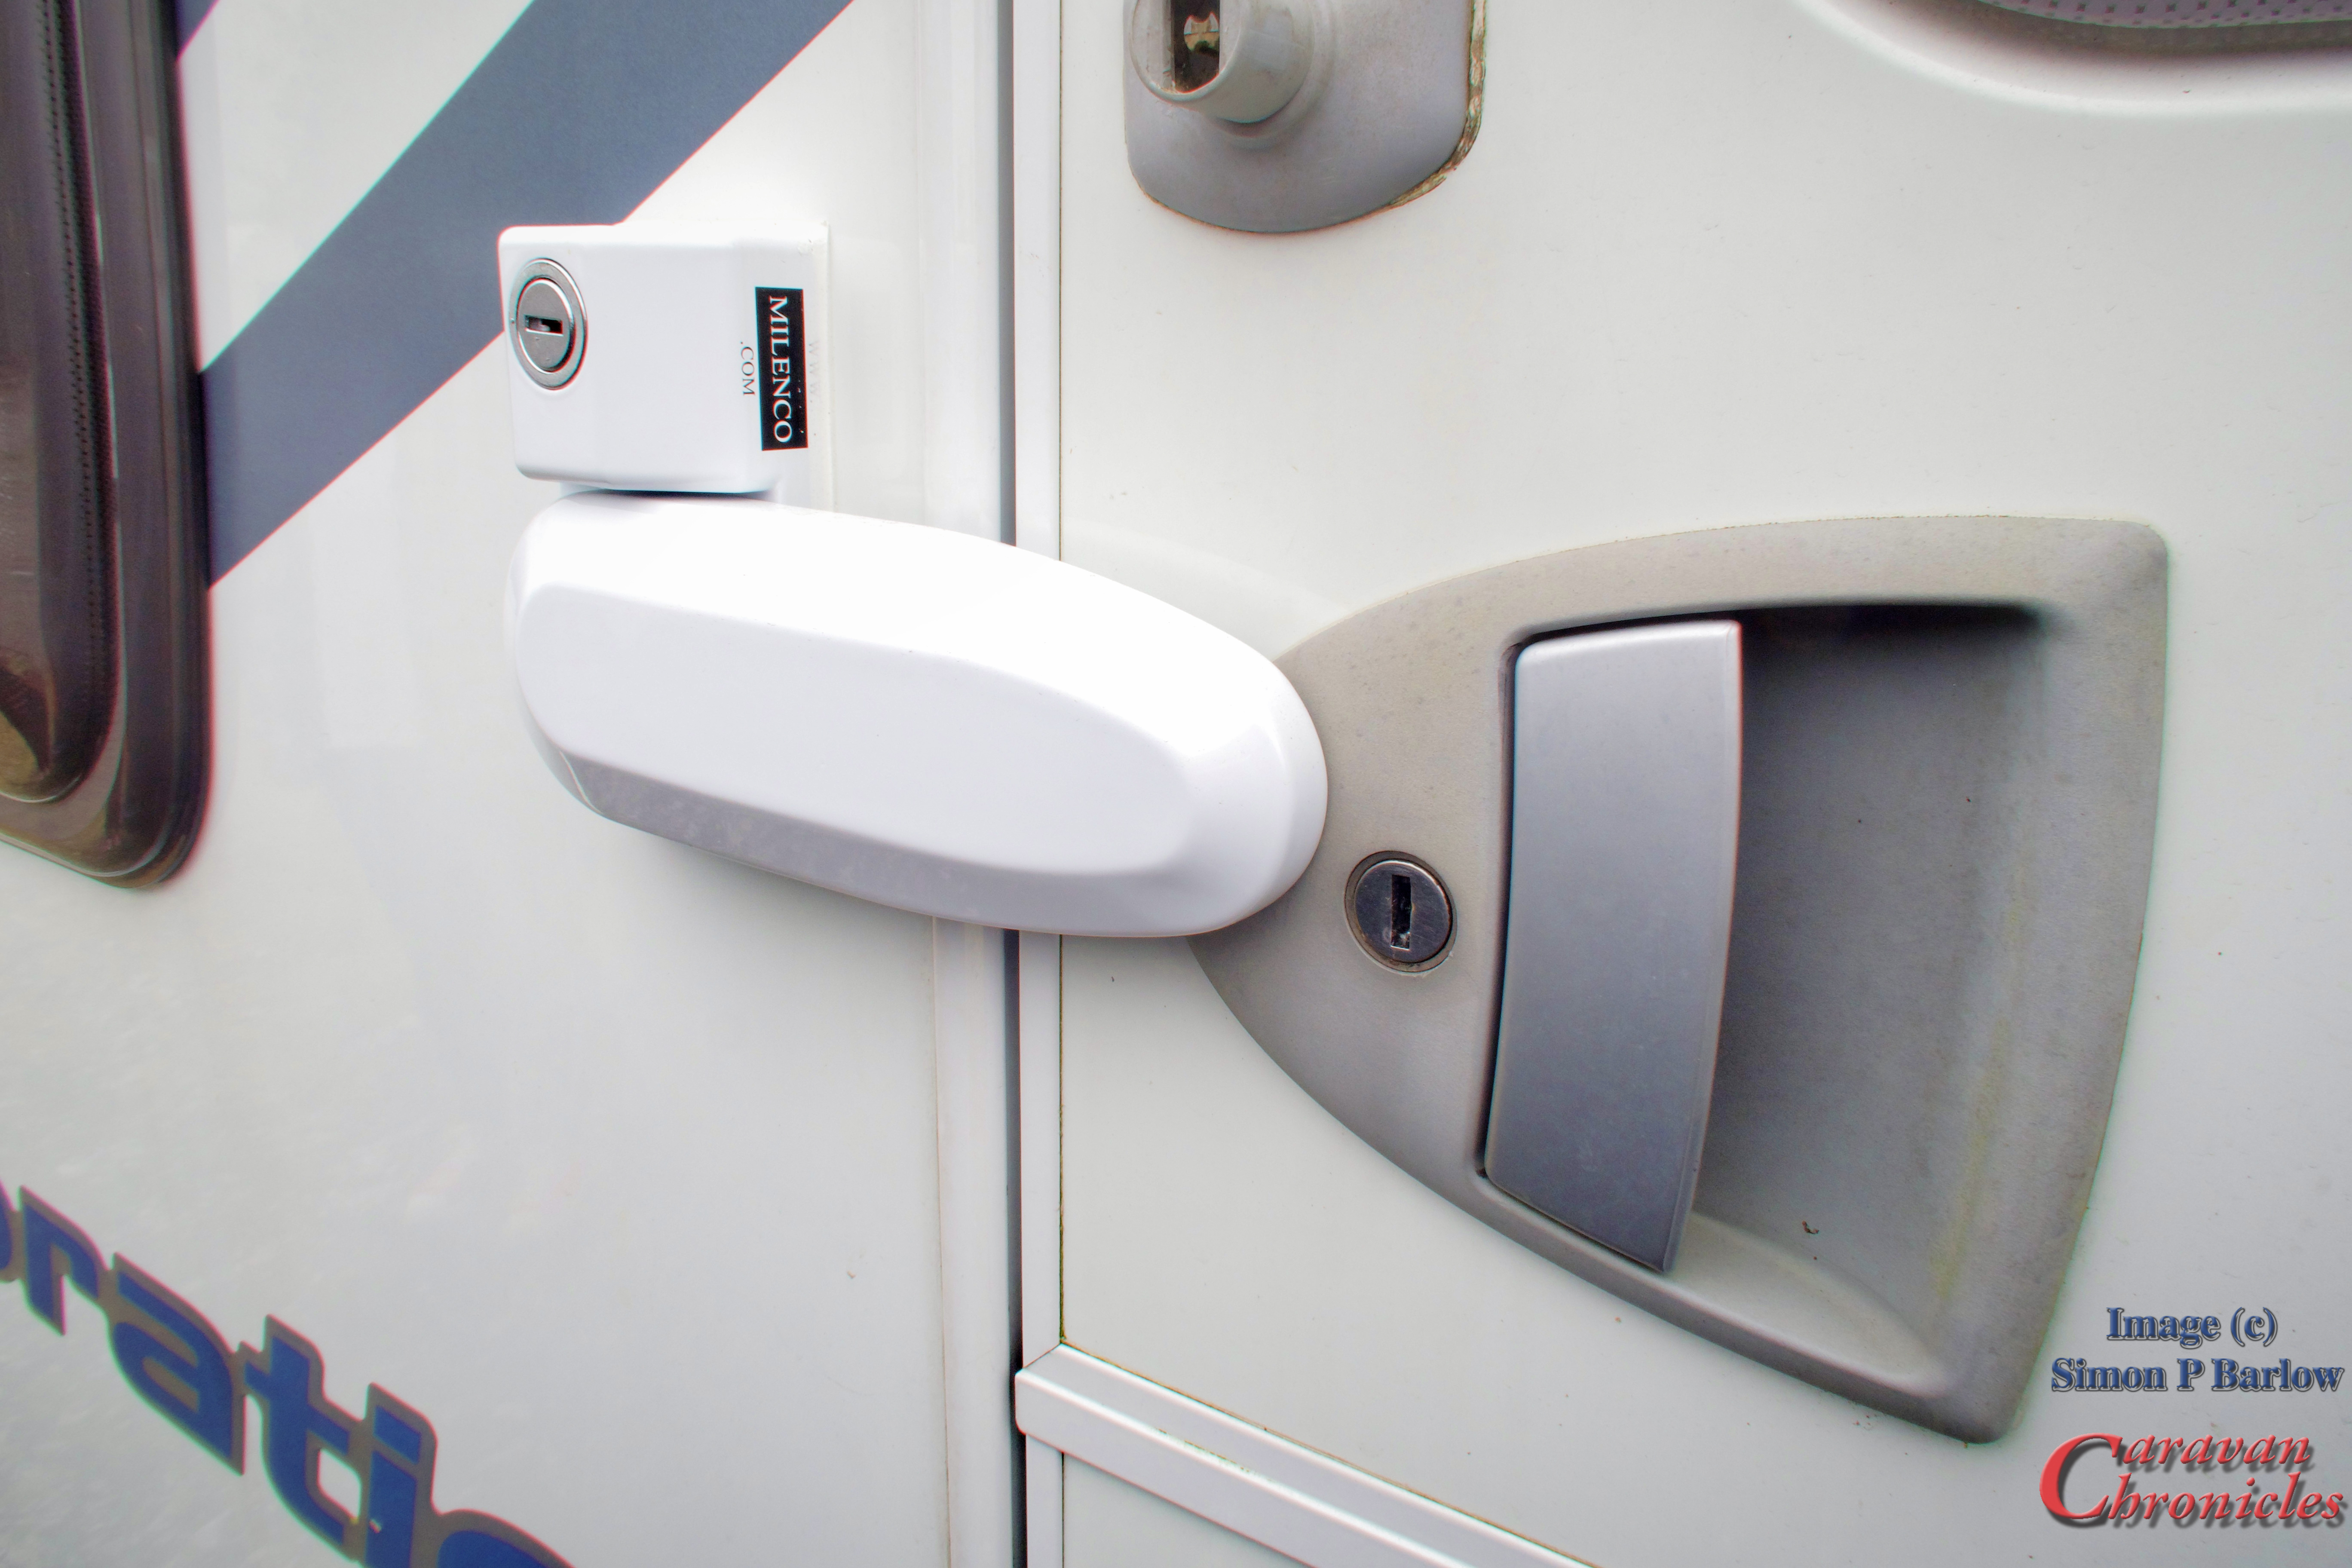
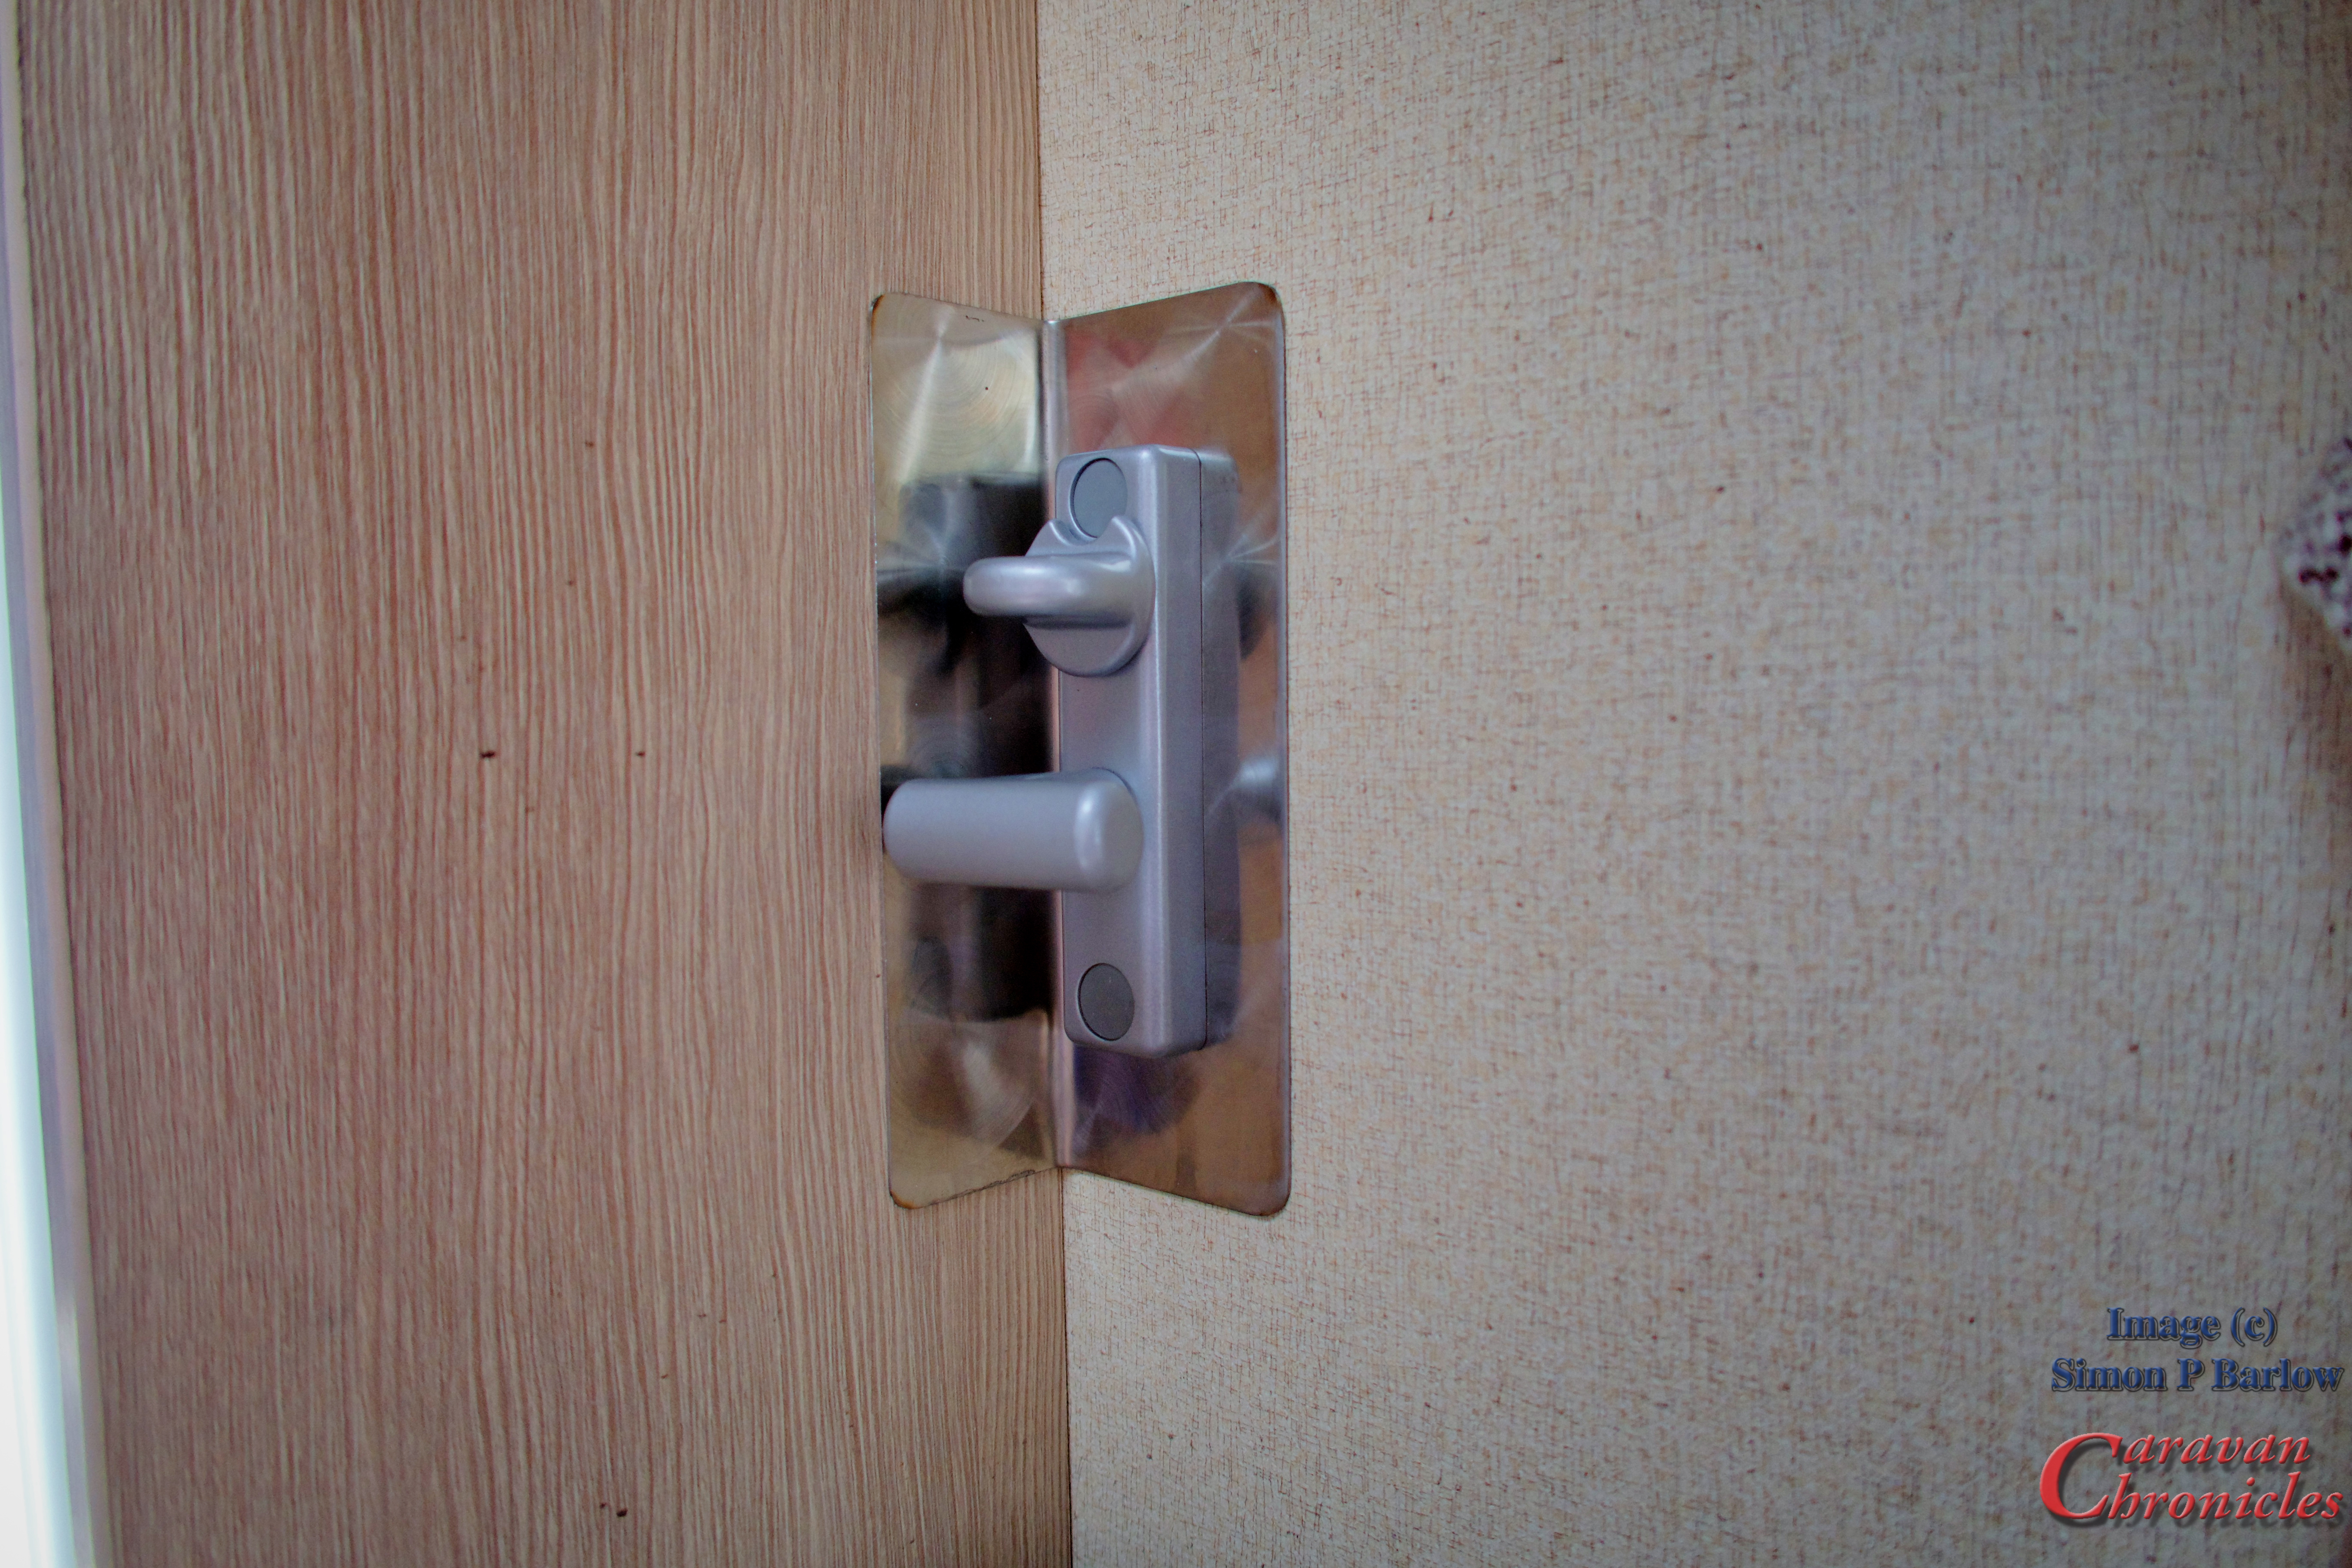
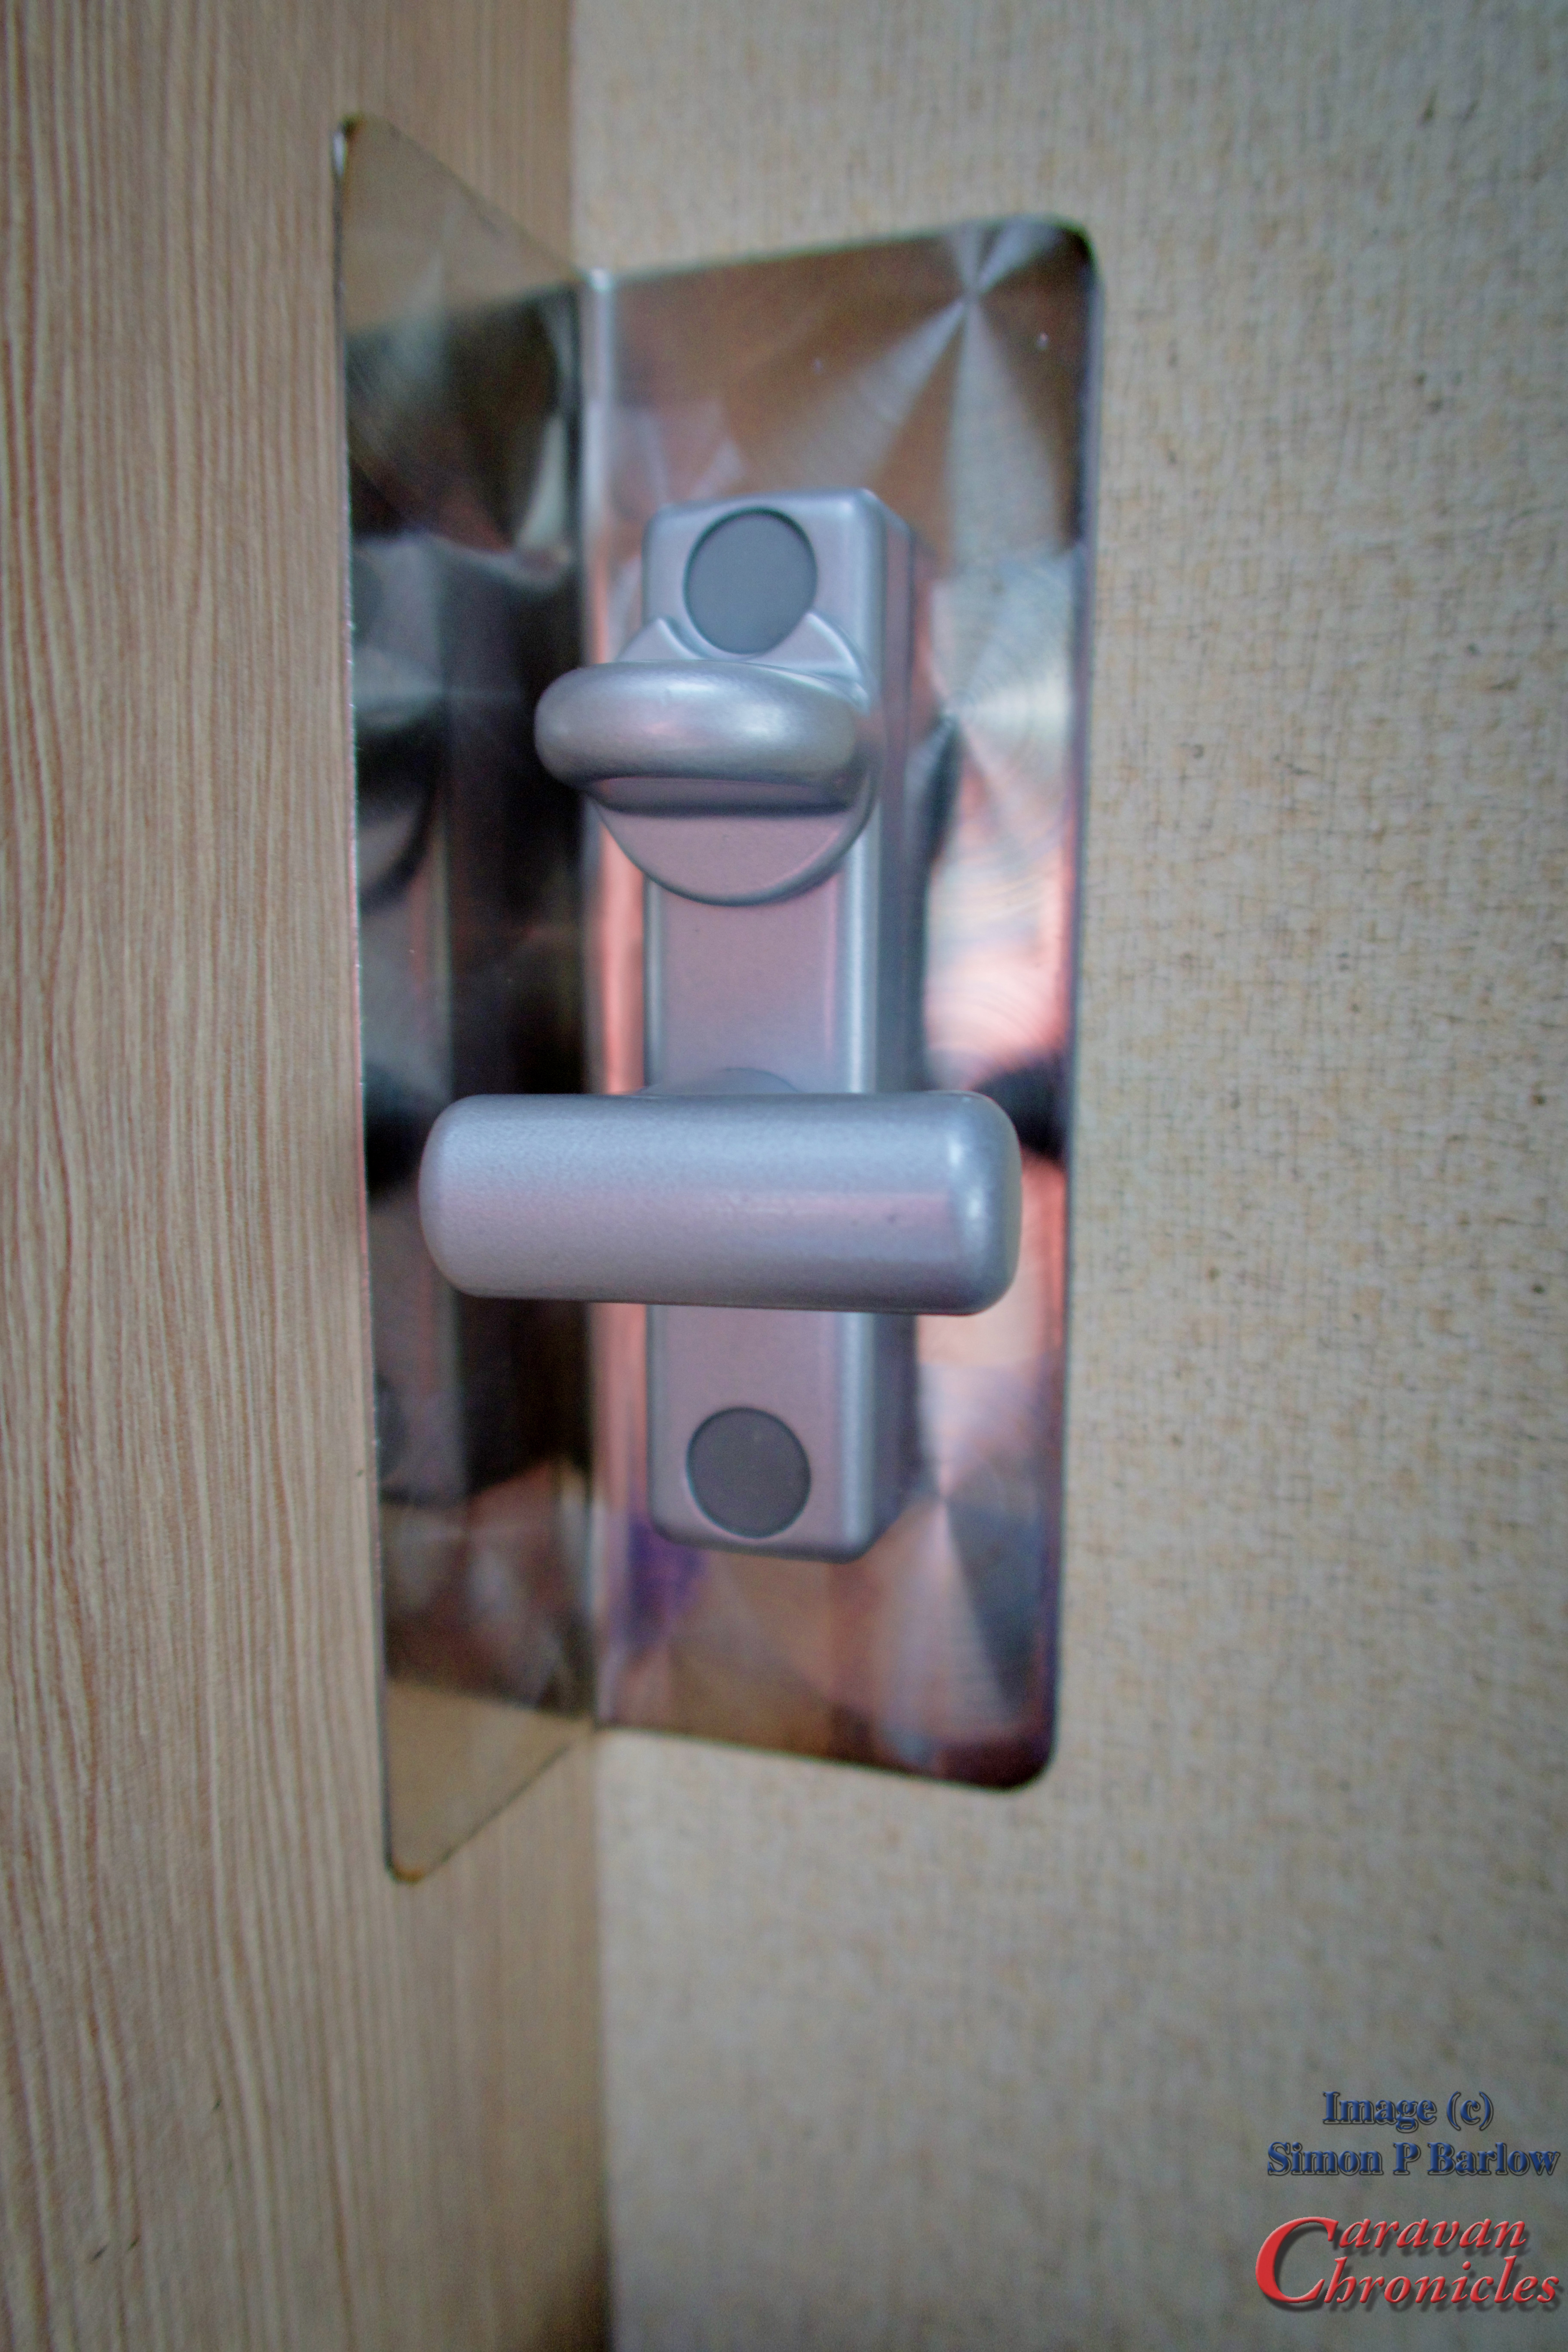
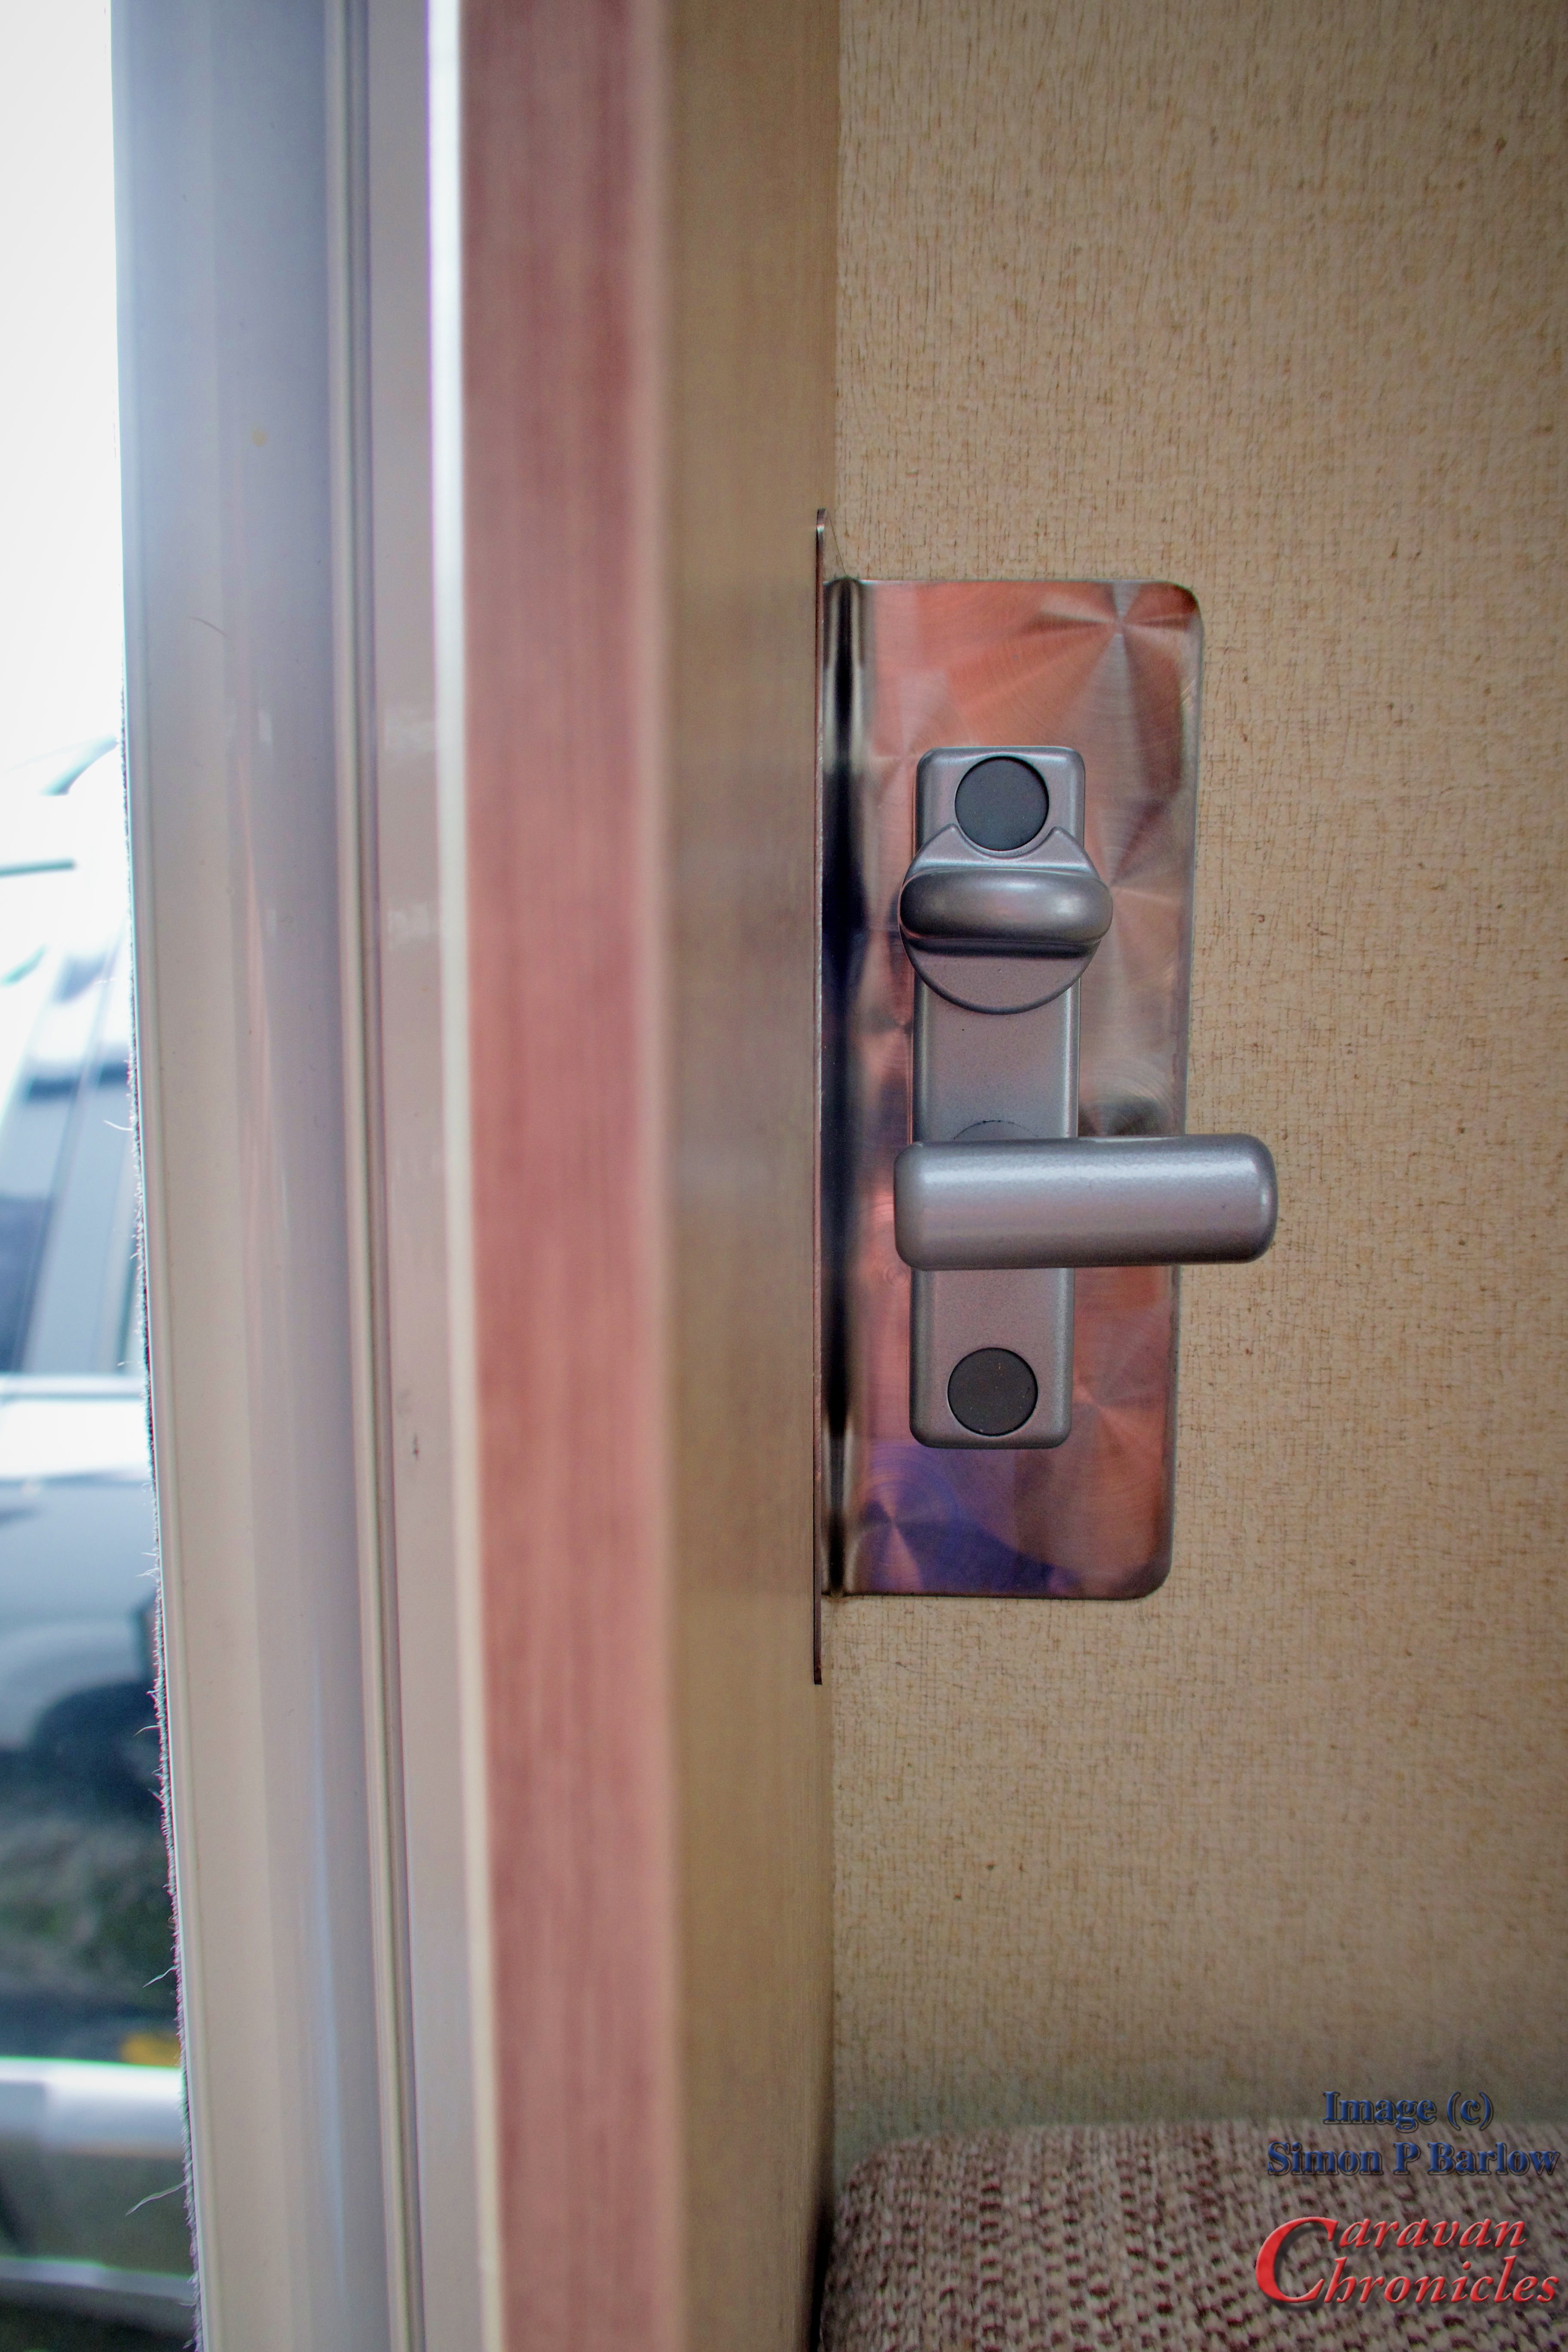
In the eleven years we have been at our storage site we have never had any break-ins but it’s aways in the back of your mind…. and couple that with us sometimes leaving Henry in the caravan while on site I decided a little security upgrade was required (there are others but I’m not going to tell you about them!) I’d looked at the various offerings of additional door locks and after some thinking… and several coffee’s decided to go for the Milenco Door Frame Lock Version 2 offering that allowed us to operate it from inside as well.
I ordered it via Amazon ( https://amzn.to/3sHywnd )and it arrived within two days. It was easy enough to install but I ‘upgraded’ the interior fitting with a custom stainless steel strengthening plate…
The stainless I used was 1.4mm tooled finish, cut to size and drilled using the template provided with the Milenco lock. After measuring the location, I bent the stainless on my sheet bender in the workshop. I chose the location as this was the strongest part of the door frame where the existing door lock was located and would help protect the original lock so a small extent. Ideally I would have liked the arm to have been a bit longer so it covered up the keyhole for the original lock. But I’m happy with it.
Down the drain…
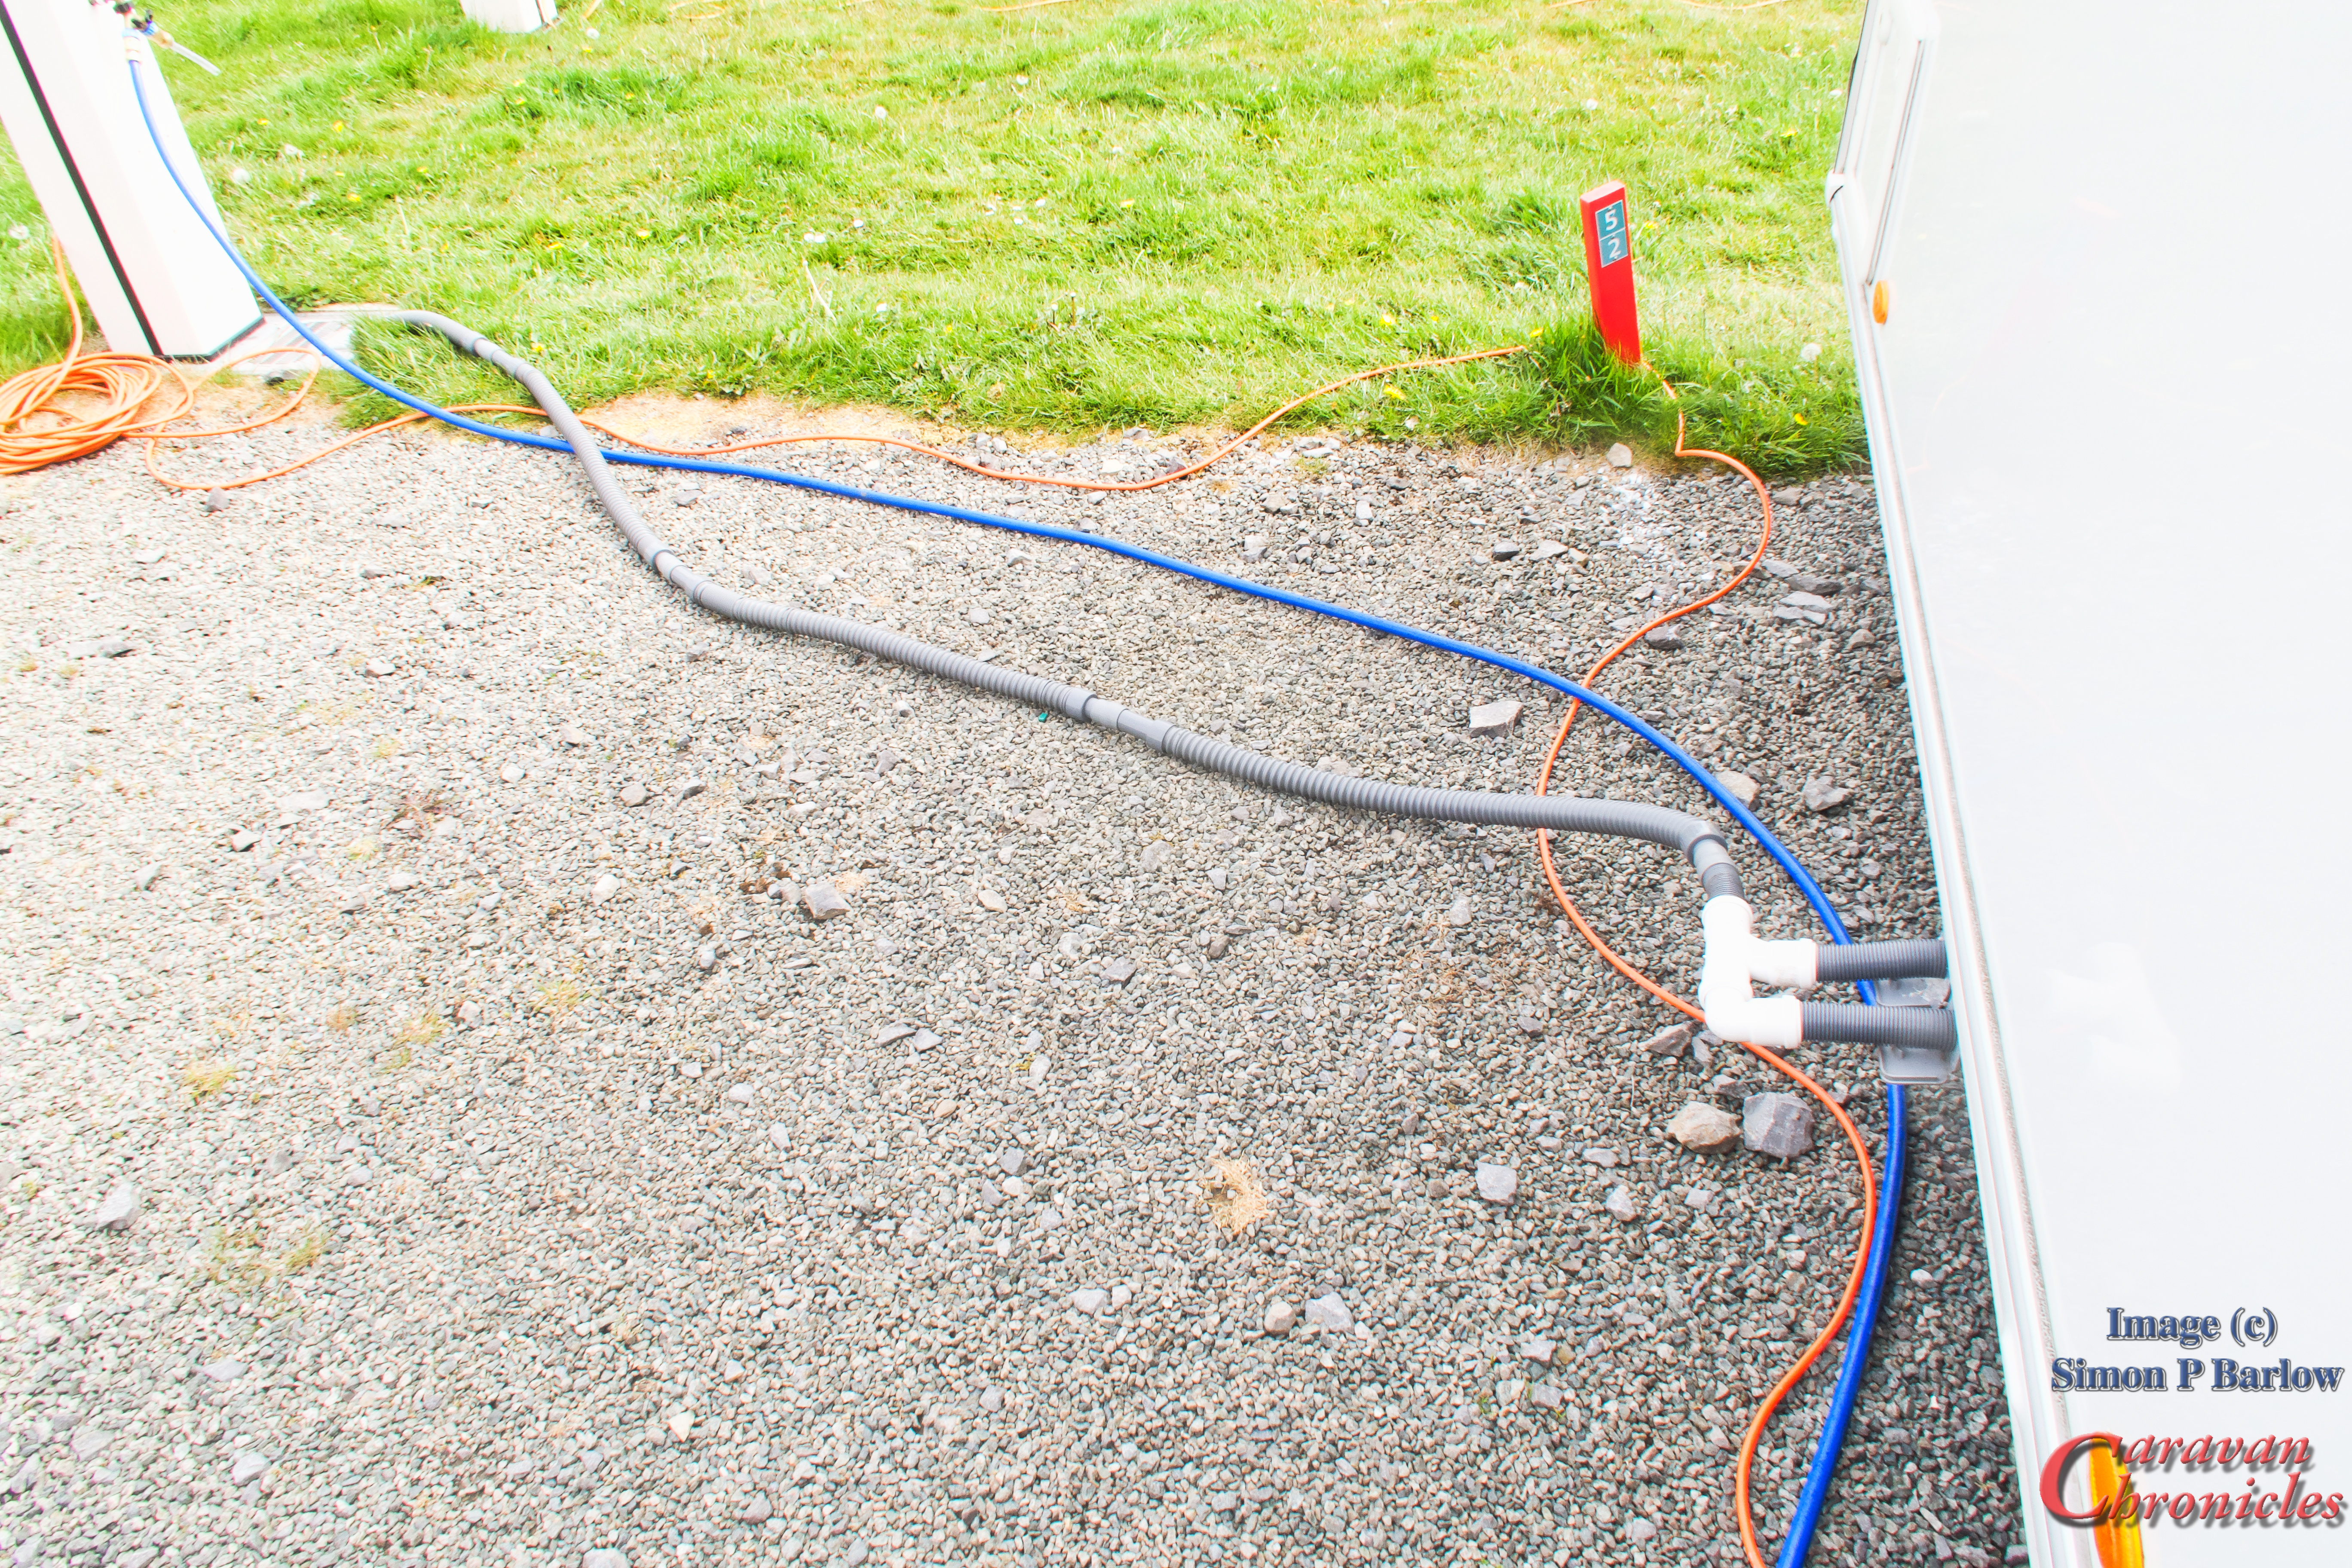
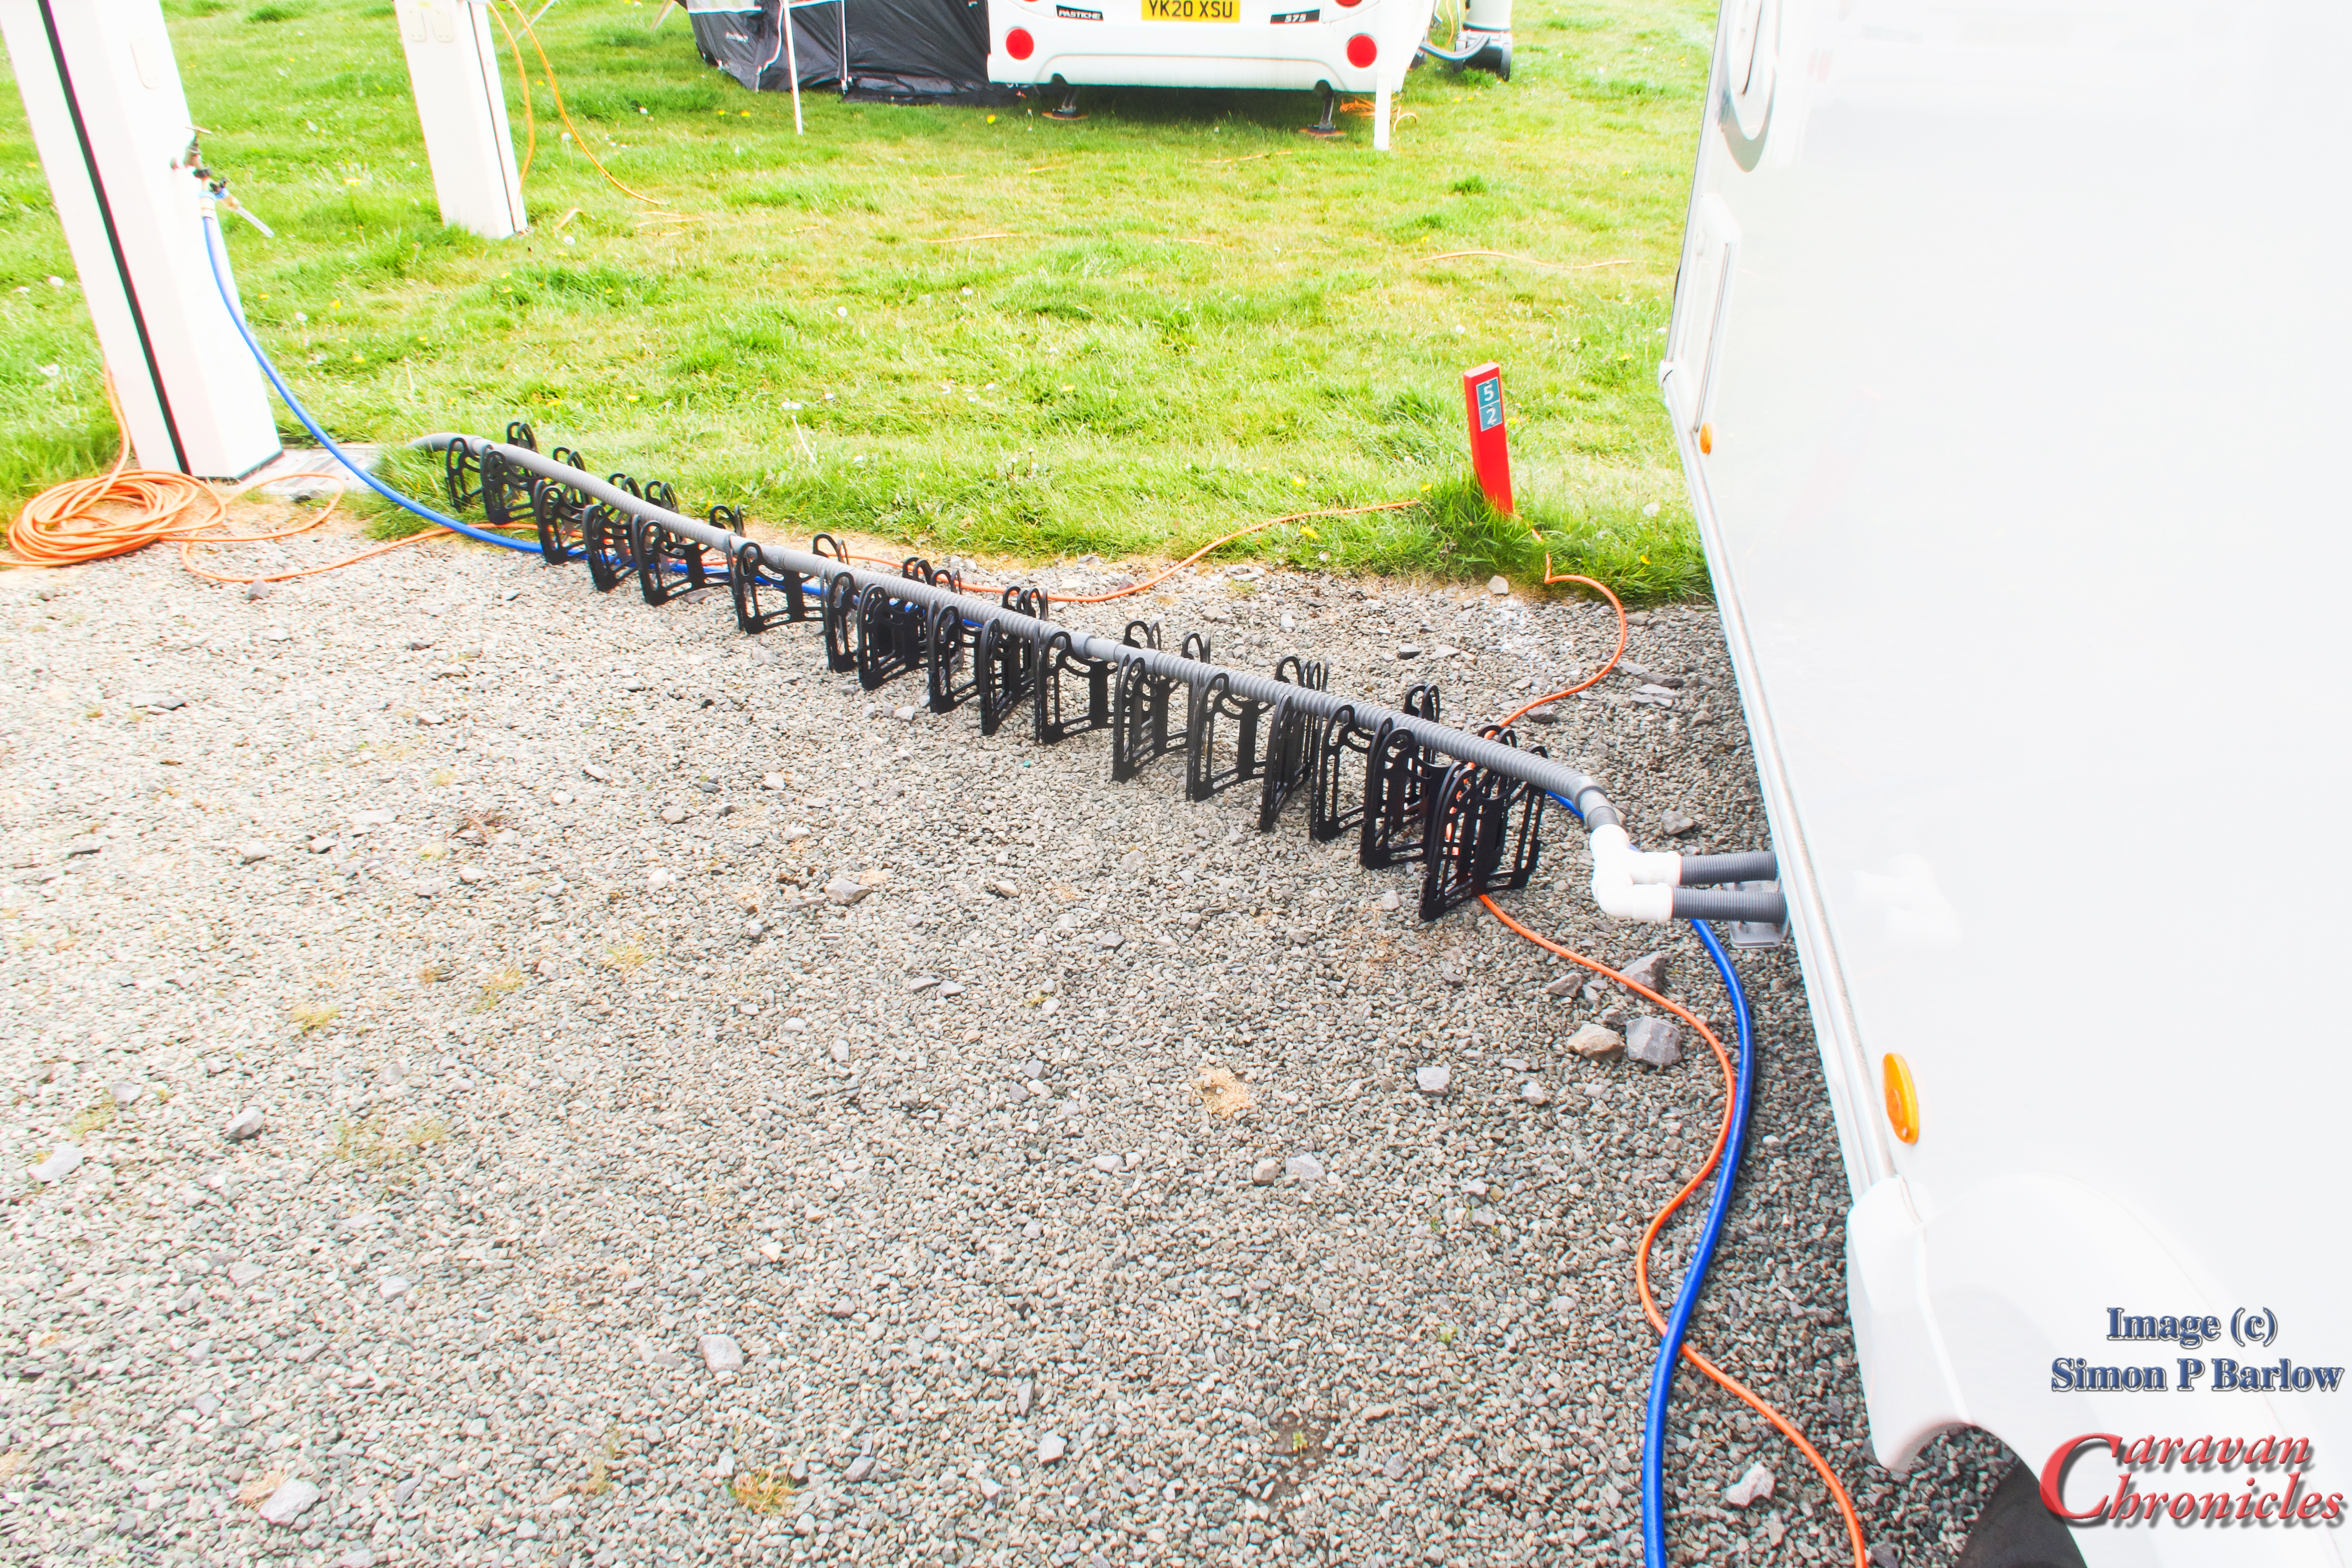
Long time readers will remember that several years ago I wrote a post about how we solved our connection to the drain while on serviced pitches. After ten years of use It was time for an upgrade and I had seen the COLAPZ products and thought it was a rather nifty idea. Having a mooch round the web I ordered directly from the website https://colapz.co.uk/?ref=yjXJSsLdBkh5d and opted for the Flexi waste pipe kit – 8 pipes for £55.
The first use was great and easy to set up. No modification was needed to my original manifold that connects to the caravan and it seems to drain OK….
However you can alway improve on things…. and if you have ever watched any Youtube videos about American RV’s then you will know that for their ‘stinky slinky’s’ they have a few upgrades…. I ordered one from Amazon….
Camco 43041 15′ Sidewinder Plastic Sewer Hose Support – https://amzn.to/3Fp2elM it cost £44 and came all the way from the great state of New Jersey. It comes with a carrying handle and honestly is really easy to use. I just stretched it out and lifted the pipe on to it. It is designed for a 4 inch sewer pipe… but as I was using basically a 2 inch version it would allow the hose support to stretch even further… I bought the 15 feet version and I recon it would stretch to 20 feet without any problems.
When we were packing up, I ran all the remaining hot water down the sink to flush the pipework out… including the Colapz pipework and honestly when disconnecting everything it really wasn’t that dirty, but breaking it down into individual lengths makes it easy if it does need a brush through it (which you get by the way in the kit).
Again we are not sponsored by either of these two companies but the links above will earn us a few pennies that will help provide biscuits for Henry. You wouldn’t want Henry to mis out on biscuit treats would you….
After all he can’t survive on just belly rubs…. I know it’s blackmail but EVERYONE said you need a cute kitty to get more views!
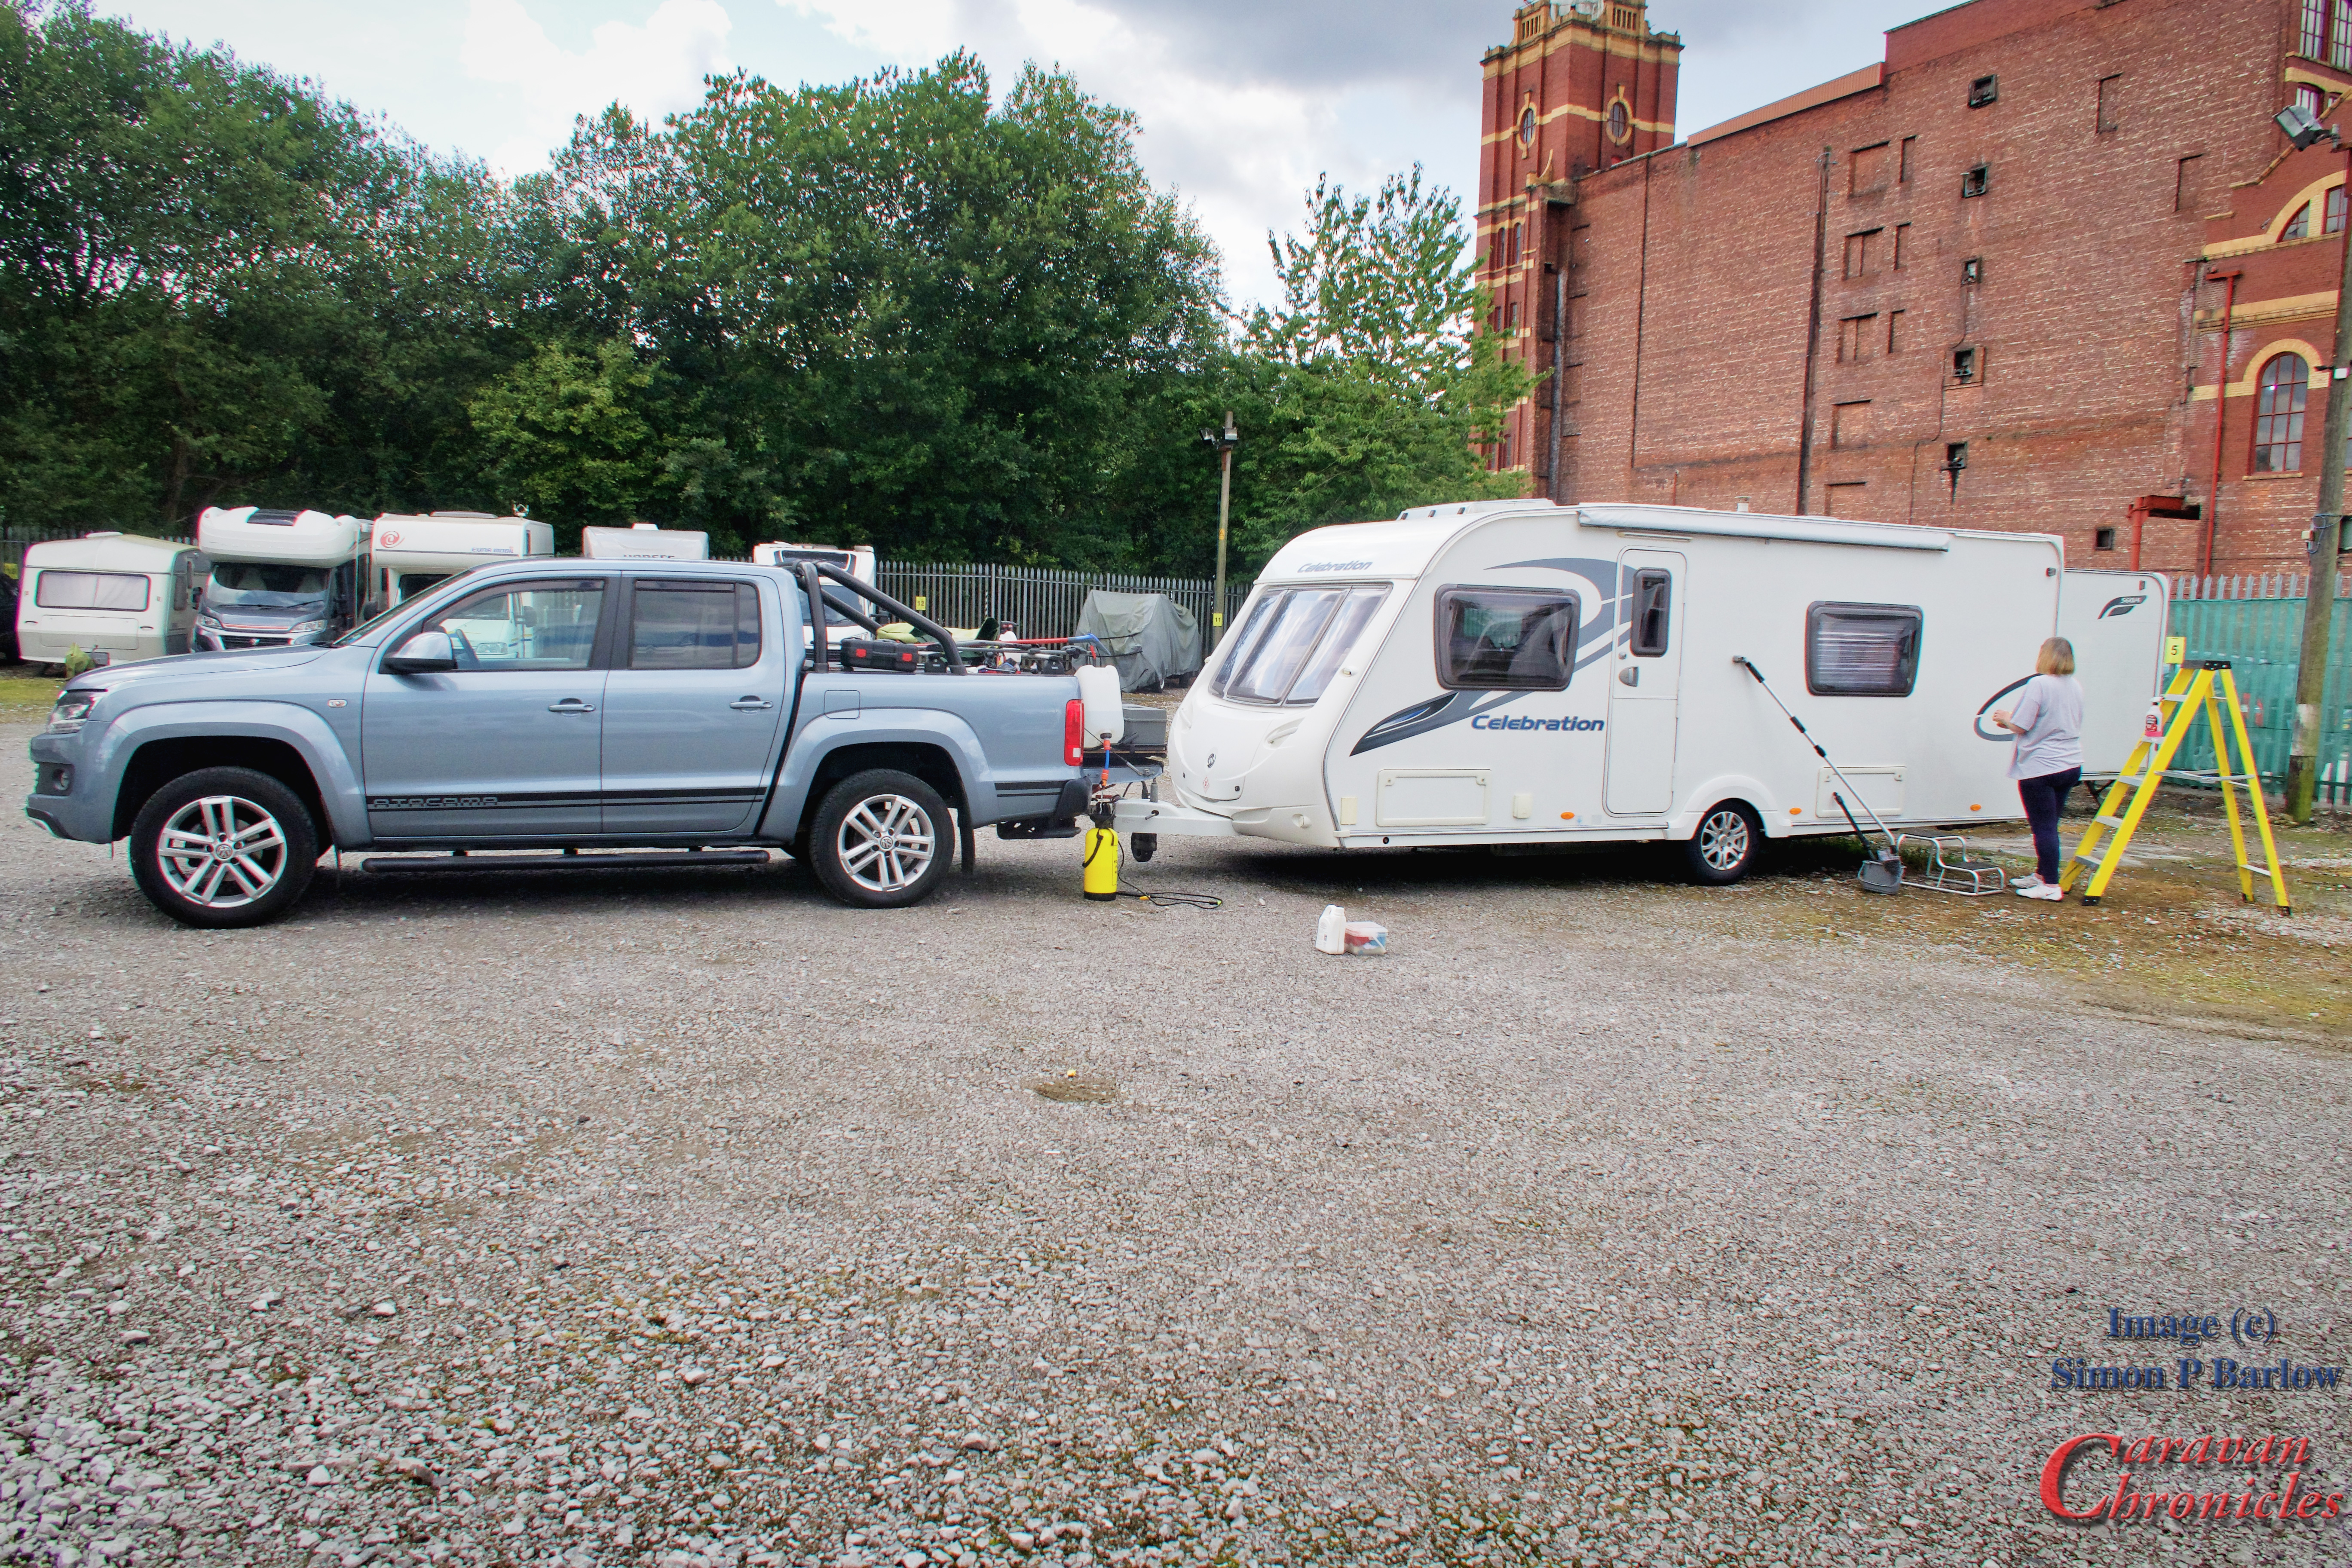
Our first visit to the caravan storage site in quite a while to check on the caravan was undertaken with some apprehension. It had been over twelve months since we had checked on it and we expected that we were going to be in for a shock.
The caravan was very dirty on the outside but it was the inside we most feared. Opening the door….. it didn’t smell musty…. we couldn’t see any mould… and nothing felt damp. In fact inside was in really good shape. Leaving all the cupboard doors open, the bed partly raised and the roof vents cracked open a touch seemed to have worked. OK, now a list of jobs that needed doing. The leisure battery is now 10 years old and given us good service. It needs replacing… more on that later. The tyres also need replacing and the outside needs a good clean and polish.
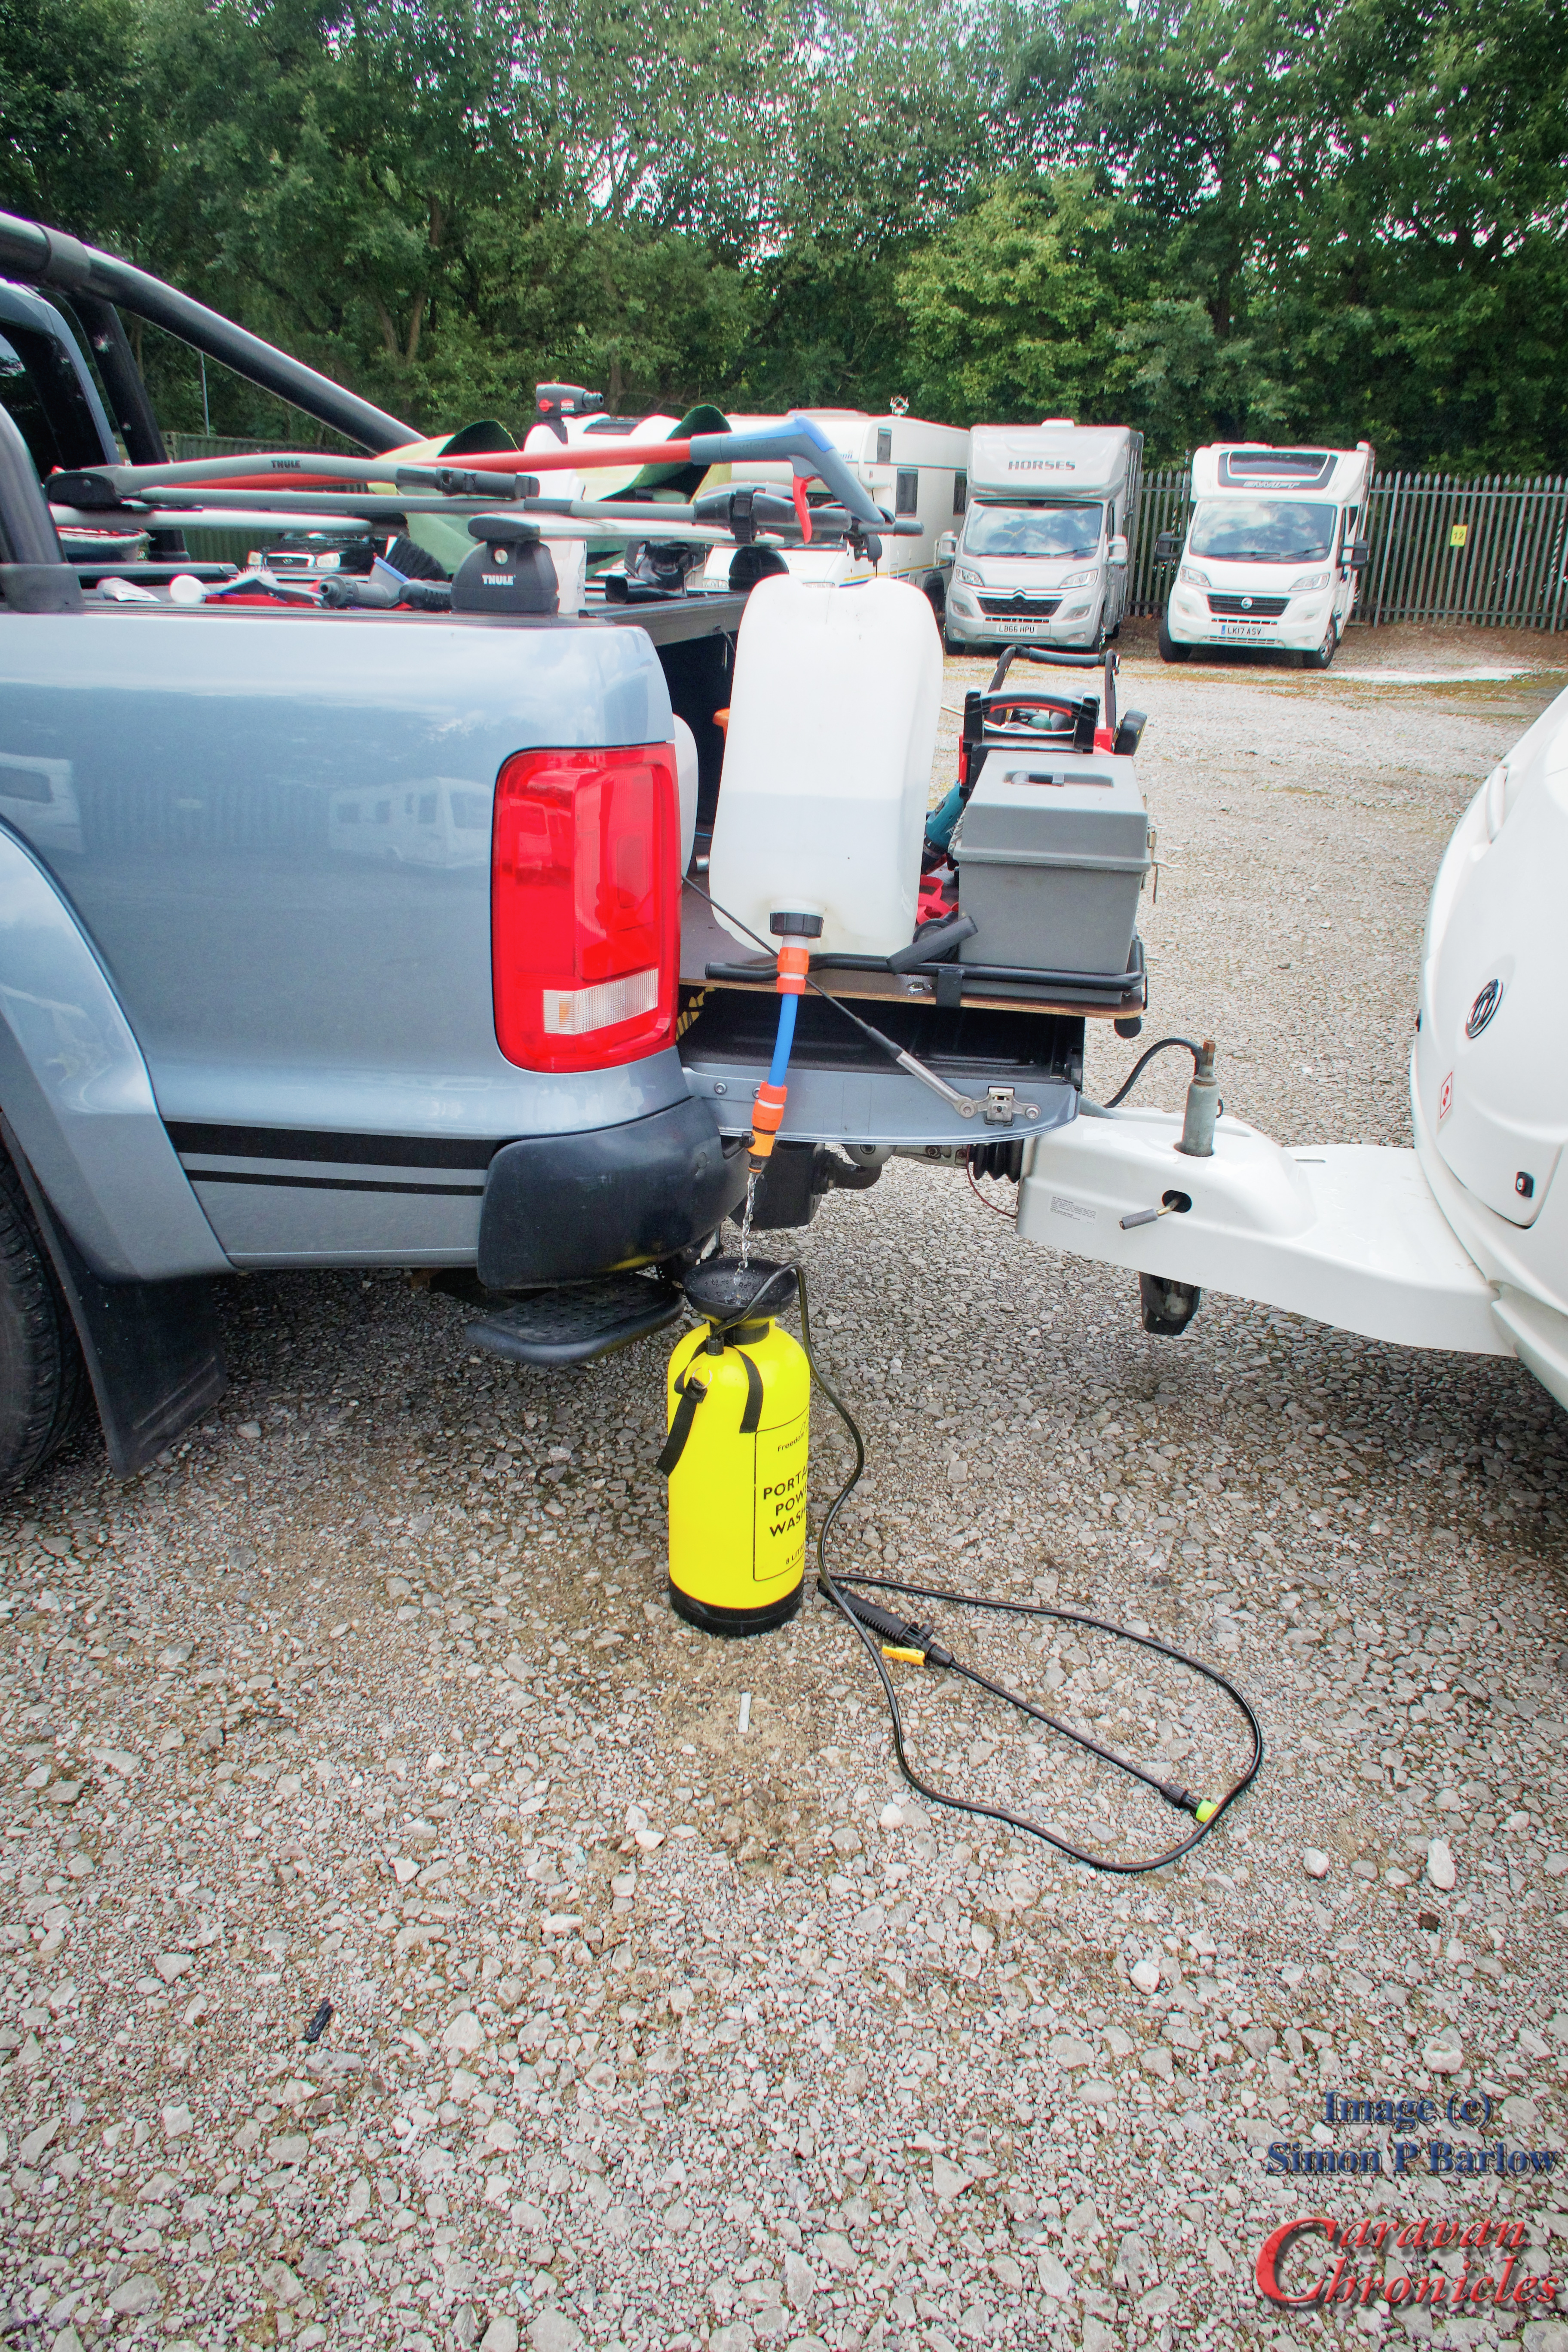
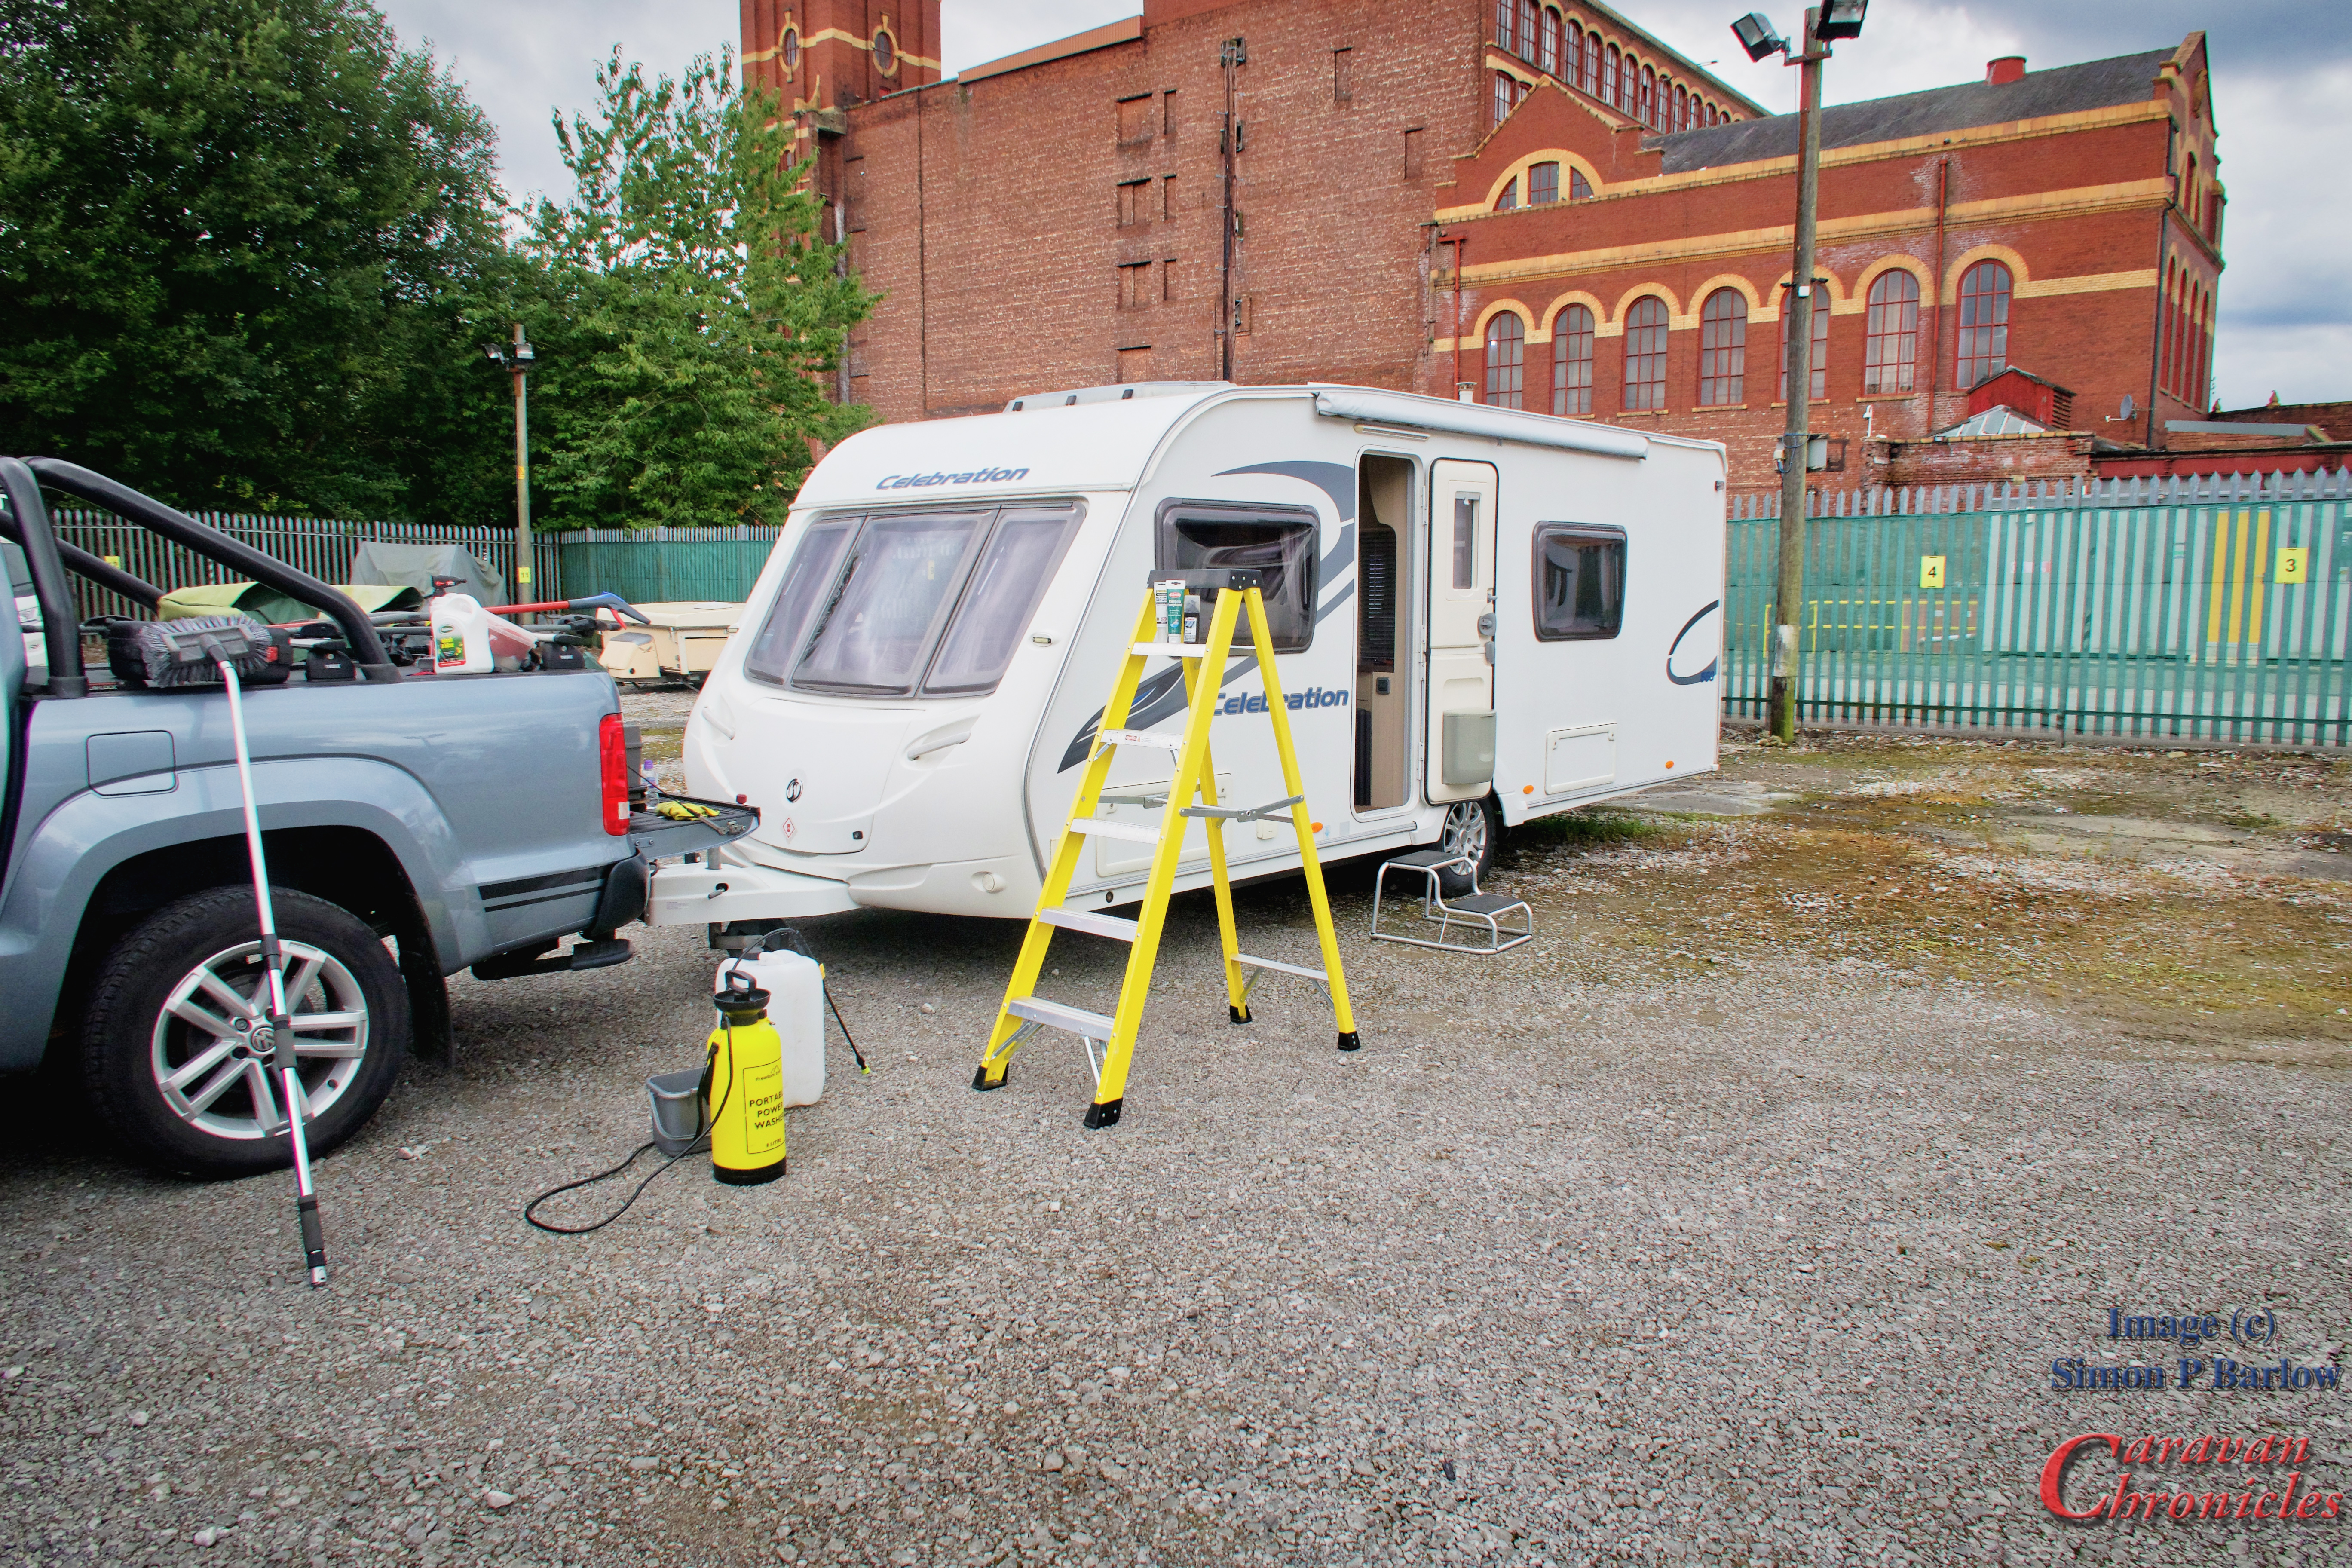
I removed the leisure battery which was showing as dead… less then 10 volts, put it in the back of the Amarok and we headed back home to come up with a plan of action. A couple of days later we returned with cleaning supplies…
We hitched up the caravan and pulled it forward out of it’s parking spot and set to work. Over the years I’ve tried all the different products for washing the caravan (and cars) ranging from mid priced to the “how bloody much” brands, but in all honesty I have found Morrisons own Wash and Wax Shampoo (It’s bright green) to be really good and it has given me really good results on our 15 year old Freelander, the Amarok and the caravan. A long handled brush for the sides and some small detail brushes for the awning rails and tight places made easy work of the sides. It was all hosed down using one of those pump up pressure washer thingy’s
To rinse I used Car Plan’s Demon Shine (the pink stuff…. also stocked in Morrisons) diluted down in the yellow pump up spray do-hicky. Which works quite effectively. The two products – Morrisons Wash and Wax shampoo and the Demon Shine seem to work together really well and I certainly found that using the two as a shampoo and then as a diluted rinse leave a good water shedding layer on the Amarok that lasts quite a while.
One thing we don’t have at our storage compound is running water. So I have three 25 litre containers that I fill up at home and throw into the back of the Amarok. To save lifting them up to fill buckets…. I fitted a hosepipe connector to one of the lids and all I need to do now is tip the container and open the tap. As there is no venting the sides collapsed inwards a little so tipping it back onto its side from time to time to let air back in means that when the tap is shut nothing can slosh out a vent while travelling.
On this trip we only cleaned and polished the sides… the roof would have to wait for a return visit. Putting the caravan back in it’s spot lead to the next task…. jack it up and remove the wheels. The caravan was fitted with Hankook 185×80 R14 and inspecting them closely revealed no cracks, bulges or damage of any kind. These tyres were now 10 years old it was defiantly time to replace them. We got 8 years use and just over a year standing out of them and I consider that a win. Realistically they should have been replaced at 5 years…. 7 max at a push, so getting 8 out of them with close inspections each trip I’ll consider we got our money’s worth out of them. After much searching on line and checking out the discount with National Tyre via the Caravan and Motorhome Club I called in to my local National Tyre could fit replacements and beat the price even that C & M Club discount gave us with National Tyres on line. As the Hankook’s had given us really good service and long life I replaced them with another set of Hankook’s. National Tyres also fitted new valve stems, valves and balanced the wheels. I know there is a lot of debate about balancing caravan wheels…. well the engineering bit of my brain thinks that anything rotating should be in balance, so I’m going to balance my wheels. We picked the newly re-shod wheels up the following day and returned to the compound to fit them. As it was raining, cleaning the roof was put off until we had better weather.
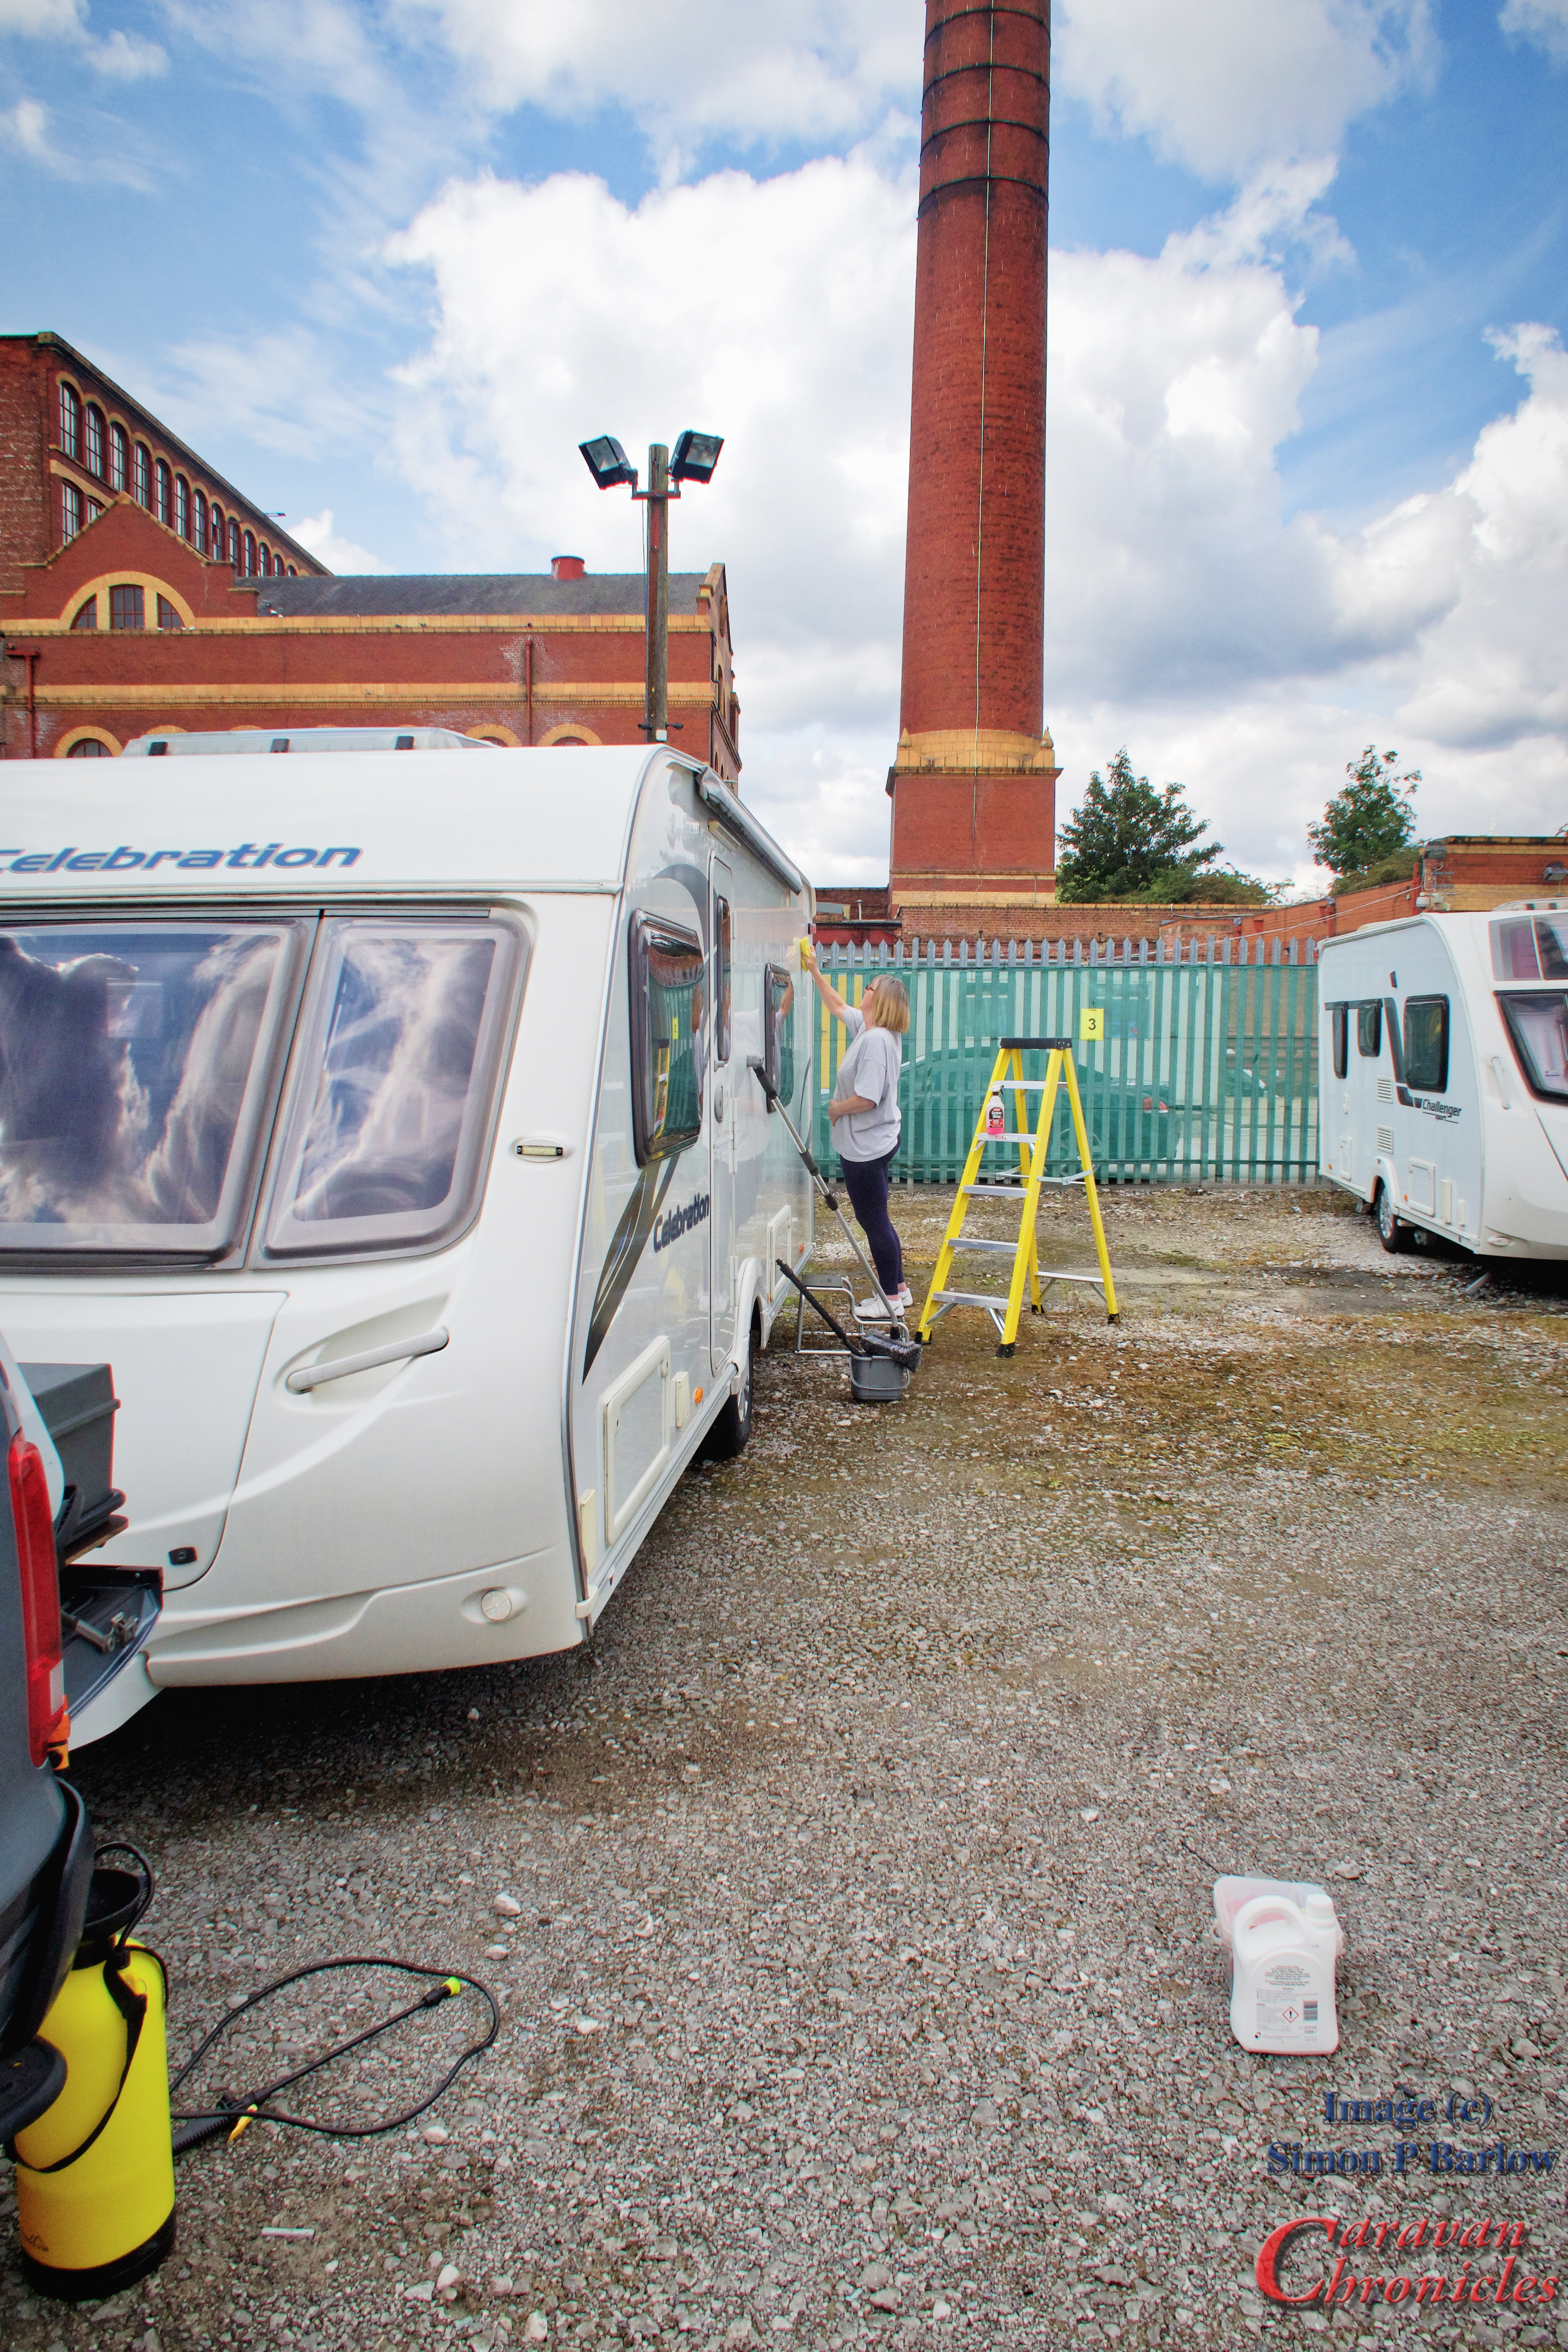
OK…. I know… you are all saying “Why did he clean the sides before the roof….. that’s bass acwards” OK here is my thinking…. the roof is going to take a few hours to do properly and when you have done that you then have no choice but to do the sides straight away as they are going to be really filthy with all the run off. It’s going to be a really long day to do everything. By doing the sides first, we could get a good layer of wax protection on them and as said earlier, the combination of products give a really good beading coat. So when it comes to washing the roof a simple rinse down would restore the sides back to their pristine finish we had a few days earlier.
As I worked round the roof scrubbing and rinsing, Sue followed me with a squirt bottle and microfibre cloths… using the Car Plan Demon Shine neat finished off the sides and gave another layer of buffed waxy finish.
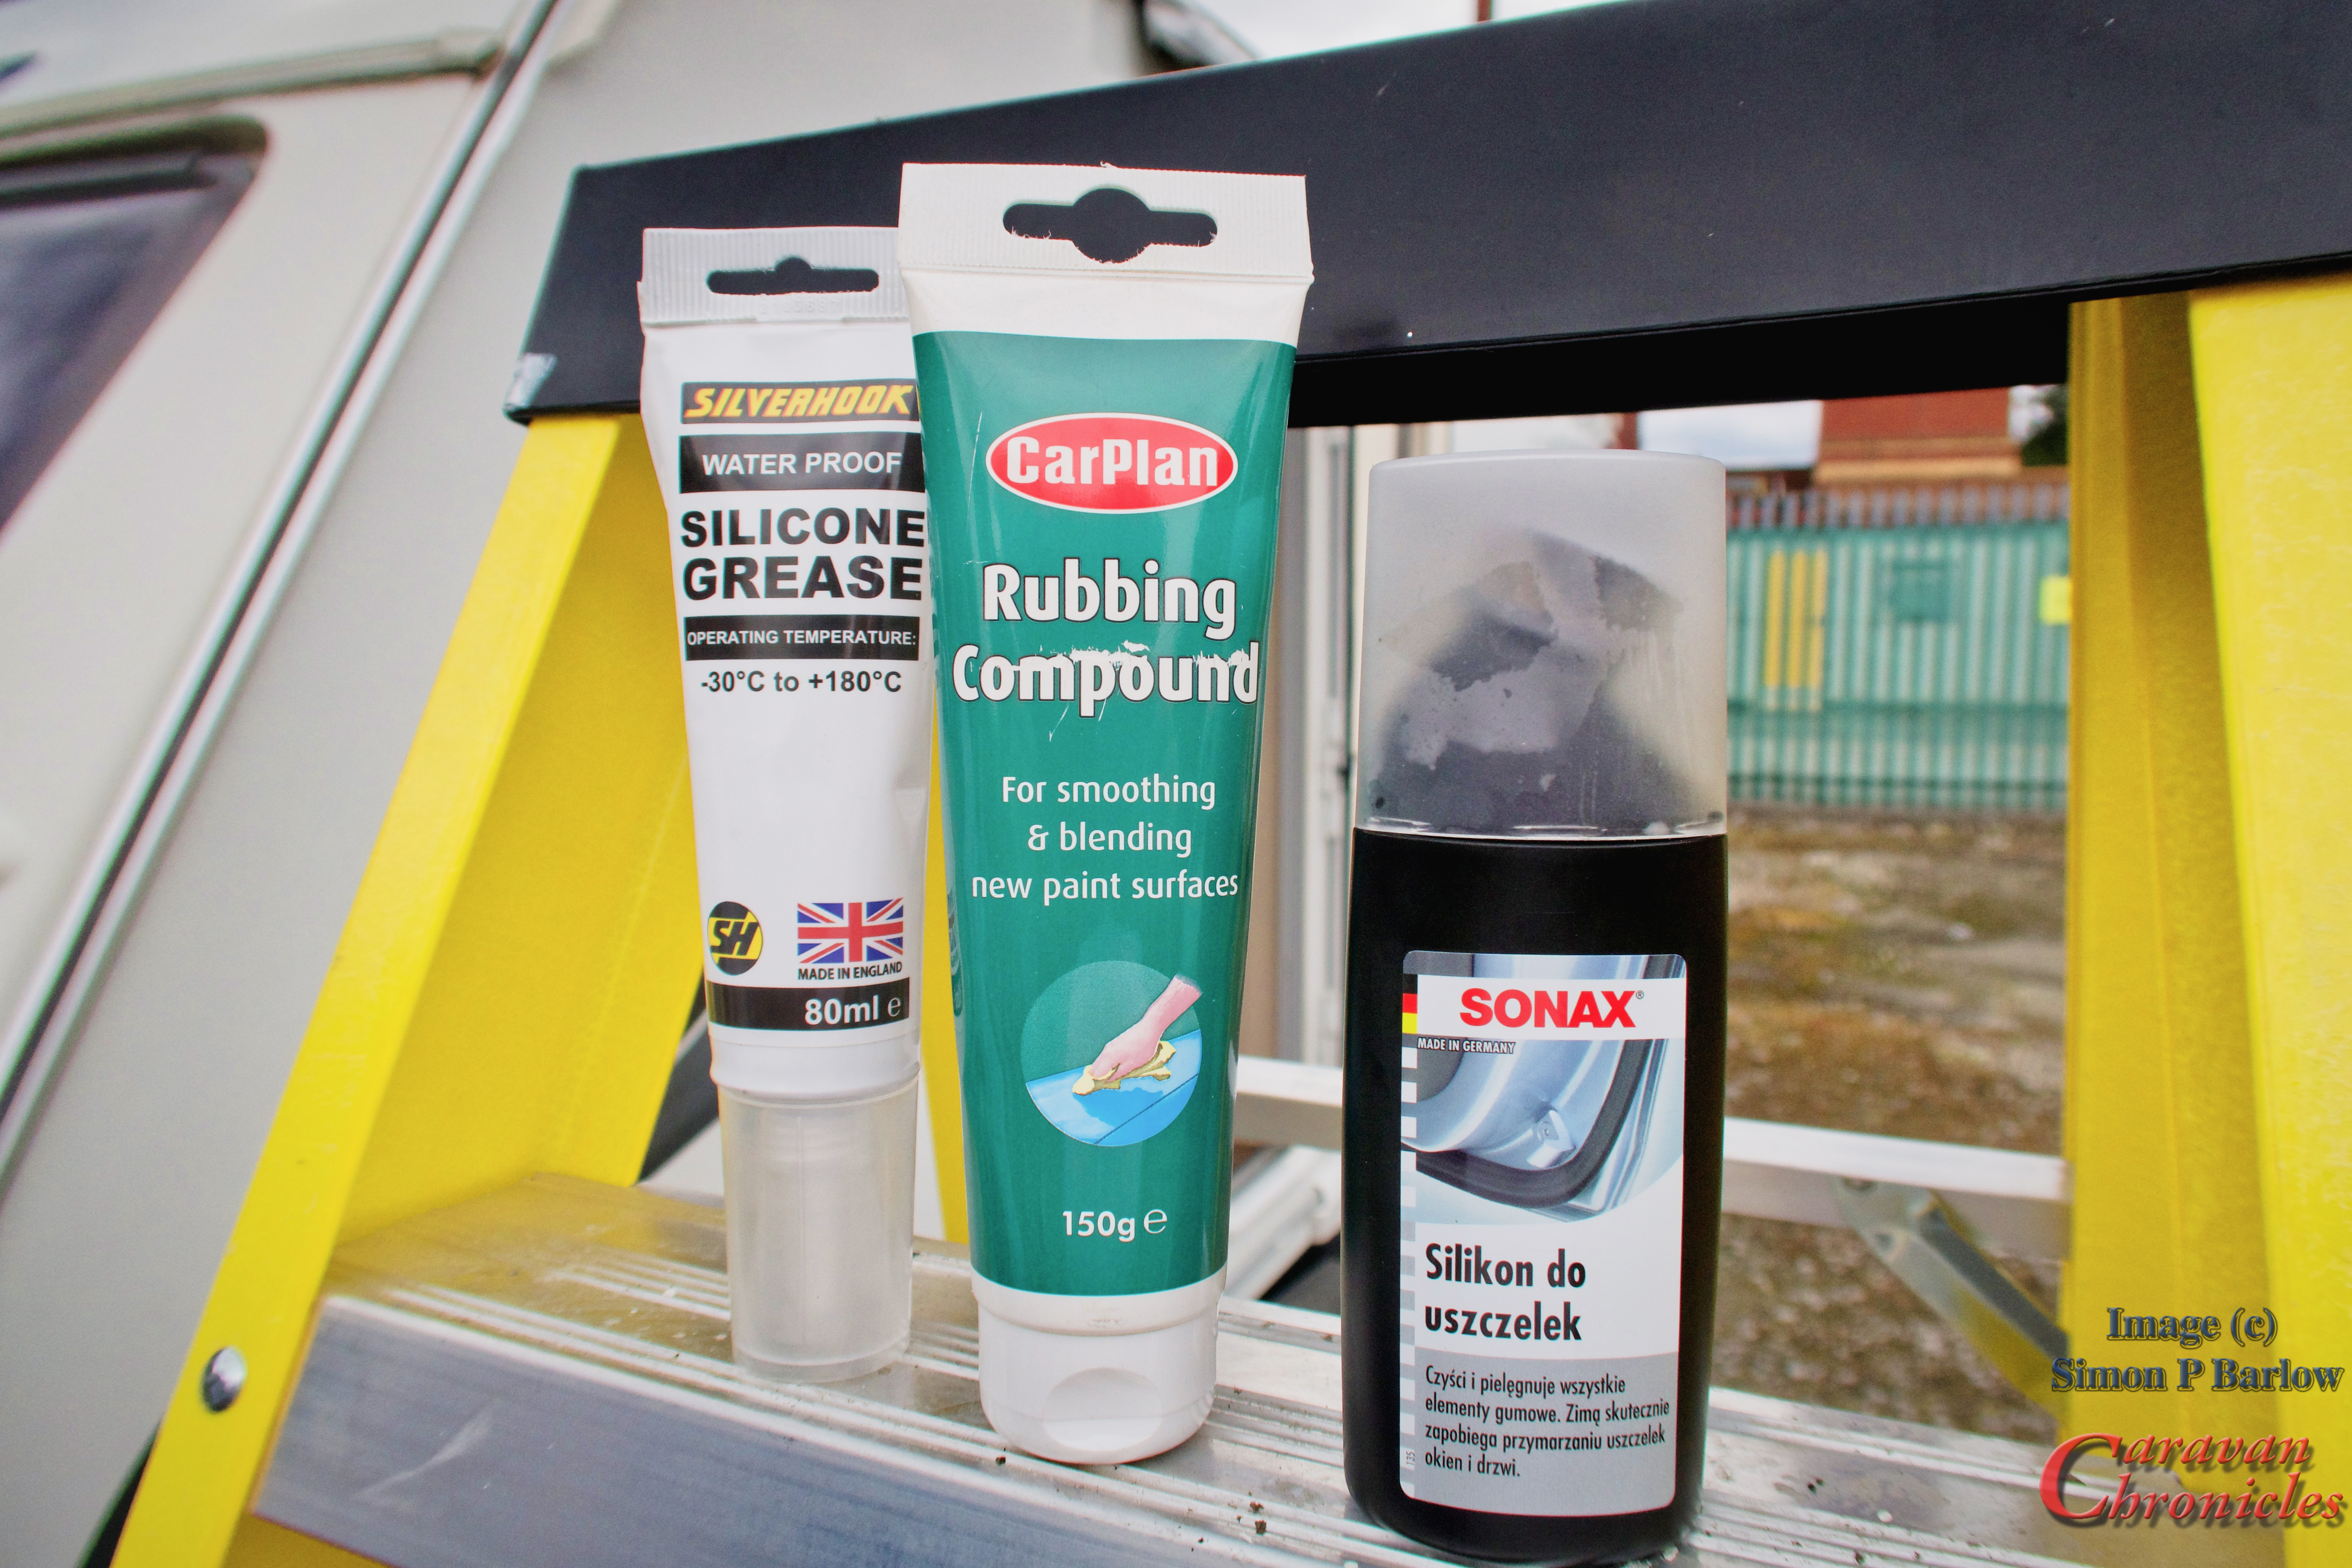
A few other jobs were completed too. All the window and door rubbers were given a good coating of Sonax Silicon… this stops the windows sticking to the rubber and keeps the rubber seals soft and supple. Some of the aluminium awning rail needed cleaning. Rather than use a metal polish (Solvol-Autosol is my normal preference as a metal polish) I used a simple rubbing compound so as not to polish the aluminium too much but brighten it’s brushed finish. And finally waterproof silicone grease for the moving and interlocking parts of the 13 pin plug.
What next?…
I mentioned earlier that our leisure battery had died… well after some tender loving care in the workshop… It’s alive! Well it’s OK for light duty. So the next project is to go lithium. I have planned out a course of action and the first step is to install on the Amarok a 50 Amp feed to the rear of the vehicle and terminate in an Anderson connector. This will allow me to use the full capability of the Amarok’s large alternator to charge Lithium batteries in the caravan via a dedicated DC to DC charger. Next stage will be installing a solar regulator and panels followed up by an inverter and changing the on board charger for a dedicated lithium charger. I also want to remove the inbuilt charger to save weight and make room as I won’t be installing any lithium batteries in the existing battery box.
I’m still in the process of doing my due diligence on equipment for this so watch this space. I’ll go through my thought processes in a later post.
The other change is going to be the rear lights on the caravan. The reversing lights are not very useful when reversing on to a pitch in the dark so I’m going to install two LED wide beam lights just out board of the rear steadies. That leaves me with the existing reversing lights. A quick search on the internet led me to replacement Hella lenses for the existing reversing lights that would allow me to convert them into fog lights with a simple lens change and a wiring change at the fuse block. Swop the reversing light cable with the fog light cable and use the old fog light as a connection point for the new reversing lights… after removing the bulb of course!
My email box tends to get a wide variety of questions covering all sorts of subjects. The most frequent one is to do with wiring and electrically related problems. Sometimes trying to diagnose issues via email and a few photos is a bit of a challenge, but hey who doesn’t like a challenge! One thing that I do see a lot of is electrical work that is…. well, quite frankly not up to scratch in my opinion. So here is my attempt at a basic guide.
So many projects start by adding one or two things… extra 12 volt outlet here… maybe another light and then something else comes along that needs adding in. Before you know it you have a mess of spaghetti that the local Italian restaurant would be ashamed of. It is all too easy to fall into the trap of adding circuits to existing fuses…. or installing a new fuse and a few weeks later adding another circuit to it as it’s easier than installing another fuse.
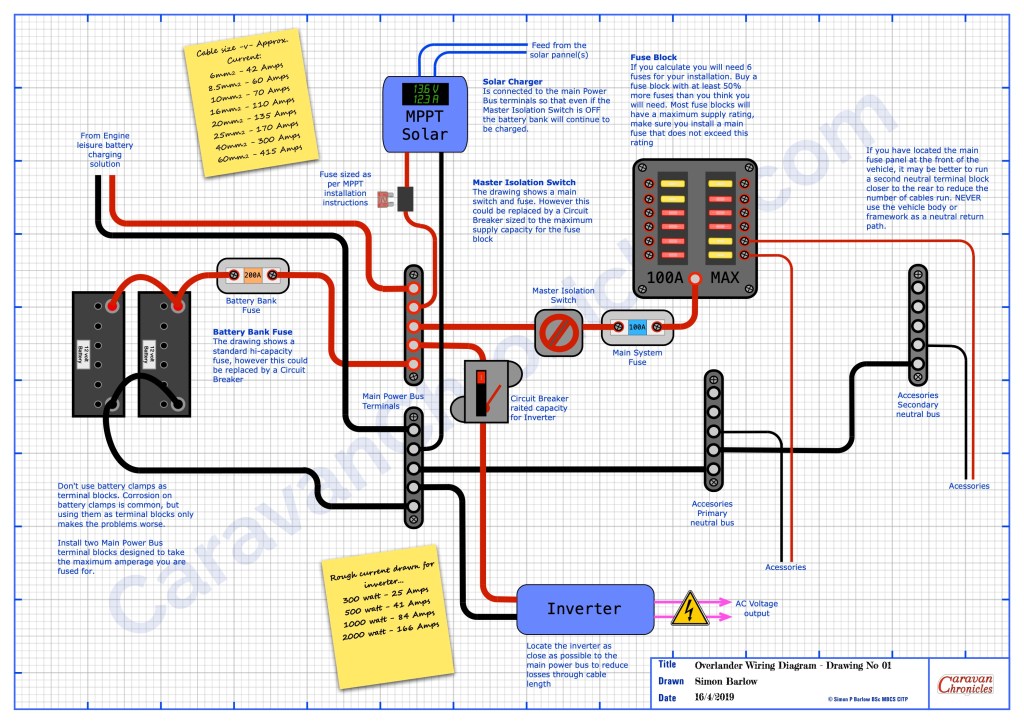
Start with a plan…
You can download these and other drawings from the Electrical Drawings page in the drop down menu under “Document Library”
You need to draw out how the major elements are going to connect together – leisure batteries, solar charger, DC to DC charger, inverter and include all the big fuses, buss bars and fuse box. Don’t think about where any of this goes for the moment just get the basic layout and how everything interconnects worked out. It might take a few goes but paper is usually cheaper and less frustrating than sorting out the mess afterwards.
Once you have all that figured out you can start working on the details… just how many fuses will be needed… and what ever number you come up with add half as many again as a minimum. Having a few spare fuse positions that maybe never used is way cheaper than in twelve months time having to install an additional fuse box. A this point you can start adding details…. what size cable is needed for each link, what sort of fuse box do you need.
You can also now start to think about specific facilities you might need. For example, many overlander vehicles will have a button on the dash that when pressed and held down activates a high current relay that links the house batteries to the engine cranking battery. Very handy to have… jump leads are not much use if you are 200Km from the nearest vehicle. If your only trip ‘off road’ however is the muddy car park at the local car boot sale than maybe not a priority.
Don’t use the vehicle chassis as a ground.
Modern vehicles are constructed using different materials and quite often panels and sub frames are glued together. Back when virtually all the panels were spot or seam welded steel, using the body and chassis as a ‘ground’…. which really isn’t a ground but the neutral return path… this was acceptable. However now, sections can be glued together and are often sub assemblies of aluminium and other light weight materials bonded together. Just because you see a neutral bonding point (earth terminal) don’t assume this is is capable of being a suitable point to bond the neutral side of a circuit or accessory you are installing. Modern vehicles often have small bonding straps between sections that can carry the current that the vehicle manufacturer rated the bonding point for. Adding additional equipment and accessories might exceed the original design spec.
I did see a spectacular failure due to a 3000W inverter having it’s neutral lead ‘grounded’ in the rear of a vehicle. Running at about 2000W the neutral side was trying to ‘return’ a current of about 170 amps through the body of the vehicle, which lead to serious damage to some of the vehicles wiring and a number of vehicle components… and a ‘repair’ bill of nearly £1500.Putting a riv-nut in a body panel that is mastic bonded to the body is not a suitable negative bonding point!
Additionally a number of vehicle circuits are now negative switching or operation and installing additional equipment or accessories could have unforeseen issues. Always from any accessory or piece of equipment you install, add the neutral return path back to a suitable single common point or buss bar you install for the purpose and connect this directly back to the leisure battery.
Ideally all the ancillary leisure circuits should never rely on any of the vehicle wiring and the negative side of the leisure wiring should only ever connect to the negative side of the leisure battery.
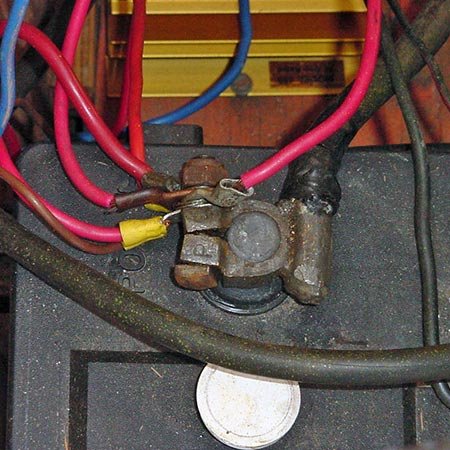
Don’t use battery terminals as a junction post.
Both the leisure battery and engine battery should only have connections that lead to either in the case of the positive terminal a master fuse /circuit breaker and isolator switch. The negative terminal should only have the connection to a master negative terminal point or buss bar.
Nope…..Not OK…. it’s a terminal not a junction post (image from the Internet)
If you want to install any sort of battery monitoring, it is convention to install the shunt on the negative return to the battery between the negative buss bar and the negative battery terminal. If you have multiple circuits terminated on the battery terminal it makes future changes and upgrades, including installing a battery monitor very difficult.
Just NO! (image from the Internet)
Using the battery terminals as connection points for multiple services also makes fault finding very difficult. Each circuit may or may not have it’s own fuse and it’s difficult to isolate circuits….. plus I’ve had enough sparks flying round when trying to disconnect a battery because someone did not install an isolator to know that it’s only a matter of time before one goes ‘pop’.
Just because it’s shiny…. NO!!! Not OK (image from the Internet)
Please, just don’t do it.
Have a think on this. If you had to go to an auto electrician to get a fault traced and corrected, they would immediately put at least an hours time on the invoice just to figure out what was going on with all the cables on the battery. Also, If you don’t have a battery master isolator installed, get one installed now. It’s a safety item that must not be missed out. Having the ability to quickly turn off all the leisure circuits in an emergency might just save you from the unthinkable happening.
Cable Termination
Every cable should be terminated. Period. There shouldn’t be any cables in an installation that don’t have a crimped (or soldered) termination. Even if it’s a screw terminal such as those found in joining blocks or 13 pin plugs.
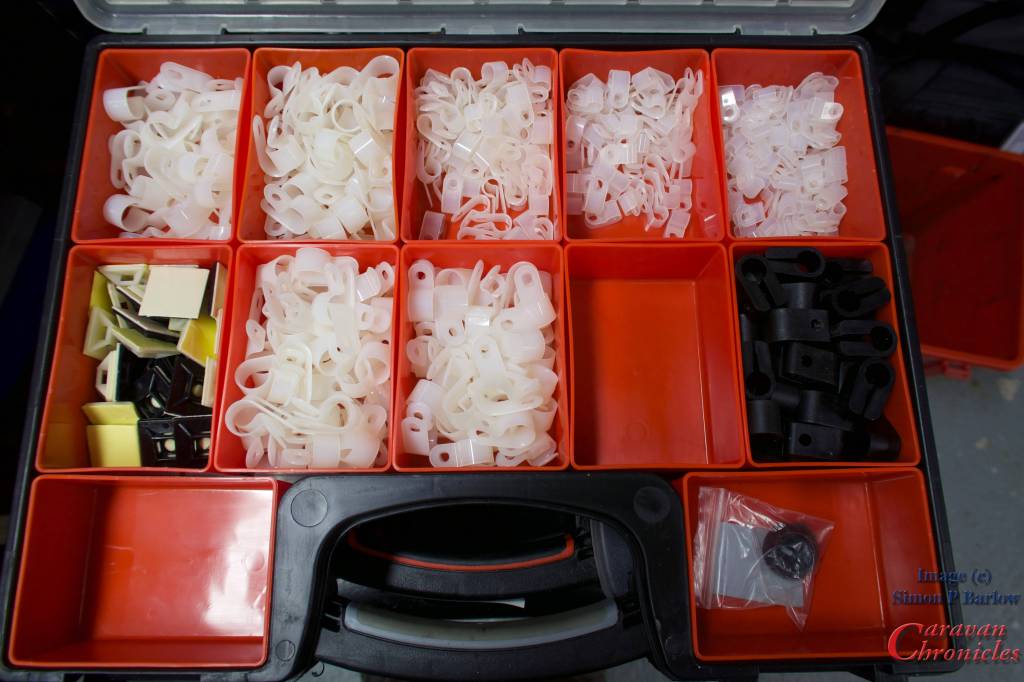
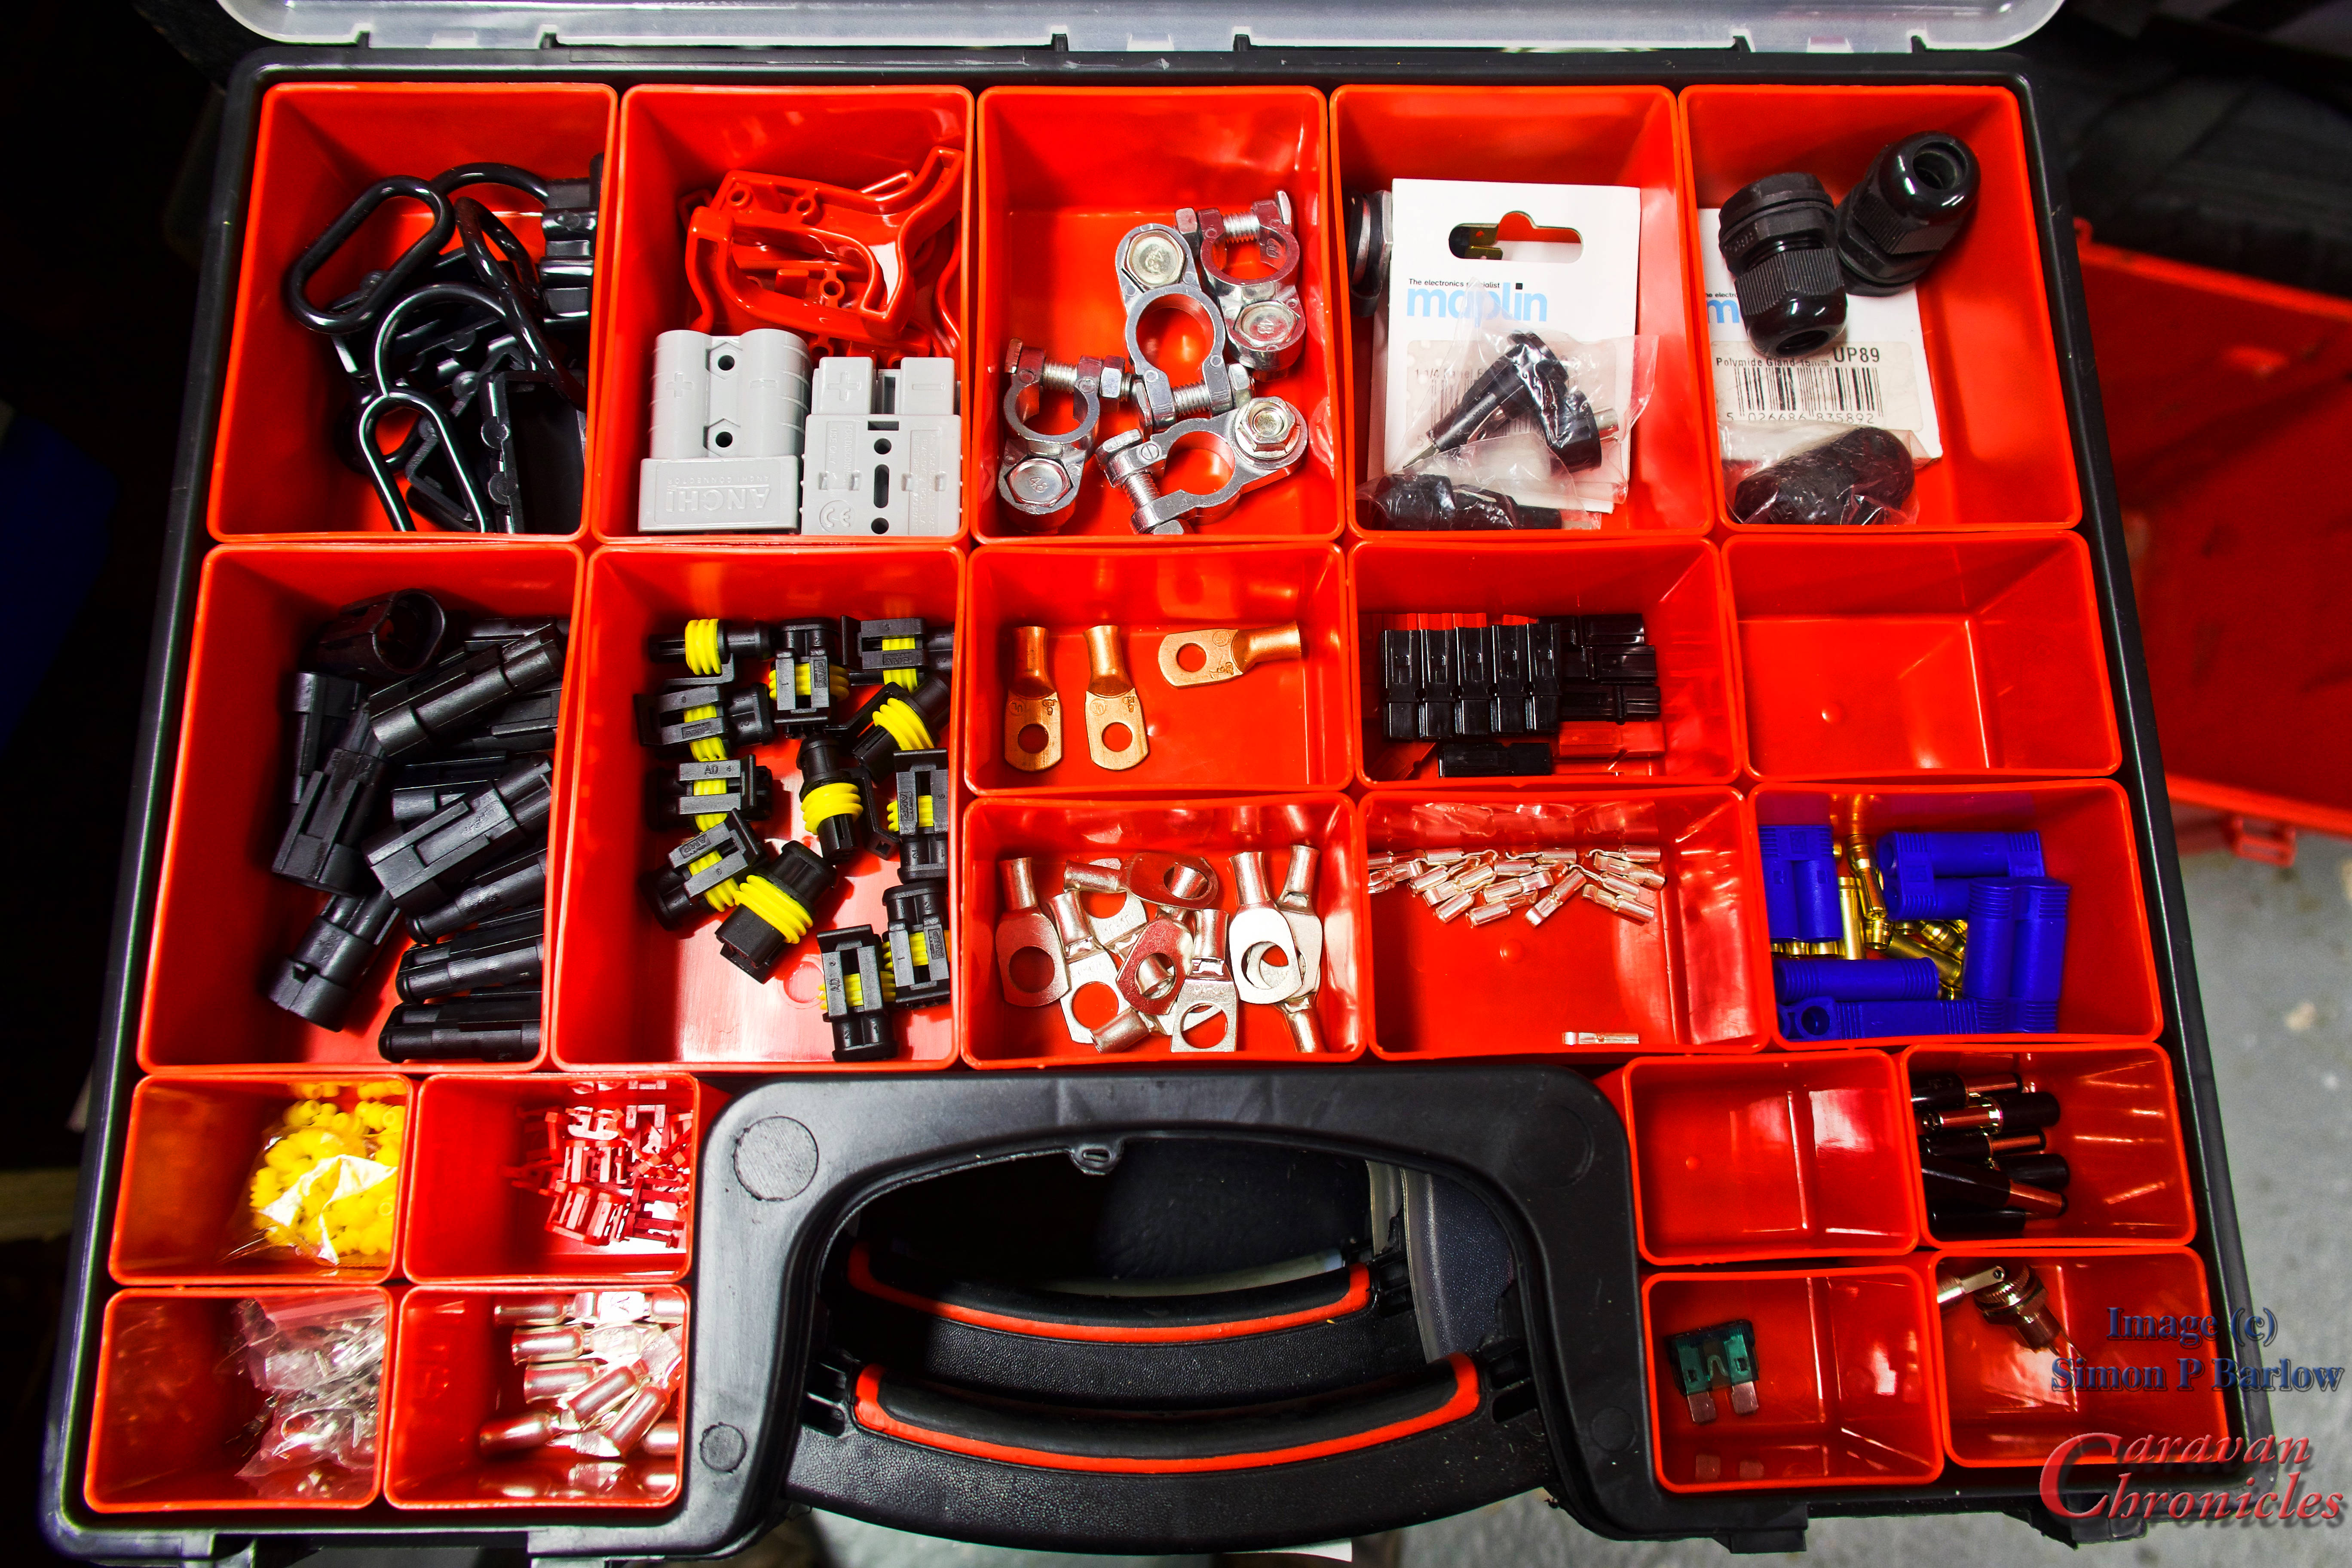
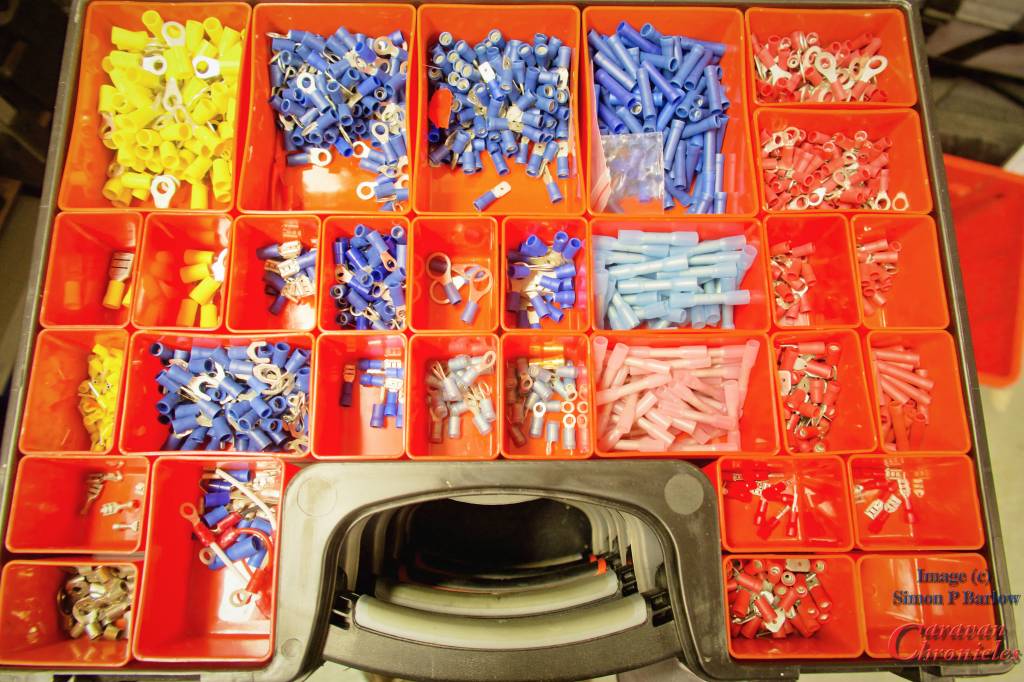
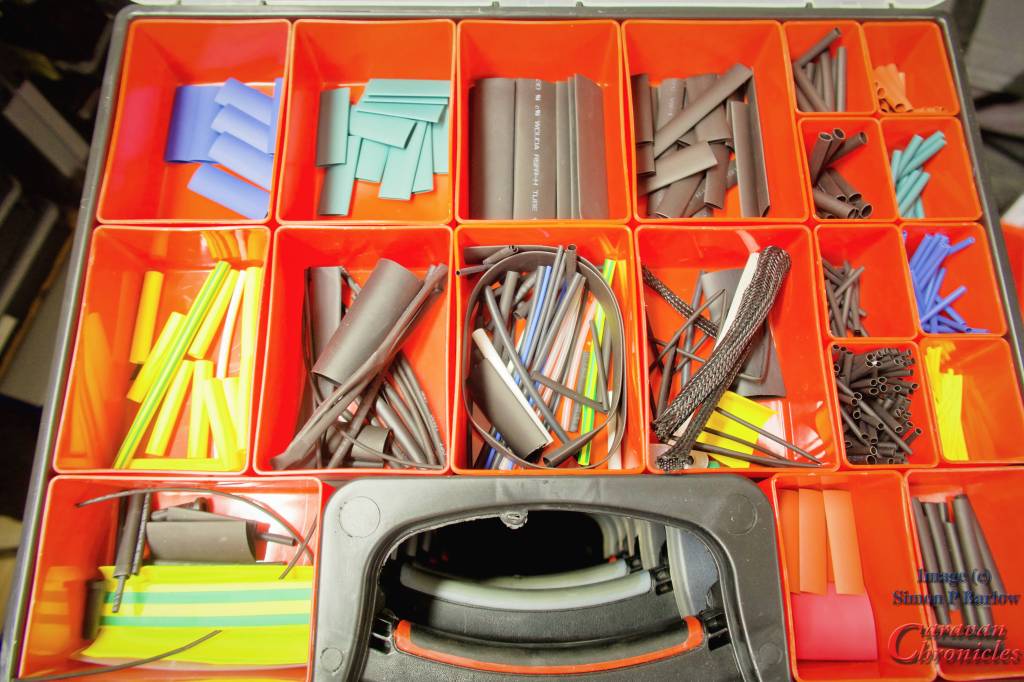
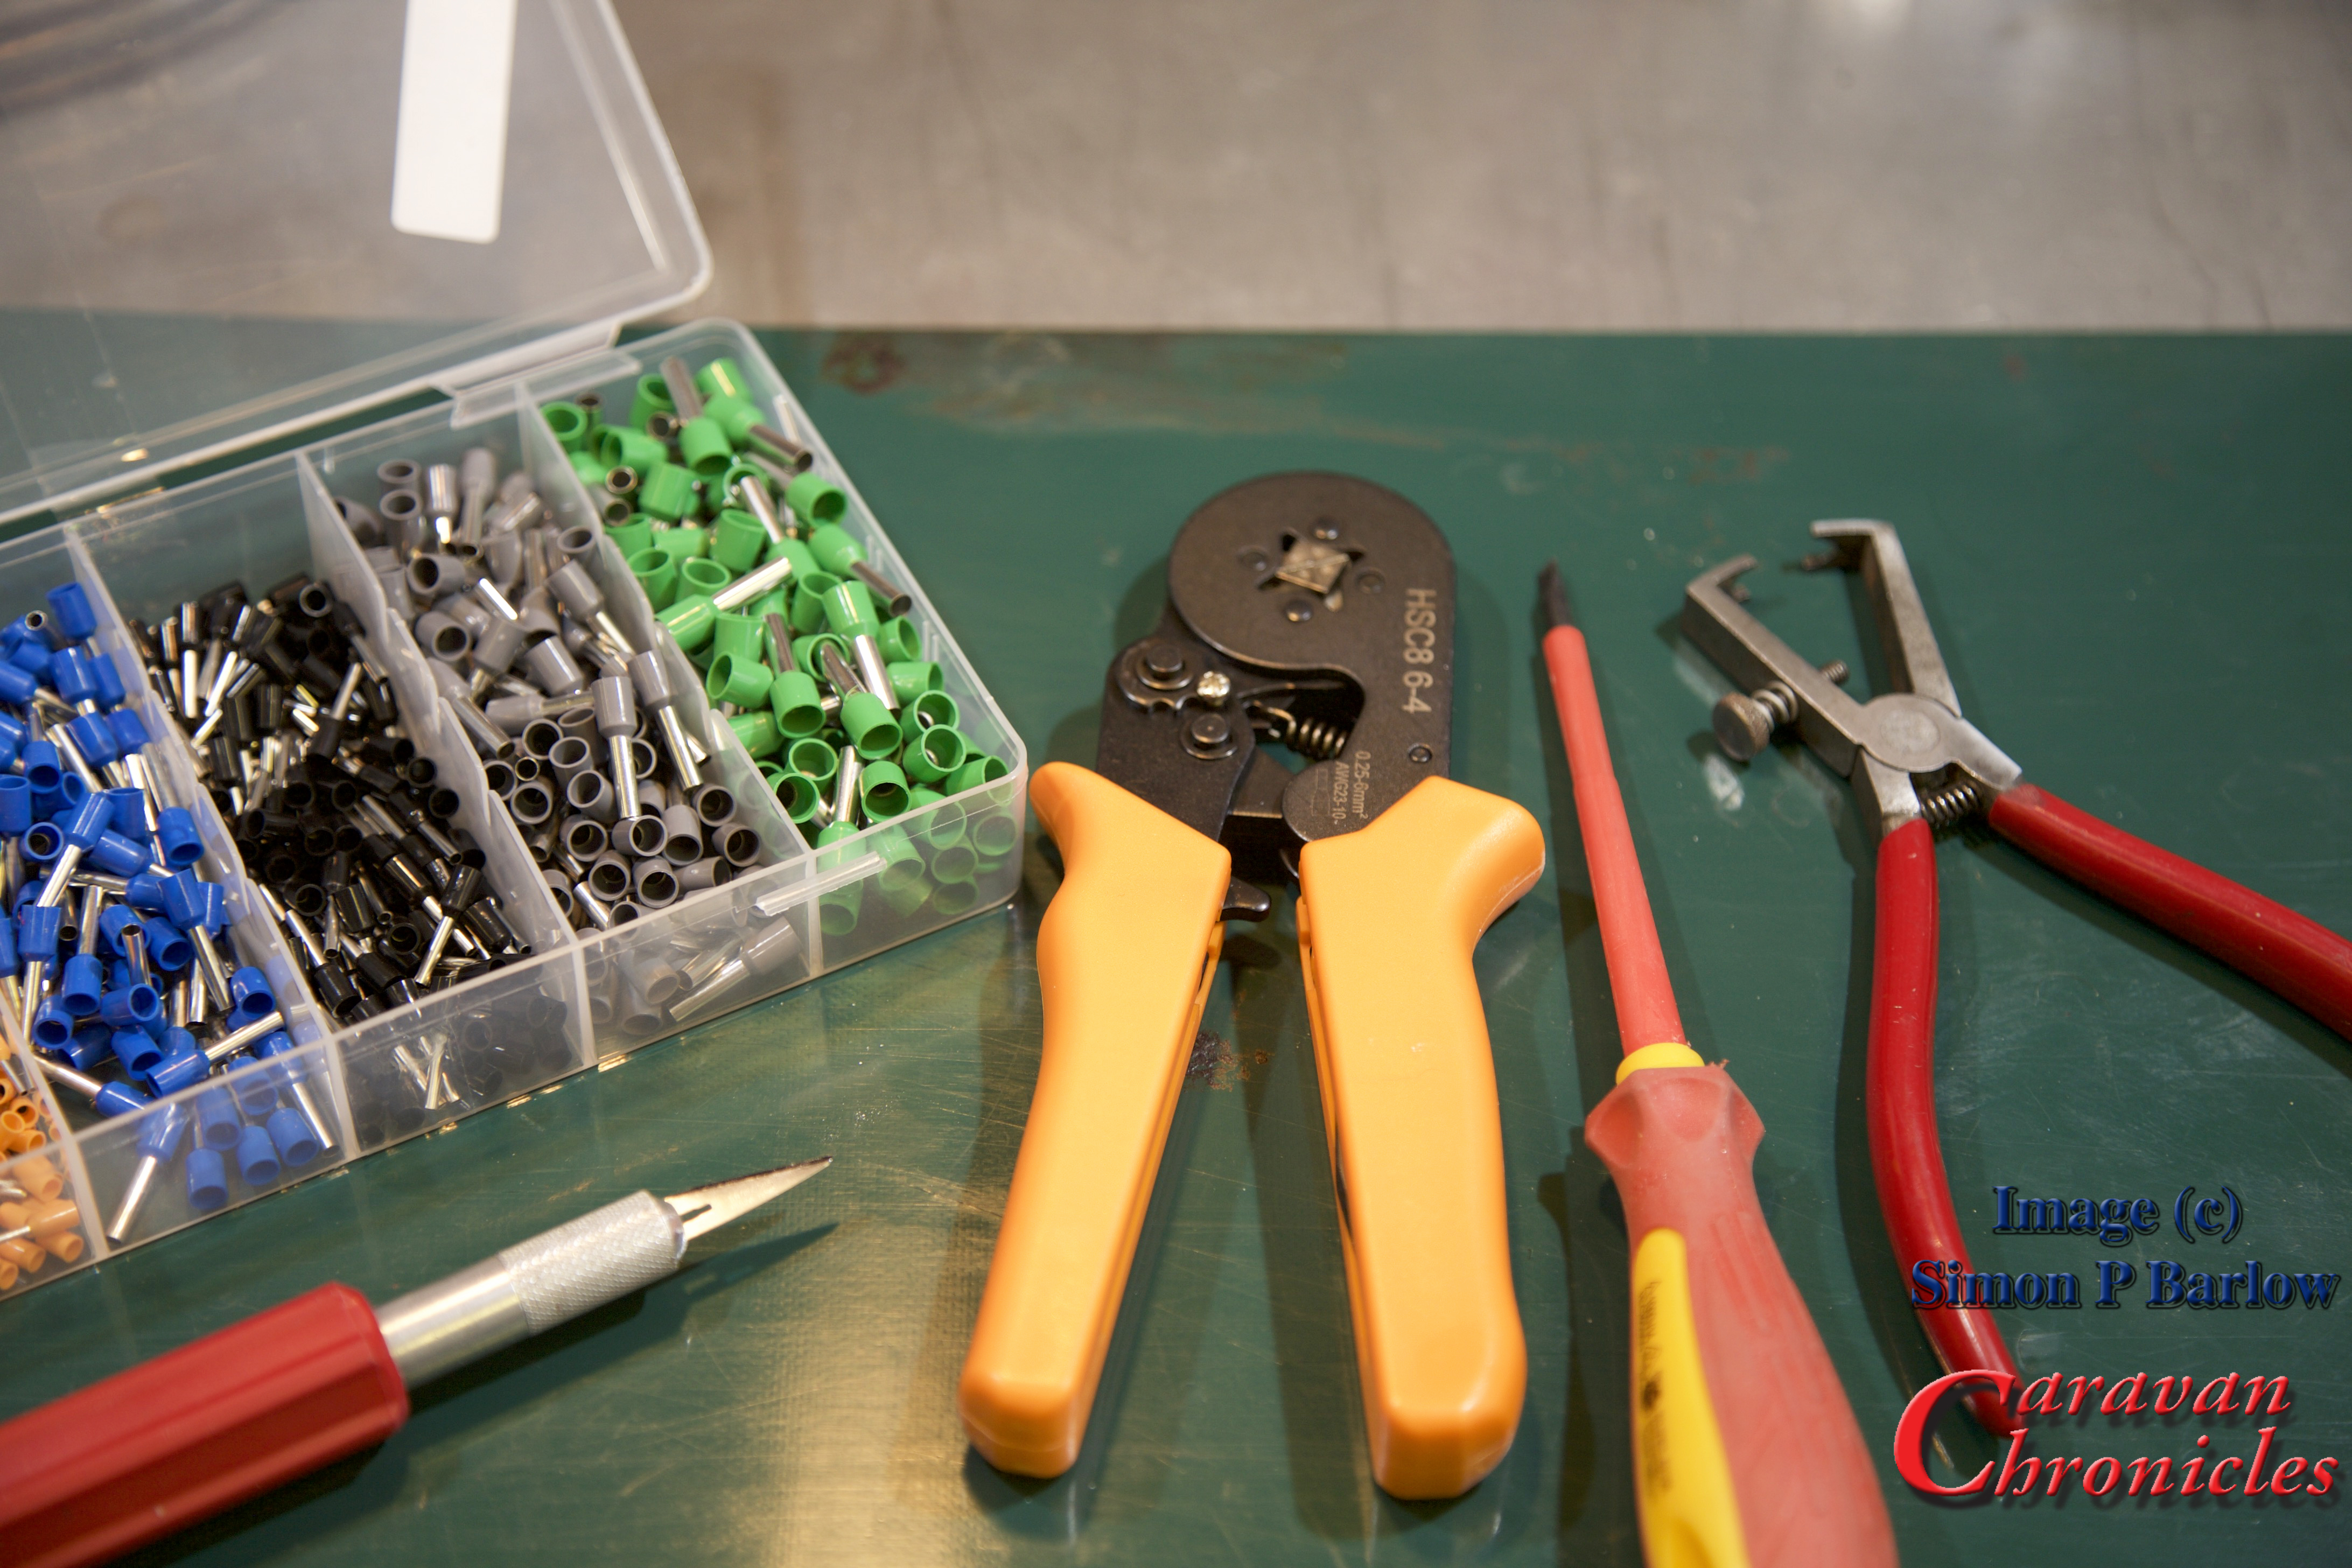
If you are embarking on a wiring project, its always best to start building up your stock of terminals. I usually buy selection boxes of terminals on line and supplement these with bags of single type connectors for the more commonly used ones. To keep everything organised tote organiser boxes are my preferred option.
A few of the 20+ of my storage boxes with wiring components
There is nothing more annoying than running out of the something and its always just as you want to finish a project off so you end up cutting corners.
For some of the larger cables, if you don’t feel up to making your own terminations there is usually a local auto electrician available that will terminate them for you for a small charge. However, a crimping tool that will terminate up to 50mm cable is not that expensive – around £27 and will probably work out cheaper in the long run. I’ve a link to the one I bought via Amazon and regularly use in the SHOP page.
Get the size right…
Selecting the right size or gauge of cable is critical. There are two factors that determine what gauge of cable to use for a installing any particular circuit. The maximum current that’s going to be drawn and the length of the cable. Once you have selected the right size cable then means you can select the right size fuse for the circuit. Never fuse a circuit greater than the current capacity of the cable.
Handy wall chart of cable size and terminal sizes.
You can download these and other drawings from the Electrical Drawings page in the drop down menu under “Document Library”
I generally tend to list what is going to be installed, then work out all the gauge for the cables for the circuits. From there it’s easy to see which is going to be the most popular gauge and rather than buy several different gauges of cable try to select a limited selection of gauges.
Always go for the safe option of over specifying the gauge of cable for any particular circuit. If it’s a 10 amp circuit and you have used cable suitable for a 16 amp circuit, it doesn’t mean however you need to use a fuse greater than the 10 Amp circuit requires.
Something else to consider too. Most 12 volt cables are copper, however if you are installing them in a less than ideal environment, such as a boat, you may want to opt for tinned copper cables. These are far less susceptible to cable corrosion. Even in the best marine installations I’ve seen copper cables corrode through in less than a couple of years.
Cardinal Sin! – Never ever use two smaller cables to make up the equivalent of one larger capacity cable. You would be surprised how many times I’ve seen this… sometimes done by “professional” tow-bar installers when reported poor leisure battery charing or poor fridge performance is reported and the voltage drop is too great.
Wiring Looms – wrapping it up properly!
Dressing cables into looms is not difficult nowadays. There are many options available on the market to help you produce a professional looking finished product. I personally like for looms within the vehicle using a felt finished looming tape. You don’t wrap it so it overlaps but at a sharp enough angle so as it spirals round the cable bunch it leaves some of the cables exposed.
Felt is good as not only does it keep the loom together, it allows quite a bit of flexibility and prevents cables from rubbing or banging on flat surfaces making a noise.
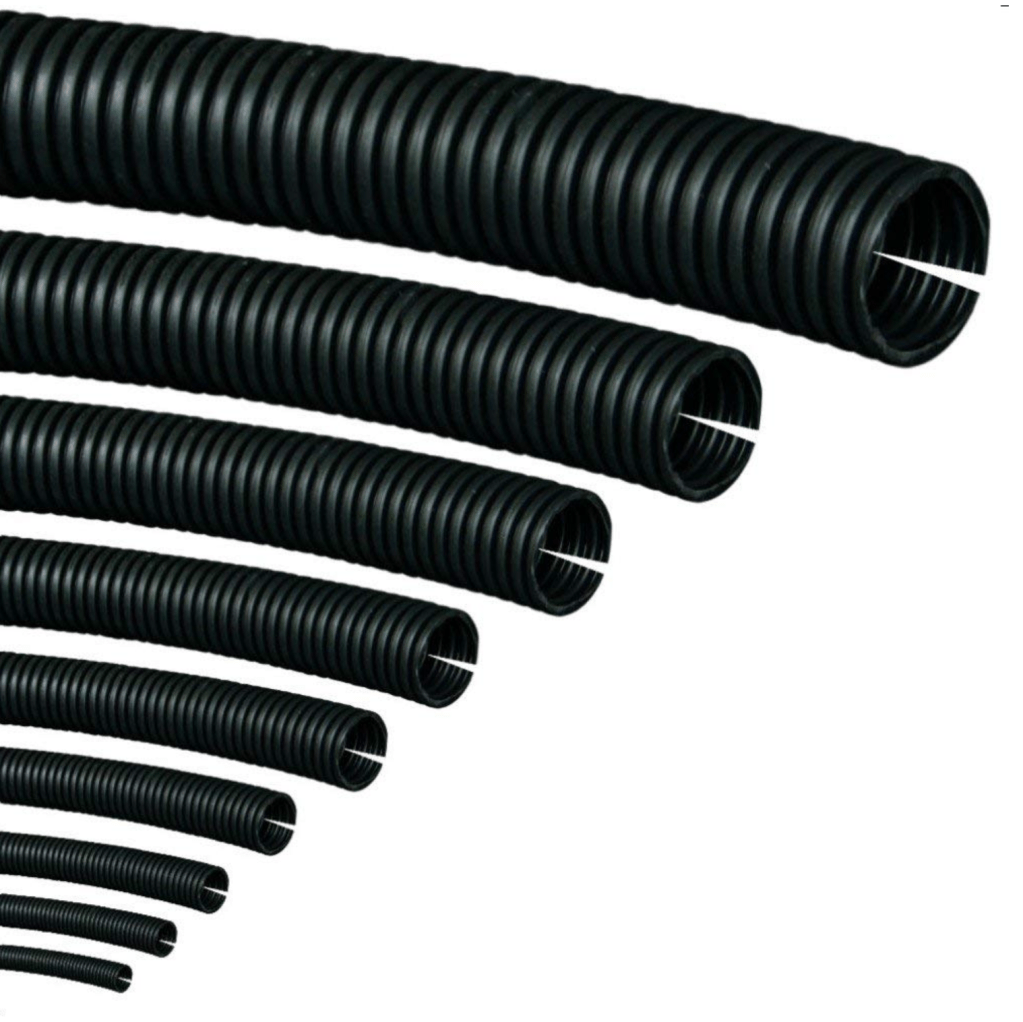
For any cables outside the vehicle body there are two options depending on use. In the main I’d go for split tube conduit. It’s available in various sizes and can be bought in either cut lengths or rolls. The other option is to use self amalgamating tape. It looks like ordinary PVC tape but as you wrap it round you stretch it and it releases a chemical which when overlapped onto its self becomes a permanent bond, effectively making a sealed tube. It is generally however fairly inflexible. Both have their place.
Anything in the engine bay or underneath the vehicle I use split tube and generally only resort to self amalgamating tape to seal inline joints.
Relays….. yes or no?
For me its Yes. I much prefer locating all the relays in one place therefore minimising the amount of heavy cable. By using relays to do the heavy switching you can use smaller and sometimes more attractive switches. I have in the past used 7 core trailer cable to connect 4 switches including LED indicators back to a relay bank rather than make up a custom wrapped loom.
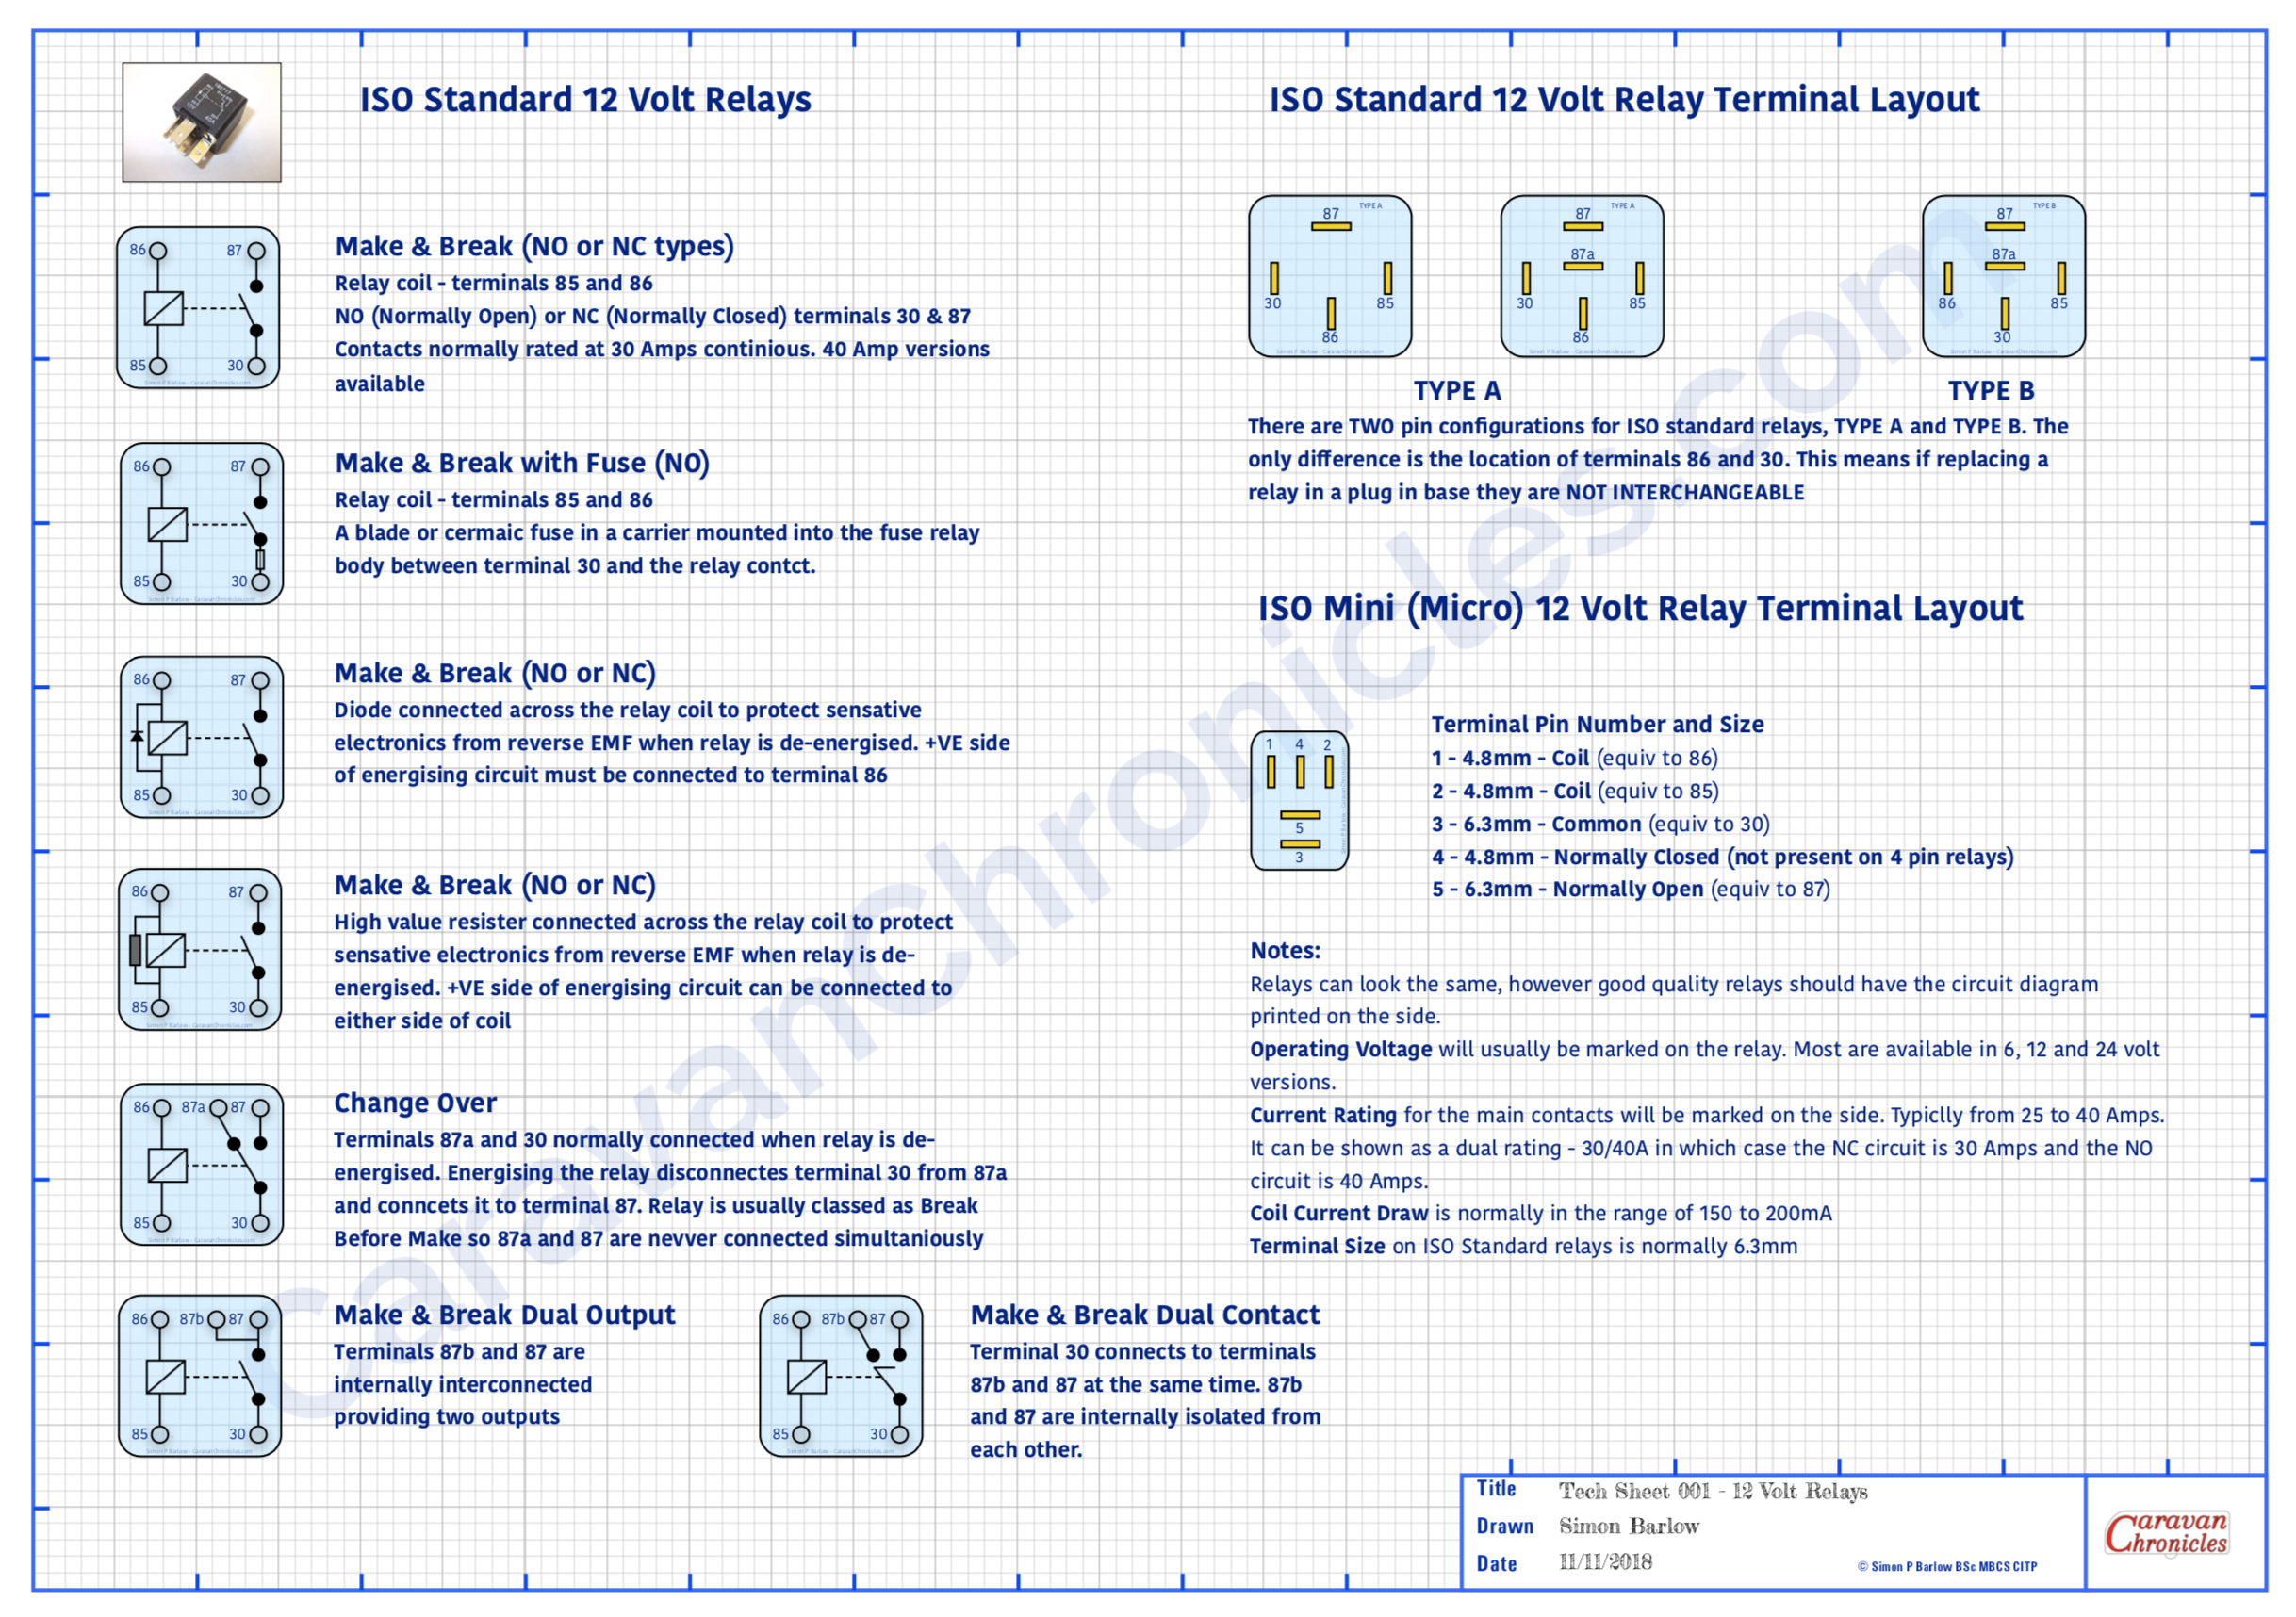
Handy wall chart of relay types
You can download these and other drawings from the Electrical Drawings page in the drop down menu under “Document Library”
It also makes tracing faults easier, as it’s simple to test if a switch is working, you can hear or sometimes feel the relay operating as you operate the switch. Its unusual to have a fault with a relay but quite simple to test… just unplug and swop over with a known working relay. If all the relays are located together it makes this task and testing the feed to the relays so much simpler. From that point all you need to check are the two wires going out to the device and the device itself.
Obviously some circuits don’t require a relay or if it’s designed to be turned on for a long period… such as a diesel heater, then adding a relay will just increase current draw, albeit small, on the leisure battery. A bit of common sense can easily determine if you should opt for a relay or not.
Grommet?…(no not Wallace’s friend!)
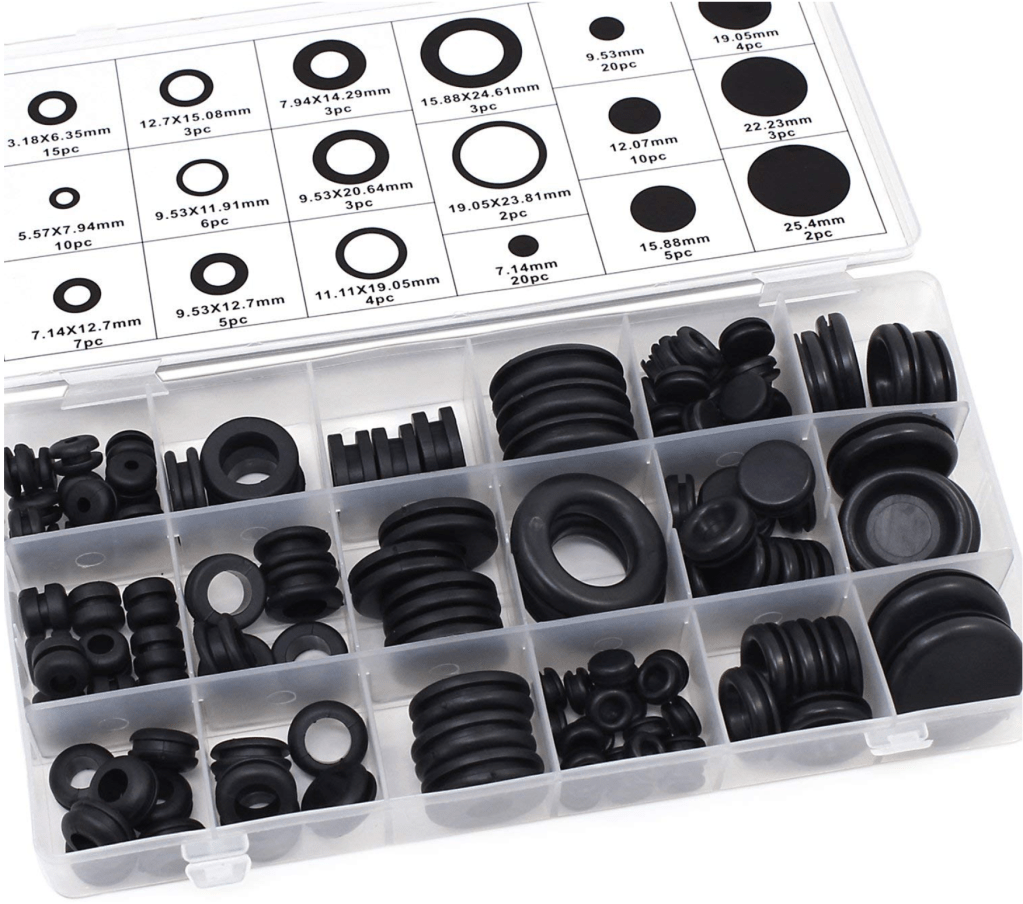
Whenever a cable or cables pass through anything solid you should use a grommet. You would be surprised at the amount of damage I’ve seen to cables due to either not installing a grommet to an insufficiently sized (too small usually) grommet.
When ever I pass either a cable or loom through a bulkhead for example I like to supplement a grommet with a bit of heat shrink sleeving over the cable as well. Even passing a cable through an existing grommet from the engine compartment to the interior, adding a length of heat shrink sleeve won’t do any harm.
There’s a link to these in the SHOP… only about £7 for the full box.
Having a handy selection of grommets available before you start threading wires through is far better than trying to install protection afterwards. You’d also be surprised at how many cables I come across that have been damaged while pulling through holes in metal and wood panels. Always better to start with a grommet or two! Where a cable or loom passes through a grommet, it’s aways best practice to try and anchor the cable or loom either side of the grommet to something solid using “P” clips. This will reduce the chances of ‘fretting’ with the movement of the vehicle.
While we are on grommets…. a quick note about cable-ties (zip-ties). Stop doing them up so tight! I’ve come across cables cable-tied to a chassis rail so tight that the cable-tie has cut into the insulation and is fretting the conductor inside. Cable-ties are generally made out of a harder plastic than the cable insulation so will over time wear away at the insulation.
Get yourself a cable-tie tool that not only allows you to precisely control how much tension you put on the tie but also cut the end off so that there isn’t a wrist slashing booby trap lying in wait for some unsuspecting person. I use a fairly cheap pair (left). I think they were around £8. So not really expensive. But they make a nice neat job of installing multiple cable ties with the correct tension and the ends cut cleanly off level with the lock tab. You can buy ones that have a tension dial built in so you can set them to a pre-tension, but I find after a bit you know just how much to squeeze the handles to get the correct tension.
So what is the correct tension… well if you are doing them up so tight an elephant could dangle on the cables then that is too tight. They should be tight enough so as not to slip but you should be able to spin them round the cable(s).
Cable-ties really should not be used to make looms or anchor cables or looms to anything solid. If you want to make a loom, wrap it in specialist loom tape. If you want to anchor cable or a loom to something solid use a “P” clip. If required… use a length of heat shrink to make the loom a tighter fit in the ‘P’ clip.
I know you are dying to ask…. when do I use cable-ties? Well generally at the installation stage to get things to stay in place before installing P clips or if I have to run a new loom along the same path as an existing loom, I generally opt for cable-ties to hold them both together (as long as the original is suitably anchored to support both)
While we are talking abut cable-ties… I have seen the worst kind of mistakes in the use of them. It is not OK to cable-tie anything to brake lines, fuel lines, vacuum lines, hydraulic hoses, coolant hoses or steering components (yep one bright spark cable-tied his front LED light bar wires to some of the steering components!)
Heat Shrink Tubing
An absolute must have in my opinion. There are two main types – plain and pre glued. The plain are the main one you would use, while the pre glued are great if you have to over sleeve a connection to make it waterproof. As you heat up the pre-glued type, the glue softens as the tube strings and bonds to the cable as everything cools. They can be a little more rigid when installed, so make a service loop in the cable. The finished covering is usually waterproof enough for brief submersion if done correctly.
Having a selection of sizes and colours is handy and assortment boxes of multiple sizes and colours can be bought on line cheaply enough. In the workshop I use an old paint stripper heat gun on low power as I find that is more controllable than a flame.
Bridging the gap… something in the future?
Although not so common in the UK, in Australia and the USA wild camping (boon docking) is probably as popular as campsites. To this end trailers and caravans usually have much larger battery capacities than anything found in Europe. It’s not uncommon to find outfits with 600 to 800Ah battery banks recharged mainly be solar, buy increasingly (especially in Australia) an additional bridge between tow vehicle and trailer is made using heavy duty “Anderson” connectors and cables capable of supplying upwards of 60 Amps from the vehicle to the leisure battery bank.
With the cost of lithium batteries reducing almost daily, I can foresee very soon that light weight lithium batteries will be installed in caravans. The down side of this currently and trying to retrofit Lithium is the existing charging setup of current European vans is not really suitable for looking after these type of batteries. We have a Sterling Power Wildside unit installed in our caravan which allows us to charge any type of battery chemistry, including lithium when connected to the tow vehicle. The draw back is the caravan’s inbuilt charger is only capable of wet lead acid or AGM. I think that a high capacity DC to DC charger installed in the vehicle and an additional cable to supply the caravans battery banks may not be too far away. It’s something you might want to keep in mind for the future. It’s something I’m looking into currently.
Well, that’s a bit longer than I anticipated and there is still a few things to cover. If you made it this far…. take a toffee out of the jar… well done! If you think I missed something or would like me to cover something specific, drop me a comment below.
Sometimes things you take for granted and have in your toolbox of fault-finding tricks are a dark art to others.
I was talking someone through a bit of fault-finding on their vehicle and asked if they had measured the current in the circuit. “No” came back the answer. I asked what type of fuse and rating it was and asked the person to just put their voltmeter across the fuse and tell me the voltage across the fuse. “Ah… that’s about 3.2 amps then” I said.
“How do you know that?”
Simple really – all fuses have a resistance and if you know that you can work out the current from the voltage drop. Even simpler really – there are tables for various fuses that have it all worked out for you. I have a selection collected over the years stuffed into the lid of my tool box, along with a lot of other junk paperwork!
I created a volt drop table based on PEC (Pacific Engineering Corporation) fuses that are supplied as OEM fuses in most Japanese, Korean and European vehicles however it is pretty accurate for almost all other makes of the same type of fuse. I printed mine out, laminated them and added them to the collection in the top of my toolbox.
It’s quite easy to use. Just set your multimeter to read DC mV and read the voltage displayed. Now select the fuse type, in this case an ATO fuse – the most common used in vehicles, caravans and motorhomes and from the chart look down the left column until you see the voltage measurement that matches the one on your multimeter… lets say 0.011 volts (11mV)
The fuse is a red 10 Amp fuse so follow the 0.011 volt line across until you get to the 10 Amp fuse column and read the current figure… in this case 1.3547 or 1.3 Amps. It’s as easy as that, no need to break the circuit to put your multimeter in as an Ammeter.
I have a couple of these cheap handy plug-in ammeter’s… although they do have limitations and only work up to 20 Amps.
Although the table is based on PEC ATO/ATC and MINI fuses (download info below) it is pretty close with most manufacturers fuses and as a general reference for fault-finding will be good enough to 0.1 amp.
If you need to know the actual current through a circuit, you need to use an ammeter and not rely on tables but for general work they are close enough.
These tables also come in handy if you are trying to find out why a battery is draining. Without turning anything on it is easy to run through a fusebox checking to see if any circuits have a current drain on them without having to constantly pull fuses and insert an ammeter, which sometimes can upset or reset the circuit you are working on.
One thing to remember with this test if you’re tracing a fault, is you are only measuring the volt drop across the fuse to determine current. You really need to know how much current you should be drawing. For example, If I was testing the 12 volt fridge circuit fuse and I only got a voltage drop across the fuse that calculates to 6 Amps then I’d know there was an issue somewhere along the circuit as I’d be expecting around 10 Amps or more.
A word from our Safety Officer…
Oscar would like to remind you that working on a live circuit has risks and never attempt to undertake volt drop measurements on mains circuits. Most cheap multimeters do not have the internal protection or fused test leads. Be safe. Be like Oscar.
You can down load the table in PDF format (4 pages) and either print them out or save them to your device from the following link:Fuse Voltage Drop Table
Unfortunately due to a lot of my drawings and text being used elsewhere without credit back to CaravanChronicles.com I’ve had to start putting watermarks on a lot of things. I hope this doesn’t make the table too difficult to read.
P.S. Someone told me that everything on the internet can be improved by cats and my “likes” would go through the roof!
As it’s now the ‘off season’ for a lot of caravaners and thoughts turn to sorting out those problems that we put up with on the last couple off trips, I thought I’d look at cable terminations. One of the problems that I’m asked about revolves around cable termination in trailer sockets and plugs. Like most things there is a right way and a wrong way of doing it and there is also the compromise.
So what’s the problem?
Well the problem is terminating a cable to a solid metal part. You will most likely see cables that are striped down to the copper conductors and the individual strands twisted together then inserted in a hole with a screw tightened down to hold the conductors. So whats the problem with this? When you tighten the screw it’s turning obviously and the end of the screw twists down on to the strands of cable, often breaking a few off and pushing quite a few out-of-the-way, usually in an average termination about a quarter of the strands are not held under the screw tip. The 2.5mm square cable you thought would reduce volt drop for the battery charging circuit is now reduced to something less and its current carrying capacity is reduced. Is there a solution?
The obvious one would be to solder the ends of the cable to stop this happening and it’s a great solution, but is does have drawbacks. When you solder the end of a flexible cable the point where the solder stops becomes a weak point and is susceptible to vibration and flexing stress and the thin copper strands transition from being flexible to a solid mass. This is why in aviation, marine and military applications soldering is not usually permitted.
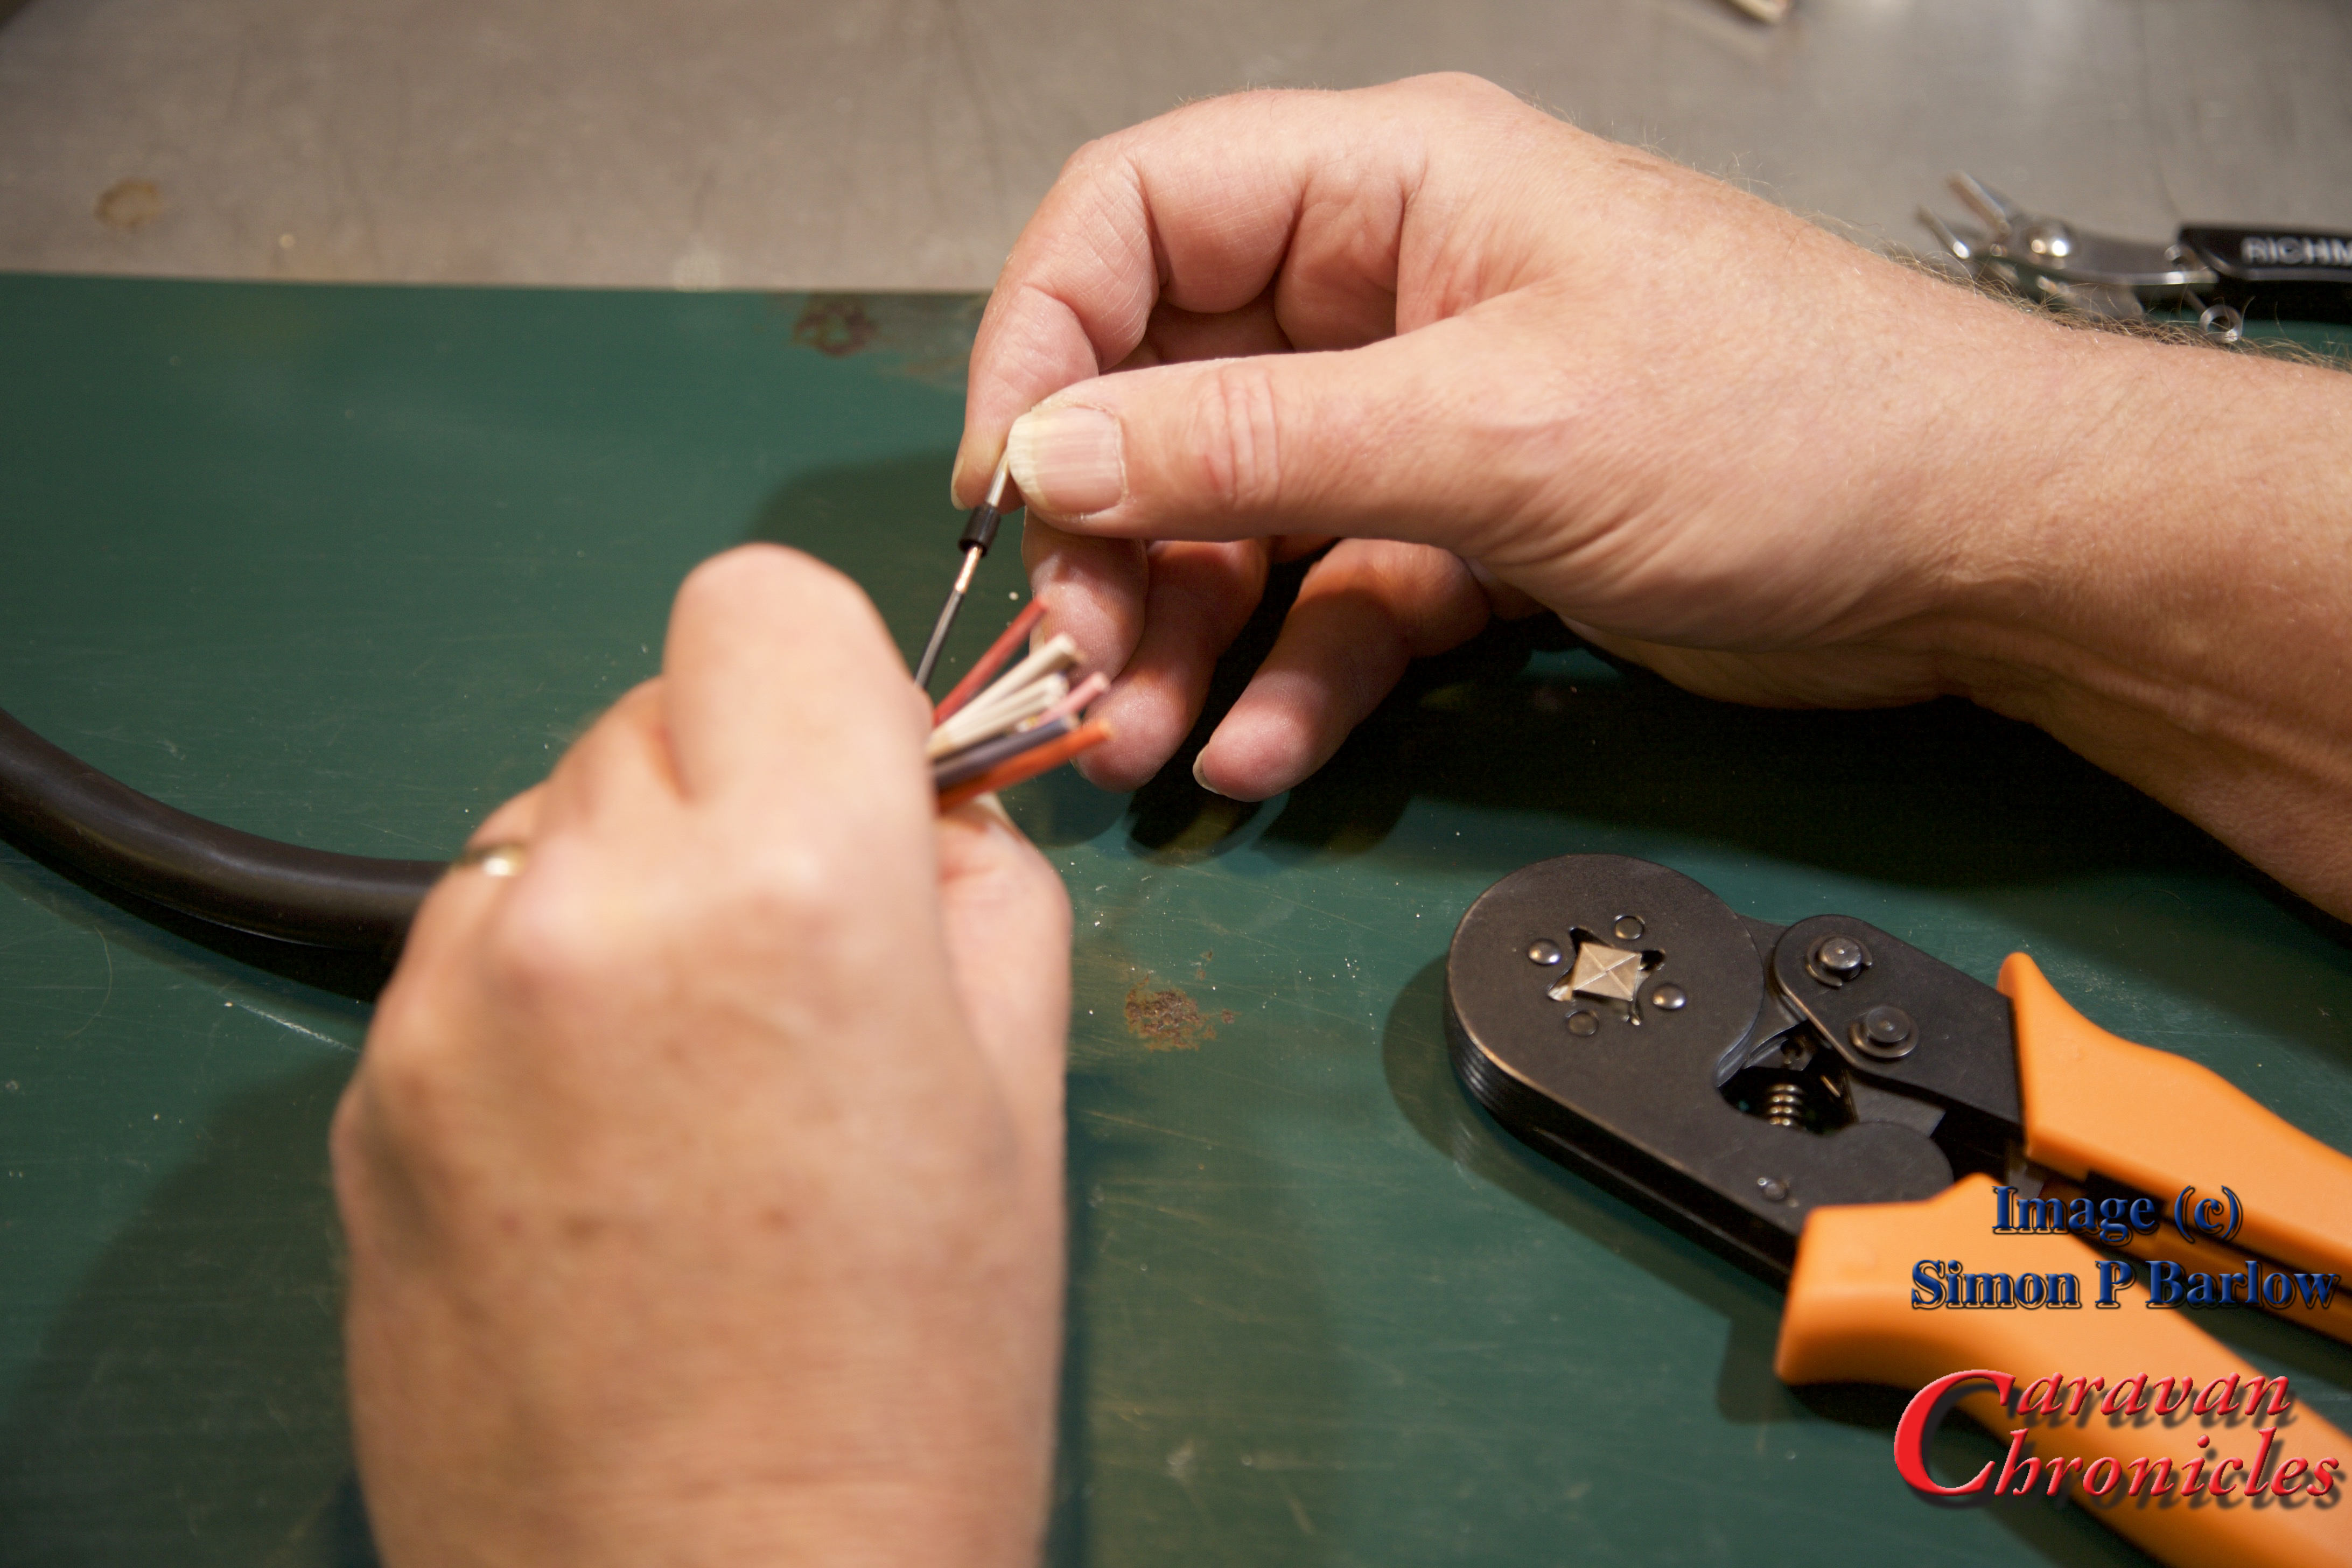
The correct way that flexible conductors should be terminated is by crimping on a “boot lace ferrule”. These are simple brass tubes, sometimes nickel-plated that are slid over the untwisted strands of the conductor and crimped tightly. Some ferrules are just small tubes or ‘U’ shaped section machine crimped and some have a plastic insulator to help isolate the conductor when several are installed in close proximity.
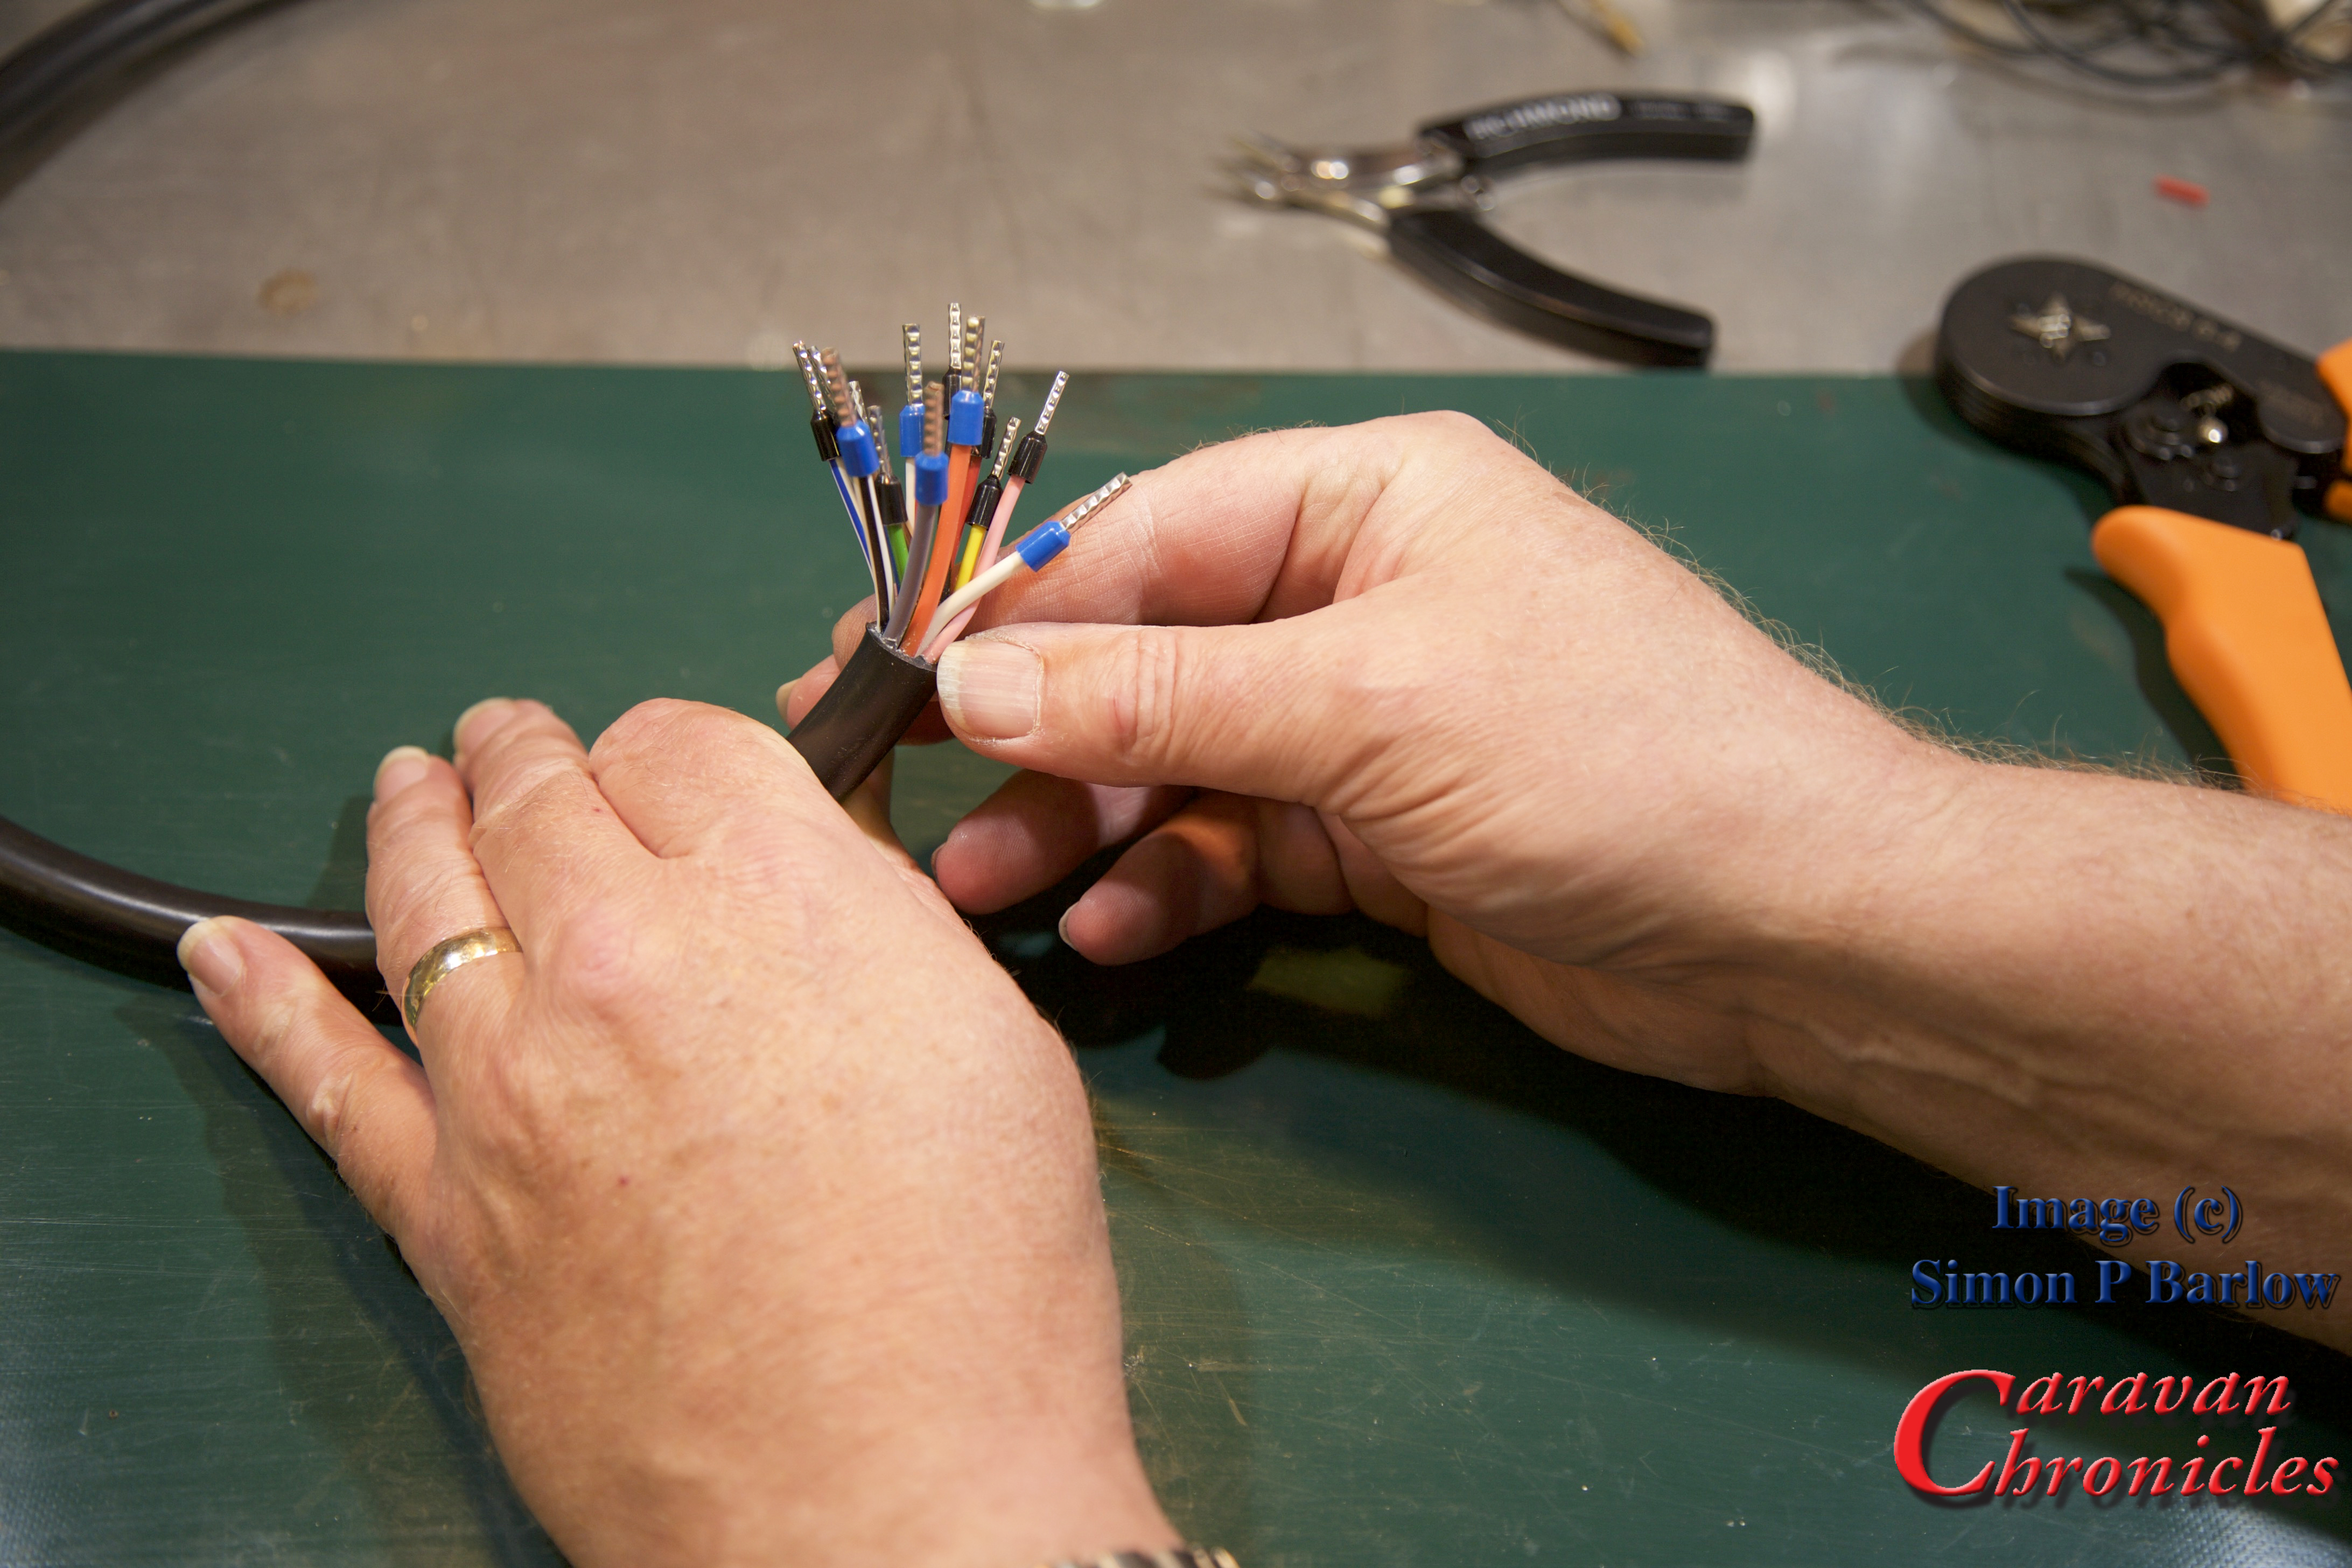
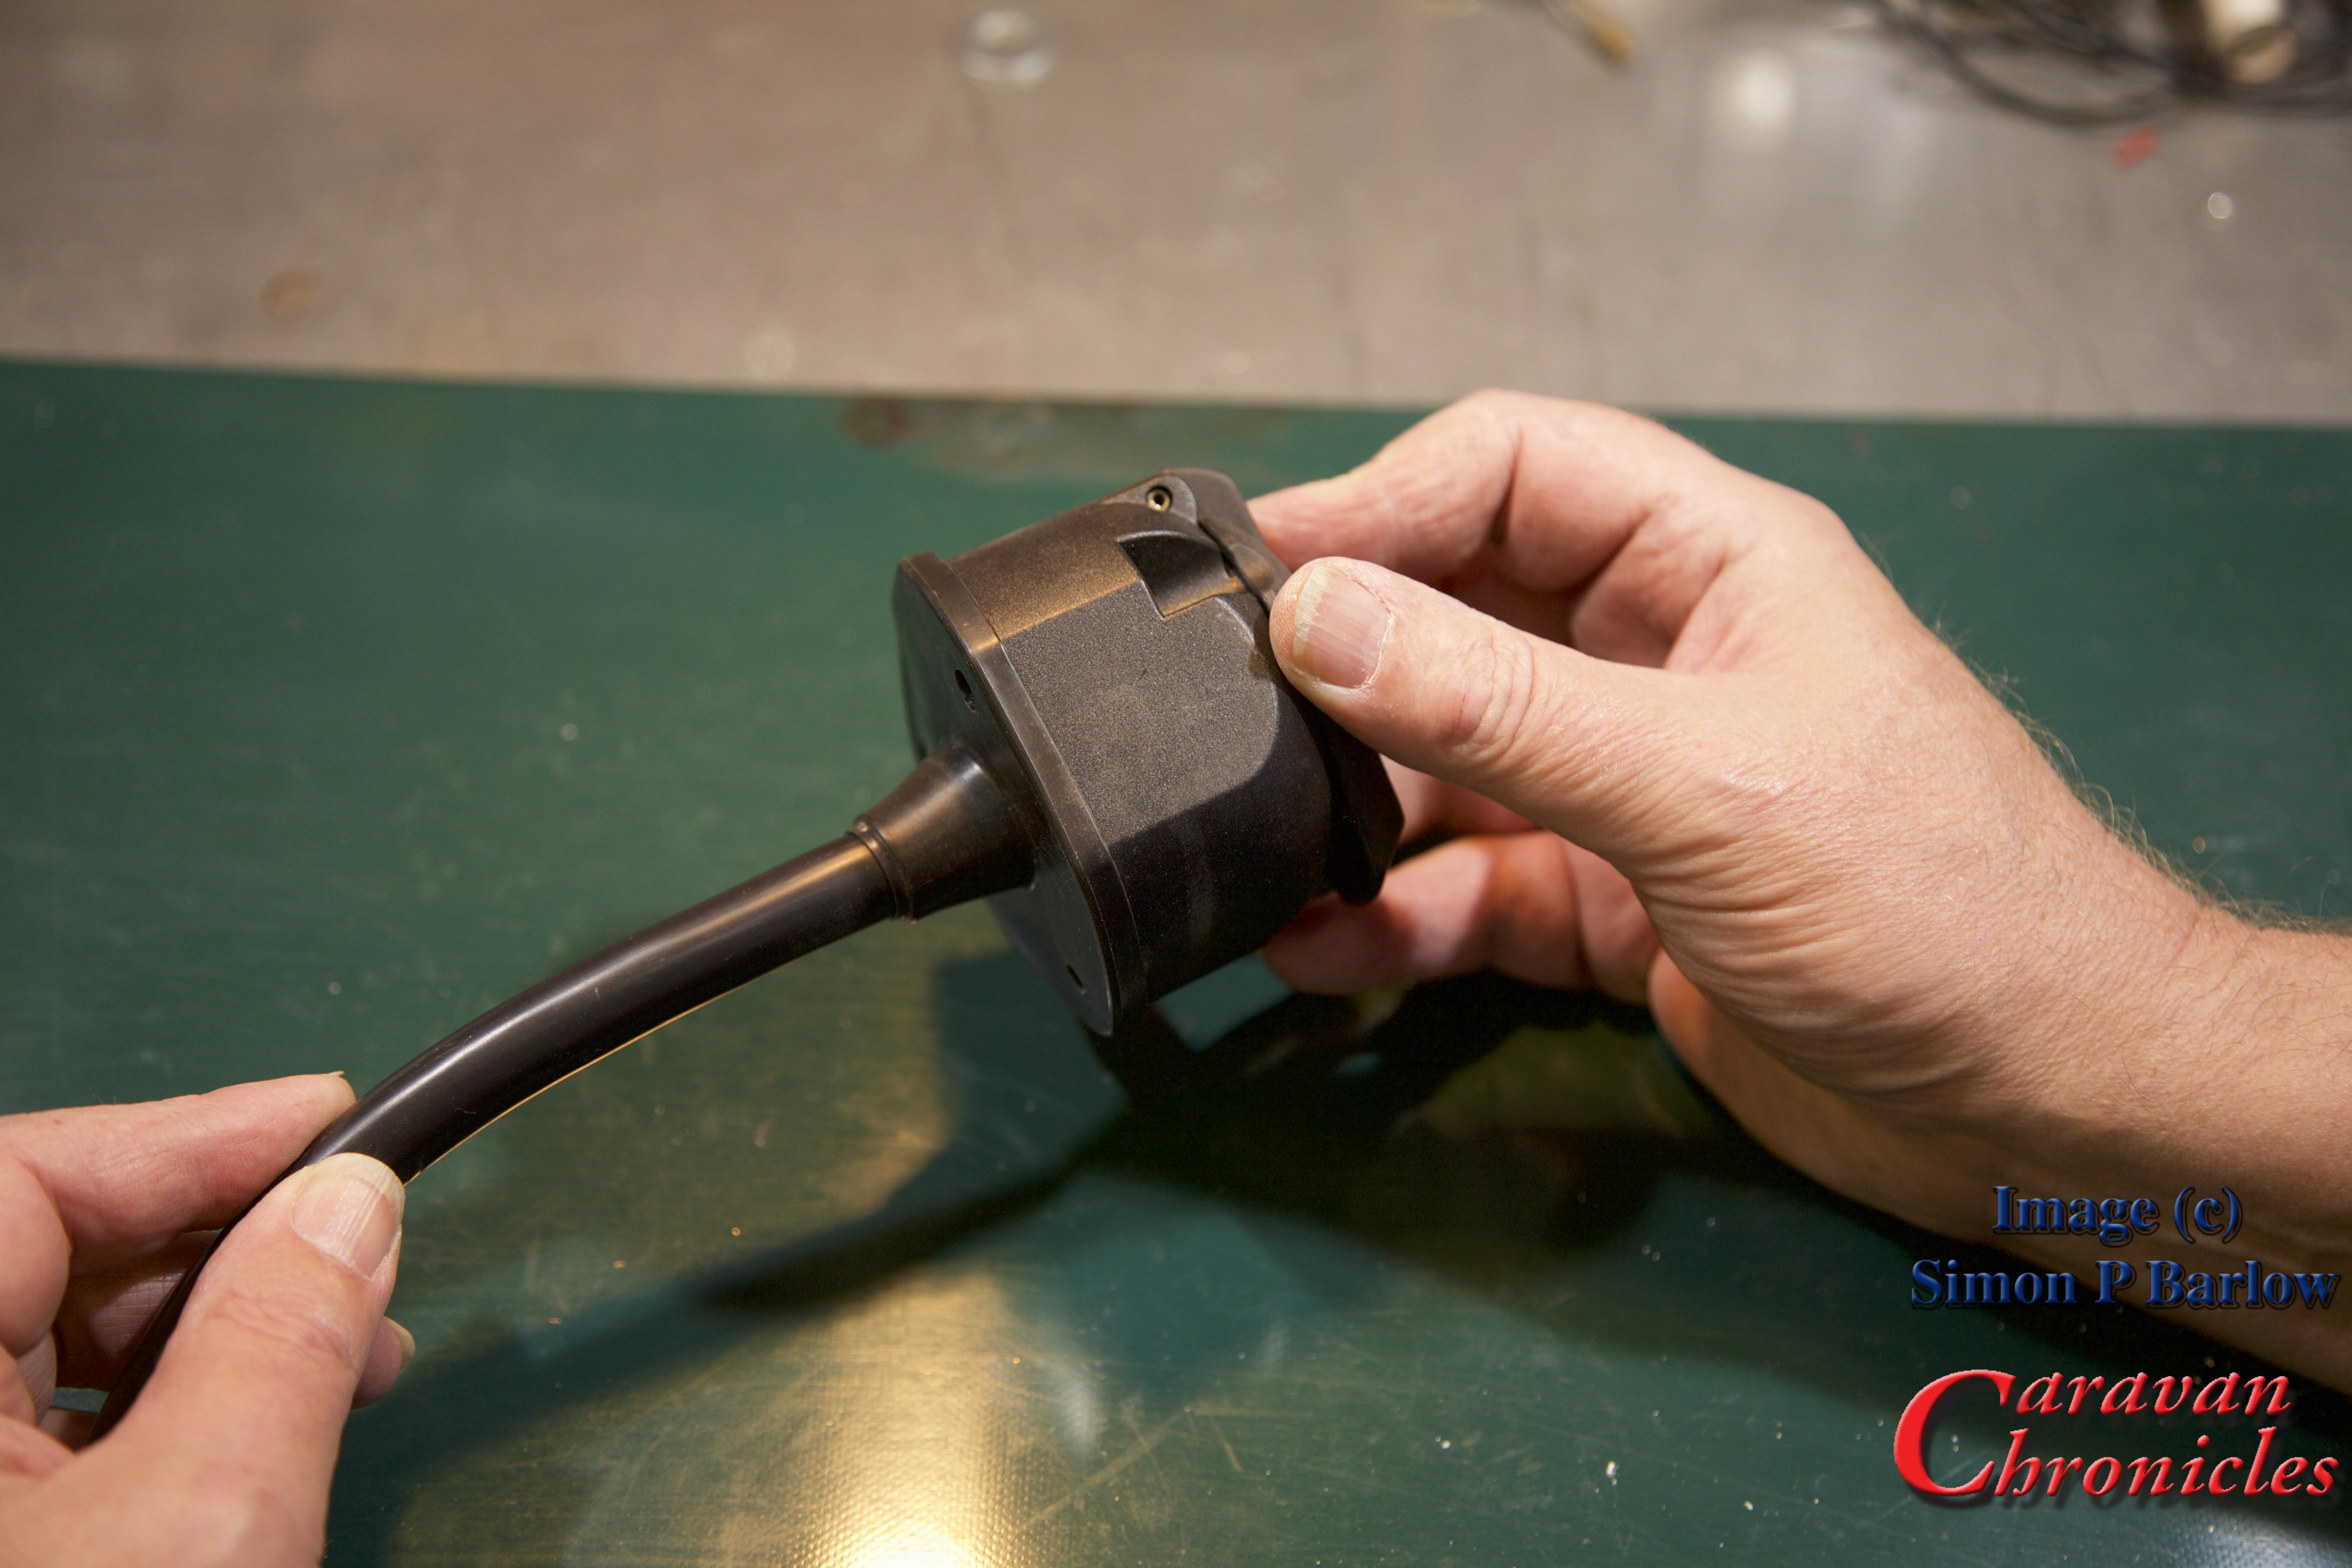
Here’s a simple step by step guide to crimping and terminating a 13 pin trailer socket. It could equally apply to a trailer plug.
For the photos I used a spare socket and short length of standard multi core cable. I have links to all the items, including tools used in the article in “Caravan Chronicles Shopping” at the end.
The tools required are a sharp knife, cable strippers, screw driver, ferrule crimps and the ferrules. (tip: make sure your screw driver is a ‘terminal driver’ with flat parallel faces and if fits snugly into the screw head. As the screws are brass, it’s easy to damage the head using the wrong screwdriver)
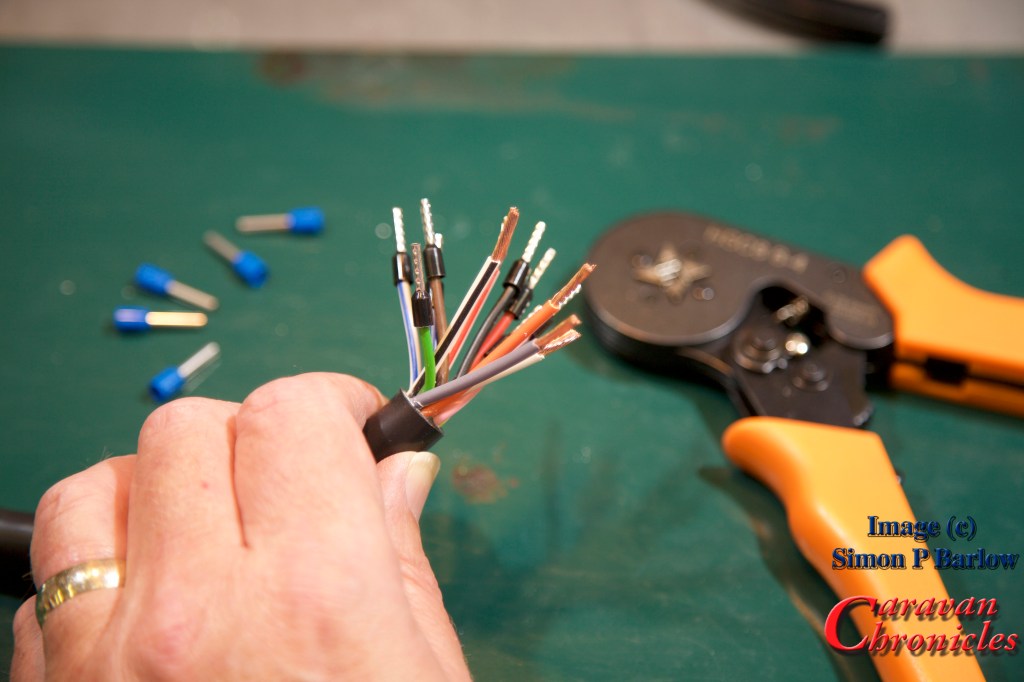
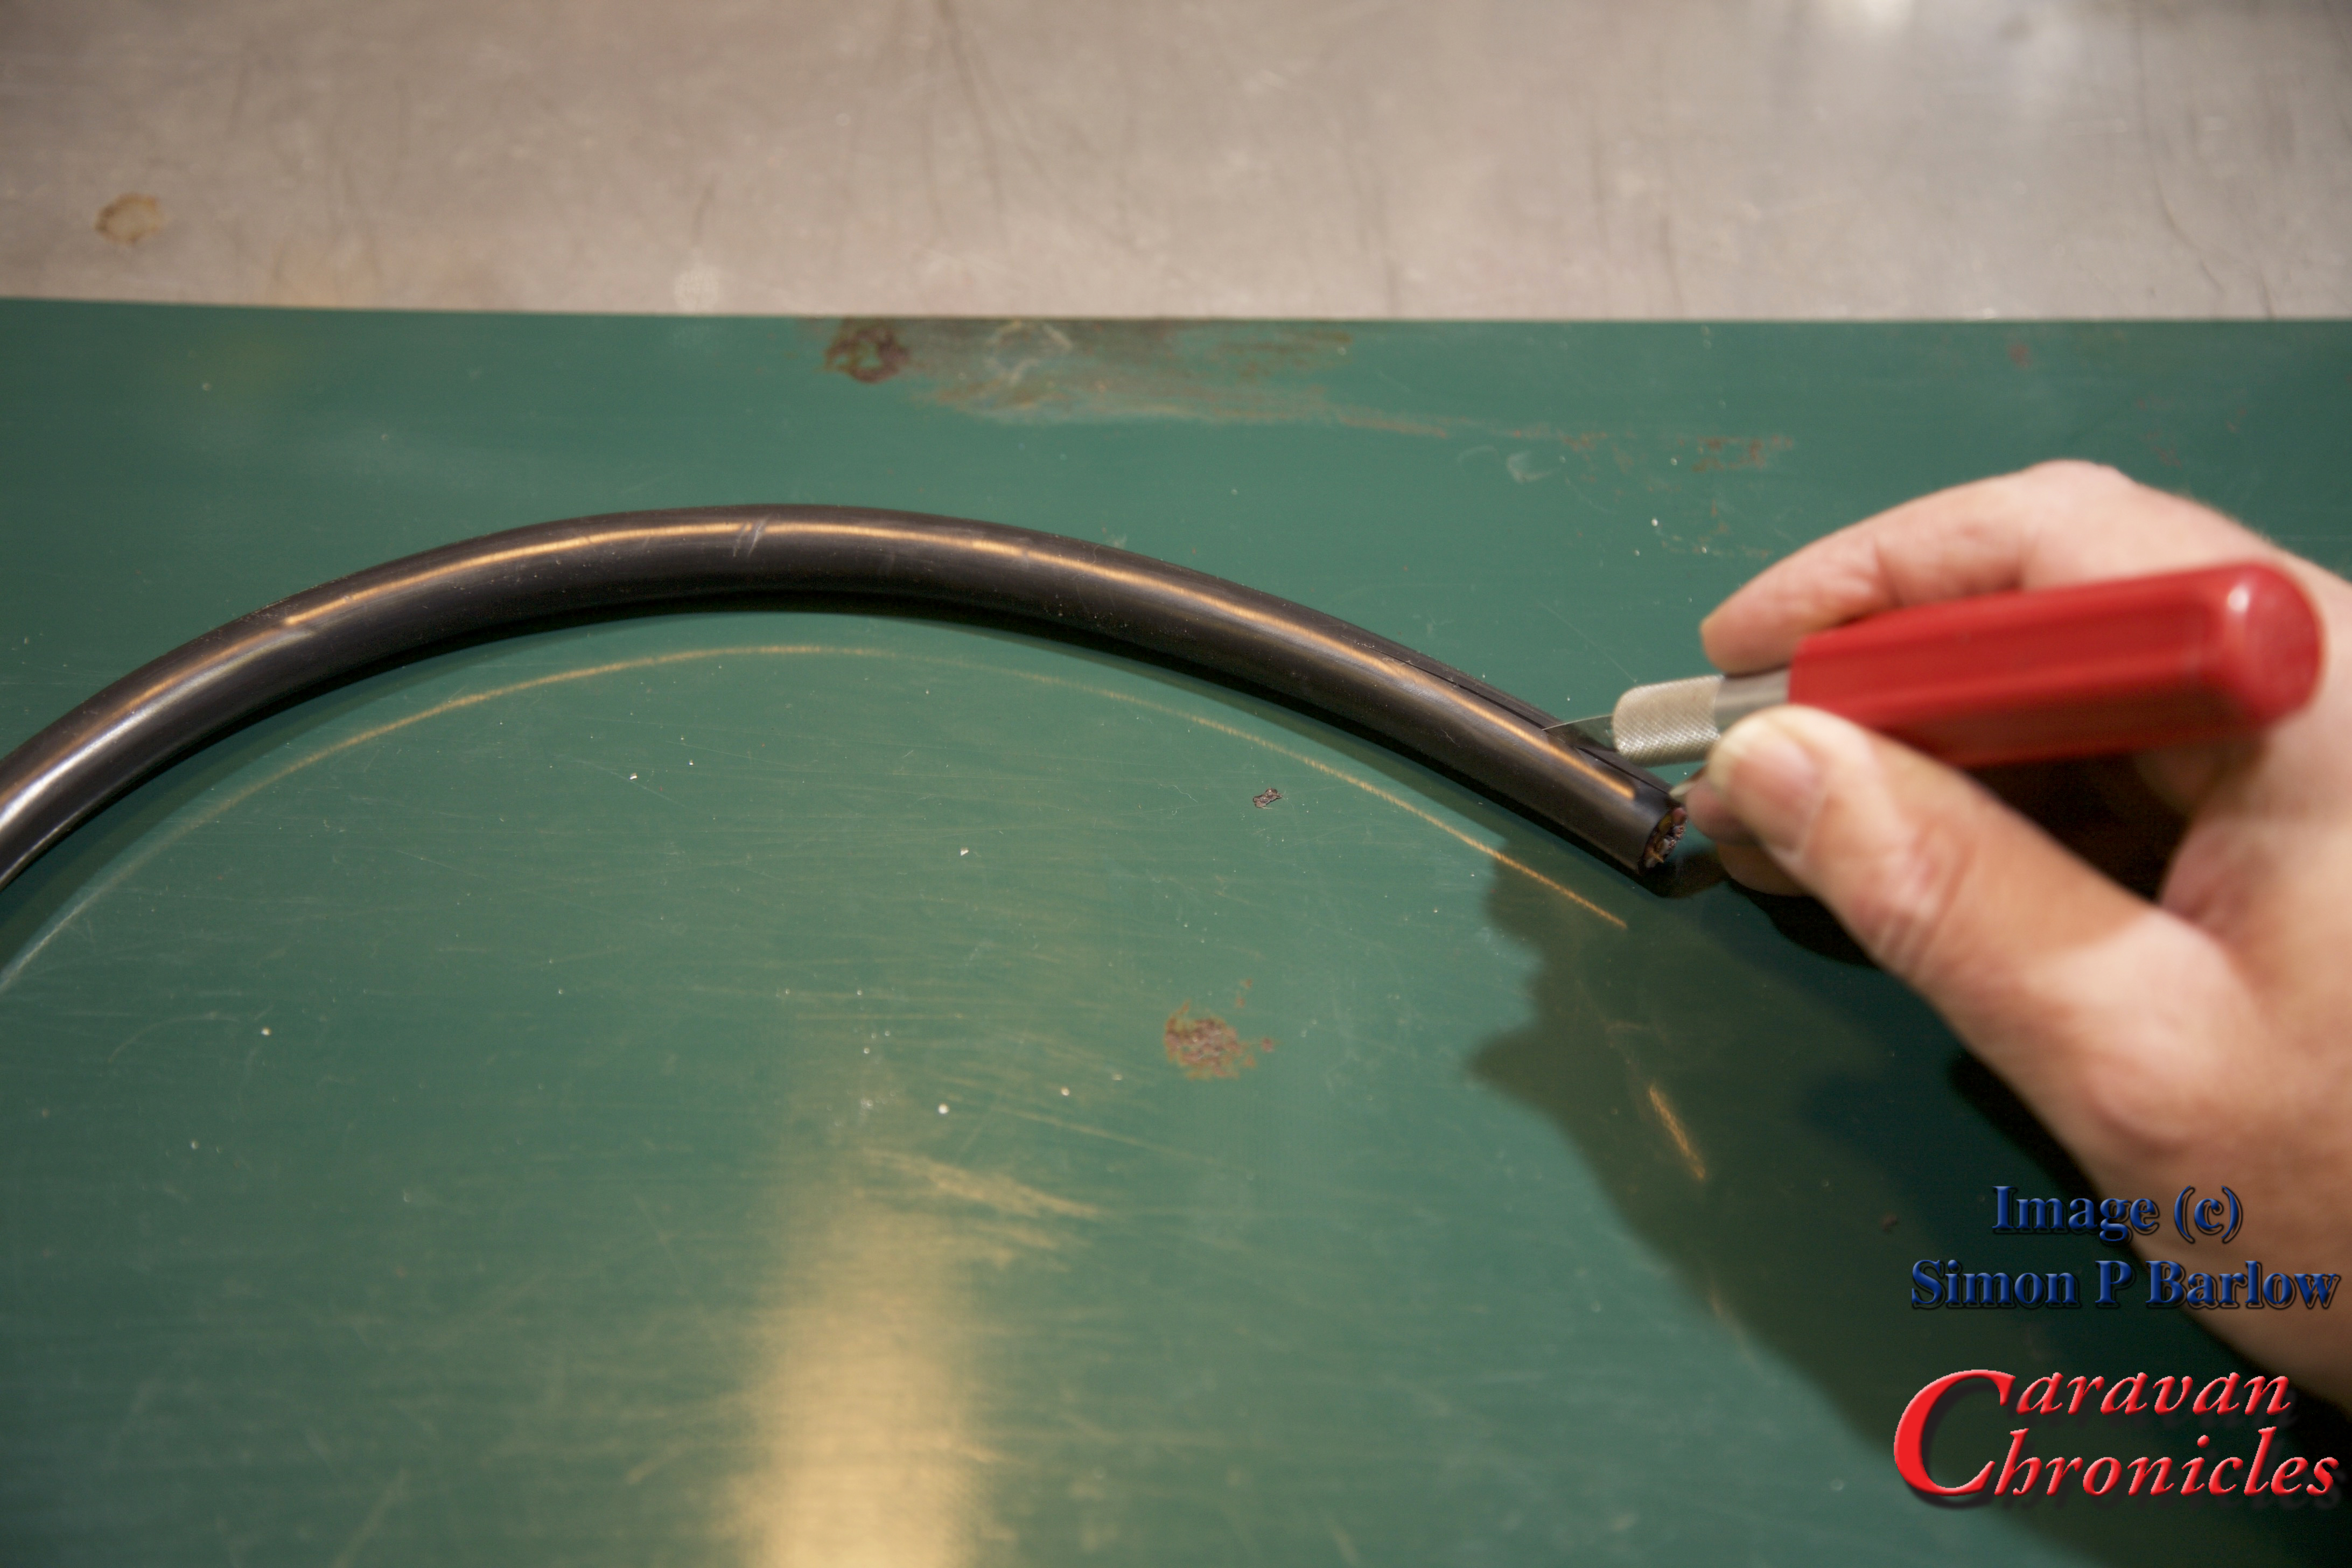
The first step is to trip back the outer cover for the cable. Strip back enough so that the individual cables are long enough to trim to length:
The next thing to check is have you got the right end of the cable? The cable manufacturers lay the individual conductors in a specific pattern so that when stripped, the pattern of colours is in the right order for the end you are terminating. If you have the incorrect end of the cable you will have to cross all the colours over each other to install them correctly in the plug (or socket) As you can see, this is the wrong end for a socket:
Ok, I’ve stripped the other end and you can see the colours are in the right ‘order’ for terminating a socket:
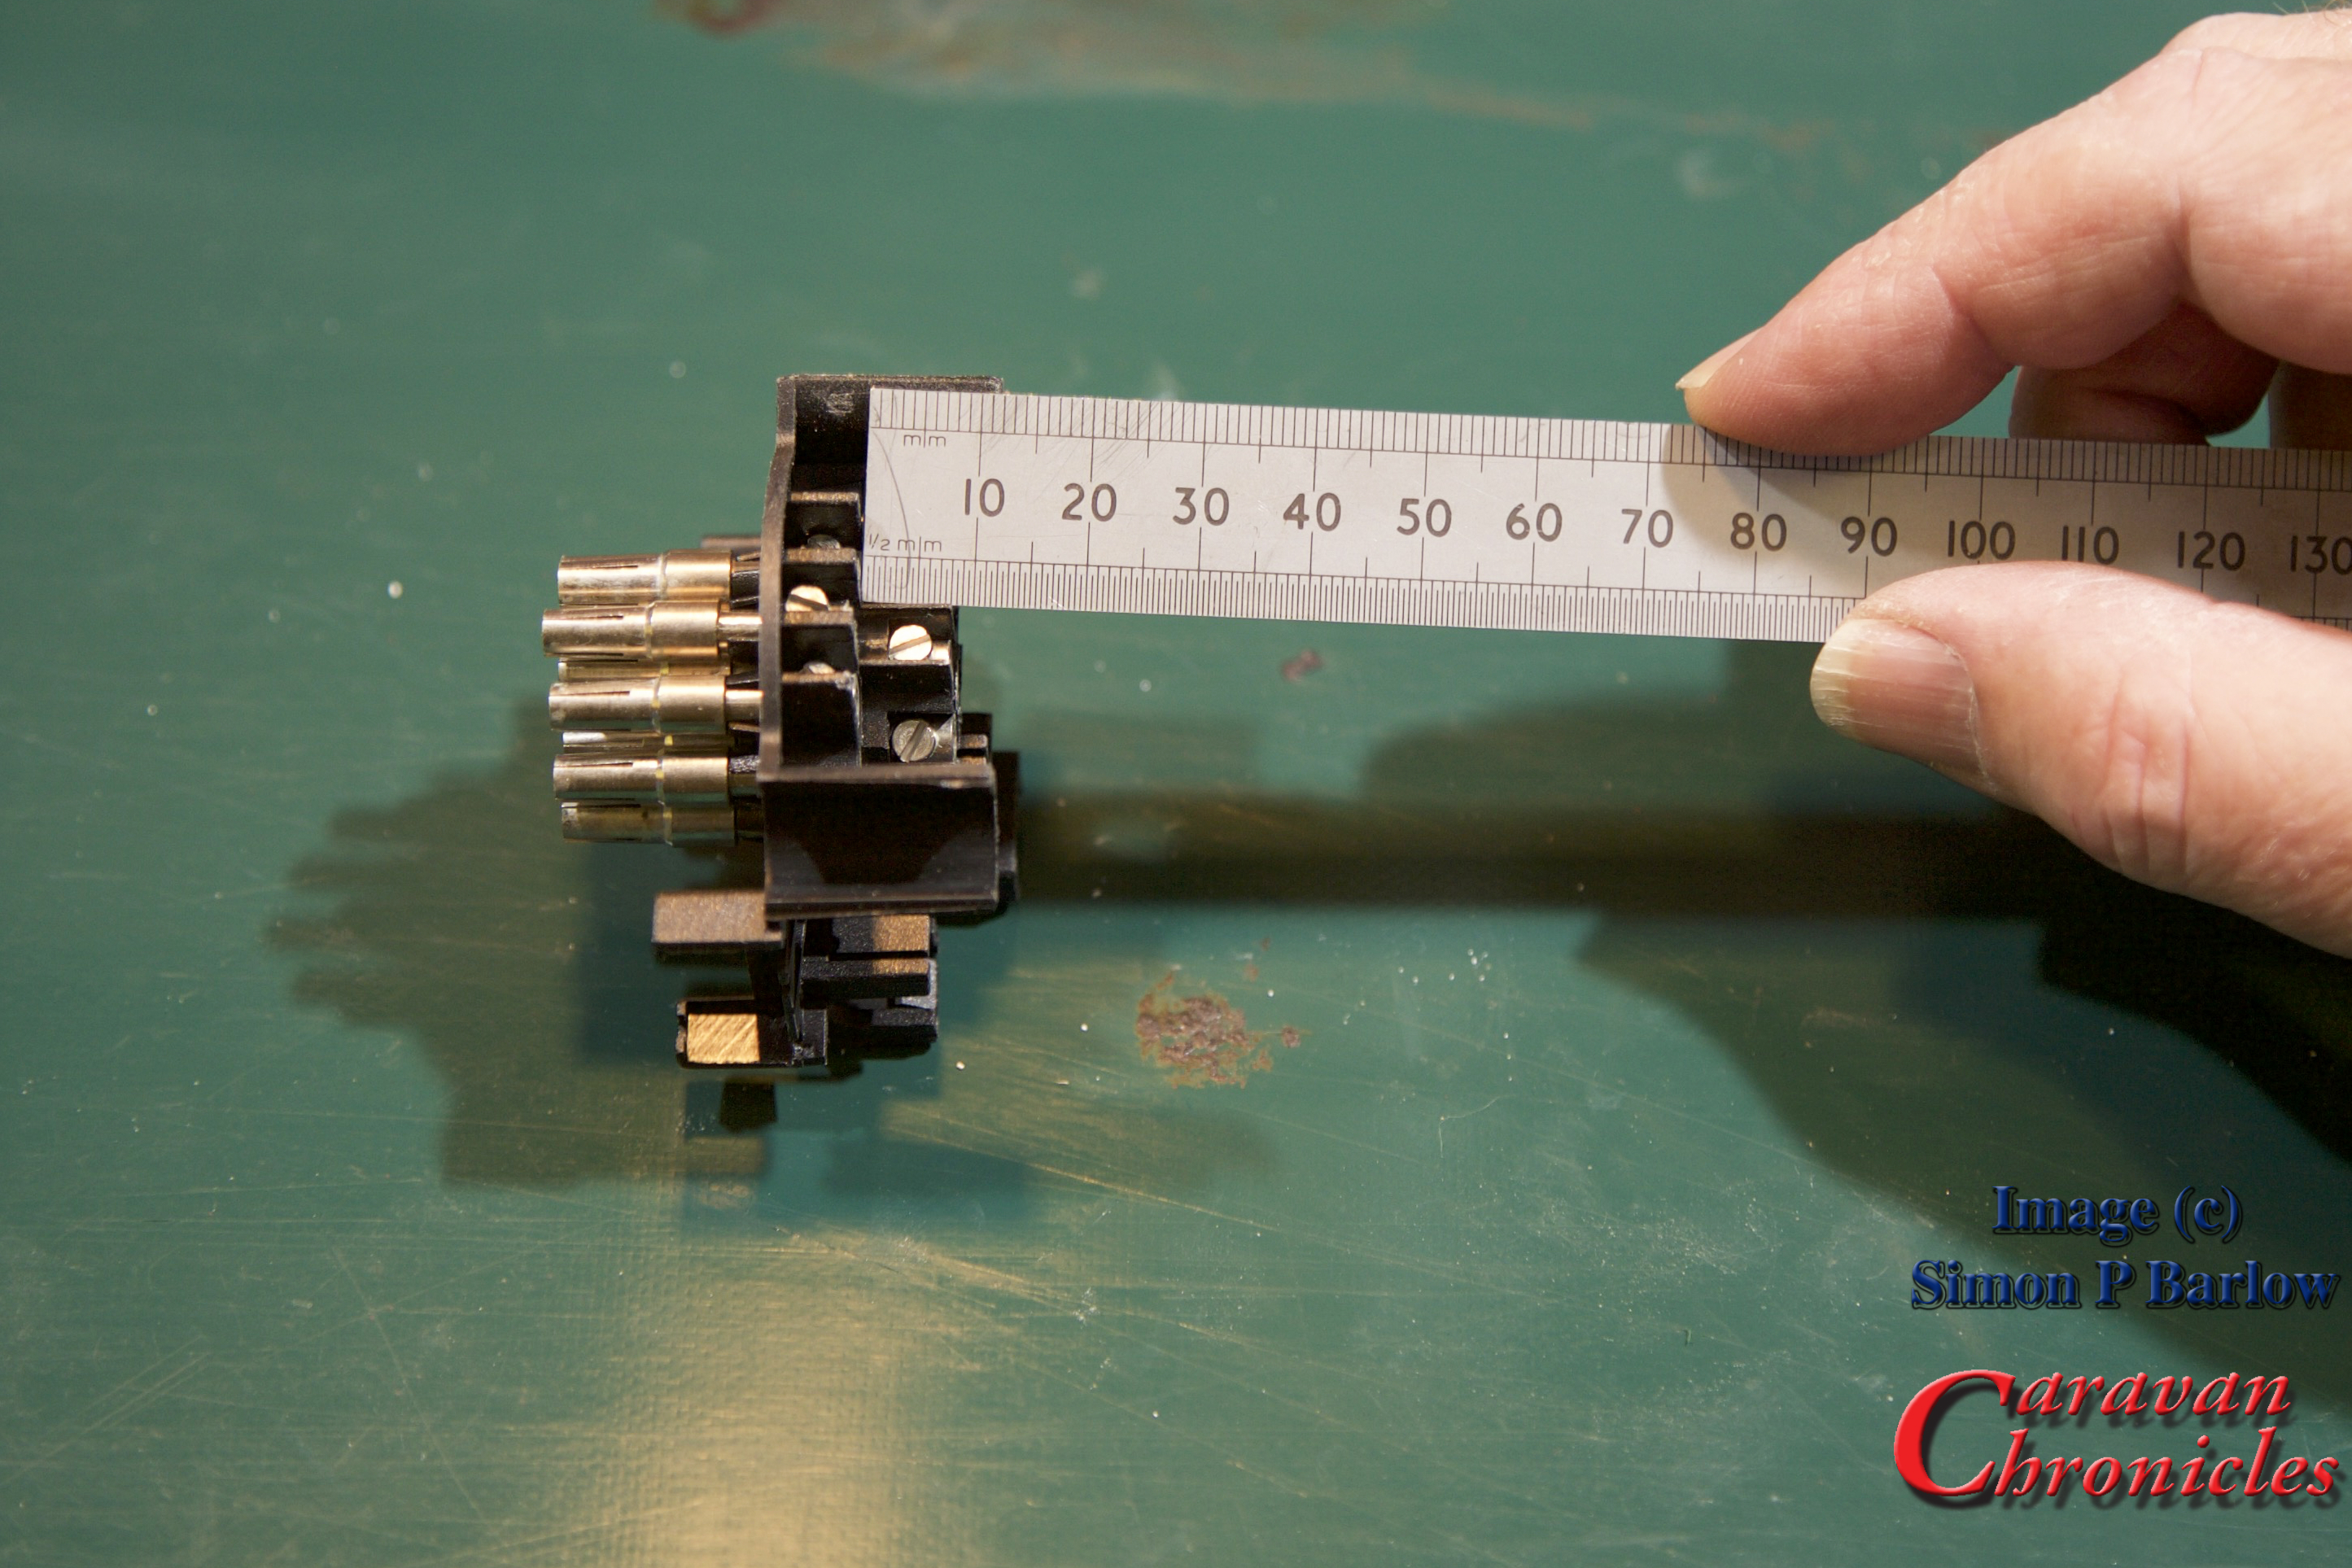
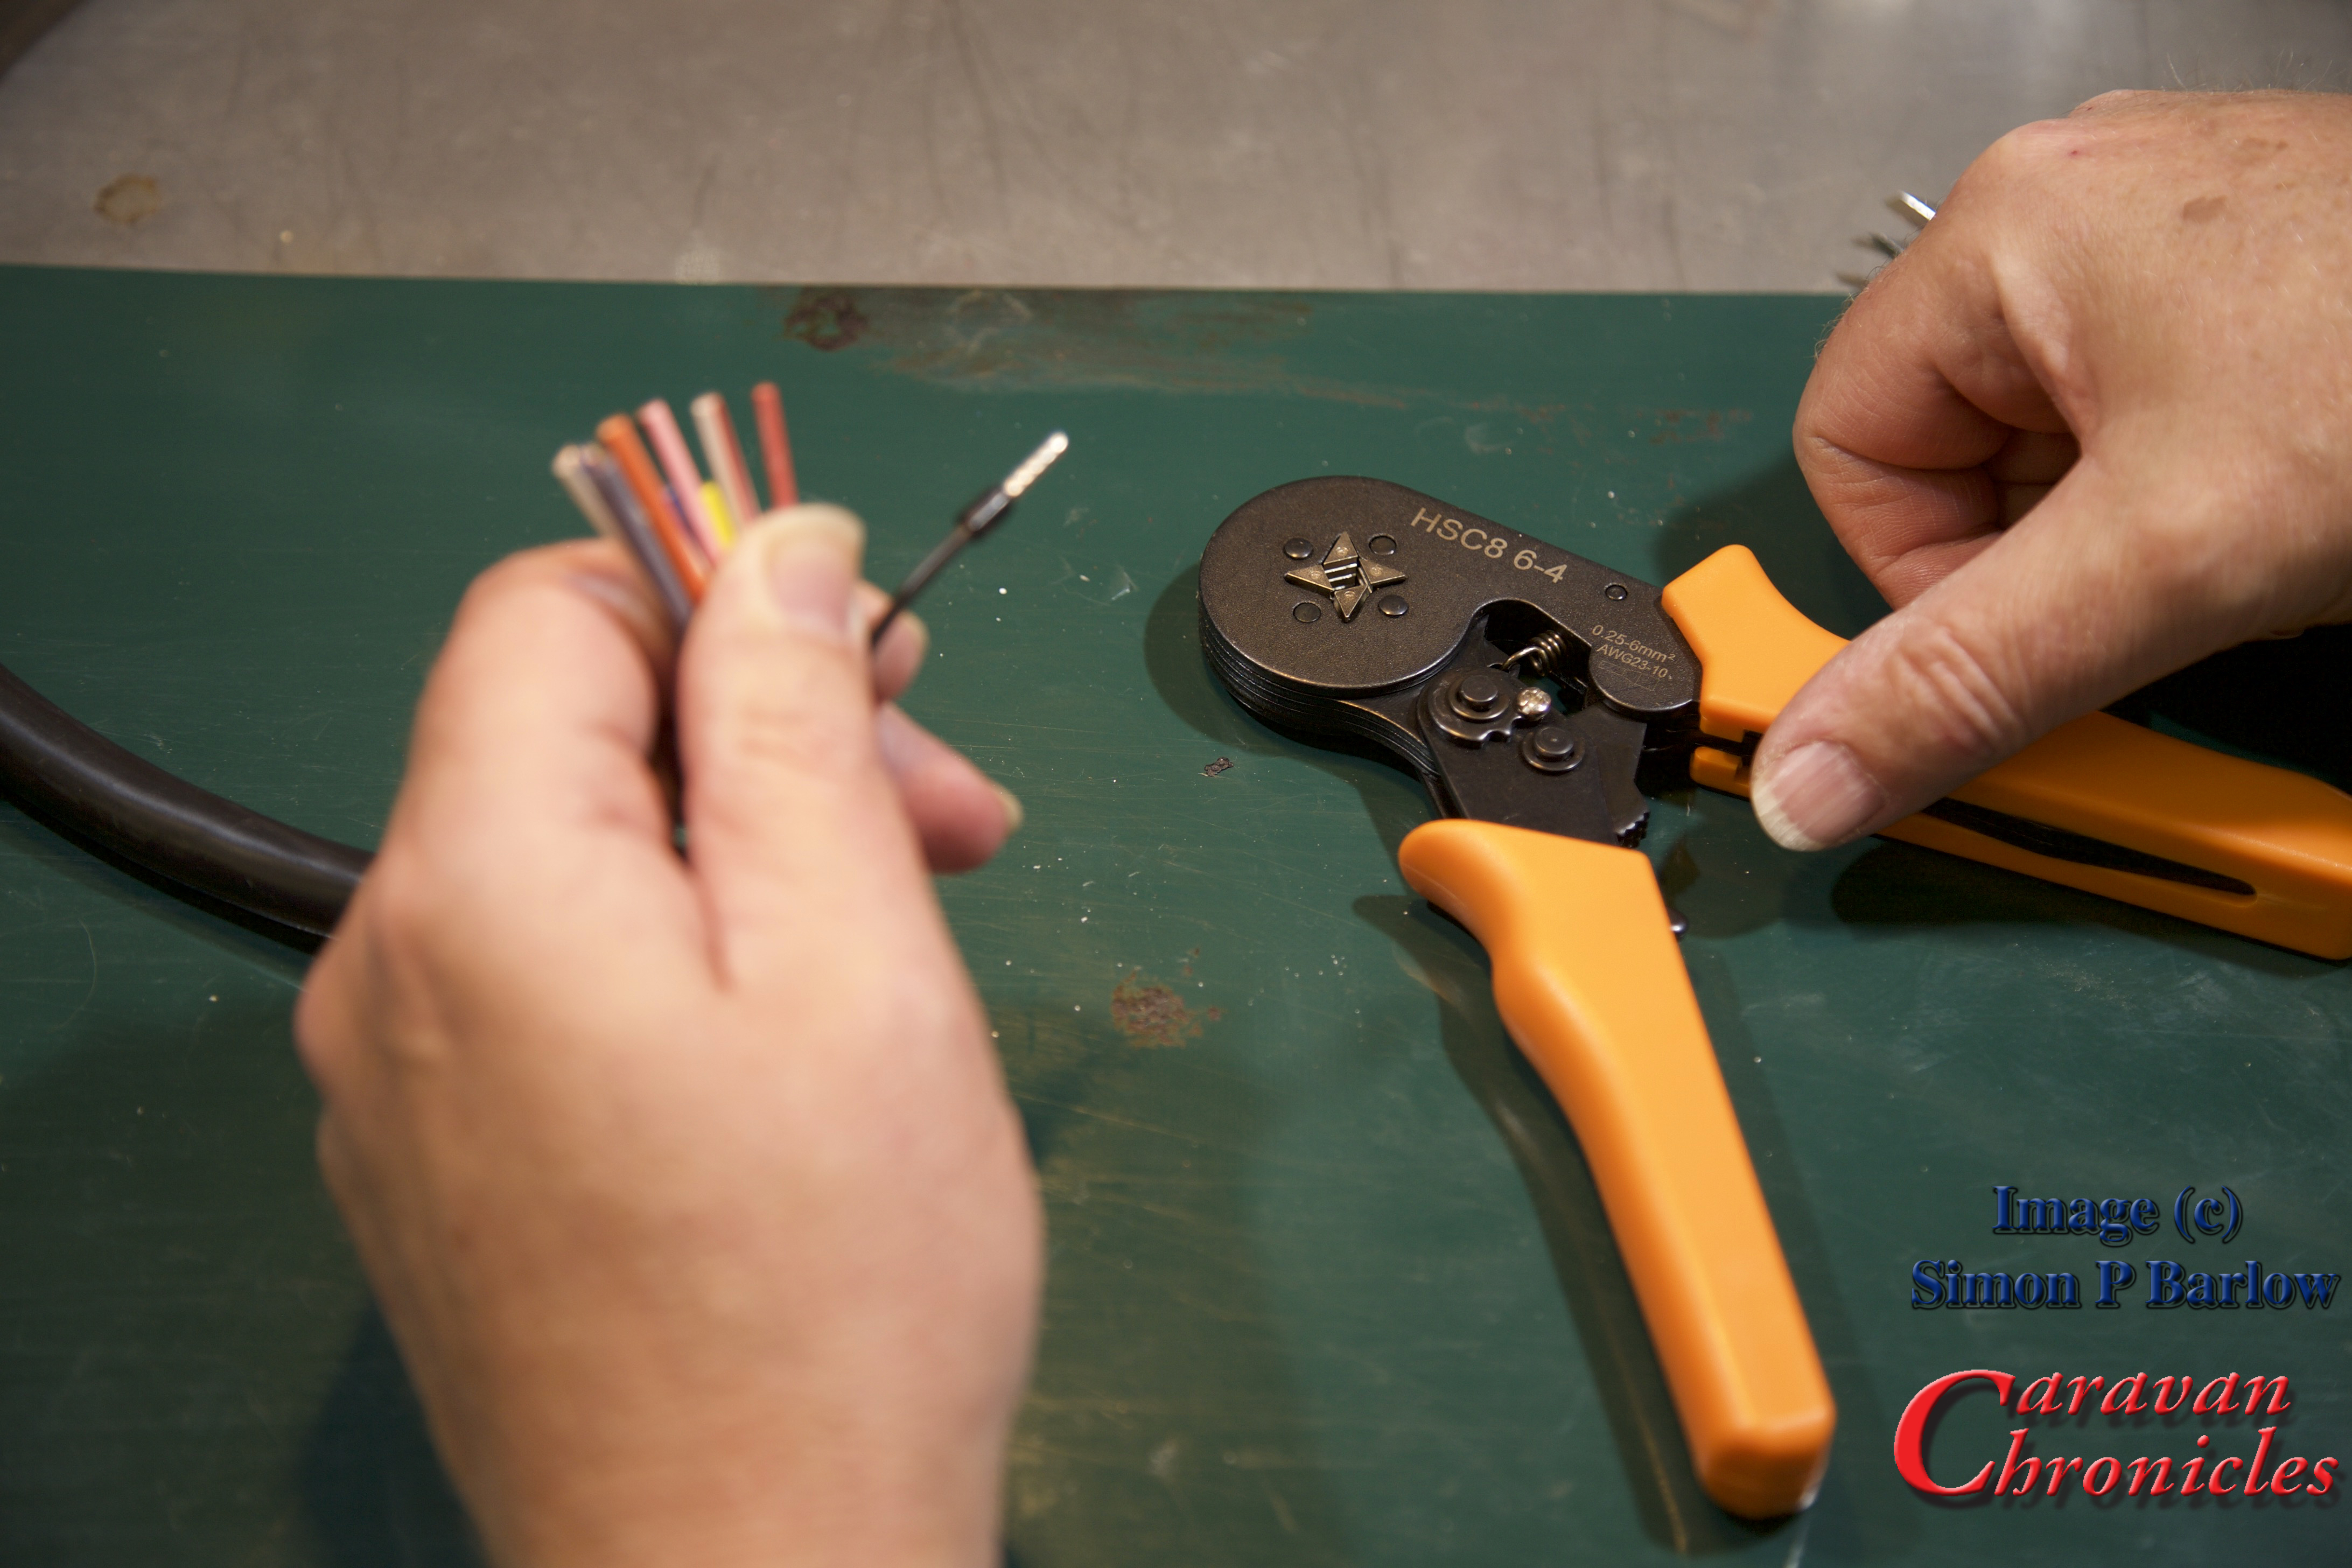
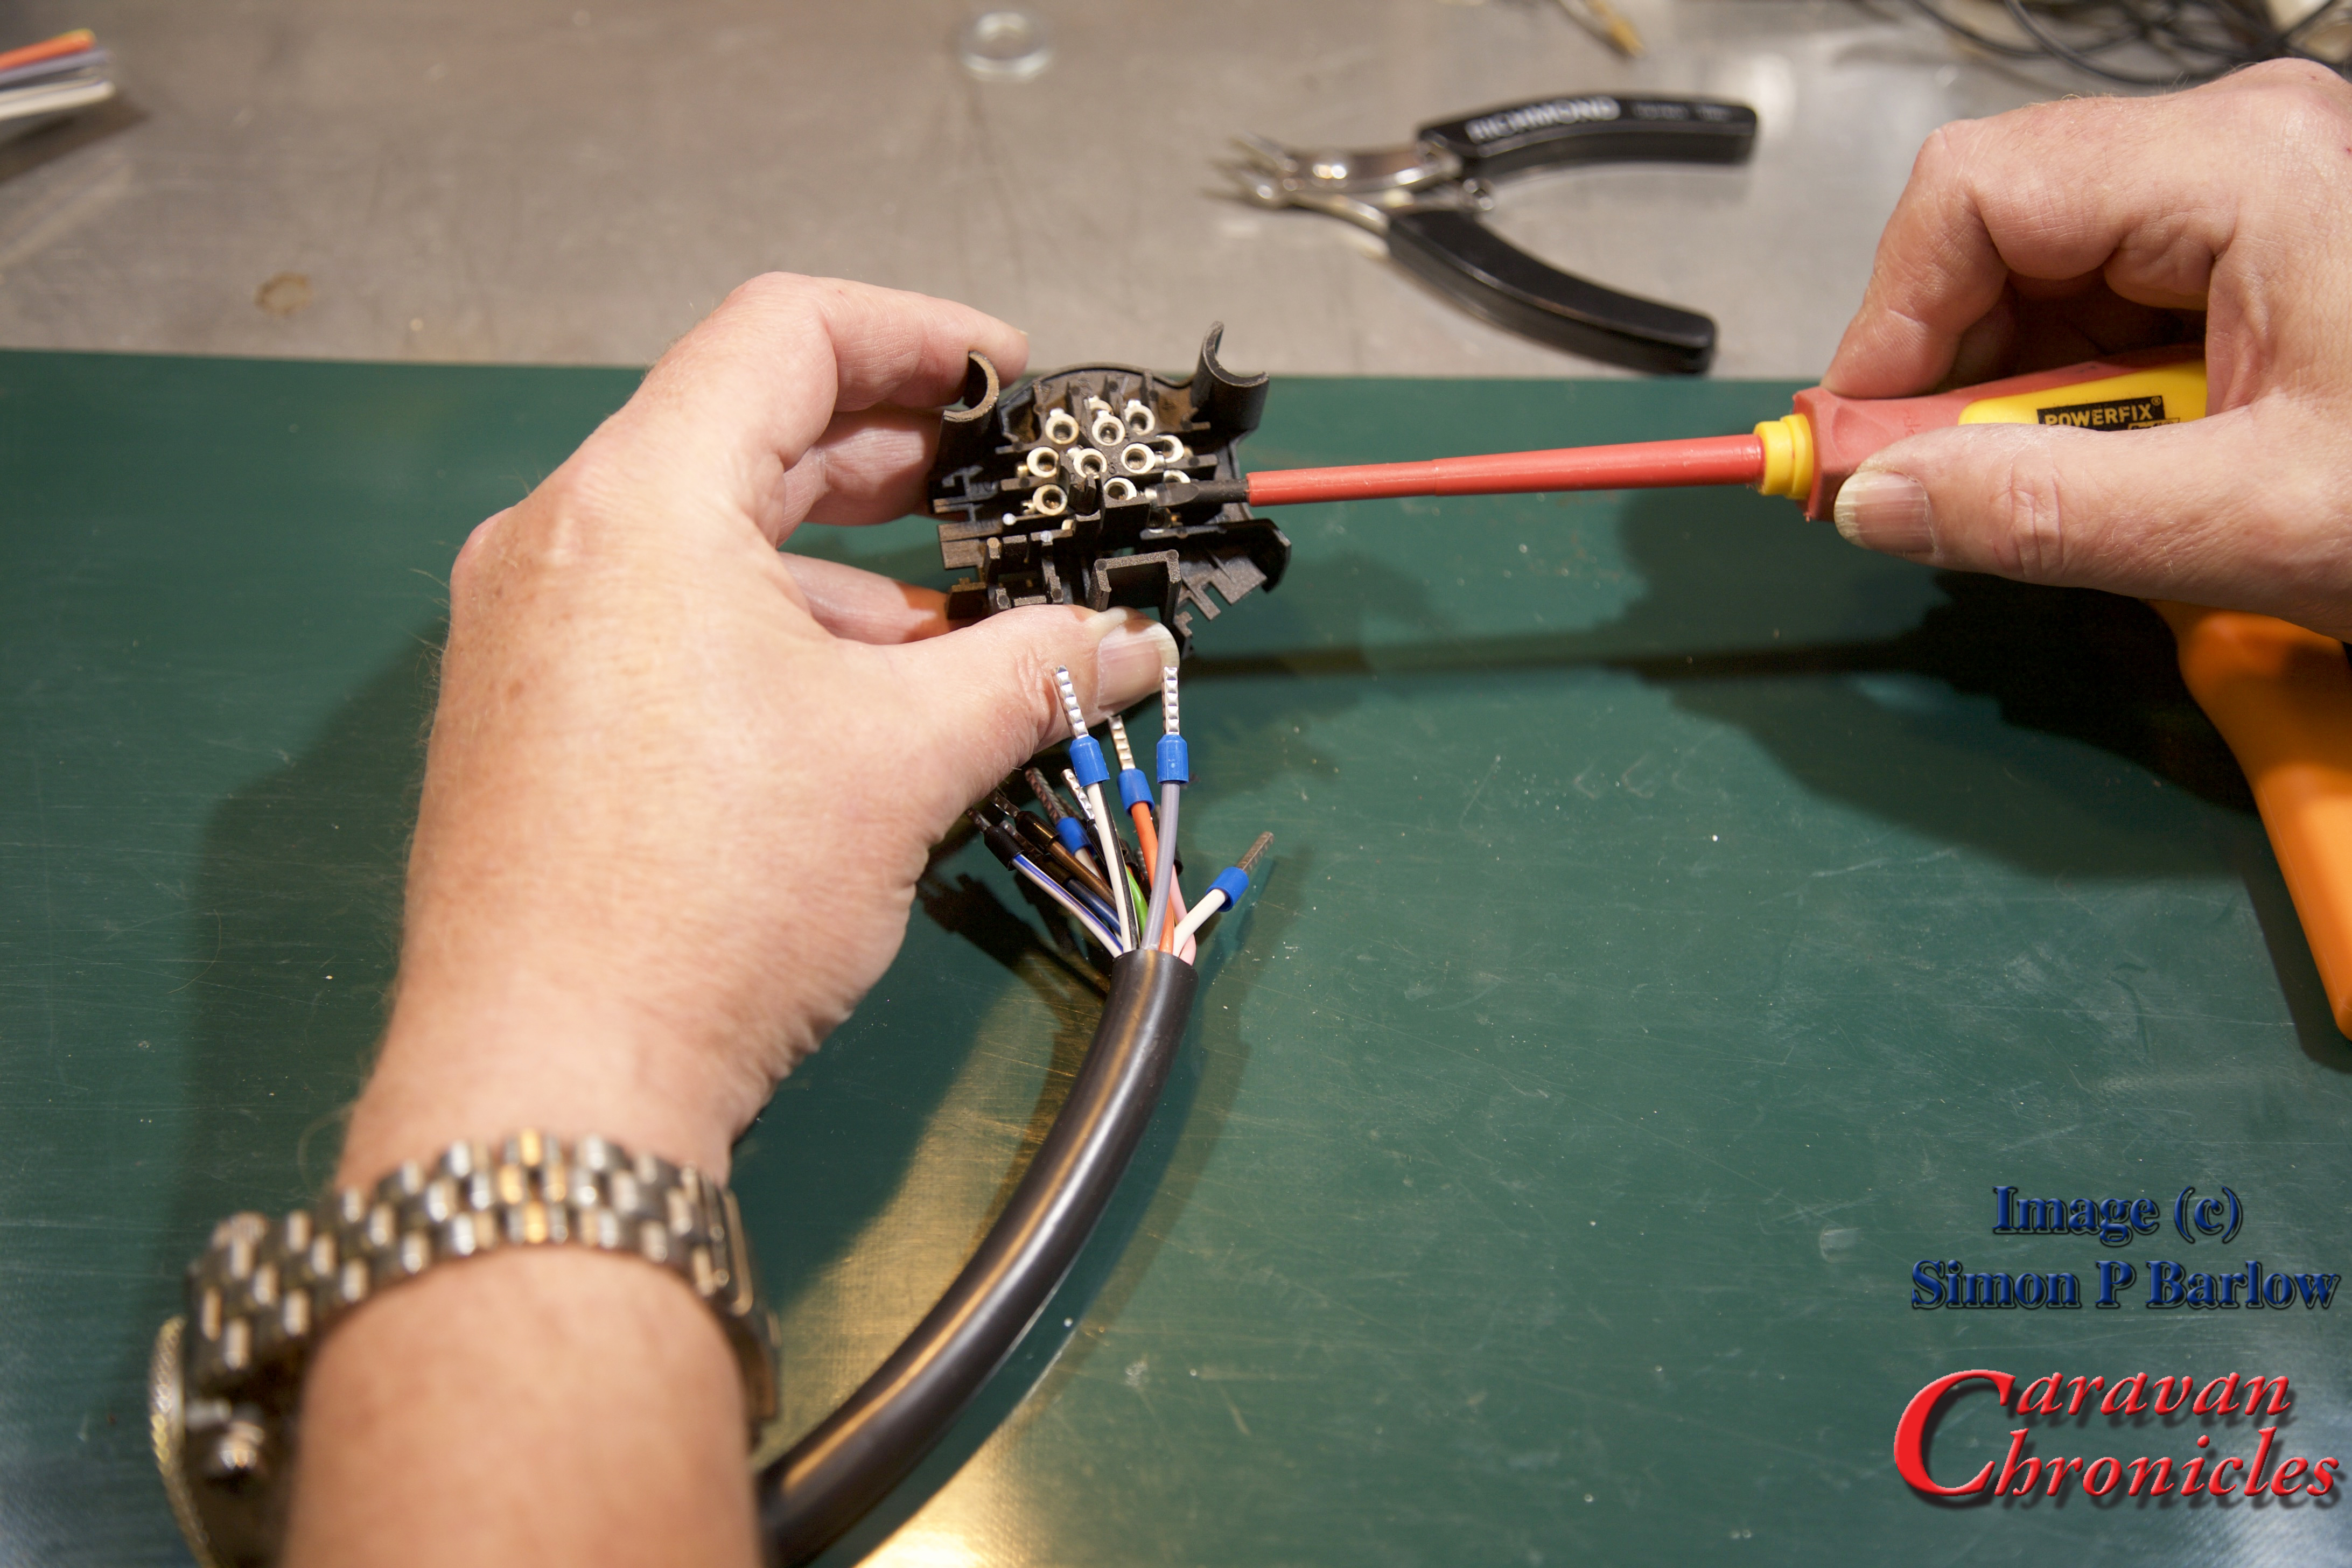
Next we need to measure the difference in termination length between the four centre line and the 9 outer pins… here it’s about 8 mm:
Measuring the back waterproofing cover I know the outer jacket needs to be a maximum of 45 mm from the 9 outer pins and the 4 inner pins need to be trimmed back to 37mm:
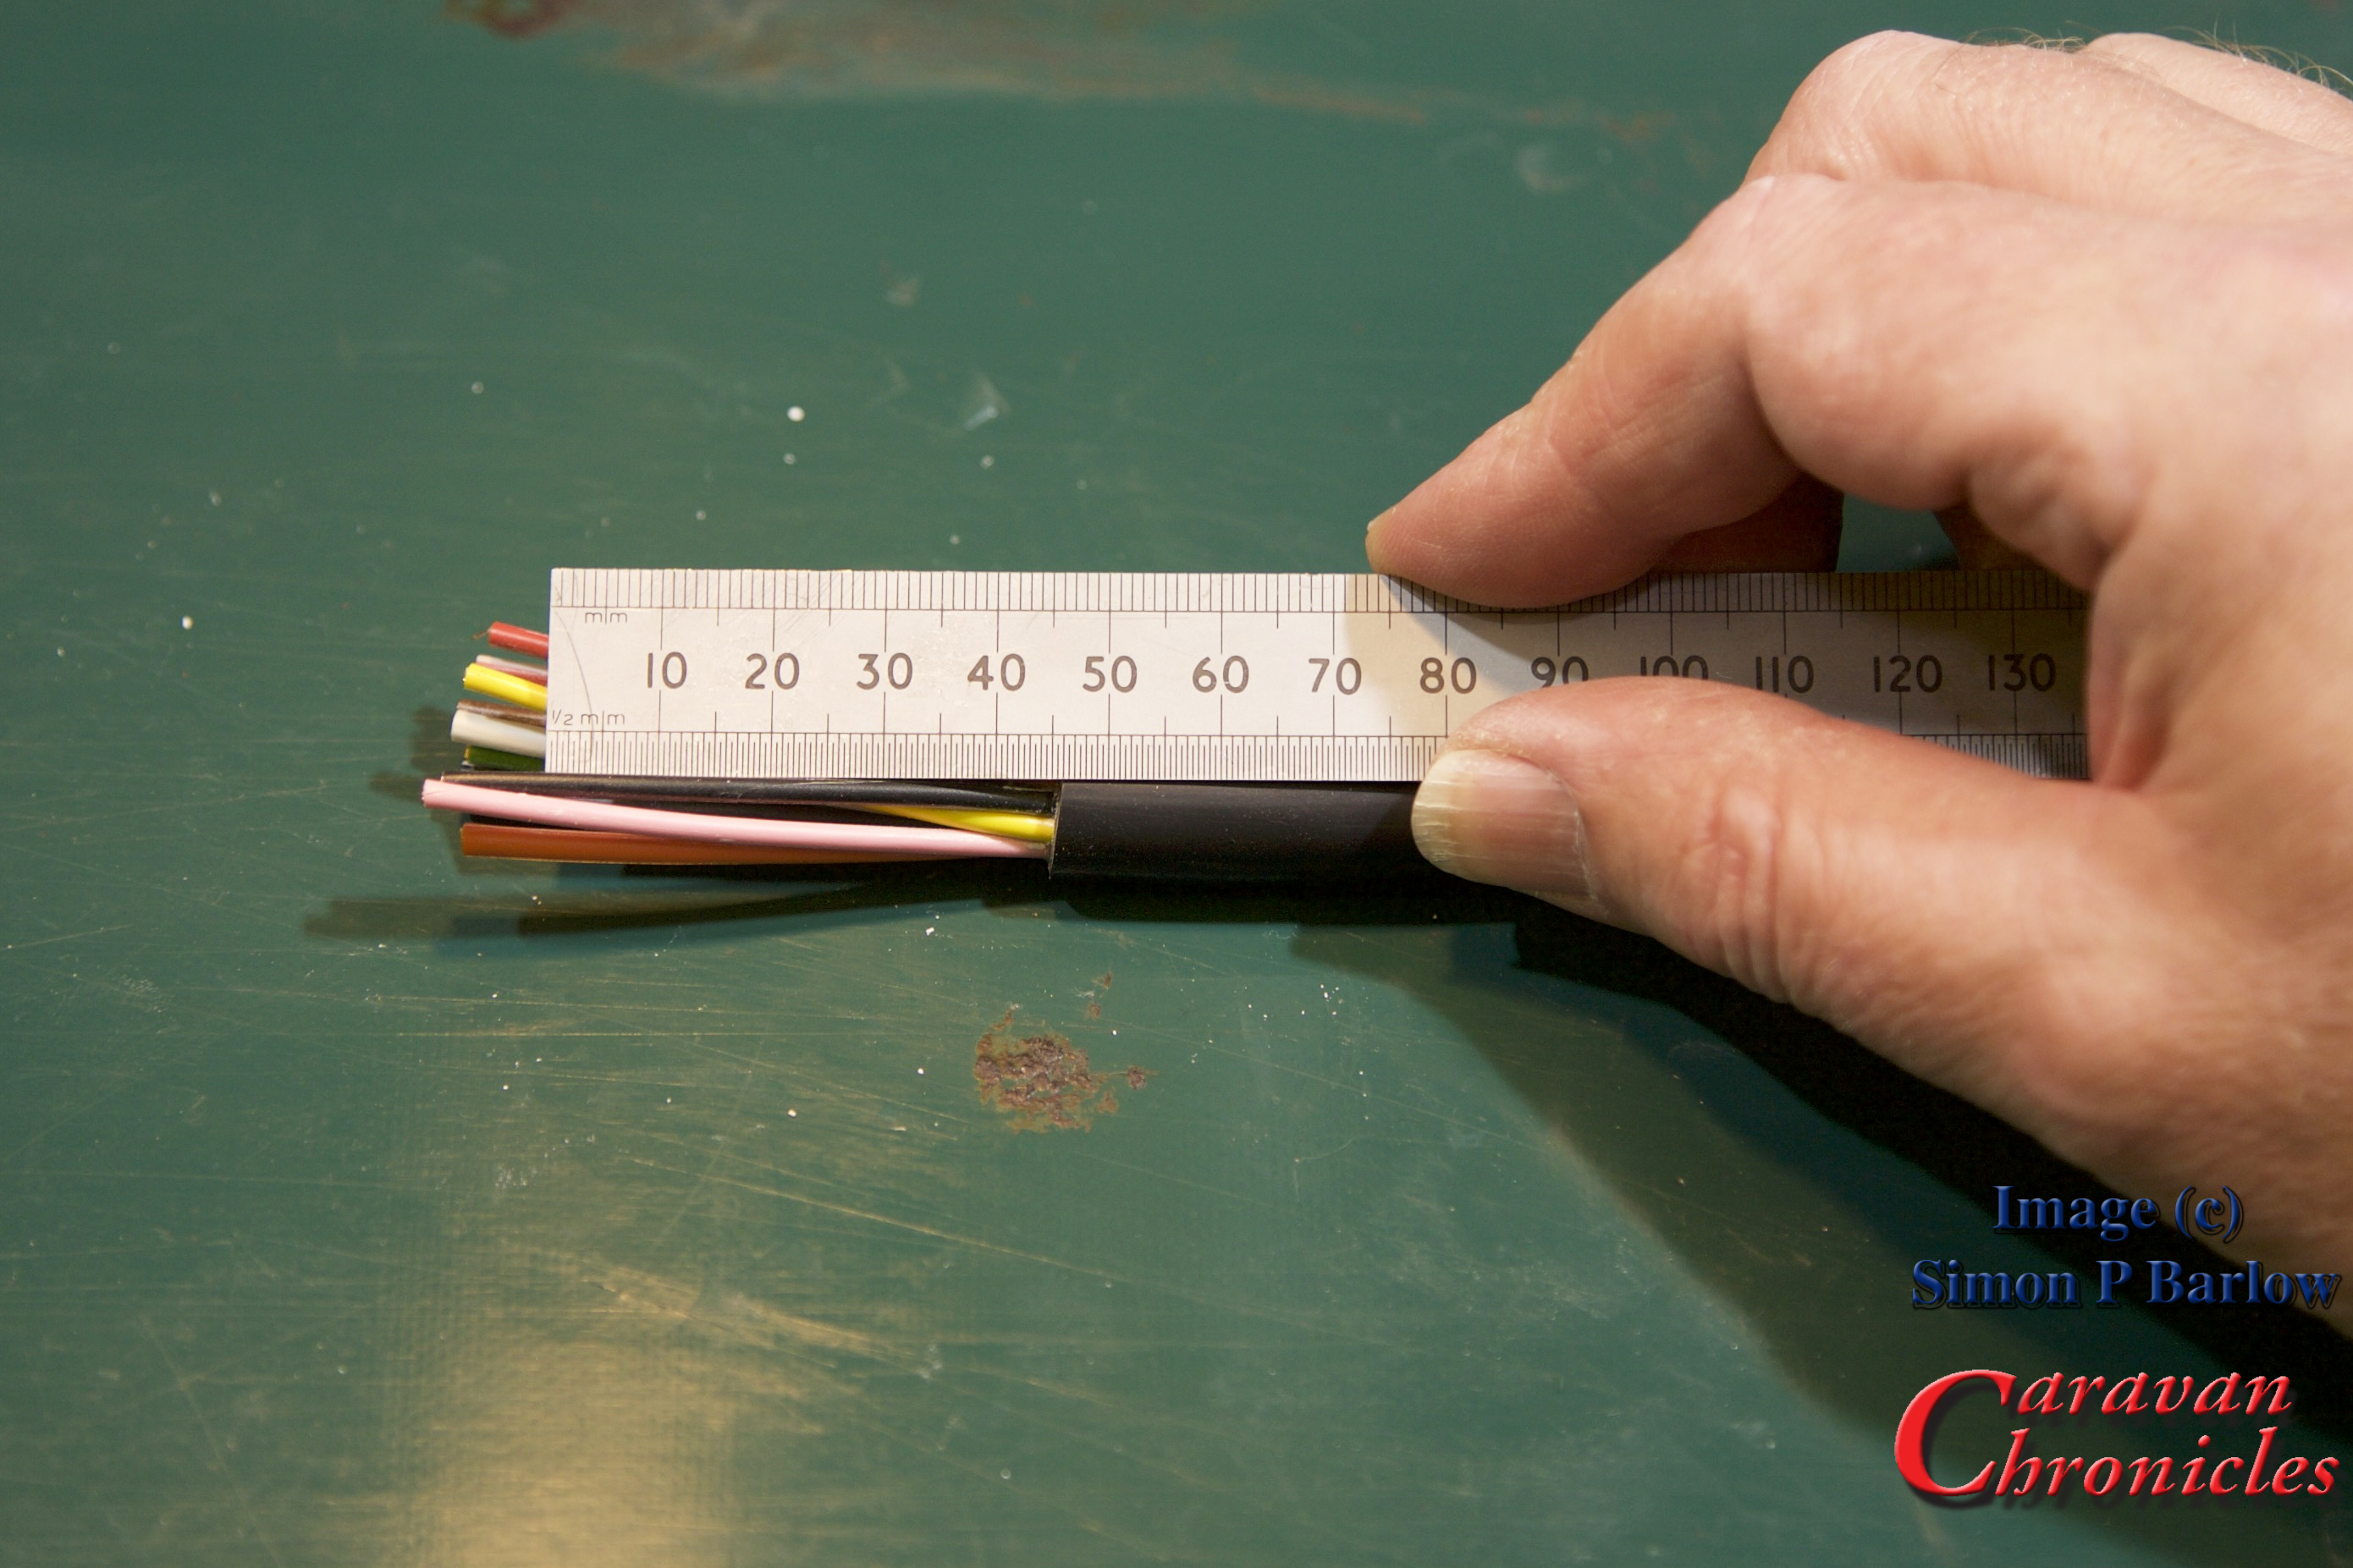
Now the cable is cut to the right length so there should be no short or long cables causing problems when assembling the socket:
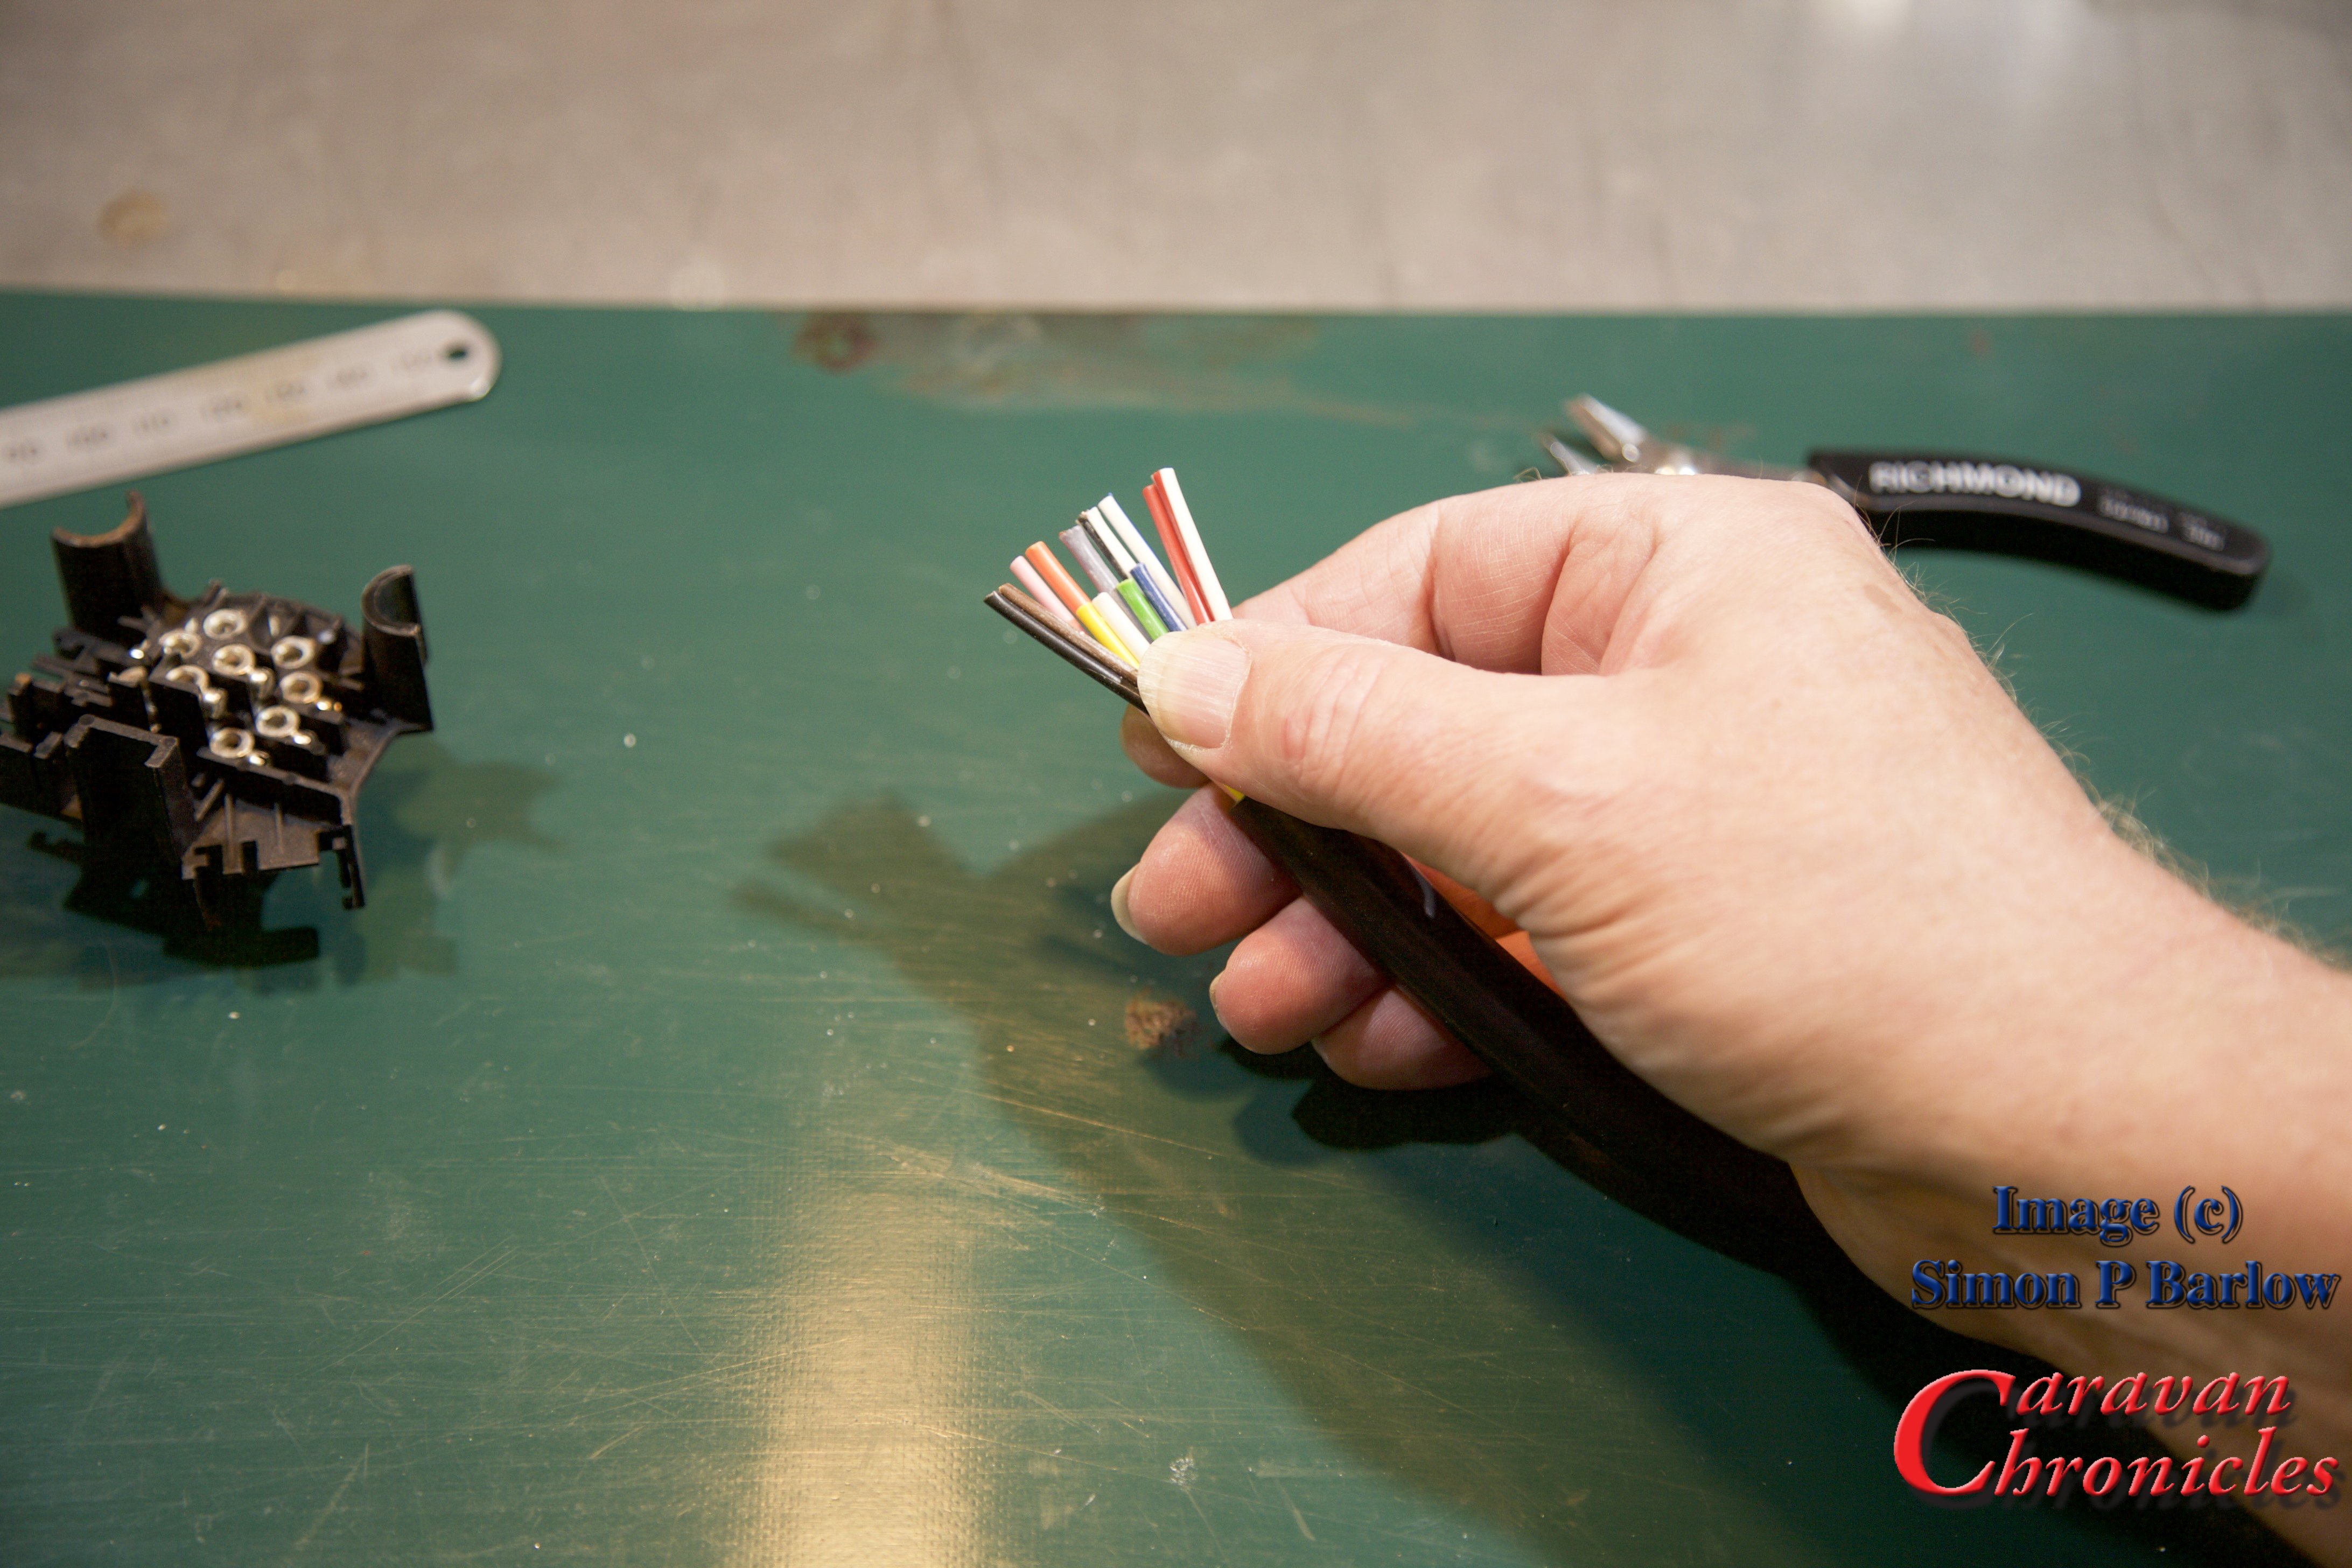
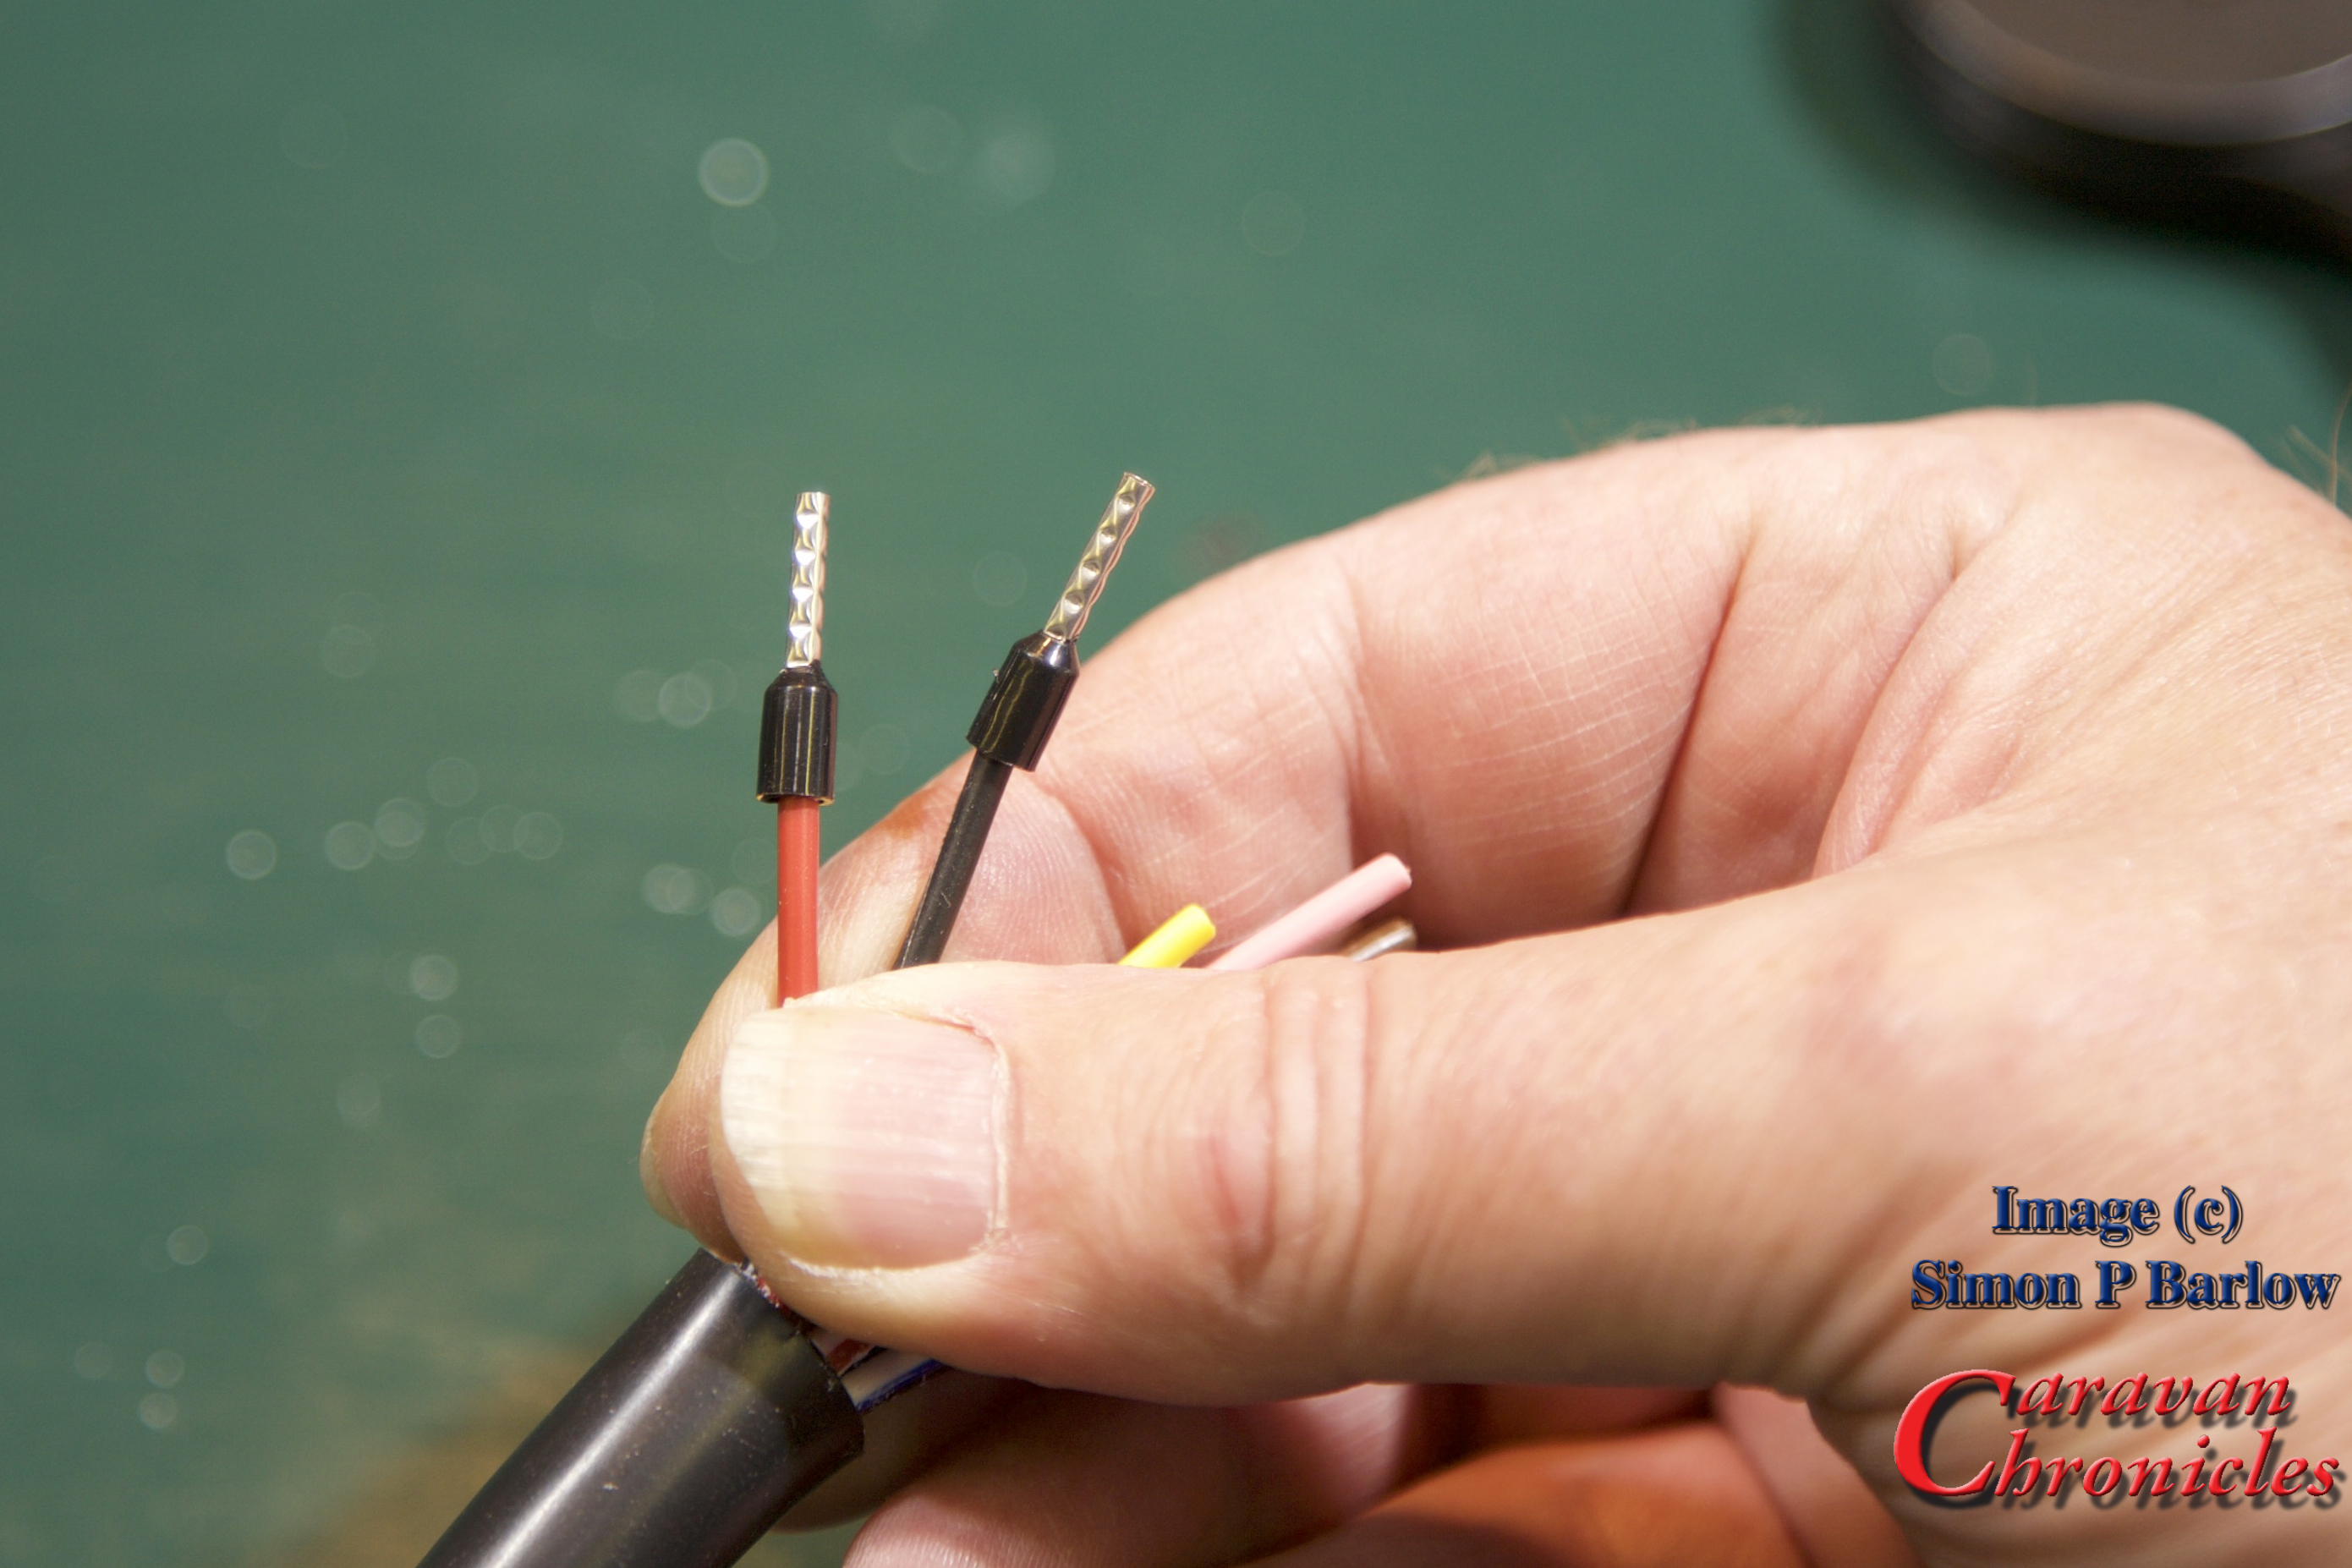
Strip back the individual cables so the exposed conductors are the same length as the ferrules:
Slide the correct diameter ferrule on to the exposed conductors:
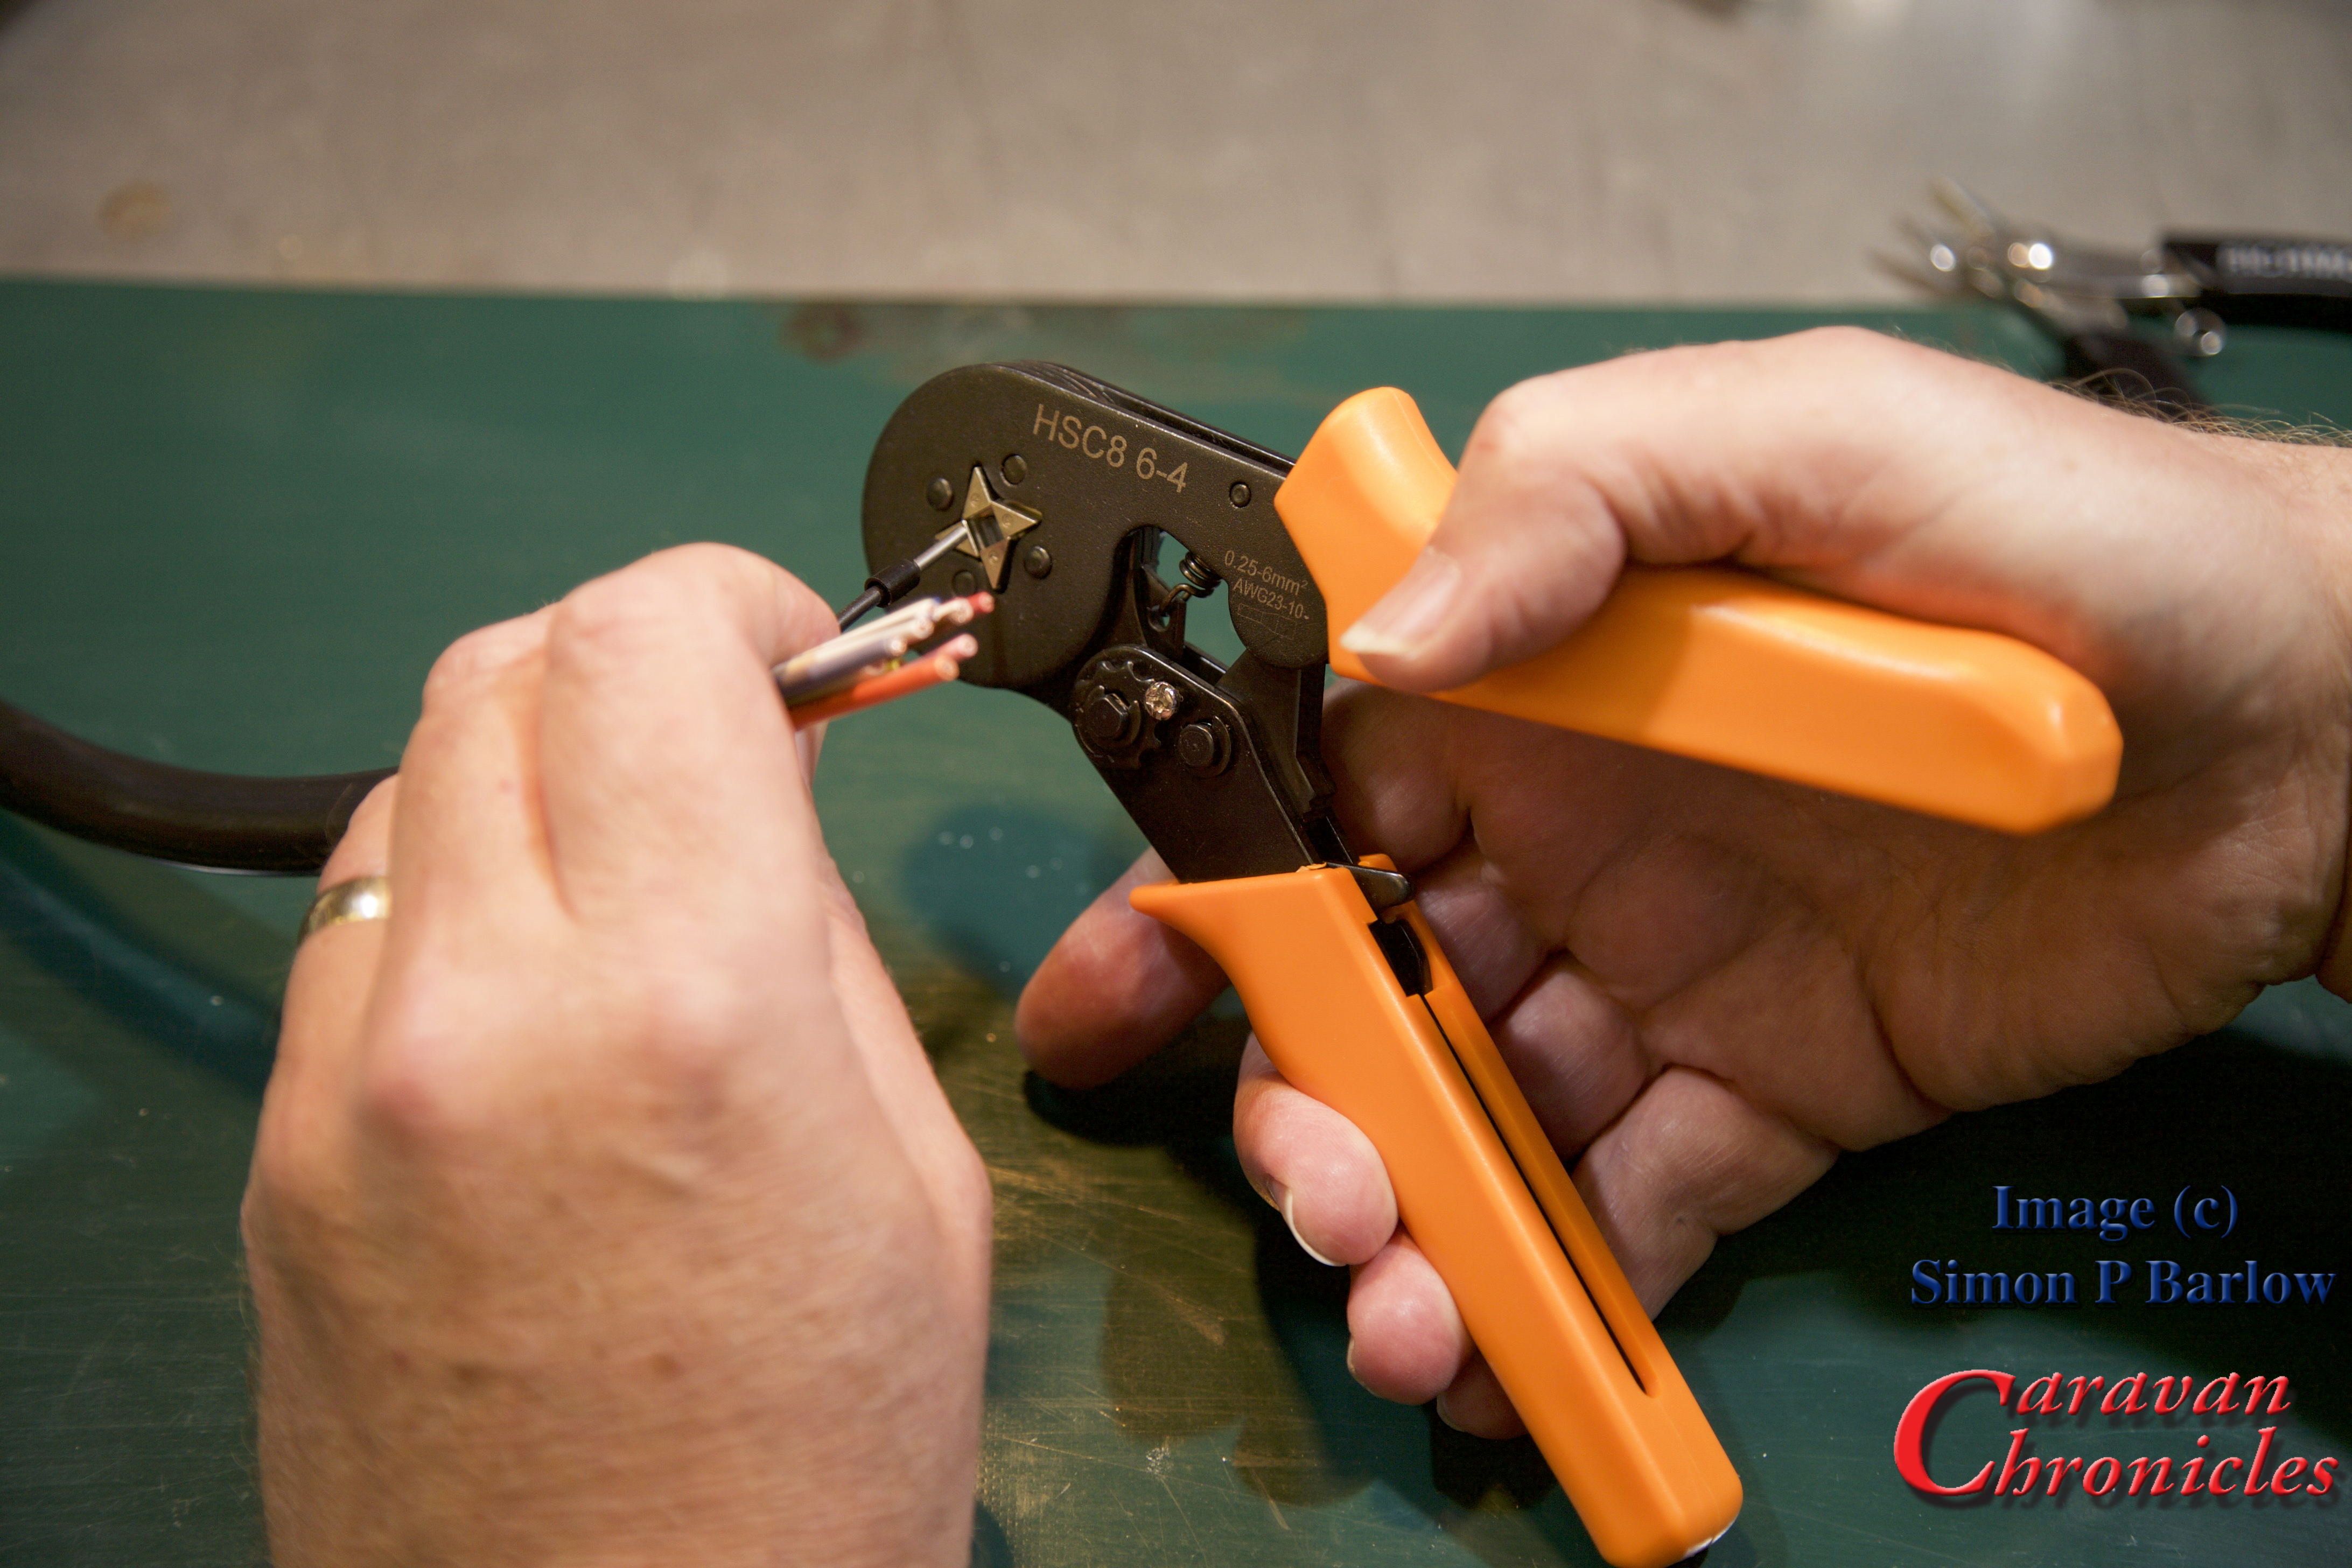
Crimp into place:
The crimp tool is set so that it will only apply the correct pressure to compress the exposed conductors the required amount. Squeeze the handles and the four jaws close on the ferrule and compress it, continue squeezing and once the jaws have attained the right pressure the ratchet mechanism in the handle releases.
If you look at the picture below you will also see that the crimp tool also presses several ridges into the tube, this is to increase the mechanical grip on the conductors and help stop the tube distorting under the pressure of the terminal screw tip:
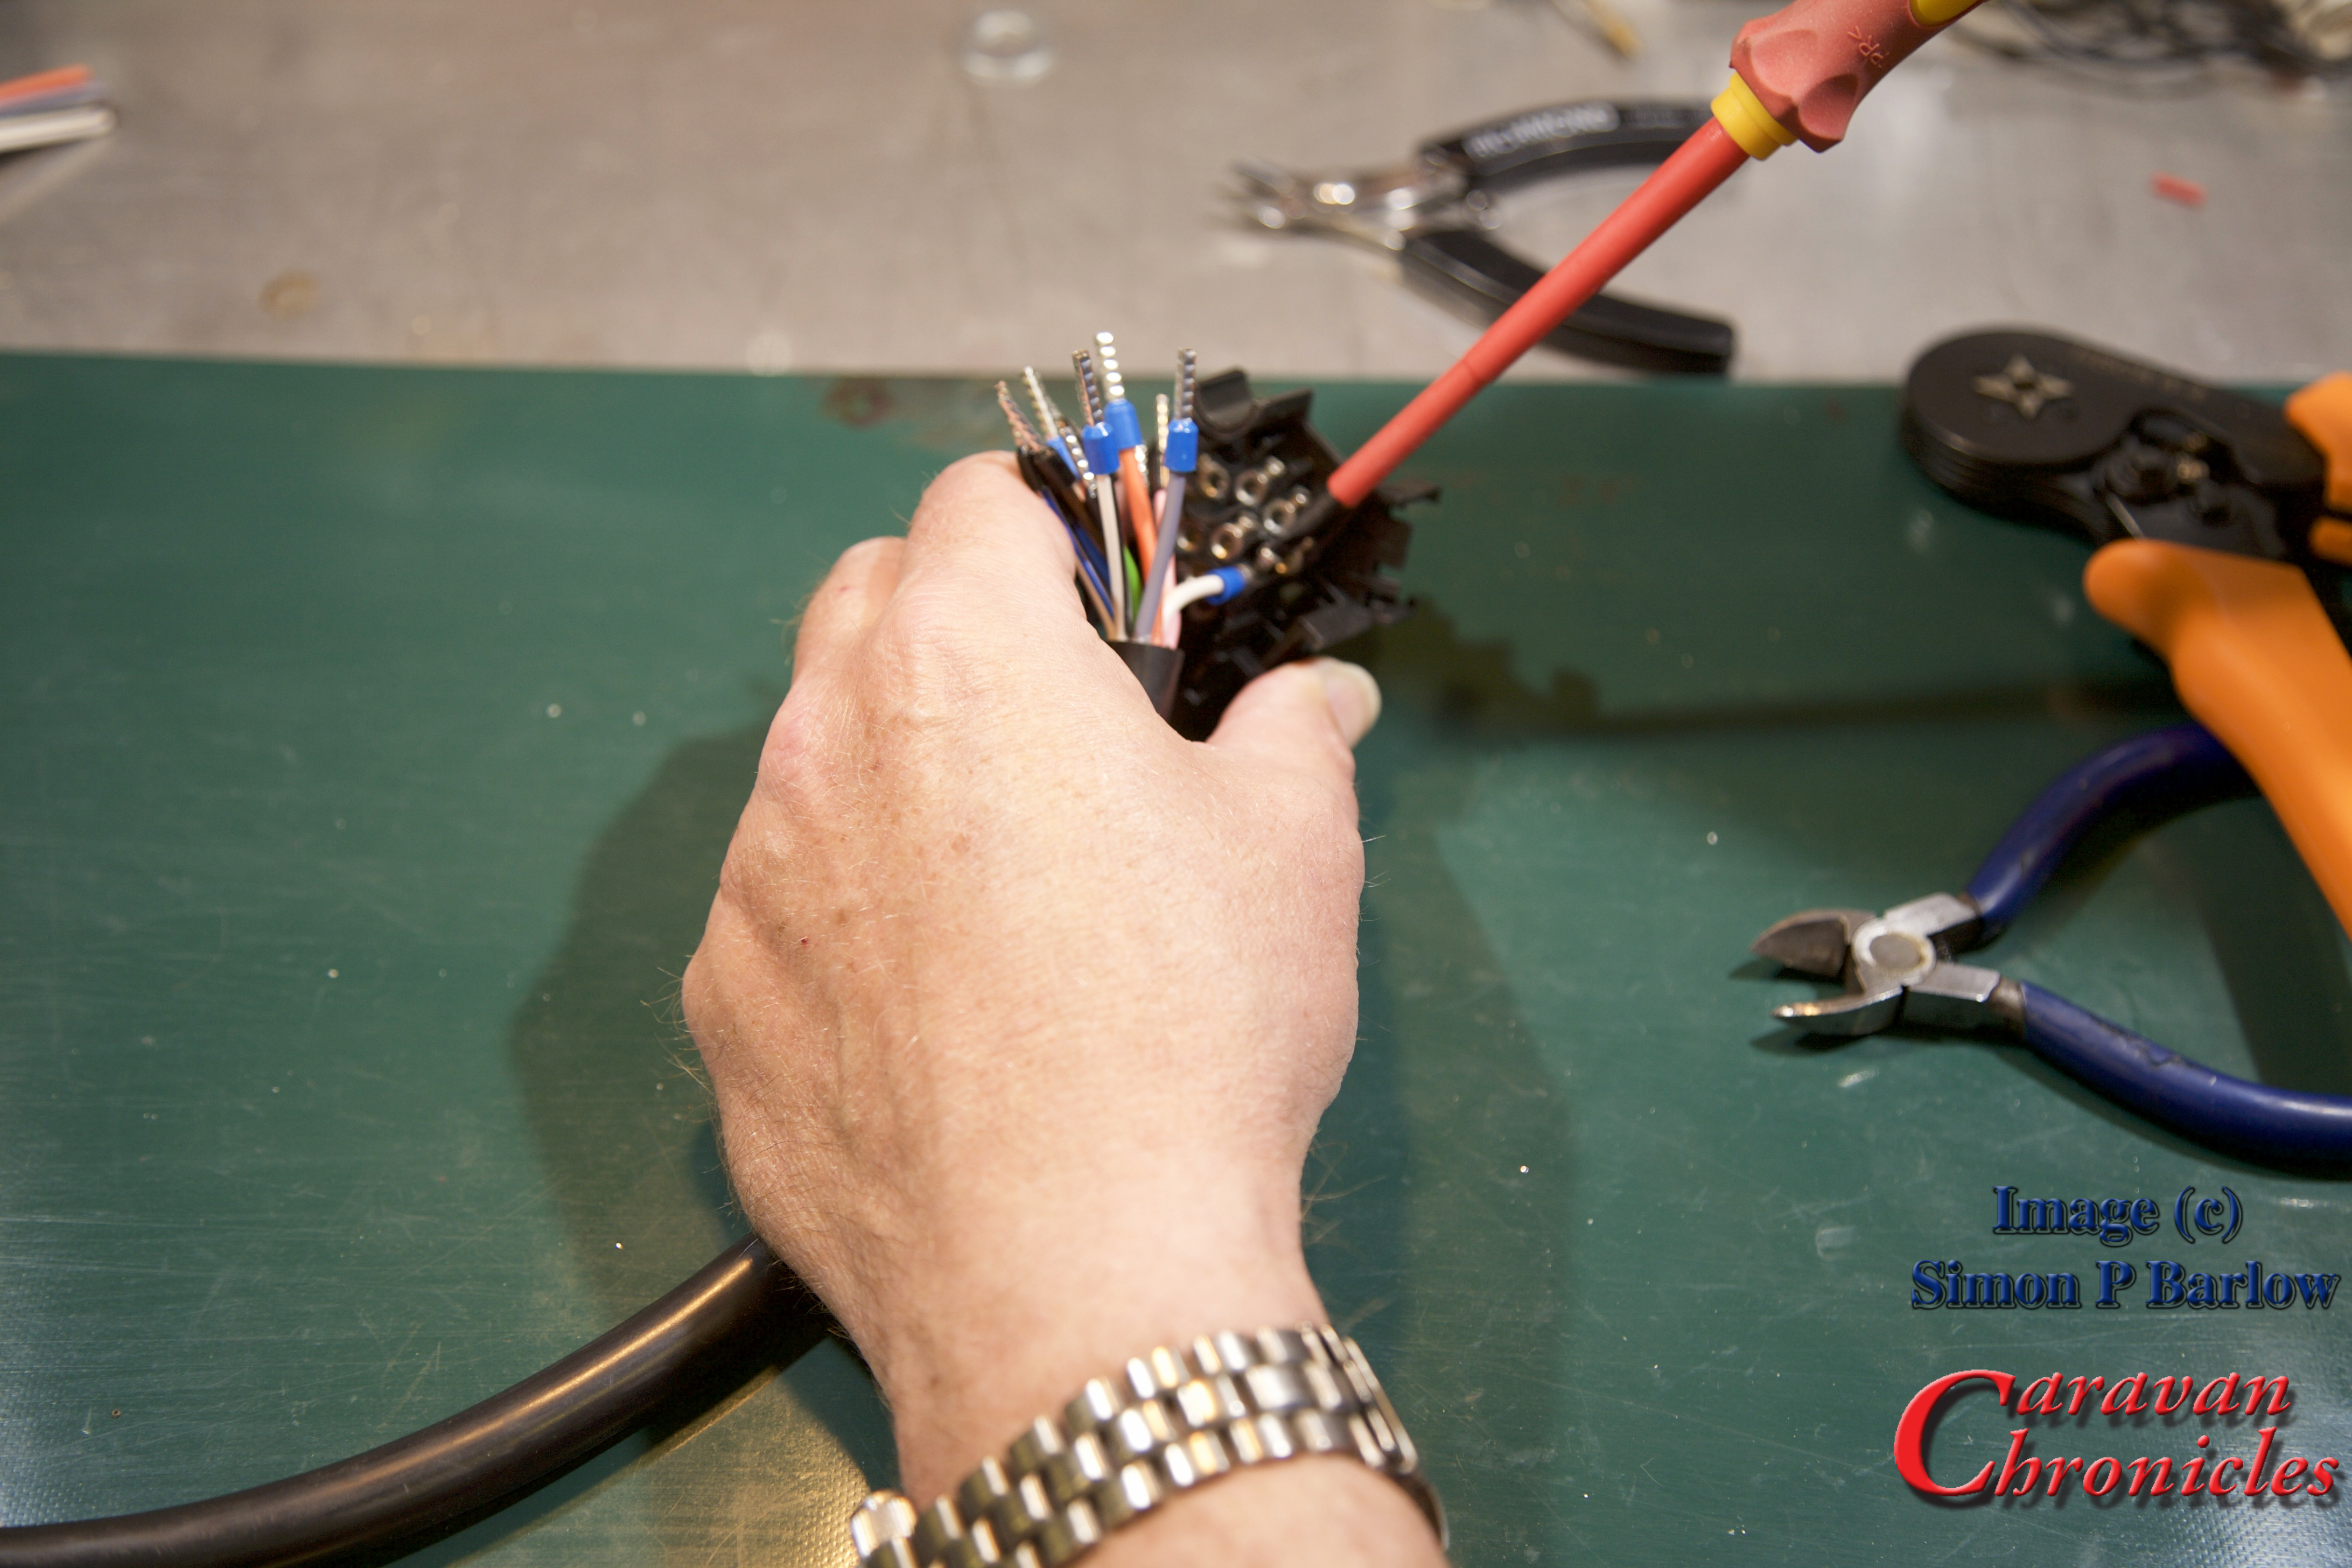
Continue until you have all the cables completed:
One last check… look for stray strands and anything that doesn’t look as though its crimped correctly… give them the ‘tug’ test if in doubt.
I always like to back off the screws so the ends are just visible in the holes:
The next thing you might need to do is correct the length of the ferrule. I have used standard length ferrules and as the holes in the socket terminals are not as deep, I had to trim off the excess. The ridges pressed into the ferrule body help gauge how much to trim off. In this case I only had to snip off to the first indent:
Once trimmed to length, it’s a simple matter of following the colour coding and inserting each cable and tightening the screw. I always start with the four pins in the middle:
Once all the cables are terminated, have a good look to see if all the screws are tight, and of course check the colours are in the right place!
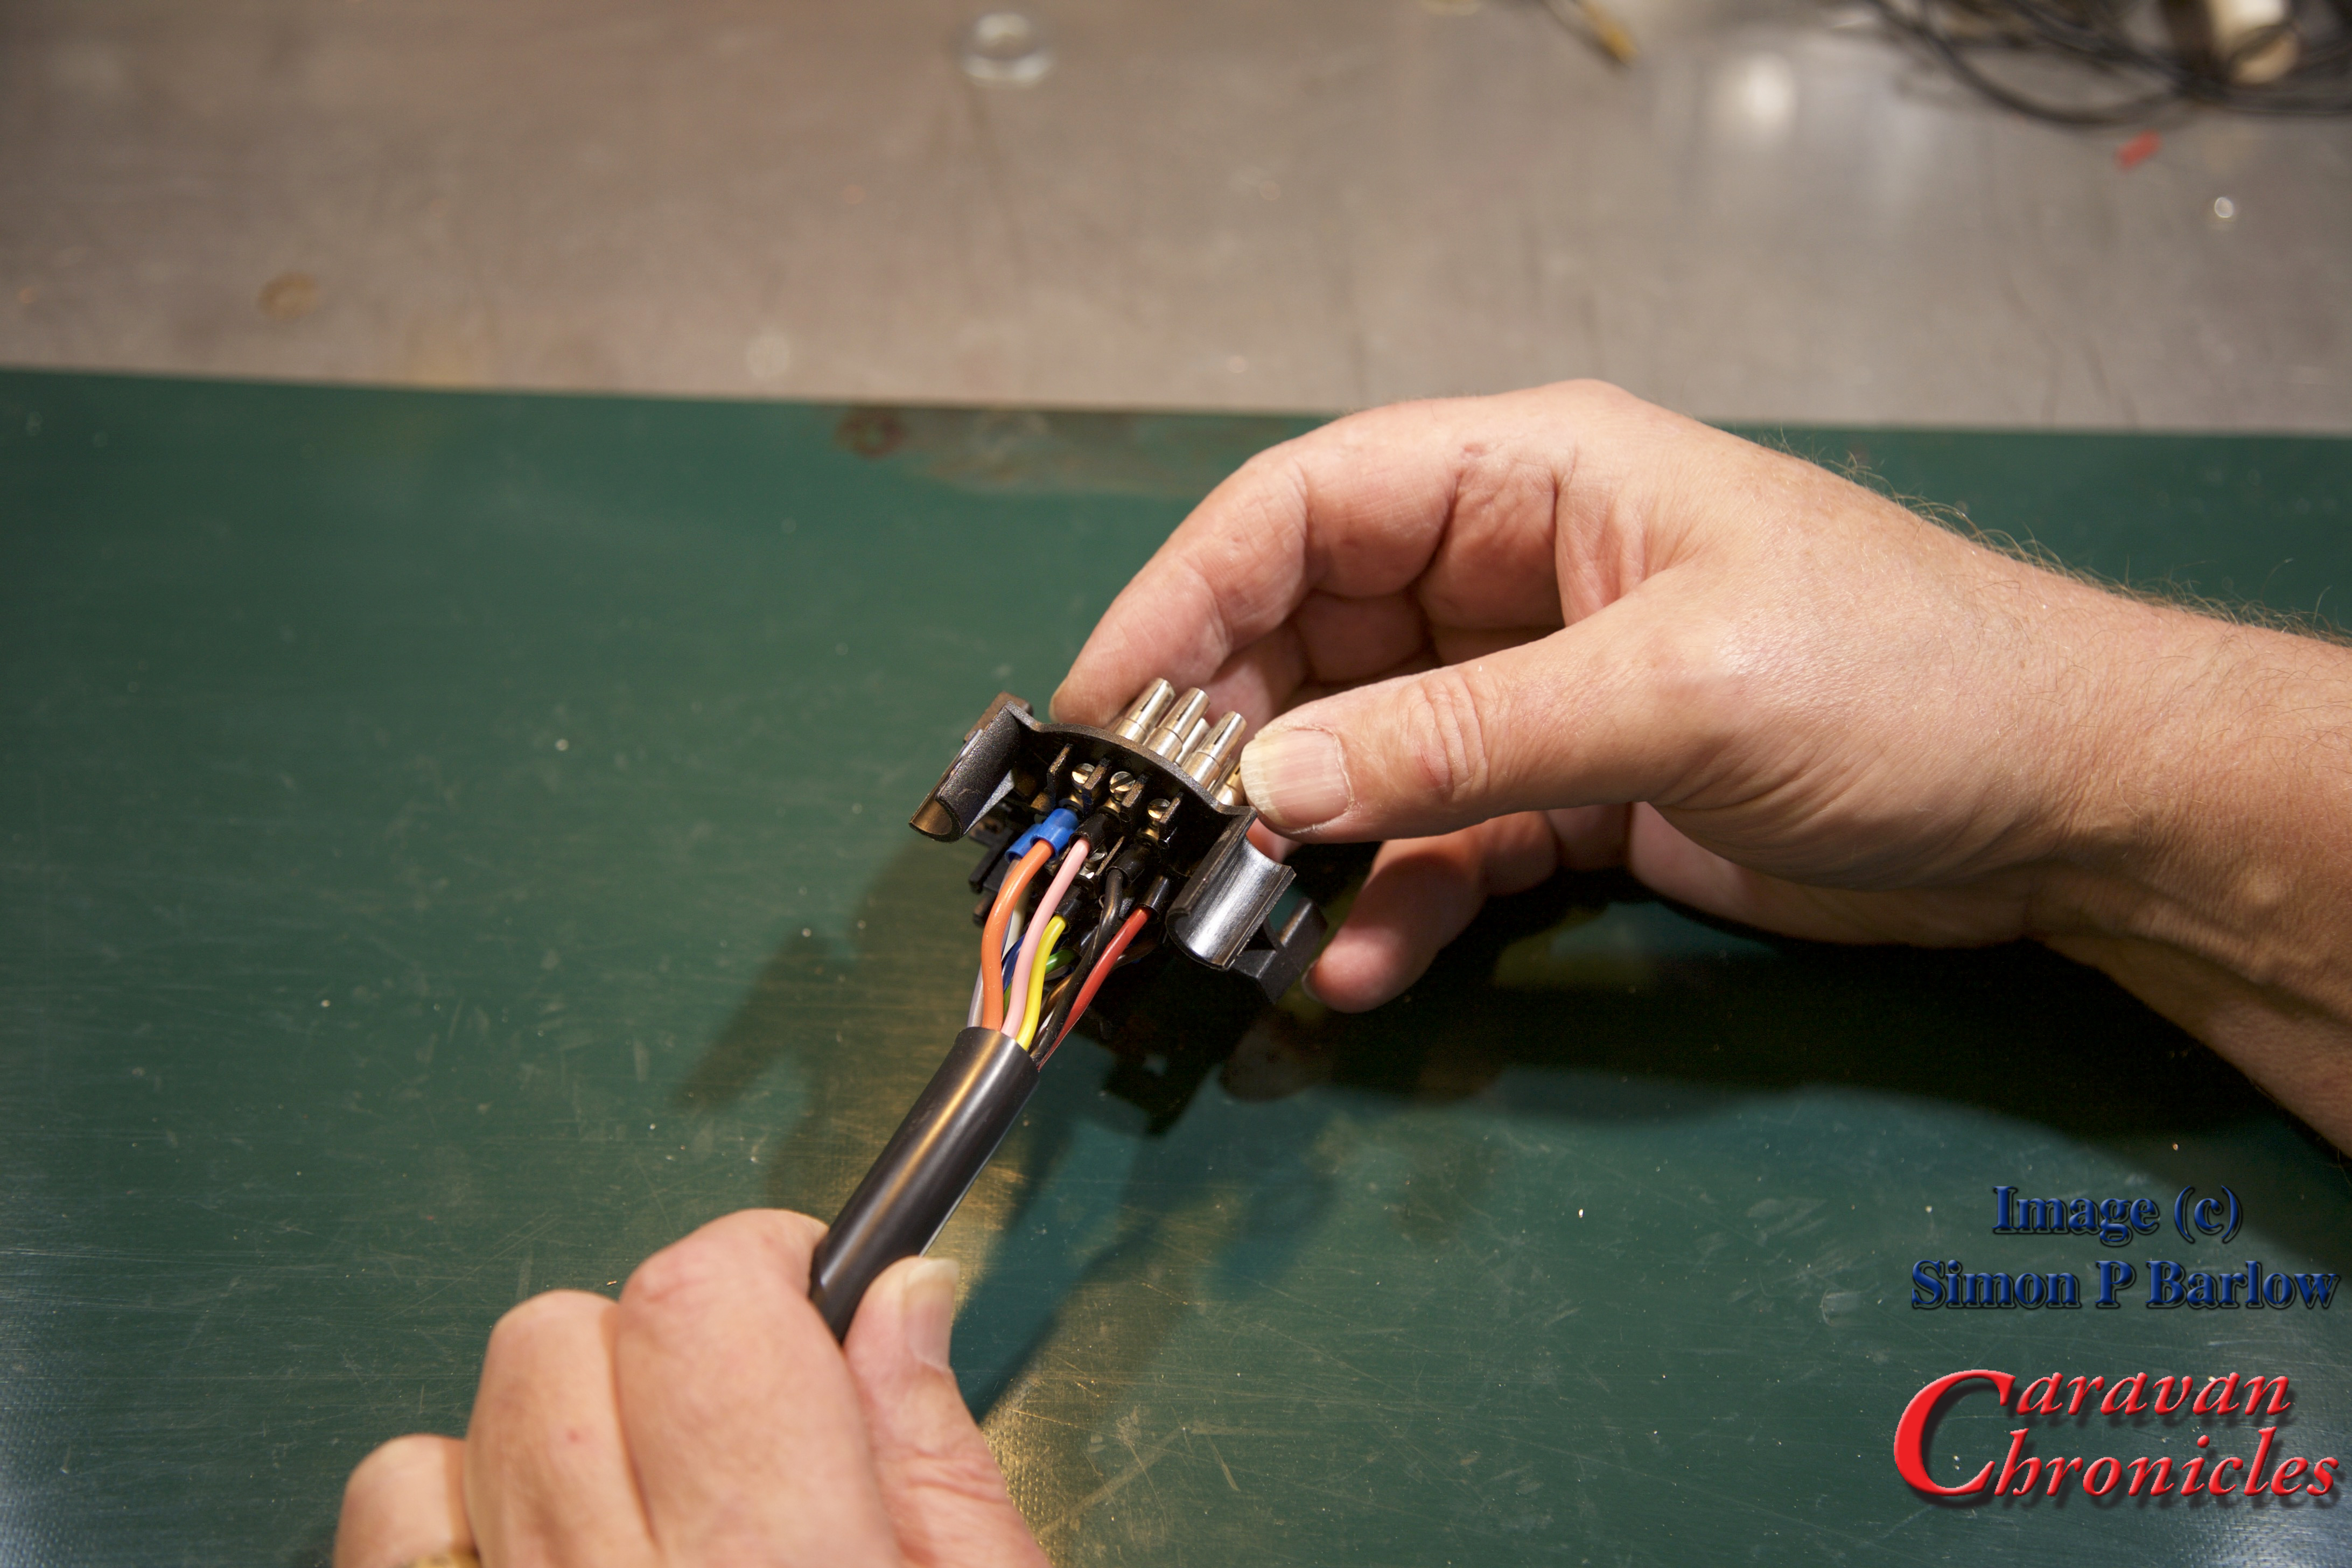
Because the cable was trimmed to the right length before we started there are no loops, so the cover can slide on neatly:
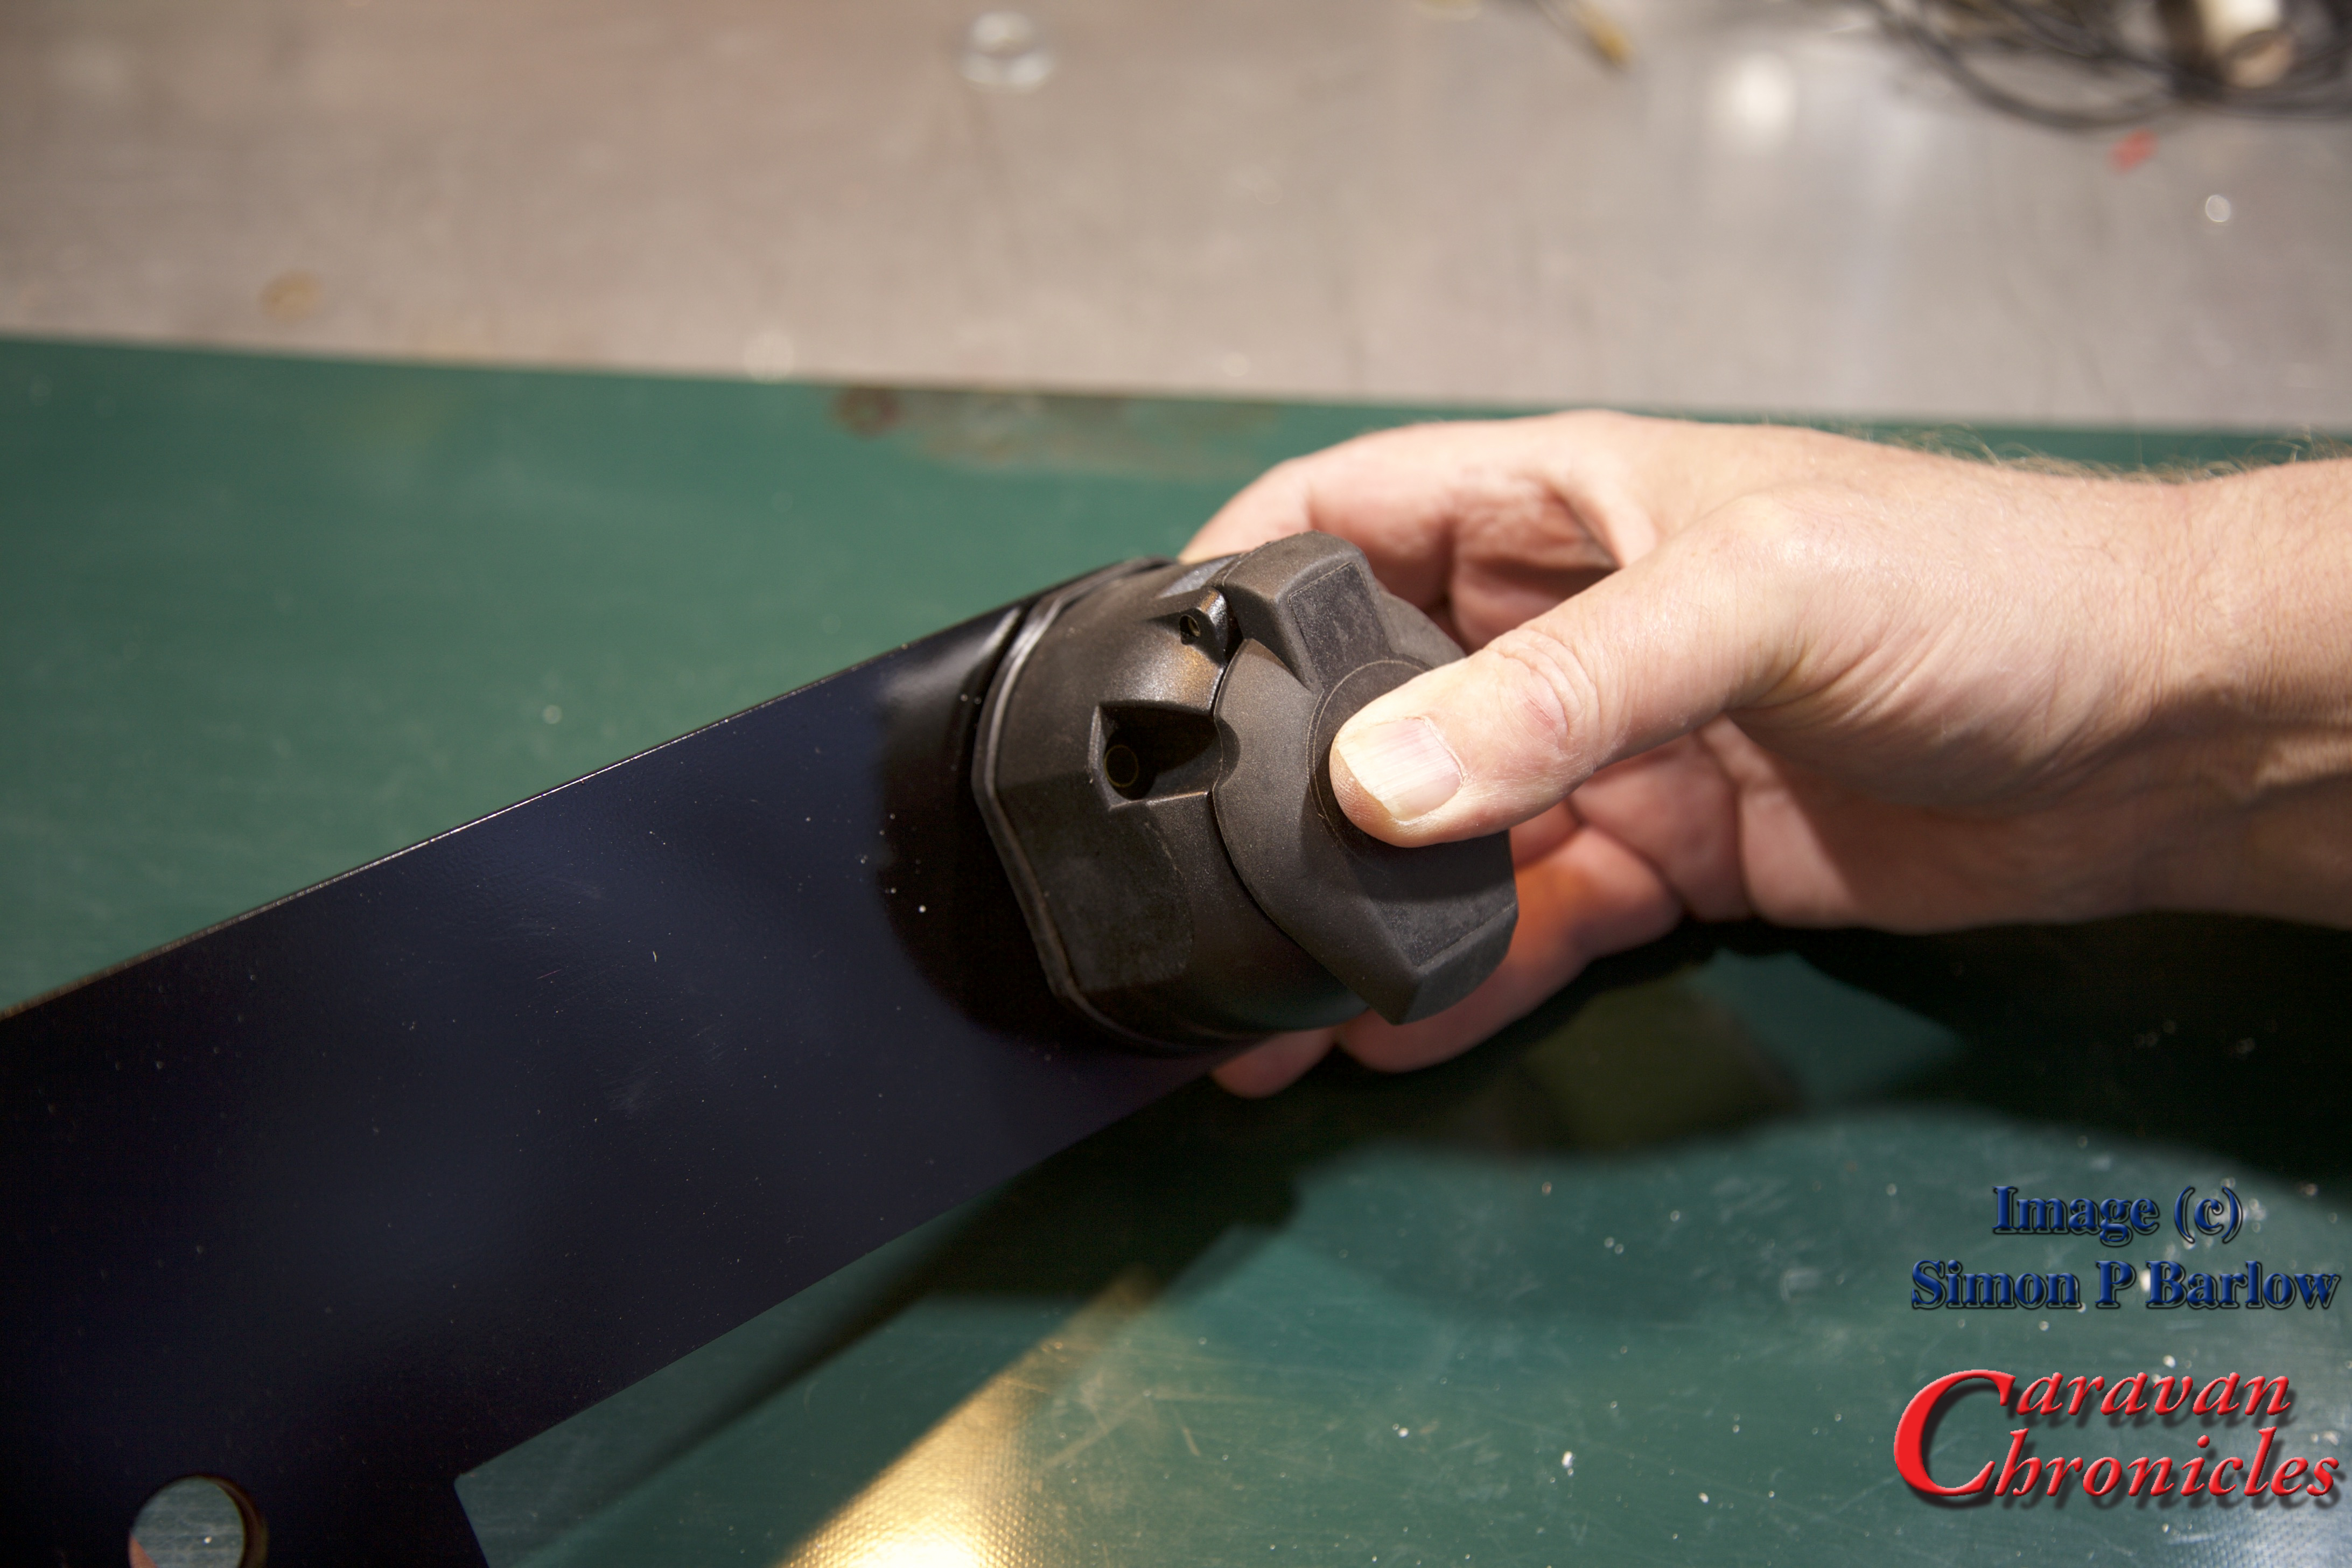
There we go, a finished socket all ready to mount onto the bracket:
To terminate the socket from start to finish and while Sue (thanks `Sue) took all the photos took no more than 25 minutes. Ok it was on a bench and doing outside at the back of a vehicle will take a bit longer, but it’s not that difficult to get a professional result.
The ‘Compromise’
Right back at the start I said there was a compromise – soldering. It’s not difficult to do and achieve and end up with a professional result.
Practice makes perfect and its worth having a go on a scrap length of cable first.
Here’s a few of my tips for successful soldering:
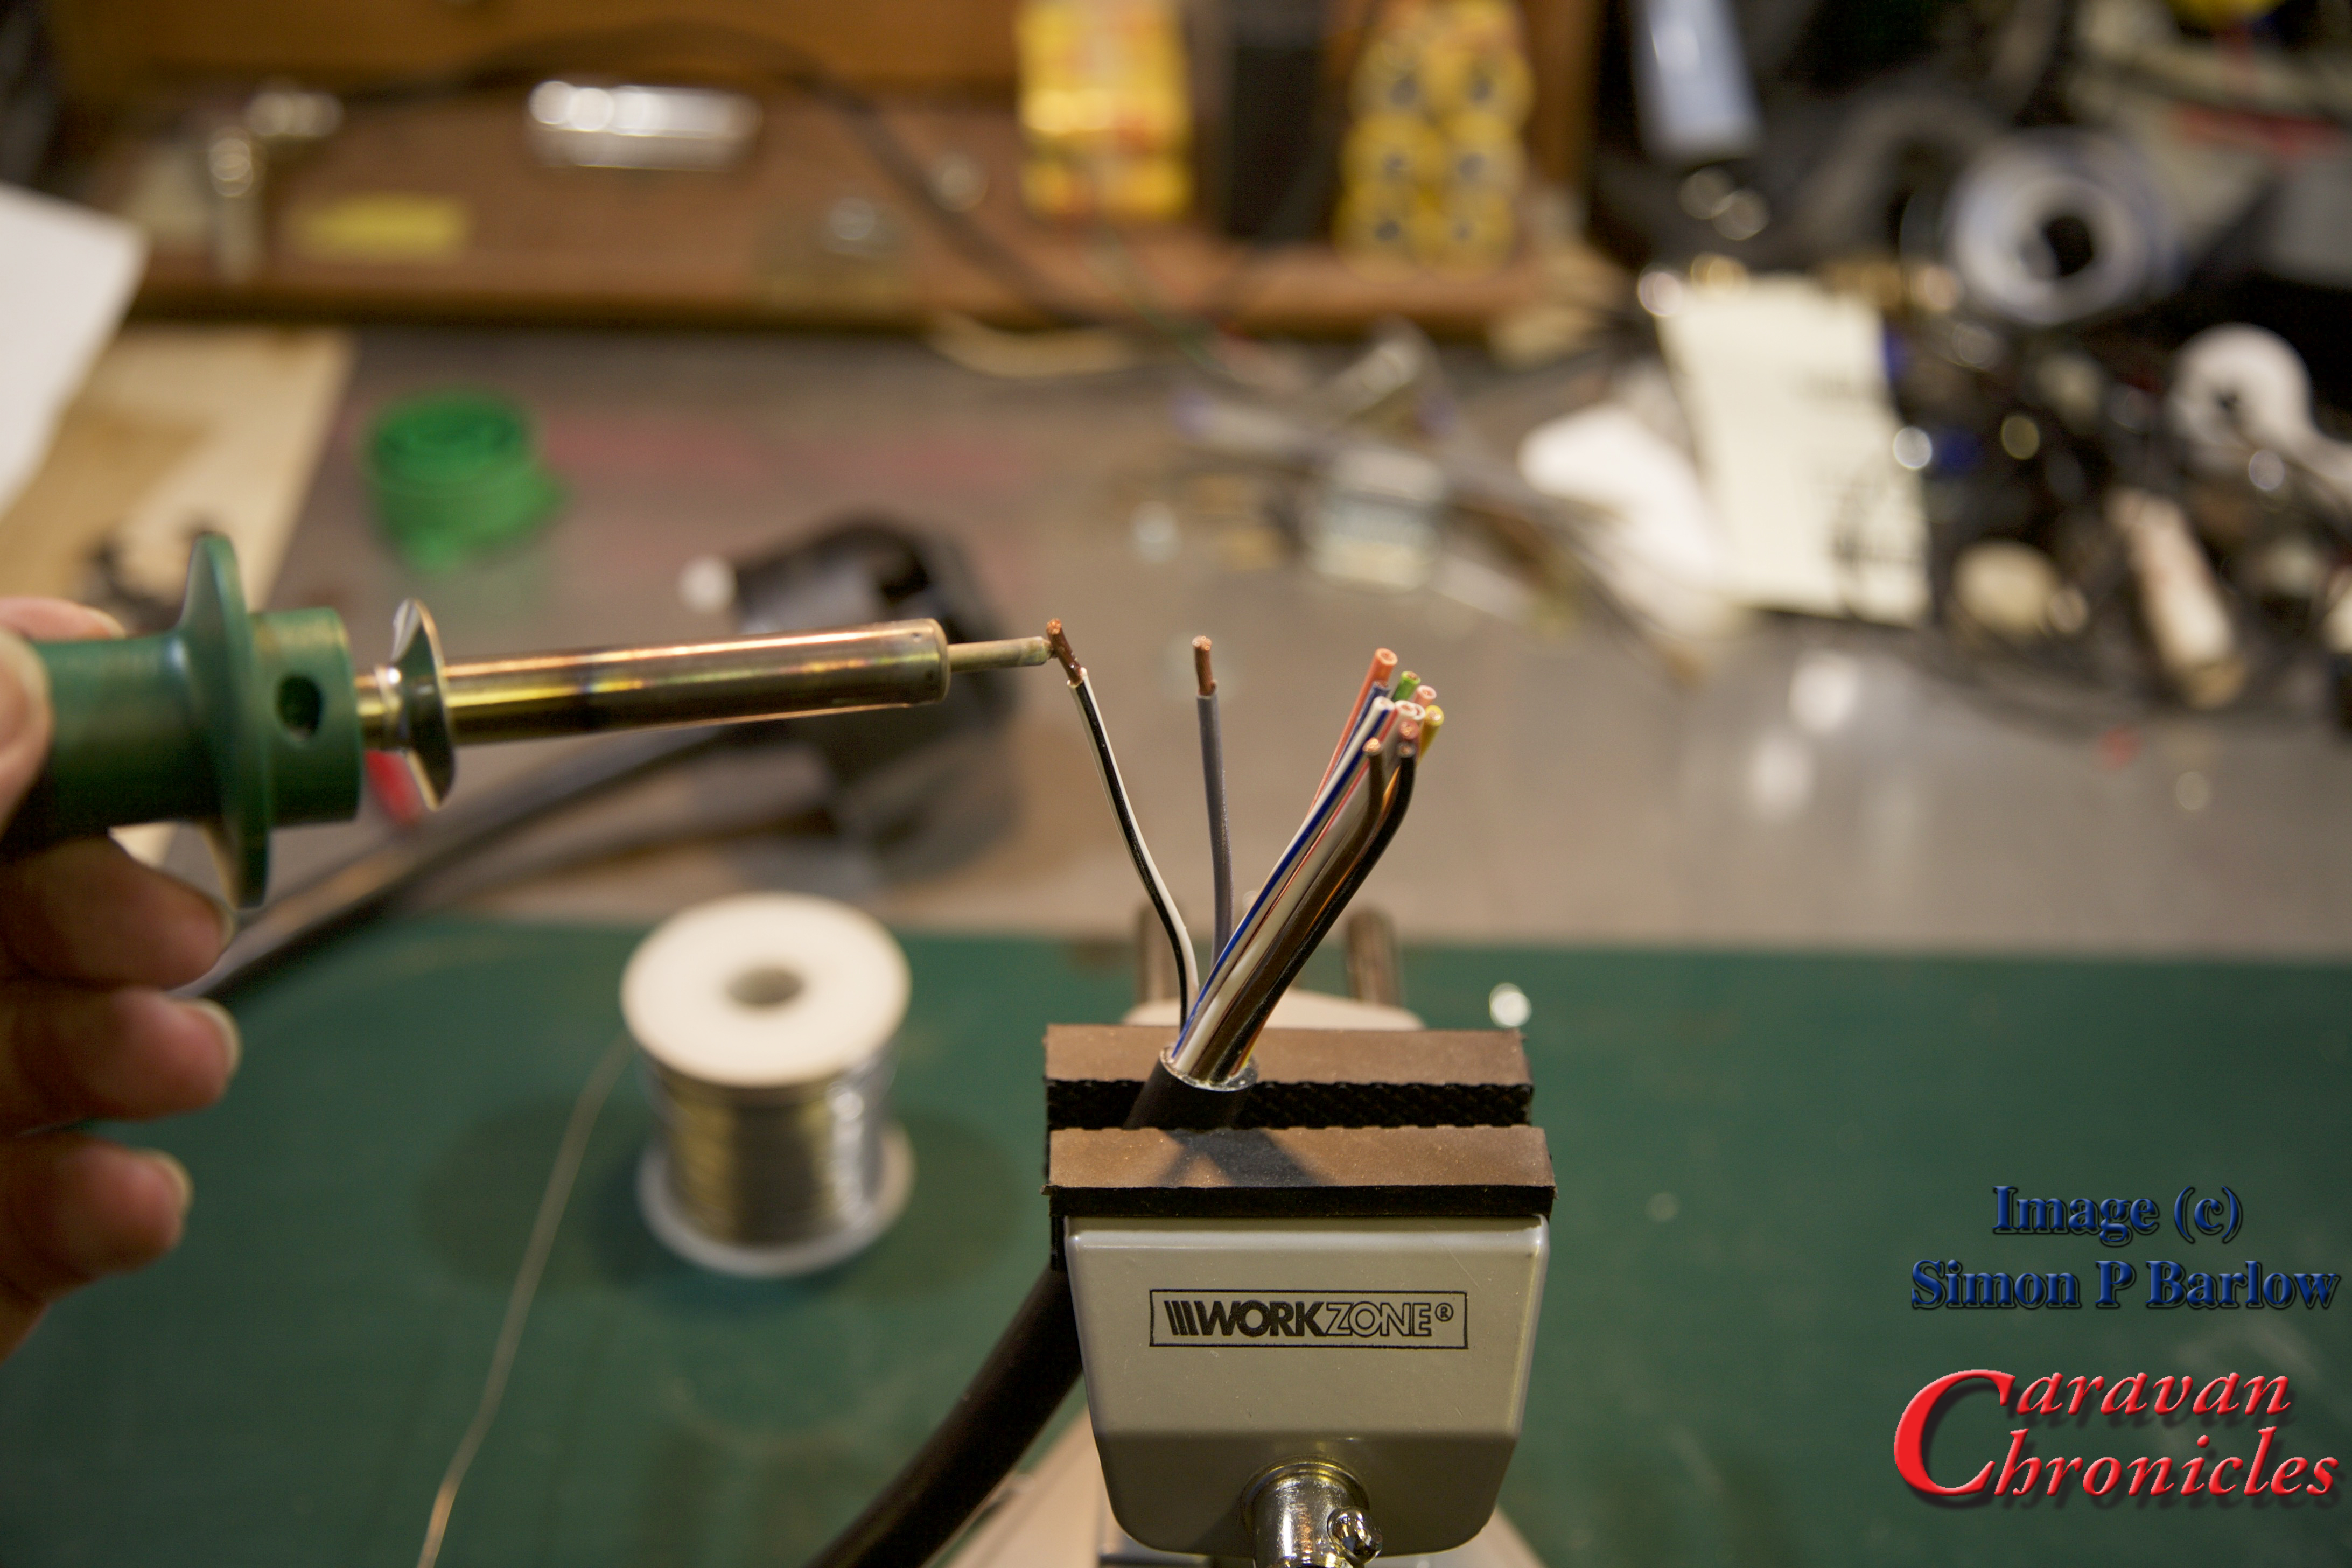
Don’t apply too much heat to cause the insulation to melt (turning down the temperature of the soldering iron or reducing the contact time between the soldering iron and cable helps)
Don’t try to melt solder onto the tip of the iron and run it in to the cable you will burn off the flux too fast… instead touch the solder onto the hot strands of the conductor. Capillary action will pull solder into the strand bundle.
Don’t allow too much solder to be drawn in. You are looking for just enough to still be able to make the outlines of the strands of cable, not a big ‘blob’ of solder on the end.
The solder should look shiny not dull. If it’s dull, the solder cooled too soon as the conductors were not hot enough, this is commonly known as a ‘dry joint’ the solder sits on the surface of the copper.
Avoid breathing in the fumes given off from the flux and the solder. Solder is an alloy of tin and lead… and the flux is pretty nasty too. ( I have an old computer cooling fan that I use to blow the fumes away if I’m doing a lot of soldering).
If you have made the soldered cables too long, you can always trim them back to the correct length. Soldering all the conductors in a caravan cable like this usually takes me no more than five minutes from start to finish.
A few practice runs will soon get you producing good results.
Finally to finish off, I usually give the finished connections a spray of ‘liquid plastic’. It comes in an aerosol can and when sprayed on form a thin plastic coating over everything. You can usually find it in motorbike and automotive shops for waterproofing electrics and HT leads.
It easy to get a good professional result, and I still can’t understand why some tow bar fitting companies don’t either crimp or solder their connections. They usually do when it comes to connecting the other end of the cable to the vehicle. The cynic in me wonders if they are hoping for repeat custom when sockets or plugs start to have problems in the future.
I have been asked where you can purchase some of the products featured above. Here are the links to the products in the Amazon store. If you click on the links and purchase the items, a few pennies will go to helping the cost of running CaravanChronicles.com
That is one of the most common questions that I am asked about road light problems with caravan’s and trailers. Others are::
“Why do my side lights come on when I brake?”
“When I turn my side lights on why do the indicators glow dimly?”
“When I put my side lights on why do my reversing lights come on?”
“When I brake why do all my rear lights come on?”
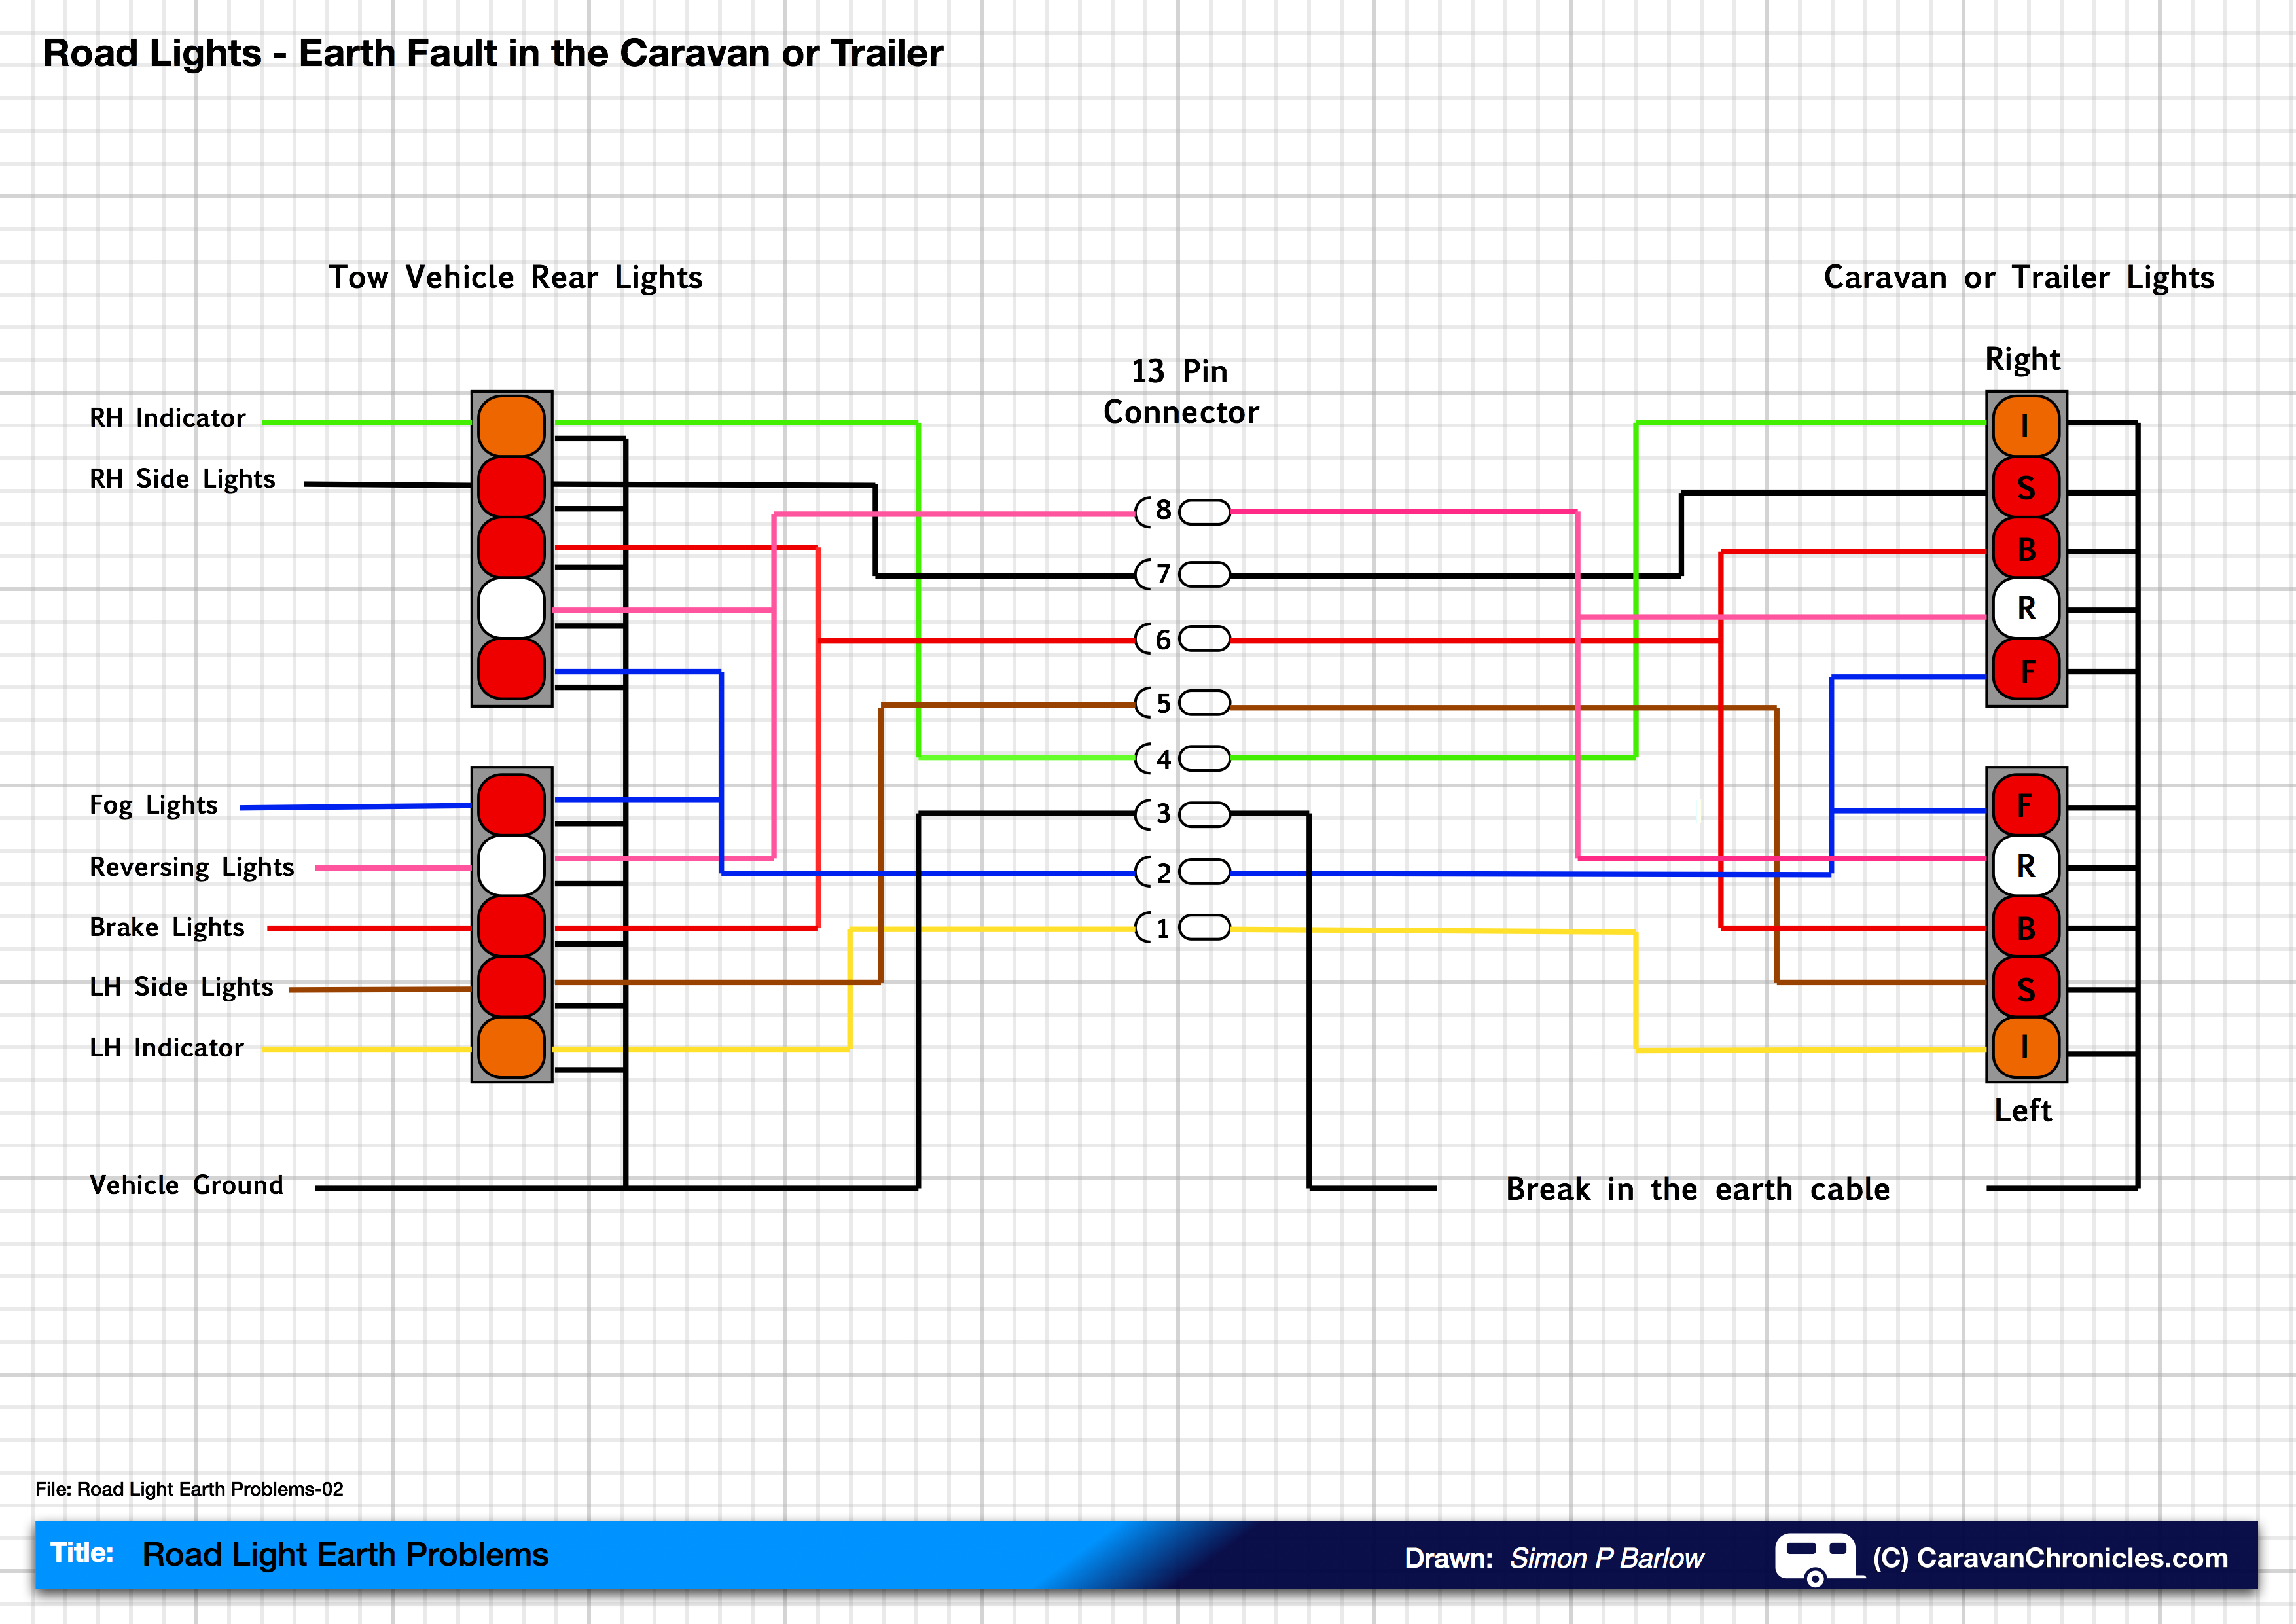
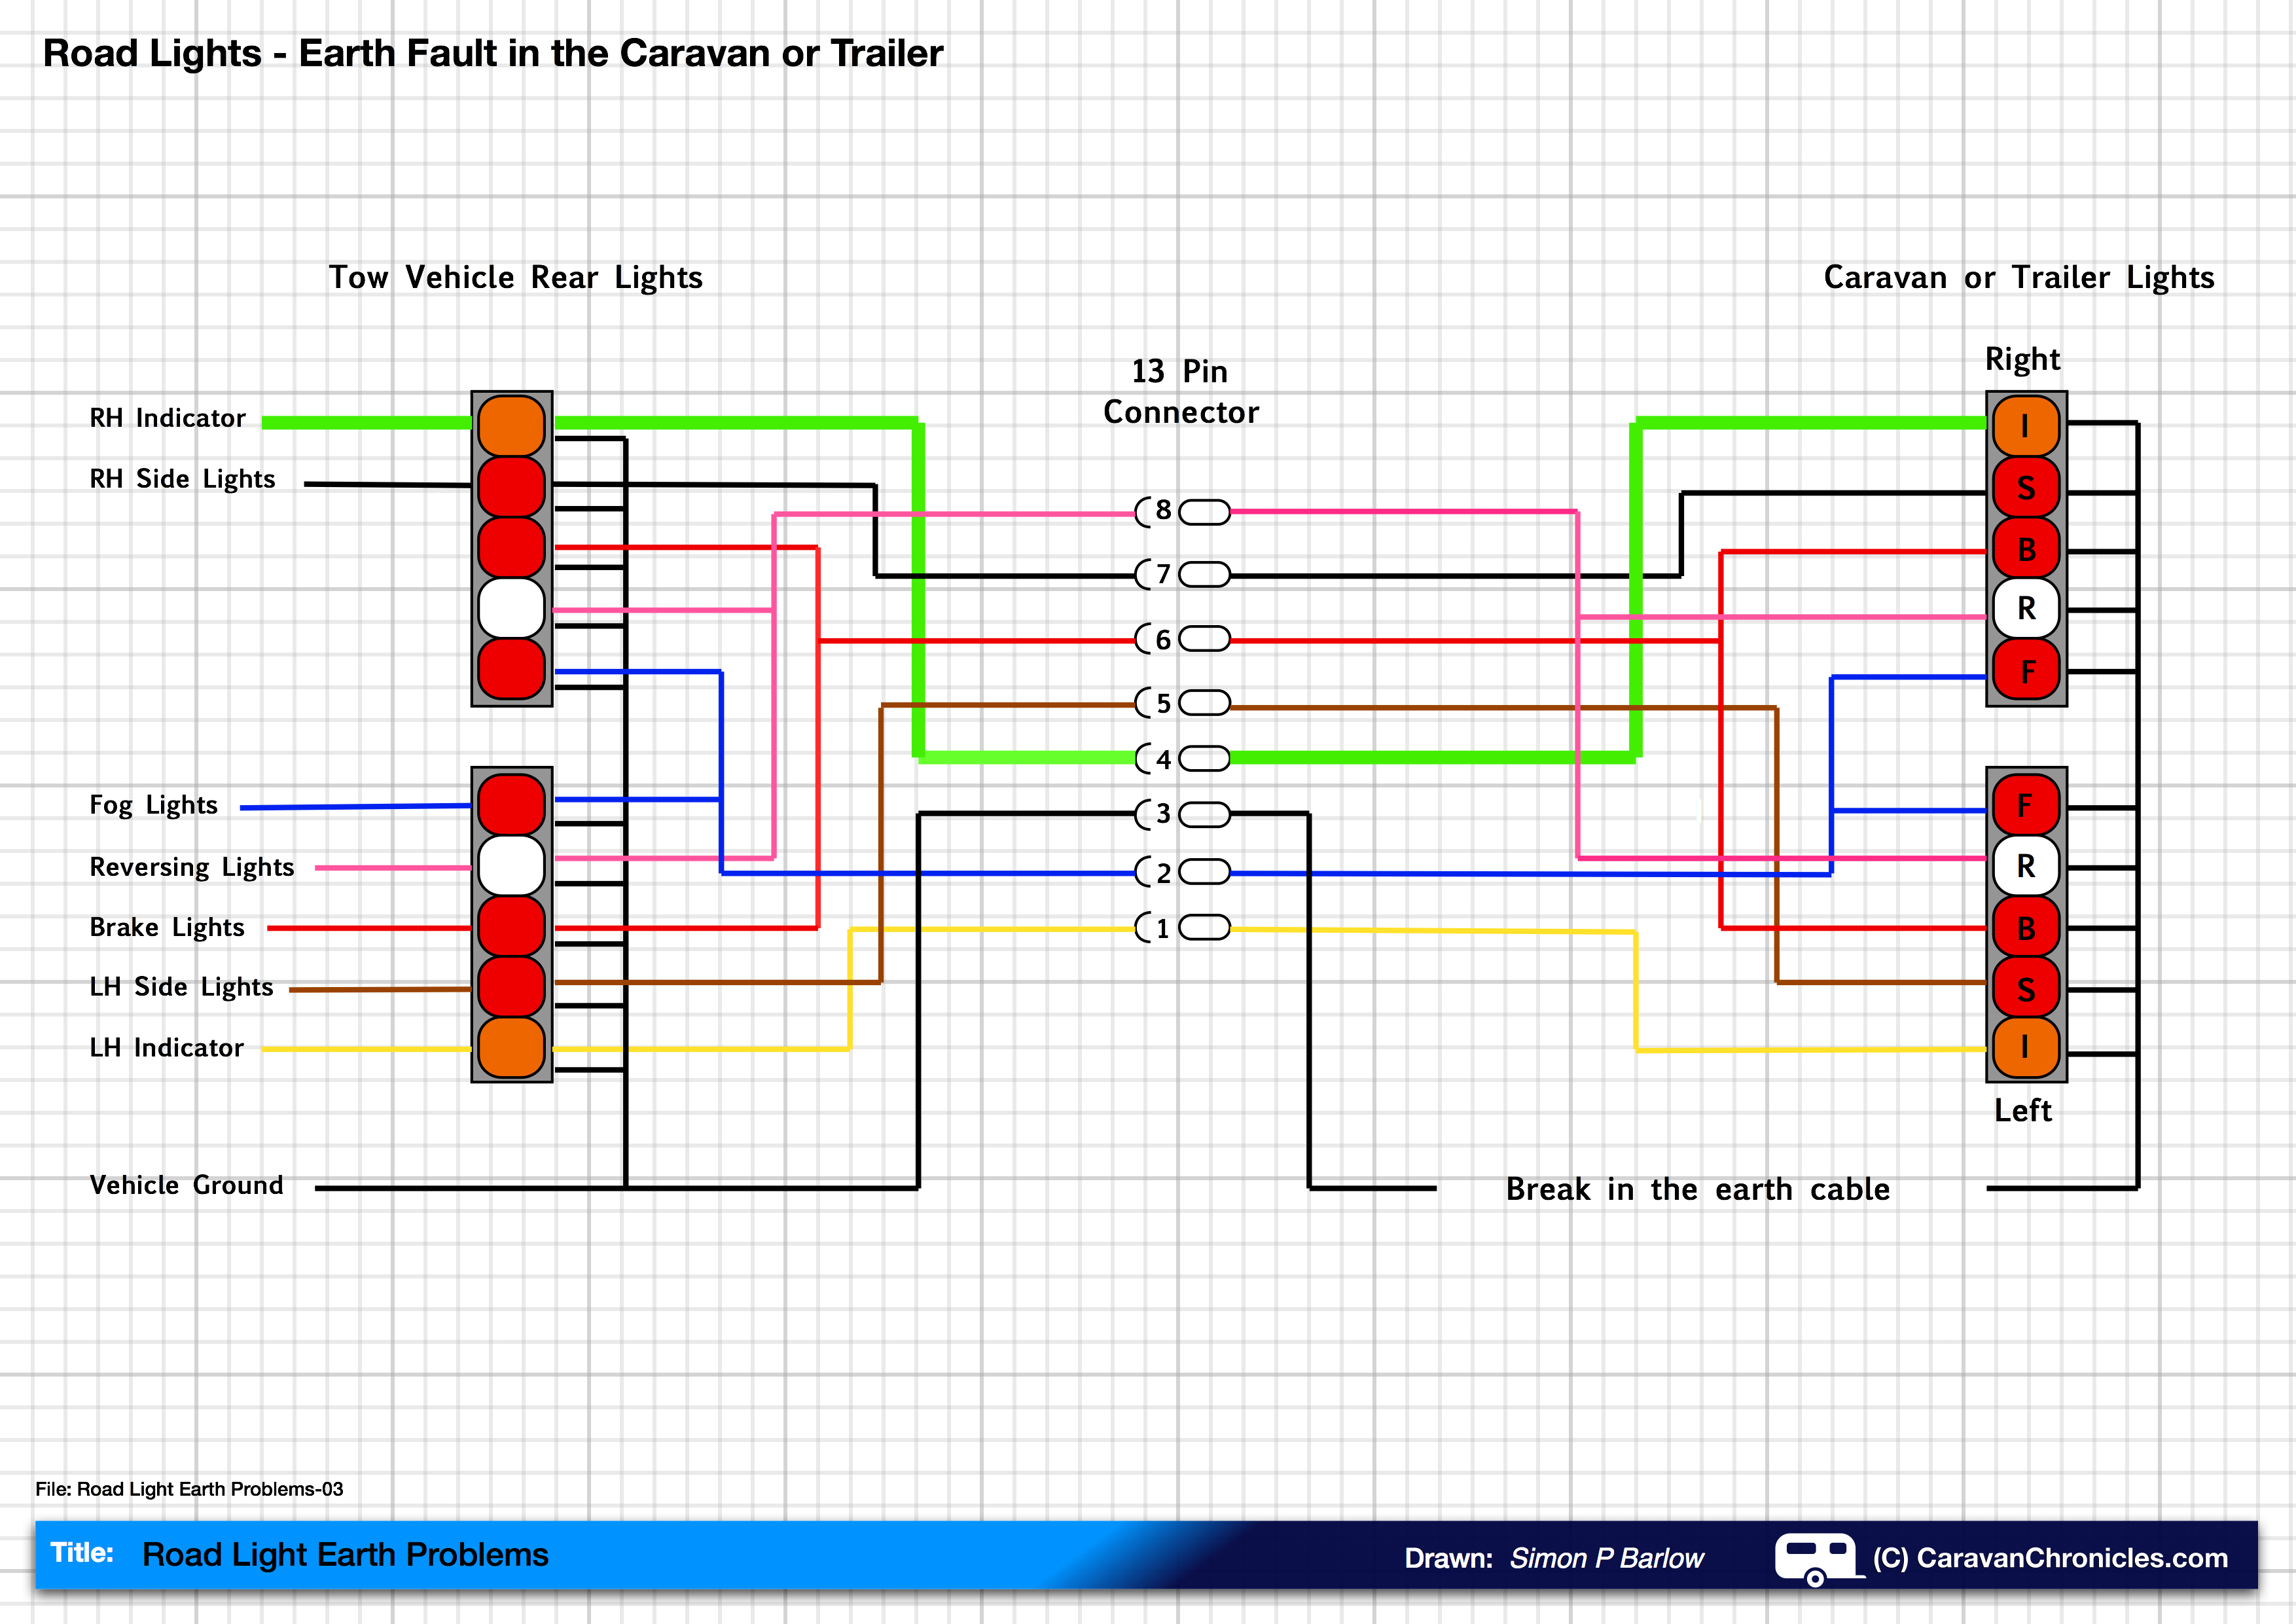
The answer is fairly simple, and a lot of people will tell you “It’s an earth fault” So often said simply because they have heard someone else say it but really they don’t understand how it can be an earth fault. Trying to find a fault even if you know what it is can be frustrating if you don’t know a bit of theory behind it, but I’ll try to give you an insight into what’s going on. Lets have a look at a basic wiring diagram for the caravan or trailer road lights and their connections.
The term ground and earth are basically the same thing but the ‘earth’ refers to the cable and the ground is the termination of the earth cable to the car in this case.
The drawing above shows the basic road light wiring. (Click on the diagram to enlarge it) You can follow each circuit through from the tow vehicle through the 13 pin connector to the rear lights of the caravan or trailer and then back through the return path (earth) to the 13 pin connector and back to the vehicle ground as shown in the diagram.
What happens when you operate the right hand indicator? Electricity flows down the green wire and lights up the right hand indicator on the vehicle and continues down the green wire through the 13 pin connector to the caravan or trailer right hand indicator. It then returns through the black earth wire to vehicle ground.
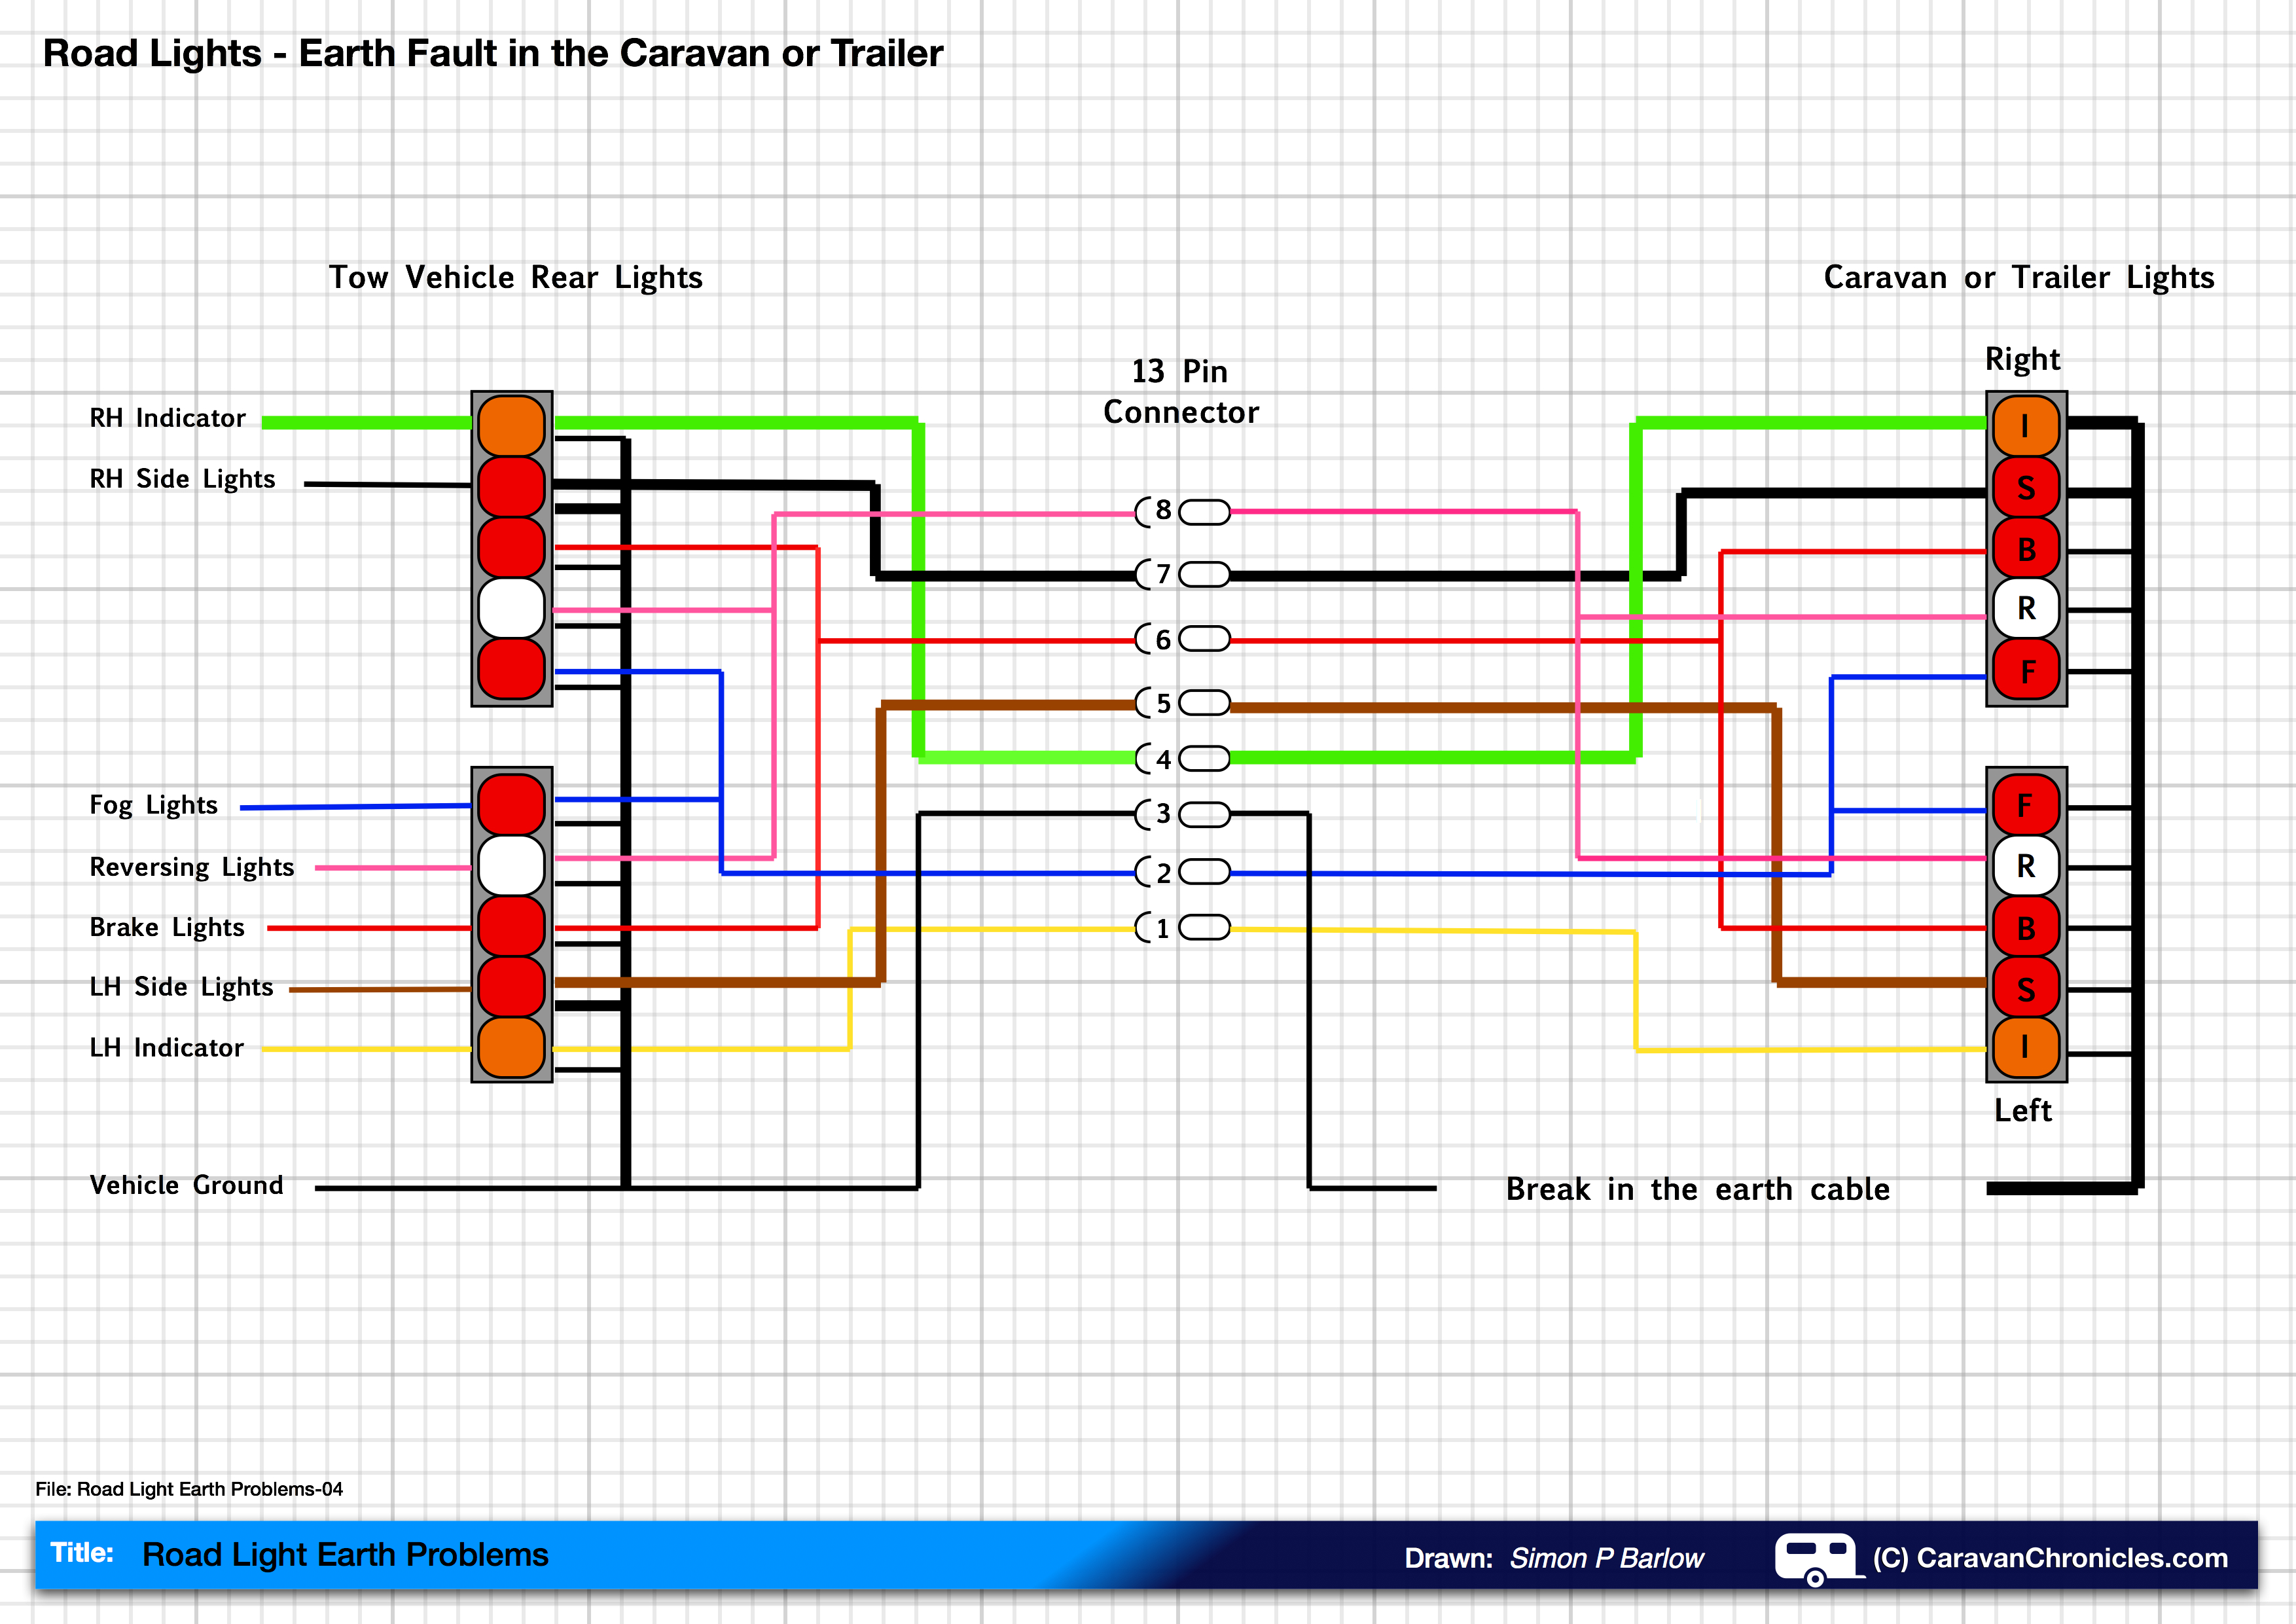
So what happens if we have an earth fault?
Here is the same drawing only this time with an earth fault.
Now the return path for the lighting circuits is broken, but using the indicators now also flashes the rear side lights. So what’s happening?
In the diagram below we have again turned on our right indicator, electricity flows down the green wire (shown a bit thicker this time) to the rear caravan or trailer indicator. It flows through the bulb and should then follow the black line to the vehicle ground. But it can’t as there is a break in the wiring.
Electricity really does like to go home!
As the return path through the black wire is effectively ‘blocked’ because of the break the electric current will try to find another way home. The only path it can find is back through another circuit, in this case the right hand side light circuit all the way back to the tow vehicle and through the bulb in the rear light to earth, as illustrated below.
So as your indicator flashes, it is also powering the side light on the caravan or trailer and the rear side light of the tow vehicle. Electricity will nearly always find a way home!
But it’s not quite that simple. In the diagram above I have shown one return path (the heavy black lines) but in fact the return path will be through all the light bulb circuits that are not powered. As there are multiple paths back to earth and only one path or circuit powering the indicator bulb, the indicator bulb will be at full brightness but the other bulbs may only be dim.
If you now turn on the side lights and indicate right, the current from the side lights and the indicator will follow the path of least resistance through the other lights that aren’t lit back to the tow vehicle earth.
So the original question of “Why do my side lights flash when I indicate” might now be expanded to “Why do my side lights flash when I indicate? It can’t be because there is anything wrong with the side lights because they work normally”
We now know that the side lights only appear to work correctly.
The diagrams all show a common earth from both sets of rear lights on the caravan or trailer. Sometimes for convenience the manufacturer will run a separate earth for each light cluster, so all the wires for the left hand lights run down the left hand side and all the wires for the right down the right hand side. The common point is usually a small junction box at the front of the caravan or trailer.
If we have similar symptoms as before but only affecting one side (the RH indicator is OK, but the LH Indicator also flashes the LH side light and LH brake light) then the break in the earth cable will be only on the left hand side earth wiring.
So now you know the theory behind earth faults on caravan or trailer road lights. If you want to do a bit more reading you might find these two articles interesting:
One thing we are asked from time to time, especially by people new to caravanning is how we pack. If you put everything in the caravan that you wanted to take for a trip, it would make life so much easier… but will probably go over the caravan’s weight limit.
It will take a while to find your own routine for packing but here’s how we do it to make life simple and easy, or so we think.
Like a lot of people we keep out caravan in storage, so the chance to ‘pre load’ with everything we need for a trip one or two days before setting off is a bit limited. Sue has a couple of large bags.. I think they are laundry bags bought from a store for a couple of pounds, that she packs all the clothes in, so when we go to pick up the caravan, it’s a simple matter of unloading the two bags into relevant cupboards and anything for the wardrobe is hung up before it gets chance to crease up and it doesn’t take that long to do.
As we do like to cook in the caravan, one of the heaviest ‘group’ of things is food and trying to store this in the caravan before a trip would take time so we have a different solution.
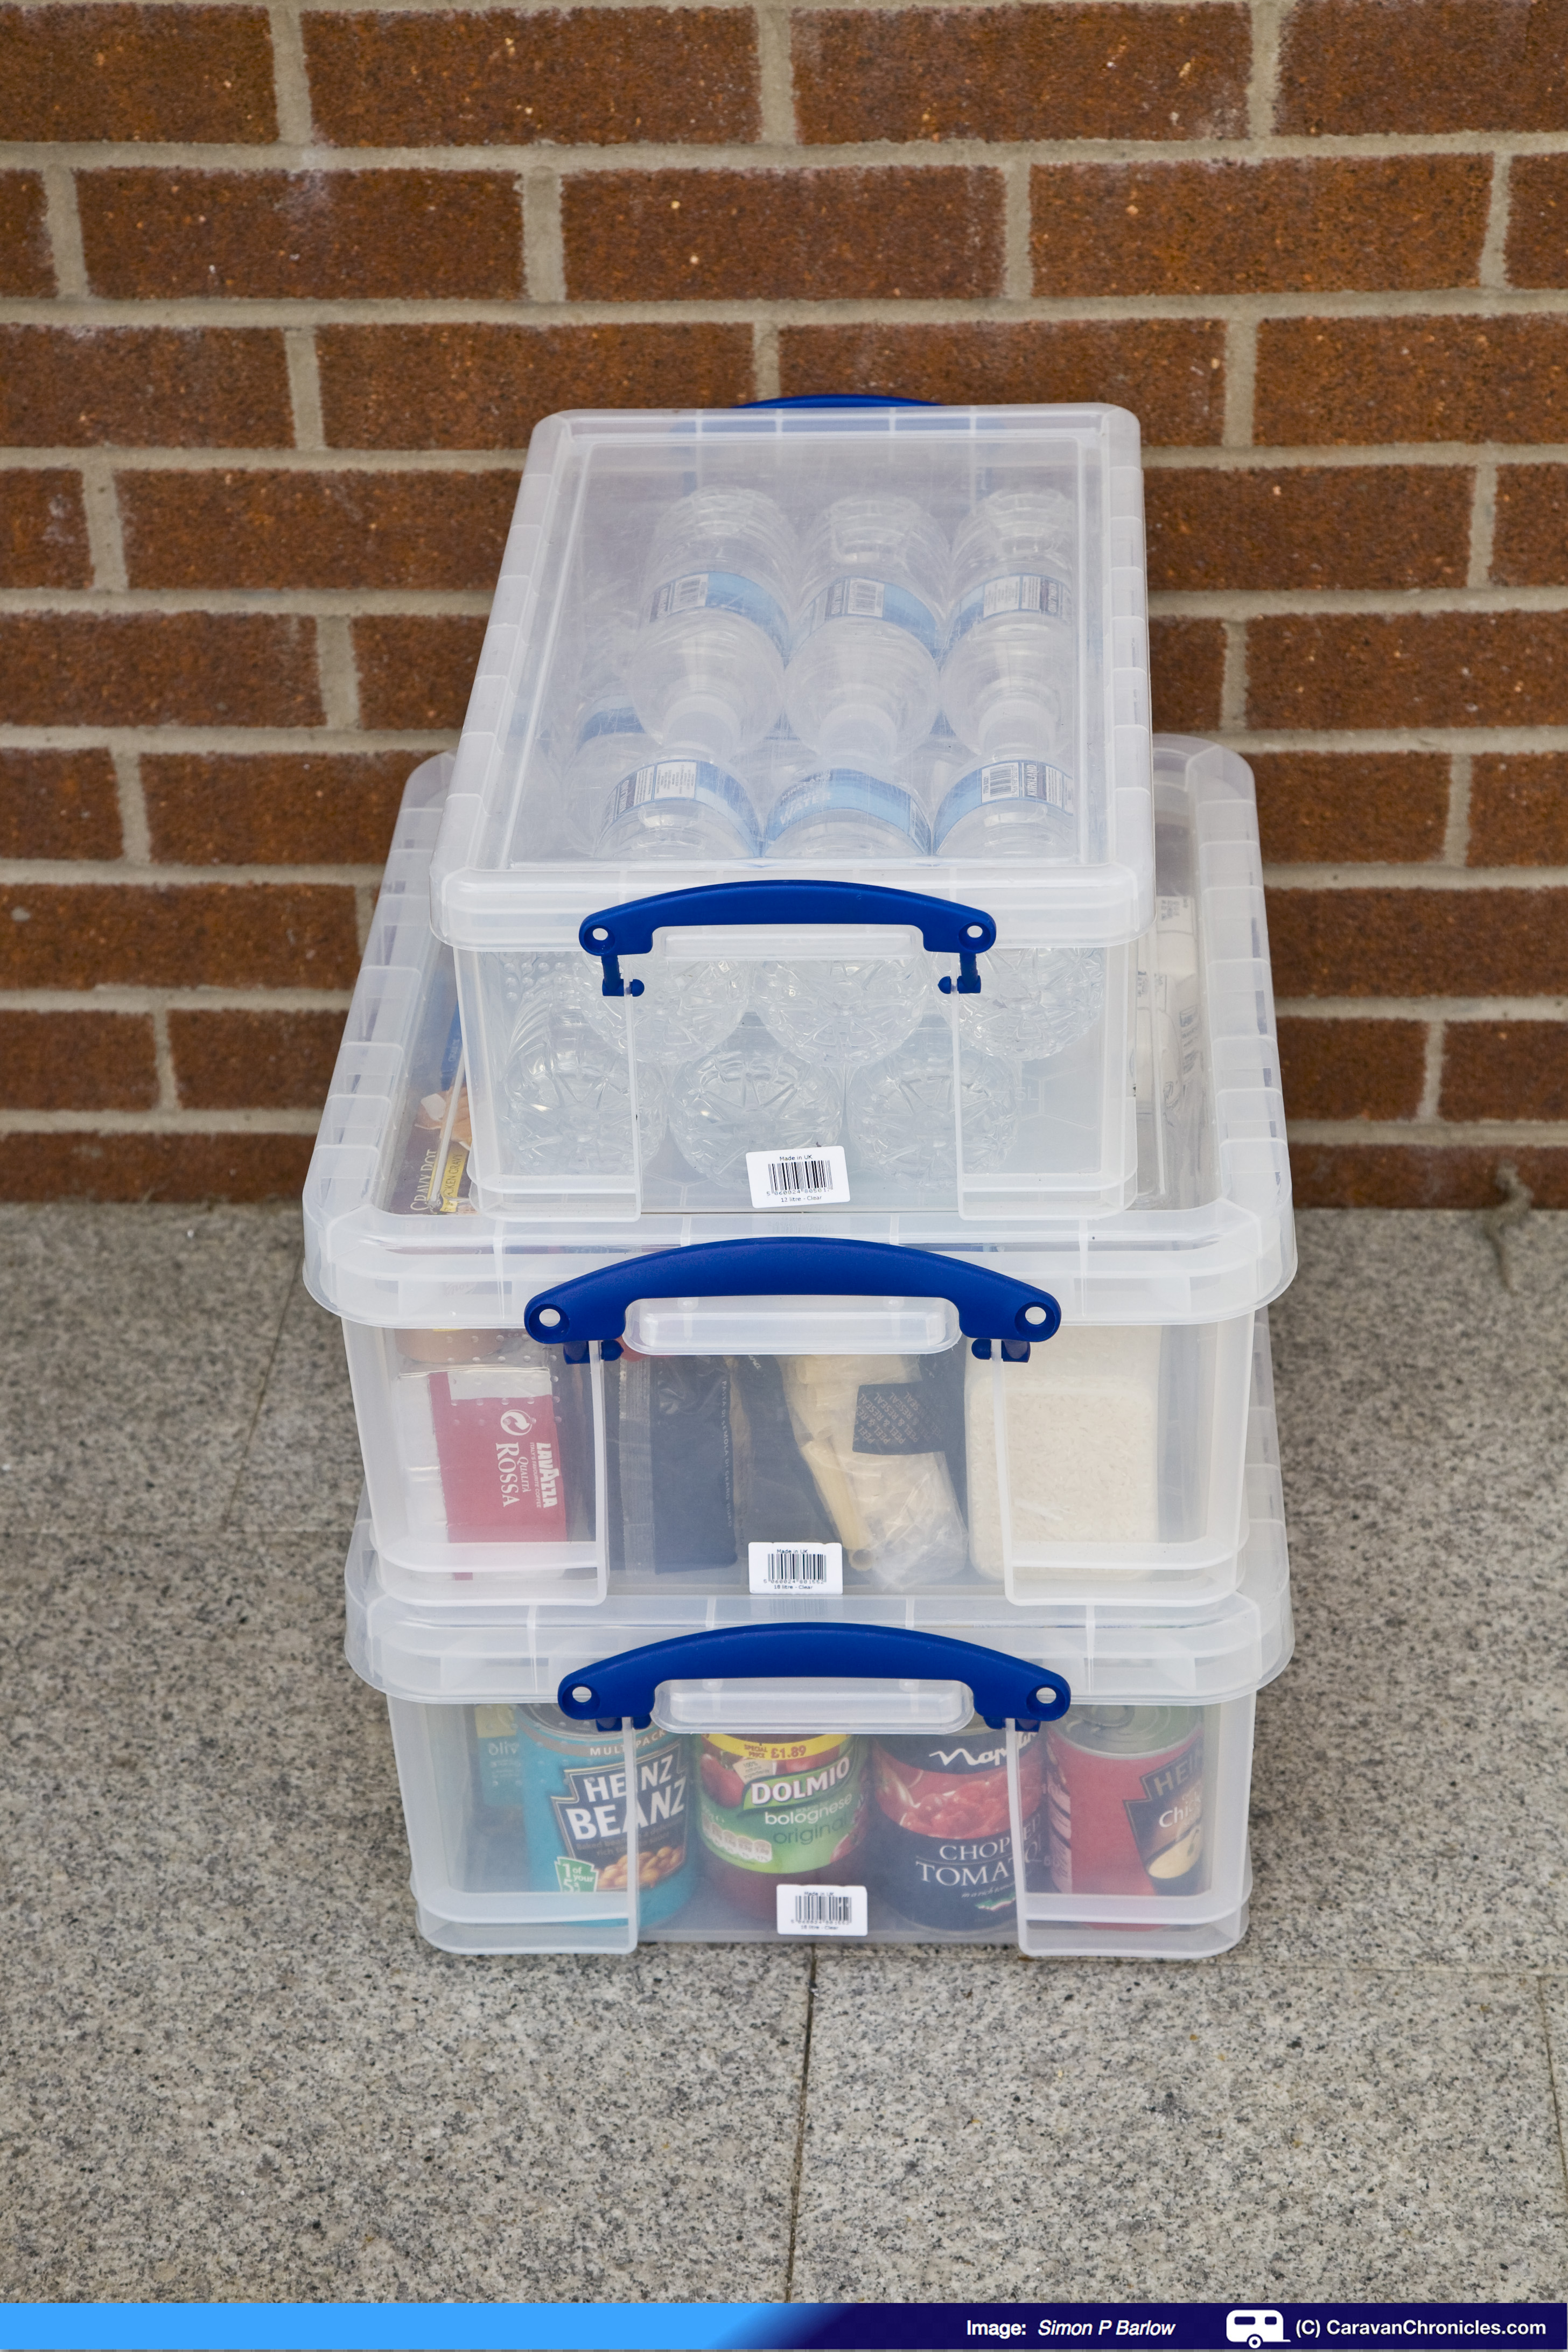
Our basic food stock
We came up with a list of essential items that we take, mostly things that we need when cooking and core ingredients. All these are stored in plastic boxes at home ready to go. Storing them at home means we can keep an eye on expiration dates and restock from a list when required. The boxes are from The Really Useful Box Coso they stack neatly and fit in the back of the Land Rover Freelander easily. They also contain things that we can use to make a few hot meals if we get delayed en-route (I’ve never had to make a meal while held up in a traffic jam for hours on the motorway… not yet anyway!)
The ‘comestibles’ boxes as we call them stack in the Freelander along with the Cadac BBQ and stay there until we reach the campsite, where we transfer them to the under bed locker. No need to unpack the boxes as we know whats in there and can simply access them either by lifting the bed or from the outside locker door. If we are moving sites or packing up to come home, it’s just a simple matter of transferring the boxes back to the Freelander.
We have a cool box that we load all the items for the fridge and freezer into along with a couple of ice packs so all we have to do is transfer these into the fridge. So far we haven’t had any issues with not ‘pre-cooling’ the fridge. Once the cool box is empty, we just load it with the wine/beer and an ice pack and it stays in the back of the Freelander until we arrive on site.
Collecting the caravan from storage usually takes about 20 minutes, while Sue unpack’s the clothes I load the fridge and re-load the cool box and prep the van for towing. Arriving on site it takes only 20 to 30 minutes to set up and there isn’t much backwards and forward between the car and caravan. Handy when it’s raining!
We recently obtained a Dometic Waeco S16 DC Thermoelectric Lightweight 12V Cooler from Leisure Shop Direct which intend to use to keep the all important sammiches and water cool while we are travelling. As we like to buy local produce wherever we stay its going to be handy to keep anything we buy cool until we get back to the caravan. In a couple of outings so far it’s proved extremely efficient and we think it is a good addition to our kit. We will be doing a full review of it soon.
The box system works for us and we have extended it now to include a box that has all our cycling equipment – helmets, lights, locks, straps, gloves etc. so if we take the bikes, It’s easy to just load the box with everything in it. I also have one that we keep the towing kit in – steady drill, jockey wheel handle, gloves, gas cylinder spanner, towing mirrors and 13 pin to 12N/12S adaptor lead (just in case the caravan has to be towed by a vehicle only fitted with 12N/12S electrics) and when we hitch up the AL-KO hitch lock and wheel lock is stored in there while travelling.
For us the boxes just keep things organised, both for storage at home and while away. It gives me the chance to check everything a day or so before we go and so far it’s worked well. It might not be right for you, but at least it’s given you some ideas I hope.
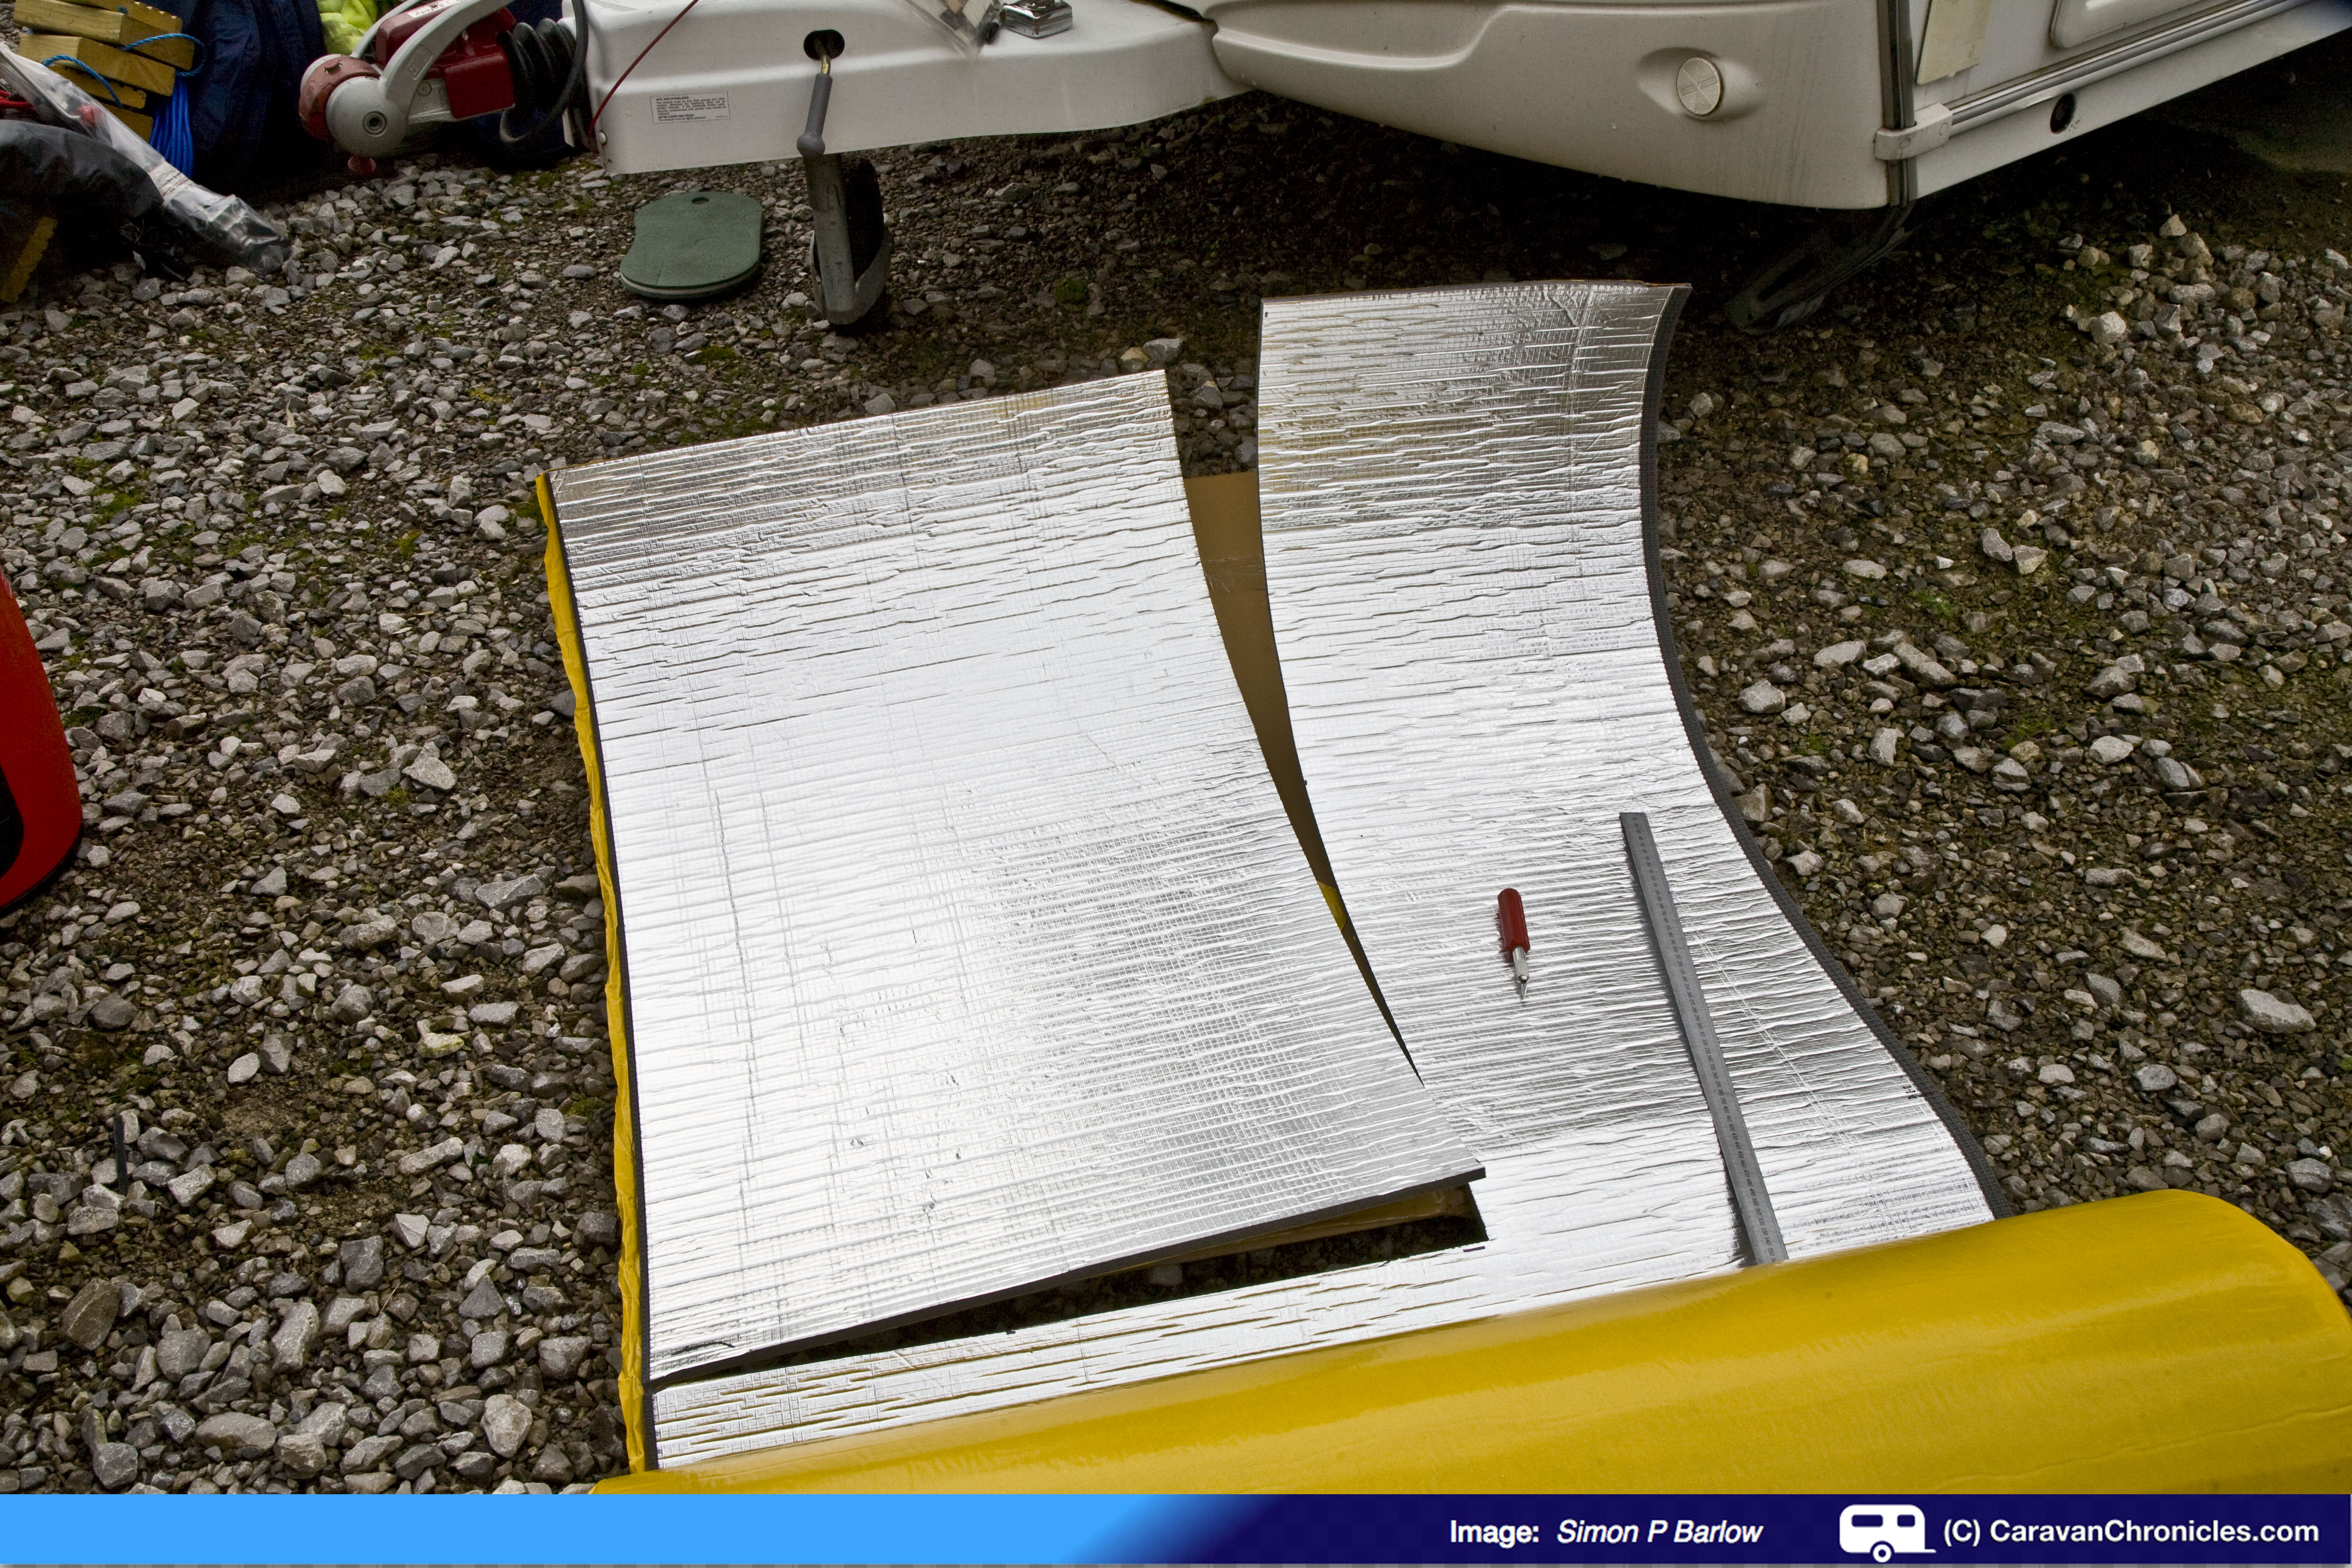
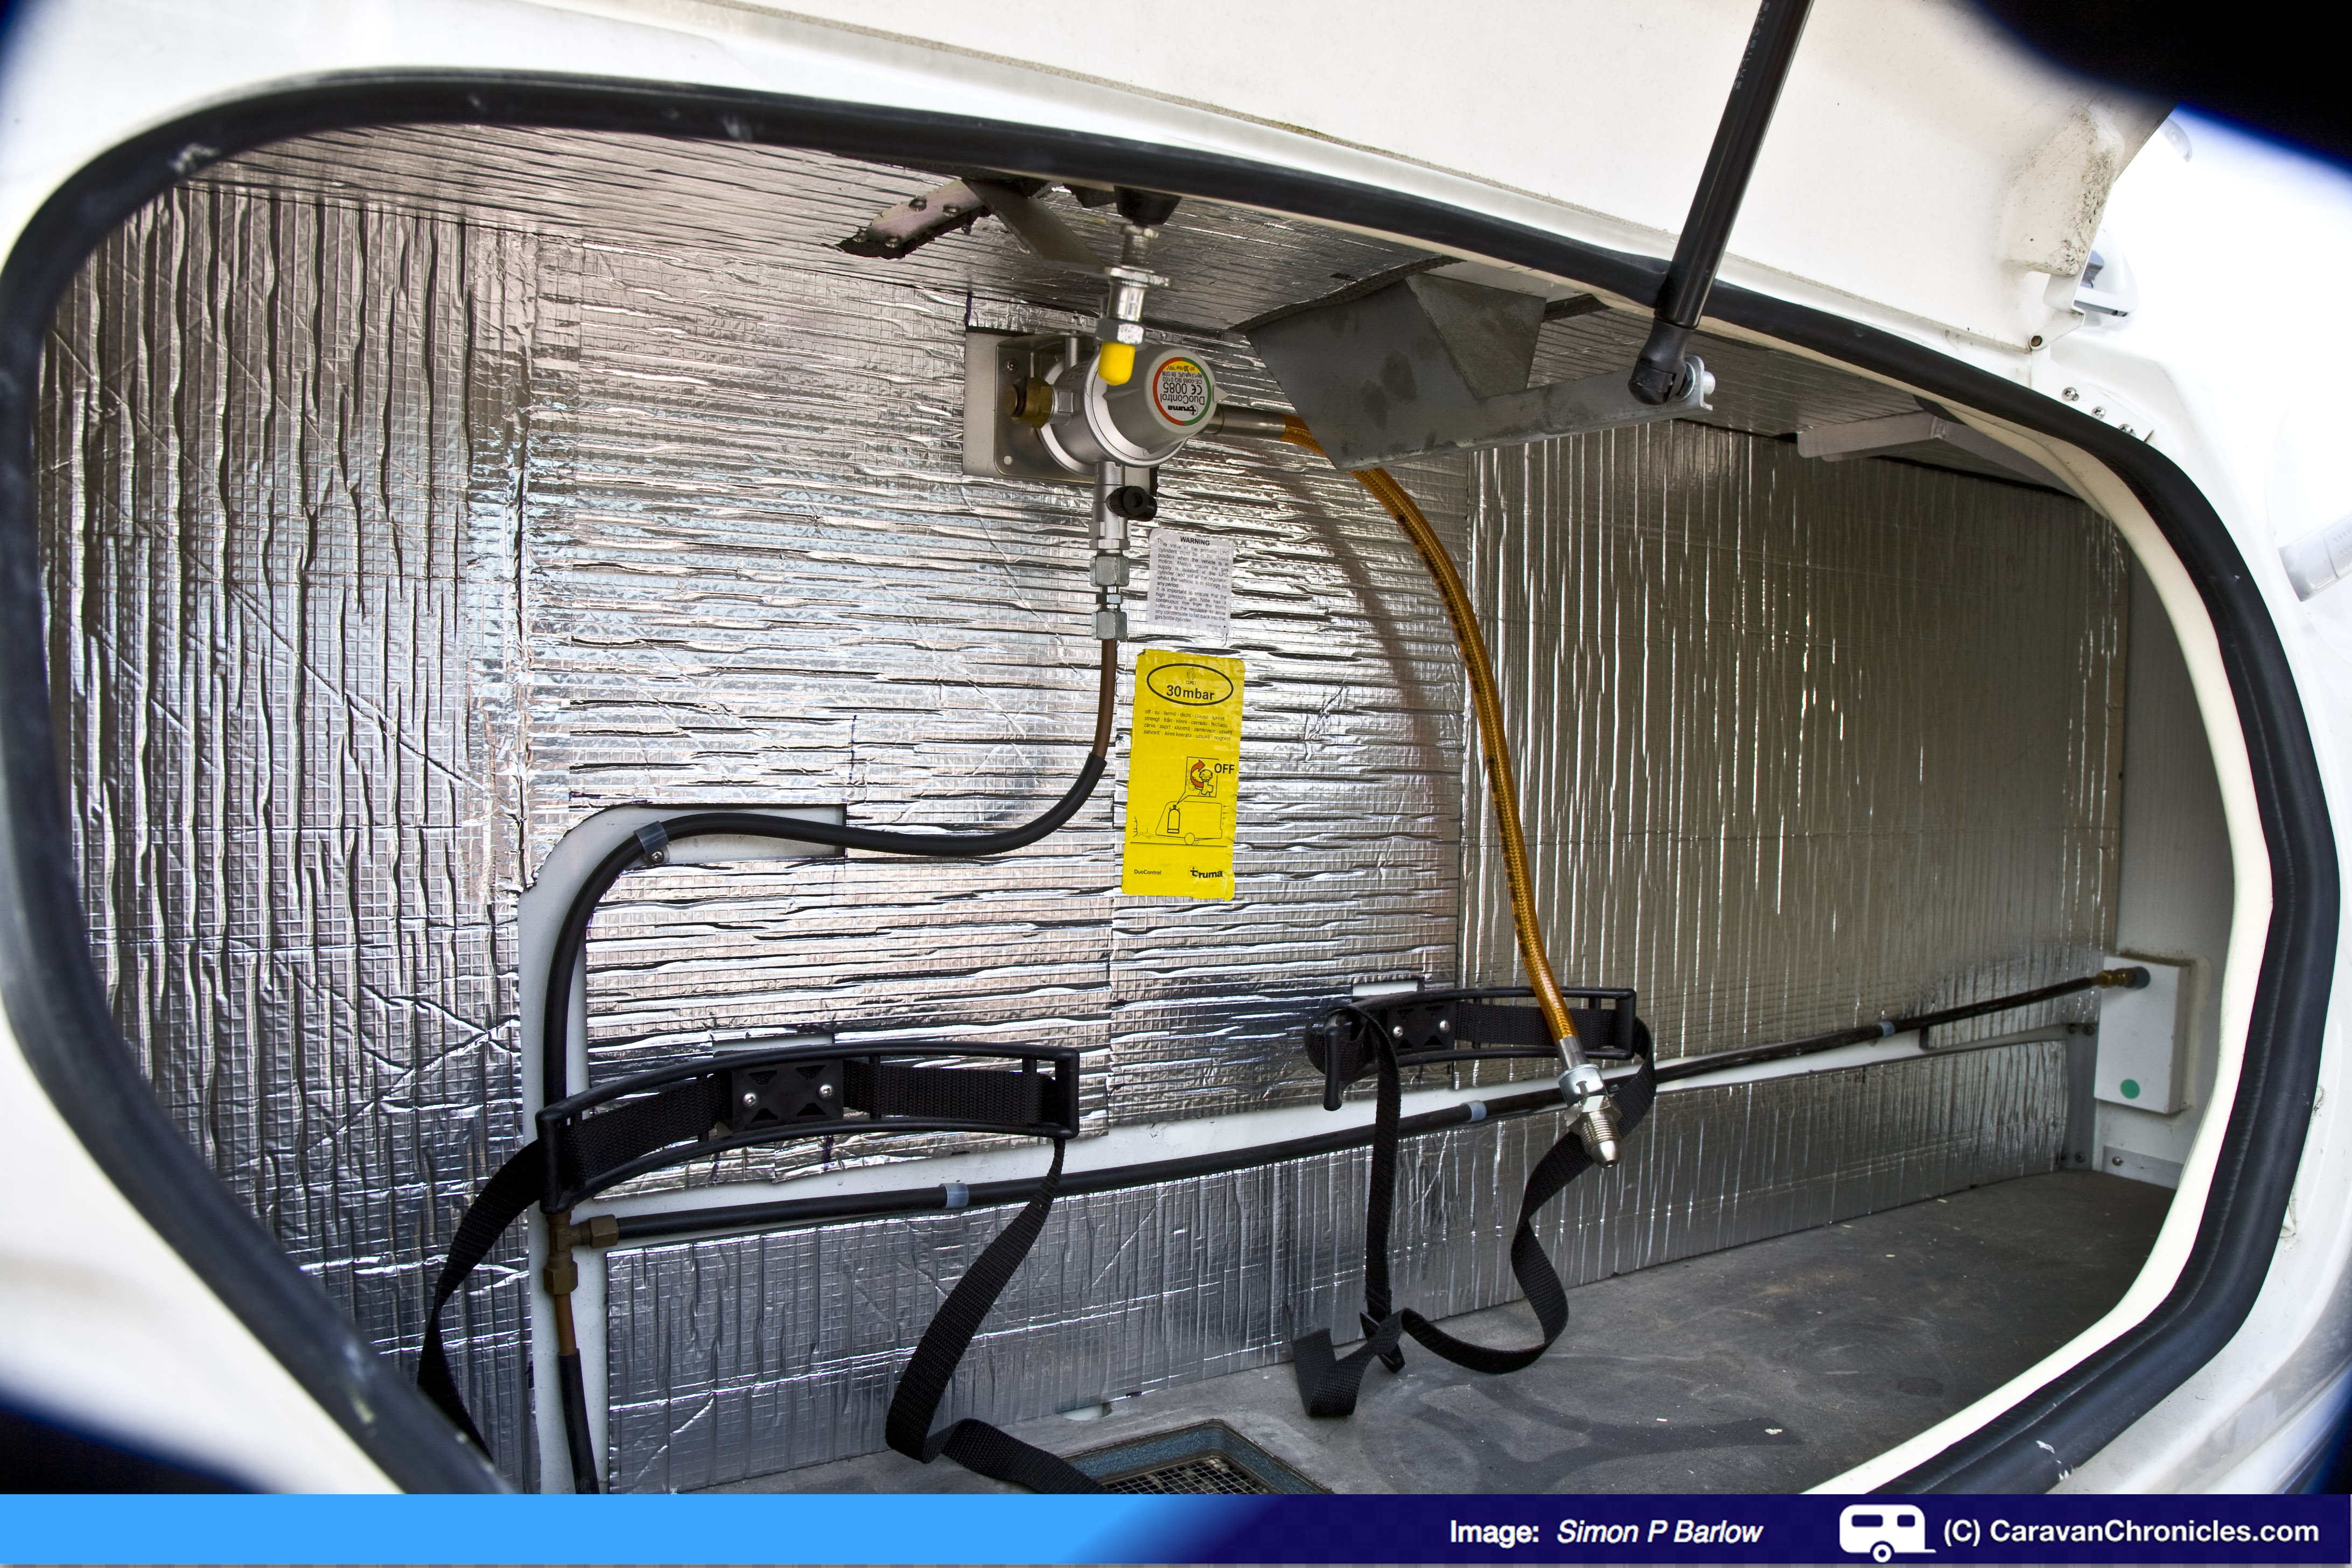
One thing we had noticed using the caravan all year round was the front wall between the caravan interior and gas locker and the window shelf above it always seemed noticeably cooler than the rest of the walls of the caravan. The cupboard under the front draws also was a lot cooler even though it had a blown heating pipe running through it. I’m not sure if it’s just a perceived thing that we think its cooler or if it’s down to the fact that the insulation in the front dividing wall my be a little thinner.
In an effort to try to cure this, I had been on the look out for some sticky backed foam insulation. Searching round the web gave a few results, but it was mainly for sound insulation rather than thermal insulation. However I did eventually discover Foam Solutions UK in Nantwich, Cheshire that offered a whole range of foam for various uses. When I started looking I wanted something that was anti-static and fire-retardant as it was being installed in the gas locker. Foam Solutions UK had just the product, a fire-retardant foam sheet that was designed for use under engine bonnets. I emailed Carole at Foam Solutions UK and she kindly sent out some samples, including a piece of the under bonnet material. A quick measure up and I ordered enough for the front gas locker and to cover the wheel arches inside the wardrobe and under the fixed bed.
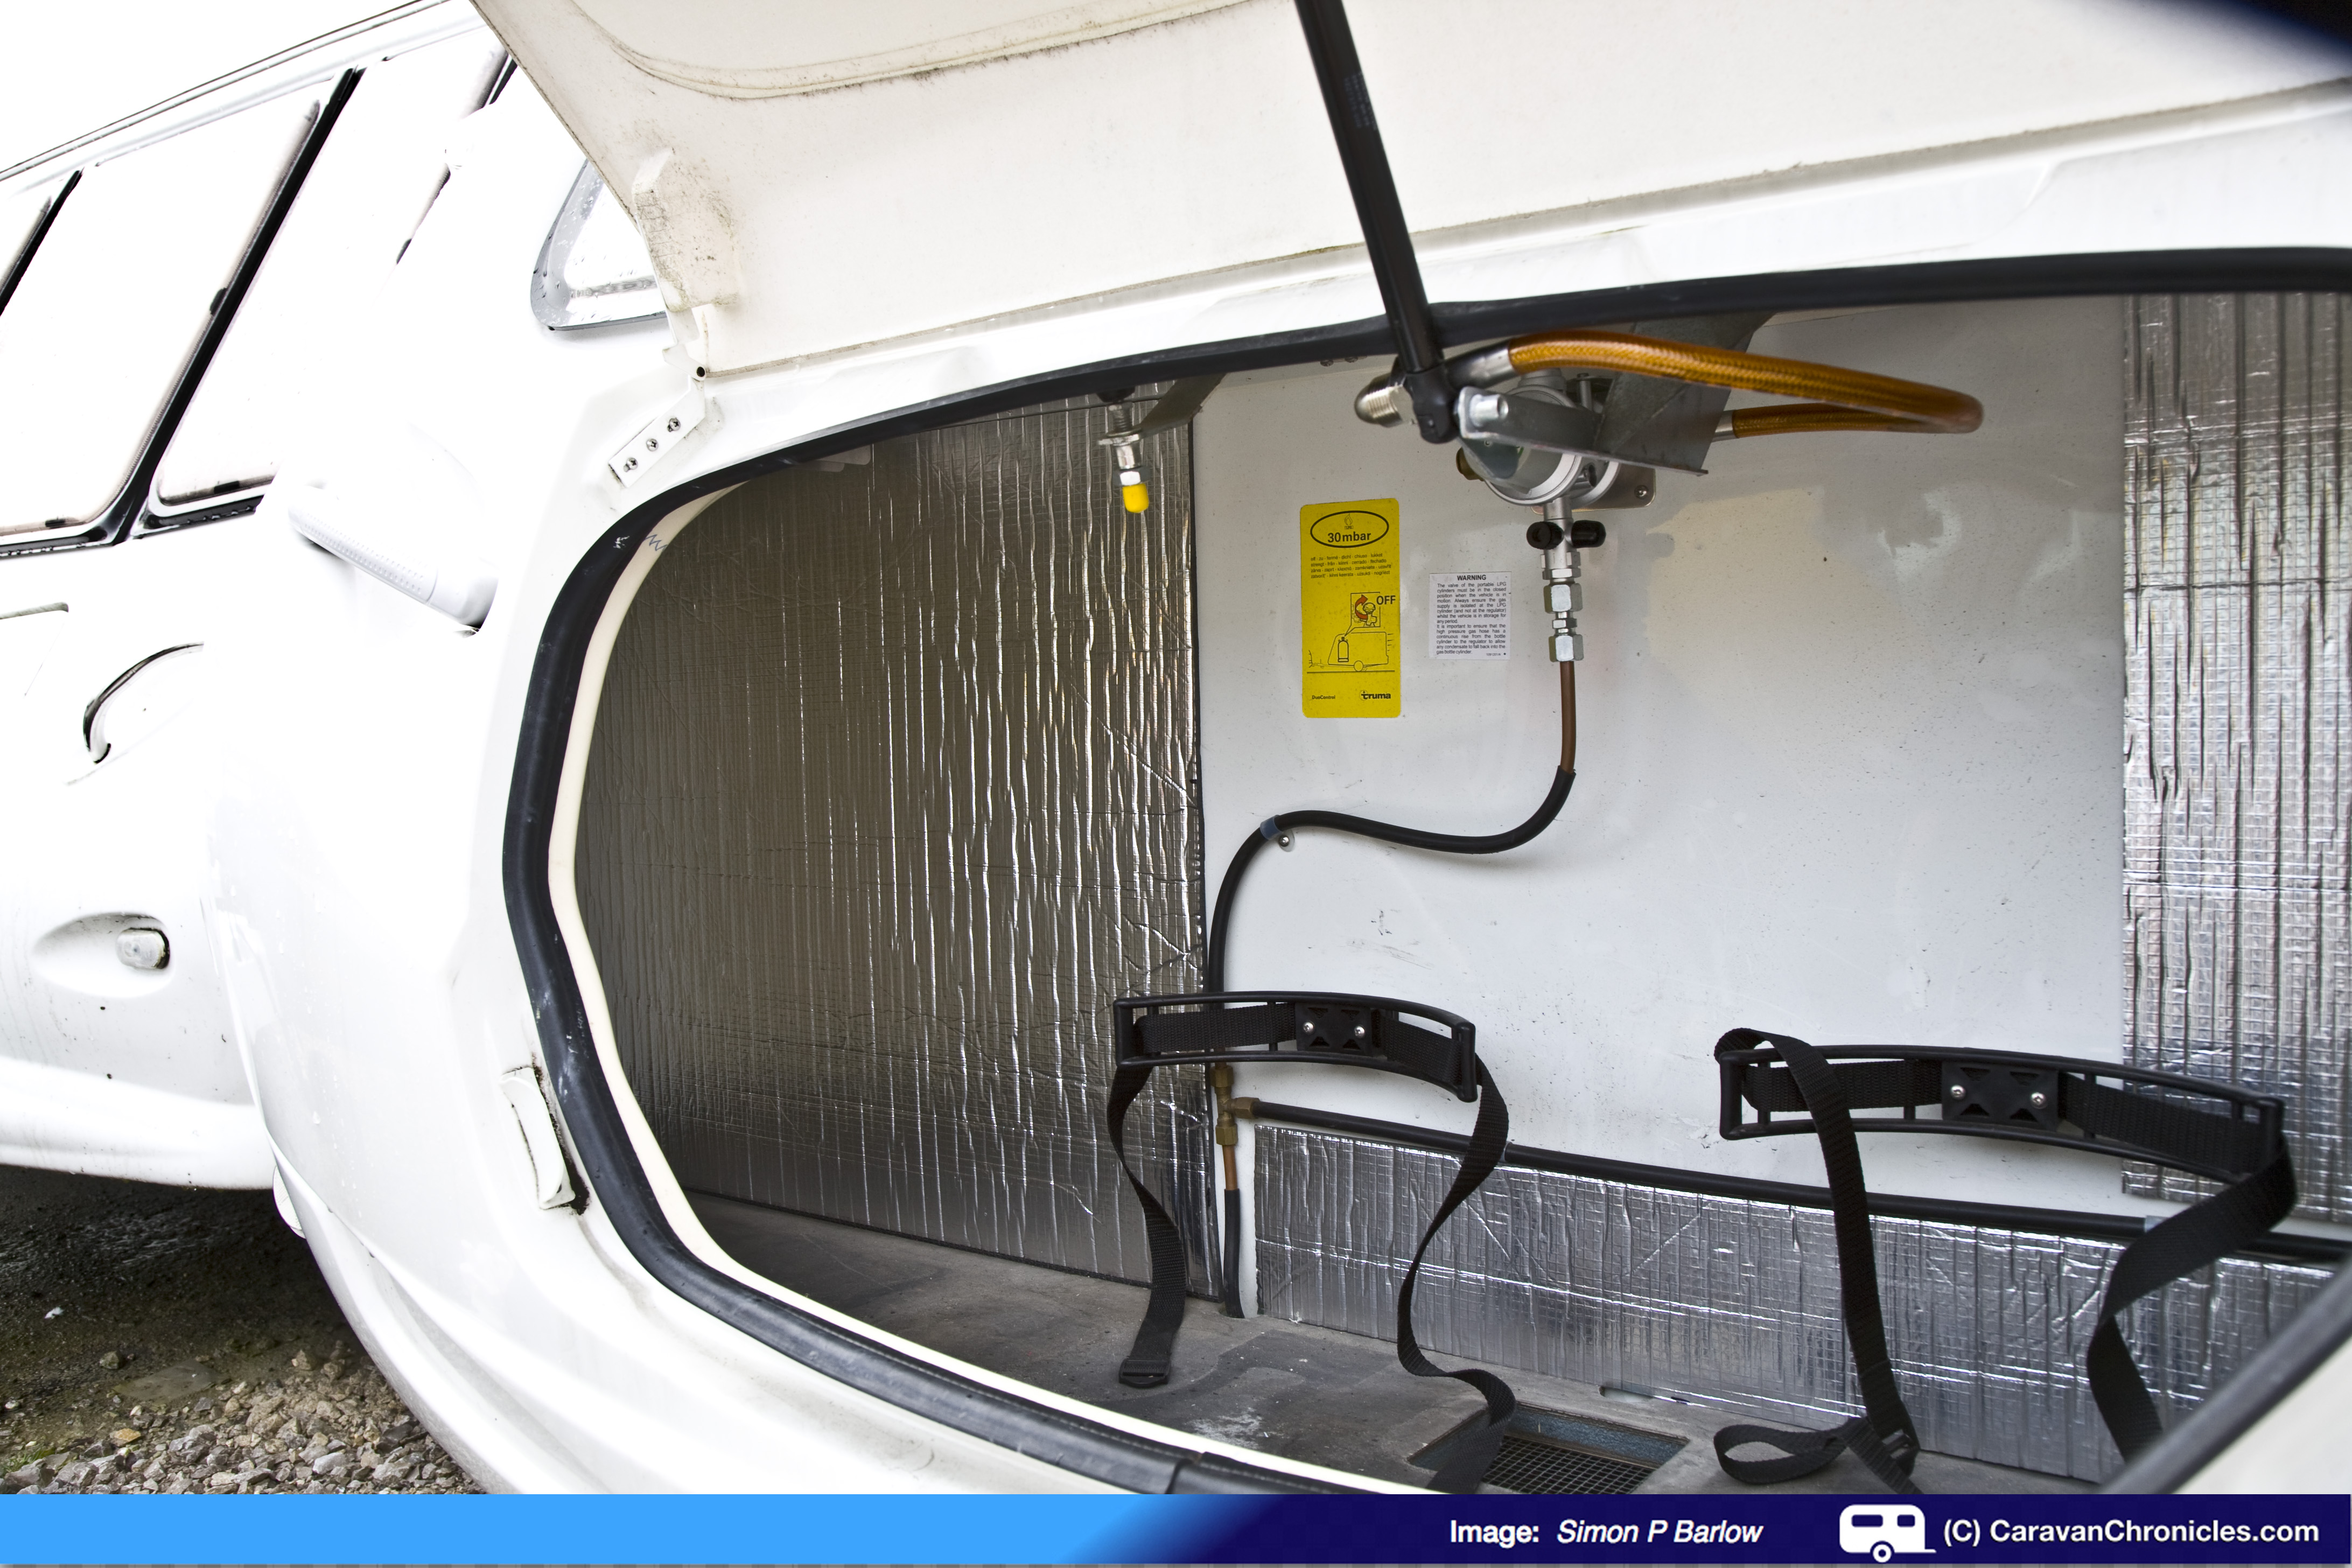
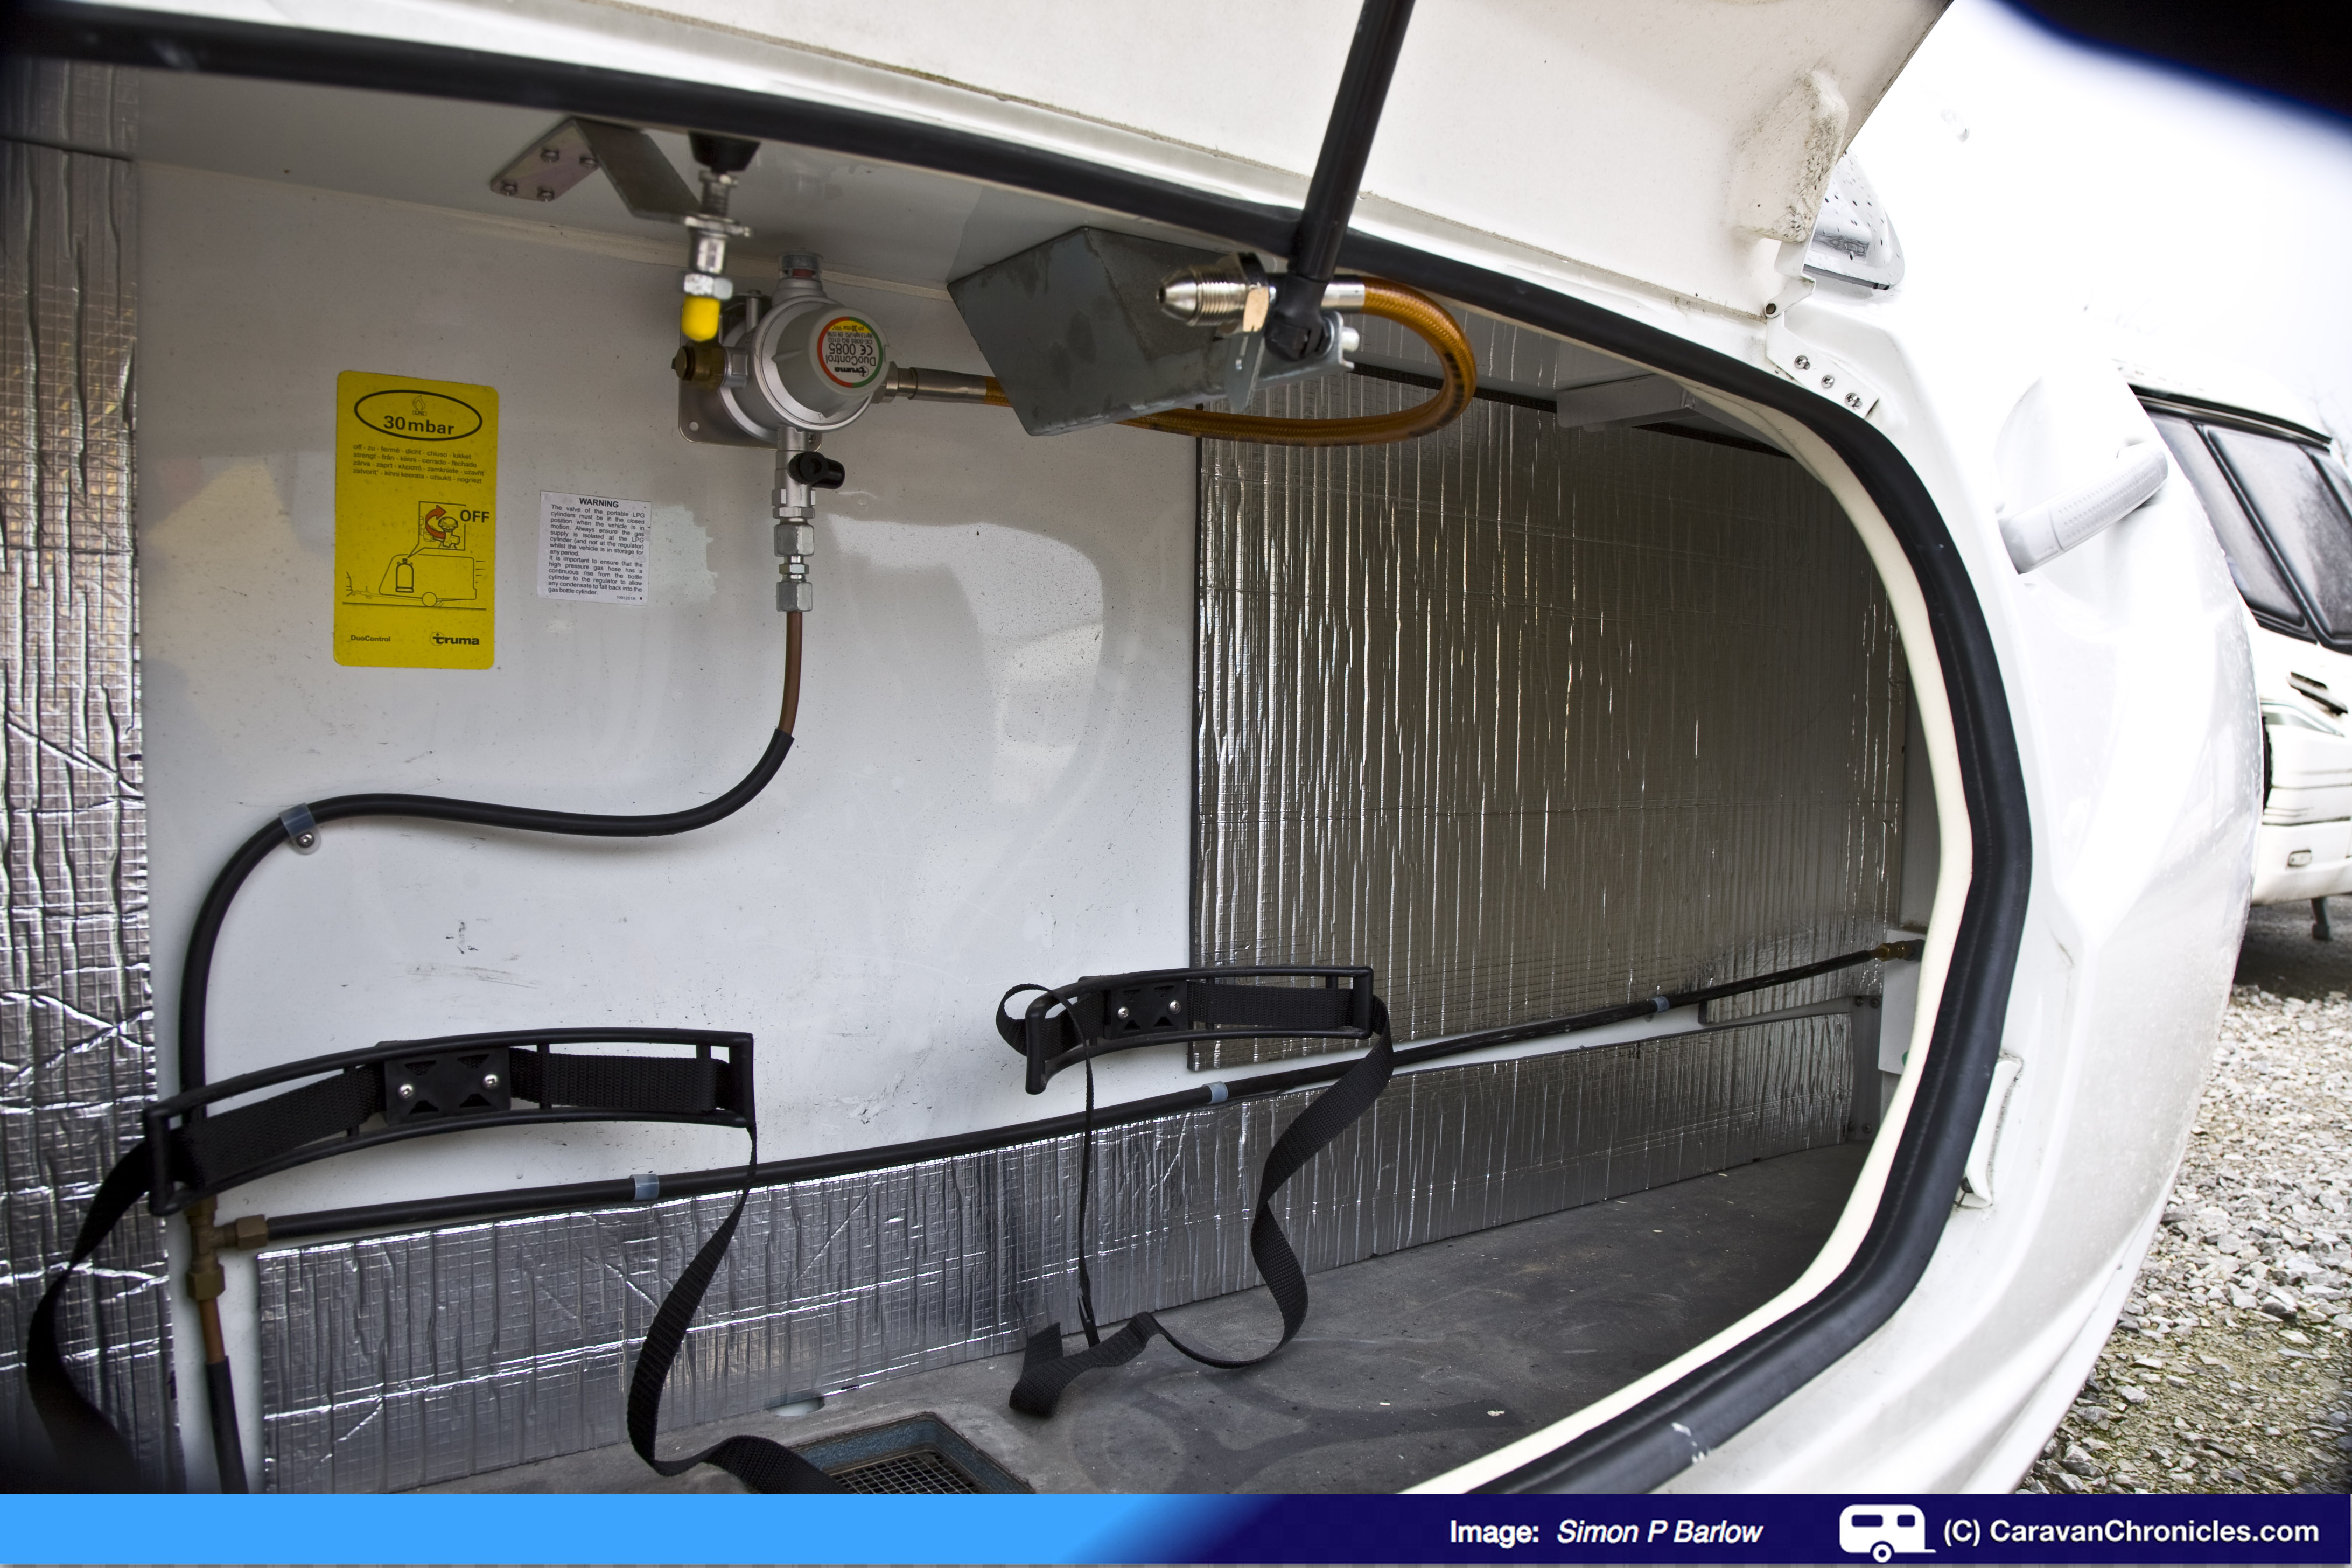
First task was to empty the gas locker and give it a bit of a dust out…..
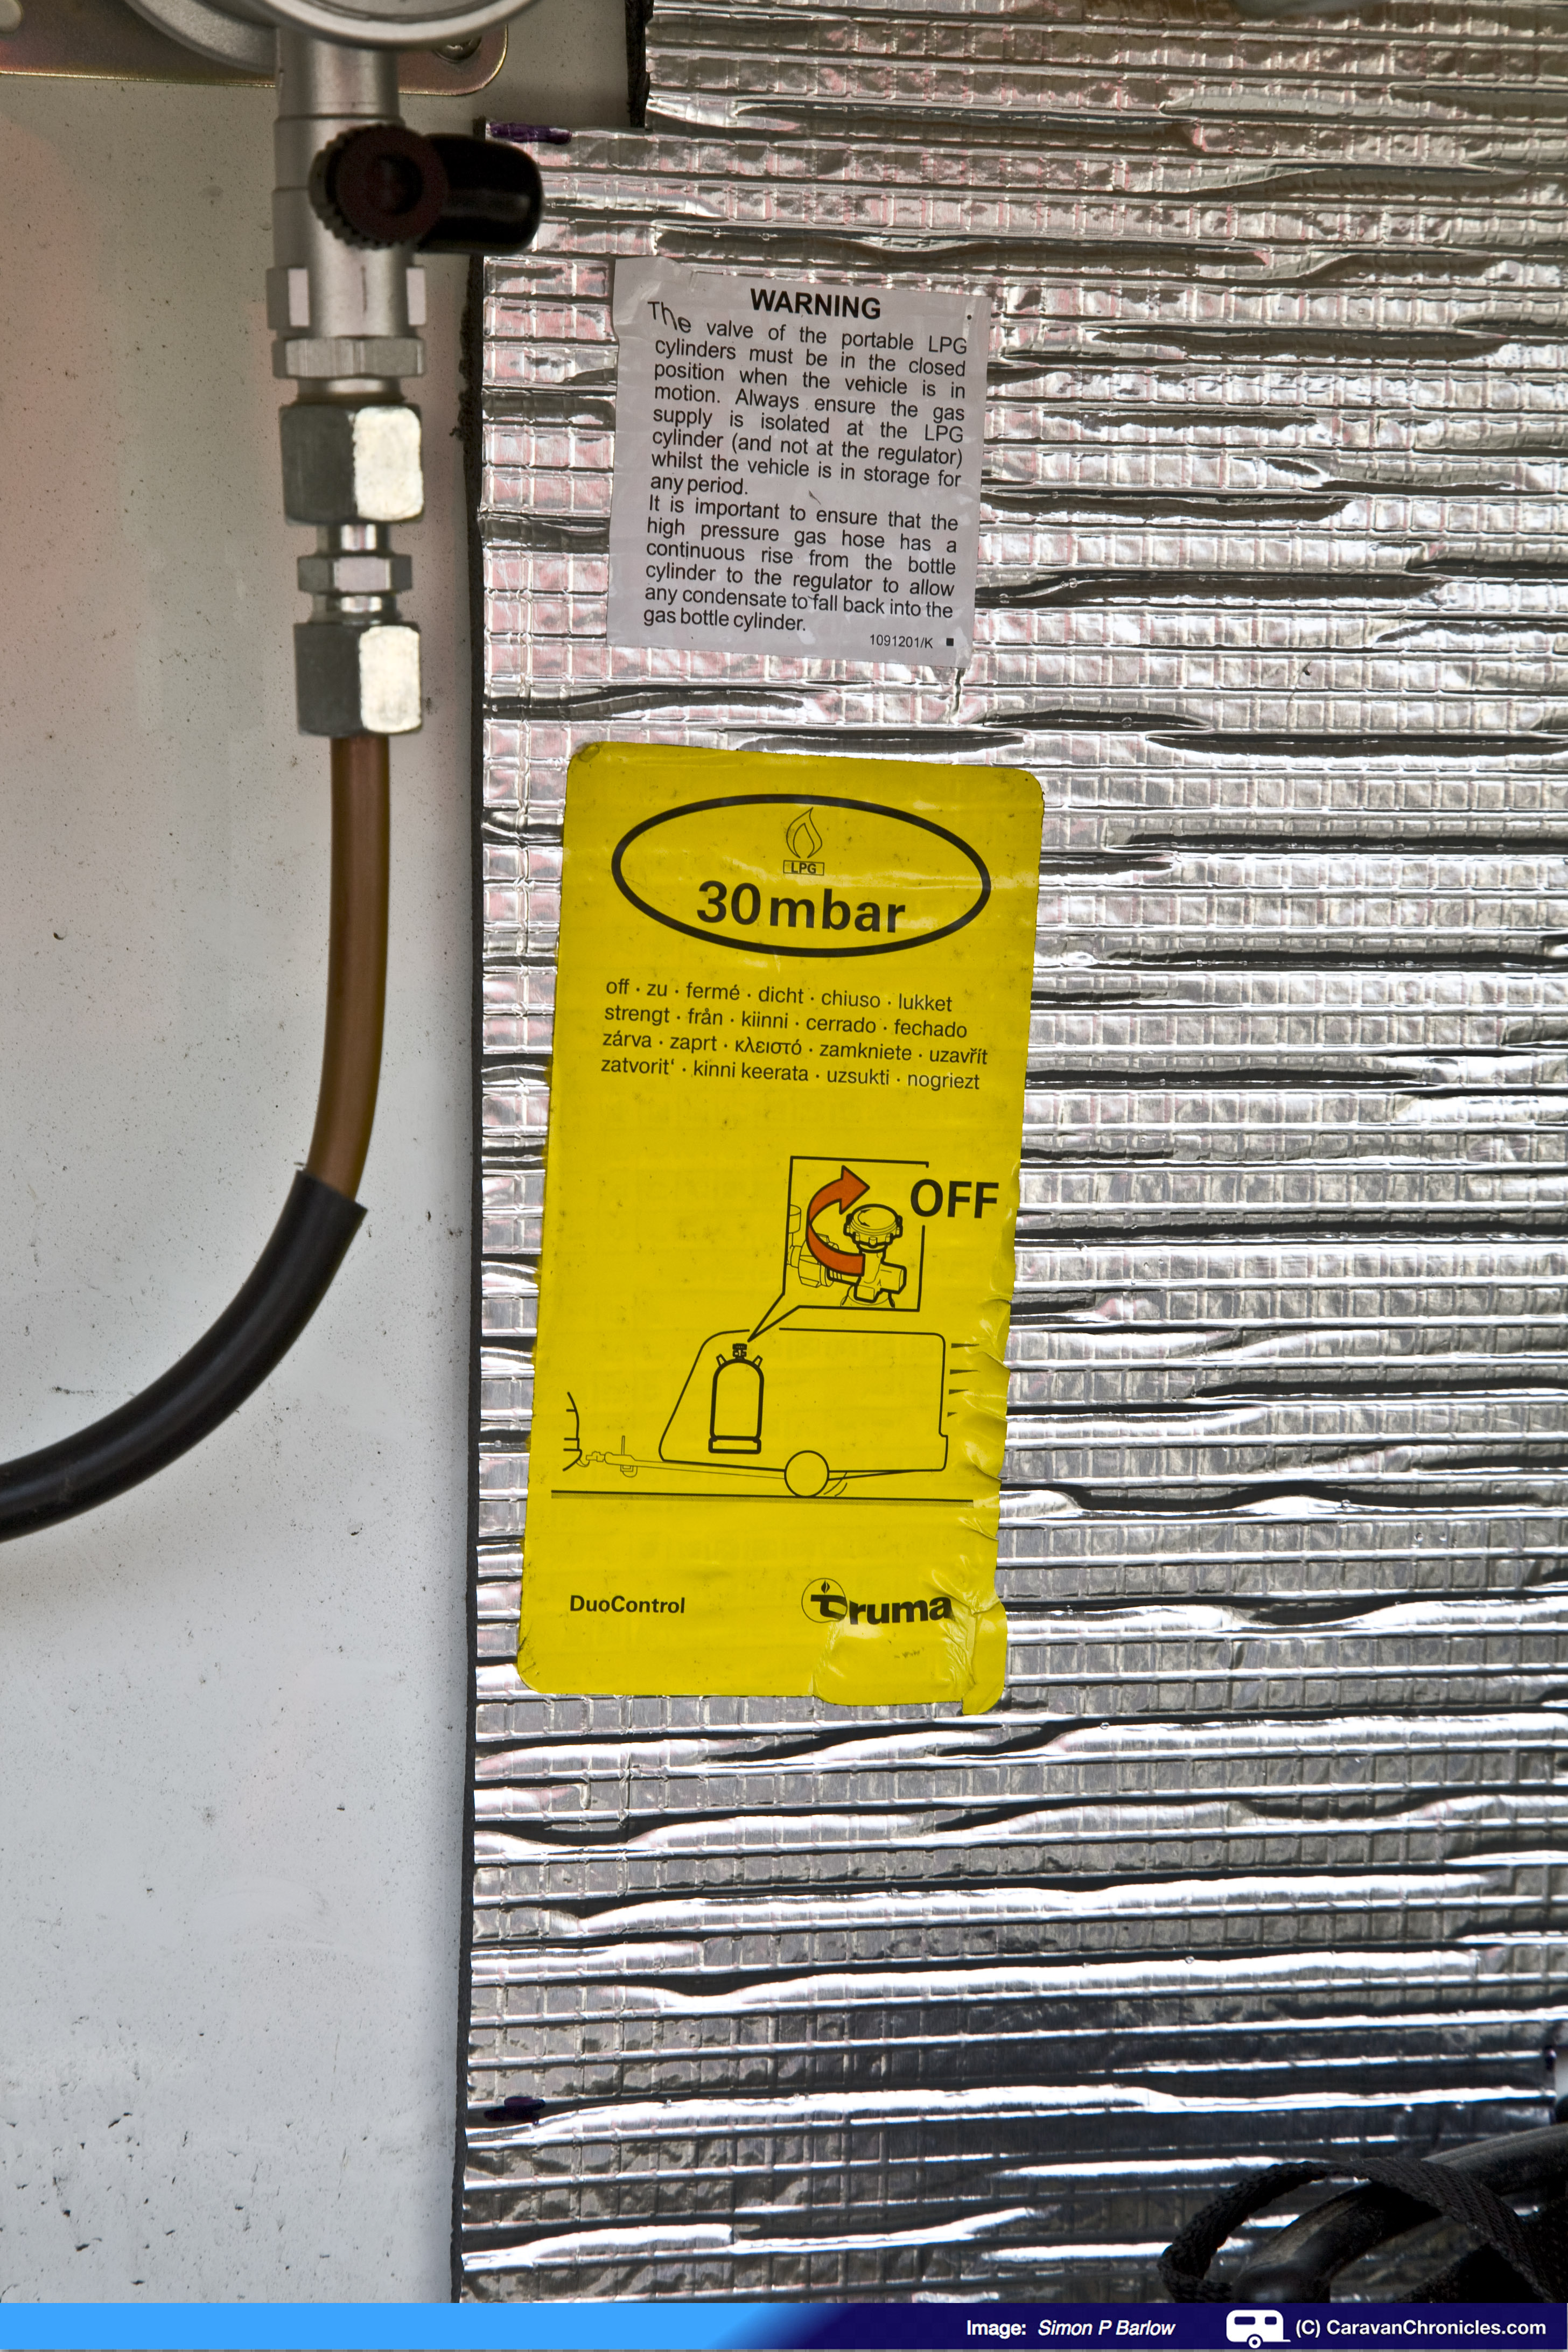
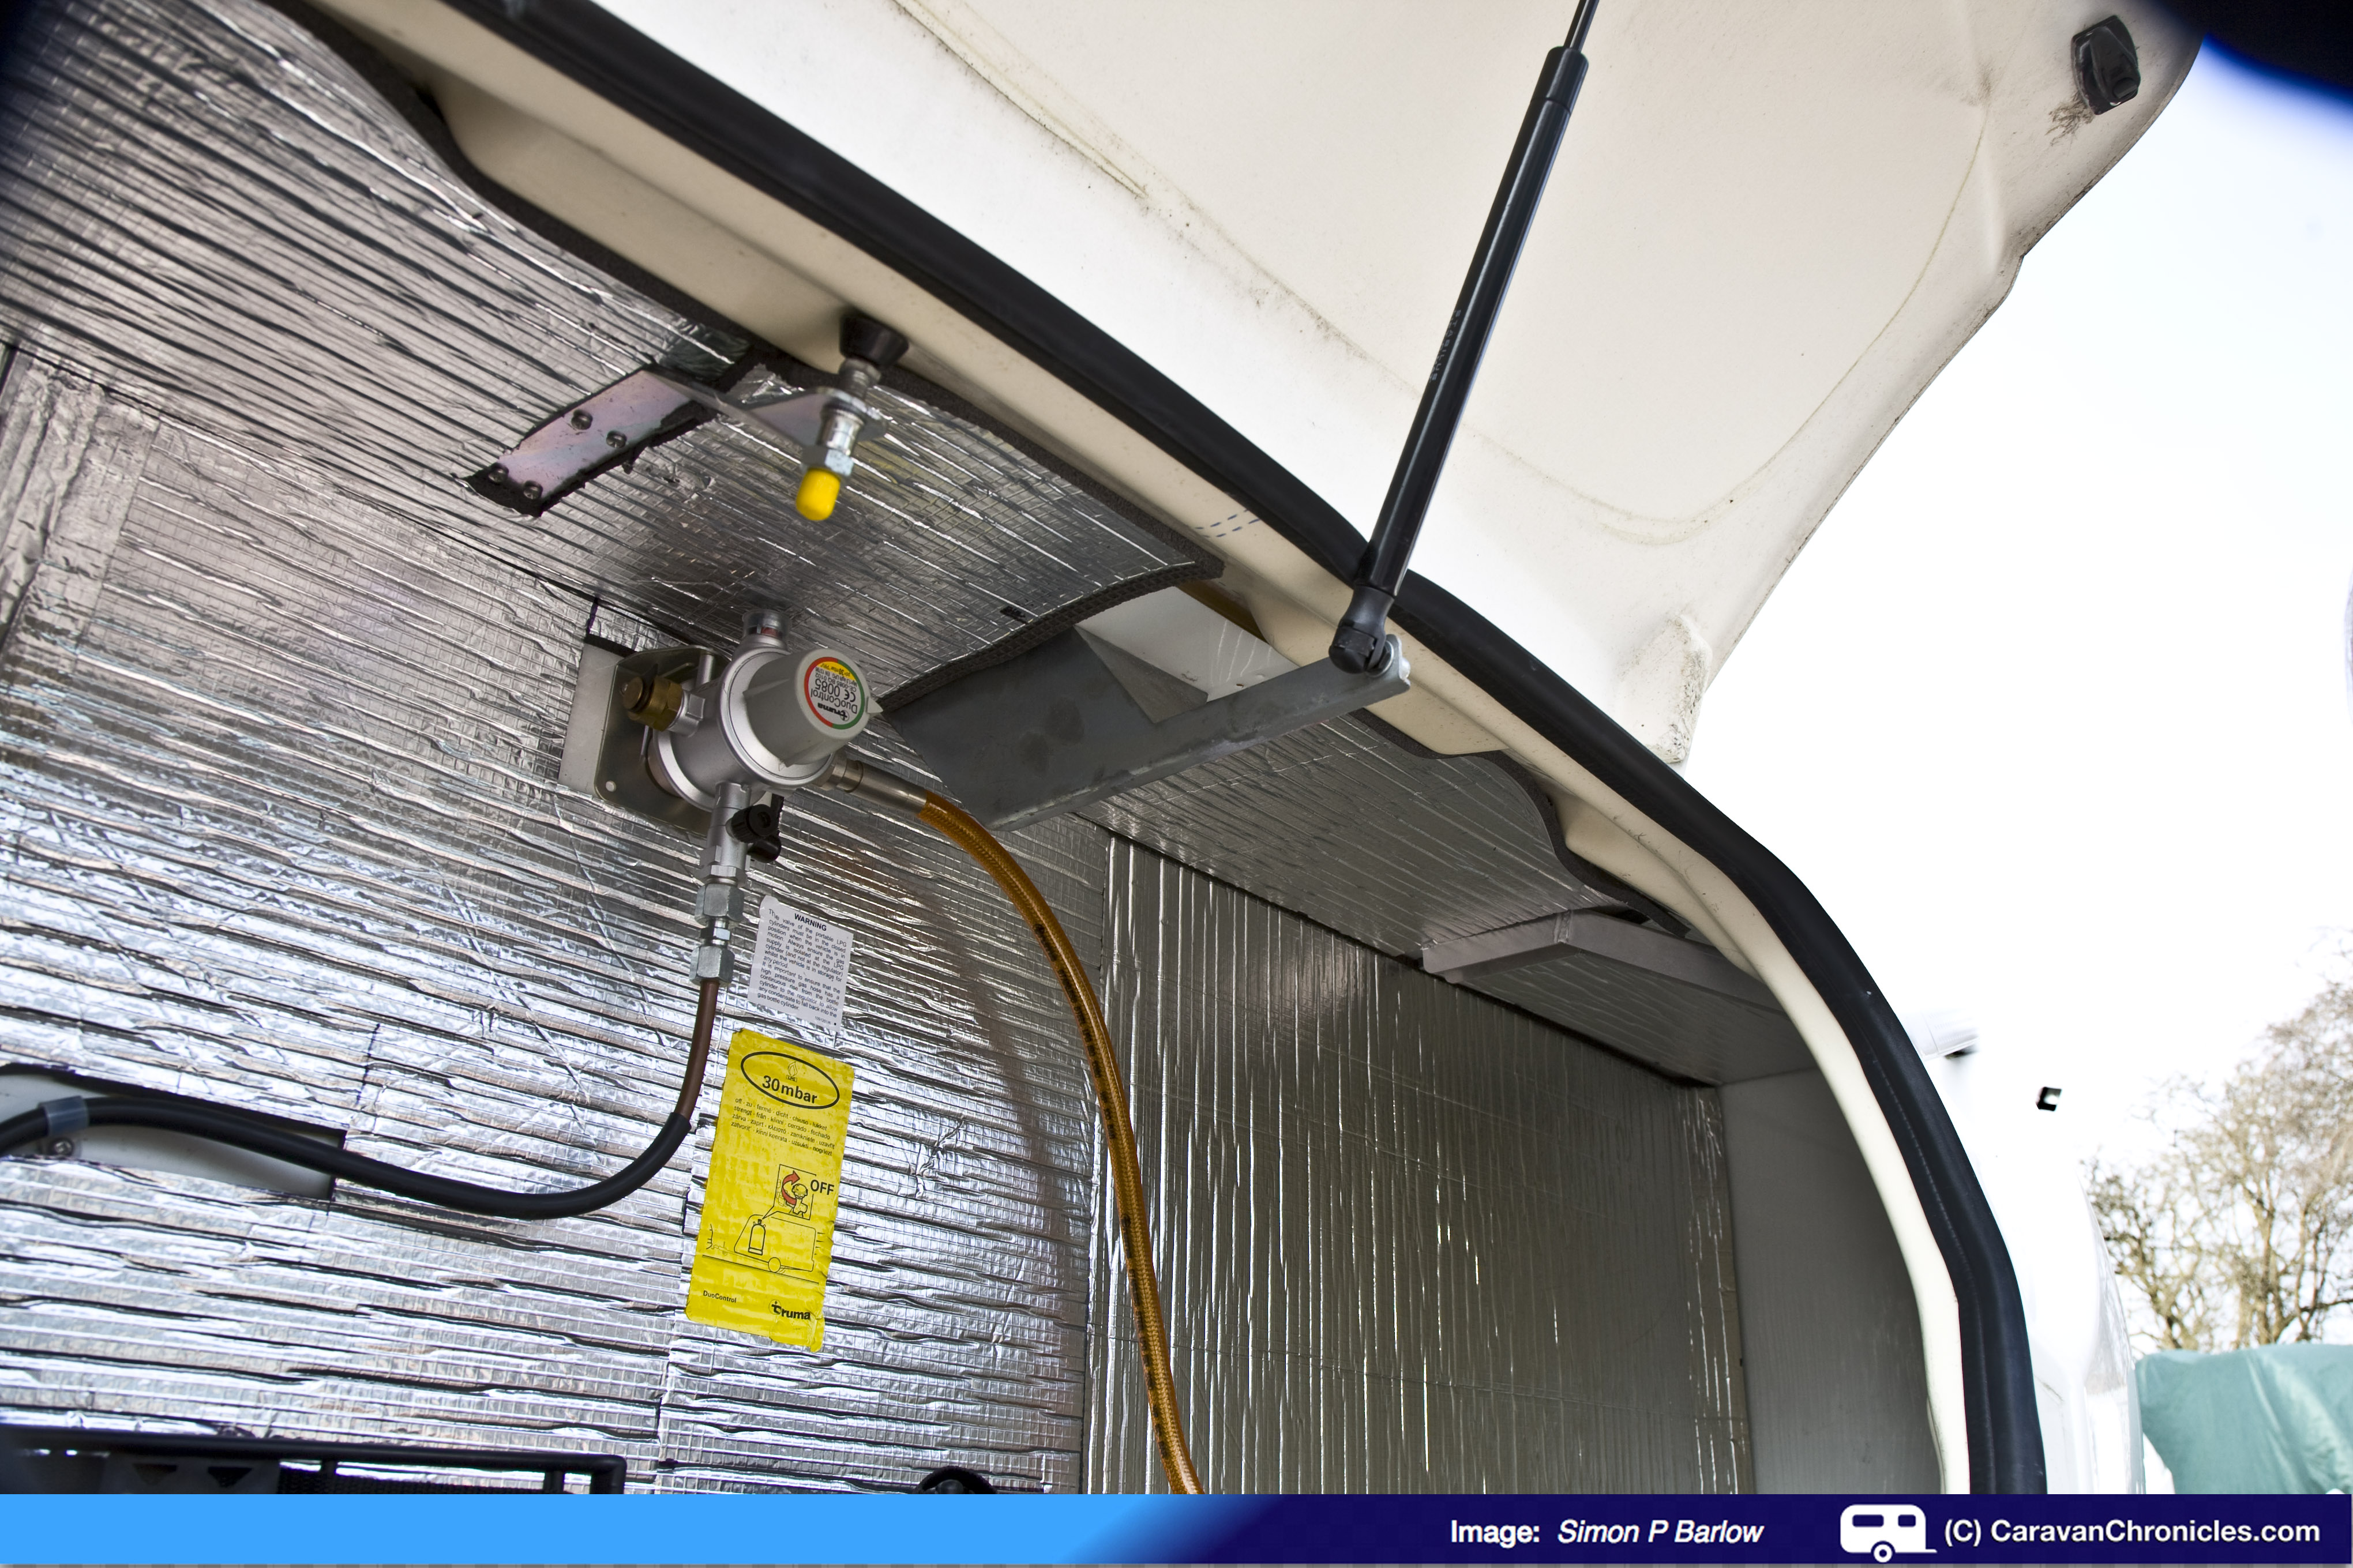
I thought I’d work from both sides into the middle where most cutting would be required. I’d have to make sure non of the gas pipes would be covered so that they could be inspected when it came to the annual service. I also had to make sure that the safety labels and notices were visible, so a bit of careful peeling would be required.
Measuring the first section, the foam was cut with a straight edge and a scalpel in an Exacto knife. I’d taken a couple of large pieces of cardboard to cut on to make it easier.
It didn’t take long to get the first few straight cut pieces installed. One thing though, the sticky back is really sticky and it took a bit of manoeuvring to get the pieces into the locker without sticking them to anything they touched.
I made sure that I left enough gap to inspect the gas pipe or to get to any screw heads that might require checking for tightness in the future. Peeling the labels off in one piece was a bit of a chore… I will probably try to get new ones at some point in the future.
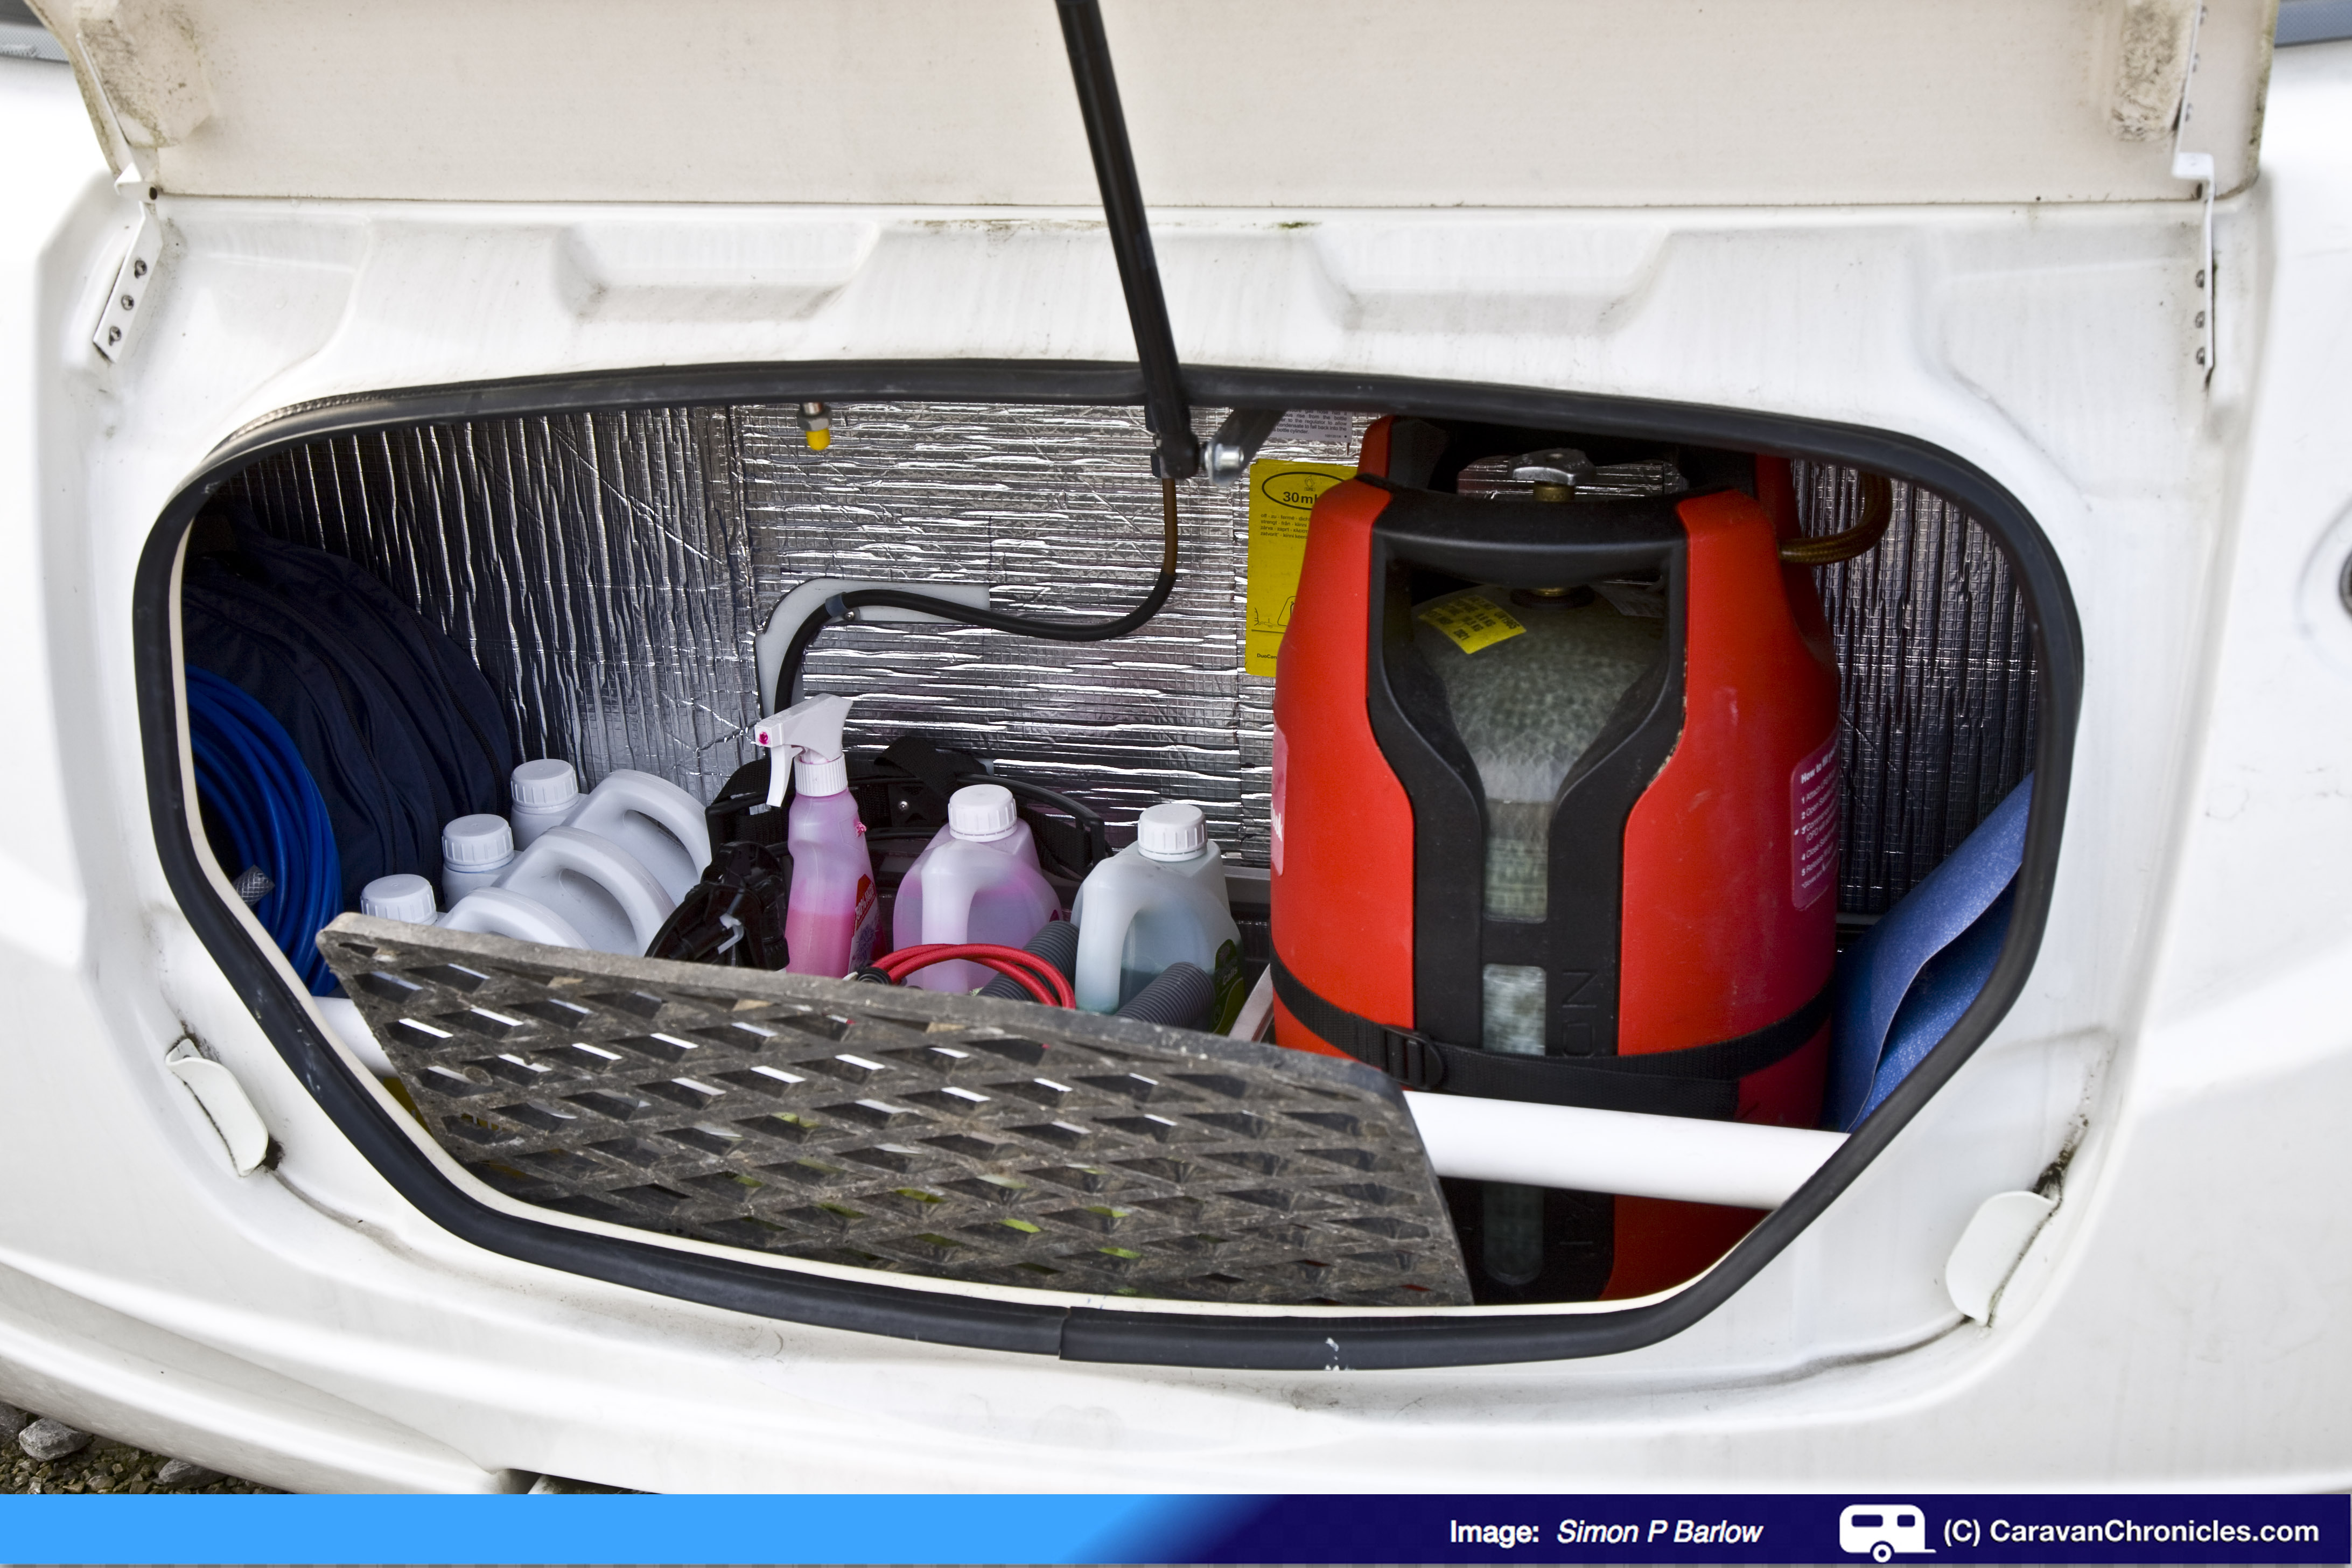
The completed locker….
… and the underside of the window shelf….
After a bit of a sort out and removing some stuff we haven’t used for a while (saving a couple of kilo’s in weight!), everything was replaced back in to the locker.
The next job will be to do the wheel arches inside the caravan.
Lucky or what!
When I was feeding in the second piece on the right hand side I had to take it out to curve it to get it in position. When I removed it I spotted something stuck to the bottom edge ( I did say it was really sticky!)….. it was my Wedding ring! I thought I’d lost it somewhere between our last stop in France – Camping Risle Seine and reaching home back in October 2012. It could have so easily dropped through one of the various vents in the floor in the couple of thousand miles of towing since then, but there it was, stuck to my piece of insulation.
So another little job crossed off the list. I’m not sure how effective it will be, only time and a bit of cold weather will tell. It might very well be a placebo thing…. but as the supermarket slogan say’s “Every Little Helps”.
Contact Info: Foam Solutions UK, Haymoor Hall, Wybunbury Lane, Nantwich. CW5 7HD or http://www.foamsolutionsuk.co.uk or telephone 01270 842 228 or email Carole: carole_395@fsmail.net
Don’t forget you can follow Caravan Chronicles on Twitter and Facebook… the link do-hickey things are on the left hand side.
You know, sometimes I miss the obvious. Someone on one of the forums (Swift Talk) was giving a tip about storing copies of important documents and forms electronically so that if you lost say your insurance document you would at least be able to print out a copy. Now that is a bit of good advice, especially travelling abroad. We have copies of all our documents and a lot of the caravan documents, manuals etc stored electronically. In fact a lot of useful manuals I have put on-line in the “Document Library” section of the blog. Continue reading →