• Home
  • Help Guides
    • Storage Sites
    • Equipment Reviews
  • Links
  • Document Library
    • Electrical Drawings
  • Photo Gallery
  • Trip Map
    • Caravan Log
    • MPG
  • Shop
  • About
    • Contact

Caravan Chronicles

~ not just another caravan blog

Caravan Chronicles

Tag Archives: Leisure Battery

Here’s Something I Think You Want To Take a Look At…

10 Monday Feb 2020

Posted by Simon Barlow in Accessories, Electrical, Gadgets, General, Maintenance, Modifications, Projects, Technical

≈ 9 Comments

Tags

Batbot, Battery Monitoring, IonOT, Kickstarter Project, Leisure Battery, vehicle battery

Something that caught my eye a couple of days ago really got me excited…. no not a new caravan ( I wish) but a Kickstarter project that I think is one of those simple ideas that has countless applications in all sorts of areas. In fact I keep thinking of more uses for it… and it’s not even my idea!

OK, so what has got me all worked up then? Well imagine getting messages direct to your email or phone telling you the voltage of your leisure battery, motorhome starter battery, canal boat battery, ATV battery, bike battery, solar powered shed battery, aircraft battery, golf cart battery, horse box battery or trailer winch battery. All from a little device that can simply be clipped on or permanently installed. Got you curious?

The company has recently been at the Scottish Caravan and Motorhome Show where they received lots of interest and loads of positive feedback. Still curious?

OK here the disclaimer thingy bit for Caravan Chronicles: I have no connection to these guys except I decided to back the project on Kickstarter. I have taken all the text and images below from IonOT’s kickstarter project page…

If you want to see the full project, follow the link to Batbot and see what you think.

Invented in Scotland by David Richie, Batbot came about from wearing two hats – one, from a career working in the technology sector, and the other, as a livery yard owner. With horse lorries stored on site in between use, he noticed a regular problem occurring. On the day of an outing, more often than not, there would be an early morning knock at the door from liveries needing help… their vehicle battery was indeed… flat. 

They had walked past their lorry every day, but had no idea that the battery was running low. This sparked an idea. Wouldn’t it be great if there was a device that could avoid this problem?! Batbot was born. After many hours, days, weeks and months  developing the concept and prototypes, here we are today, with a brand new product that will ensure flat batteries (and early morning wake up calls) are a thing of the past. 

Batbot is a device that every equestrian, marine enthusiast, motorhome or vehicle owner has missed… until now. 

This clever product monitors your vehicle’s battery and sends alerts to your mobile device or email when the battery requires charging.

How it works

Batbot simply hooks up via two croc clips (provided) to the battery points under your vehicles bonet and can be secured in place with a cable tie. 

Once installed the device then sends your battery’s data to the cloud where alerts are generated and then sent to your mobile device or email address. Unlike other products, Batbot uses the Sigfox or LoRaWAN radio networks to send this data, so no bluetooth connection is required.

Key Benefits of Batbot:

  • Quick and easy to use
  • Keeps track of your battery state
  • Alerts you when action is required
  • Saves destroying batteries with deep discharge
  • Regular daily “All Ok” status for peace of mind
  • No monthly SIM contract
  • First year subscription included
  • Low further yearly subscription (£7 ~ £10)
  • Chose Sigfox or LoRaWAN version of product
  • LoRaWAN has Home Gateway option to provide cover in remote areas
  • Helps identify when your battery or vehicle has an electrical fault. 
  • Avoids the vehicle not starting when needed for emergency or planned use
  • Save’s garage call out charges to jump start your vehicle
  •  24V lorries can be difficult to find a suitable jump start source for, or require a garage call out. Batbot helps you avoid this problem

For all the details and to see the full project go and visit the Batbot Kickstarter page and maybe you too might want to invest a few beer tokens.

Share this:

  • Twitter
  • Facebook
  • Tumblr
  • Pocket
  • Pinterest
  • Reddit

Like this:

Like Loading...

Getting All Charged Up – Part 3 “The Install”…

30 Tuesday May 2017

Posted by Simon Barlow in Accessories, Boondocking, Caravan Electrical Fault Finding, Caravan Electrics, Caravan Fault Finding, Electrical, General, Modifications, Off Grid, Technical

≈ 14 Comments

Tags

Caravan Electrics, Leisure Battery, Leisure Battery Charging, Maintenance, Sterling Power, Sterling Power Wildside, Technical

There has been a bit of a delay since Part 1 and Part 2 due to Sue having a fall and breaking her arm in three places. This required over three hours of surgery to install enough metalwork and screws to keep a blacksmith happy followed up by a lot of trips back and forth to the hospital. However, on with the install of the Sterling Power Wildside unit. I think that this will be the first ever install of a unit in a caravan.

I printed out copies of the wiring diagrams and loaded up the Amarok with everything  I’d need and set off for the storage site. Arriving at the caravan everything was cleared out to give me some space to work.

IMG_1134

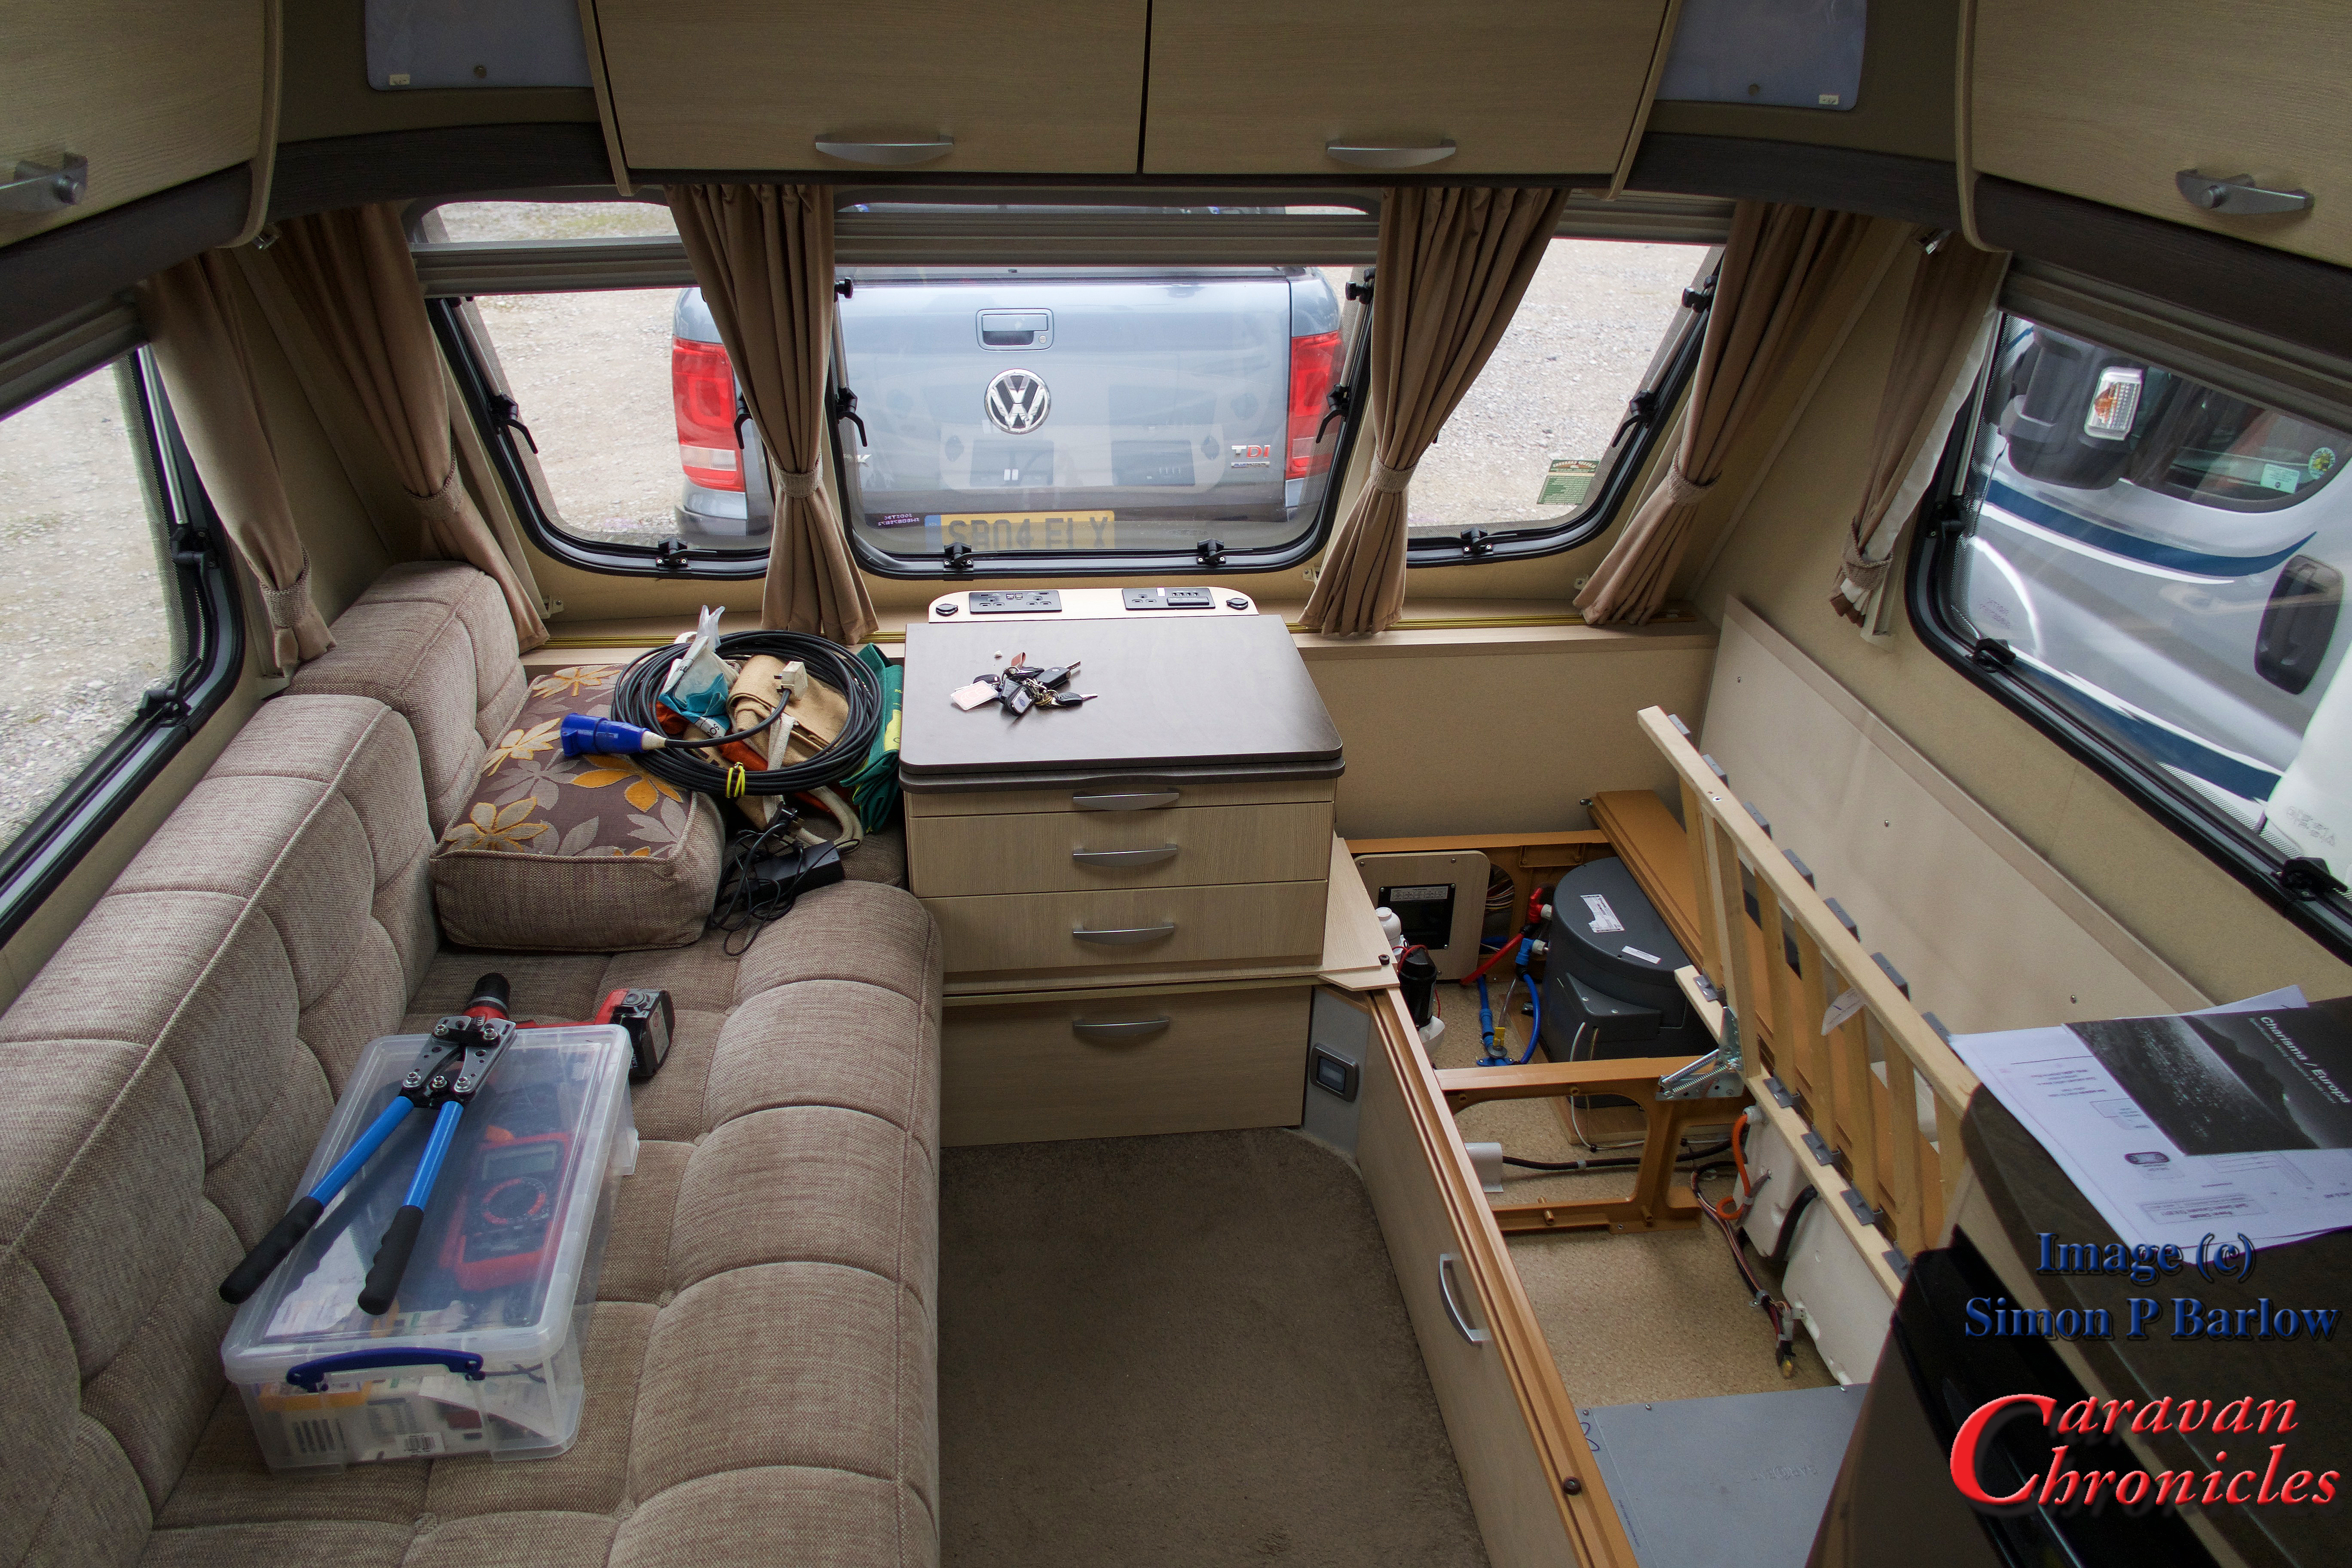
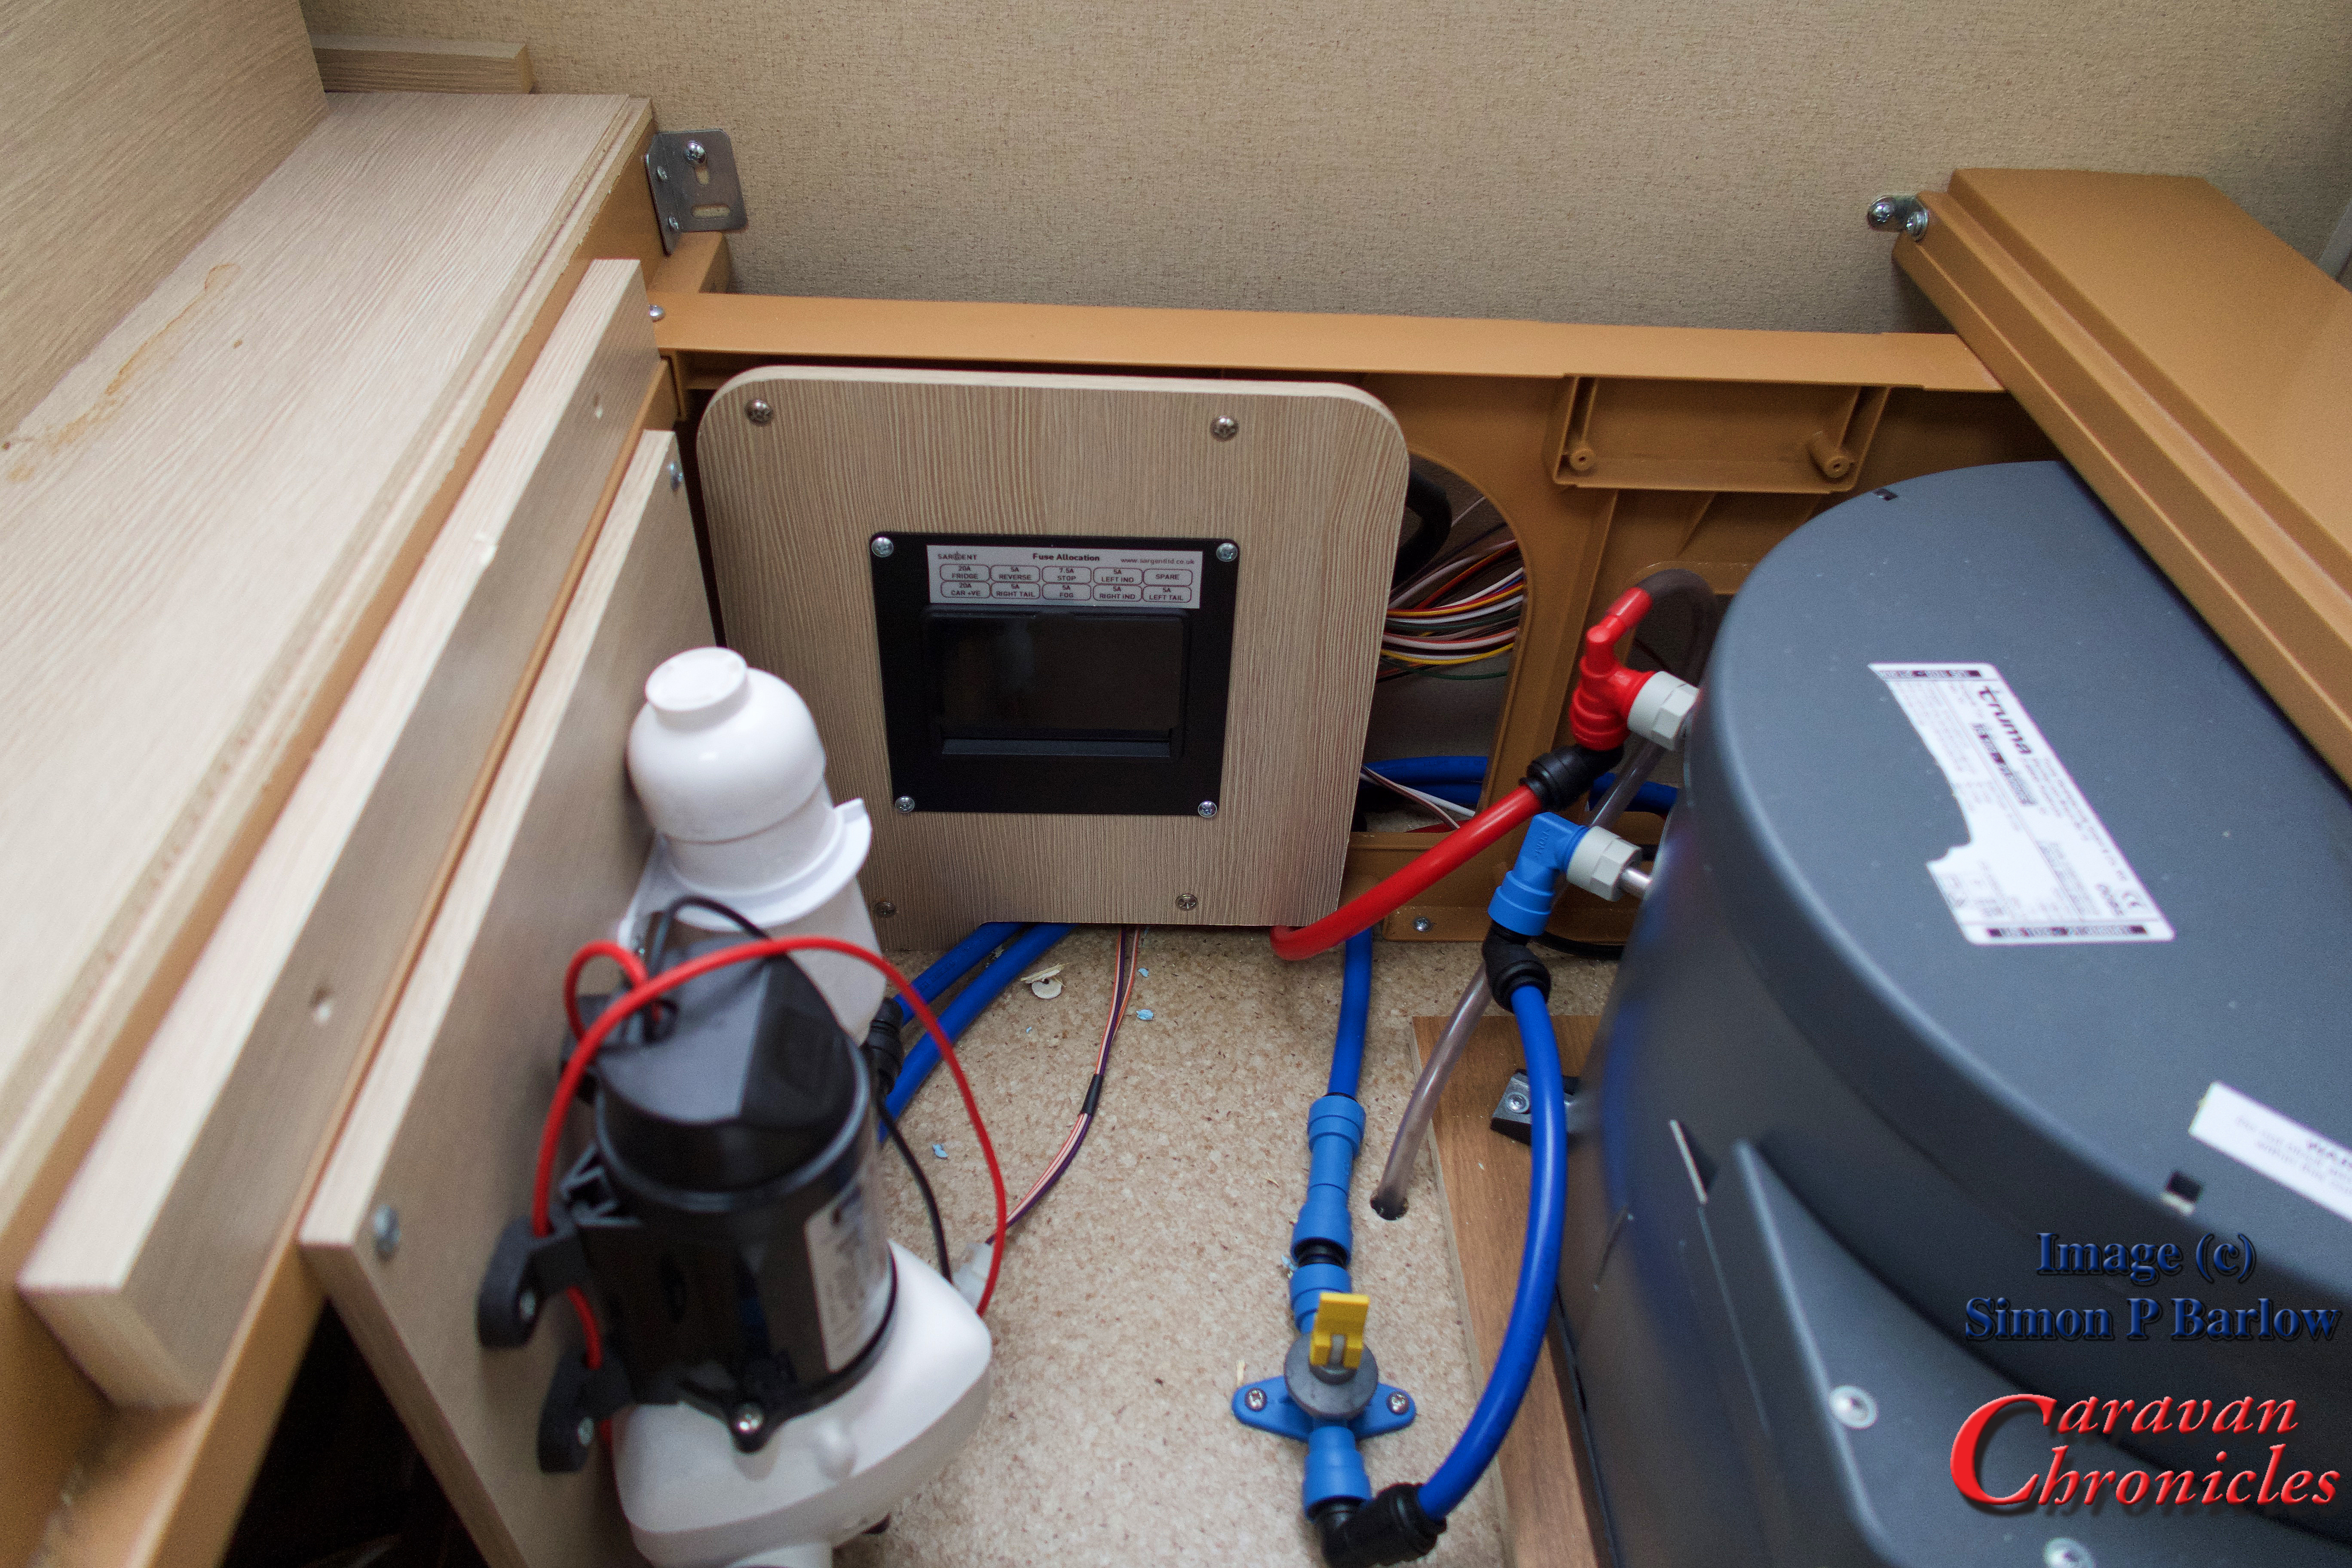
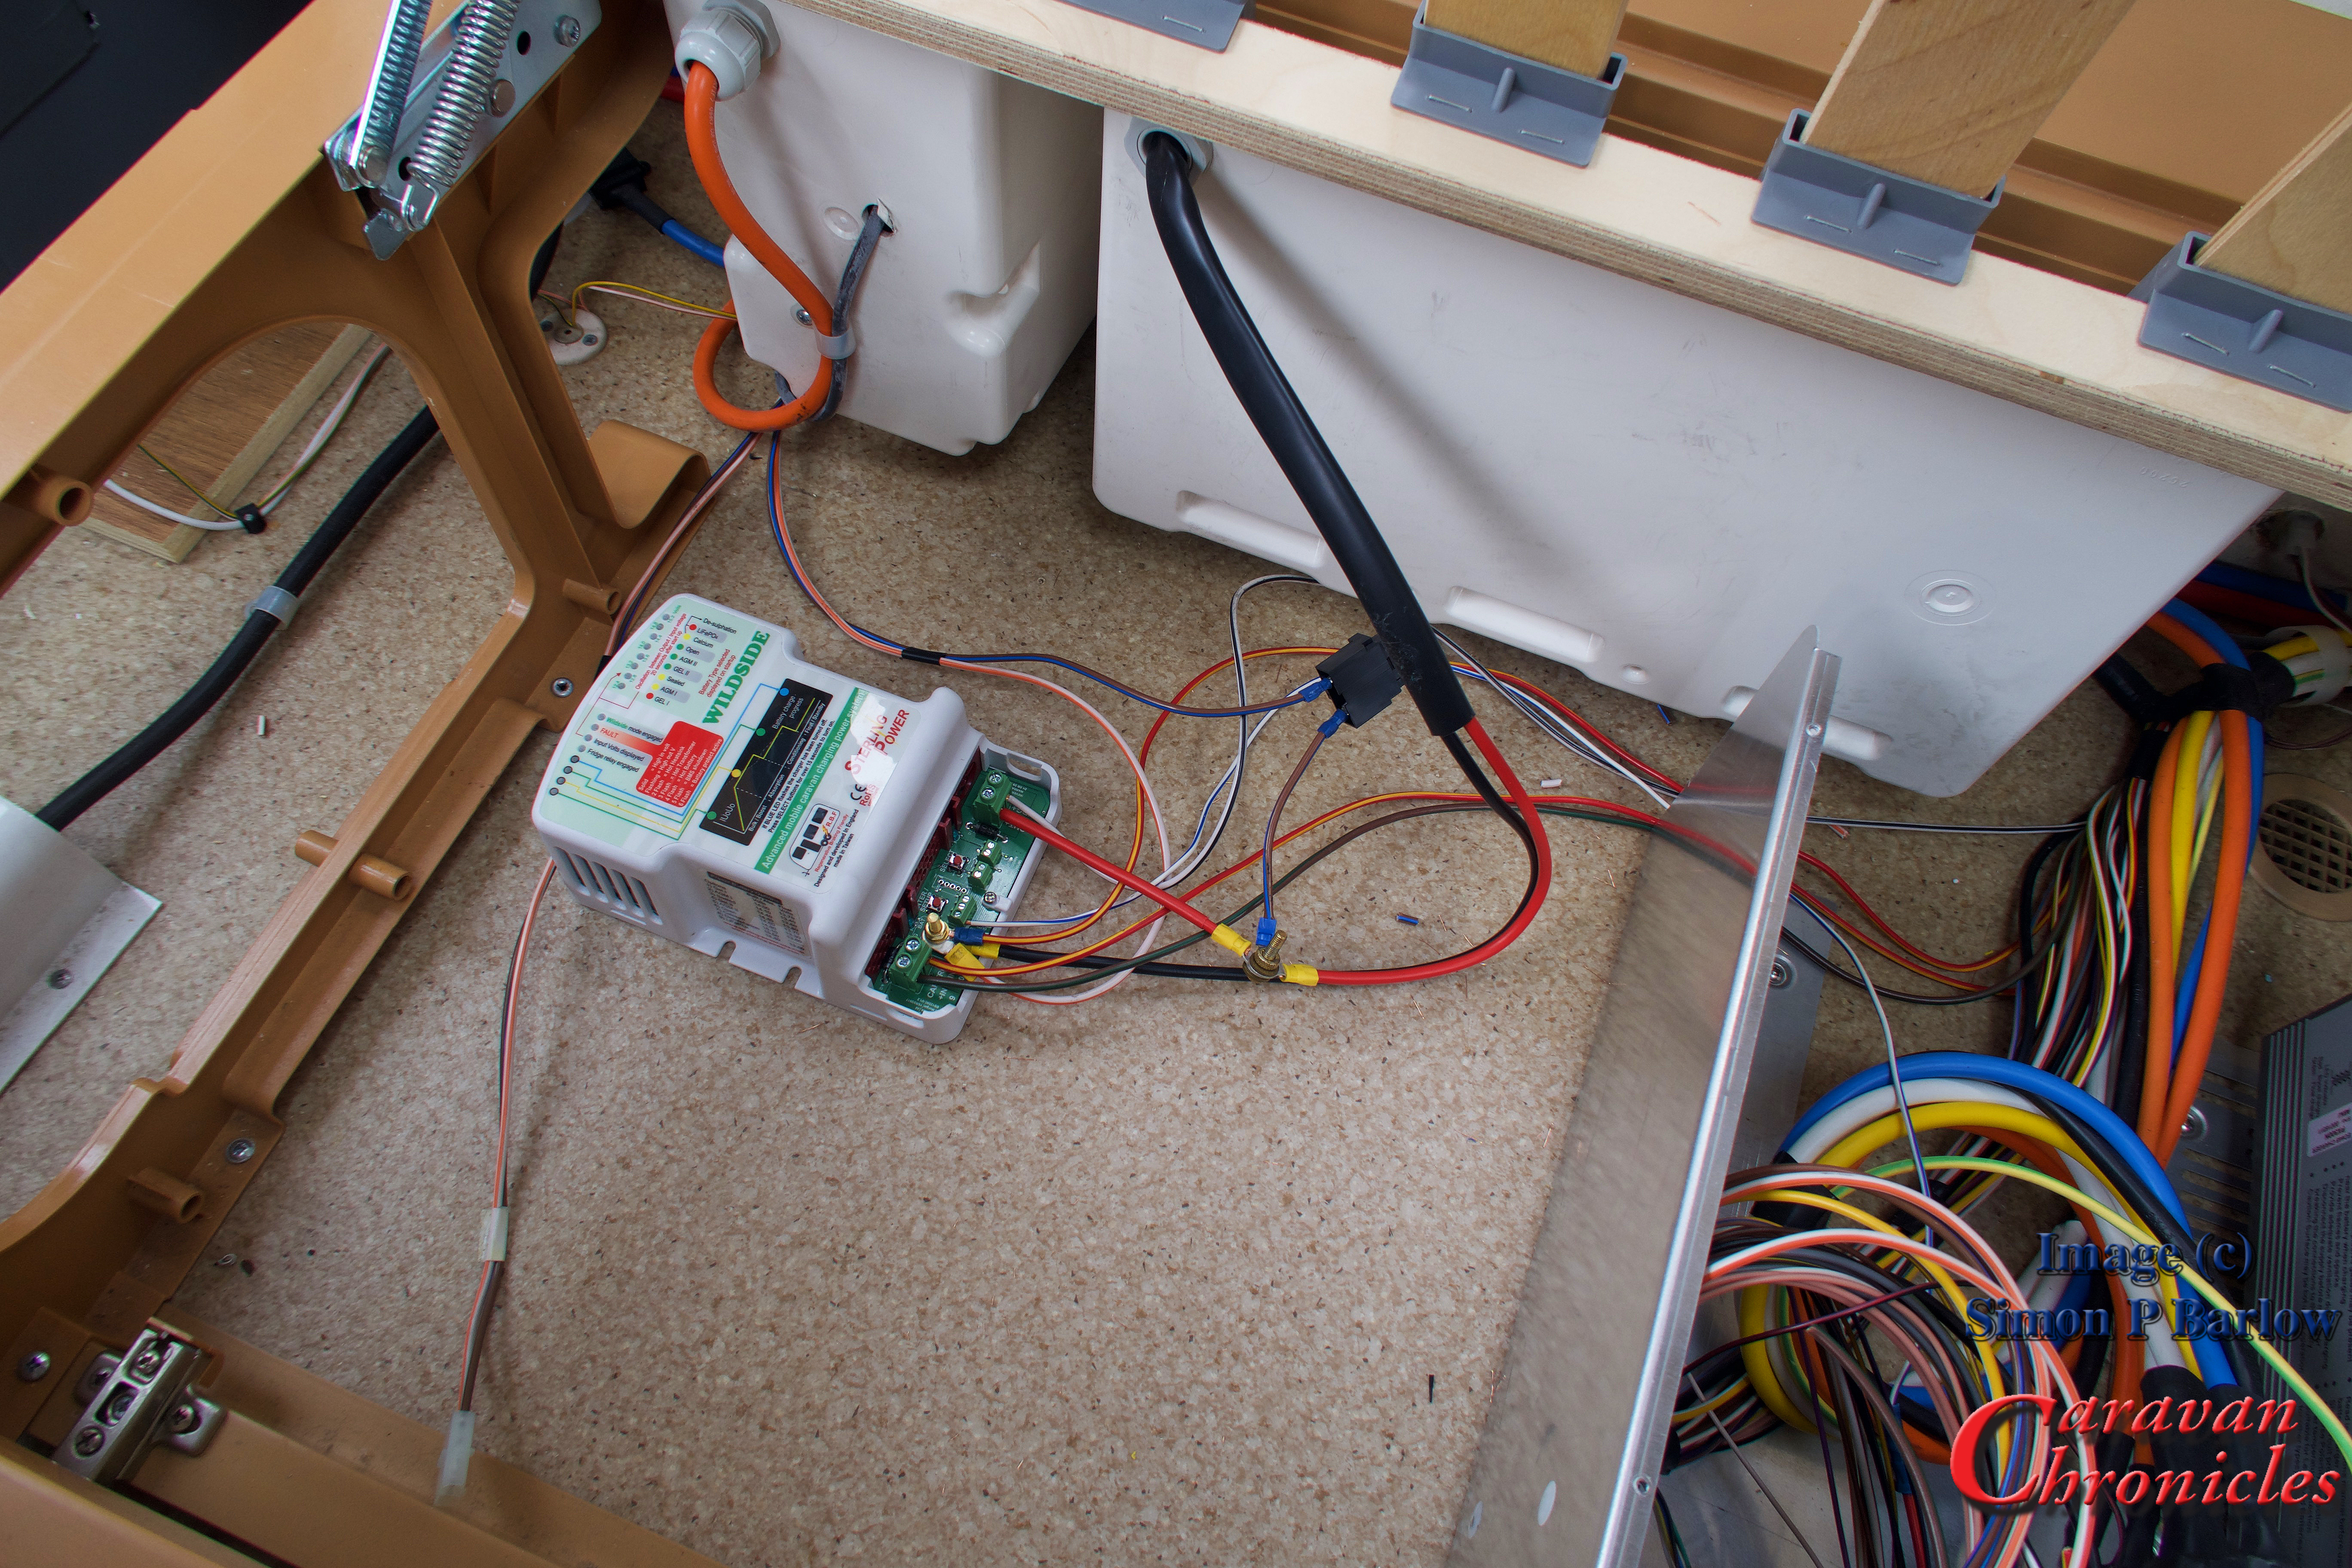
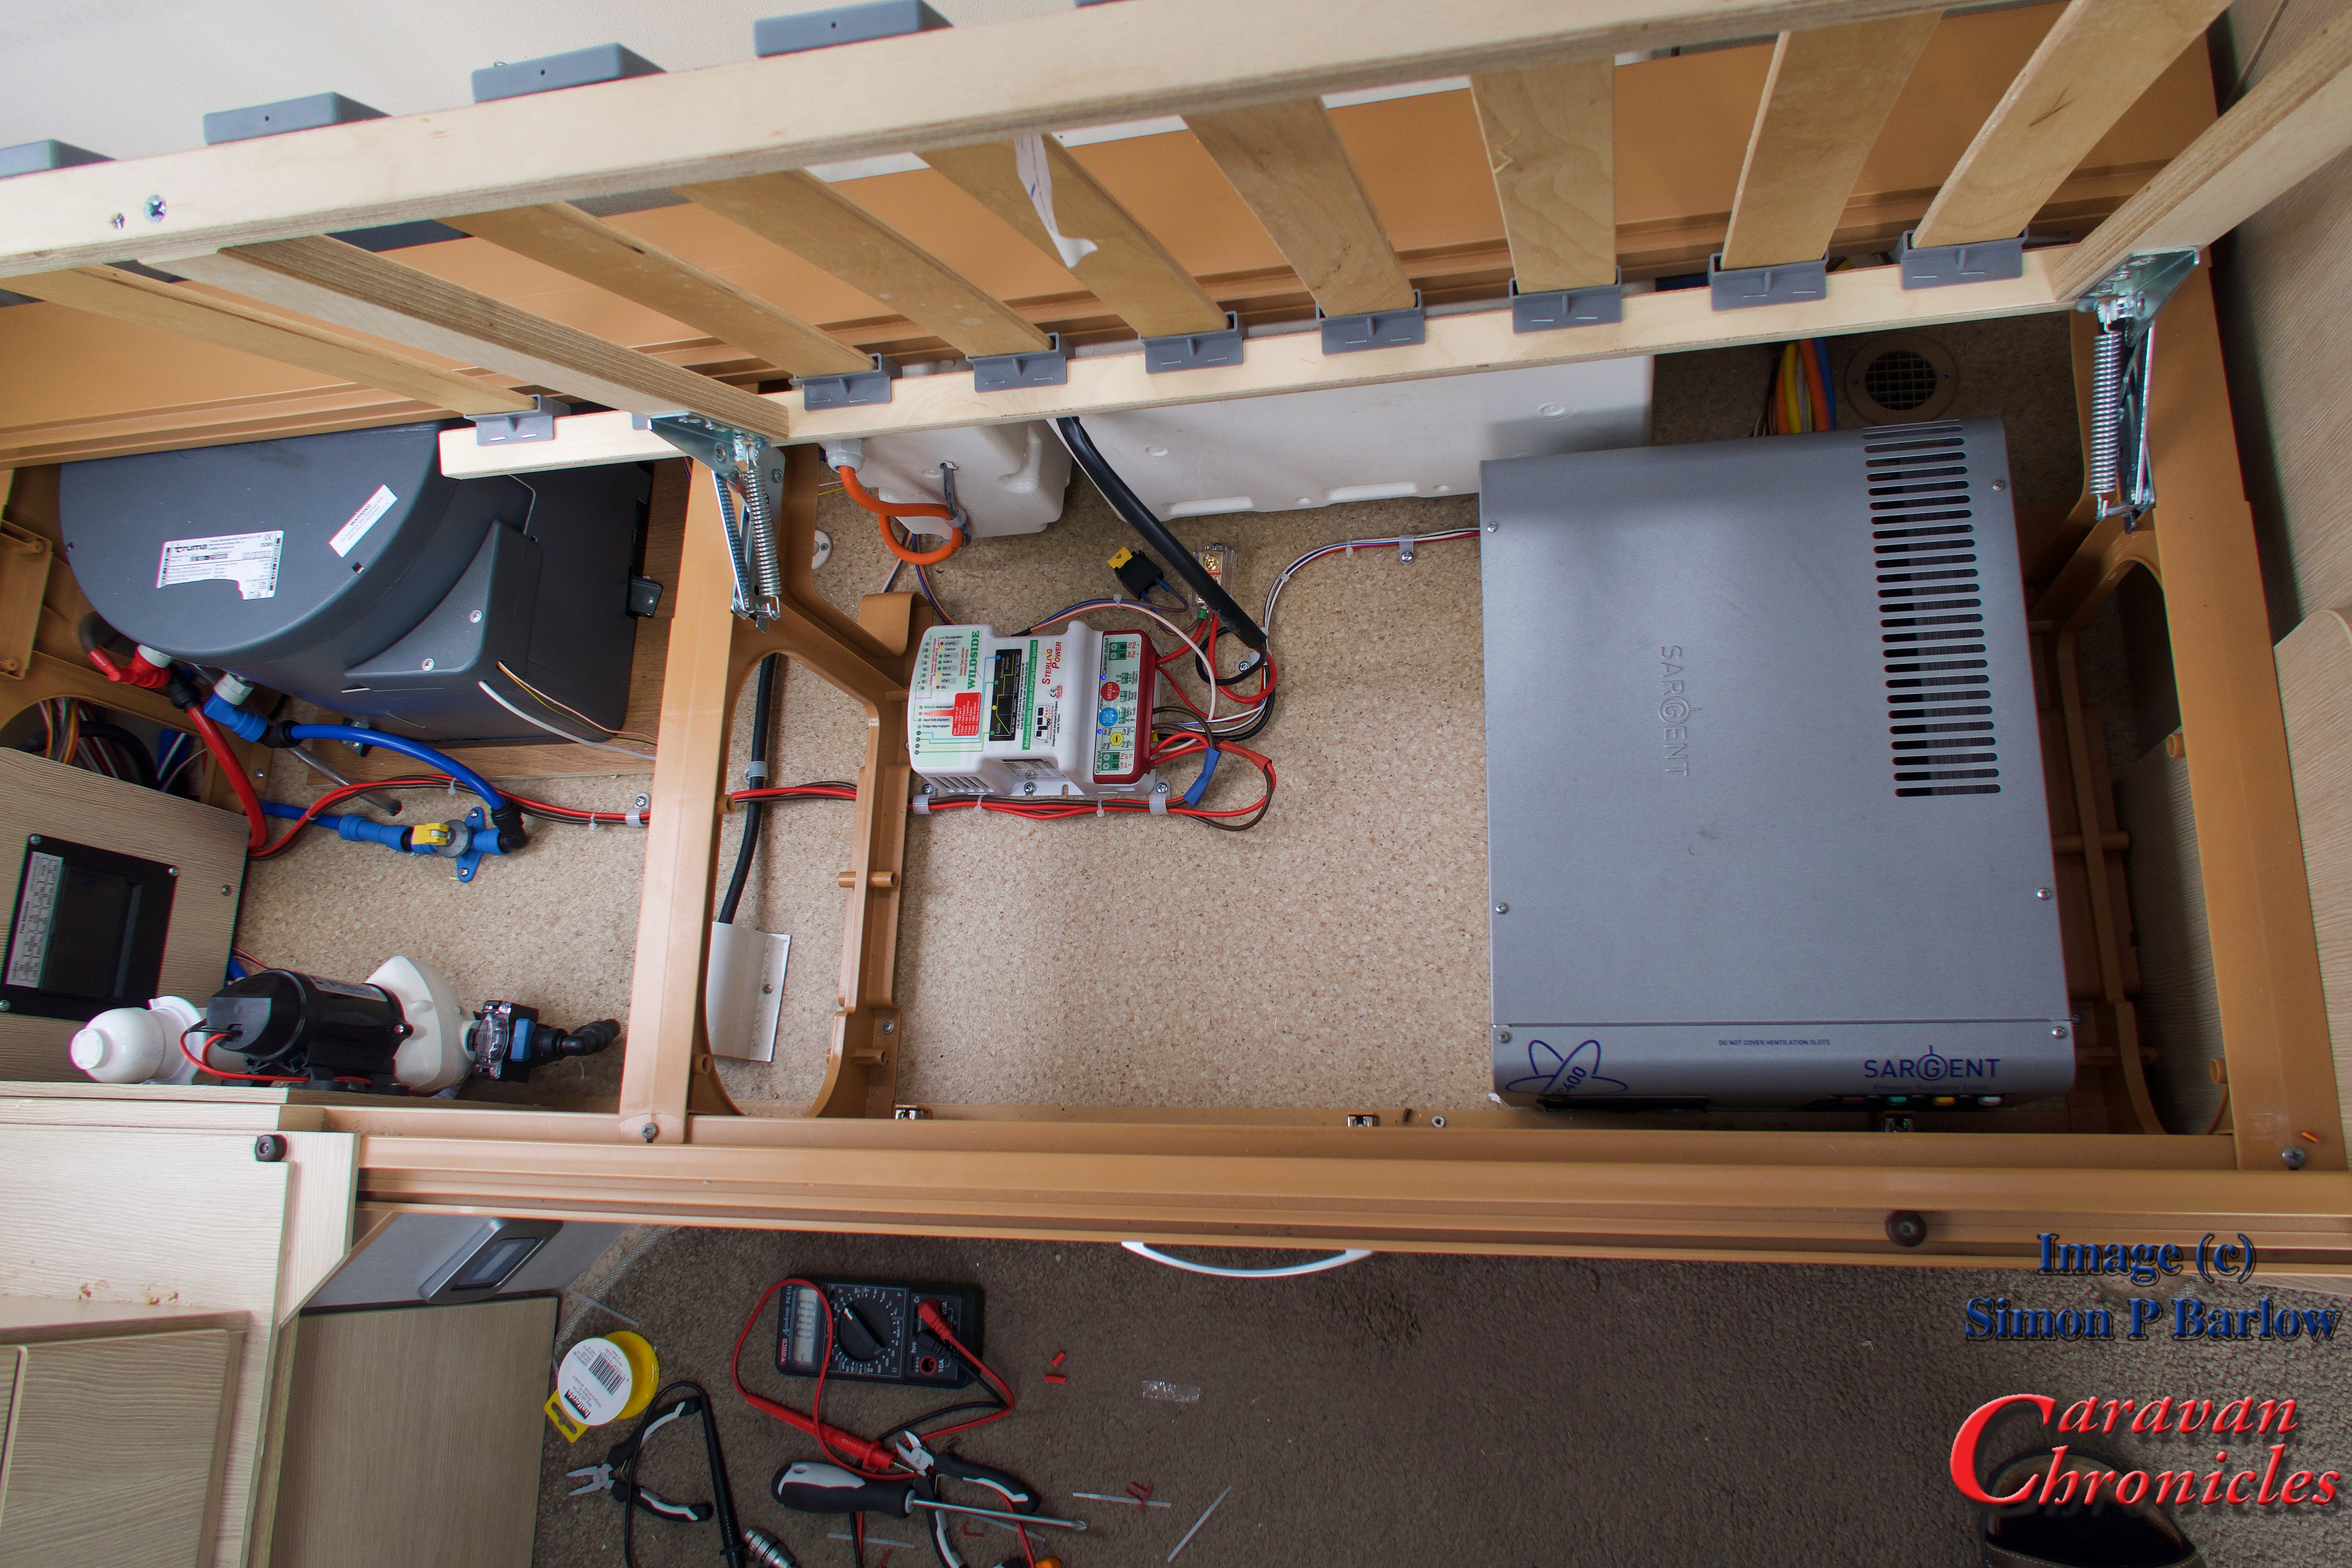
I’d planned to install the unit somewhere close to the Sargent control box as all the connections I’d need could be found here and it was close to the fuse box that connected the lead from the 13 pin plug to the caravan services.

IMG_1136

The fuse connection point for the lead from the 13 pin plug is in our caravan, located right at the front next to the centre chest of draws against the gas locker wall.

IMG_1135

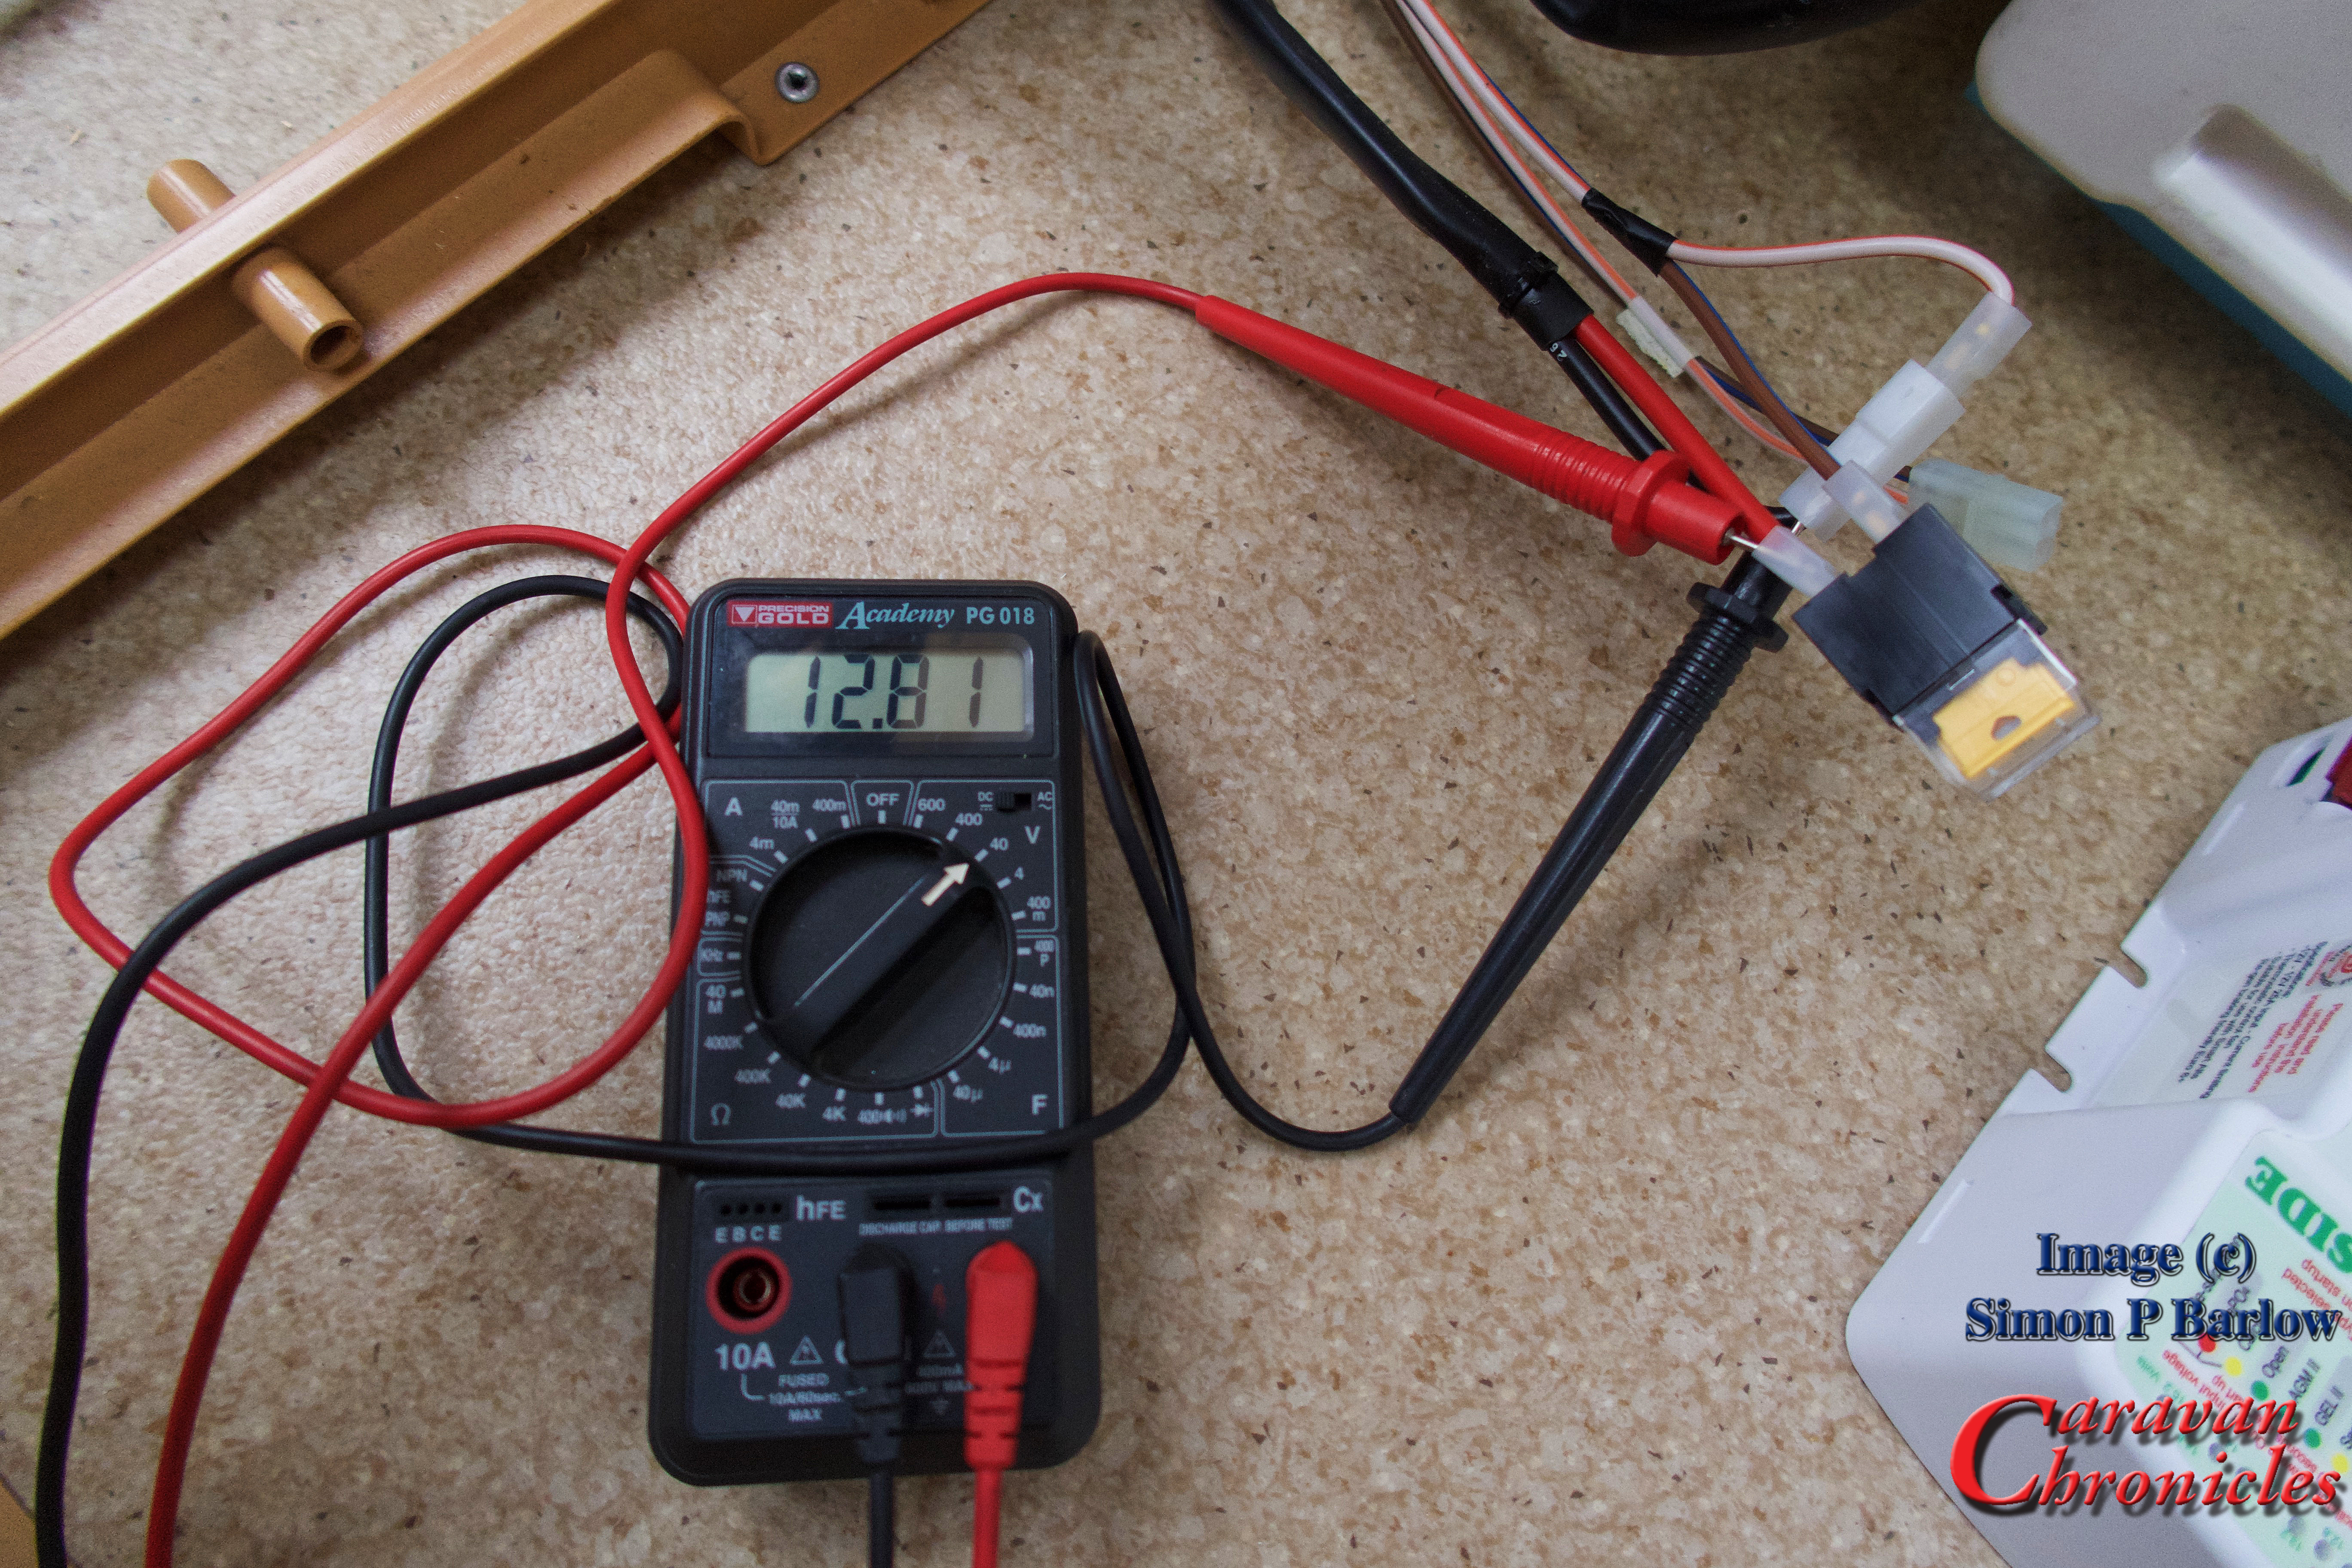
Before starting, I did a quick voltage check on the leisure battery…. 12.81 volts, which isn’t too shabby as we don’t have a solar panel and it had been February 25th when I left the Caravan show at the NEC and the battery was last charged up. Which was   about 13 weeks earlier.

IMG_1139

To gain access to the wiring going into the Sargent unit, I removed the 4 screws holding the top cover on and the lid simply lifted off revealing all the connections and as a bonus, service loops in the cable. This meant it should be possible to install the wild side unit without having to do any cable splicing. I did debate at this stage if it would be possible to install the Wildside unit inside the Sargent box… but I decided as I didn’t know the heat gain of the Wildside unit, it might be prudent not to attempt it.

IMG_1137

The cables inside the Sargent box are basically separated into two looms. One 12 volt and the other 230 volt which keeps things easy and neat. Also the back of the circuit board within the Sargent unit was printed with each of the plug numbers, so doing all the planning paid off as I could simply find the plug number from my diagram and locate the correct cable easily.

I decided I was going to do a pre-install and connect the Wildside unit up and do a few tests, then once I was happy I’d go ahead and do a full more permanent installation.

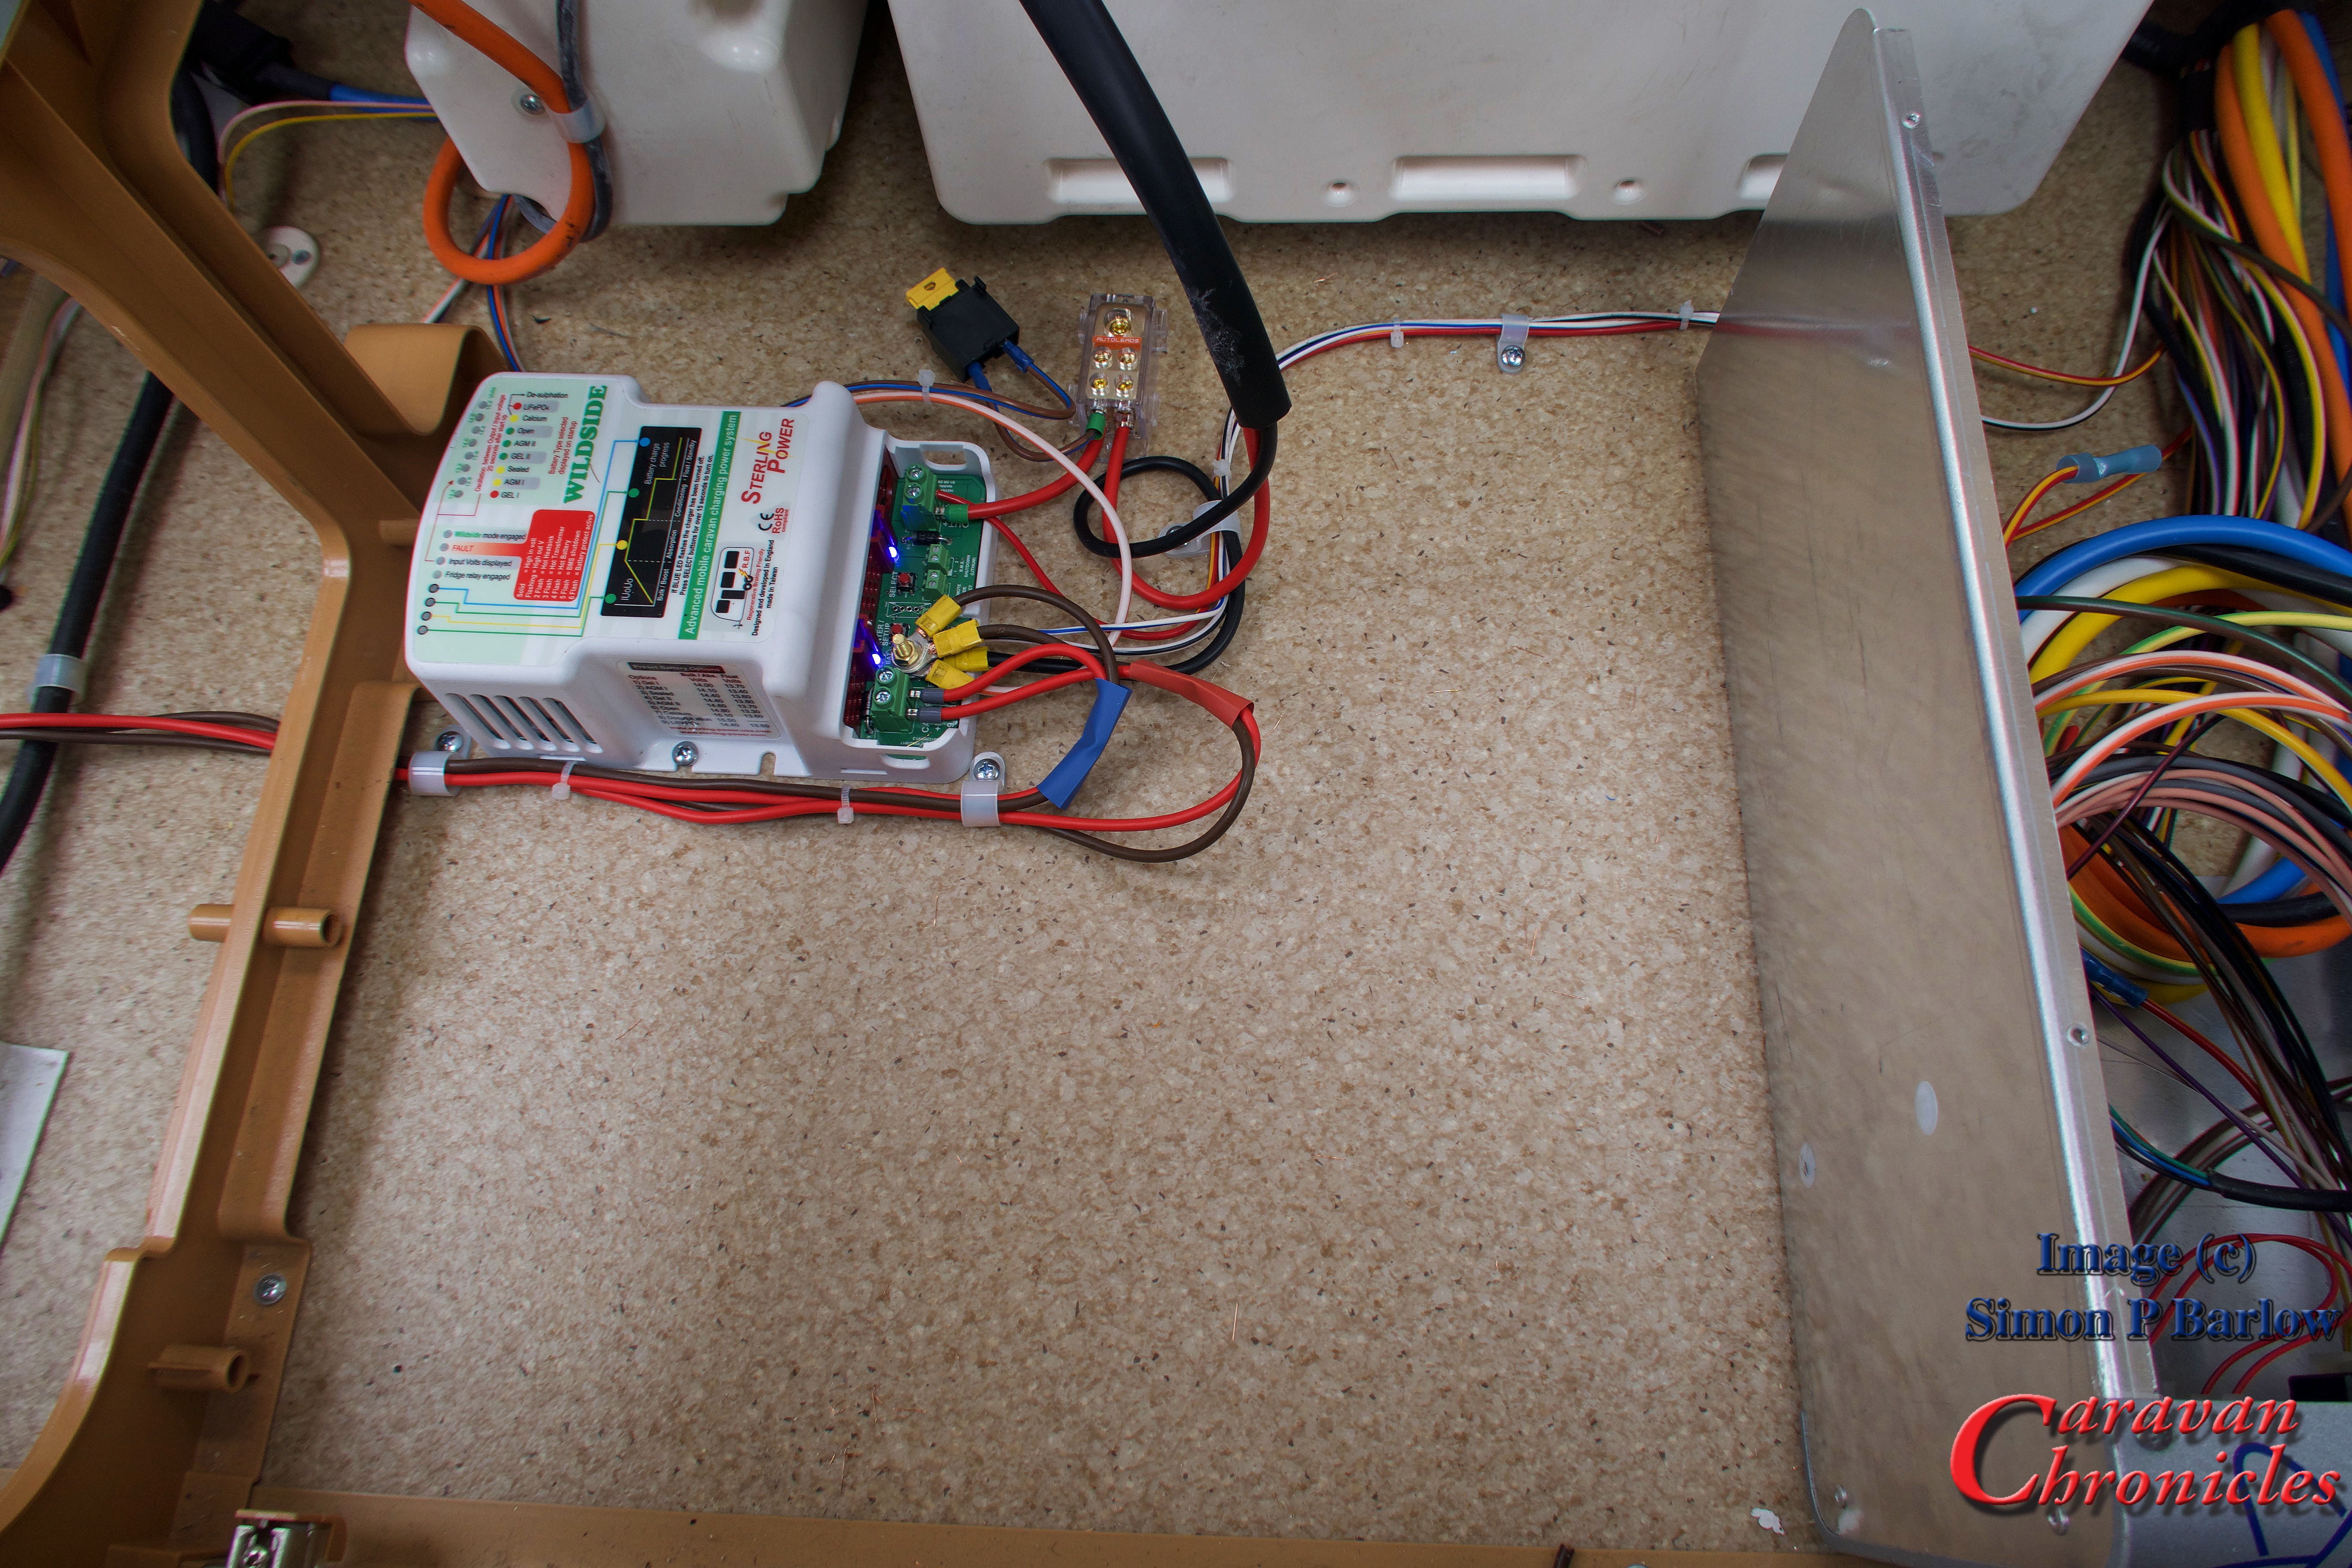
It was simply now a matter of finding the plug I needed, unplugging it, locating the correct wire, cutting it and terminating it in the Wildside unit.

IMG_1140

I cut the cables about 4 inches away from the circuit board plug. This would give me plenty of length to crimp on a sleeve connector and heat shrink if I needed to remove the Wildside unit. As a backup I have also ordered some replacement pin inserts for the plugs so I could always re-terminate directly into the plug.

The next connections would be the incoming feed from the vehicle. 4 cables, two neutral and one positive fridge supply from pin 10 and one positive charging supply from pin 9.  These arrive from the 13 pin plug via the fuse box mounted on the front wall through two 20 amp fuses and to the Sergeant unit. I had trouble identifying the cables as the colours were not as indicated in the manufacturers drawings. So to double check I removed the fuse box to gain access to the 13 core cable where it terminates.

IMG_1141

It was easy enough now to trace the correct cables and confirm with my multimeter. So all the connections now made, albeit temporary, I could install the 20 Amp main battery fuse and make sure the Wildside unit powered up OK.

Don’t worry about the brass bolt holding together the three cables, it was so I could easily get a clamp meter on the cables to take current readings.

IMG_1142

It started up without any problems and so I could connect up the 13 pin plug to the Amarok and start the engine and take a few measurements.

I checked the vehicles voltage and it was sat at 14.5 with run/stop disabled and the engine ticking over. OK how come I had a voltage of 14.5 volts in the vehicle with a Euro 6 engine ticking over? Well the Wildside unit basically makes the vehicle’s ECU think that the vehicle battery requires charging (remember an Euro 6 engine cranking battery will only ever be charged to 80% of its capacity so that regen will always work).

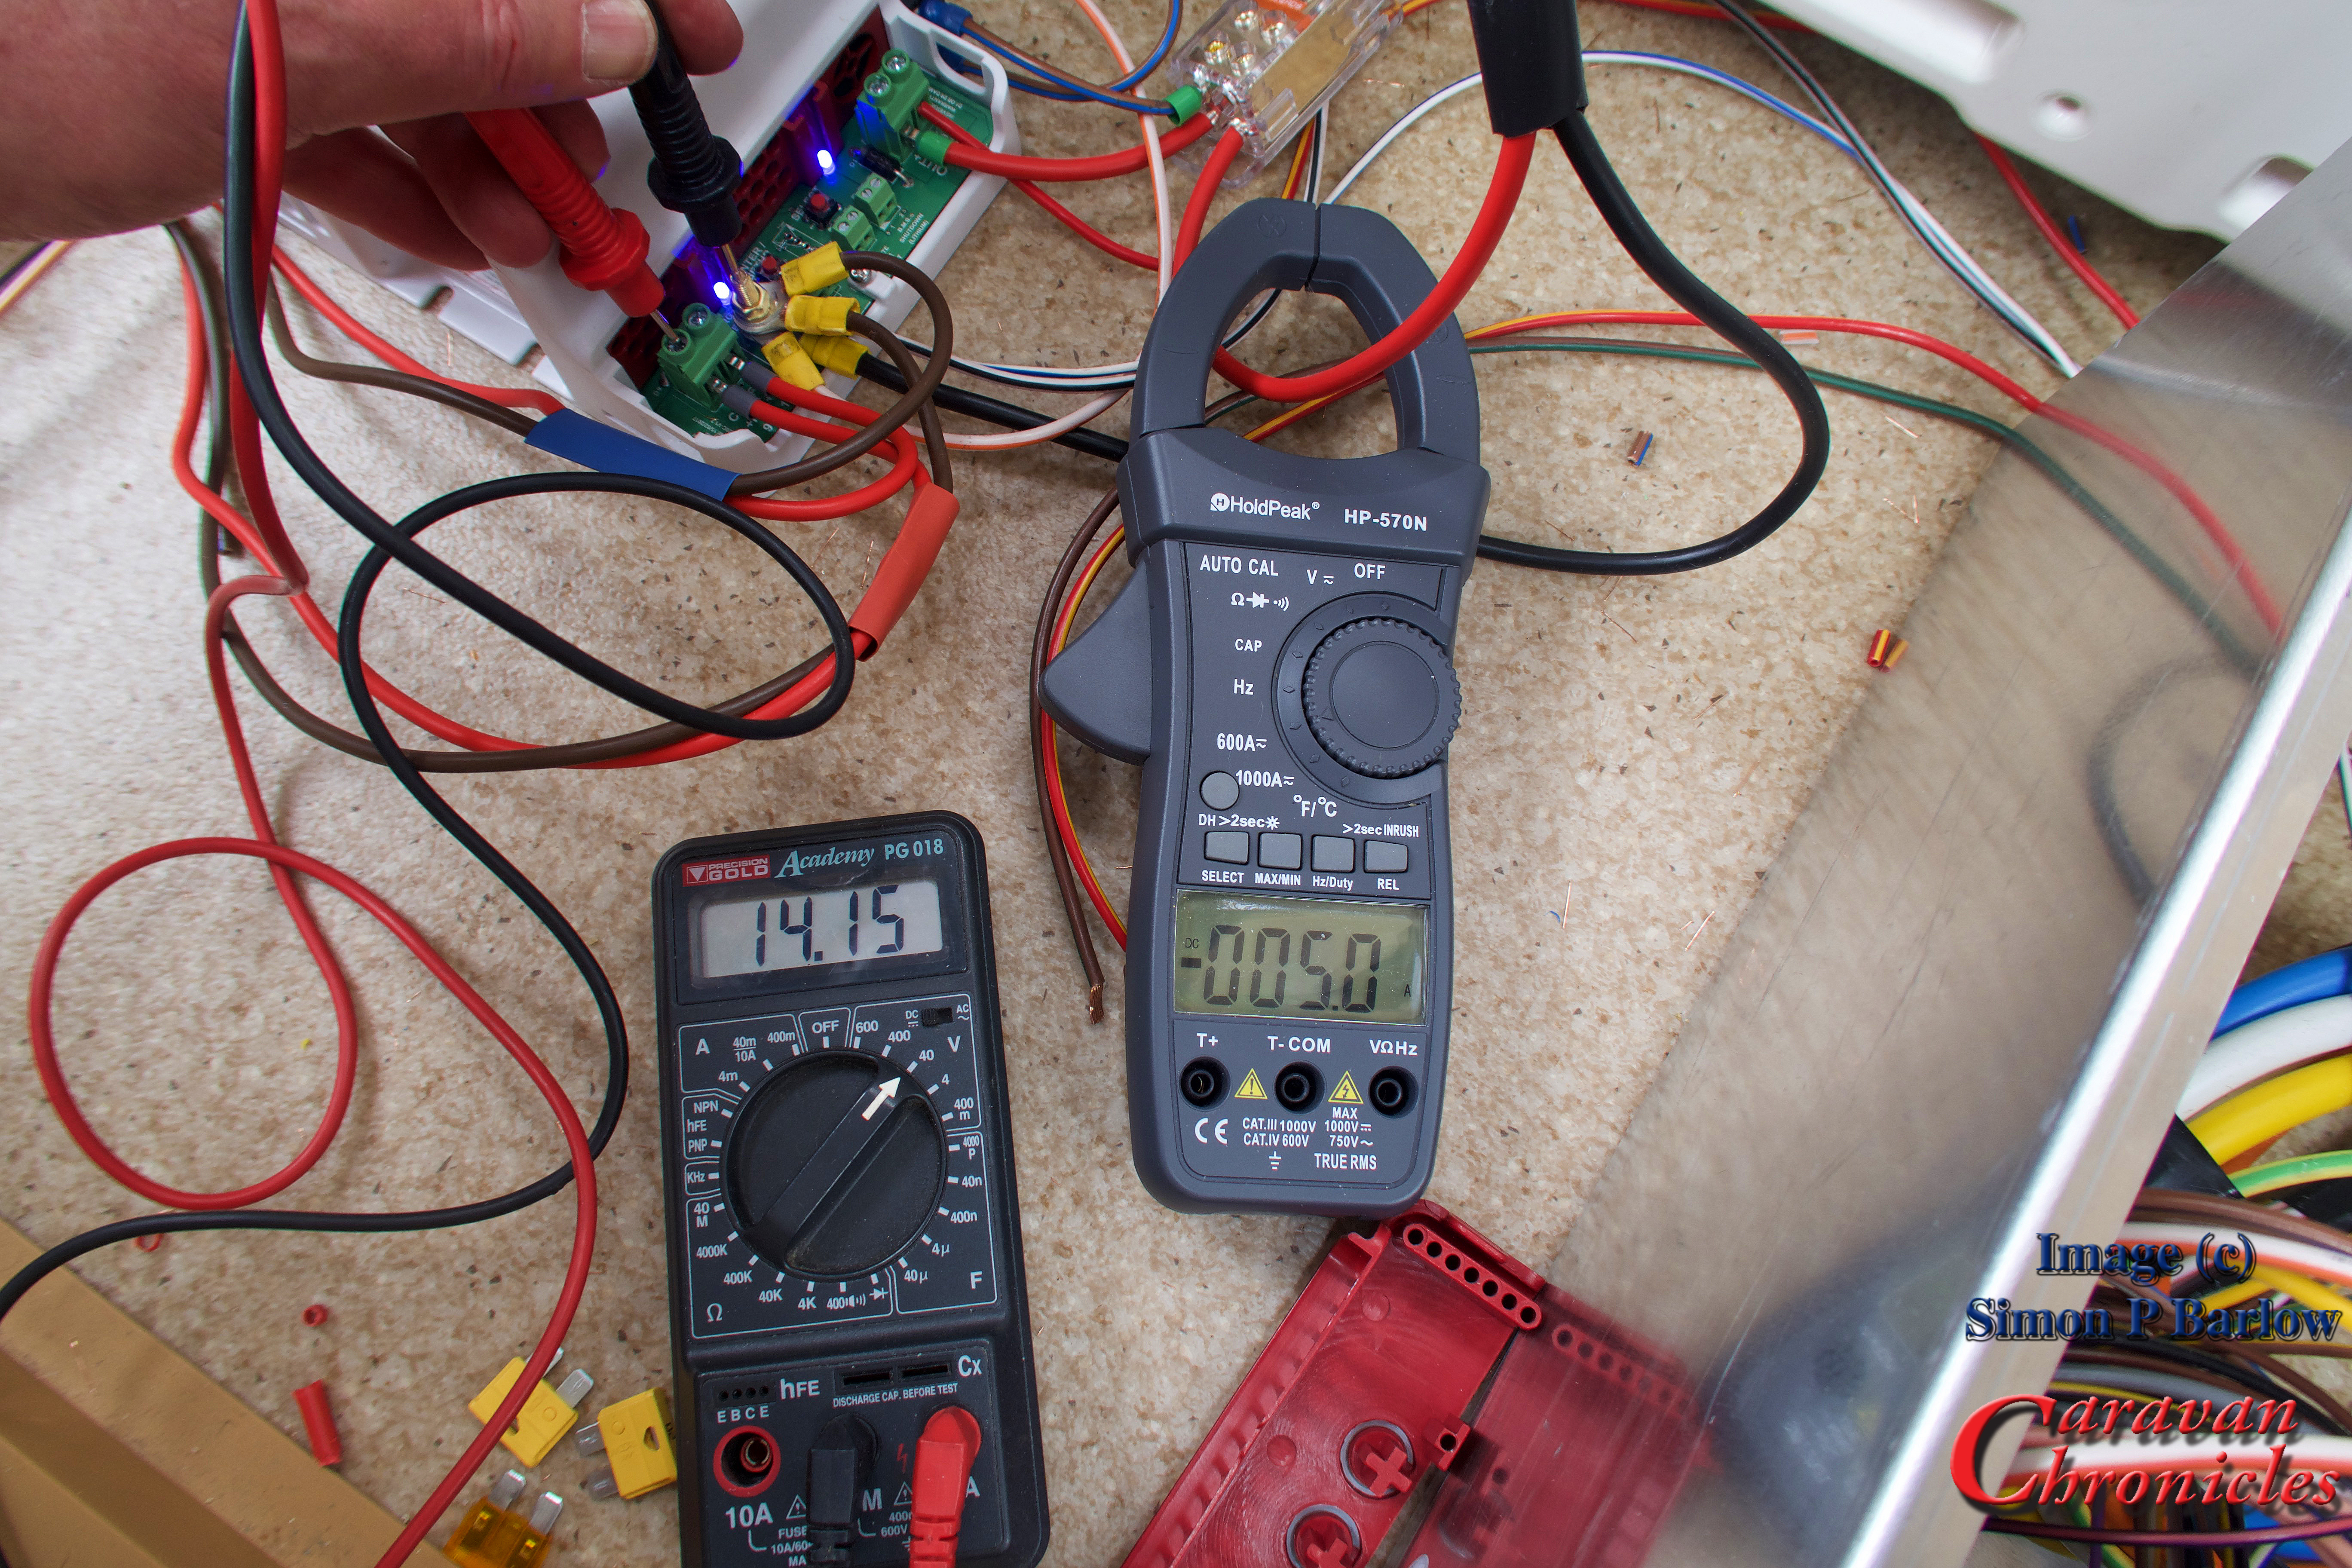
The first reading I checked was the leisure battery incoming link. I had a reading of 9.96 volts and a current of 8.8 amps. That was quite a big voltage drop.

IMG_1143

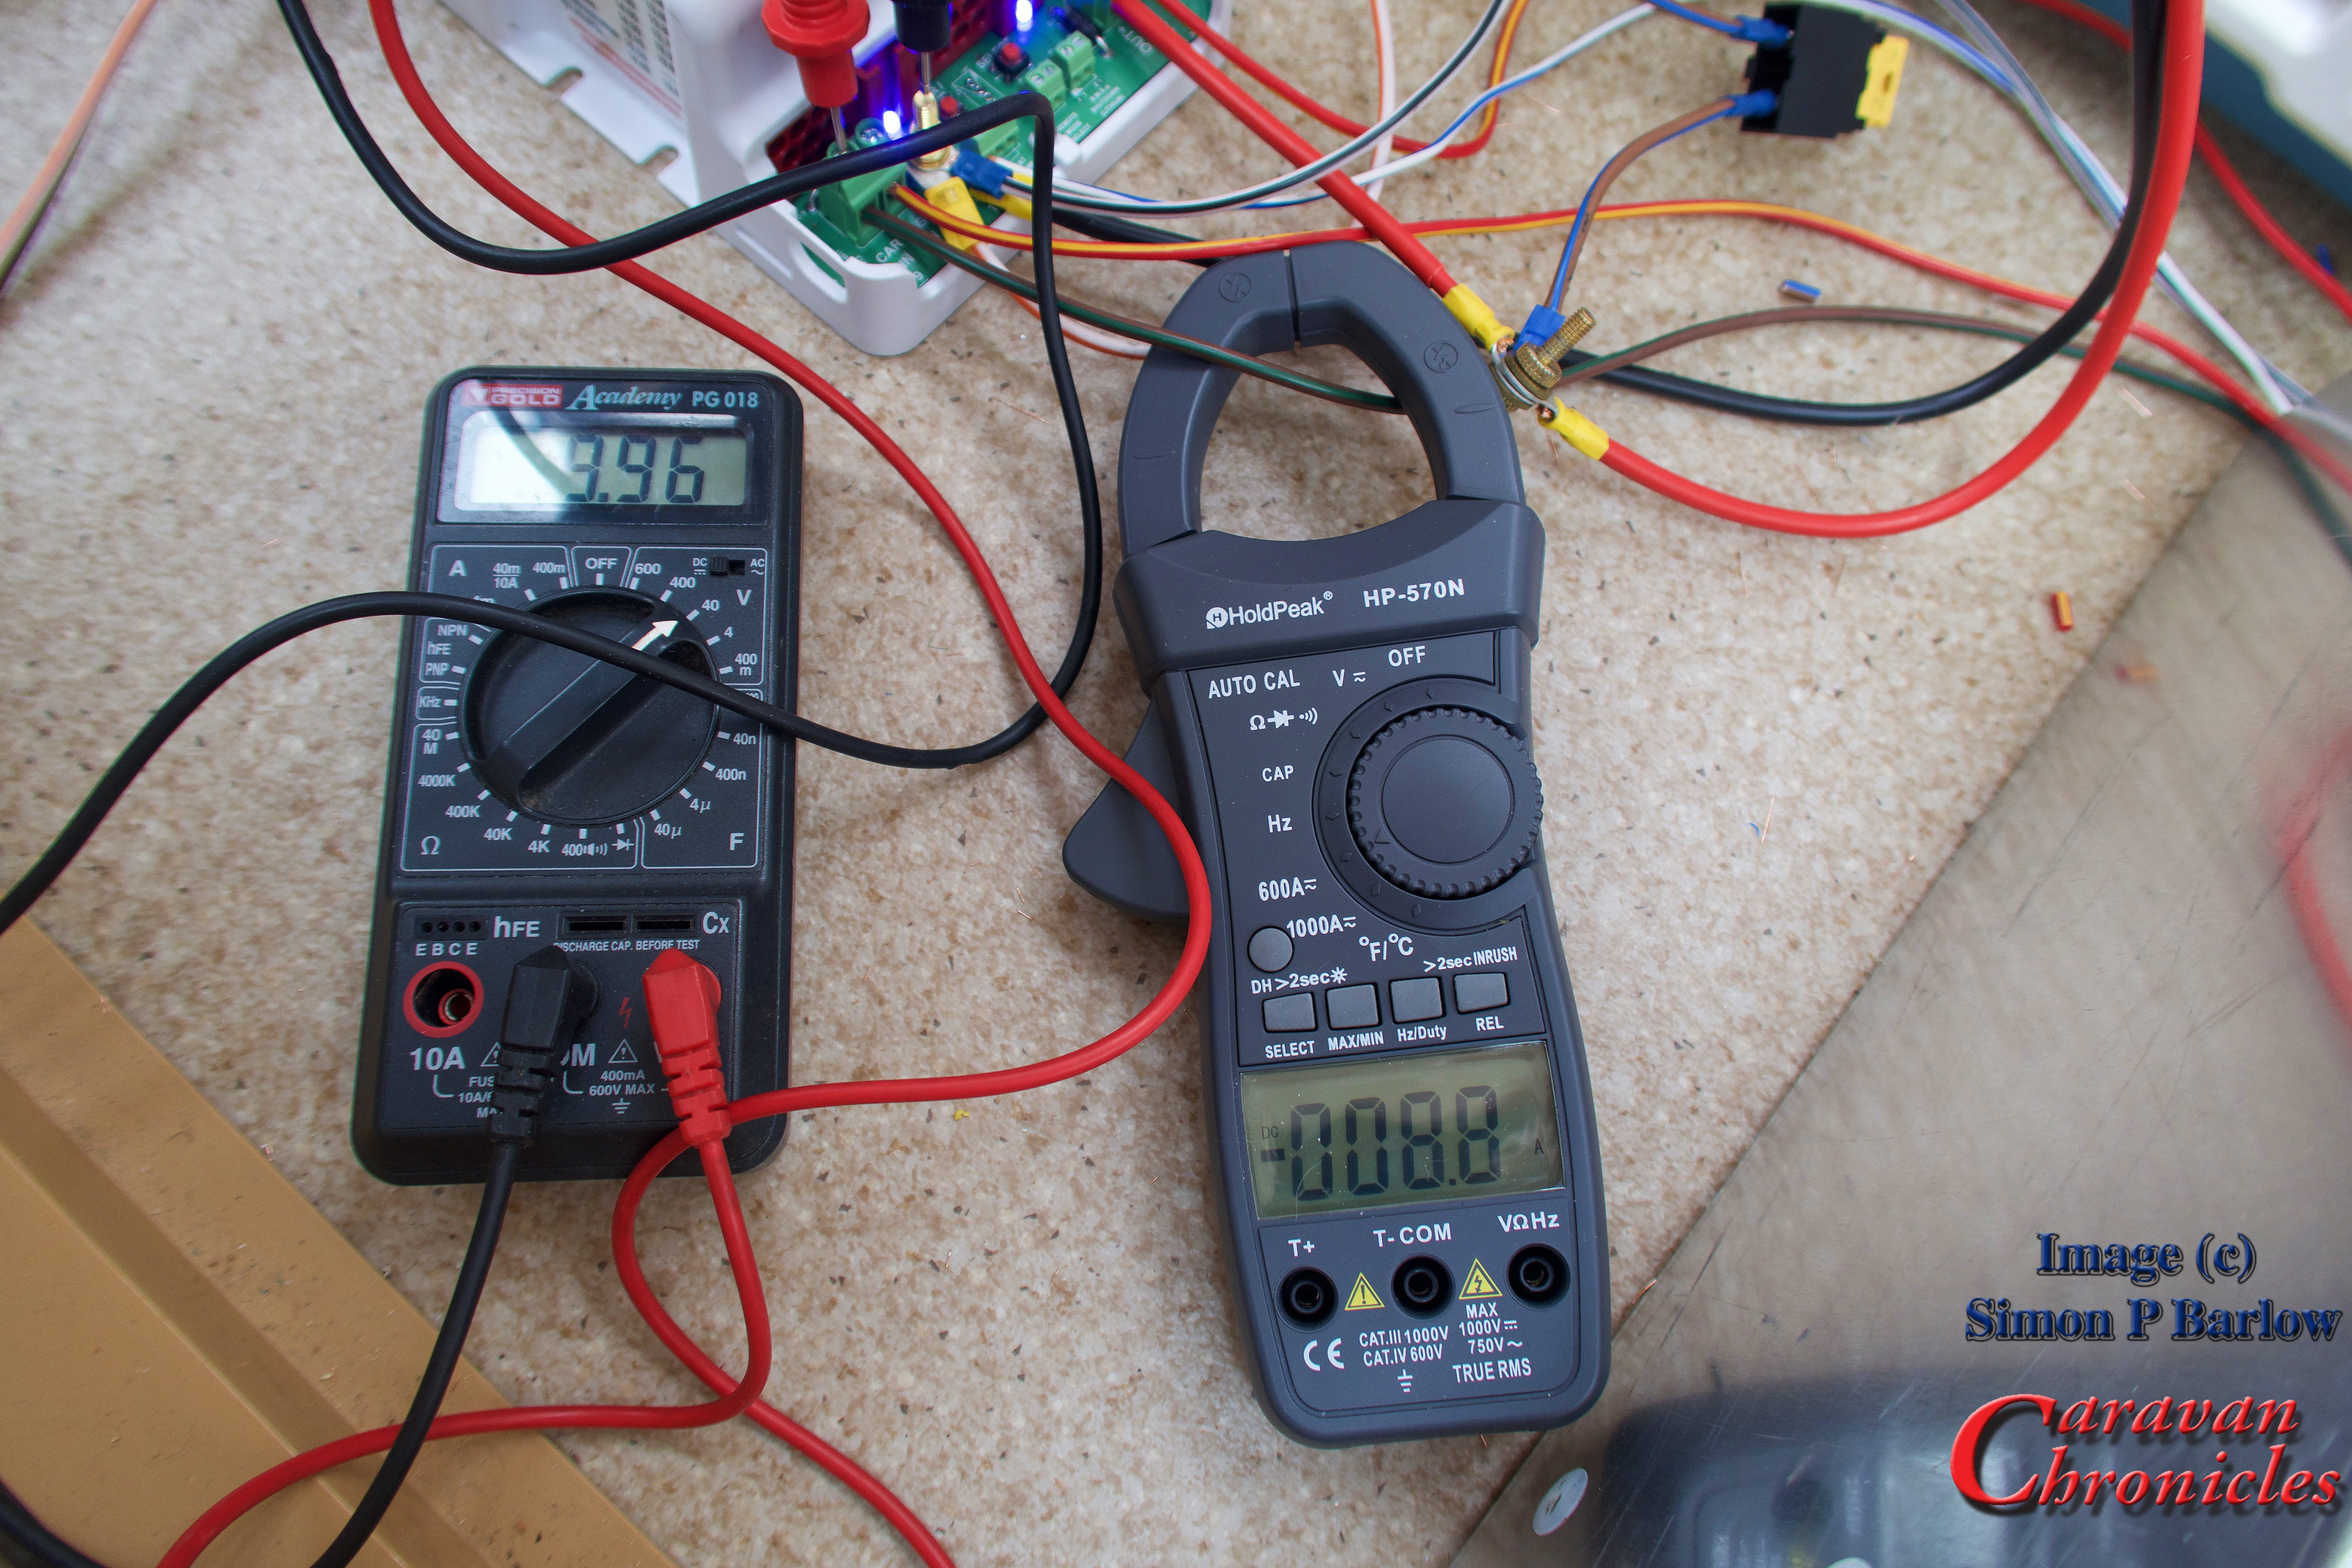
I moved on to test the incoming fridge circuit. This was showing 9.99 volts and a current of 13.3 amps. I had a big voltage drop somewhere. I checked the voltage at the point the 13 core cable terminates and got a reading of 12.75 volts. somewhere between the incoming cable and the termination on the Wildside unit I was getting a  big voltage drop.

IMG_1144

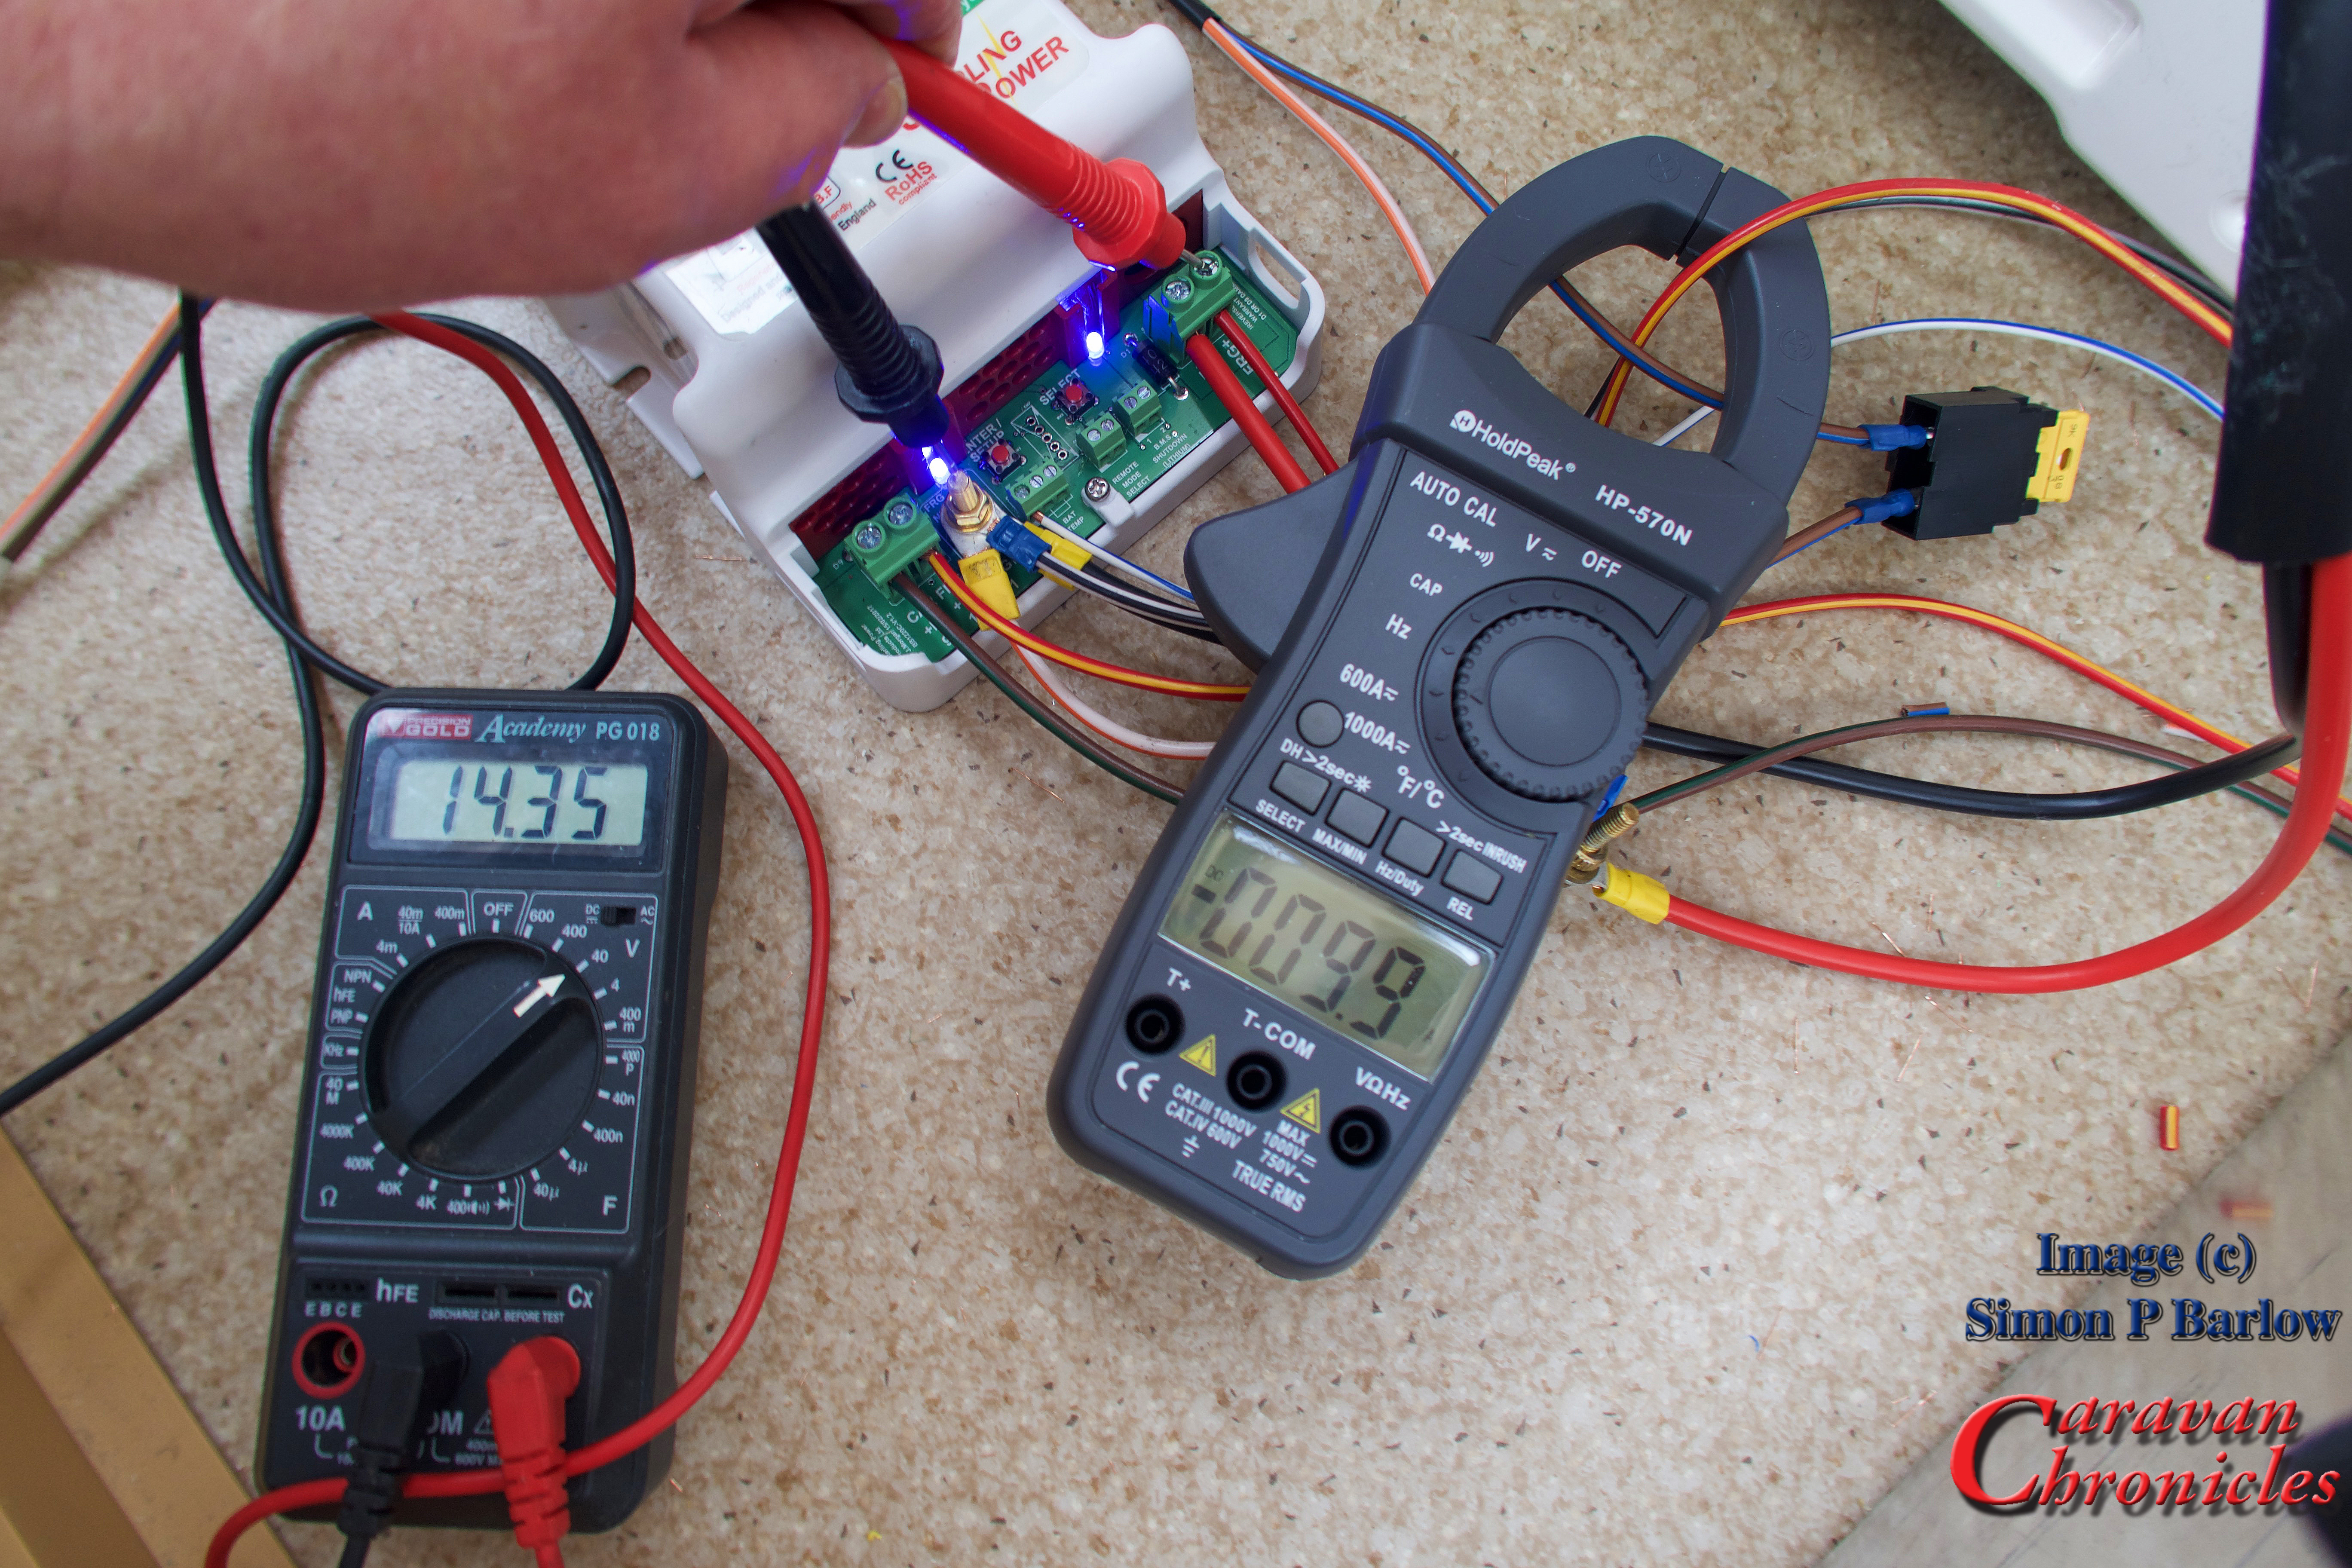
Continuing with taking some readings, I checked the fridge output and it was stable at 14.35 volts, 9.9 amps.

IMG_1145

A problem with the fridge…

On the original caravan wiring diagram it showed the fridge heating element connected with just two wires and on the face of it this looked simple enough. However when I first connected the fridge and powered up, the fridge came up with error code 10 – no power. There was definitely a supply voltage there and it was indicating a current draw of just under 10 amps. I wondered if the voltage detect circuit was polarity sensitive so swiped the connections round and this cleared the error code. So double check the polarity of the connection if you get an error code 10 don’t assume there is a connection fault.

Thinking cap on…

I decided to stop at this point. Unless I could eliminate that volt drop between the incoming cable and the Wildside unit it was pointless taking any further readings.

The next thing to do would be to eliminate the existing wiring for the leisure battery charging circuit and fridge circuit between where the incoming cable from the 13 pin plug terminated and the Wildside unit. I decided to replace the existing caravan wiring with some 2.5mm² cable.

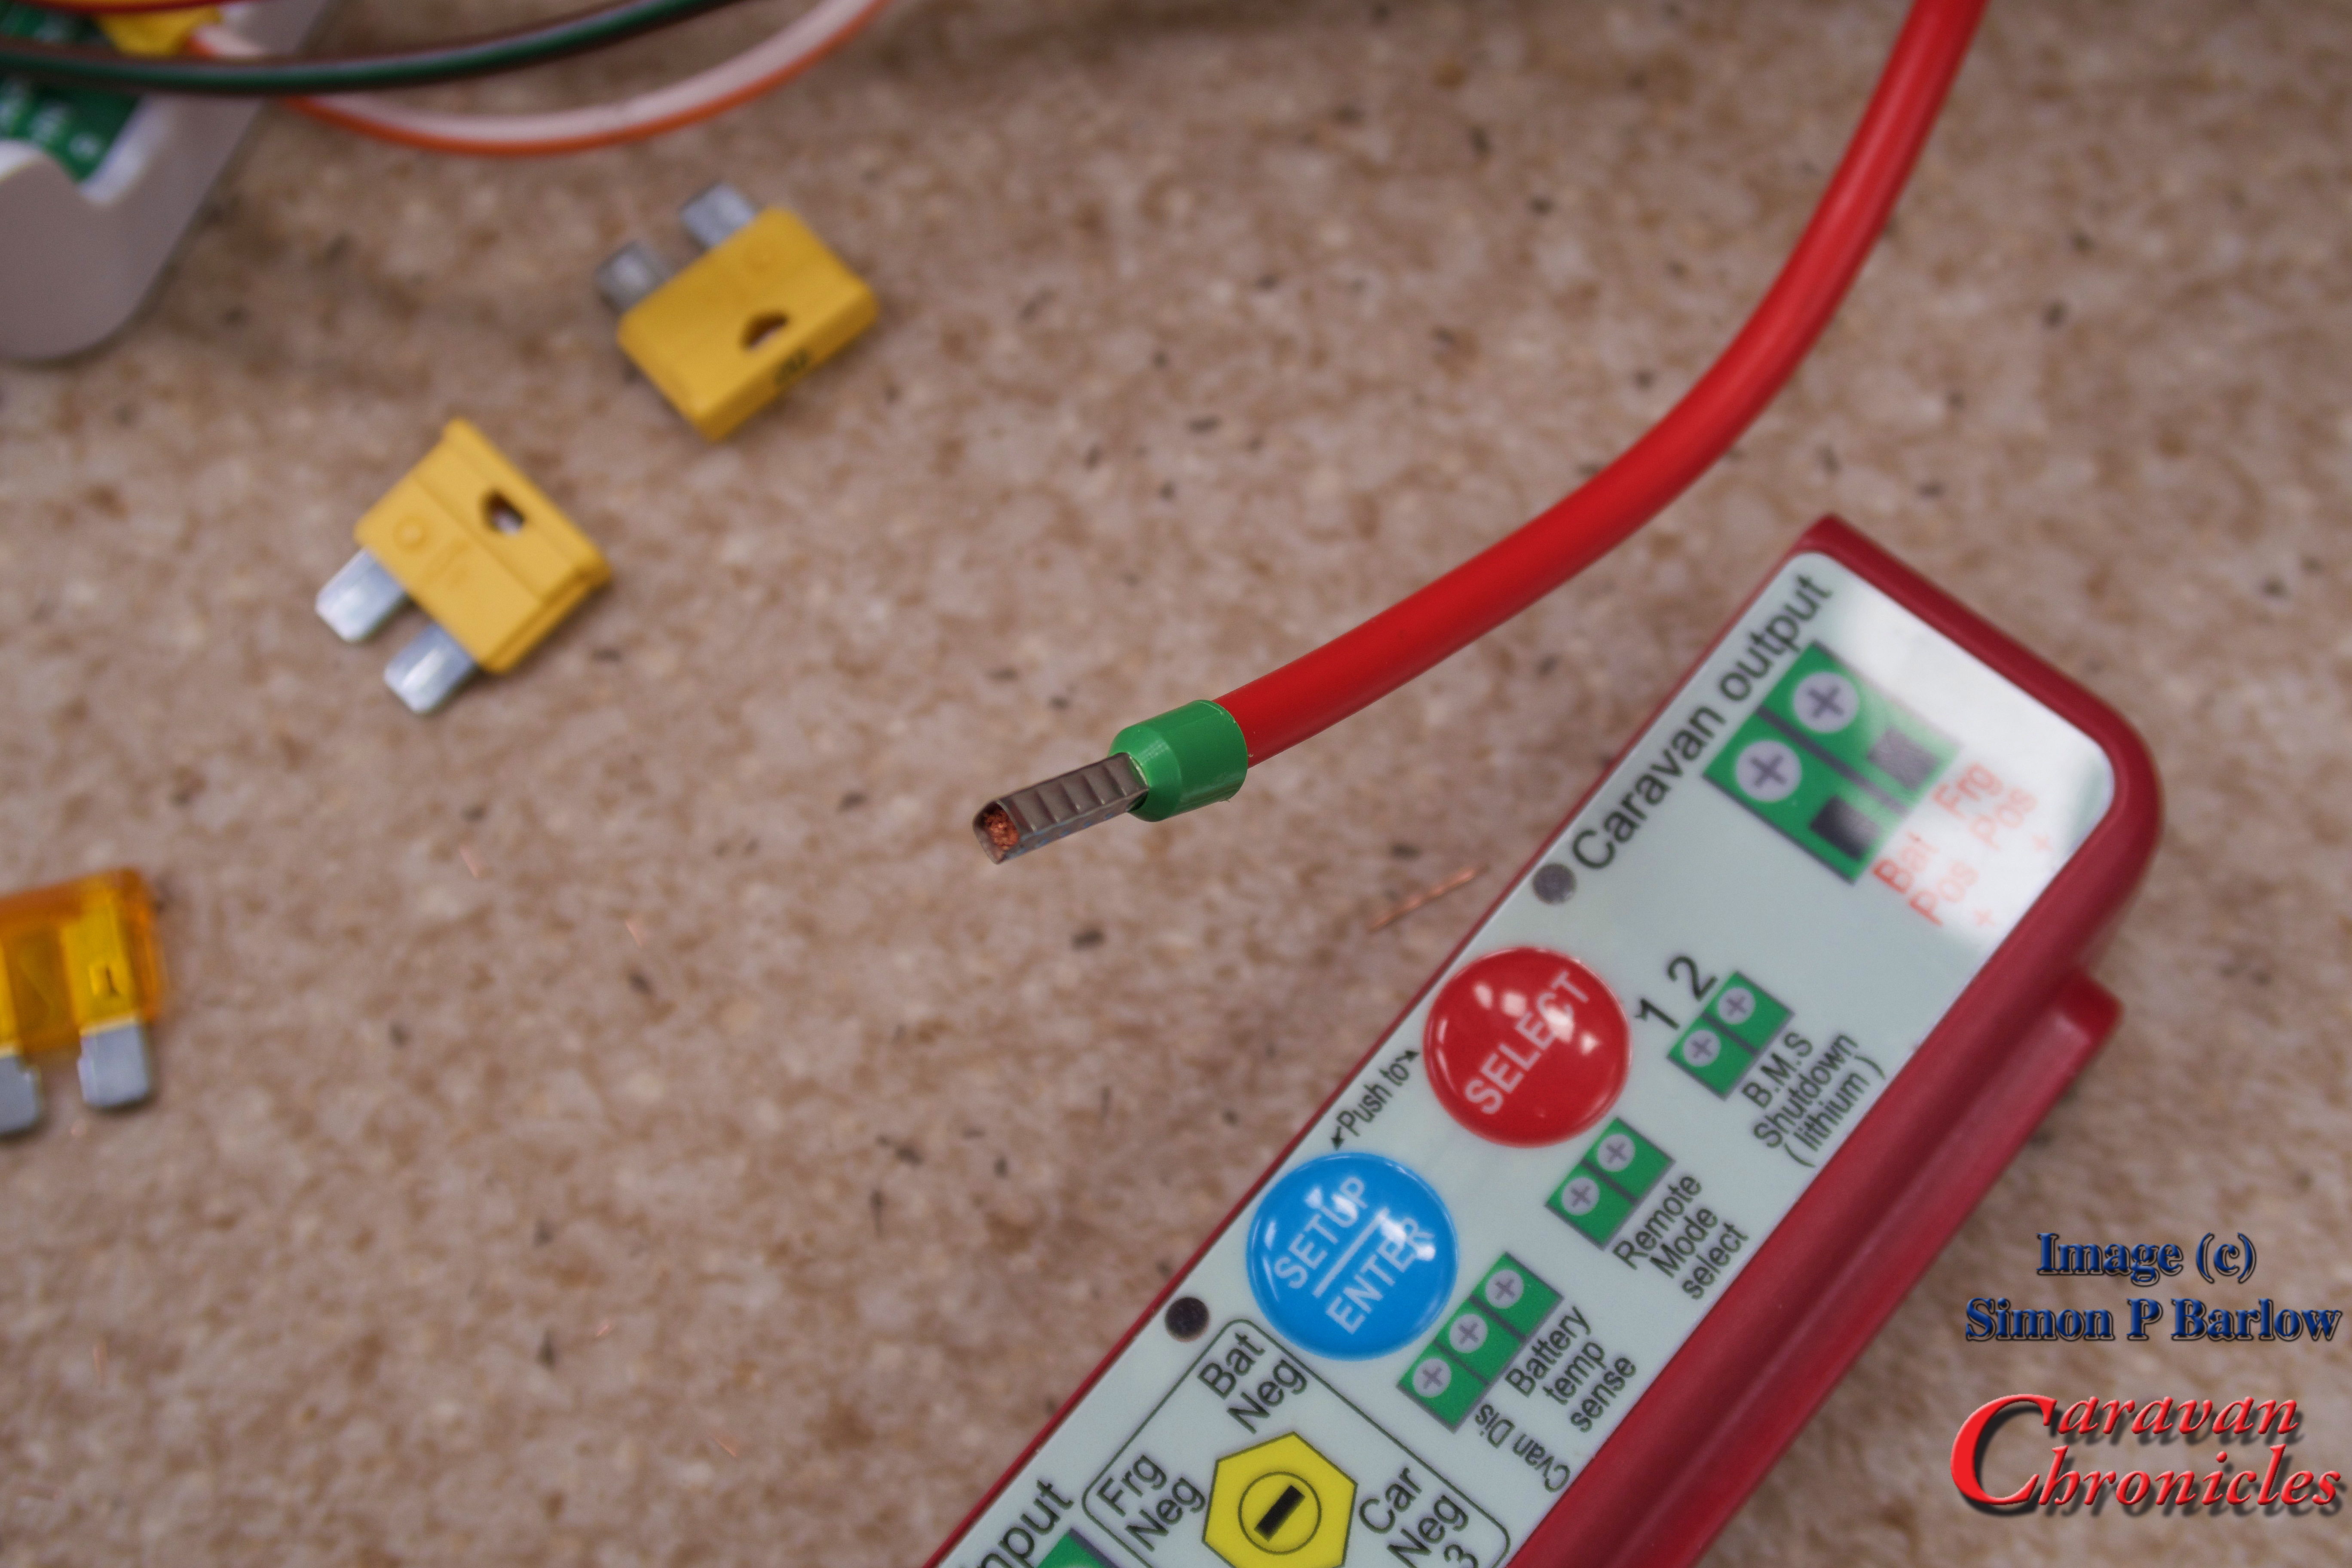
First job was to terminate all the previously terminated cables on the Wildside unit correctly with the correct size ferrule crimped on. When ever you terminate a stranded cable in  a terminal block that compresses the wire, you should first crimp a ferrule on to the cable to ensure a secure connection.

IMG_1148

Next I installed the four new 2.5mm² cables from the 13 core cable to the Wildside unit. I opted to use straight through sleeve crimp connectors to join to the cable coming from the 13 pin plug. I kept the length as short a possible – about 900mm, which resulted in not the best cable route option but I wanted to minimise voltage drop. (remember, the more current you draw through a cable and the longer the cable the bigger the voltage drop!)

All that done, and the correct terminal block installed for the battery positive lead rather than my brass bolt, I powered up everything and hooked up the Amarok and started the engine once again. With the engine running the vehicle was showing 14.7 volts and I was now getting 14.1 volts on the incoming charing circuit with a current draw of 8.2 amps. Note: the clamp meter in the picture is actually showing the charging current for the leisure battery… 5.0 amps.

IMG_1149

Checking the incoming fridge feed I was reading 14.2 volts and a current of 8.6 amps. Which was a vast improvement over my previous readings. (Note: the clamp meter in the picture below is still showing the battery charging current)

IMG_1150

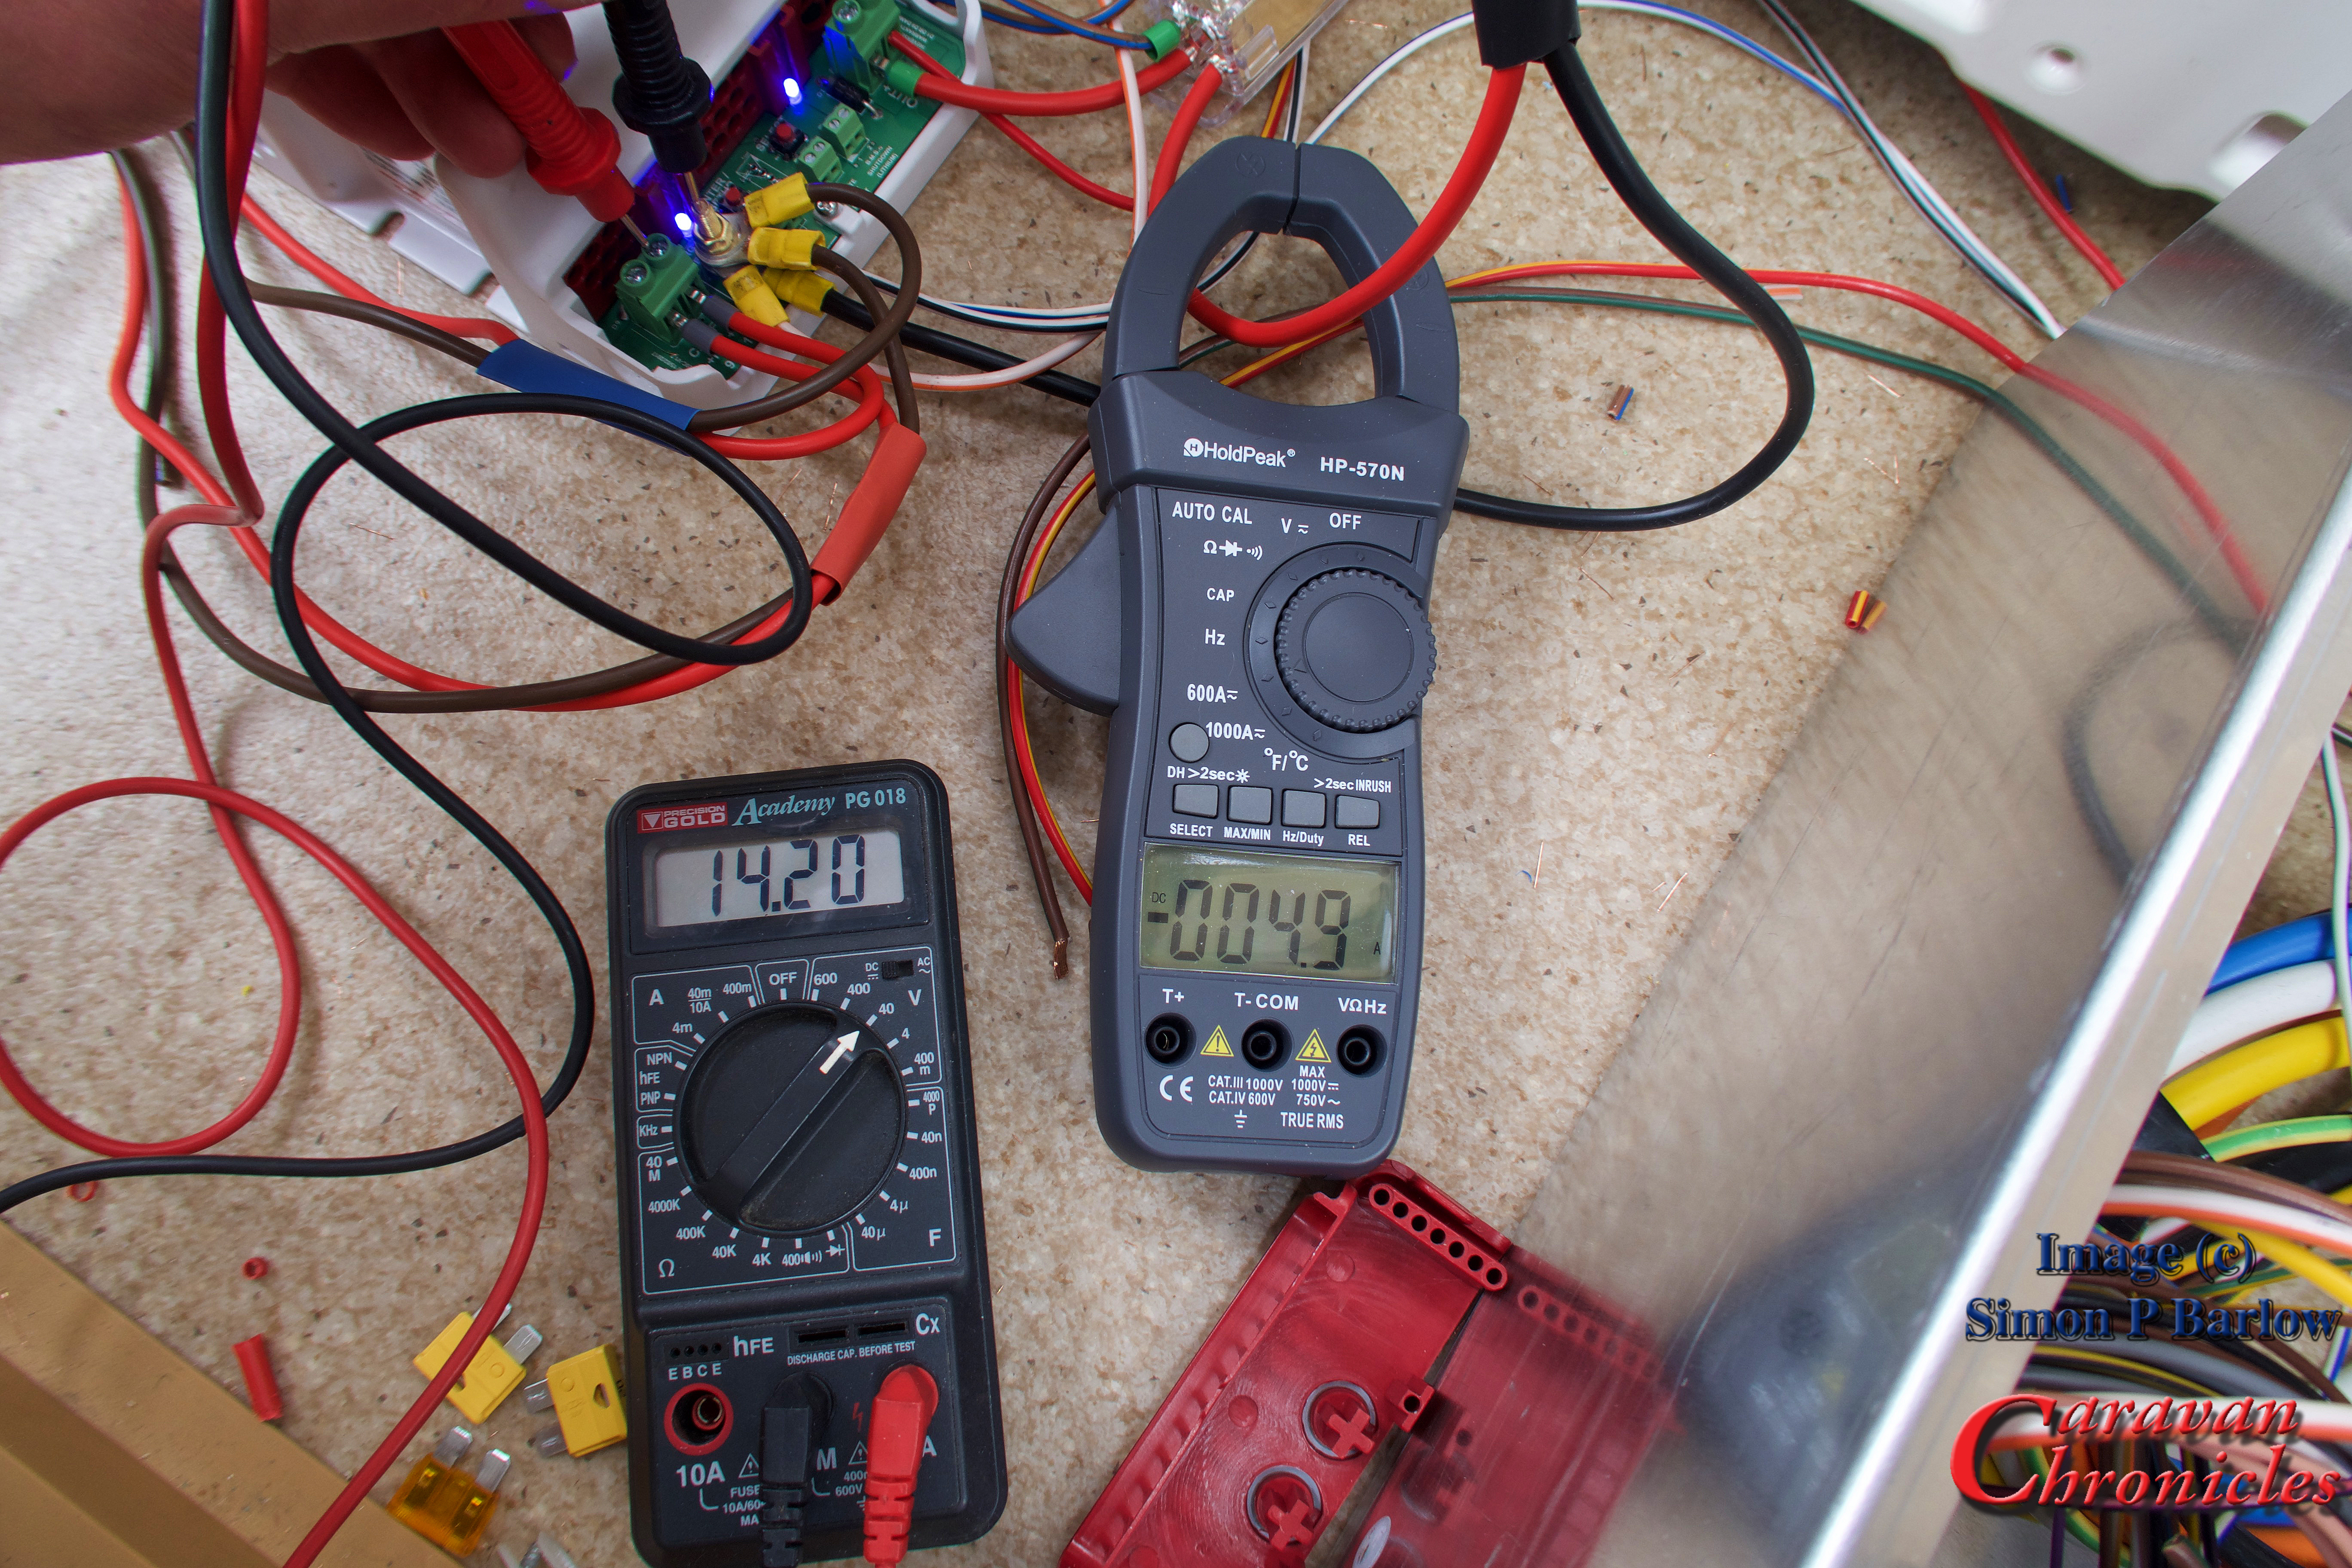
The battery charging voltage was showing 15.01 and 4.8 amps which meant I was at least charing the battery with just the engine on idle.

IMG_1152

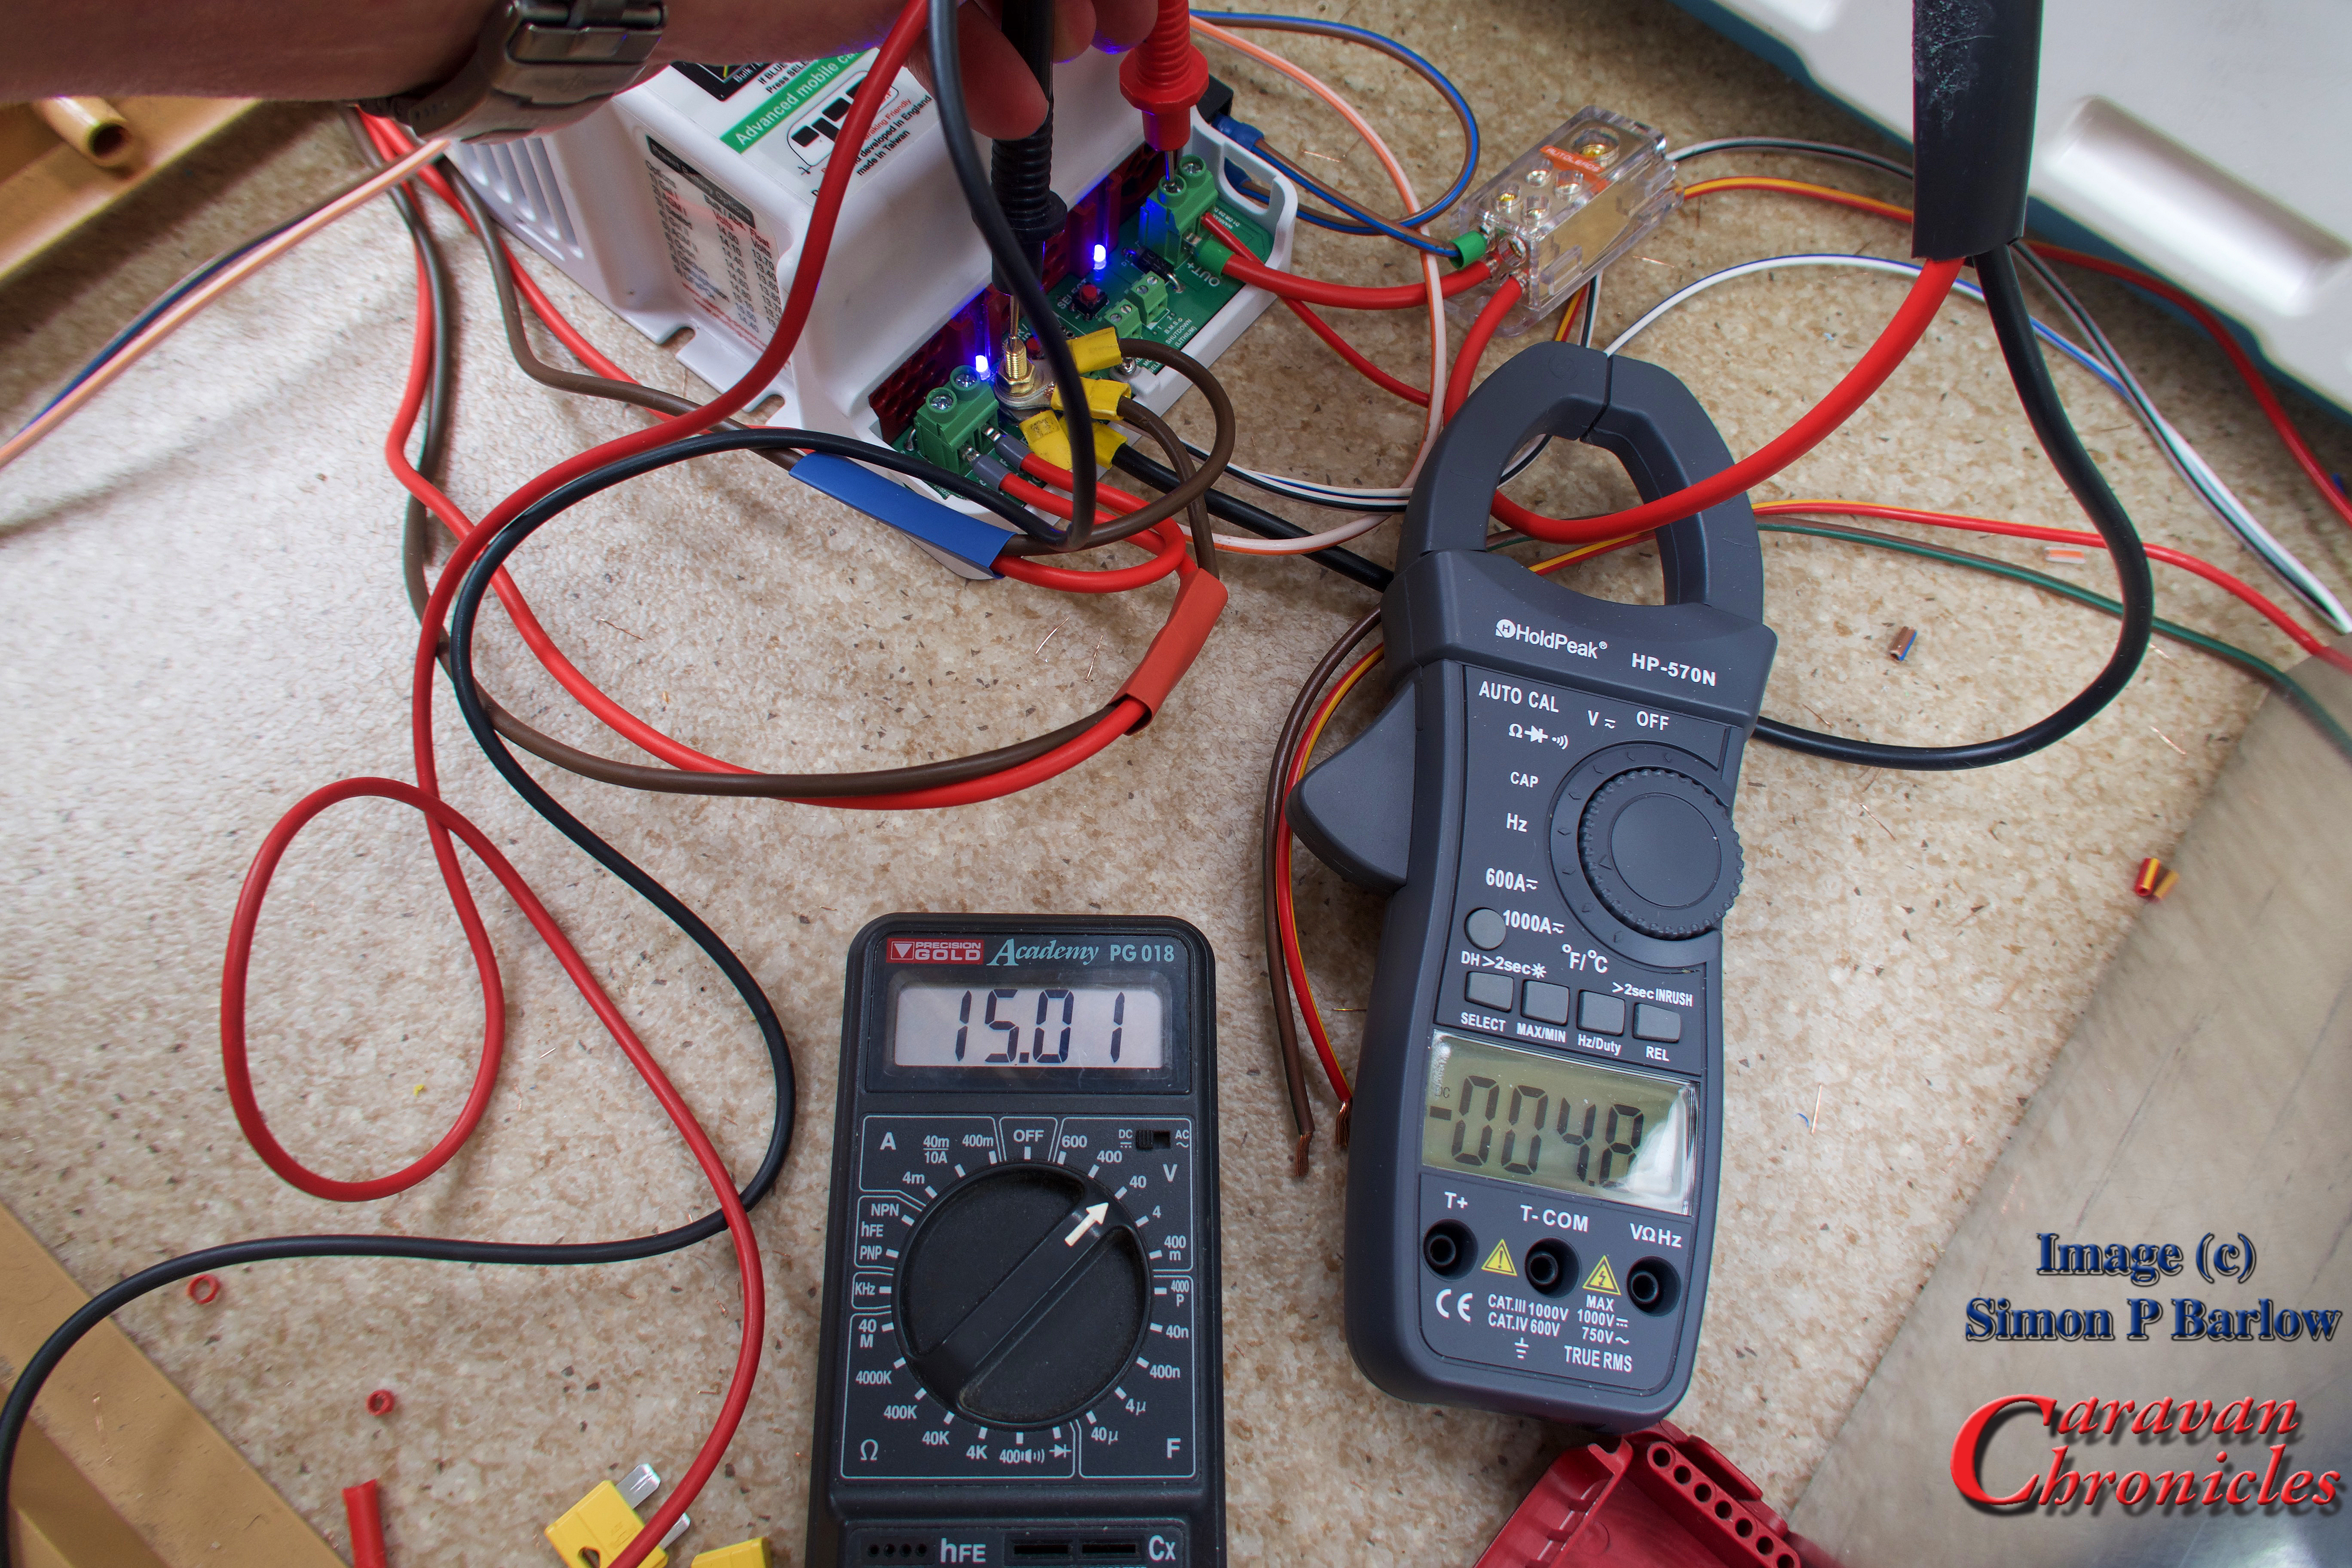
Doing a little maths – I was pulling 8.2 Amps via the leisure battery charging circuit and 8.6 Amps via the fridge circuit giving a total of 16.8 Amps. I was supplying 9.9 Amps to the fridge and 5.0 Amps to the battery. A total of 14.9 Amps. The difference would be due to the losses due to stepping up the voltage being supplied by the vehicle to the output voltages of the Wildside unit. In terms of watts – the vehicle was supplying 237.74 watts and the wild side units was outputting 224.49 watts.

This did make me think. As the fridge was now consuming 149.49 watts (its rated at 150 watts) so it in theory should be at it’s max efficiency… did it need to be on all the time? Could the fridge be switched on a duty cycle of say…on for 75% and off for 25%? This would then increase the ability to put more back into the leisure battery, especially useful on short runs.

Speaking to Charles Sterling, I know this unit has been rated on the conservative side and in theory 20 amps can be pulled from each circuit. This would give around 560 watts of power… and in theory about 400 watts available for charging the leisure battery. Will that damage your vehicle? Well as most Euro 6 engines are fitted with 2Kw alternators, there is still plenty of power available.

Finishing up

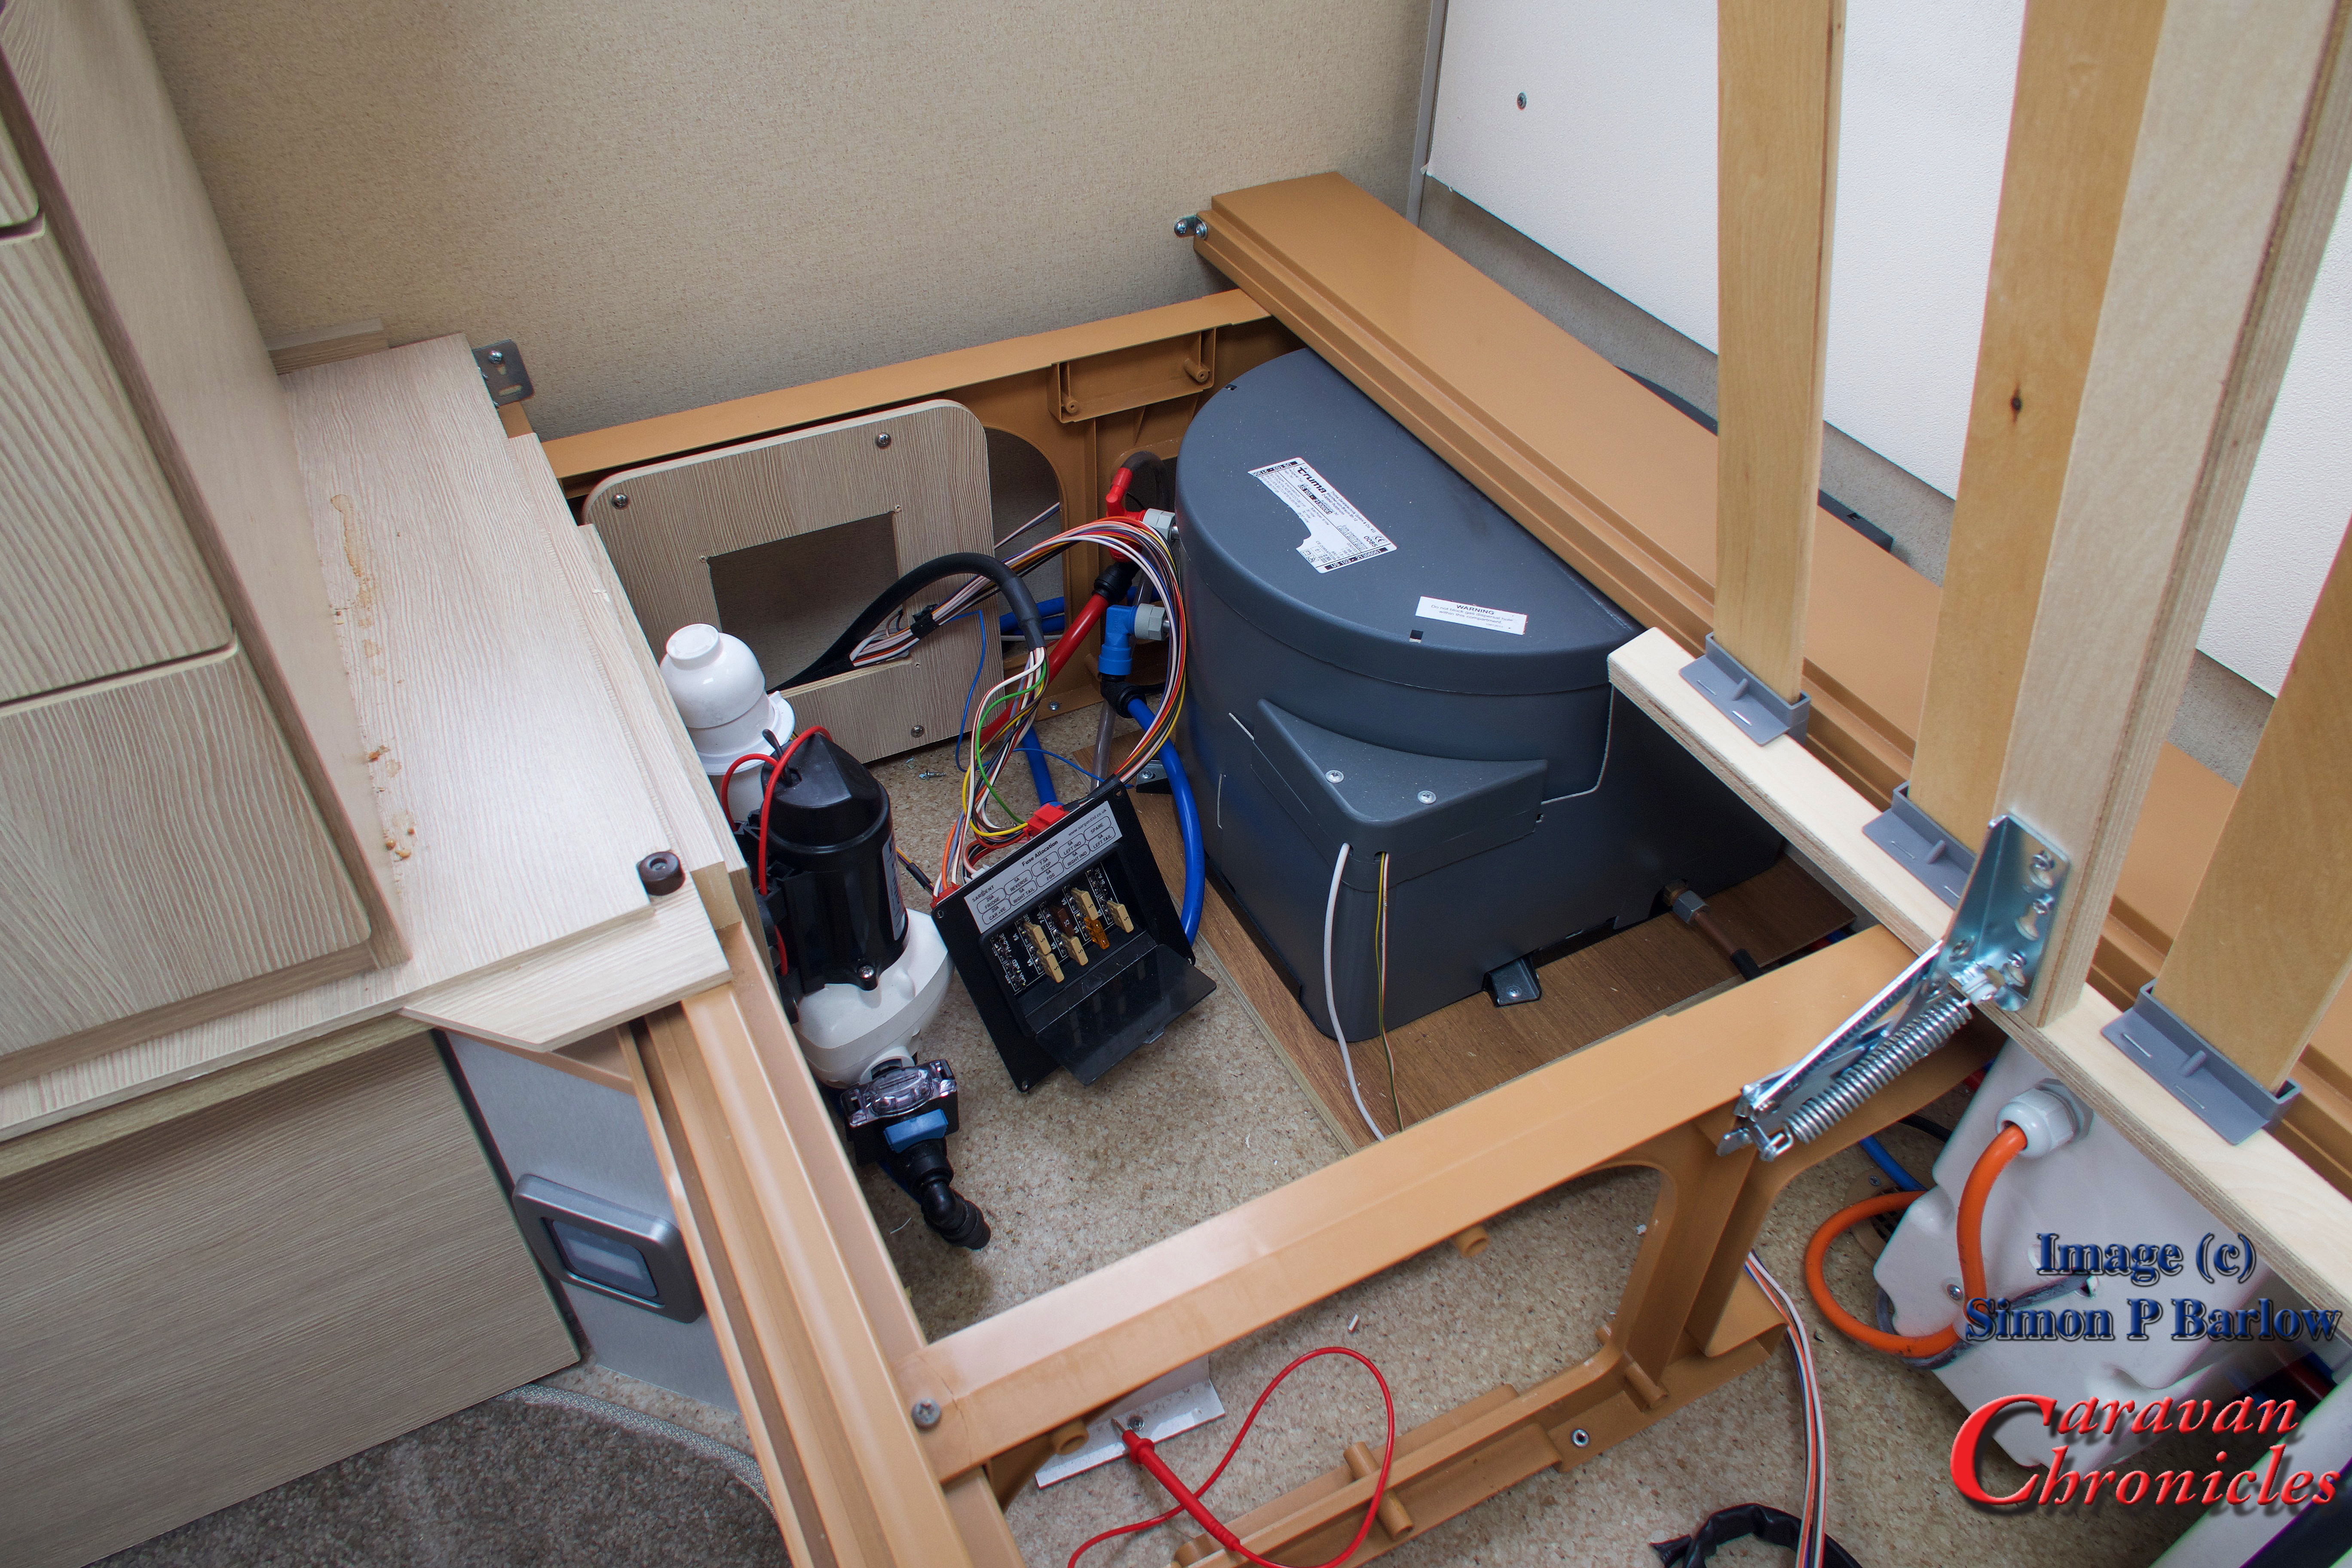
It was now a matter of tidying up my mess and installing some cable ‘p’ clips to secure everything to the floor. The two sleeves on the cables that come from the 13 core cable are there so I can identify each circuit. Red for leisure battery charging and blue for fridge circuit.

IMG_1157

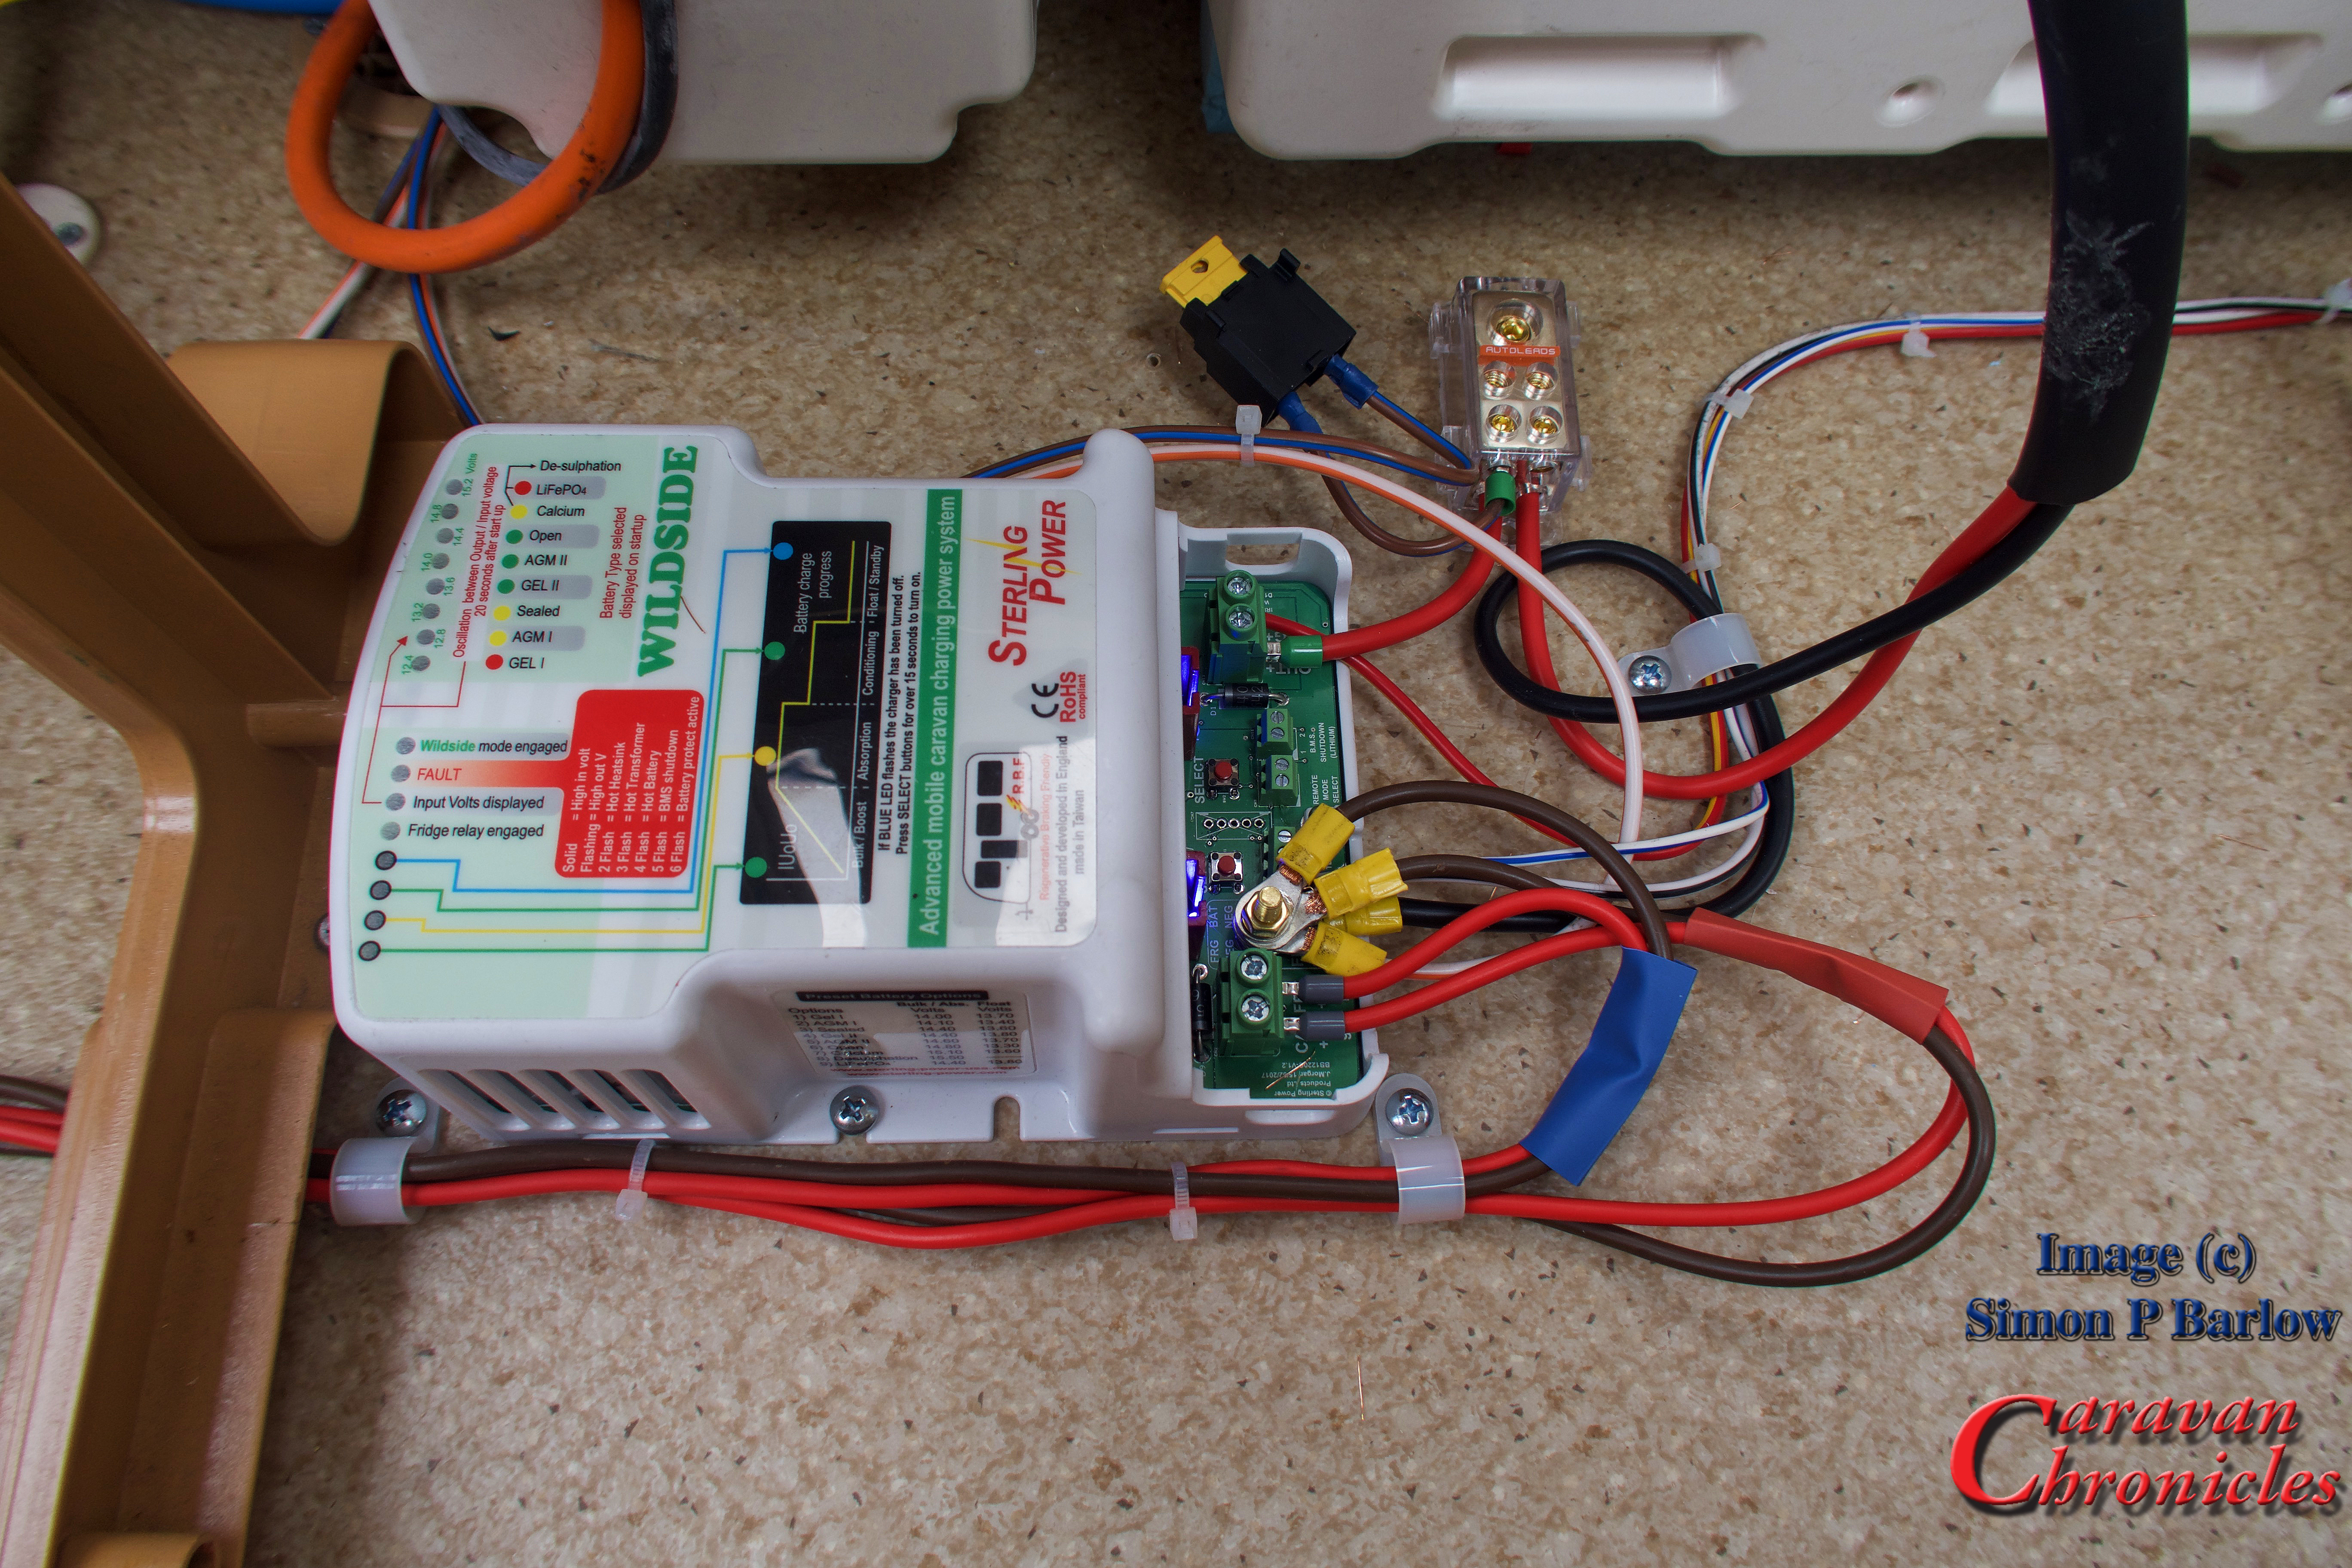
The yellow fuse you can see is the leisure battery fuse. It’s rated at 20 amps and is in circuit between the leisure battery and the caravan services, so pull that fuse and the caravan will be isolated from the 12 volt system. I’ll probably replace that with a circuit breaker in the near future.

IMG_1156

IMG_1161

A couple of things I thought about while doing this install.

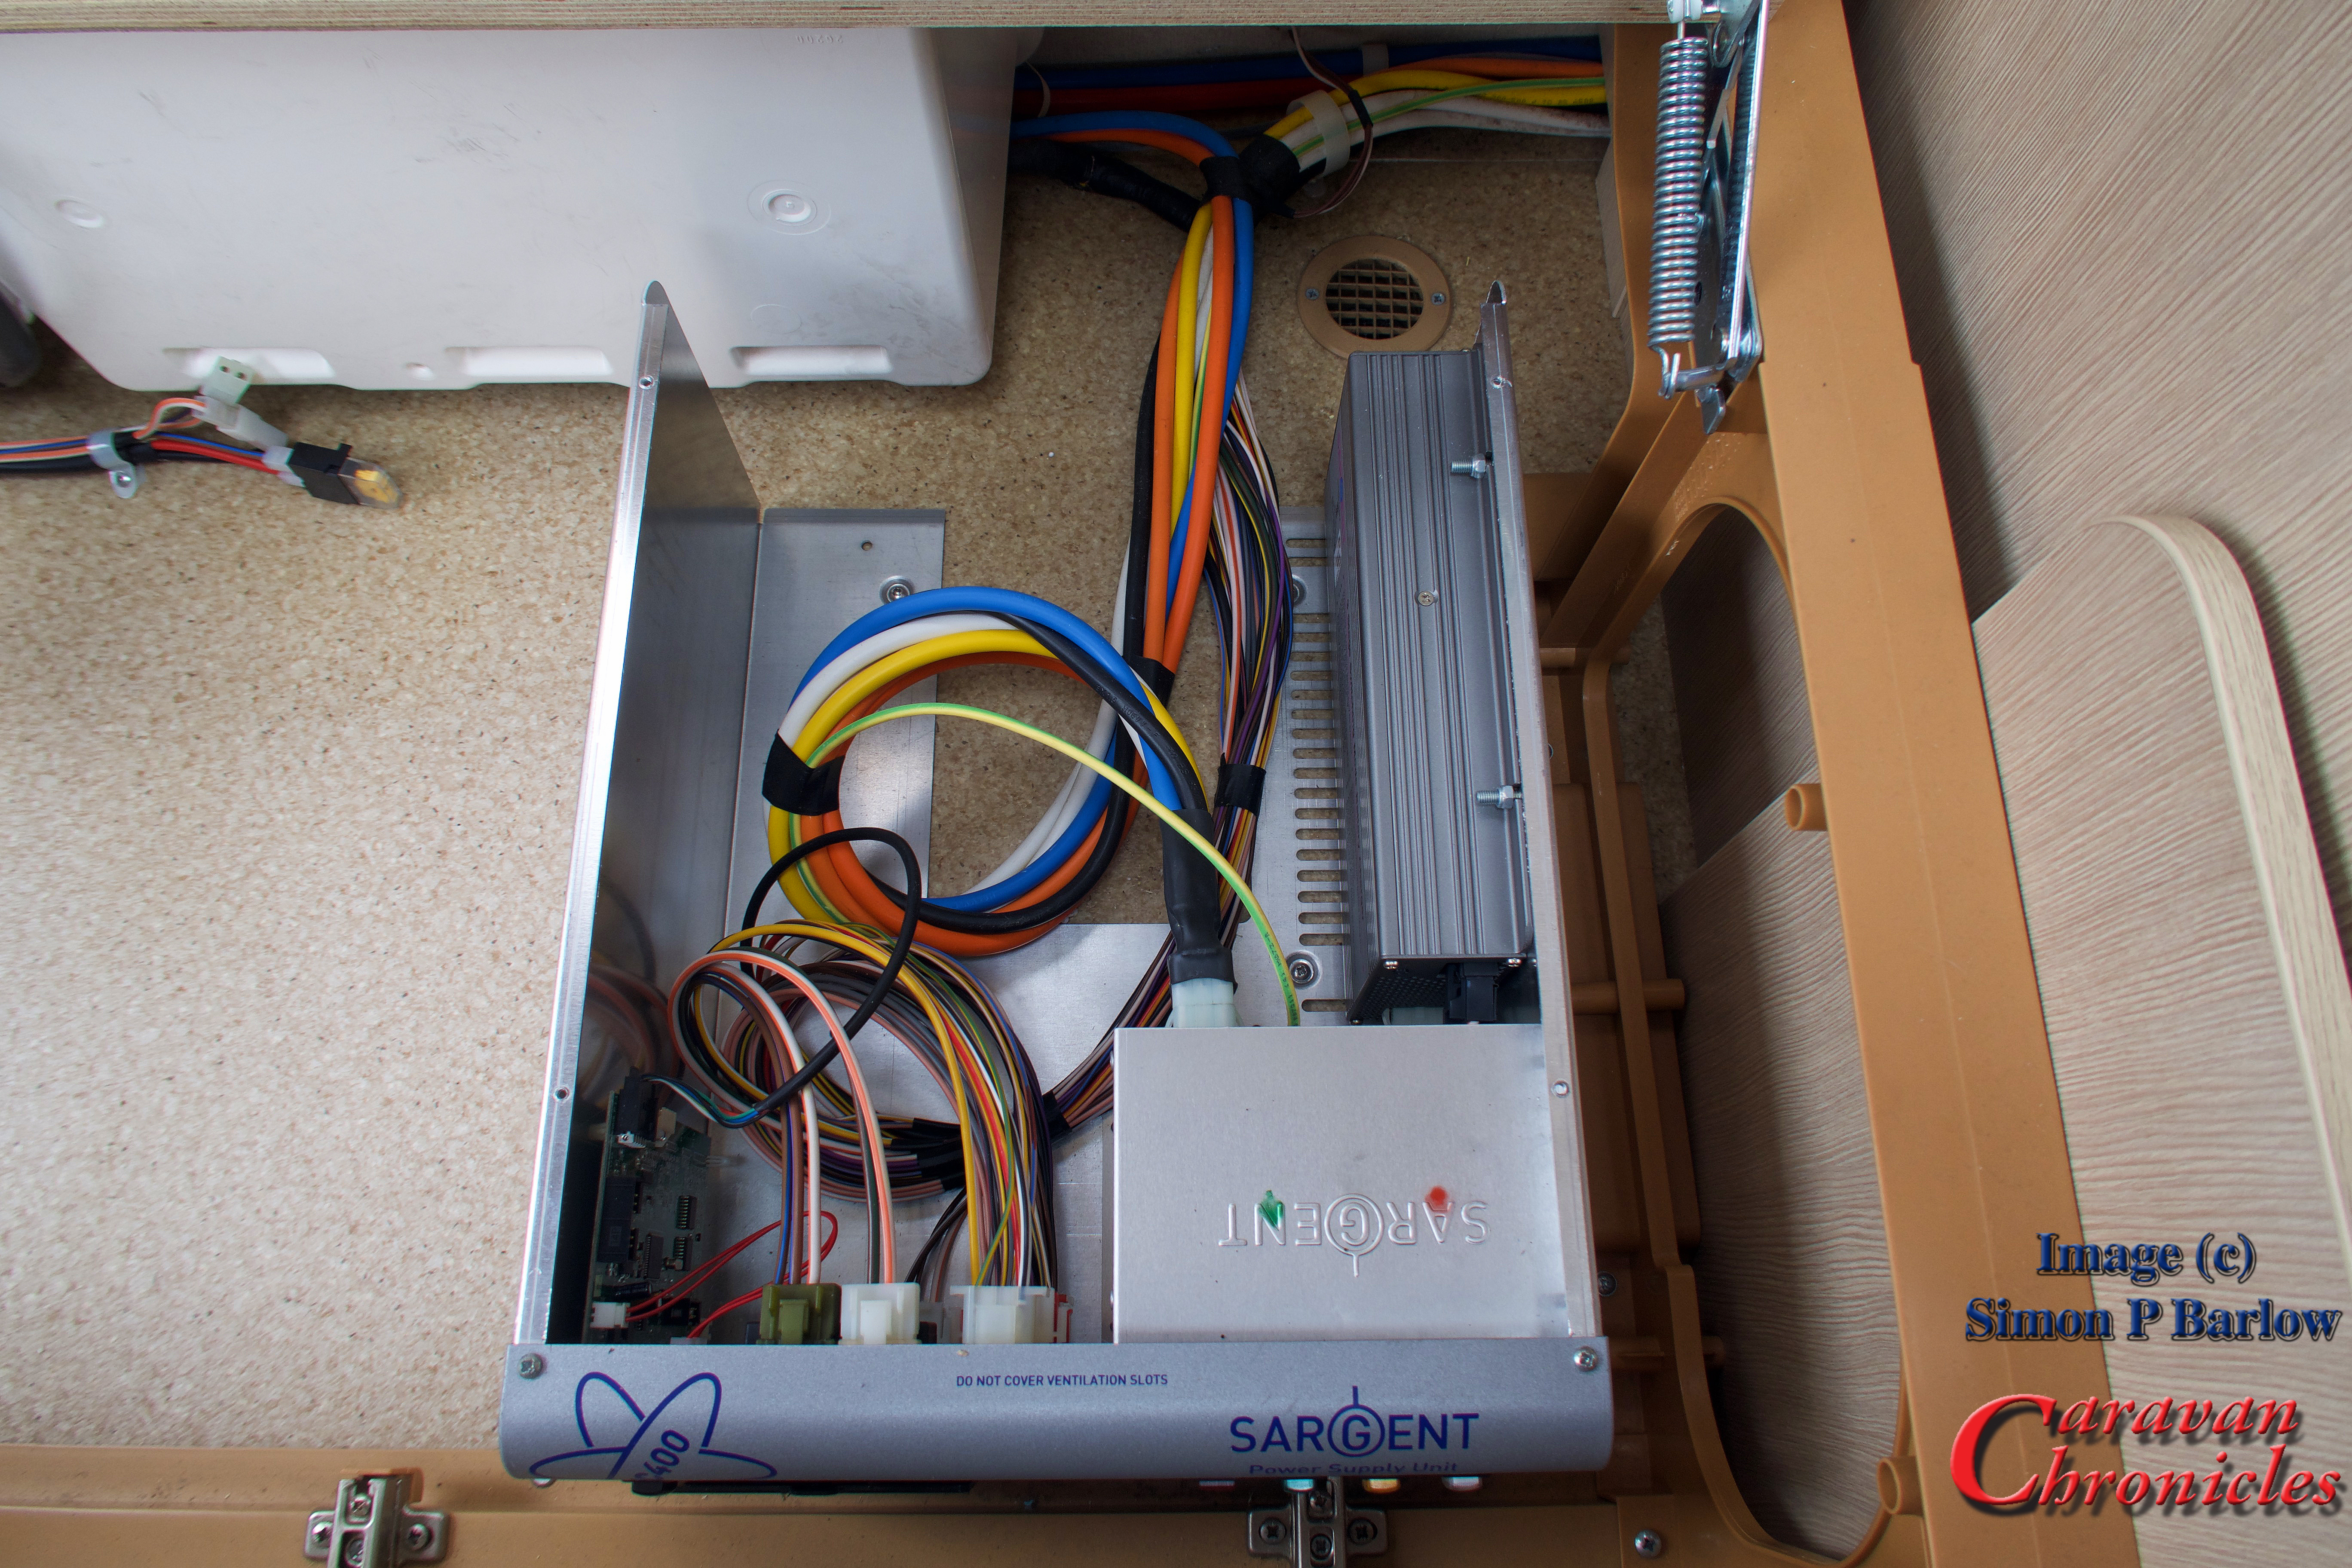
The Sargent control box is a lot of wasted space. I recon that it should have been shrunk down to ¼ of it’s current size and probably relocated to somewhere else… maybe under the draw unit at the front of the caravan.

The incoming fuse connection panel too seemed a little flimsy. All it consisted of was a circuit board with multi plug connectors on one side and spade connection soldered on the other for the blades of the fuses to slide into. Some of the soldering looked ‘dry’ and I wondered if this was causing some of the volt drop I was experiencing… that coupled with the multi-plug connections in the loom. I know it makes the build of the caravan easier on a production line and you only need semi skilled labour to install but hey sometimes things like this matter.

Its obvious that caravan wiring is done down to a cost and the minimum standard required. I would have liked to seen some slightly heavier gauge cable for some of the connections. It amazed me that the leads that connect to the battery are 6mm² but drop down to 2.5mm² once outside the battery box and the connection between the two is just a simple male/female spade connection.

The other thing that struck me was how inefficiently the plumbing was done. I’d never really looked at it before, but casting my eye over it I think I could have laid it out a bit better and saved three push-fit connectors.

Who’s this unit designed for?

Well anyone really that has a Euro 6 engine in their tow vehicle or motorhome (if you have a motorhome you need to look at the BB1230 which is a step up again from this) and cares about maintaining their leisure battery.

If you have a motor mover fitted and use it to get your caravan out from its parking spot before you set off and then find sometimes you don’t have quite enough power to position your caravan on your pitch when you arrive or the reverse… your motor mover always seems to run out of steam trying to put your caravan back in its storage area when you return home, the Wildside unit should make sure you always have a fully charged battery and I’m my opinion is something that should be classed as an essential item.

From a lot of emails I have received it would seem that generally people with motor movers seem to be changing their batteries more frequently. A lot of the time when the motor mover stope working or works erratically the advice from the motor mover manufacturer is “you need a new battery” or” its a problem with your battery”. I”m going to throw this out there… I think it may be down to the batteries never really getting a proper charge and sulphating, radically shortening their life.

Alternatively if you do a lot of “Off Grid” (Boon-docking) camping, this will make sure you maximise the charge in your leisure battery to allow you to get the most from it. Especially if you have a Euro 6 engine.

How easy is it to install?

Planning is the key and a modicum of skill in being able to trace cables and terminate correctly. However a lot is going to depend on your caravan, how it is connected and the quality of the original installation. For me it was quite straight forward but the location of the existing components made it easy. Depending on your particular caravan you may end up having to run some additional cabling. Whatever you do, do not cheap-out on cable termination! Buy the right terminals and a good ratchet style crimp tool and make sure any cable you install is a good quality brand of the correct gauge.

Were there any issues?

Nope, it worked straight out of the box.

What next?

Road test! In a few weeks we are travelling down to Glastonbury which is between a 5 and 6 hour tow and I’ll be taking readings during the trip to see how the battery is being charged and the fridge temp. Just for the pure fun of it….. I’m going to try to make ice cubes in the freezer so we have ice for our drinks when we arrive! I’ll let you know how I get on.

Looking forward.

The biggest problem really is the fridge. A three way absorption fridge is probably the single most inefficient way of chilling anything. Whether its powered from 12 volts, 230 volts or gas. Its far more efficient to use a compressor fridge.

Now a 230 volt compressor fridge is relatively cheap when compared to a three way absorption fridge, great for when you are on hook up, but now imagine being able to run it via an inverter while you are driving or off grid from your battery. As they only run short periods and take less power to run. Coupled with the fact they don’t run continuously like an absorption fridge. It would be possible to do away with a 3 way absorption fridge completely.  As we now have a sensible way of charging batteries, and given the fact the price of modern lithium battery technology is dropping all the time I don’t think technically we are far off making the transition. Its just down to the caravan manufactures…. so don’t hold your breath.

Contact:

Sterling Power

Stuff I used:

You can find links to all the crimp terminations and tools that I used in the Caravan Chronicles Shop


Share this:

  • Twitter
  • Facebook
  • Tumblr
  • Pocket
  • Pinterest
  • Reddit

Like this:

Like Loading...

Smart Alternators: how they affect Caravans and Motorhomes….

15 Wednesday Feb 2017

Posted by Simon Barlow in Accessories, Caravan Electrics, Electrical, Maintenance, Motor Home, Technical

≈ 32 Comments

Tags

Battery Charging, Caravanning, Caravans, Leisure Battery, Maintenance, Towing

I have been receiving a lot of emails over the last two or three months from people reporting issues around charging their leisure batteries after changing tow vehicles and a similar number from people who are having problems with performance of the installation of the electrical harness on their new vehicle tow bar.

I’ve spent quite a bit of time answering emails and thought I’d try to sum up what is happening. A lot of this is also going to apply to Motor Homes, especially if they have a new Euro 6 engine. Continue reading →

Share this:

  • Twitter
  • Facebook
  • Tumblr
  • Pocket
  • Pinterest
  • Reddit

Like this:

Like Loading...

Relay, VSR, SCR… what’s the difference?

16 Sunday Mar 2014

Posted by Simon Barlow in Electrical, Help Guides, Maintenance, Technical

≈ 16 Comments

Tags

Caravan, Caravan Electrics, Caravanning, Caravans, Charging, Leisure Battery, Maintenance, Split Charge Relay, starter battery, Technical, Towing, vehicle battery, Vehicle Wiring

There is a lot of confusion over what the differences are and when to use each one. So what are they?  A relay is just a simple switch that allows a low power electrical circuit to turn on (or off) a high-powered electrical circuit. An SCR or Split Charge Relay is a switch that senses voltage and switches over from one circuit to another at a pre set voltage. Finally a VSR – Voltage Sensing Relay is similar to an SCR but turns on and additional circuit at a pre set voltage. So what do you use each one for?

Split Charge Relay – SCR

These are usually installed in 4 x 4’s that have a lot of accessories fitted especially electrical winches. The general idea is the winch is powered from a second battery so that using the winch should never flatten the main vehicle starter battery. As the winch uses a lot of power, it is necessary to be able to recharge this battery as fast as possible using the output from the vehicle’s alternator, so once the vehicle starter battery is fully charged, the output from the alternator is switched directly over to the second battery. Modern SCR’s are usually all solid state and some times have a bypass switch allowing both batteries to be directly connected for either starting the vehicle if the starter battery is flat or to allow the winch to be powered from the starter battery in emergencies.

SCR's are normally solid state, I have shown it as switches to make it clearer.
SCR’s are normally solid state, I have shown it as switches to make it clearer. Note: I haven’t shown any fuses or earth (neutral) cables. Never use the vehicle body as a conductor, always install correctly sized earth (neutral) cables.

How do SCR’s operate?

If you look at the drawing above, you can see the alternator output goes straight to the split charge relay. In normal operation the relay connects the output of the alternator to the starter battery. Once the engine is running and the relay determines the starter battery is fully charged, it switches the output of the alternator to the vehicle accessory battery. If the voltage on the vehicle starter battery drops, the relay switches back. However, these relays are slightly more sophisticated and have the ability to dual feed – i.e. charge both batteries at the same time or the ability to link both batteries for either vehicle starting or to power accessories under extreme load… heavy and prolonged winching for example. Expect to pay serious money for a good quality SCR with a remote bypass facility and battery monitoring.

A true ‘split charge relay’ is not suitable for charging your caravan leisure battery, but could be used for charging leisure batteries in motorhomes.

Voltage Sensing Relay – VSR

Voltage sensing relays were designed to sense the tow vehicles battery voltage and when the battery is sufficiently charged switch on a second circuit, usually the power to the caravan’s fridge. Some of the more sophisticated VSR’s allow the setting of the voltage the relay will operate at. The biggest draw back with these is if the electrical load with the tow vehicle suddenly increases – turning on the headlights, heated windows, air con etc, they can turn off the circuit to the caravan’s fridge until the electrical load is removed. It is for this reason they should be installed with an indicator light on the dash to confirm that they are actually supplying the fridge. With a caravan, if there isn’t a feed to the fridge, the habitation relay will not operate and therefore the caravan’s leisure battery will not be charged.

VOltsge
VSR’s can be a mix of solid state and mechanical switch or all solid state. Again, I have not shown fuses or earth (neutral) cables for clarity.

VSR’s work on the principle that they monitor the vehicles electrical voltage. The VSR’s sensor detects the voltage change when the vehicle battery is fully or near fully charged, it closes the contacts connecting the leisure battery in circuit and allowing it to be charged. However, if the vehicle voltage drops for some reason, the relay will open disconnecting the leisure battery.

Problems with VSR’s

Most of the time they are installed when the rest of the towing electrics are installed and are usually located behind a panel in the rear load area of the vehicle. Because of this, it is rare to see one that has a dashboard indicator light installed to show when it is ON and charging your leisure battery and consequently switching over the habitation relay allowing your fridge to work. The second problem is when they leave the factory the voltage that they are designed to switch on at is set at the correct level if it was installed near the vehicle battery. As it has been installed some distance away, the length of cable between the battery and VSR has its own voltage drop – dependant on length of cable and current through it. So one fault that is often reported is that the relay ‘vibrates’ or ‘chatters’. This is caused by the voltage drop on the connecting cable increasing below the “trigger voltage” when the leisure battery is connected and the relay is simply turning on and off repeatedly. Like most things you get what you pay for and the more expensive VCR’s have a timer circuit built-in so that they only switch over after a pre-determined time.

But wait…. there’s more!

Modern vehicles are sophisticated bits of engineering, electronics and software. In order to reduce emissions a lot of manufacturers removed things like hydraulic power steering pumps and air conditioning pumps and replaced them with electrical motors. This removed mechanical load from the engine and reduced the weight. The trade-off was the vehicle needed more electrical power, so larger alternators were fitted. As power steering and air conditioning wasn’t needed all the time and in order to prolong the life of the vehicle battery, the alternator is now controlled by the software in the vehicles ECU. So when the ECU detects the vehicle battery is fully charged it reduced the output of the alternator by reducing the voltage and therefore reducing the load on the engine and hence reducing engine emissions. If you have a VSR fitted, this drop in the vehicle voltage will stop the VSR working as it was intended to do. So even if the VCR has a timer circuit, it can still fail to work as intended.

Theres is an interesting letter posted in the September 2013 issue of Land Rover Owner magazine:

Article appeared in Land Rover Owner INternational September 2013. (c) LRO /  Bauermedia
Article appeared in Land Rover Owner International September 2013. (c) LRO / Bauermedia

How can we reliably charge the leisure battery in modern vehicles? Well the clue is in the article above. If we can fool the tow vehicle to ‘see’ the leisure battery as part of the vehicles own electrical system the software in the ECU won’t reduce the voltage until both the leisure battery and vehicle battery are suitably charged.

Ordinary Relay

The most straight forward way of providing the leisure battery with a suitable charging circuit is also the cheapest. A simple 30 Amp 12 volt relay can be bought for a few pounds and it will be a reliable way of charging your caravan’s leisure battery.

Ordinary 30 Amp relay
Ordinary 30 Amp relay. Again, I have not shown fuses or earth (neutral) cables for clarity.

The circuit above shows an ordinary 30 Amp automotive relay being used to switch the leisure battery charing circuit. The relay is controlled by the ignition circuit, so when the engine is running the relay is energised and the leisure battery is being charged. As the leisure battery is in circuit all the time the engine is running, the vehicles software in the ECU ‘sees’ just one big battery and will keep the alternator voltage high enough to charge both batteries fully before reducing the output in energy-saving /emission reducing mode.

Some vehicles including a number of Land Rover’s actually have a connection on the main fuse board specifically to control this relay.

I hope you have found this useful.

Share this:

  • Twitter
  • Facebook
  • Tumblr
  • Pocket
  • Pinterest
  • Reddit

Like this:

Like Loading...
Banners for Top 20 RV blogs https://caravanandmotorhomeparts.com/blogs/news/25-best-caravan-blogs-news-sources-you-need-to-follow-right-now
Blogging.com

Caravan Chronicle Stats

  • 43,132,784 Views
Follow Caravan Chronicles on WordPress.com

Follow Caravan Chronicles and receive notifications of new posts by email.

Follow on Facebook

Recent Posts

  • Has Bailey Built Our Perfect Caravan?…
  • Just a quick one…
  • A Few Mods and Updates…
  • A Bit of a Milestone…
  • Finishing Off A Few Jobs…
  • “Put your lights on mate…..”
  • Well that took some cleaning…
  • How have you all been doing?
  • Copying Content… Again!
  • Here’s Something I Think You Want To Take a Look At…
  • Ticking All The Boxes…
  • Vehicle Wiring Projects… Some Thoughts.
  • A Bit of Unashamed Promotion…
  • Season’s Greetings…
  • The problem with information from the internet…
  • I can’t think of a snappy title…
  • Euro 6 Engines, Smart Alternators and Your Leisure Battery…
  • For Anyone Restoring A Vintage Caravan…
  • What Time Is The Shop Open?
  • An Easy Fix…

Archives

Categories

RSS Links

RSS Feed RSS - Posts

RSS Feed RSS - Comments

CaravanChronicles.com Tag’s…

13 Pin Plug Accessories AL-KO Avtex Bear Extender Bike Rack Blackpool Blackpool Illuminations blogging Cadac Camping & Caravanning Club Canterbury Caravan Caravan Blog Caravan Club Caravan Electrical Caravan Electrics Caravanning Caravans Caravan Show Caravan Talk Caravan Tyres Cheltenham Chirk Christmas Market Christmas markets Cleaning design Event City Factory Visit Fiamma France Freelander Glastonbury Glossop Caravans Humor Insync Jonic Bedding Lady Heyes La Tournerie Ferme Leisure Battery Leisure Battery Charging LPG Refilling Maintenance Manchester Caravan & Motorhome Modifications NEC North Western Caravans Ltd OLPRO One Hairy Caravanner Oswestry Oxford Product Review Project Safefill Sat Nav Sterling Caravans Sterling Power Wildside Swift Factory Swift Group Swift Talk Technical The Old Oaks Touring Towing tow vehicle TPMS Trafford Centre travel Travel Trailer Travel Trailers vacation VW Amarok Warwick Racecourse WiFI

Create a website or blog at WordPress.com

  • Follow Following
    • Caravan Chronicles
    • Join 2,459 other followers
    • Already have a WordPress.com account? Log in now.
    • Caravan Chronicles
    • Customize
    • Follow Following
    • Sign up
    • Log in
    • Report this content
    • View site in Reader
    • Manage subscriptions
    • Collapse this bar
 

Loading Comments...
 

    %d bloggers like this: