Back in June 2018 I fitted a Man HummelProVent oil catch can to our Amarok. Since then I’ve had a few people asking me how we have been getting on with it and has it actually ‘caught’ anything.
I fitted the ProVent to our VW Amarok when it had done about 8000 miles (12,800Km) and we have now done just over 13,000 miles (21,000Km) a great deal of it towing. I opted initially to drain the ProVent every 600 Miles (1000Km) and the first three each time I got about half a cup of slightly oily water. It was clear like water but when rubbed between your fingers it felt ‘slippy’ a bit like baby oil. I did notice that one draining that covered two long tows up to the Lake District what came out was slightly darker, still about the same quantity though. However I did notice on the last draining I had more of a dark oil content as a separate layer in the lighter clear ‘oily water’. Watching the video below I did find out that this is normal. The filter that is in the ProVent takes a few hundred Km to start working properly, first catching the condensate and then once the filter is saturated does it start to catch and drain the heavy oil.
I did recently remove the hoses on the intercooler (inlet and outlet) just out of curiosity and the interior from what I could see was still clean, with only a light covering deposited from the first 8000 miles (13,000Km) of running without a catch can fitted.
So how much have I got out?
Well in the first 5000 miles (8000Km) I have now filled an old 500ml 2 stroke oil container and just started on my second. I’ll continue to drain at the 600 mile mark. Although I must admit I now drain it before a long towing trip and again when I return home. It only takes about a minute and doesn’t require any tools so really is one of those tasks that is easily accomplished with the minimal of effort. Hopefully this will keep our engine in tip-top condition and not start to suffer from the oily carbon build up that saps power and is prevalent in all diesel engines.
Here’s an excellent video from the guy’s at 4WD Actionwith probably the best explanation I’ve seen so far on the net… (Video (c) 4WDAction.AU)
This isn’t one of my usual posts, but if you use or are thinking of a TomTom device, I’d urge you to read on…
We have used TomTom sat nav products for a number of years. I think it was early 2006 when we bought our first TomTom, a TomTom 760. After we had some questionable routing while towing in France and a number of issues with the unit simply failing to respond to commands on an early morning departure from a site in France in heavy rain in the dark. In April 2013 we ‘upgraded’ to the TomTom GoLive Camper & Caravan version to take advantage of the features this offered in navigation and database. Something that at the time was not offered on any other device. I wrote a review of the device Review of the TomTom GO LIVE Camper and Caravan Sat Nav and followed that up with an update some time later when they updated their database update platform from “MyTomTom” to “MyDrive”. This change over was not without issues and resulted in me loosing my subscriptions… which involved a lot of back and forth with their support line until I eventually got my subscriptions back. I did post an update to my review with a new conclusion… UPDATE — Review of the TomTom GO LIVE Camper and Caravan Sat Nav. Creating POI’s off line to upload was not straightforward and I followed that up with a ‘how to’…. Create accurate POI’s for your Sat-Nav…
My ‘investment’ in TomTom was not only time, but I came to realise that it was quite a substantial financial investment too. Back when I did the original reviews I commented that the ongoing costs were around £100 per year for the map, traffic and speed camera updates. It wasn’t until recently It dawned on me how TomTom try to hide this cost.
When you buy the unit, you get 12 months updates free. However at some point they have an “offer” where for a slightly reduced cost you can get and extra two map updates.. or an offer that gives you an extra few months ‘free’ for your traffic updates. What this does is move the subscription dates round so instead of paying a £100 for 12 months in one lump sum you pay £20 here and £30 there over the course of a few months. In effect hiding the real annual cost of subscriptions. So if you work it on £100 per annum from my original review the unit we have currently has actually cost £600 in subscriptions. Add that to the original purchase price of £330 thats a massive £960 “investment” and I’m not including the cost of two additional vehicle mounts and hard wiring them in!
The Final Straw…
A few weeks ago, just before we were off to Meathop Fell Caravan & Motorhome Club site near Grange-over-Sands, I went through my normal routine of firing up MyDrive to check on the number of updates pending, connecting the TomTom and performing the updates. The MyDrive (and previously MyTomTom) have never been particularly fast on either downloading updates from TomTom and in particular pushing the updates to the device. At home I’m on about a 80Mbps broadband connection and generally never have issues moving large files about either on my own network (1Gbps switched Ethernet) or to and from the internet. We have not had a Microsoft driven PC in the house for over 14 years now, but I do have a number of Mac devices to hand. I digress.
I had a new map update pending and the usual cameras and other bits. The map update used to take about 20 minutes to download and around 45 to 50 to push to the device. I left it all connected and waited patently. No more updates pending, I checked the GPS unit and all seemed well, disconnected the Mac (yes I did do it correctly) and all still seemed well. Check the entry for Meathop Fell to get an idea of expected travel time and it worked fine. So I switched it off.
Couple of days later Sue was going somewhere and telephone me to say the GPS isn’t working. When she returned home I fired up the TomTom… got the usual splash screen picture of the motorhome on the road….… And waited…… and waited a bit more….. Finally….. black screen with the TomTom logo up the left hand side. “Ah” I thought “It has done a full shutdown” so I waited… and behold the splash screen with the motorhome appeared. “Sorted!” thought I. Wrong was I! Back to the black screen with TomTom up the left hand side followed a few seconds later with the splash screen… and it just kept on with this cycle. Oh bugger.
There is a way of doing a hard reset… turn on the unit and continue holding the power button down and clicking it three times, wait for the spinning cog and connect to a computer running logged in MyDrive… did that too. Best ‘consult’ Google at this point.
Googling “TomTom keeps resetting” brought up the usual links. However one caught my eye…. On the TomTom help forum dated a few days ago… clicked on it. Yo… other people having the same issues with the camper version after the last map update. Now for copyright reasons I can’t post any screen shots from the forum (I do have them) but there were a number of people with a similar issue to me. There were the usual “Try taking it to the southern hemisphere and turning it on there that cured my problem” type replies and a couple that basically said try the same as I’d already tried.
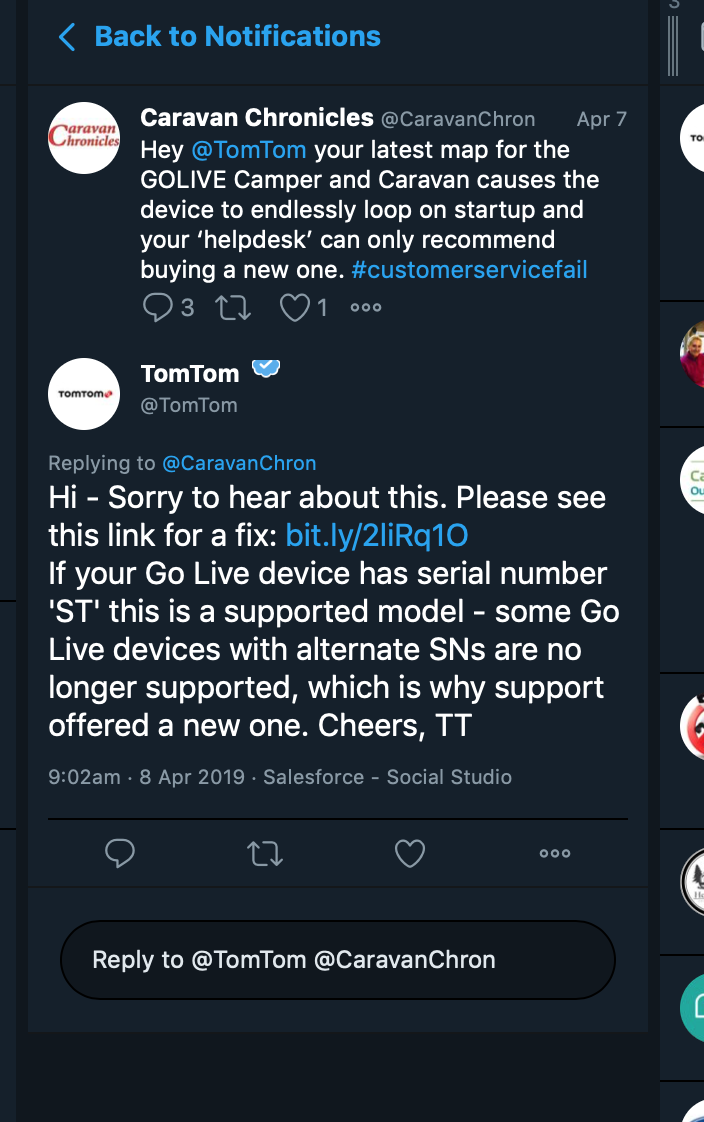
Initial contact with ‘Help Desk’ was…. “you need a new one” which kind of pee’d me off somewhat and so I tweeted and got a reply…..
Now that reply from TomTom is intriguing. They must have known there was an issue as ‘HelpDesk’ first response was “You need to buy a new one” and that means they must have been primed with that answer. A point that might indicate this is the fact in the tweeted reply they say serial numbers starting ST are supported but others are not. Also the final bit “…. which is why support offered a new one.” is wrong…. they said I have to BUY a new one.
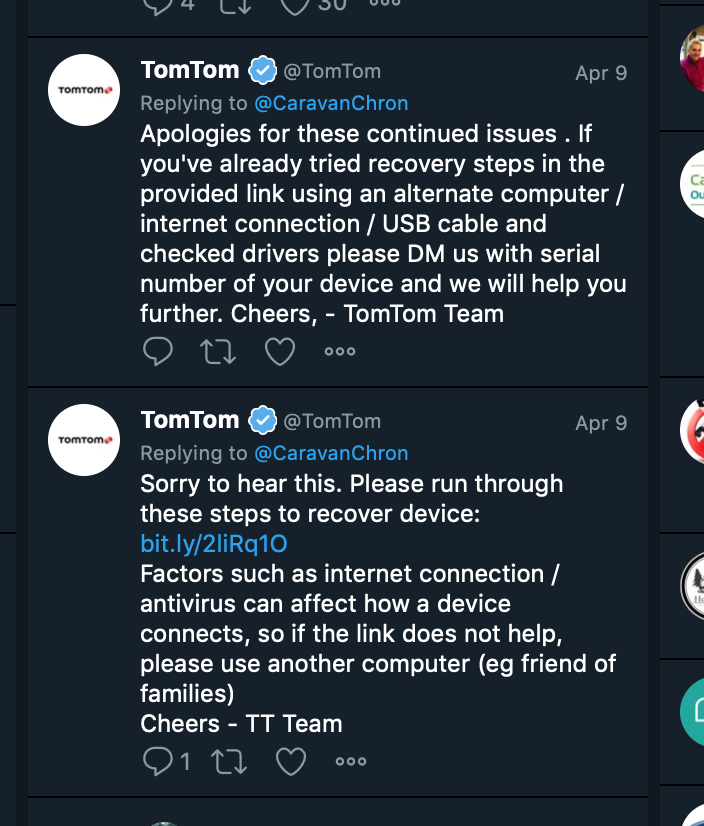
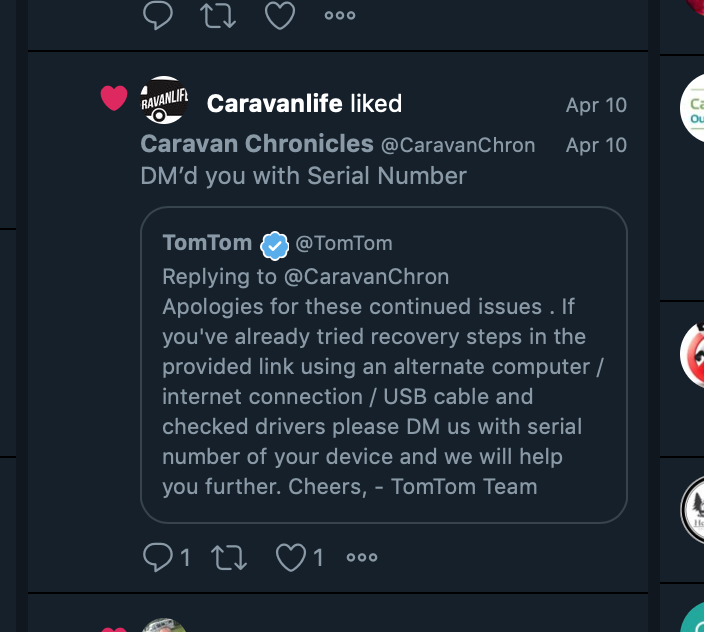
At this point TomTom asked me to DM them with a serial number. Which I did.
… and here is their reply (obviously rating forth bottom tweet upwards)…
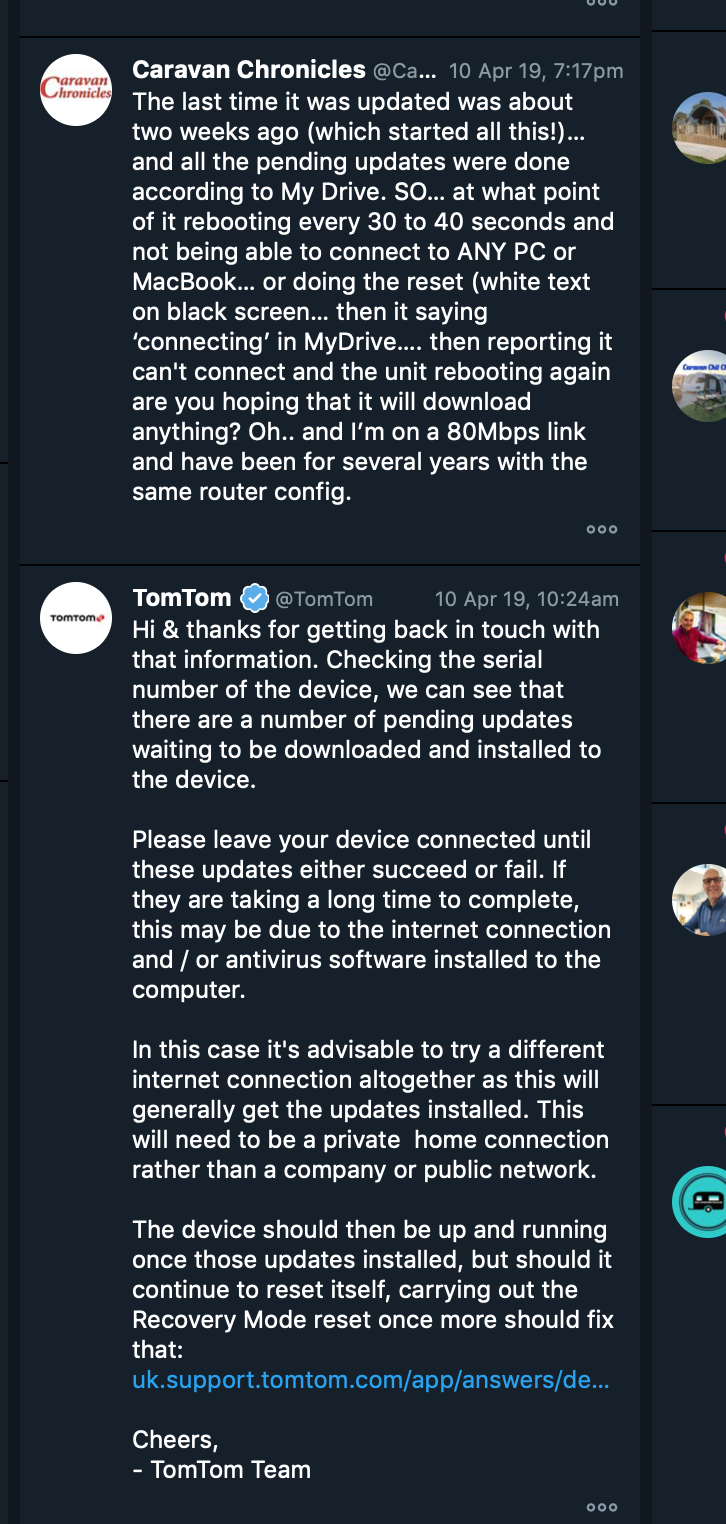
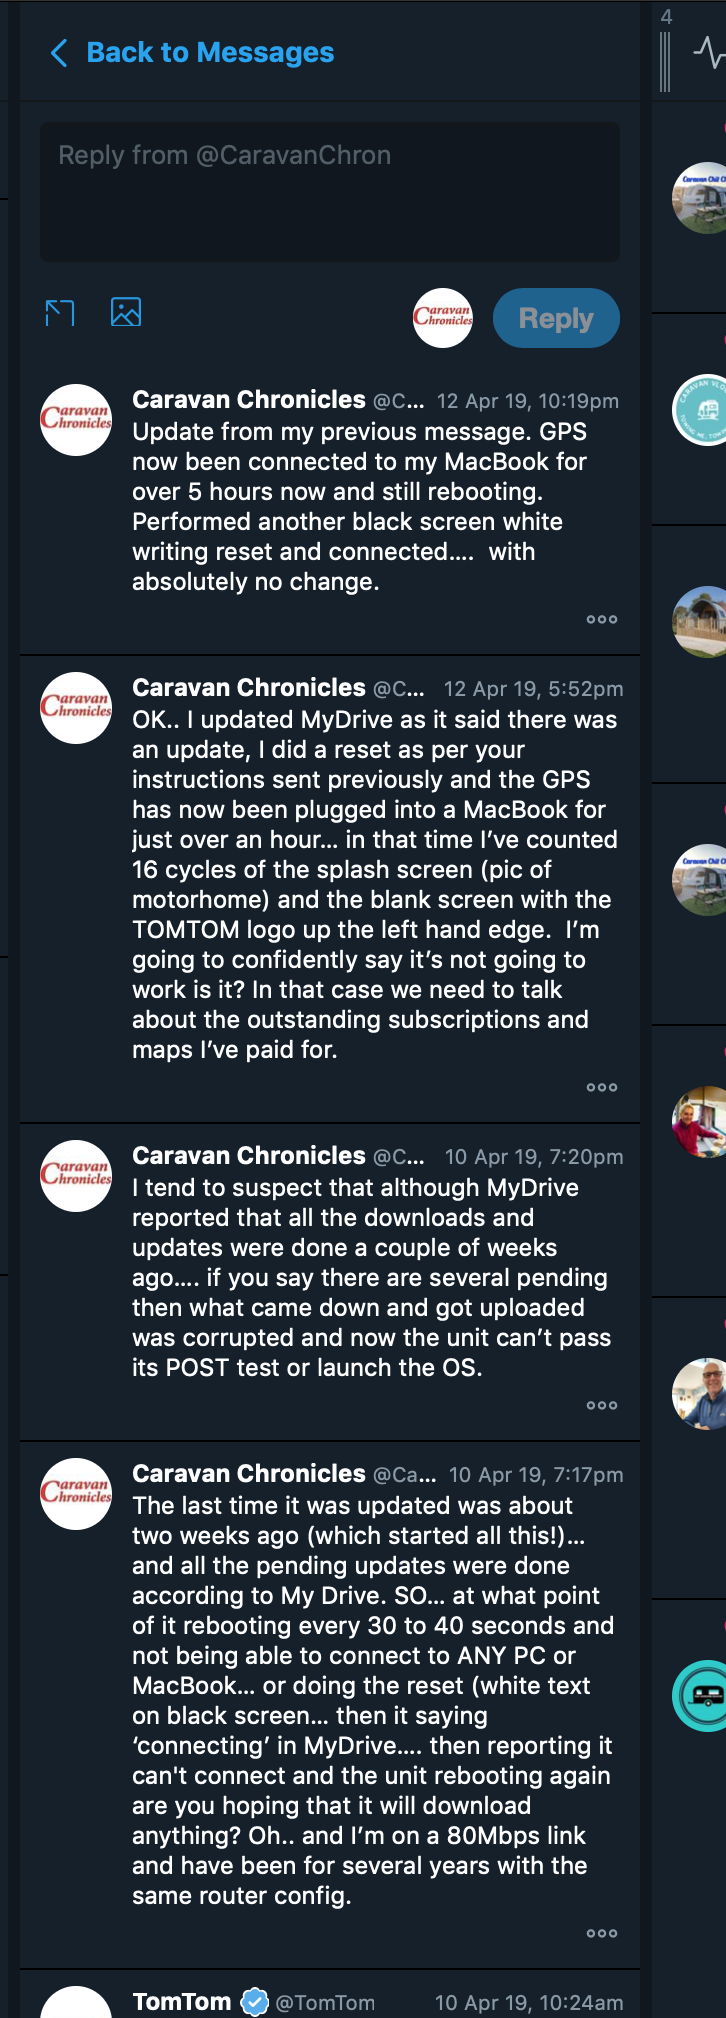
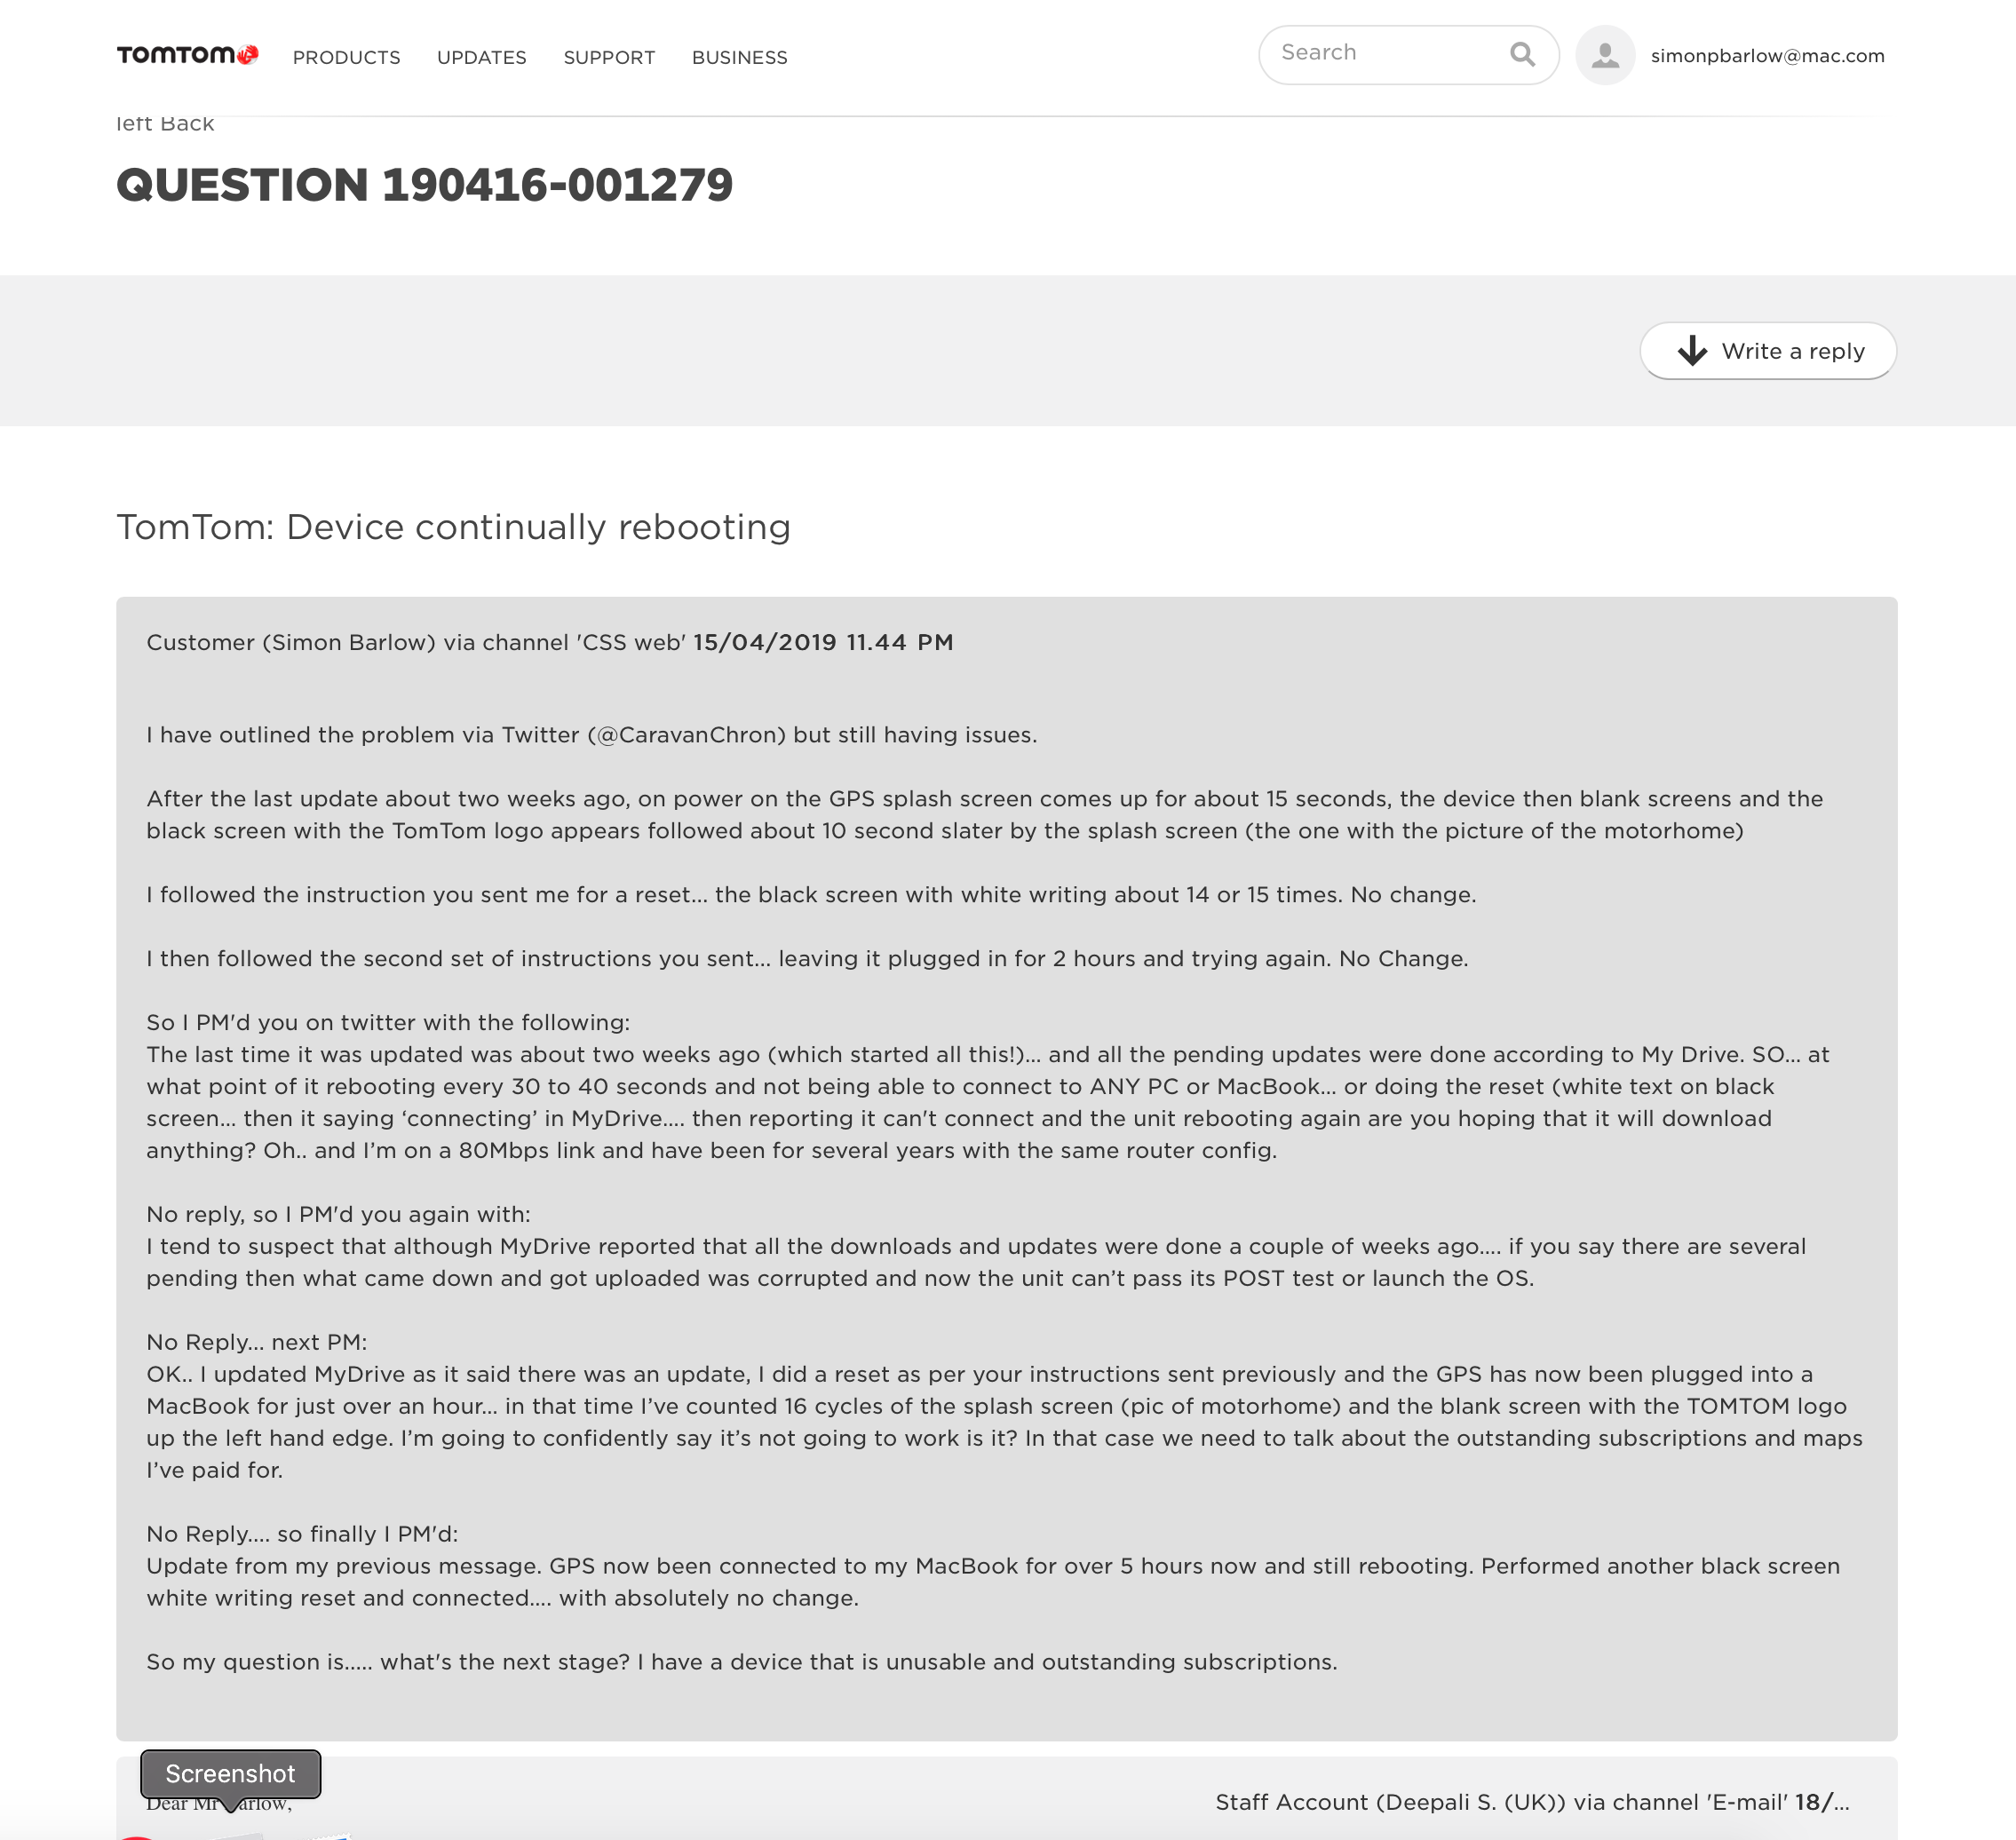
It was at this point TomTom went quiet on the Twitter front. So I Asked a Question on their web site…. here is the exchange in full. (click on the image to open in a new window if you can’t zoom in to read).
All the way through this there was no hint of “We acknowledge there may be a problem and are looking into it”. I suspect they know there is an issue and are seeing it as an opportunity to sell some more units and make money from continued subscriptions for their services. It is painfully obvious that I’ll not see a refund for the residual of my pre-paid subscriptions (around £70 or £80 in my estimation) or much hope for any other user that has been affected. I counted around ten people on one post in the forum that were reporting issues. Also at no point was any indication of how much the “discount” on a new unit would be. Plus as the discount would probably be applied to their list price, not the price the unit was generally available for from some on-line stores I suspect it would not be a good deal anyhow.
Why Garmin?
Basically as i understand it there are two other players in this market, Snooper and Garmin. Avetex have a rebadged Garmin. The Snooper I discounted a while ago as back then you could not upload your own POI’s and they didn’t have an update service via a Mac, only a Microsoft PC. This may have changed, but I decided to go for Garmin.
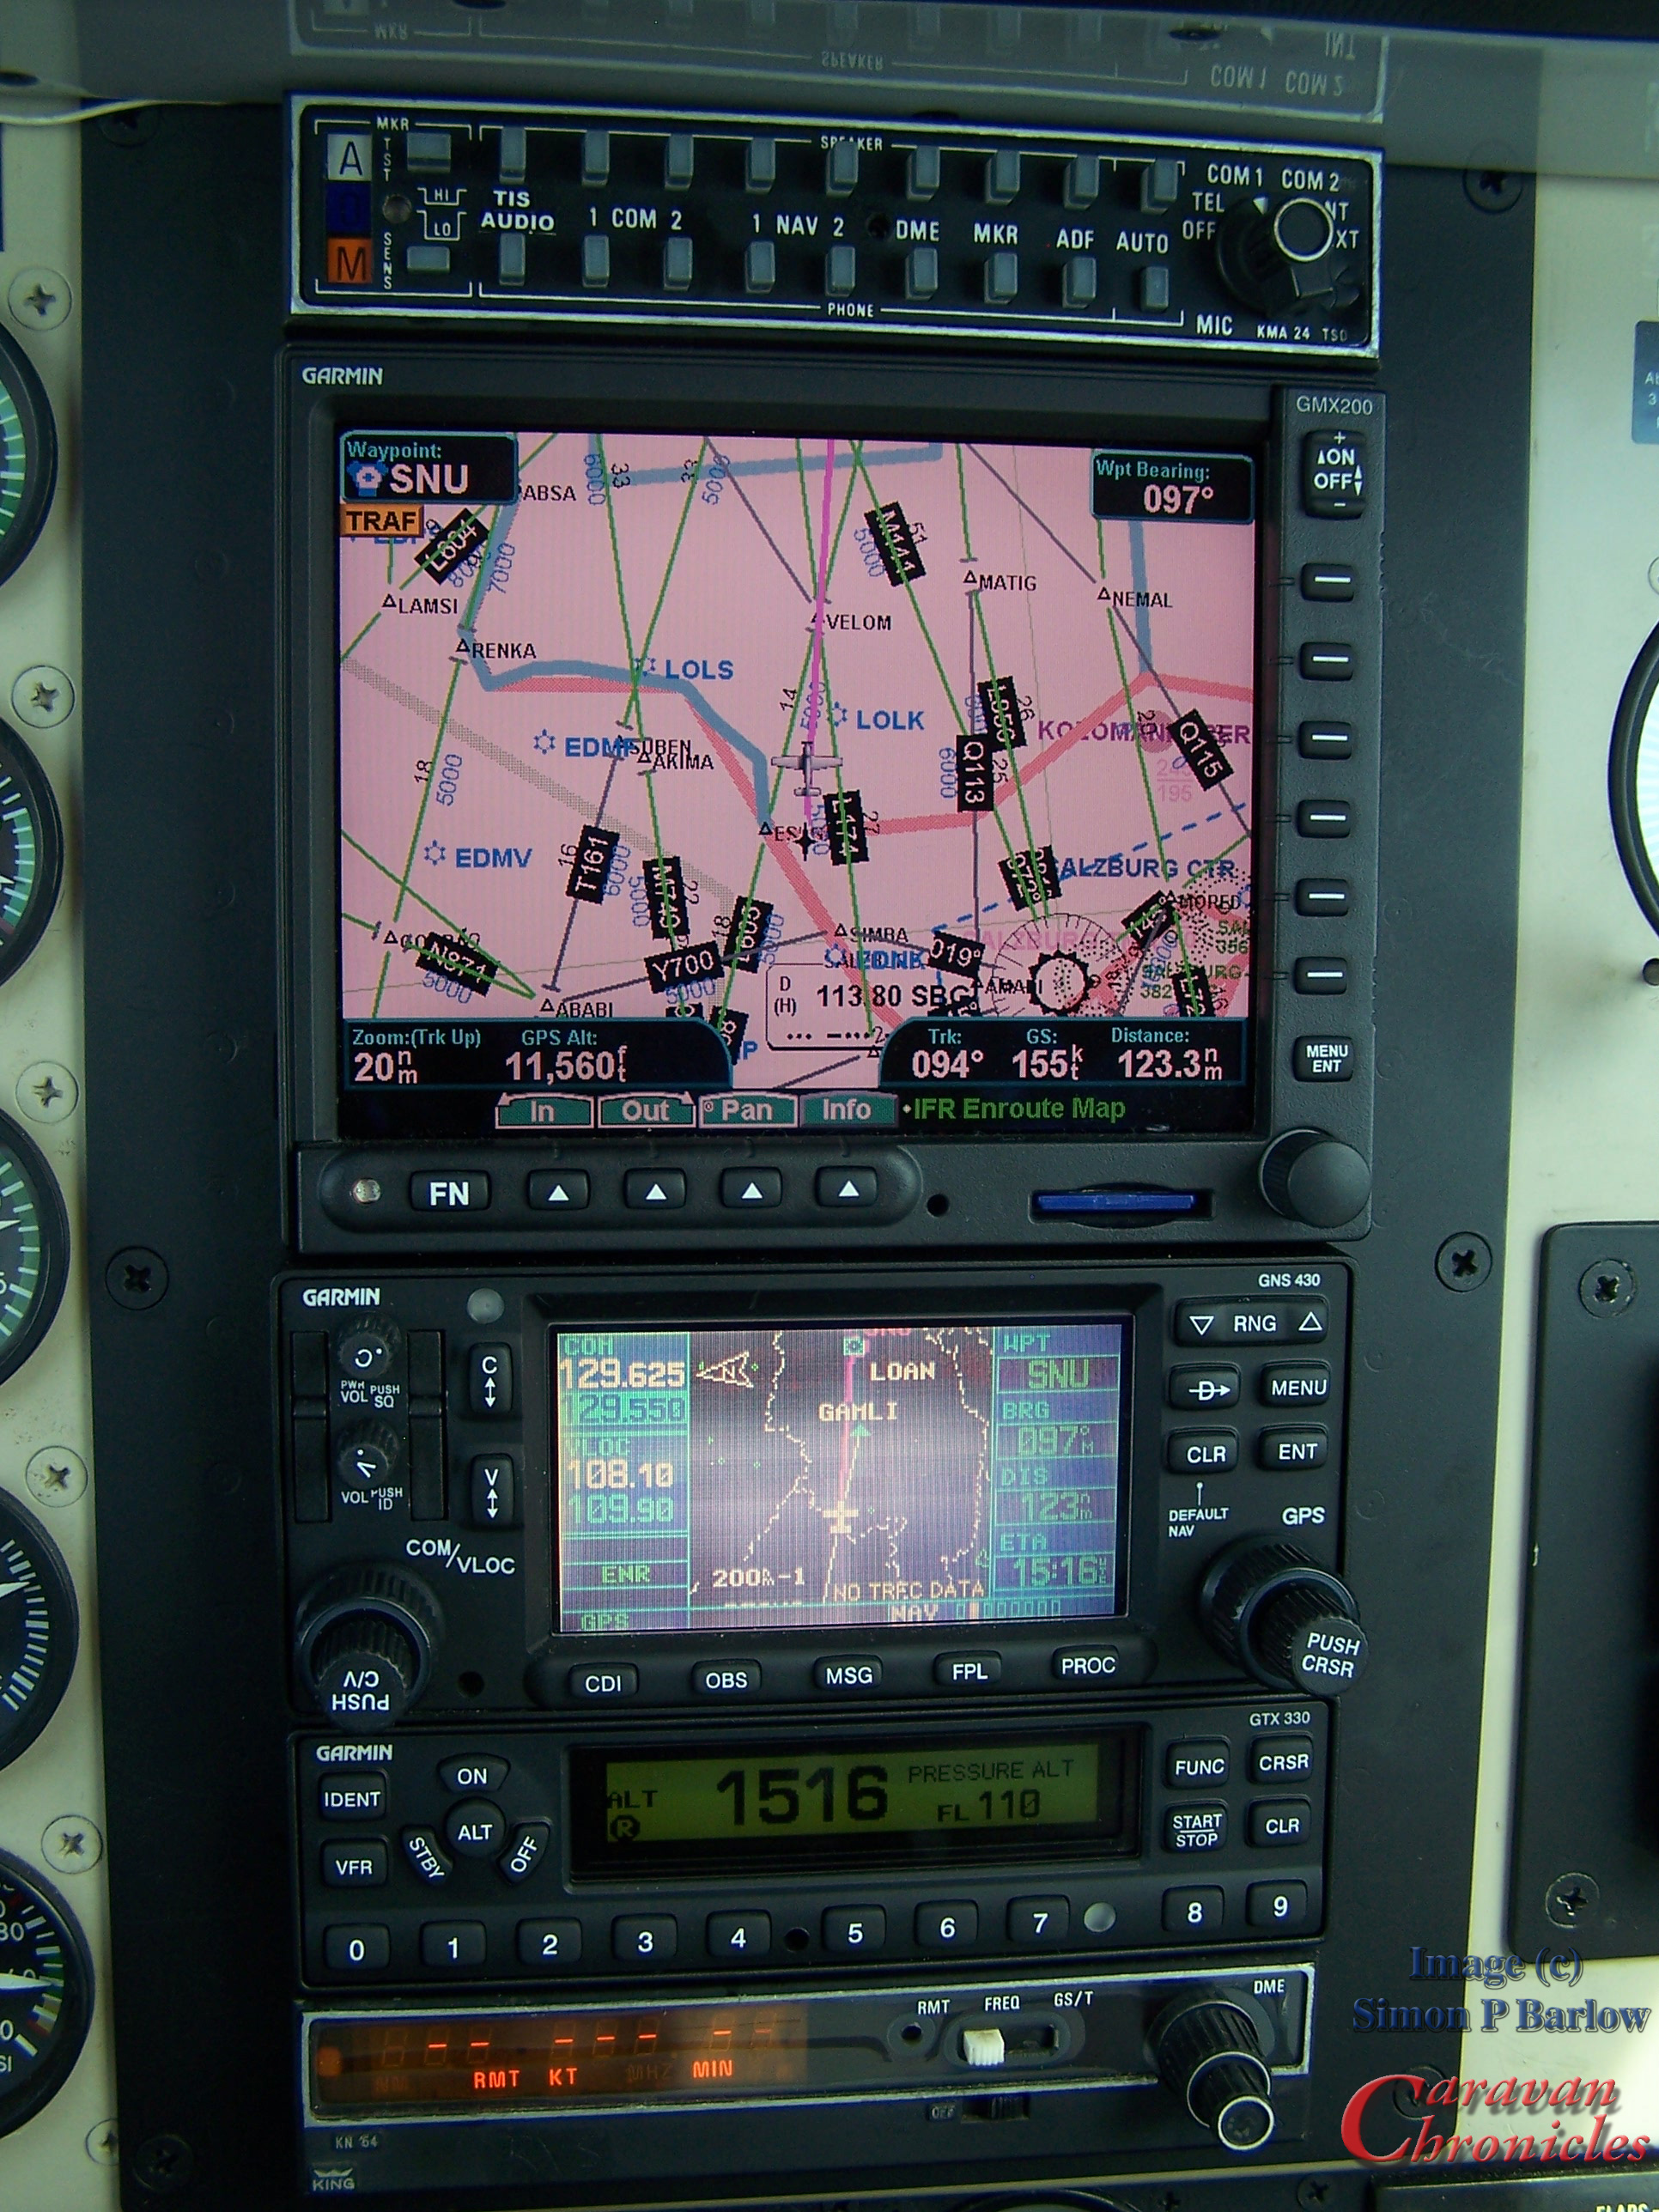
My association with Garmin goes back several years… intact to around 1996 when I bought a hugely expensive (for the time) Garmin 92. The 92 was one of the first hand held aviation GPS units you could clamp to the aircrafts yoke and it came with a database of all the VOR’s, NDB’s, TACAN’s and ground obstacles along with restricted airspace. all displayed on a 2 wide by 3 inch high monochrome LCD display. From that point I’ve always had Garmin GPS in every aircraft I flew and relied on them for RNAV approaches into airports in minimal weather conditions.
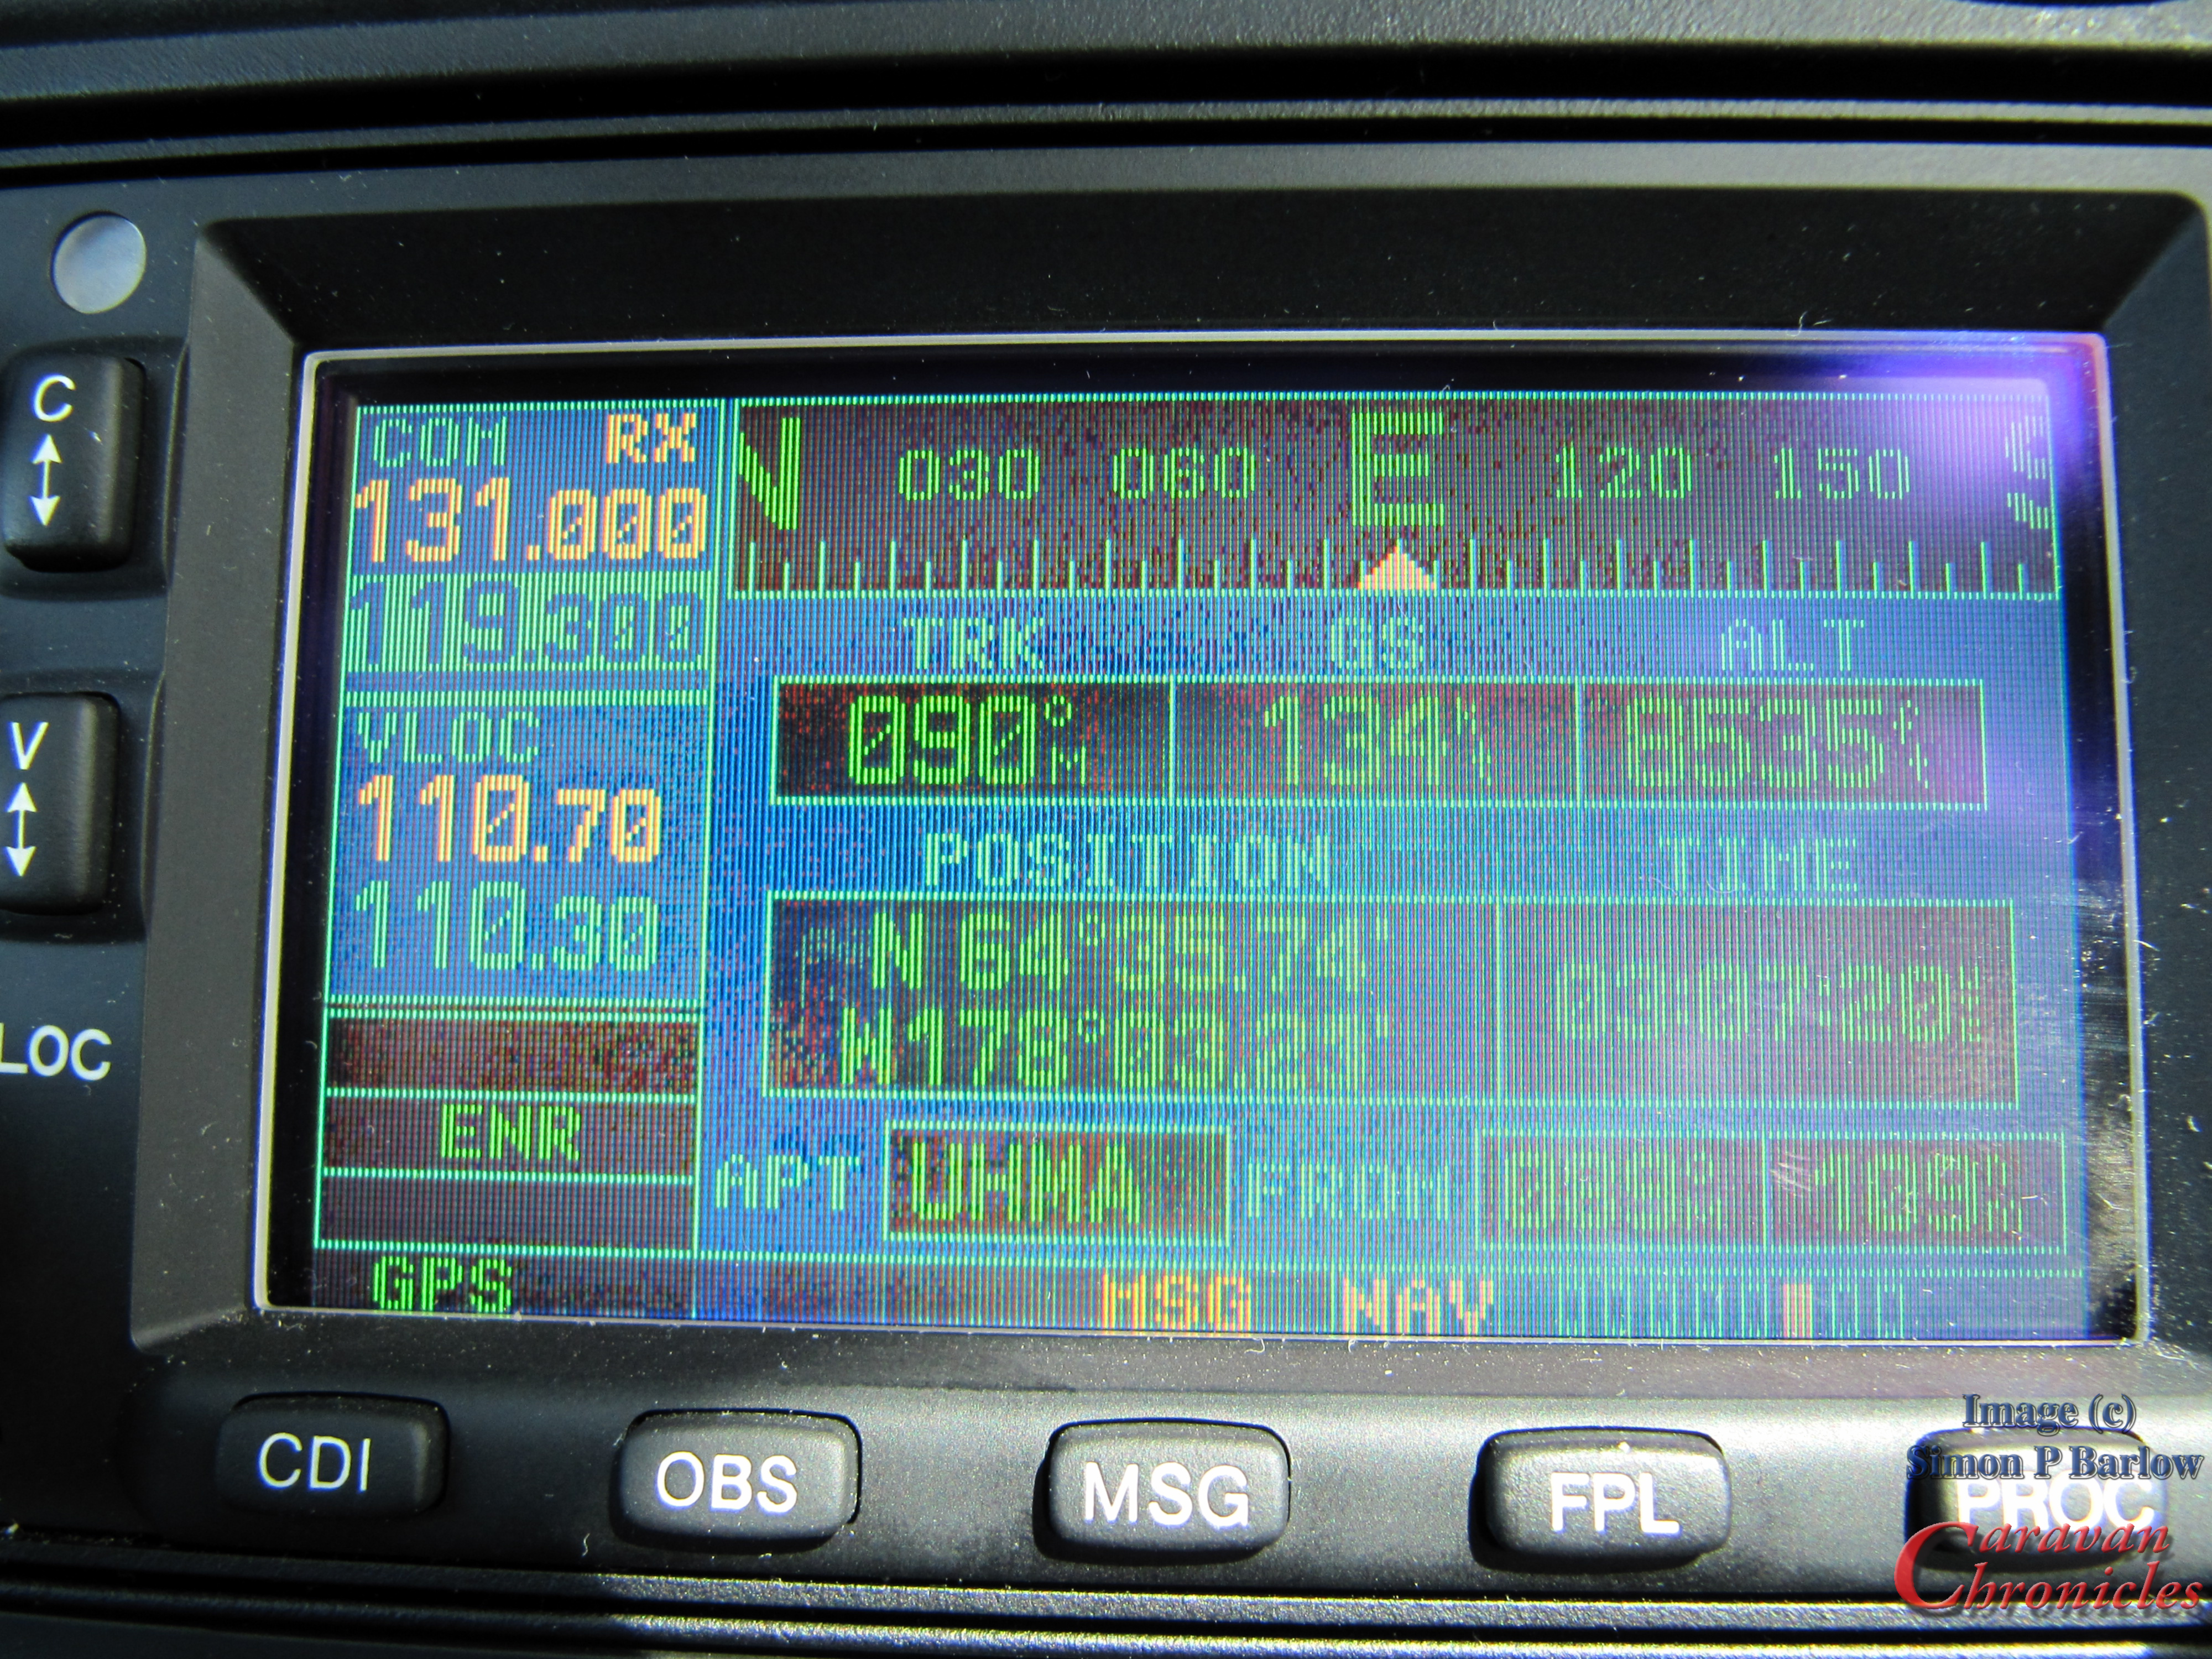
The Garmin system in the Bonanza….. and below the same system showing us flying East (090) from Magadan in Russia to Nome, Alaska approaching the international date line…
So, I’ve got around 23 years experience of Garmin’s aviation navigation products, time to try their earth based stuff!
Looking forward…
I ordered a Garmin Camper 770LMT-D 6.95 inch sat nav with Full Europe Lifetime Maps, Free Lifetime Digital Traffic, Bluetooth and Wi-Fi for £255.27 from Amazon yesterday. Todays Saturday and it’s due to arrive Monday morning. I look forward to testing it out and giving it a bit of a review. I have already downloaded Garmin Basecamp and got the hang of creating way points… really easy in fact. DOn’t quite know the upload to the device process yet!
For those that follow @CaravanChron on Twitter… you may remember that I was offered a Garmin unit by a company to try. Well, I declined. One of the reasons being is I don’t generally like doing reviews or recommendations based on a loaned bit of kit. If I say “yea.. I like it I’d recommend it” and it subsequently turned out to be not as promised, then I’d feel like I’d done you a disservice. If I buy something and say I like it and would recommend it and it turns out to be crap, well I’m in the same boat as you… we both paid for it and we both got stung.
Epilogue
Just as a final ending to this, if perchance TomTom do sacrifice some small fluffy animal and decide the Gods will smile on them again if they sort out my GPS or even offer a refund, as it is now a point of principle with me about failed customer service, Sue and I agreed any refund will be donated to our local Cat Charity.
I’m sure Oscar and Henry would approve….
Foot Note
What do I think is wrong. Well I guess in either the map database update or in some additional packet of code that was uploaded designed to update the operating system (OS) of the device [firmware] there was a corruption or error. What is happening with my device (and I can only speak for my device as I’ve not had hands on with any other) is during boot up it is failing some internal OS checksum… which results in a reboot. However it’s now in a loop. This happens before any port is enabled the would allow data transfer. Most system designers build in right at the start of the boot up process a piece of code that states if some ‘condition’ (I.E if this button is held down on start up, boot from external port only) is met. This allows a device to be accessed if it falls into the startup loop. Maybe TomTom have a way of directly connecting at a board level or a number of key presses that allow this interruption to the boot process, but alas I don’t know them. So now it is caught in a loop before any eternal communication from MyDrive can take place and stopped any chance of downloading new firmware or firmware patch.
As many of you know I don’t really do reviews… I occasionally buy things and put my thoughts on the product in a post. Companies do contact me and ask if I’d review their ‘Do-Hicky Mark 4’ on the blog and most of the time I decline. Why? Well a lot of them stipulate that they want to see anything I write before it’s posted, we’ll sorry no. If I think it’s crap, I want to be able to say so. There are a couple of companies that I deal with that say “We are thinking of importing/manufacturing/marketing the ‘Functionvardle Mark 9’ we would like to send one for your feedback and not for reviewing on your blog.” They do get an honest feedback and I never mention the company or the product in my blog…. Even if the “Functionvardle Mark 9” makes it to market.
This was slightly different. The PR department simply said “We’d like to send you a Bosch Fontus for review” No requests for editorial control, previews before publishing, promises of ‘it’s yours to keep’ if we like the review. What made me say “Yes” to this particular request?
Well, for a while I’d been procrastinating on coming up with a contrivance of my own that did a similar job. I’d bought one of those bright yellow overgrown pump up spray things when they were on offer for rinsing down the caravan after cleaning… we have no water or electricity at the storage site we use. I’d already got three of those 25 litre water containers that I’d throw in the trailer along with the buckets, brushes, ladders… everything for a cleaning mission down at the caravan storage yard… and I thought it wasn’t beyond the realms of reality (and my awesomeness) to throw a 12 volt pump…. some hose…. a couple of hose connectors…. length of cable…. fuse & fuse holder…… suction pipe… board or box to hold it all… you see where this is going? By the time I’d assembled all the bits found I’d got half of them wrong and moved the goal posts half a dozen times. Apathy set in and I resigned myself to keep pumping the big yellow spray thing. The nice Lady from Bosch PR hit me in a weak moment and I thought “Hmmmmm.”
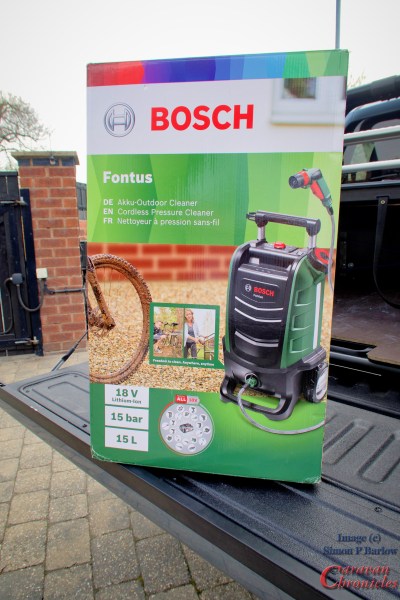
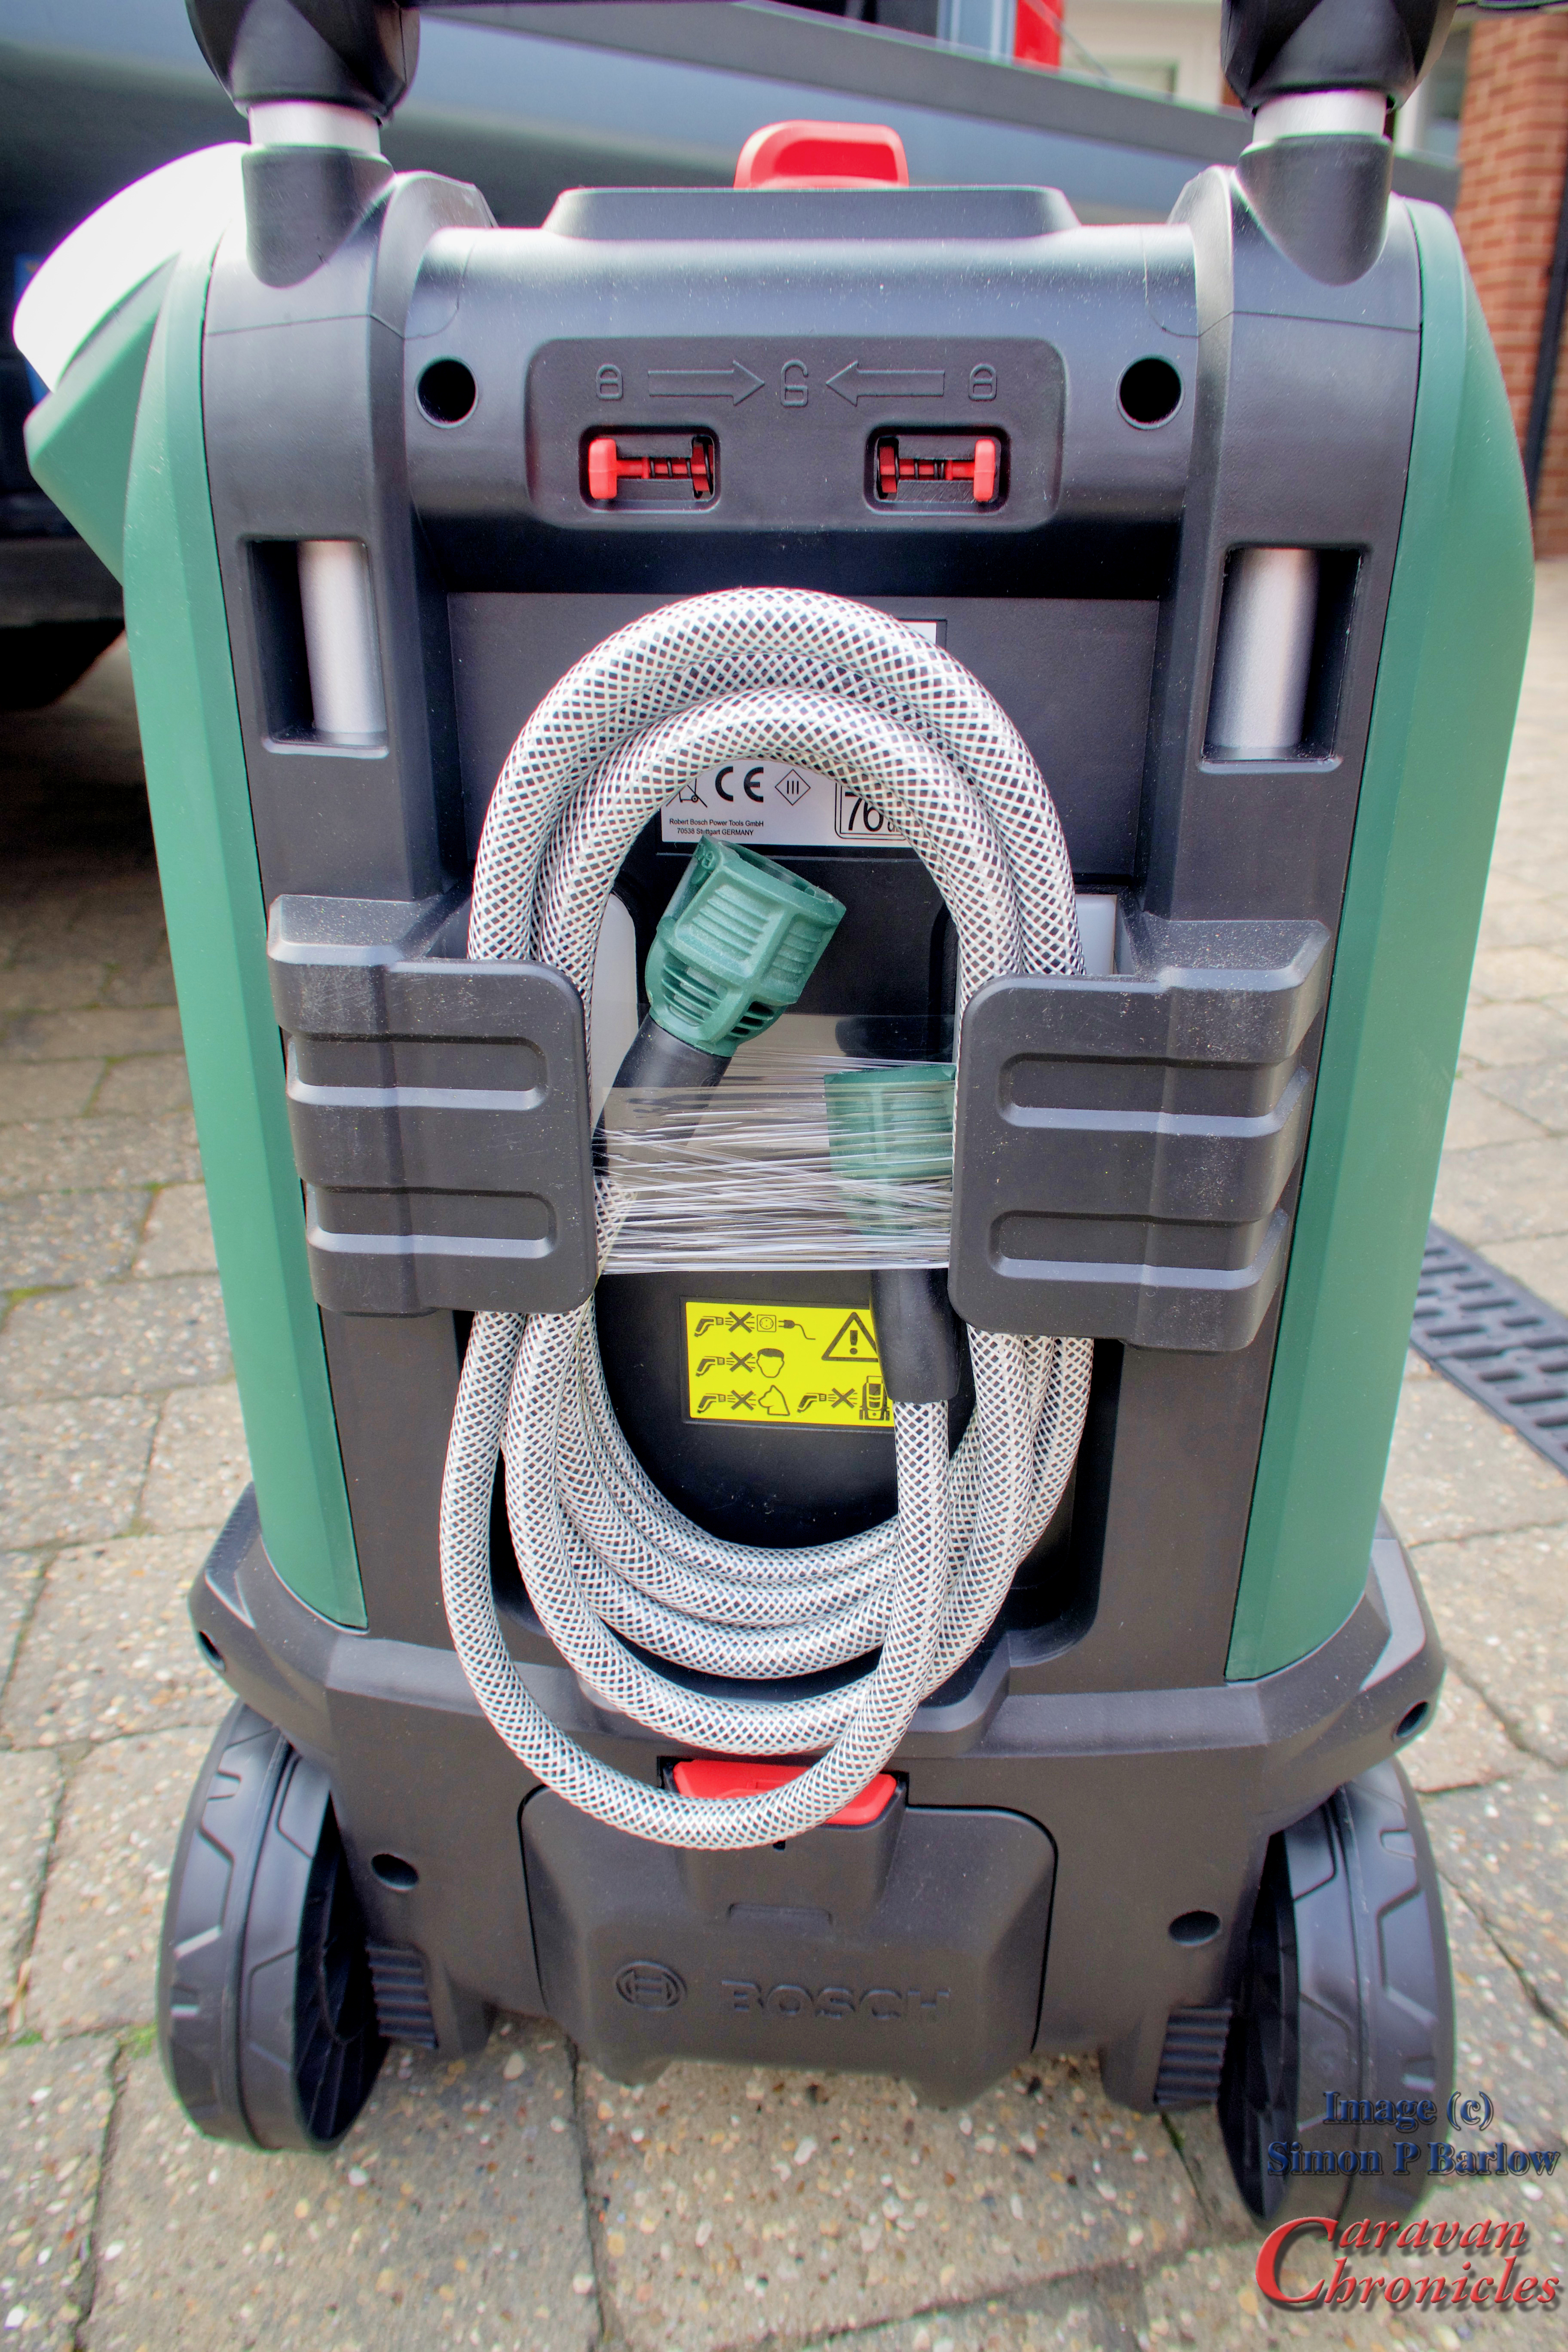
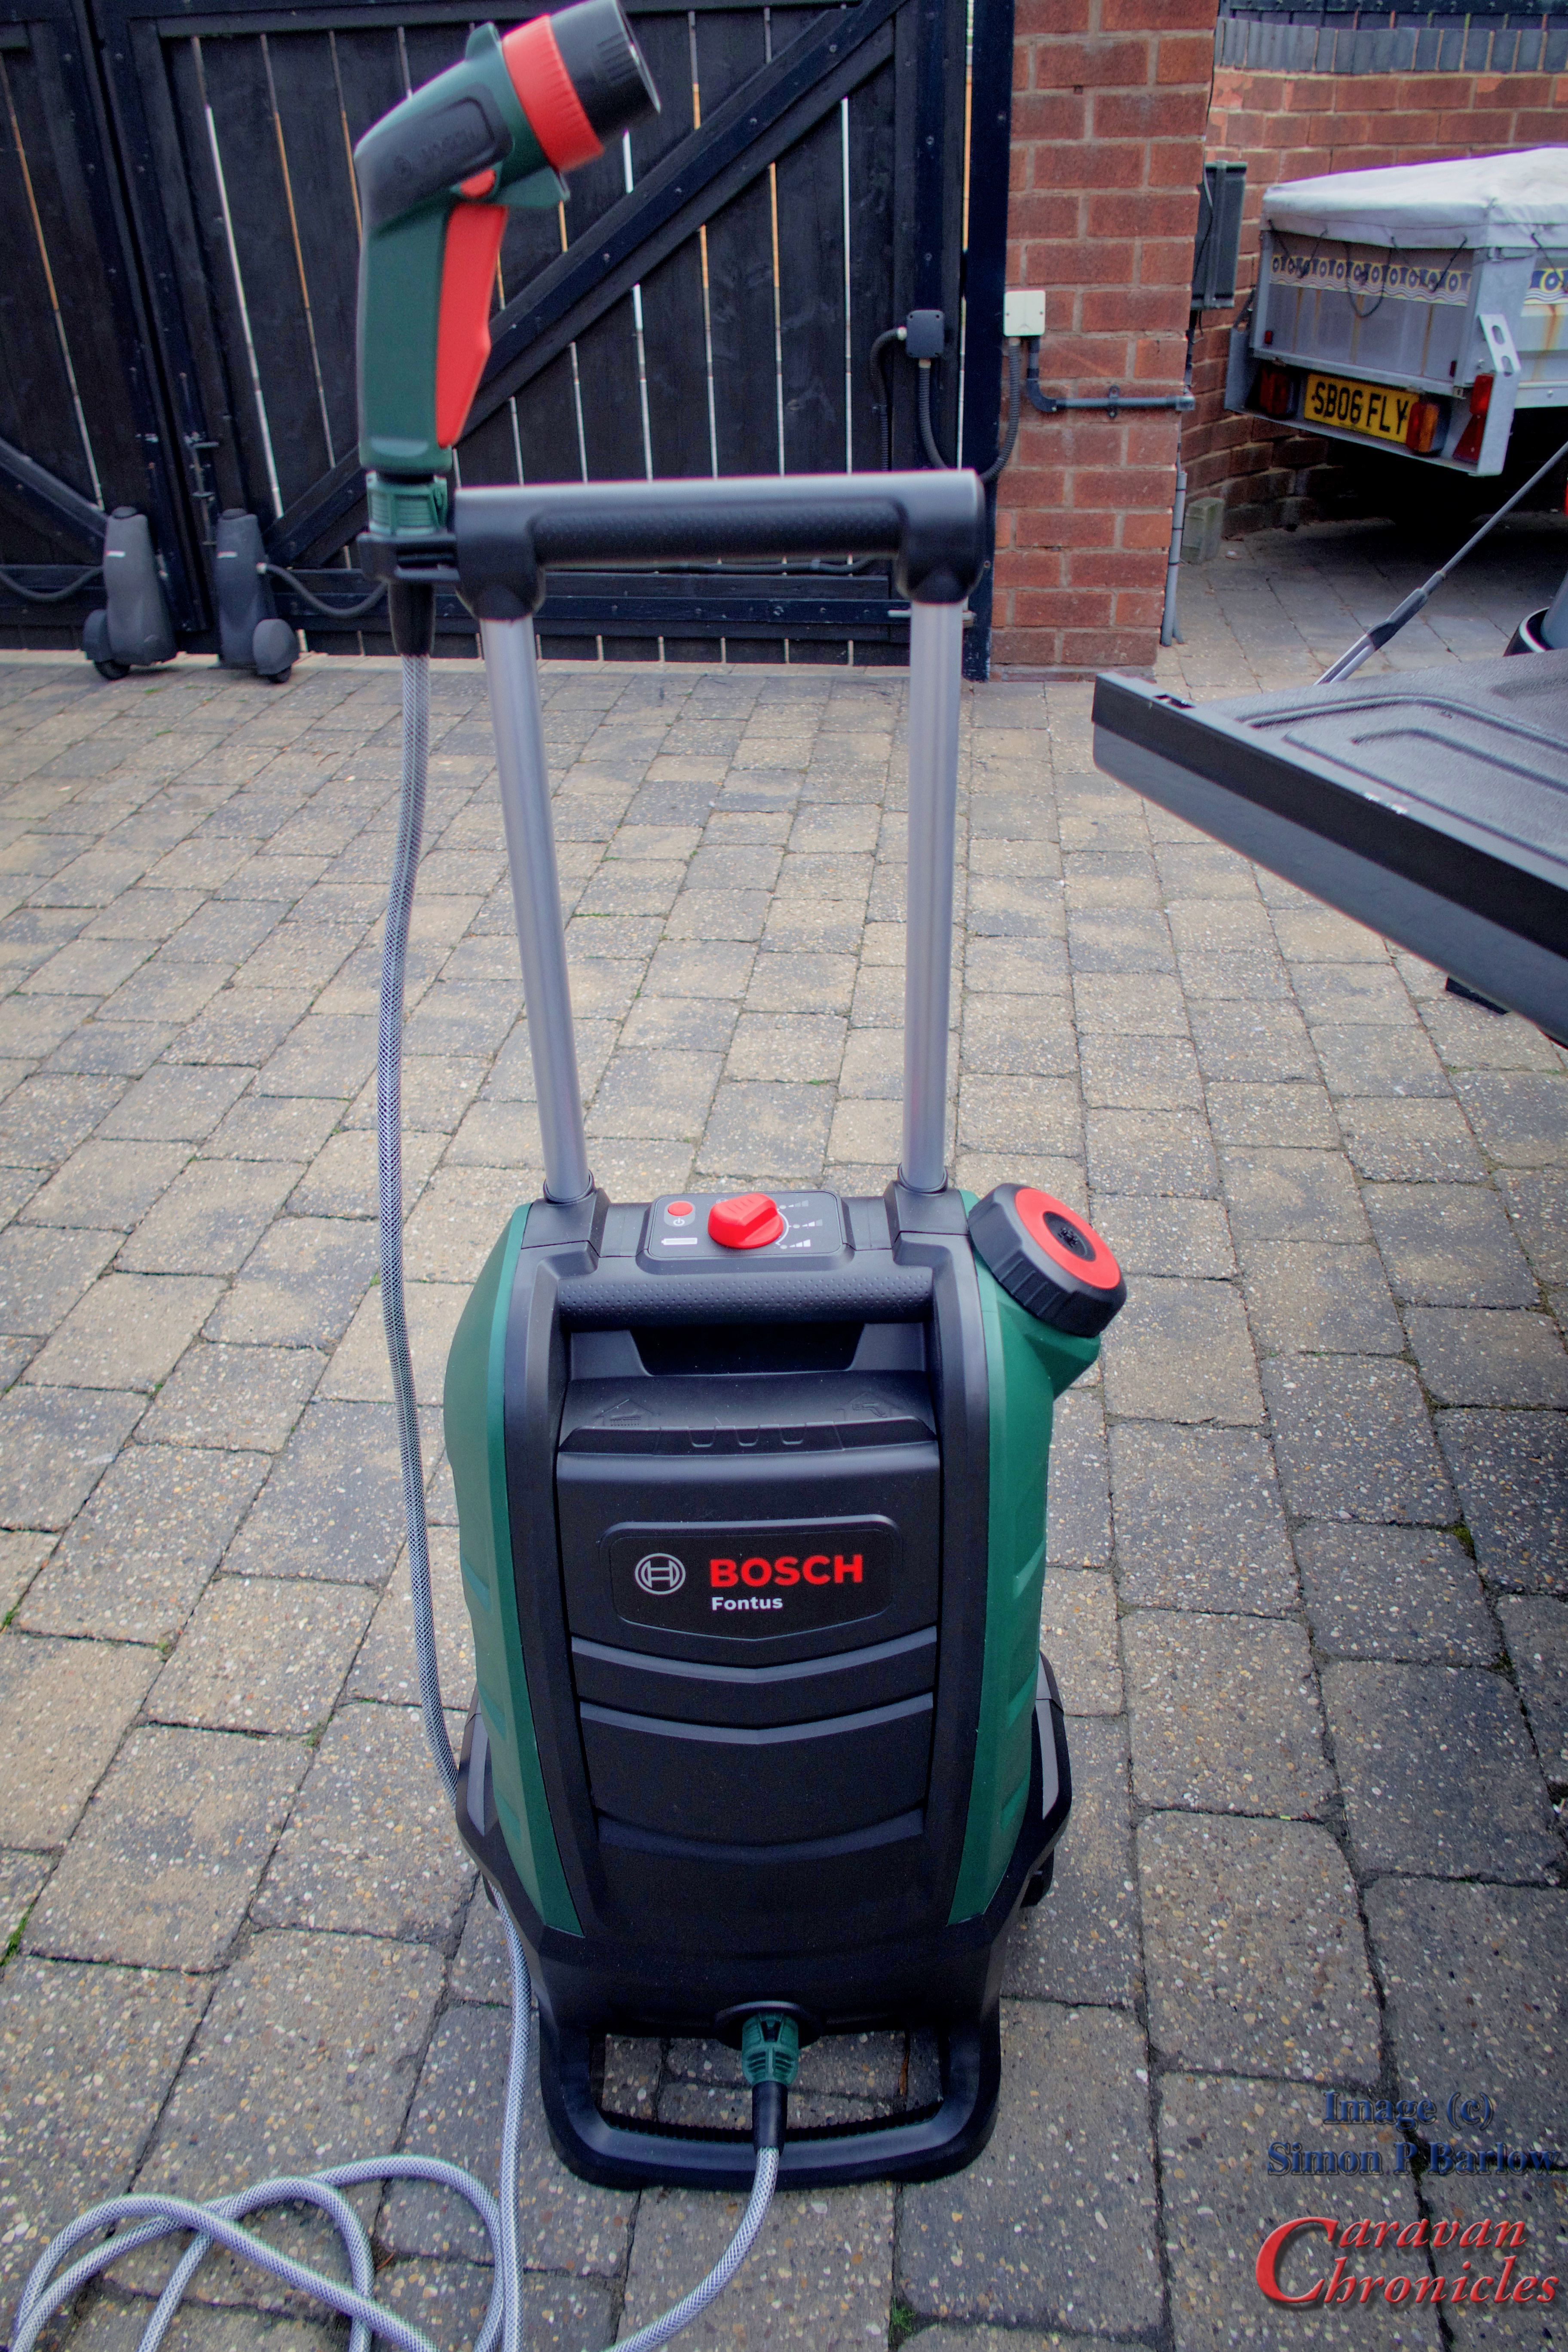
OK why “Fontus” and not “Rechargeable Battery Powered Portable Water Reservoir and Spray“? Fontus, I had to Google it – In ancient Roman religion, Fontus or Fons (plural Fontes, “Font” or “Source”) was a god of wells and springs. So that answers that question. Now you know why I don’t work in product marketing! The box arrived and I was surprised at the heft of the box. The actual unit itself weighs in at just under 10 Kgs…. and has a water reservoir capacity of 15 litres.
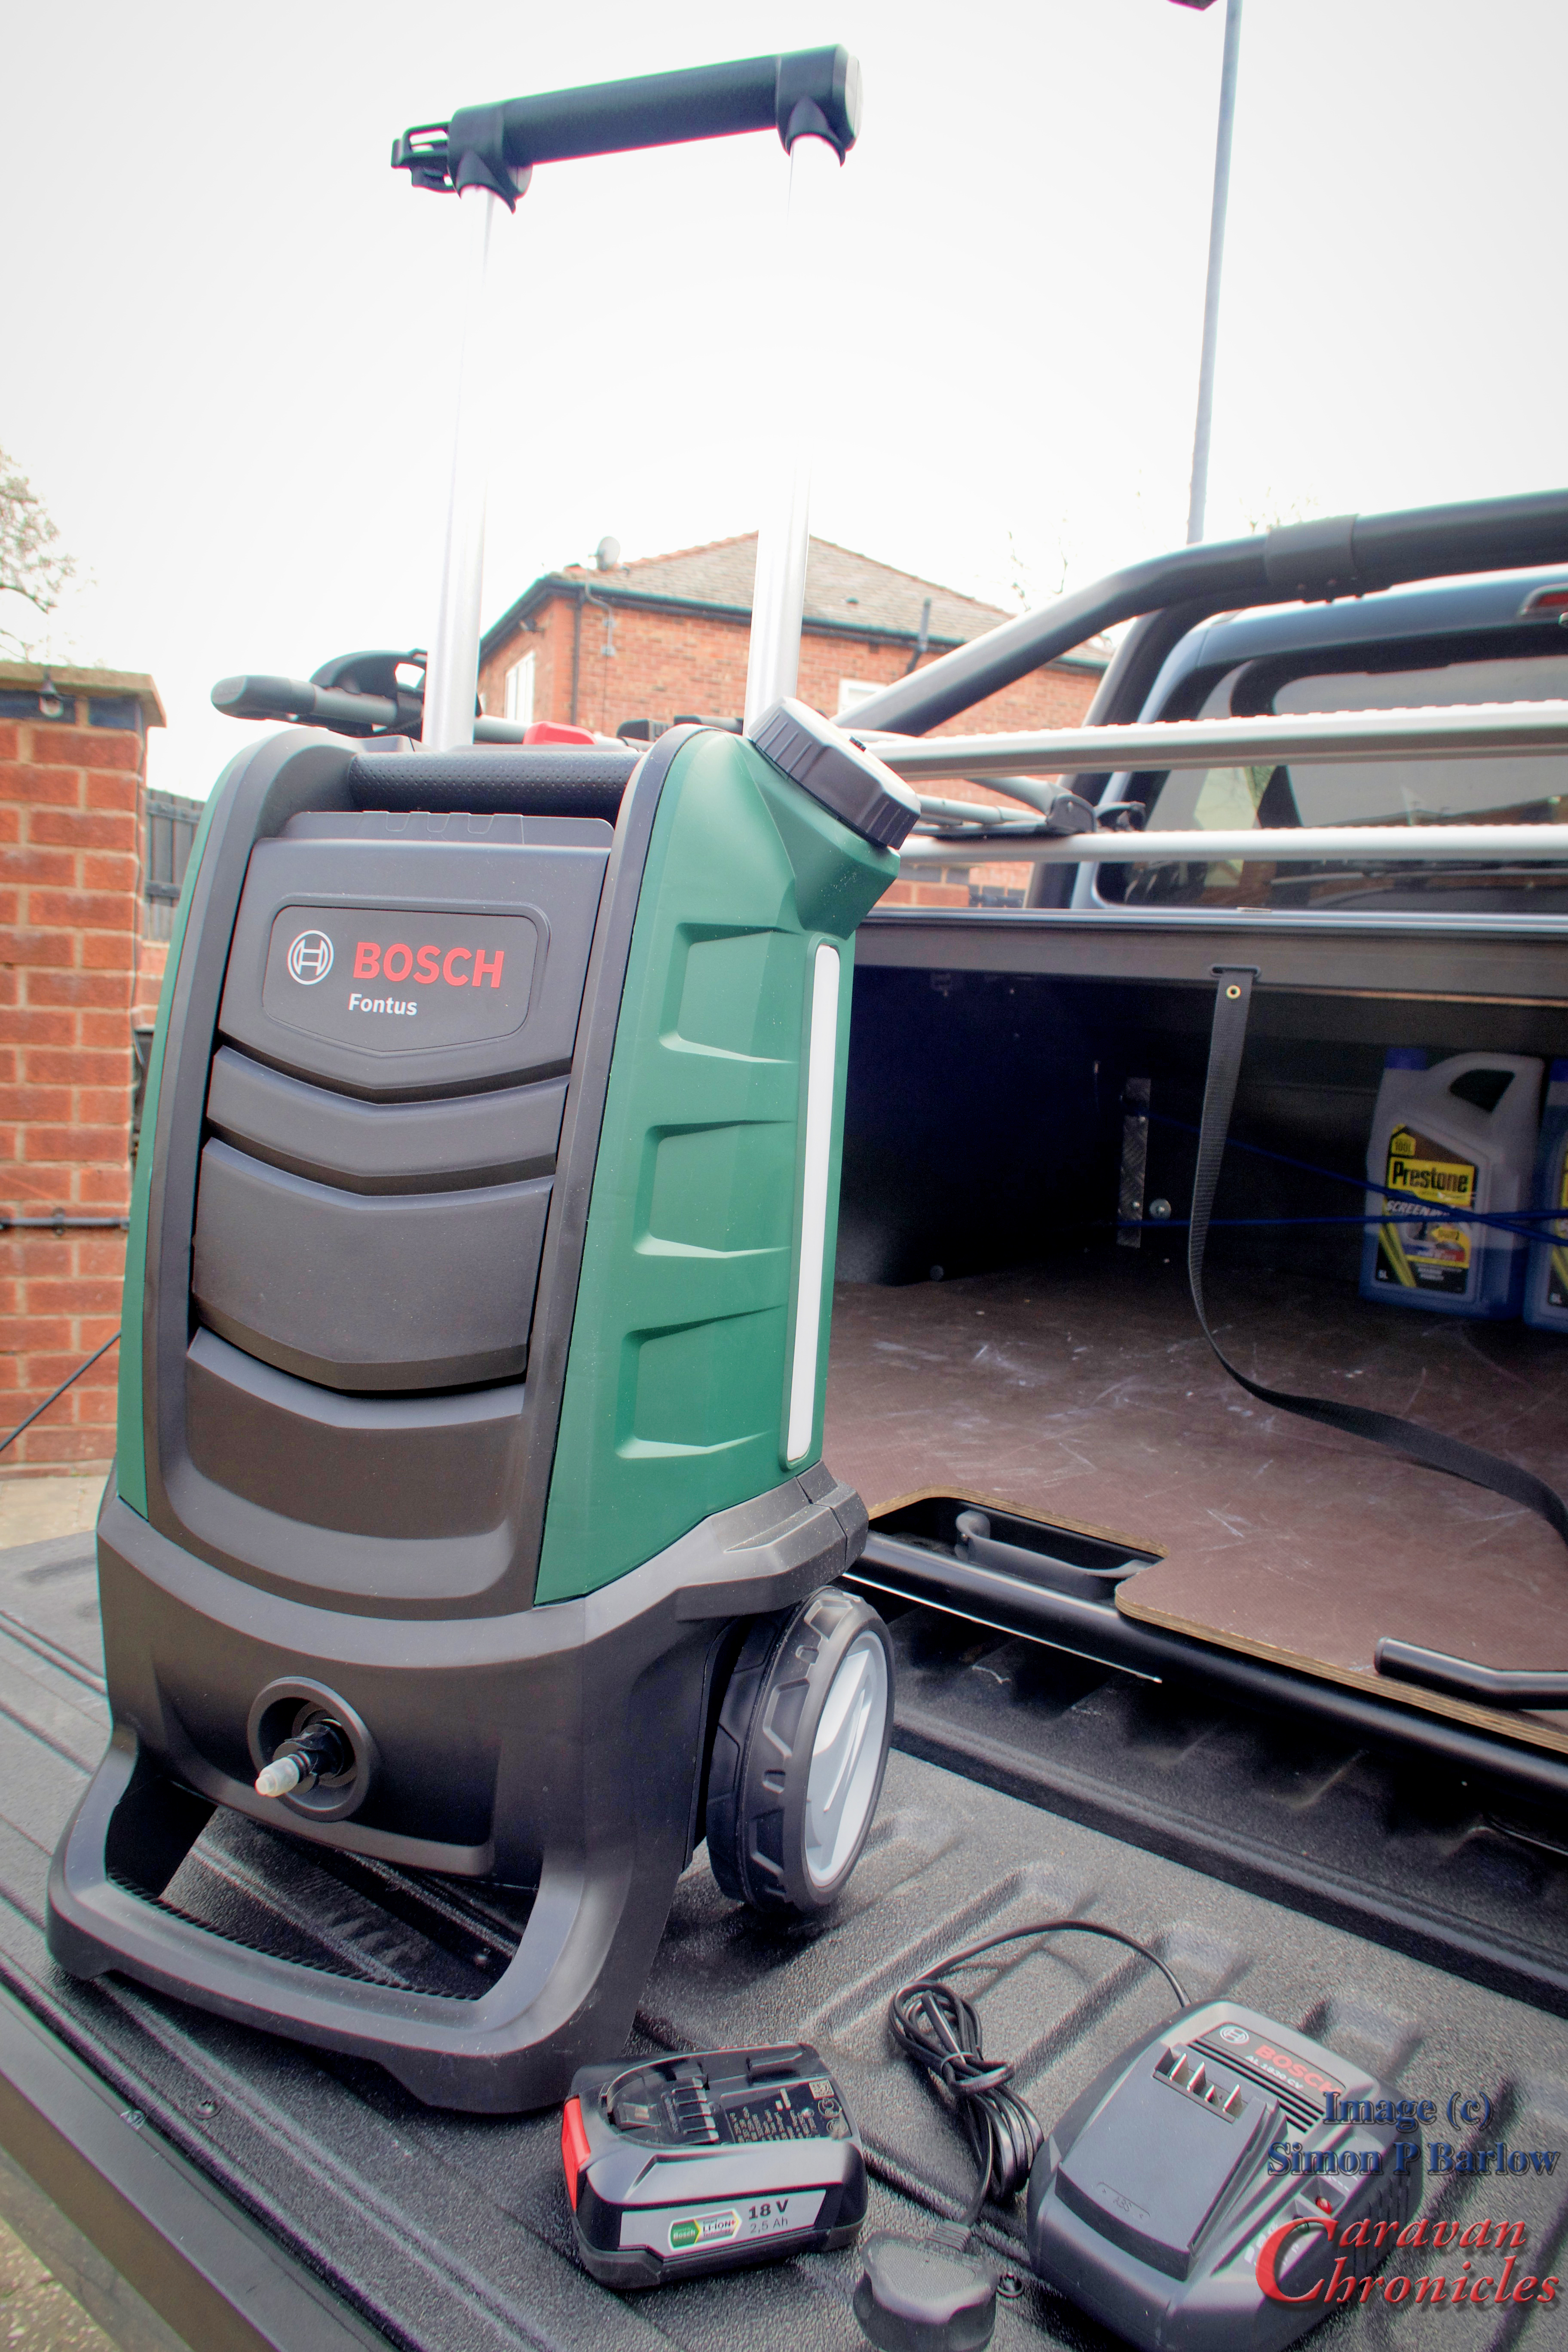
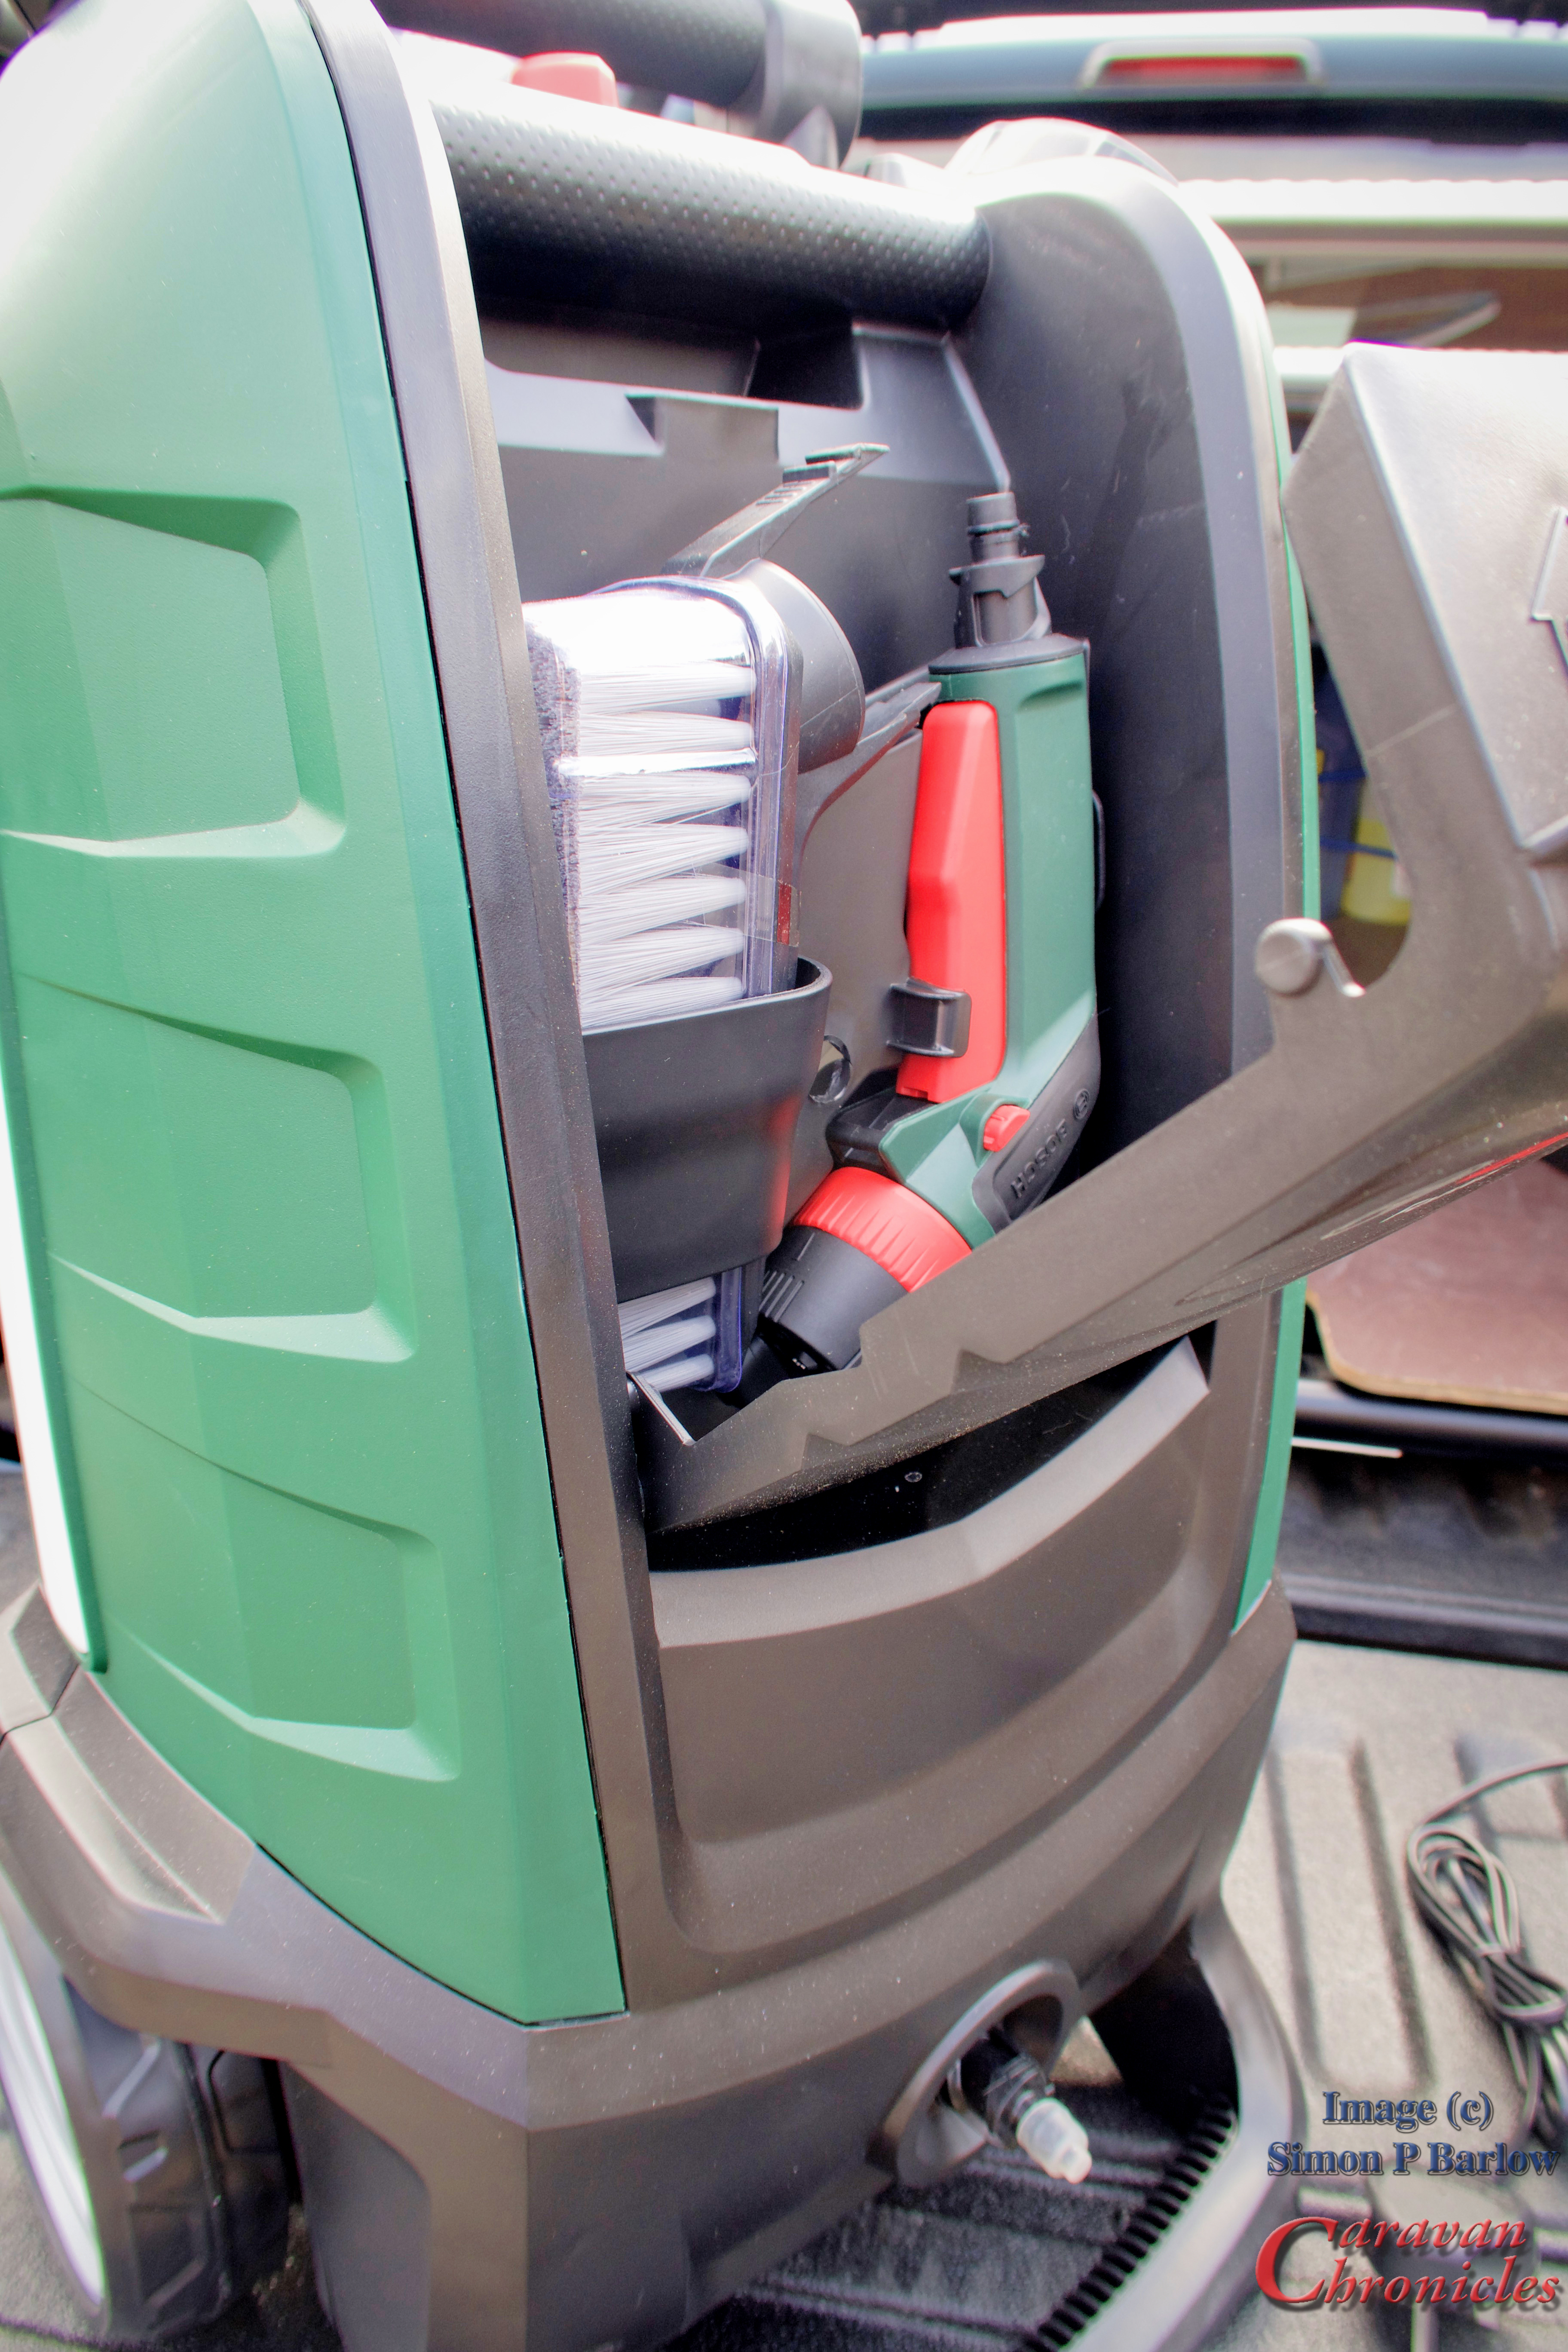
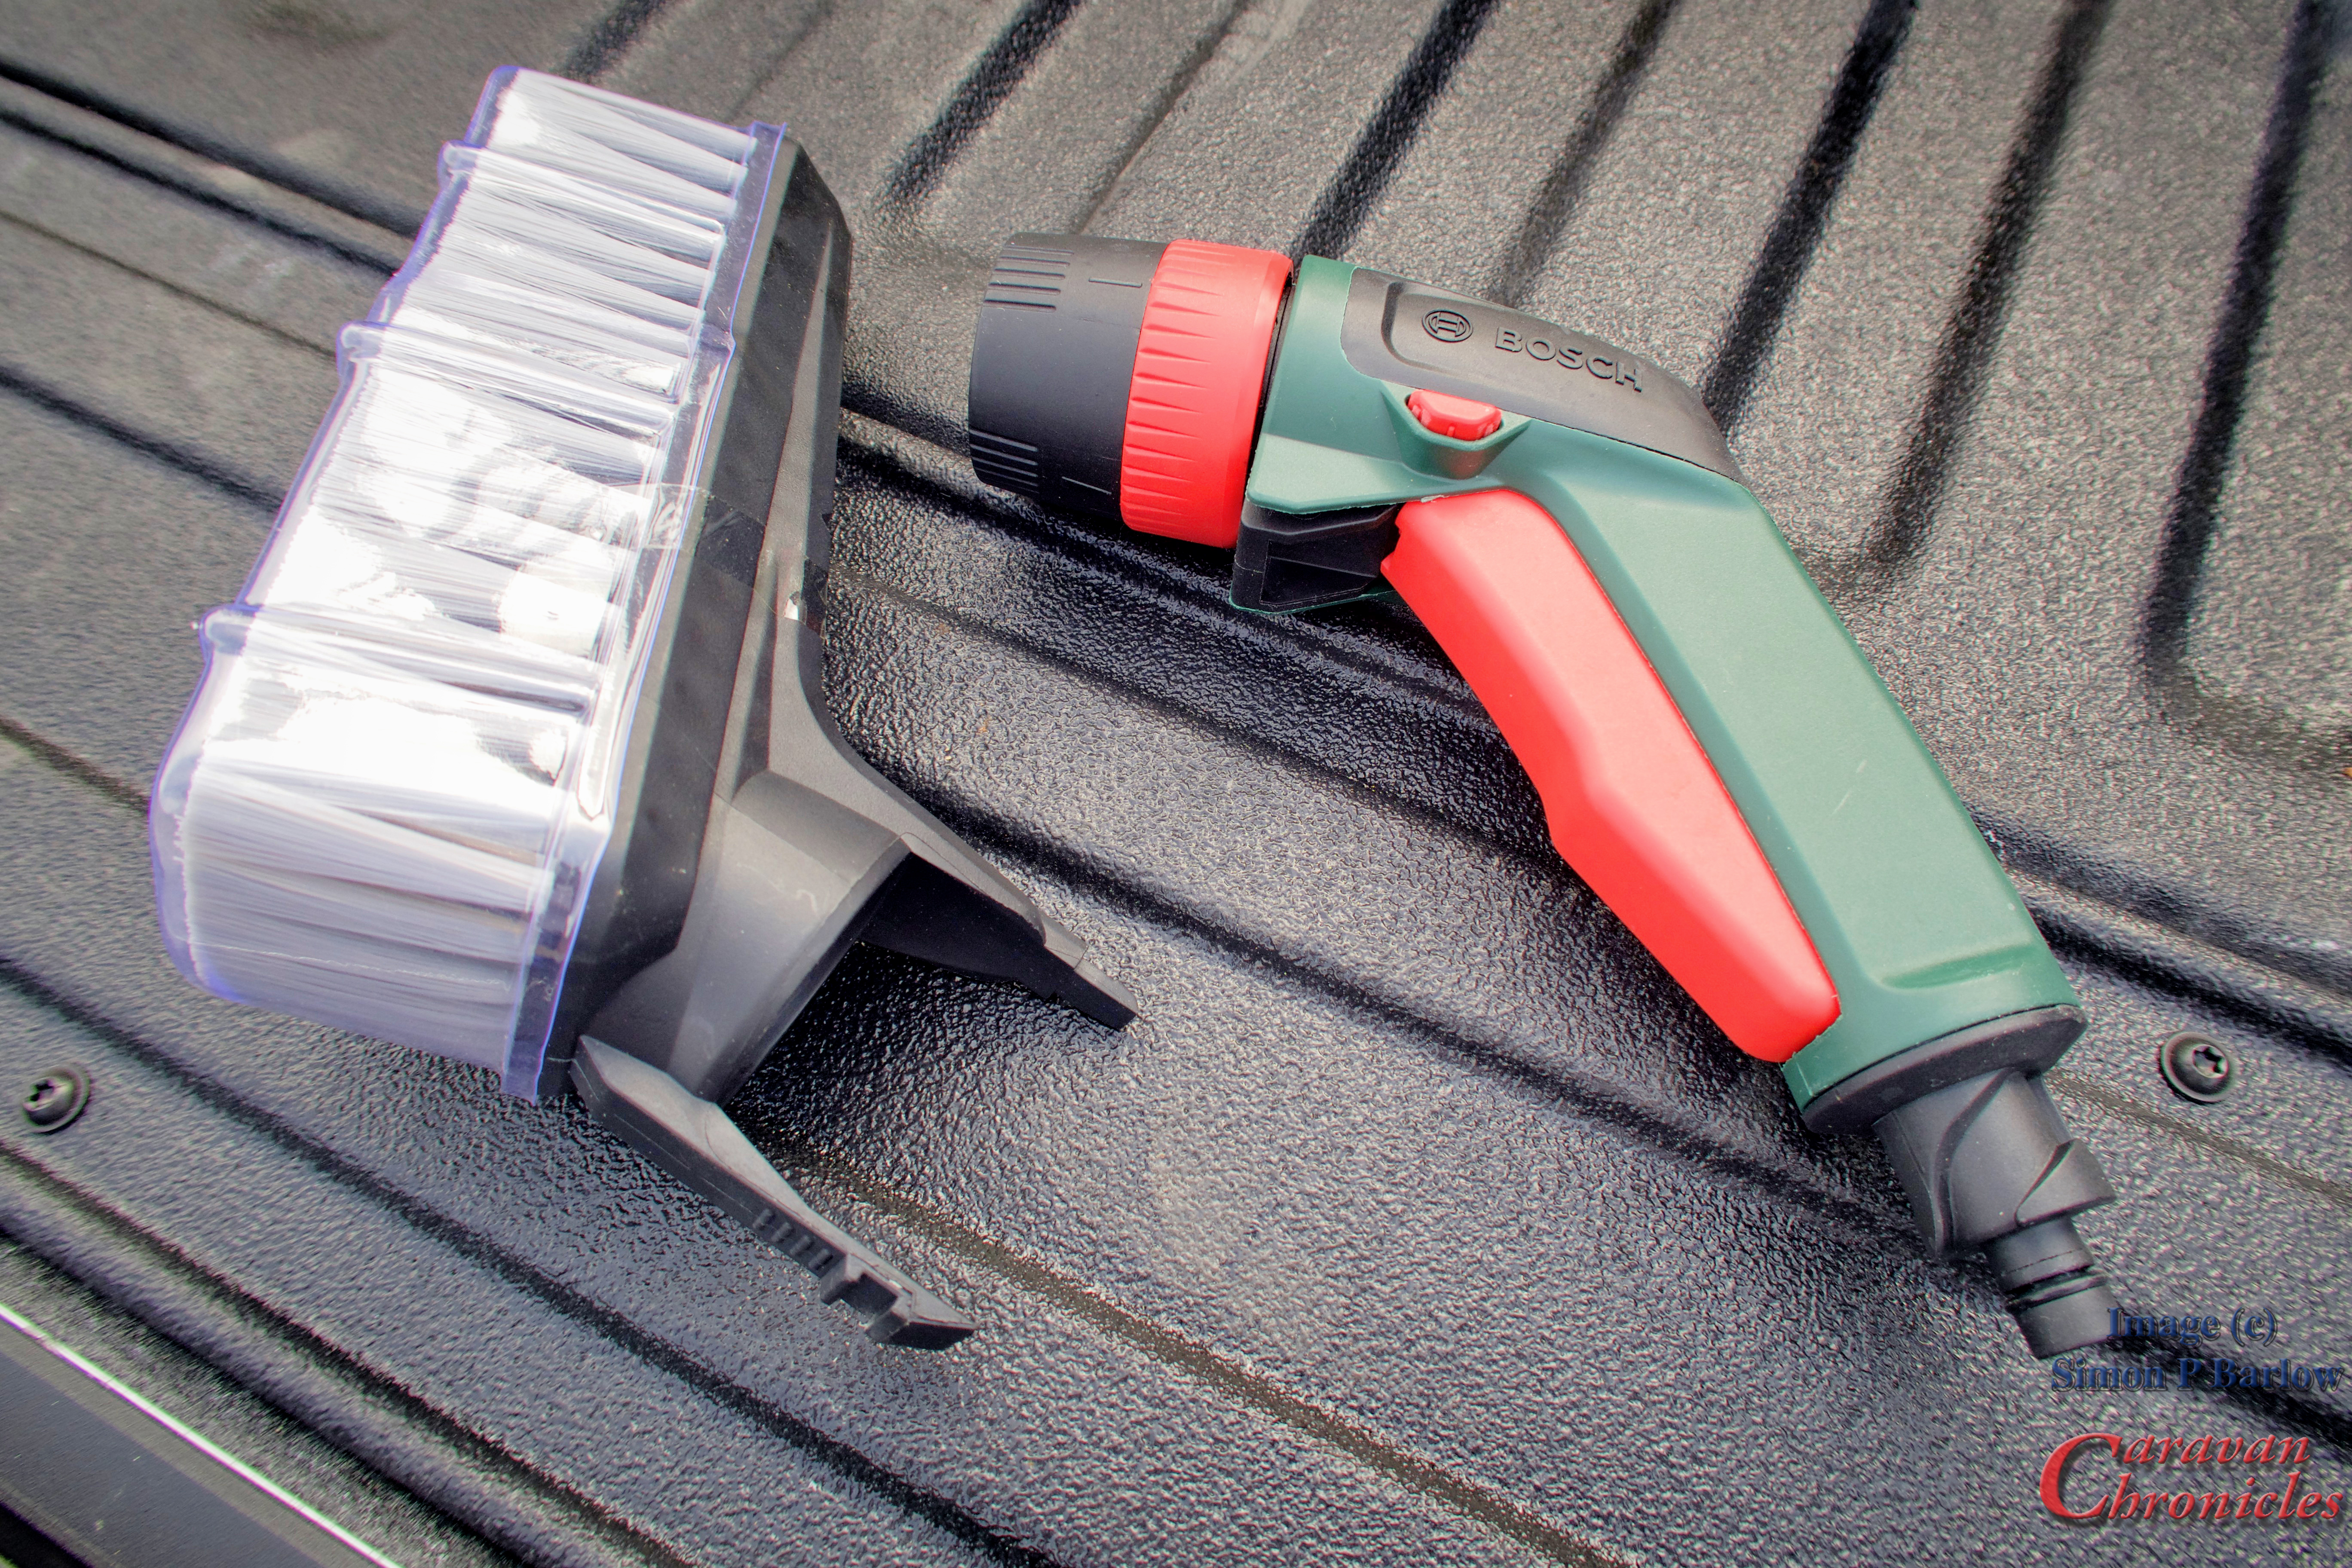
So what is it… well basically it’s a Rechargeable Battery Powered Portable Water Reservoir and Spray Unit. You fill it up with water, insert the rechargeable battery, connect the included hose and spray head, push the ON button and squeeze the trigger. Is it a jet wash? No, it runs at a max of around 1.5 MPa that’s 15 Bar or 217 PSI to you or me or if you are really old 14.8 Atmospheres. So it’s not a jet washer.
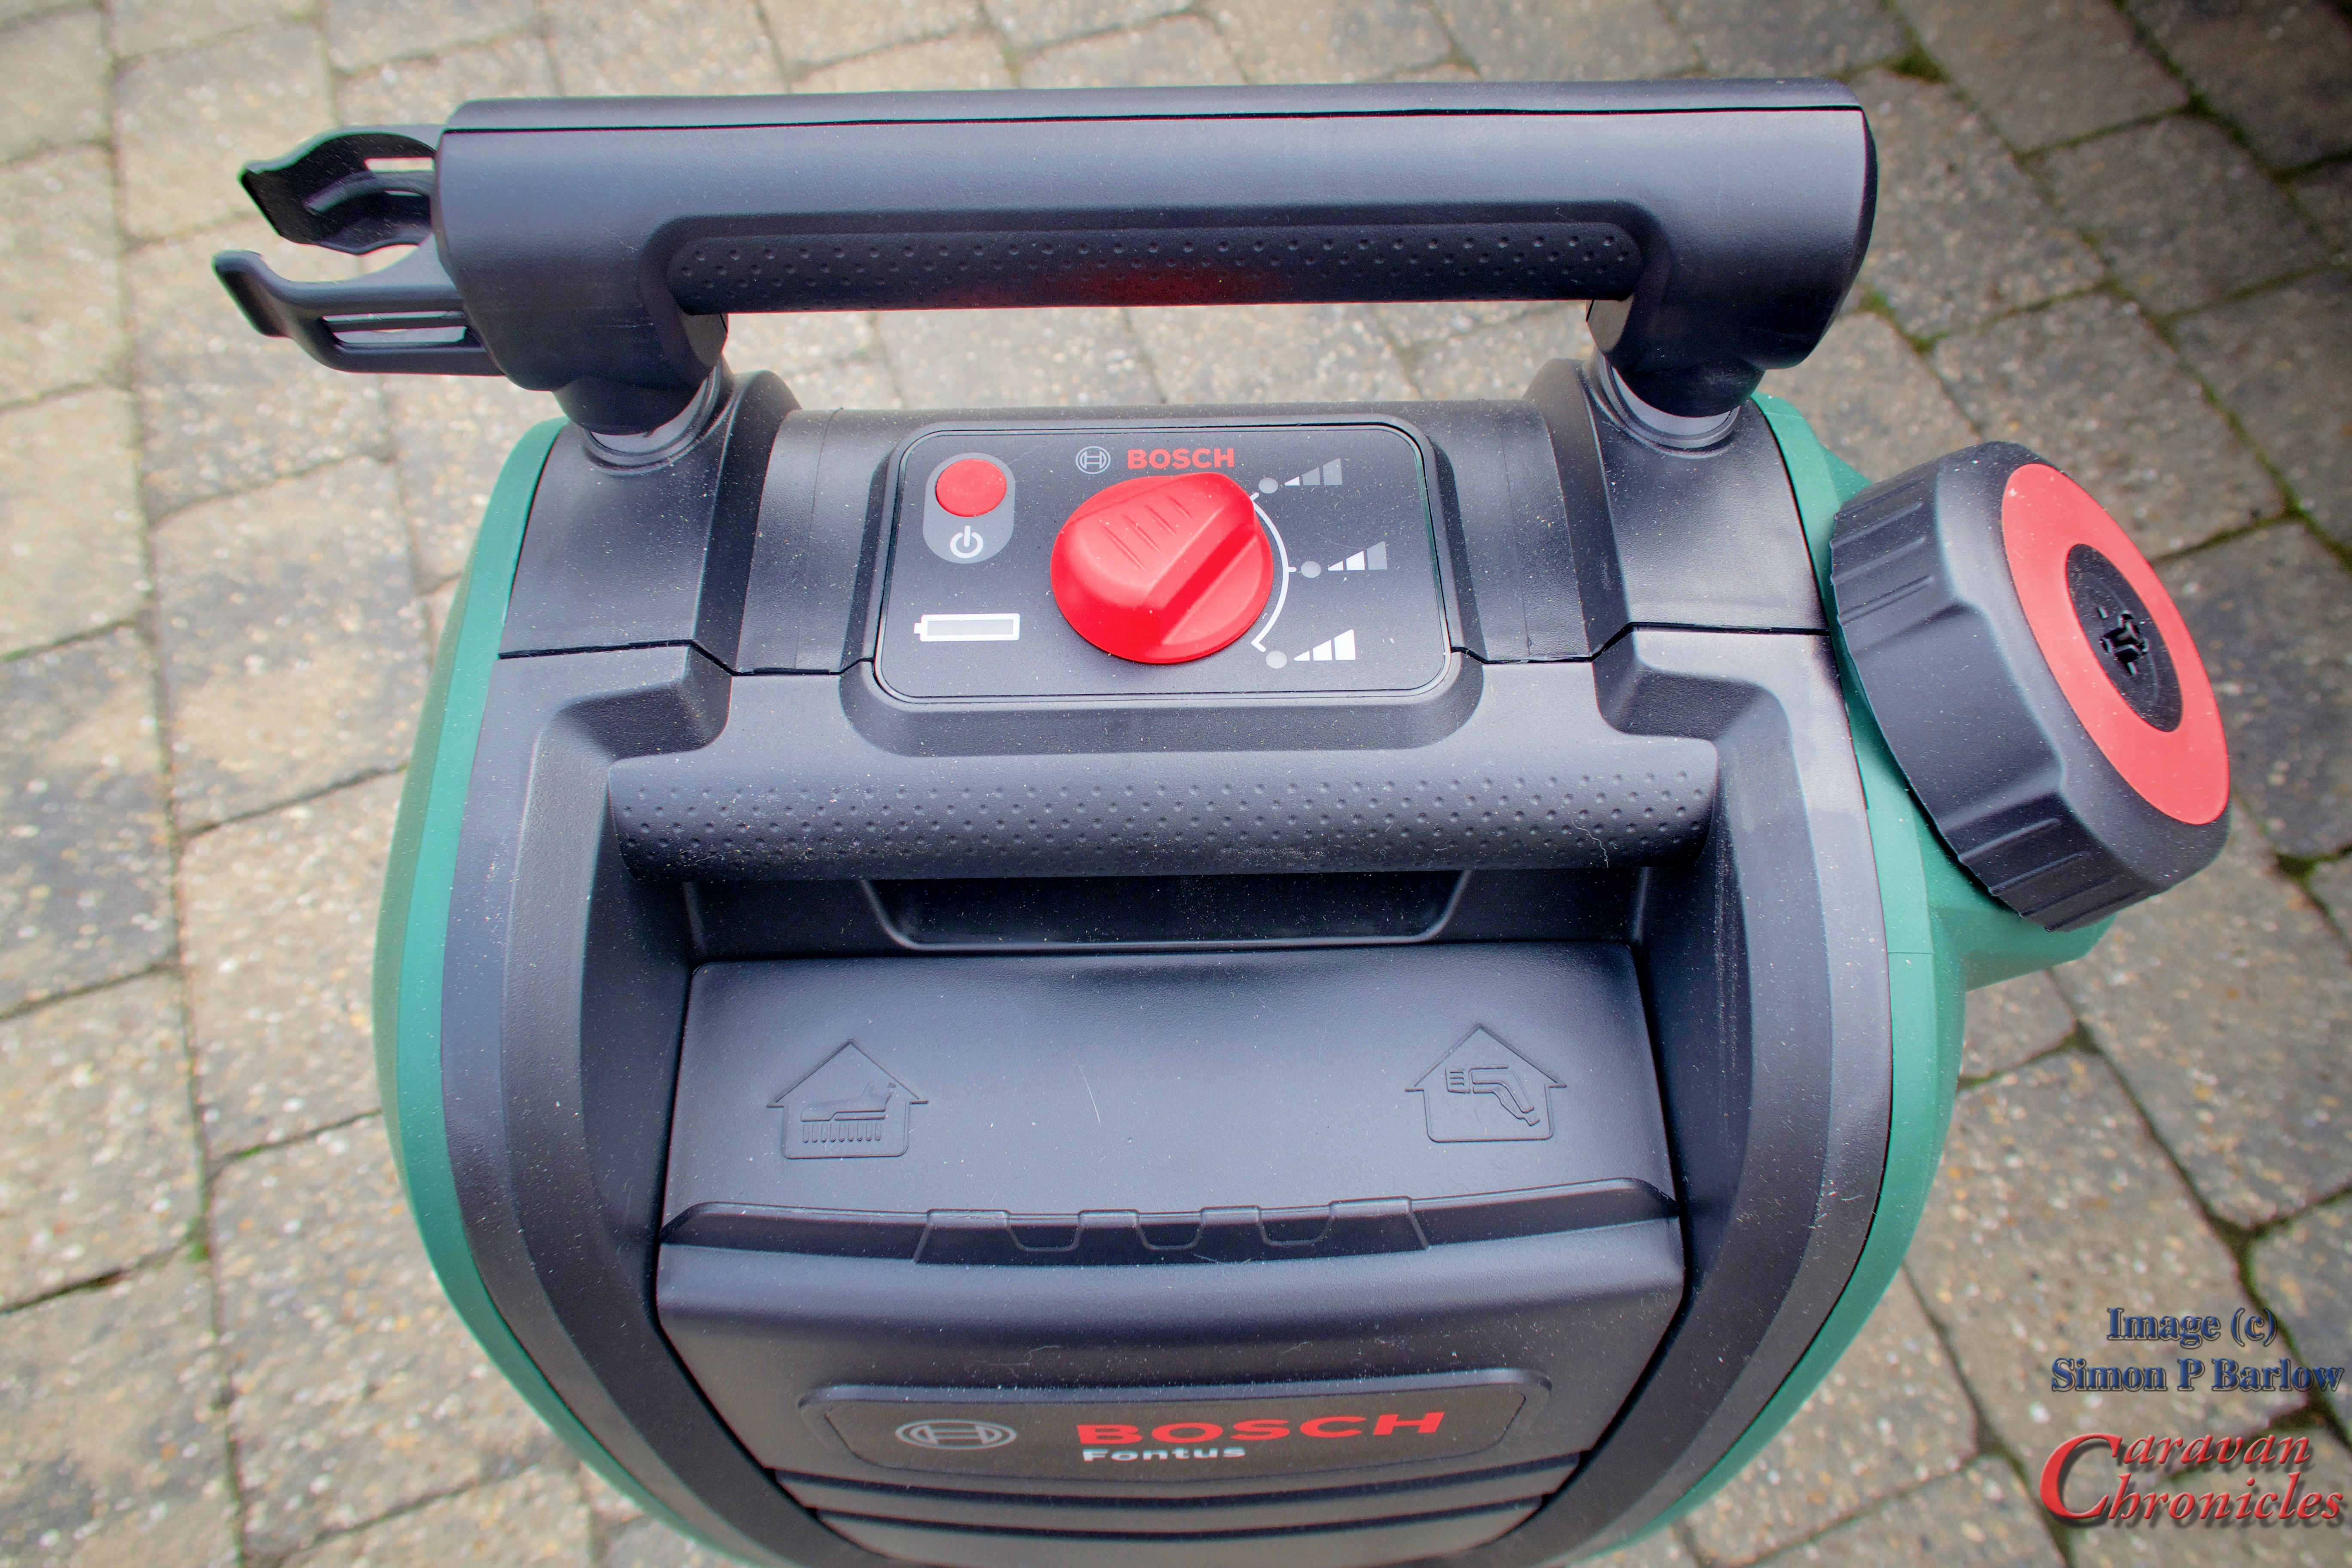
Now here is the thing that has me fascinated. On the top there is a three position power switch. While testing (read playing around) I could tell it changed the power… but also it seemed to change the amount of water without affecting the spray pattern or distance it should spray the jet of water I could do the same width ‘fan’ of water on each of the three power settings but with three volumes of water. (OK I know the physics behind it… no need to comment.)
When washing the car when it comes to rinsing off I normally have my hosepipe rose set on ‘rain’ so its a constant rain shower and proceed to go round the whole vehicle rinsing off the shampoo (yes I shampoo my vehicles… get over it) Now with the Fontus I used the horizontal fan setting not he trigger and could literal have a line of water that I just moved down the body panel pushing the shampoo suds down as it went. I was amazed I could do the whole of the VW Amarok.. Which isn’t small… on less than 15 litres on the lowest power setting. That is some serious water saving there.
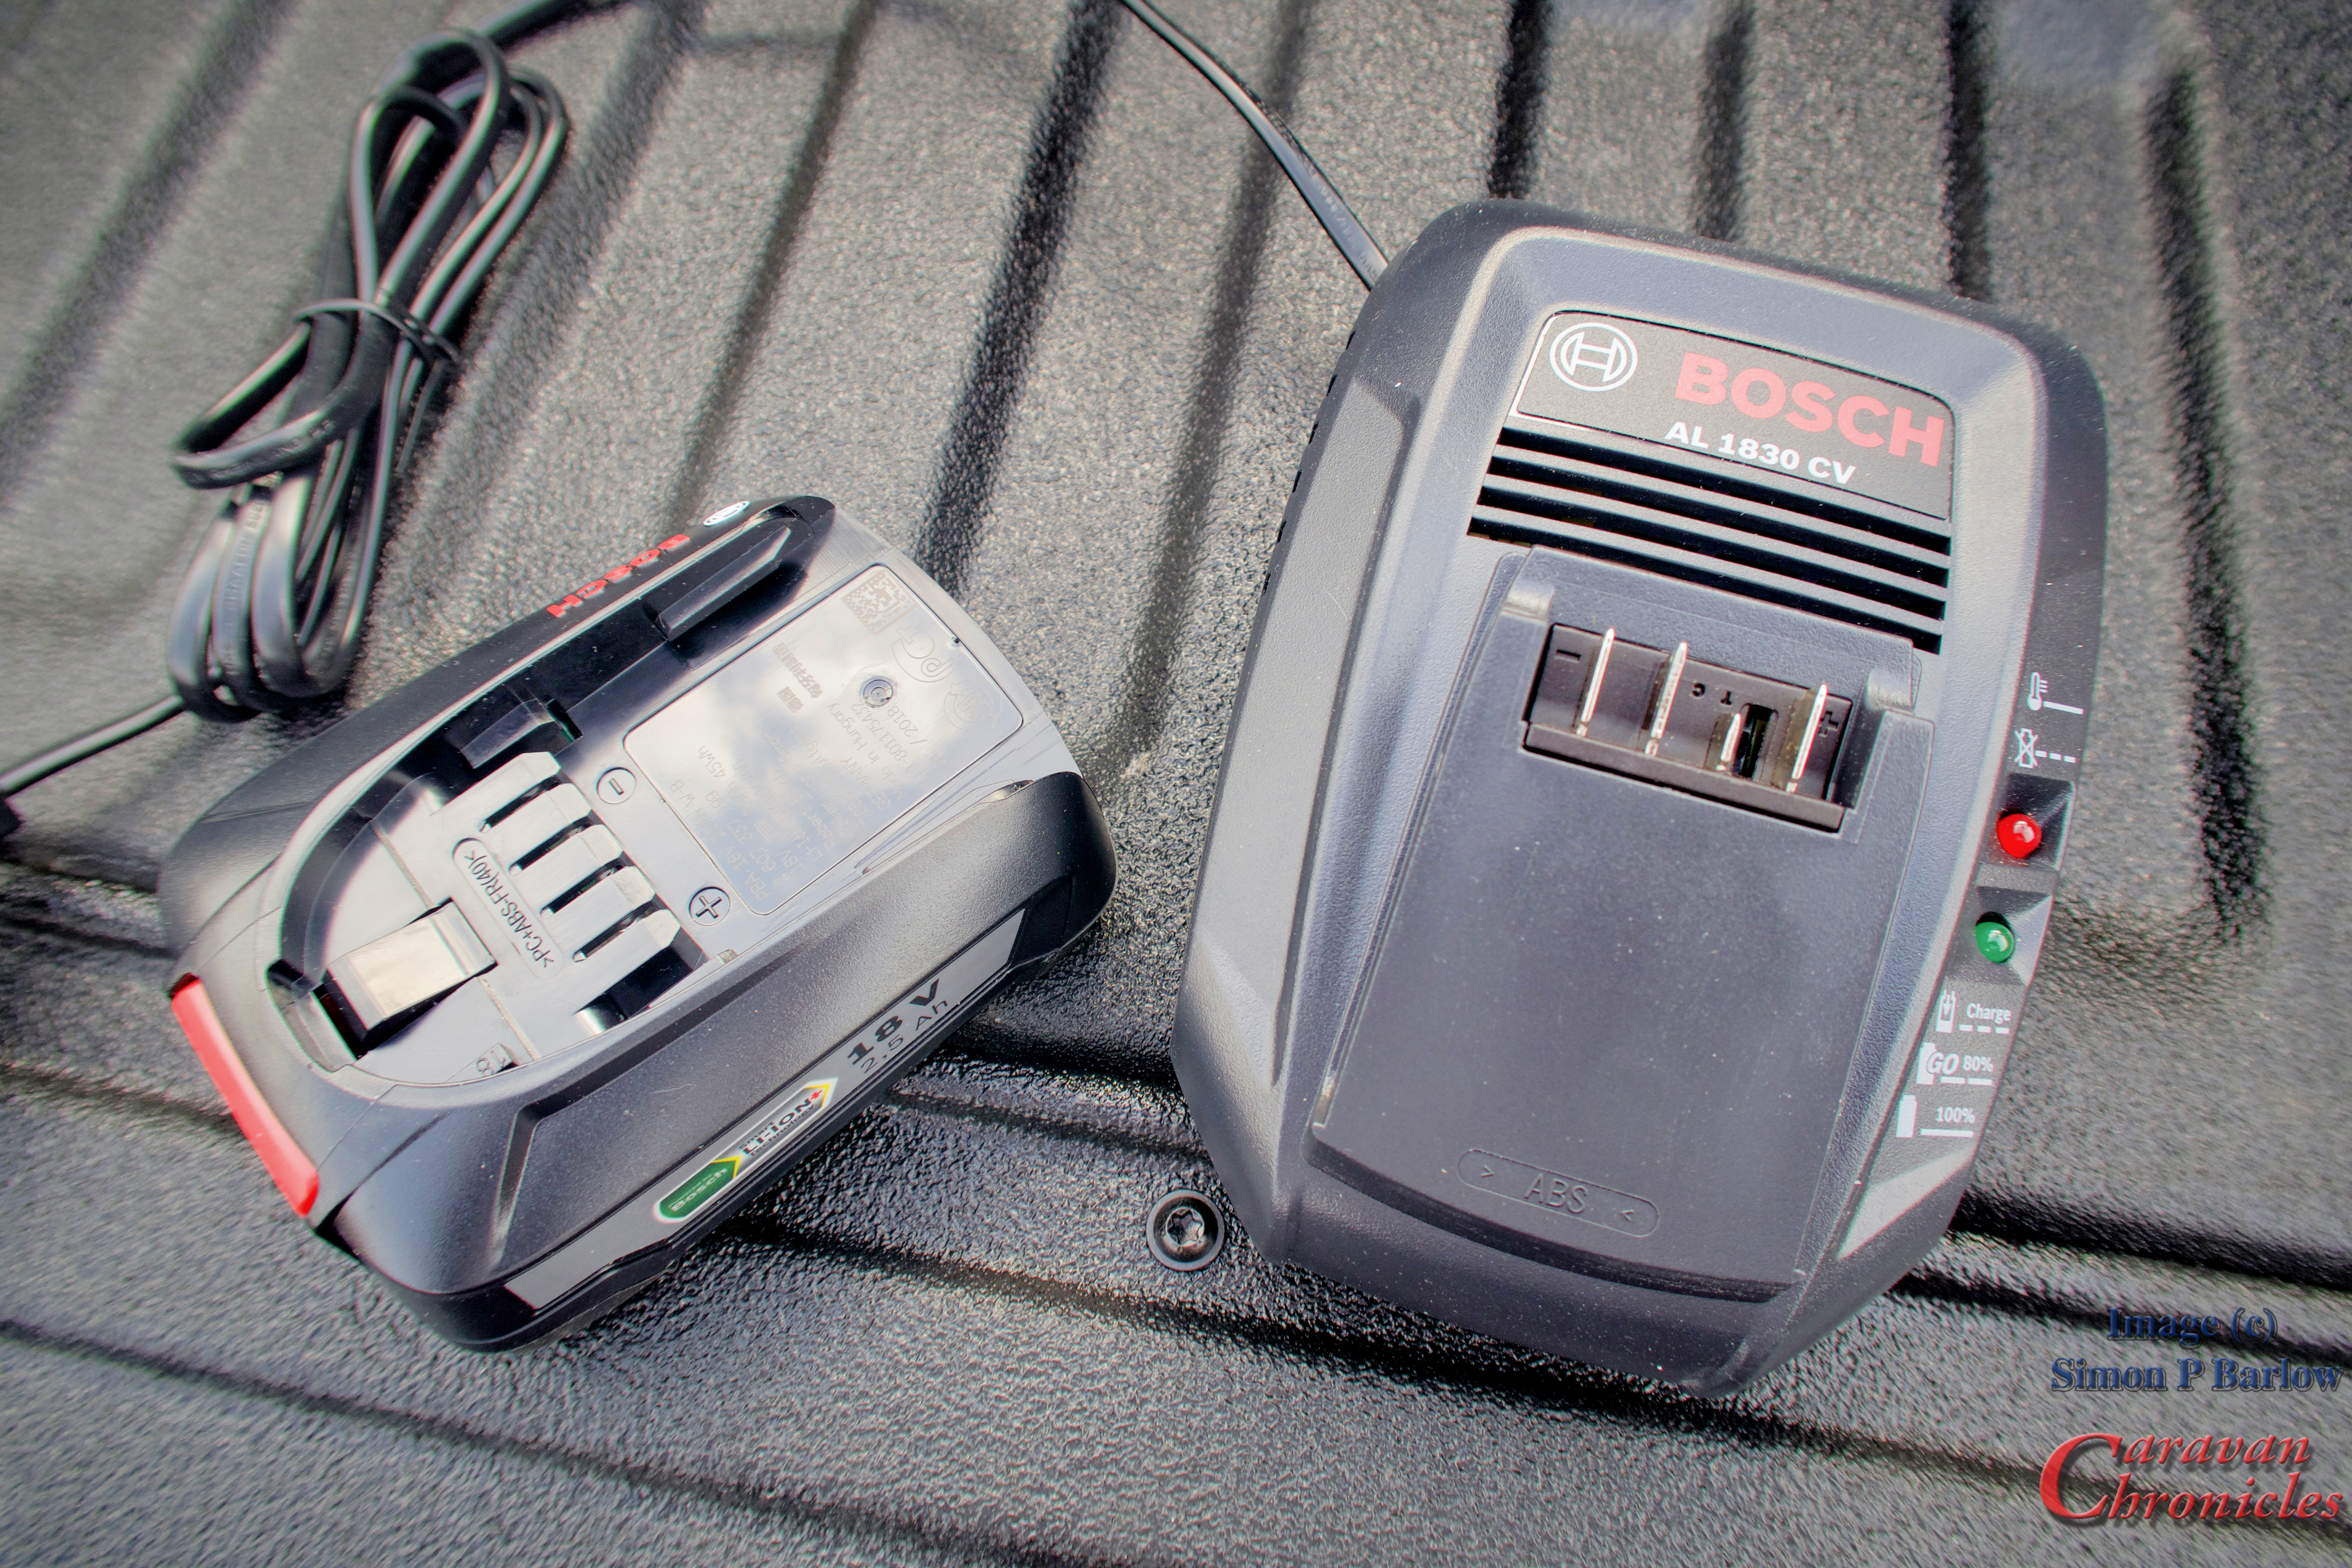
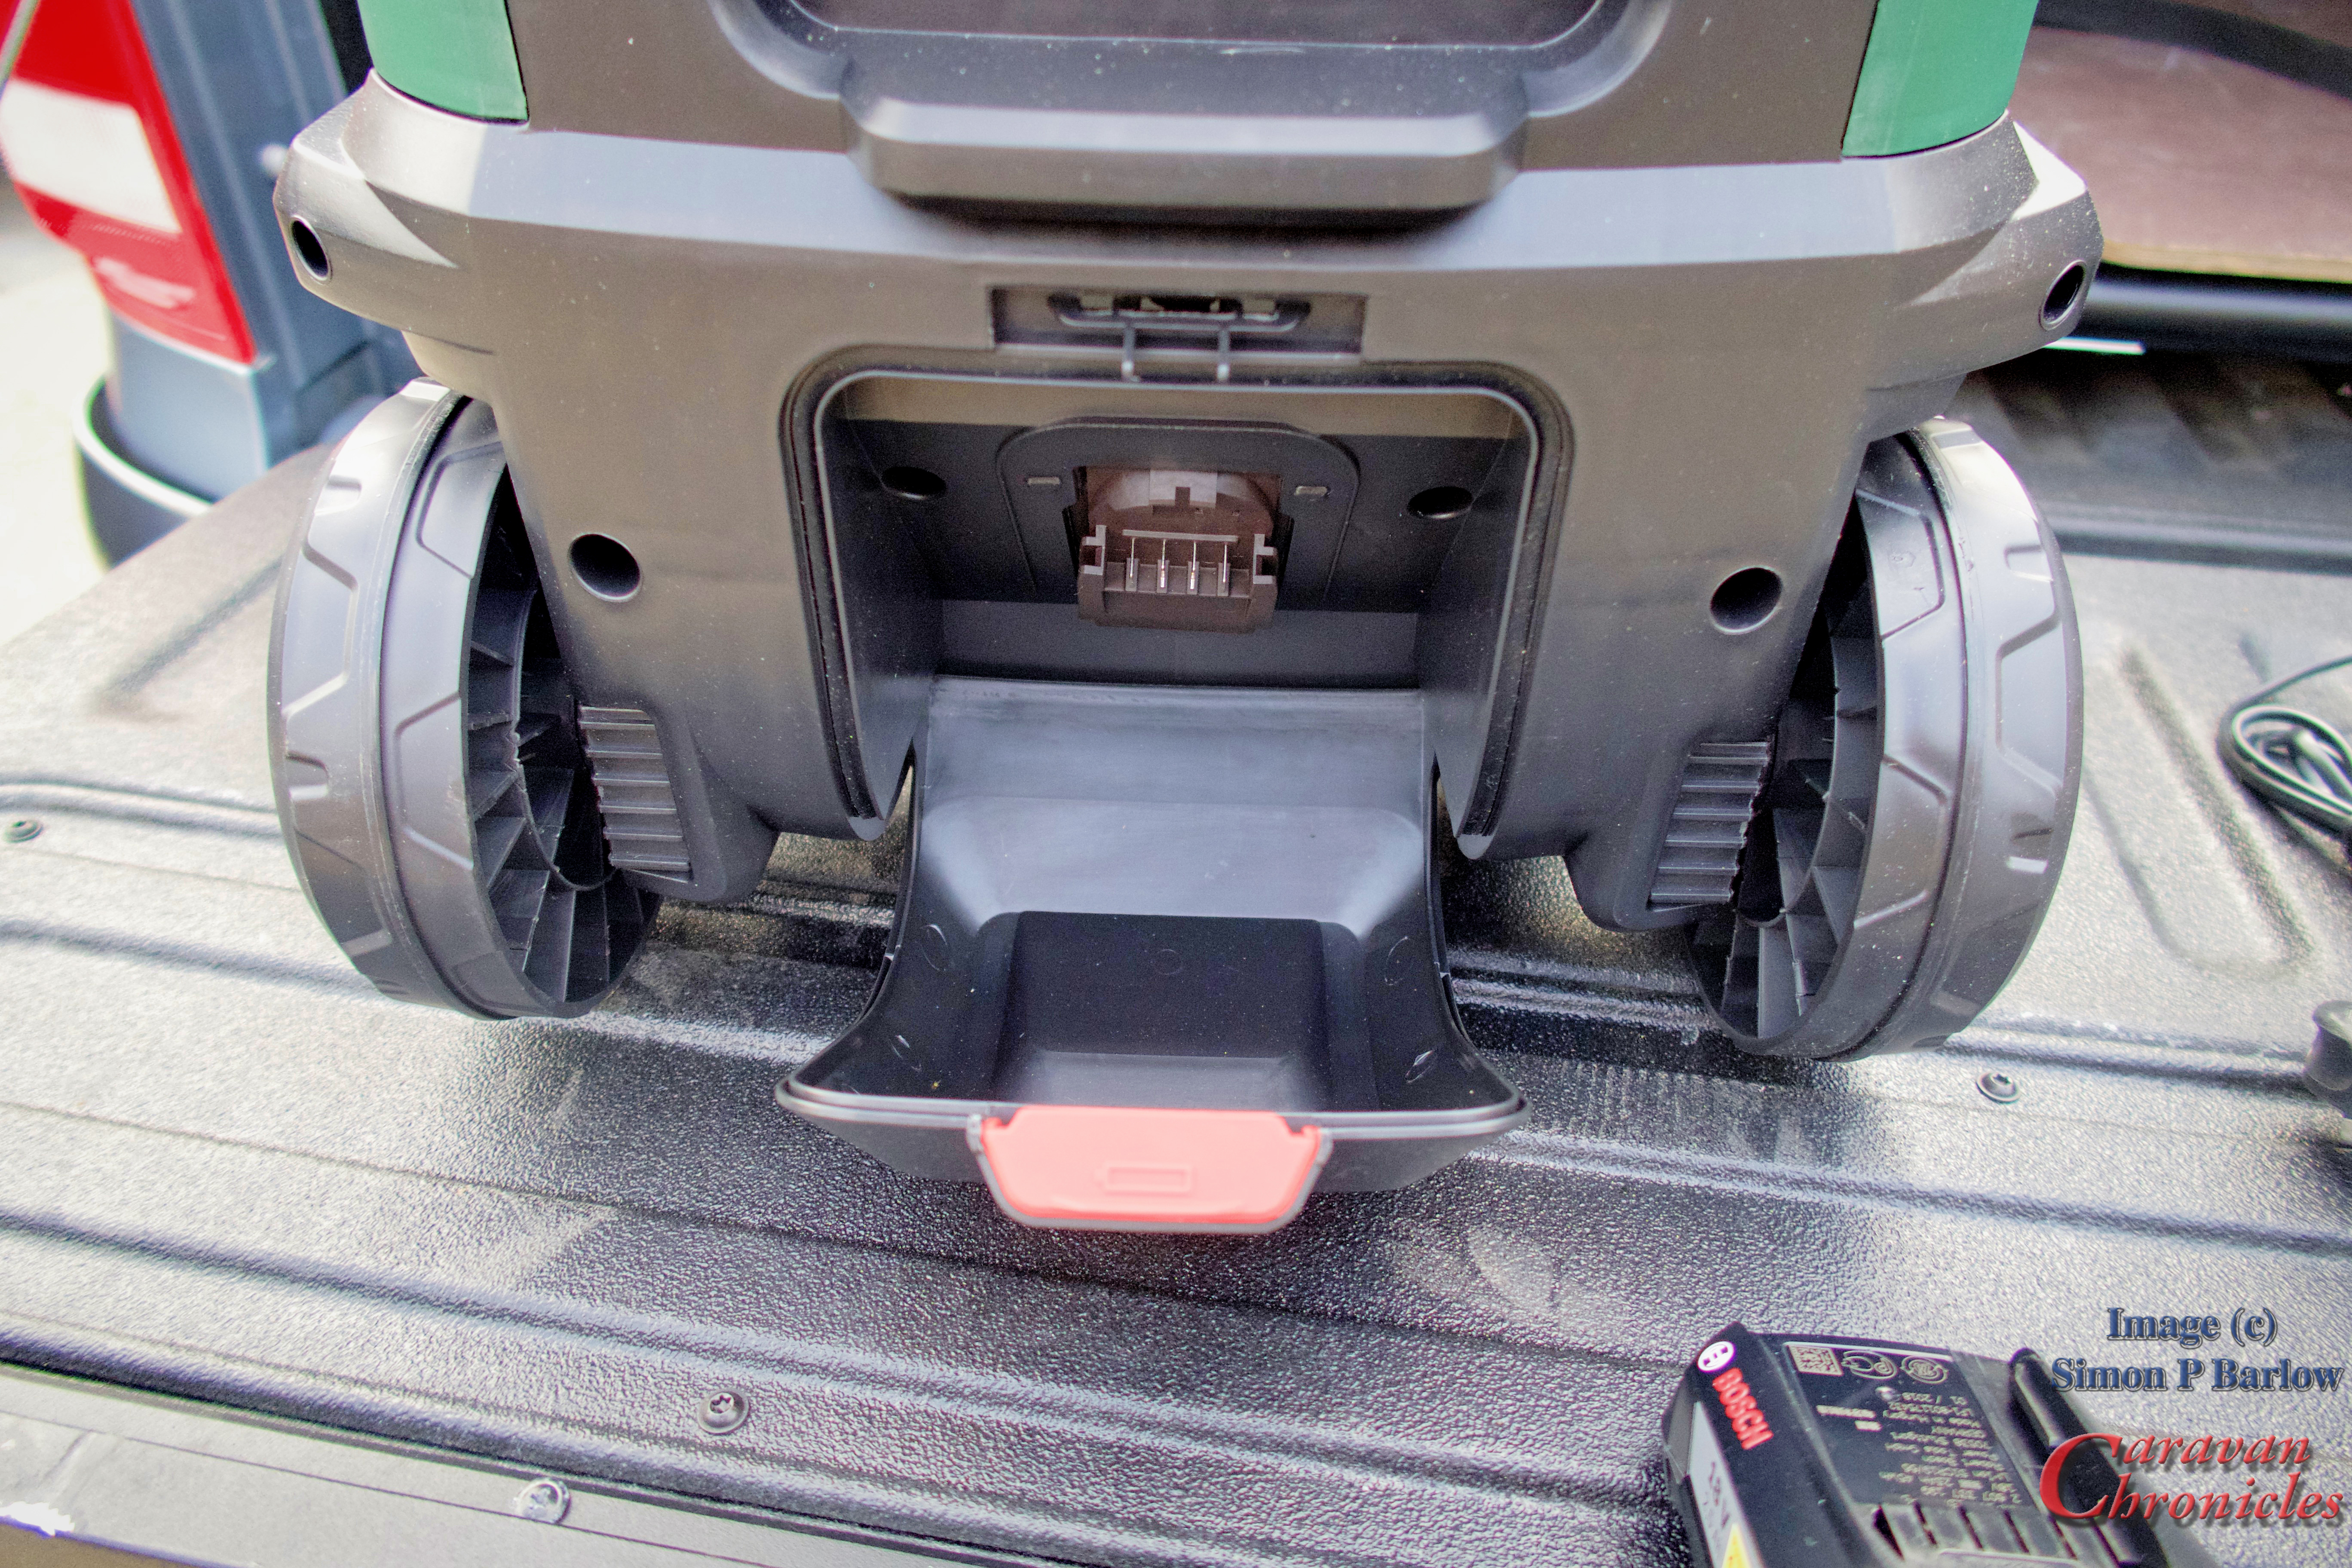
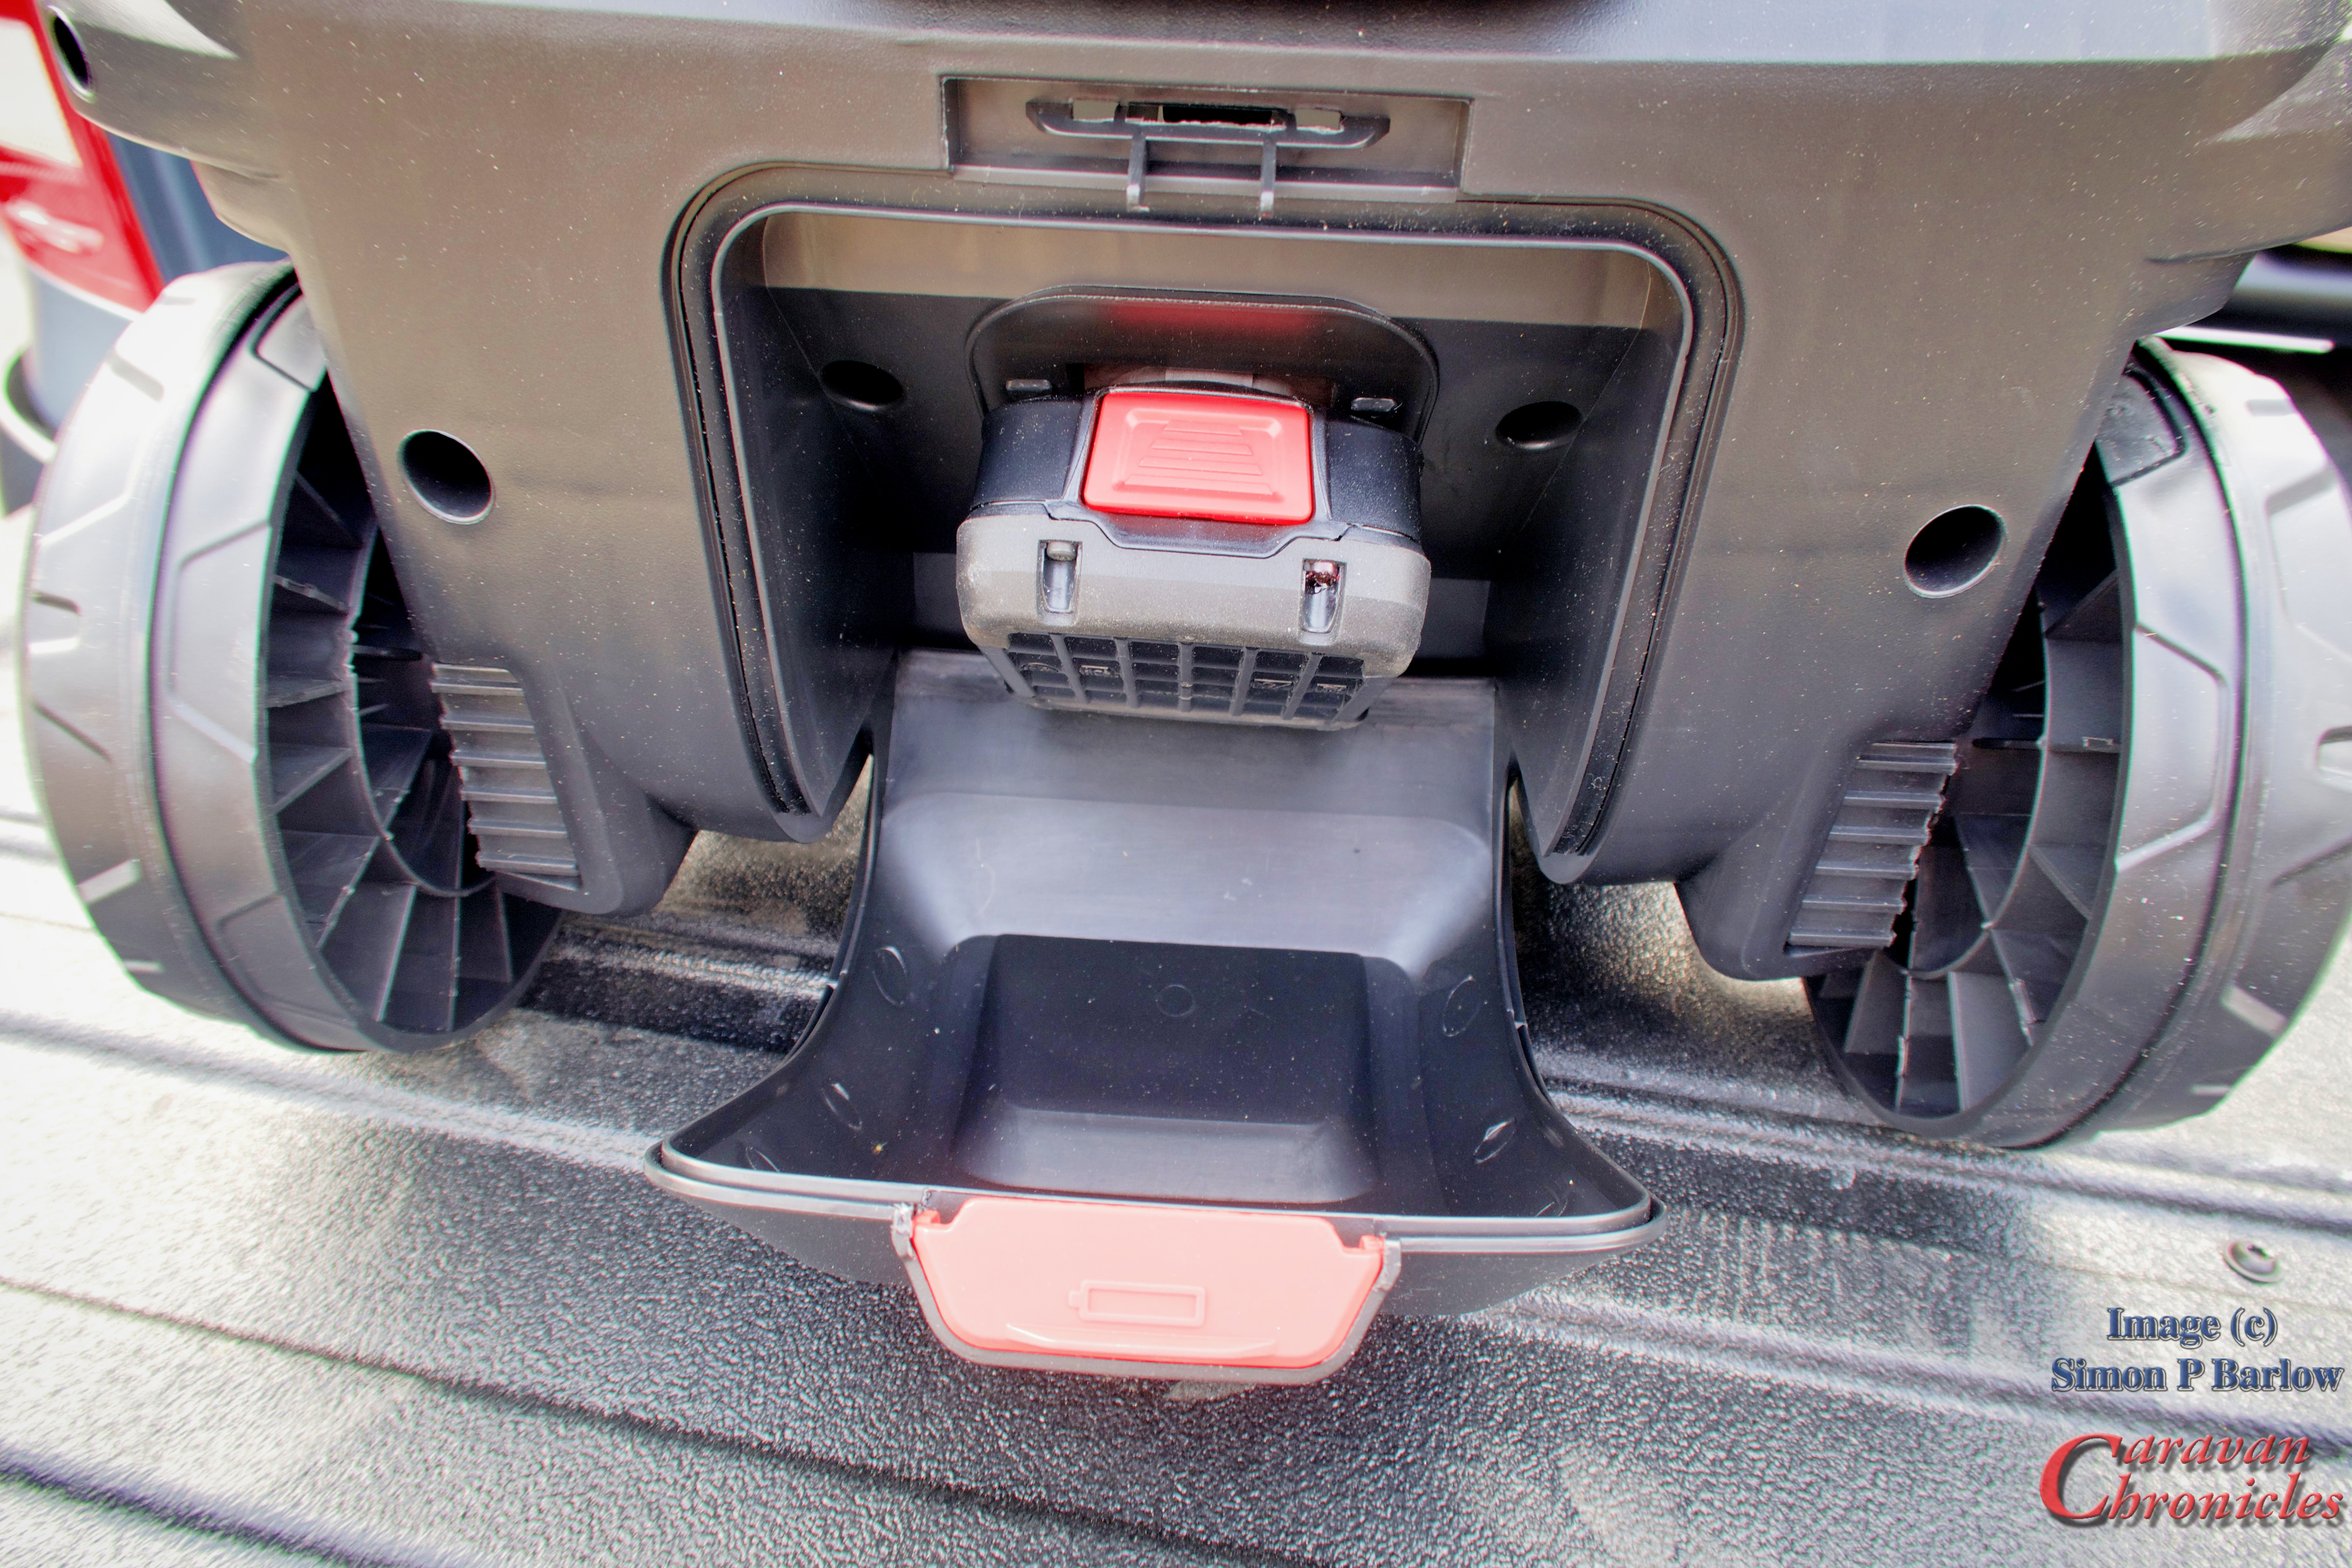
The battery duration is unknown at the moment. It comes complete with a 18 volt 2.5 Ah battery and charger, that are as far as I know the same Bosch fitting as used on many of their power tools. SO if you already have Bosch power tools it’s Billy Bonus time… another charger and battery for your tools and spare batteries for your Fontus. (Curse my early lifestyle choices for going with Makita and DeWalt.) I believe there are also 4.0Ah and 6.0Ah batteries available in the range.
Toy or Tool?
After first thinking what a great idea…. I had a look at the price… an eye watering mahhosive amount… list price. However as everyone knows “Google is you friend” a quick Google later and John Lewis & Partners have it down to £209* (*at the time of writing) Now that is not a small amount so the question is… expensive toy or tool? Well, After my initial “testing [read playing about again] I’d been jet washing in the front garden over Easter… around five hours worth of jet washing in fact and the front door and windows were to say the least showing the dried on signs of mud splattering. Now Sue is understanding, but waiting for the window cleaner to deal with it was not an excuse I was going to get away with! Not wanting to drag the hosepipe round to the front of the house again, I had a “Ha.. I have just the tool for that” moment and having already recharged the battery and topped off the water tank I wheeled the Bosch Fontus out of the garage and round to the front of the house. A quick light spray to wet each window and door, wipe down with a soapy sponge and rinse off with the Fontus. Done in ten minutes. It’s also completed several other little tasks around the home now too.
Would I take it with me on a caravan trip?…. If we were taking the bikes, yes. I have used a dog wash station in the past (I know I wasn’t supposed to) and as long as I don’t use a chemical on the bikes, just rely on pure water and the included brush I should be OK washing the bikes on the grass. I wouldn’t use the brush on a vehicle’s bodywork (but I’m a bit OCD about things like that) nor would I wash the vehicle or caravan for that matter, on a pitch.
A few Q and A’s…
Can it be carried full of water? – Yep, I also tried it on its back, the filler cap seems to have an air admittance valve that stops water from leaking out. I wouldn’t do it for long periods though on it’s back… just the ten minute trip to the caravan storage yard. Upright shouldn’t be a problem I would have thought.
Can you spray anything else? – Nope… fresh water only.
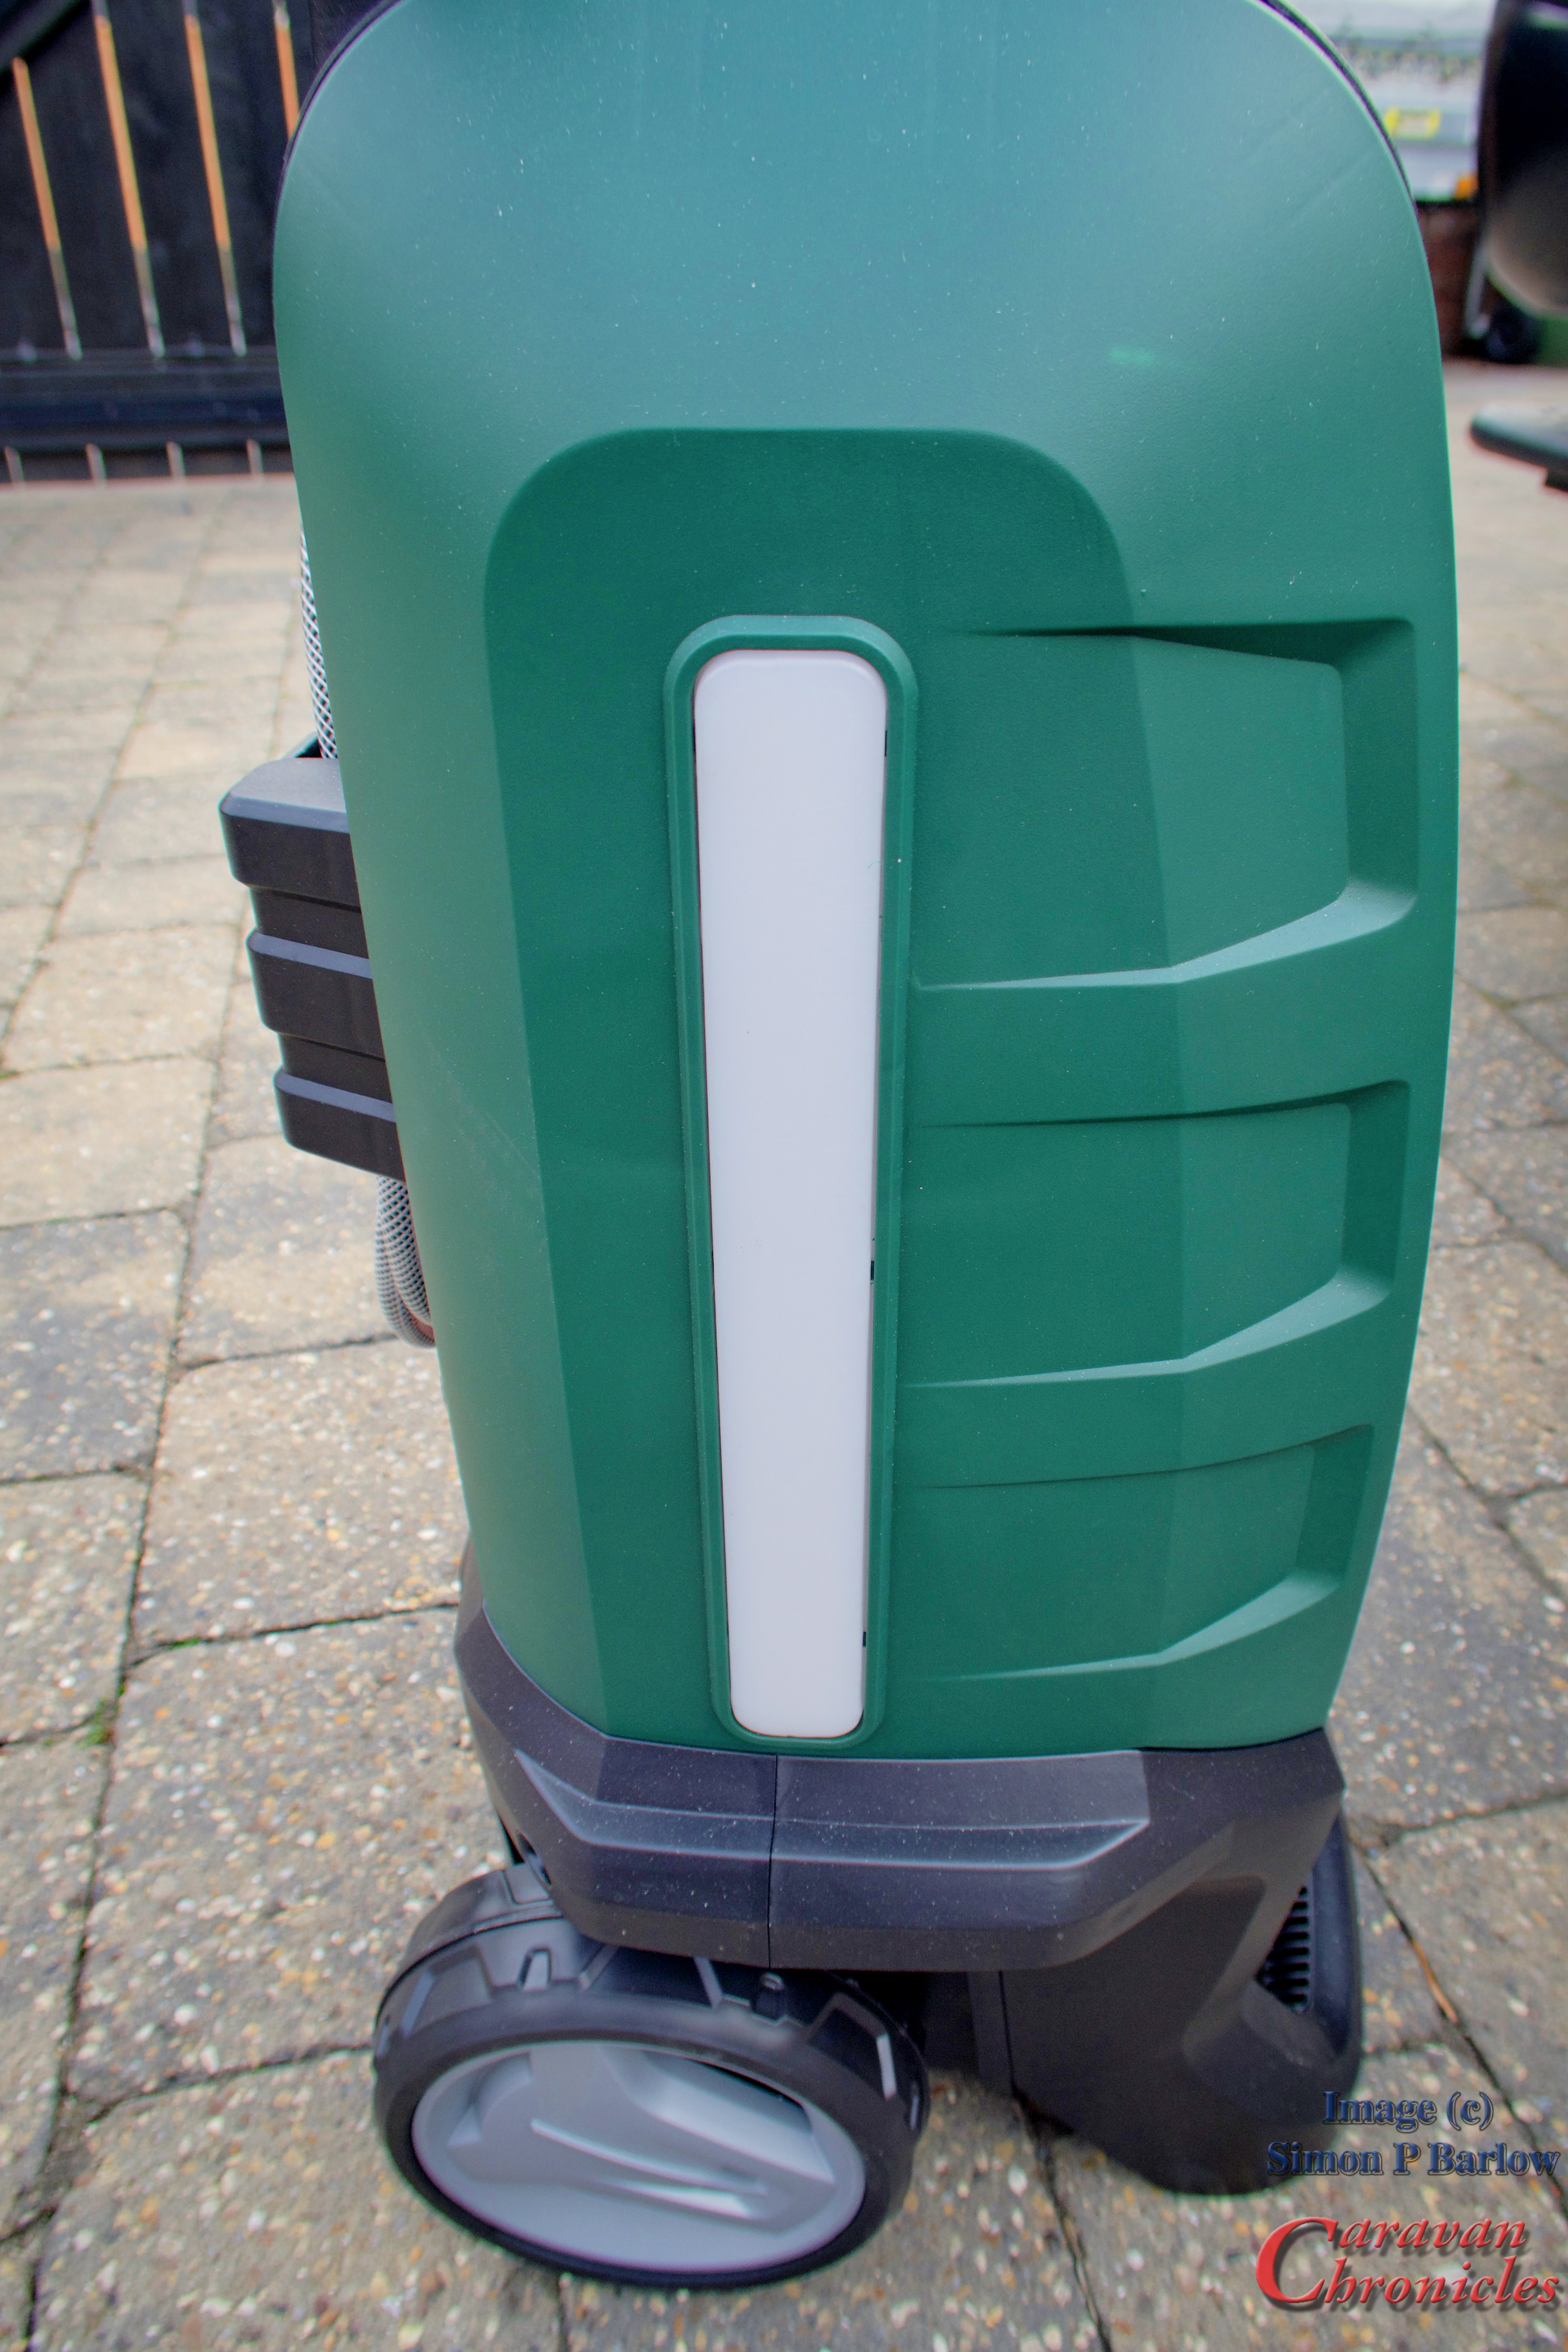
Can you see how much water is in the tank?– Yes the tank has a site gauge in each side.
Can you store it full of water? – I did for few days, however it cautions you not to do so in the instructions.
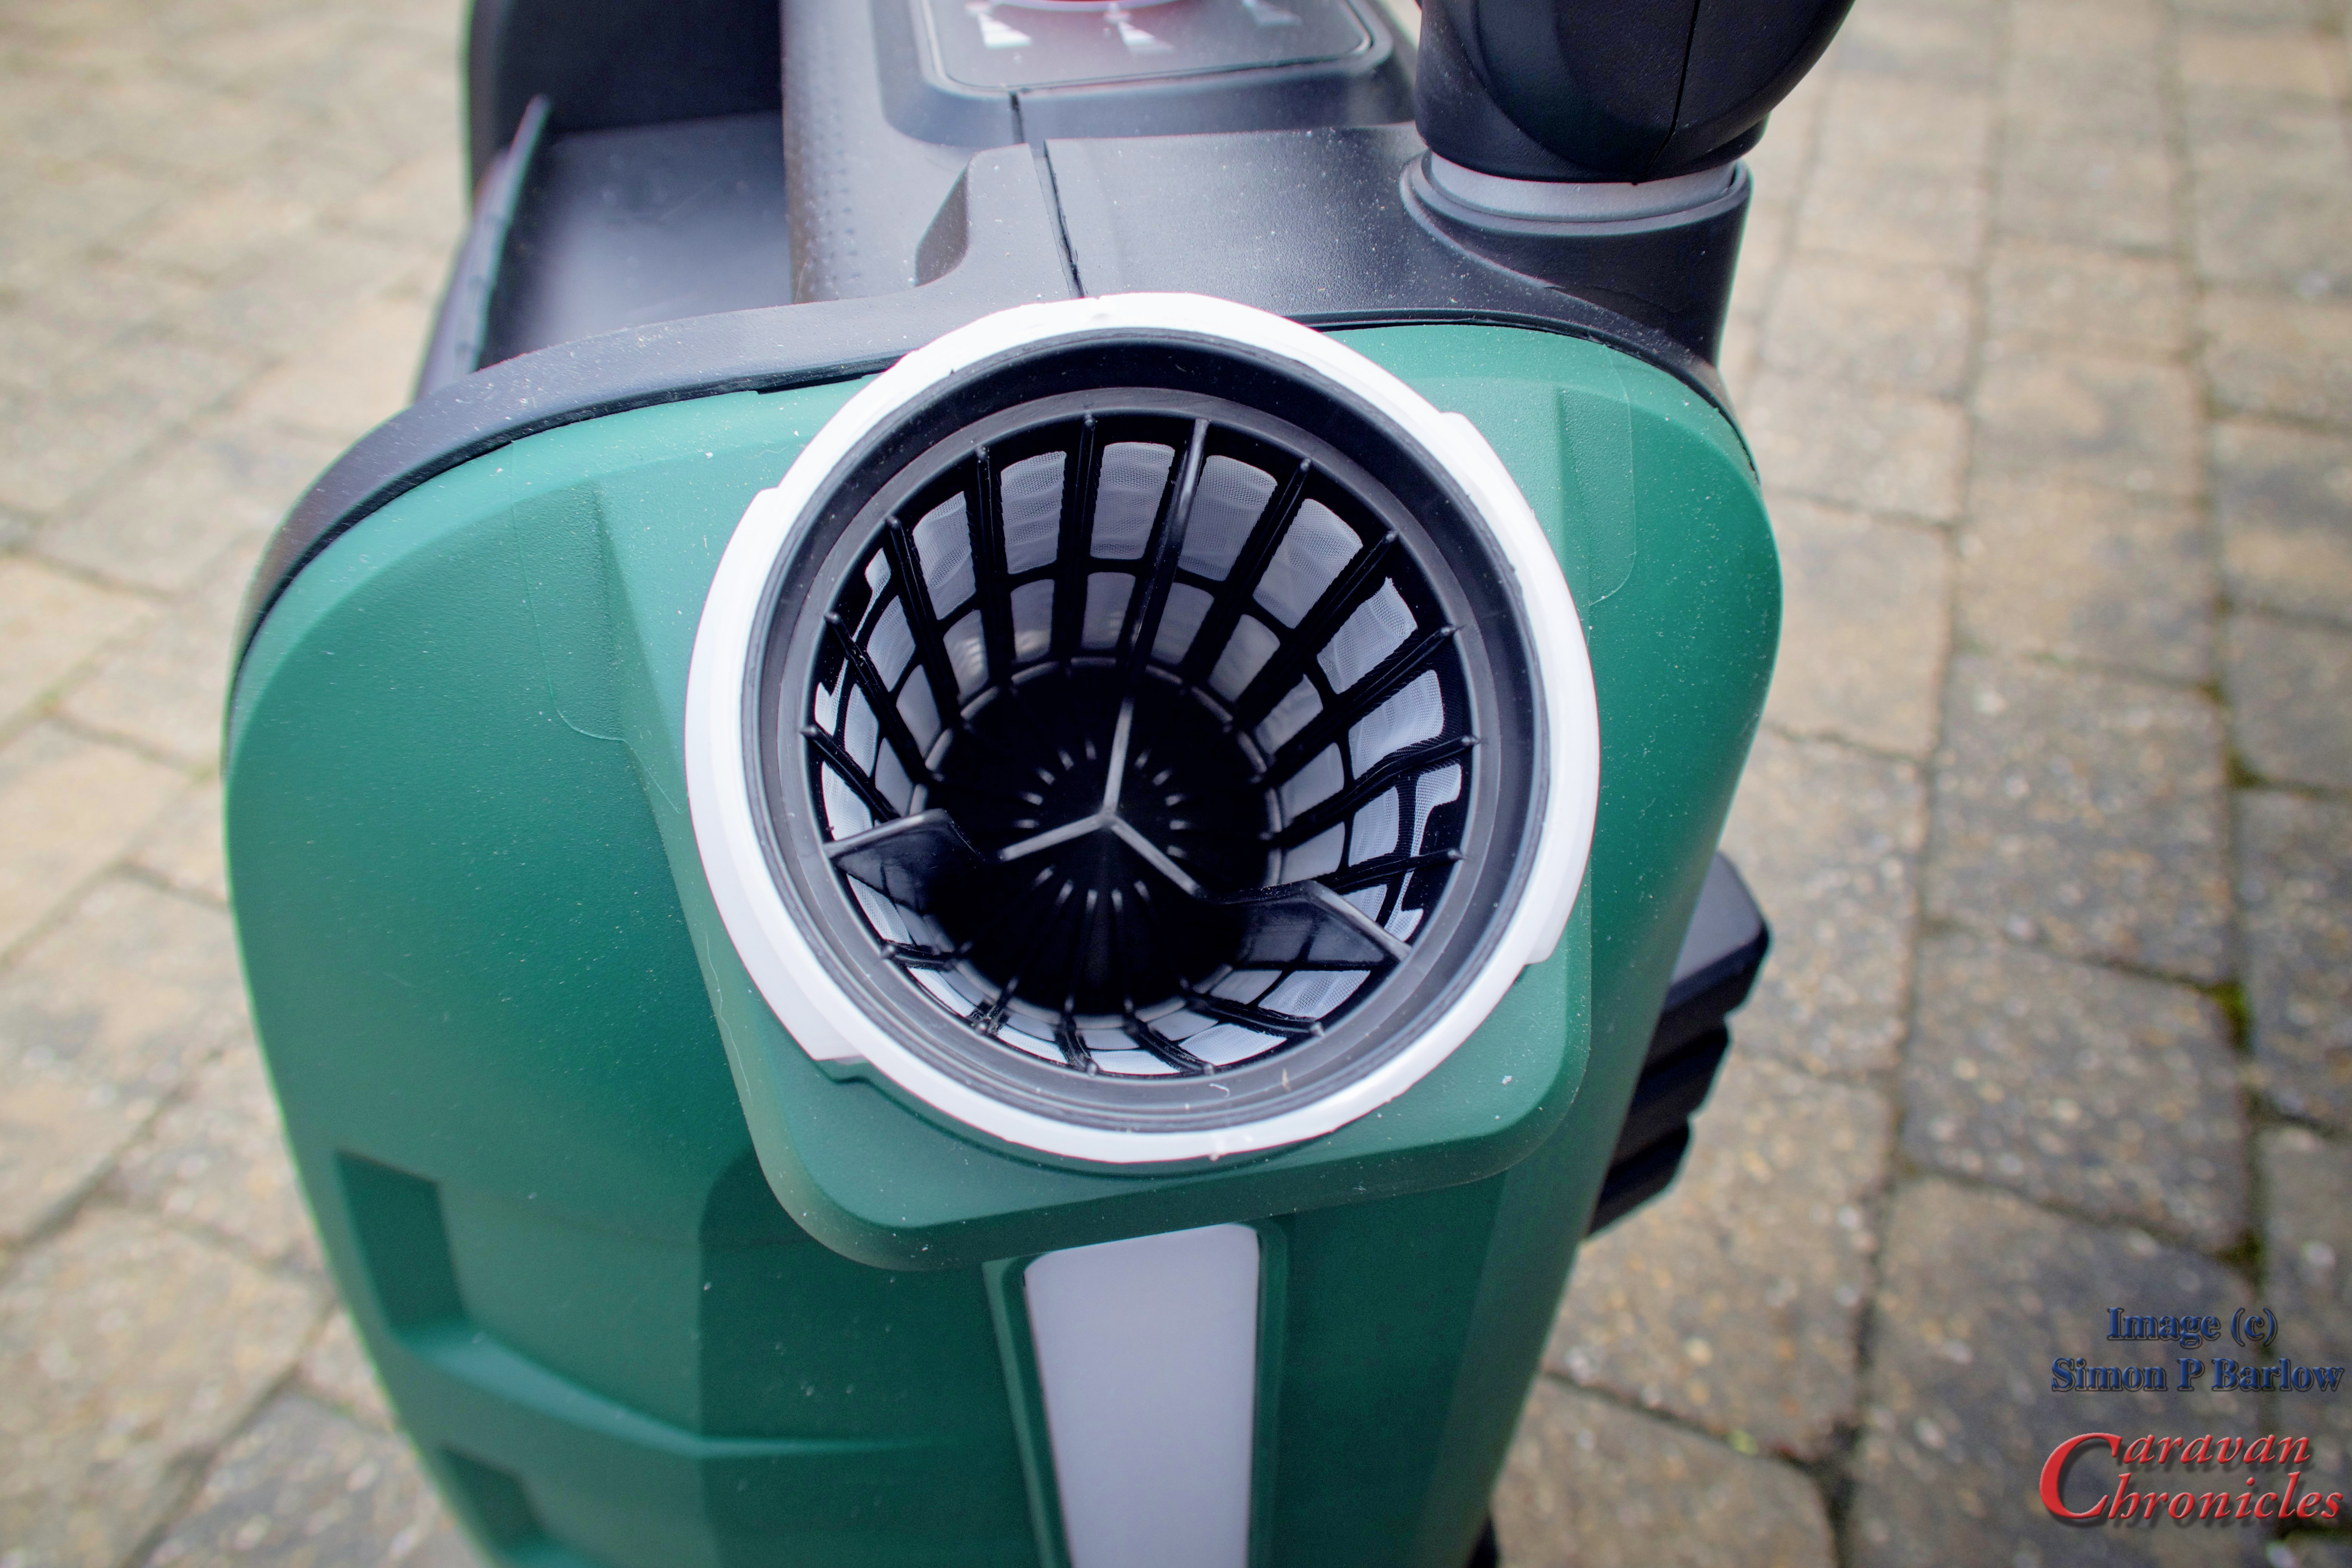
How big is the filler cap?– It’s about the same size as an Aquarol filler cap and has a removable mesh filter trap… I could get a Hoselock fitting on the end of my hosepipe to fit through the opening and wedge in the filter when filling it. It’s also easy to poor water in from a container.
How heavy is it full? – 9.8 Kgs empty and 24.8 Kg’s full… so about two bags of sugar heavier than your airline baggage allowance.
How long does the battery last? – well I certainly got through 30 litres of water (2 tanks) on the low power setting (which was all I needed for rinsing off) and looking at the battery indicator maybe I could have made inroads to a third tank. I don’t know if the battery indicator is liner or not.
How long does it take the battery to recharge? – From battery empty indicator to full with the supplied AL1830 CV charger 60 minutes… or about 1 cup of tea, two digestives and a quick catchup with your neighbour.
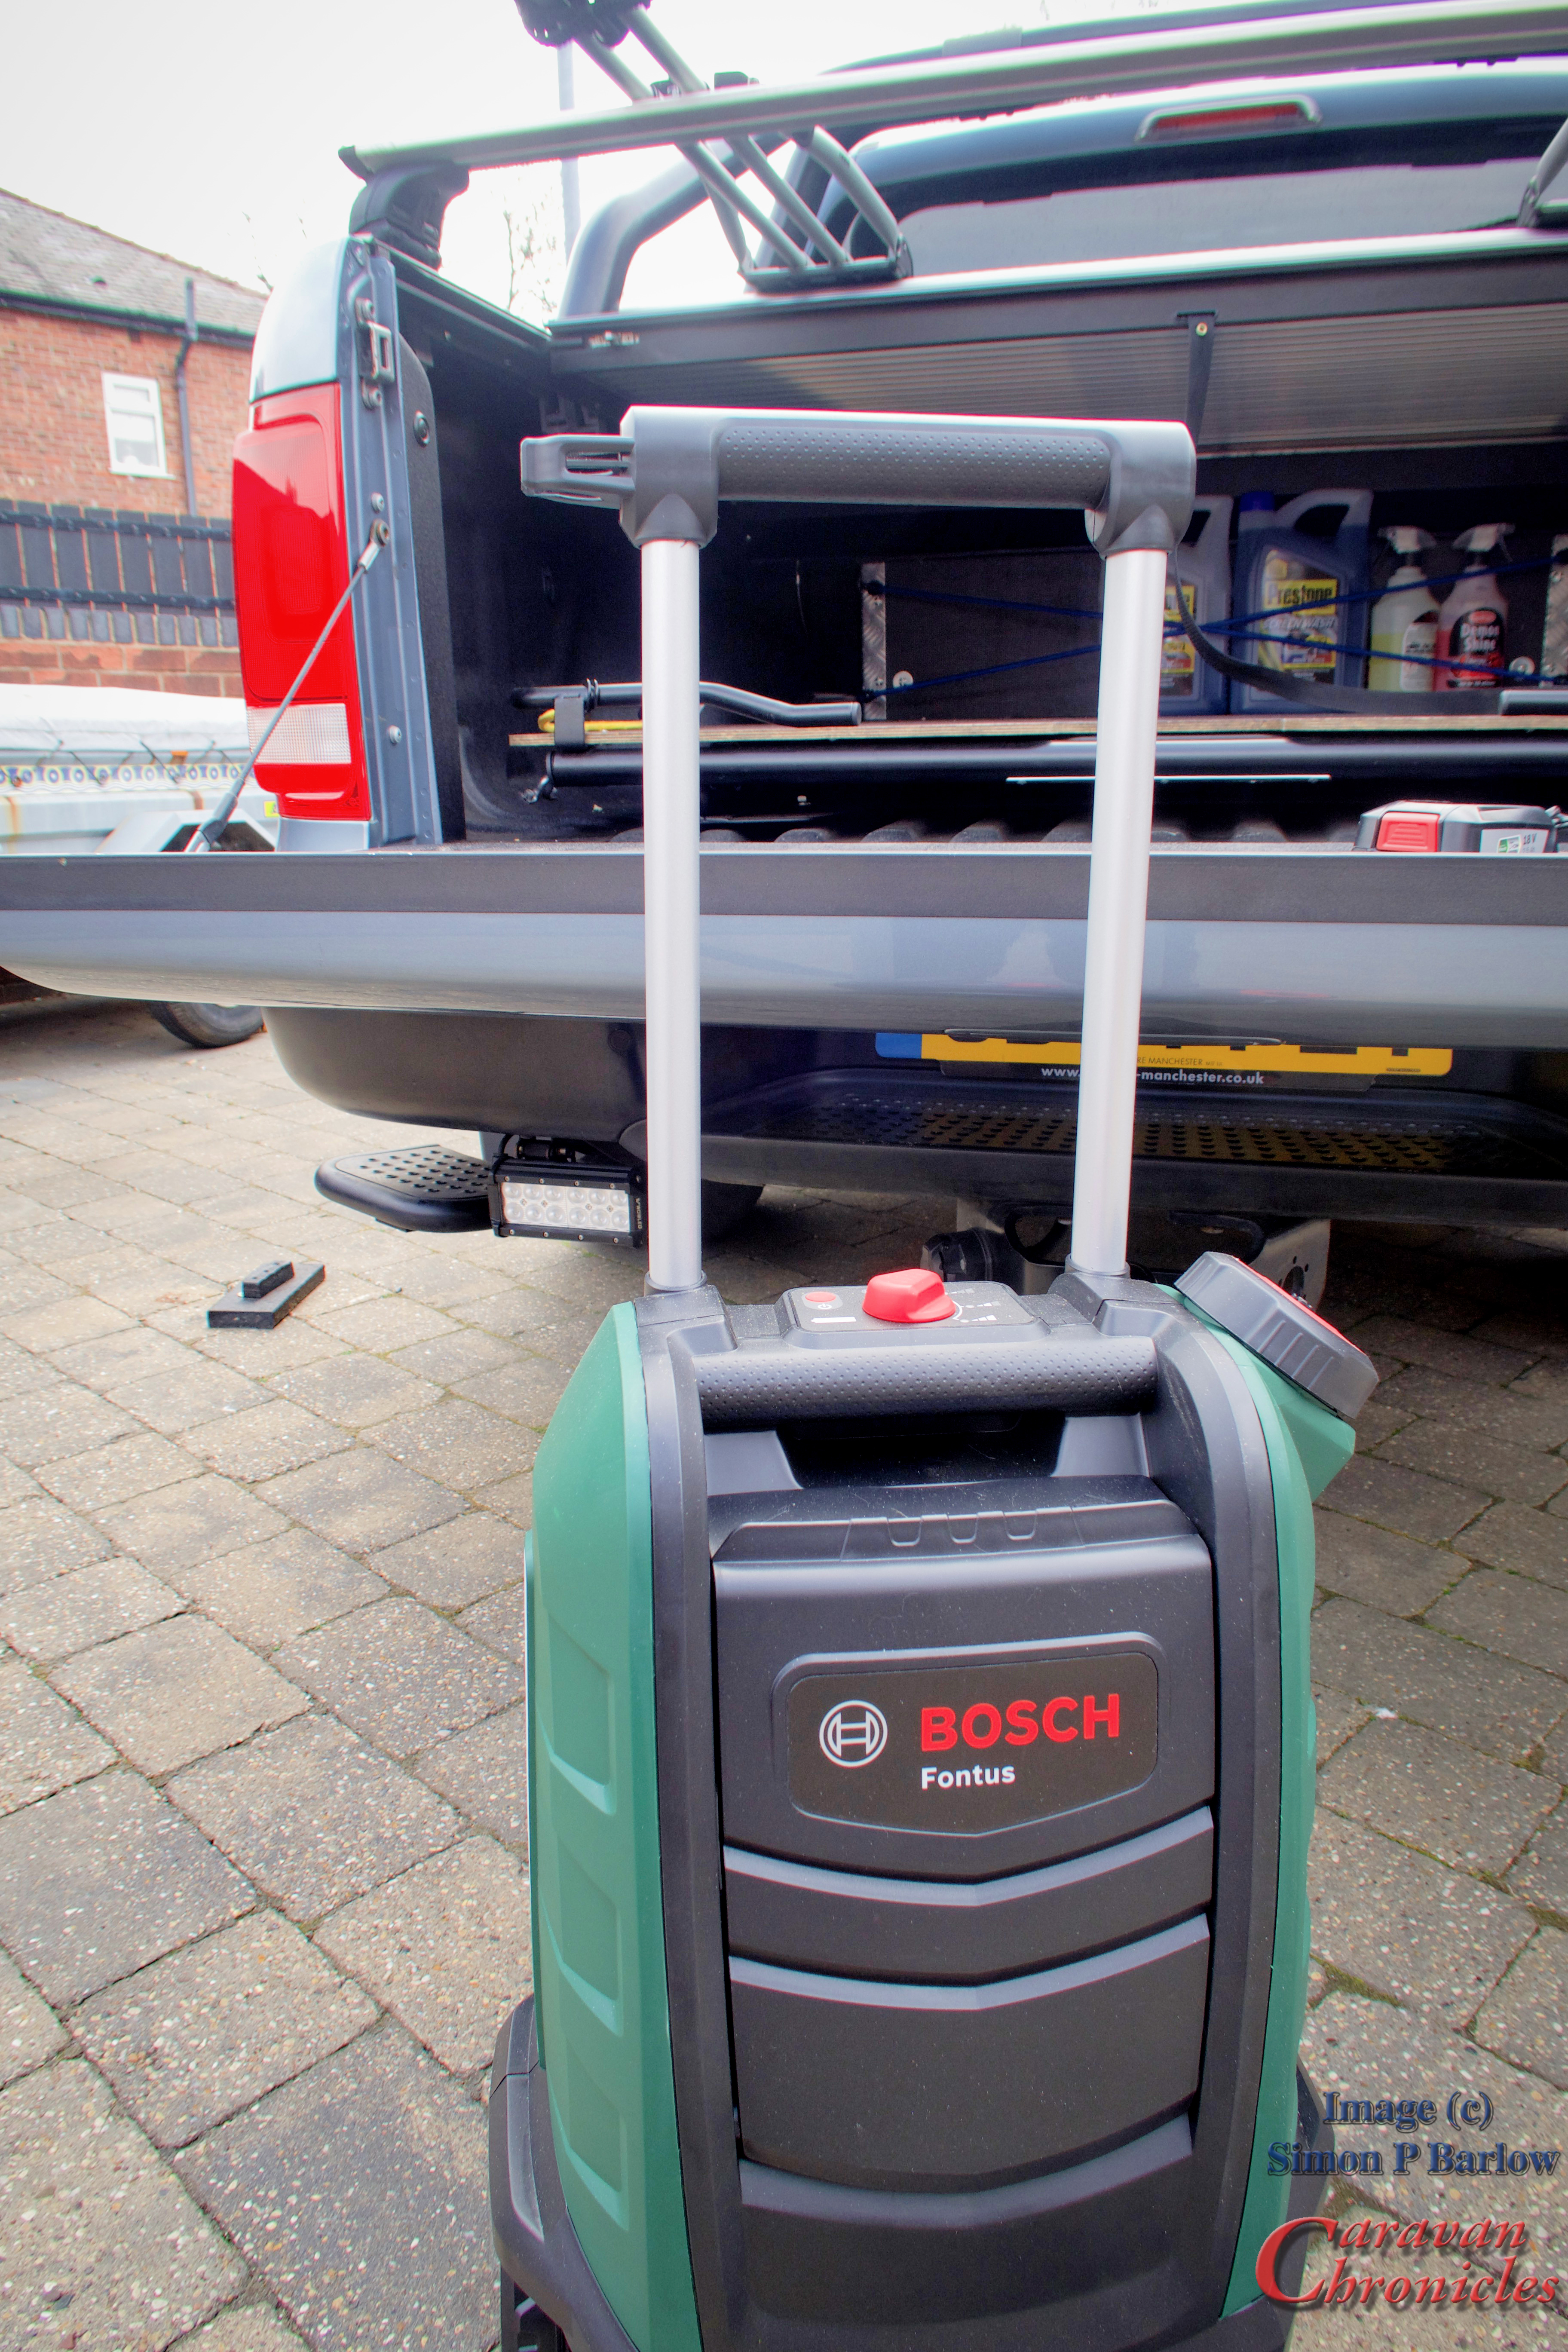
Is it easy to move? – When full it trundles around just like one of the wheeled over head locker type pieces of luggage. If you can drive one of those… you can handle this.
Will 15 litres be enough to rinse a caravan? – Yes I could do it with 15 litres. But it’s easy just to have a container with a bit more water.
What fittings connect the hose, can I use a garden hose? – The fittings are a twist lock type.. not seen them before but I did like the fit and function of them. They seem quite suitable for the task. Why would you want to use a garden hose… just wheel it to where you need it.
What else can it be used for? – Washing off salt water from wet suits, boat trailer, outboard engines, muddy dogs, muddy bikes, wellies, washing windows, washing the beach off anything…. making sure your BBQ is properly extinguished (as I write this I keep getting the smell of burning moorland wafting in through the open windows into the office).
Anything Else?
Only two things… do they make a 12 volt ‘in car’ charger for that battery? That would be really cool and…. nope I got nothing else. That will be one thing then.
Final thoughts…
If I already had a couple of Bosh power tools that used the same battery pattern and was thinking about an additional battery and charger… then the price makes it a good deal. An extra tool that gives you an extra battery and charger into your Bosch ensemble of kit.
The hose is not as pliable as I’d have personally liked, but then again looking at it it’s not going to get damaged easily.
It is a bit of a ‘luxury’ bit of kit… but then again once you start using it… I’ll stop there, Sue might be reading this.
Do I want one? Well I don’t really want to give this one back.
I seem to have had an increase over the last few weeks of emails from people involved in building, modifying or upgrading Overland Expedition type vehicles. I think some of my posts must have been quoted or referenced in related forums. A lot of questions are related to roughly the same group of topics so I thought I’d produce three drawings to help answer the bulk of the questions. If you read down the comments on some posts I have answered a lot of specifics that might help. I’ve merged a lot of the questions into a paraphrased ones…
Question 1
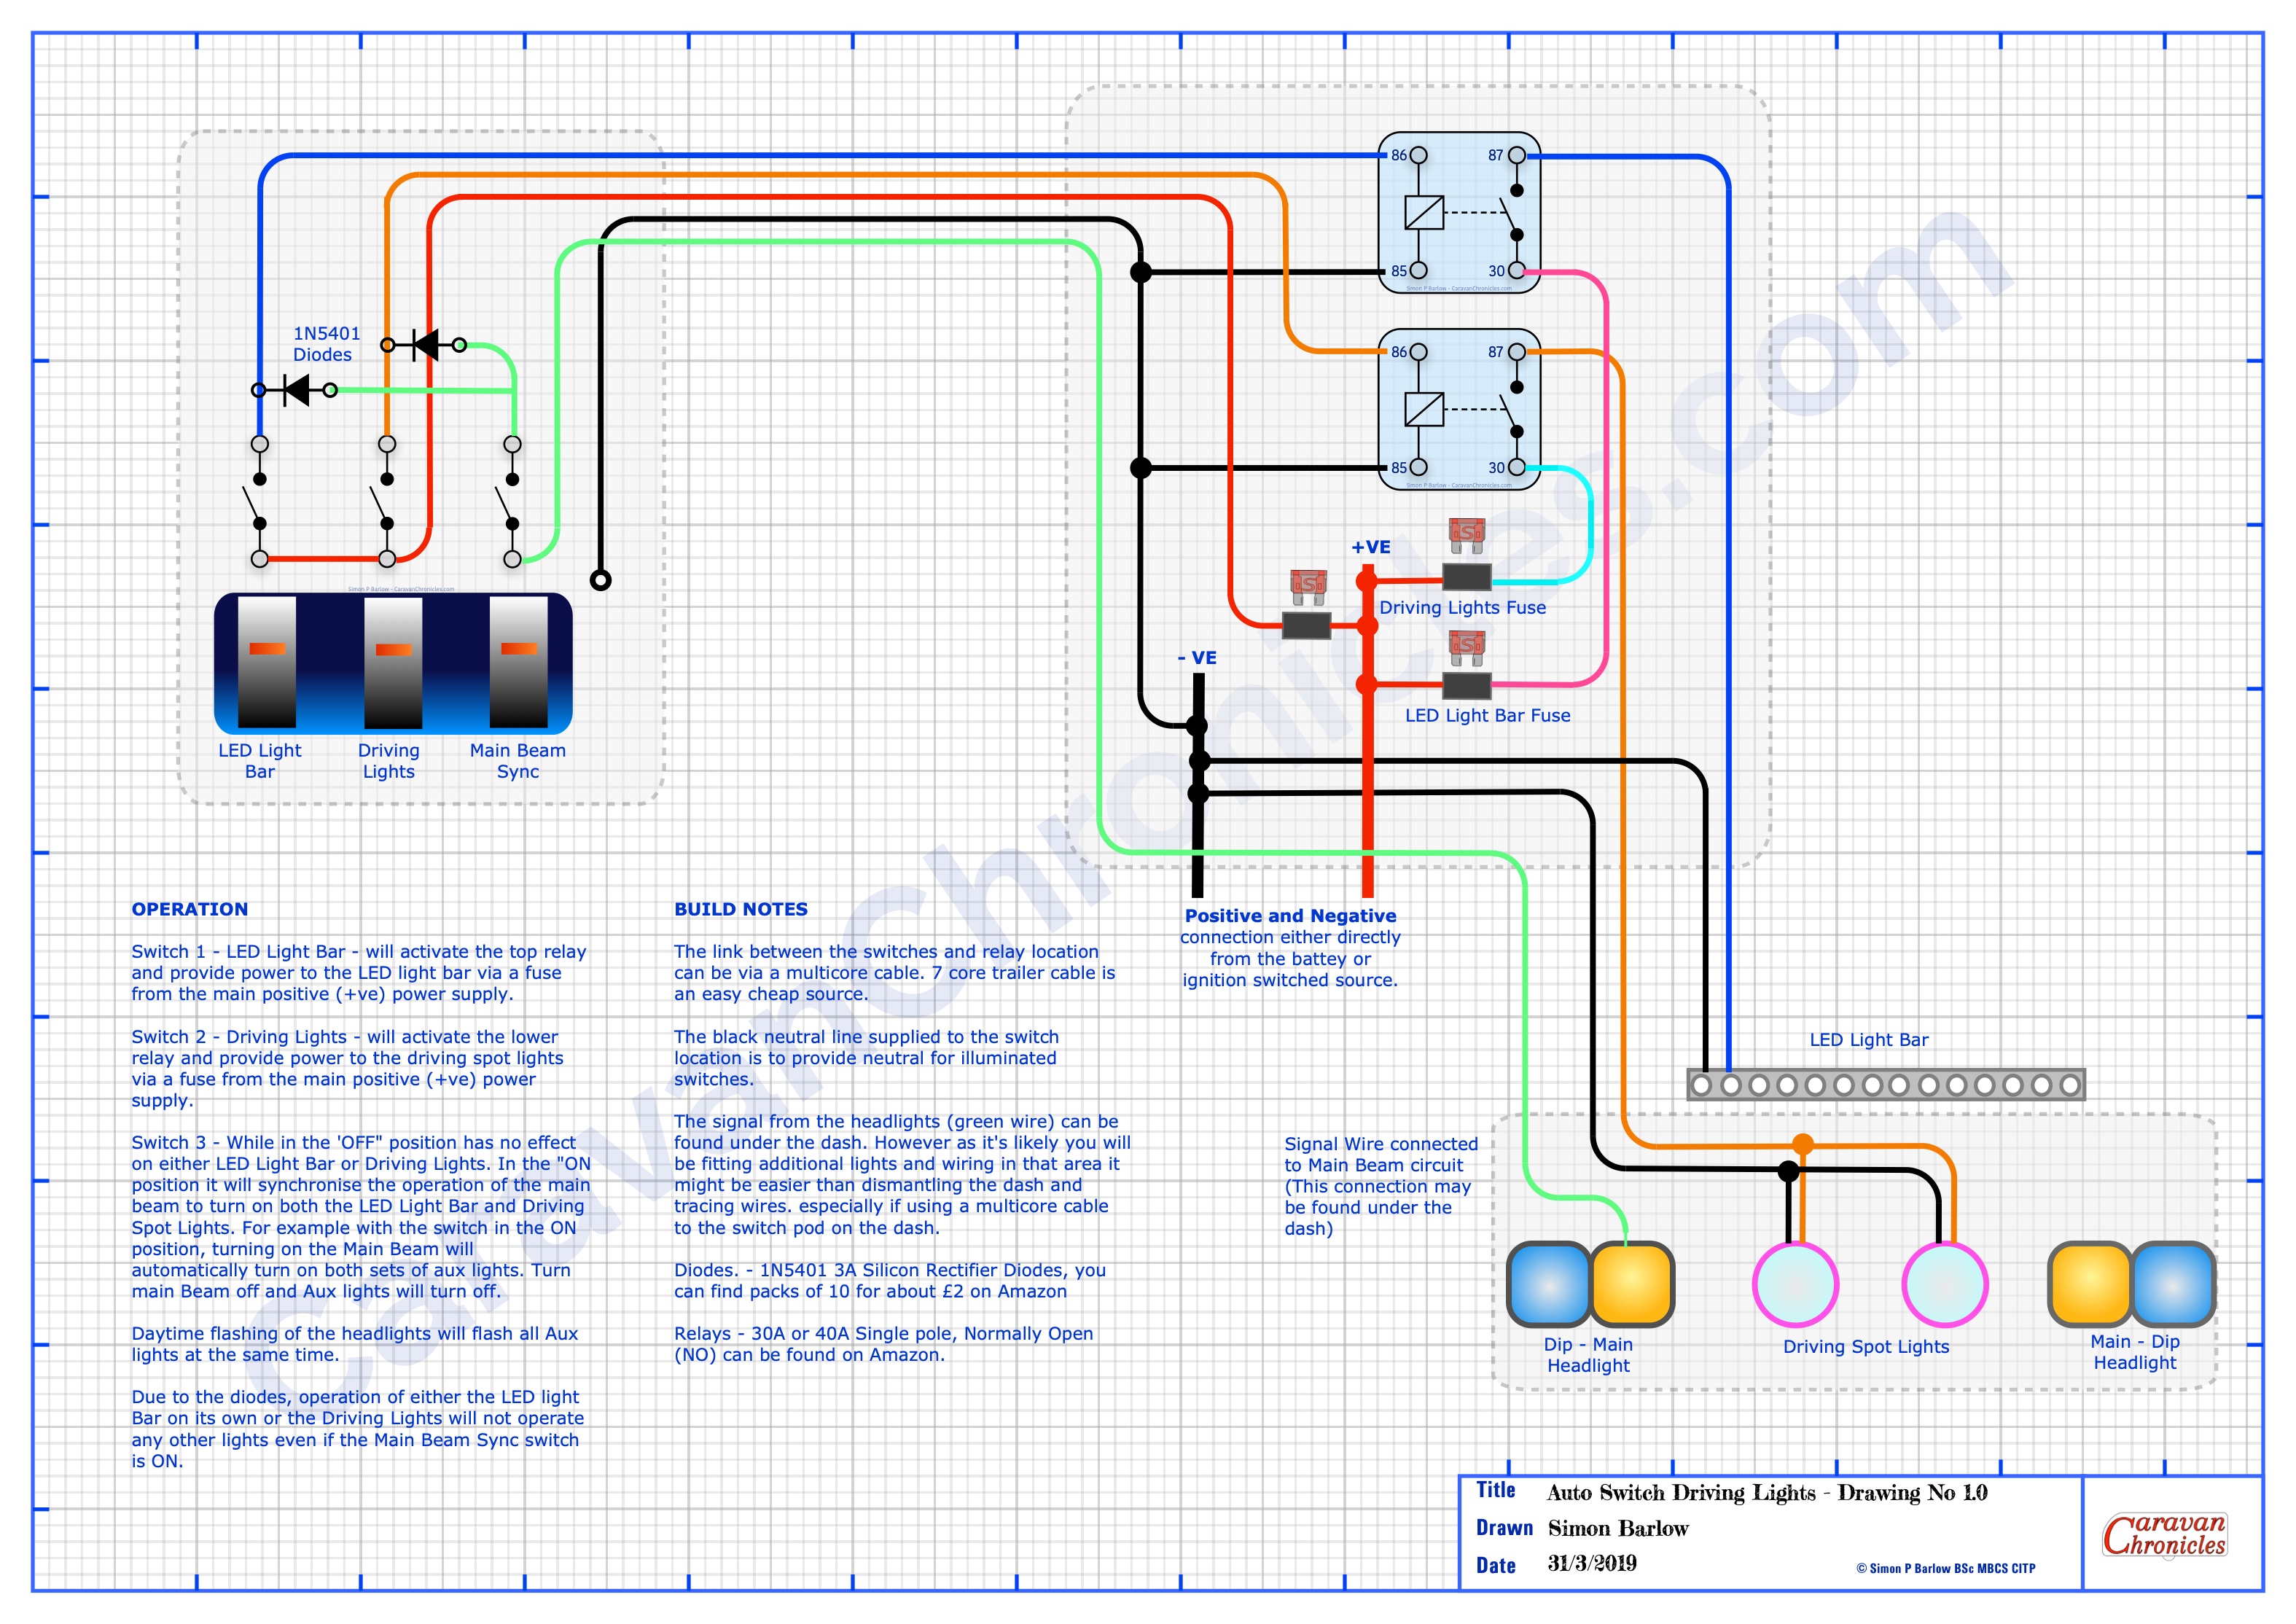
“How can I get my LED light bar and spotlights to come on when I use my main beam switch but I want to disable them when on the highway?”
The questions were from a number of 4 x 4 Off Road enthusiasts and Overland vehicle people. Simplest way I could come up with was using a couple of diodes (details on the drawing) Three switches… one for LED Light Bar, One for Driving Lights and one that allows you to sync the LED Light Bar and Driving Lights to the operation of the main beam in the vehicle. Flash the main beam and with the Sink Switch ON… all the lights will flash. Note… this may be illegal in some countries, so having the option to turn off the facility when on the roads ‘should’ keep you within the law…. don’t quote me on it!!!
Question 2
“Whats the best layout for connecting a solar controller / inverter / isolation switch to my battery bank?”
The best schematic I could come up with that is flexible for most situations. I’ve put a few notes on the drawing. The various components I’ve drawn generically…. all can be found at your preferred supplier.
Question 3
“What’s the basic layout of the vehicle fridge and leisure battery charing circuit?
This I think has come from a few on-line discussions relating to poor performance of the fridge and leisure battery charing in older 4 x 4 vehicles. I was receiving for a while a number of questions related to upgrading older installations. I also receive a number of emails asking how to add the facility of fridge and leisure battery charging to older vehicles and upgrade the 7 pin tow socket or old military lights socket.
You can download the PDF’s and are free to use for personal use. If you post them on other forums I’d appreciate a link back to this page and/or an acknowledgement.
I’d appreciate any feed back in the comments below.
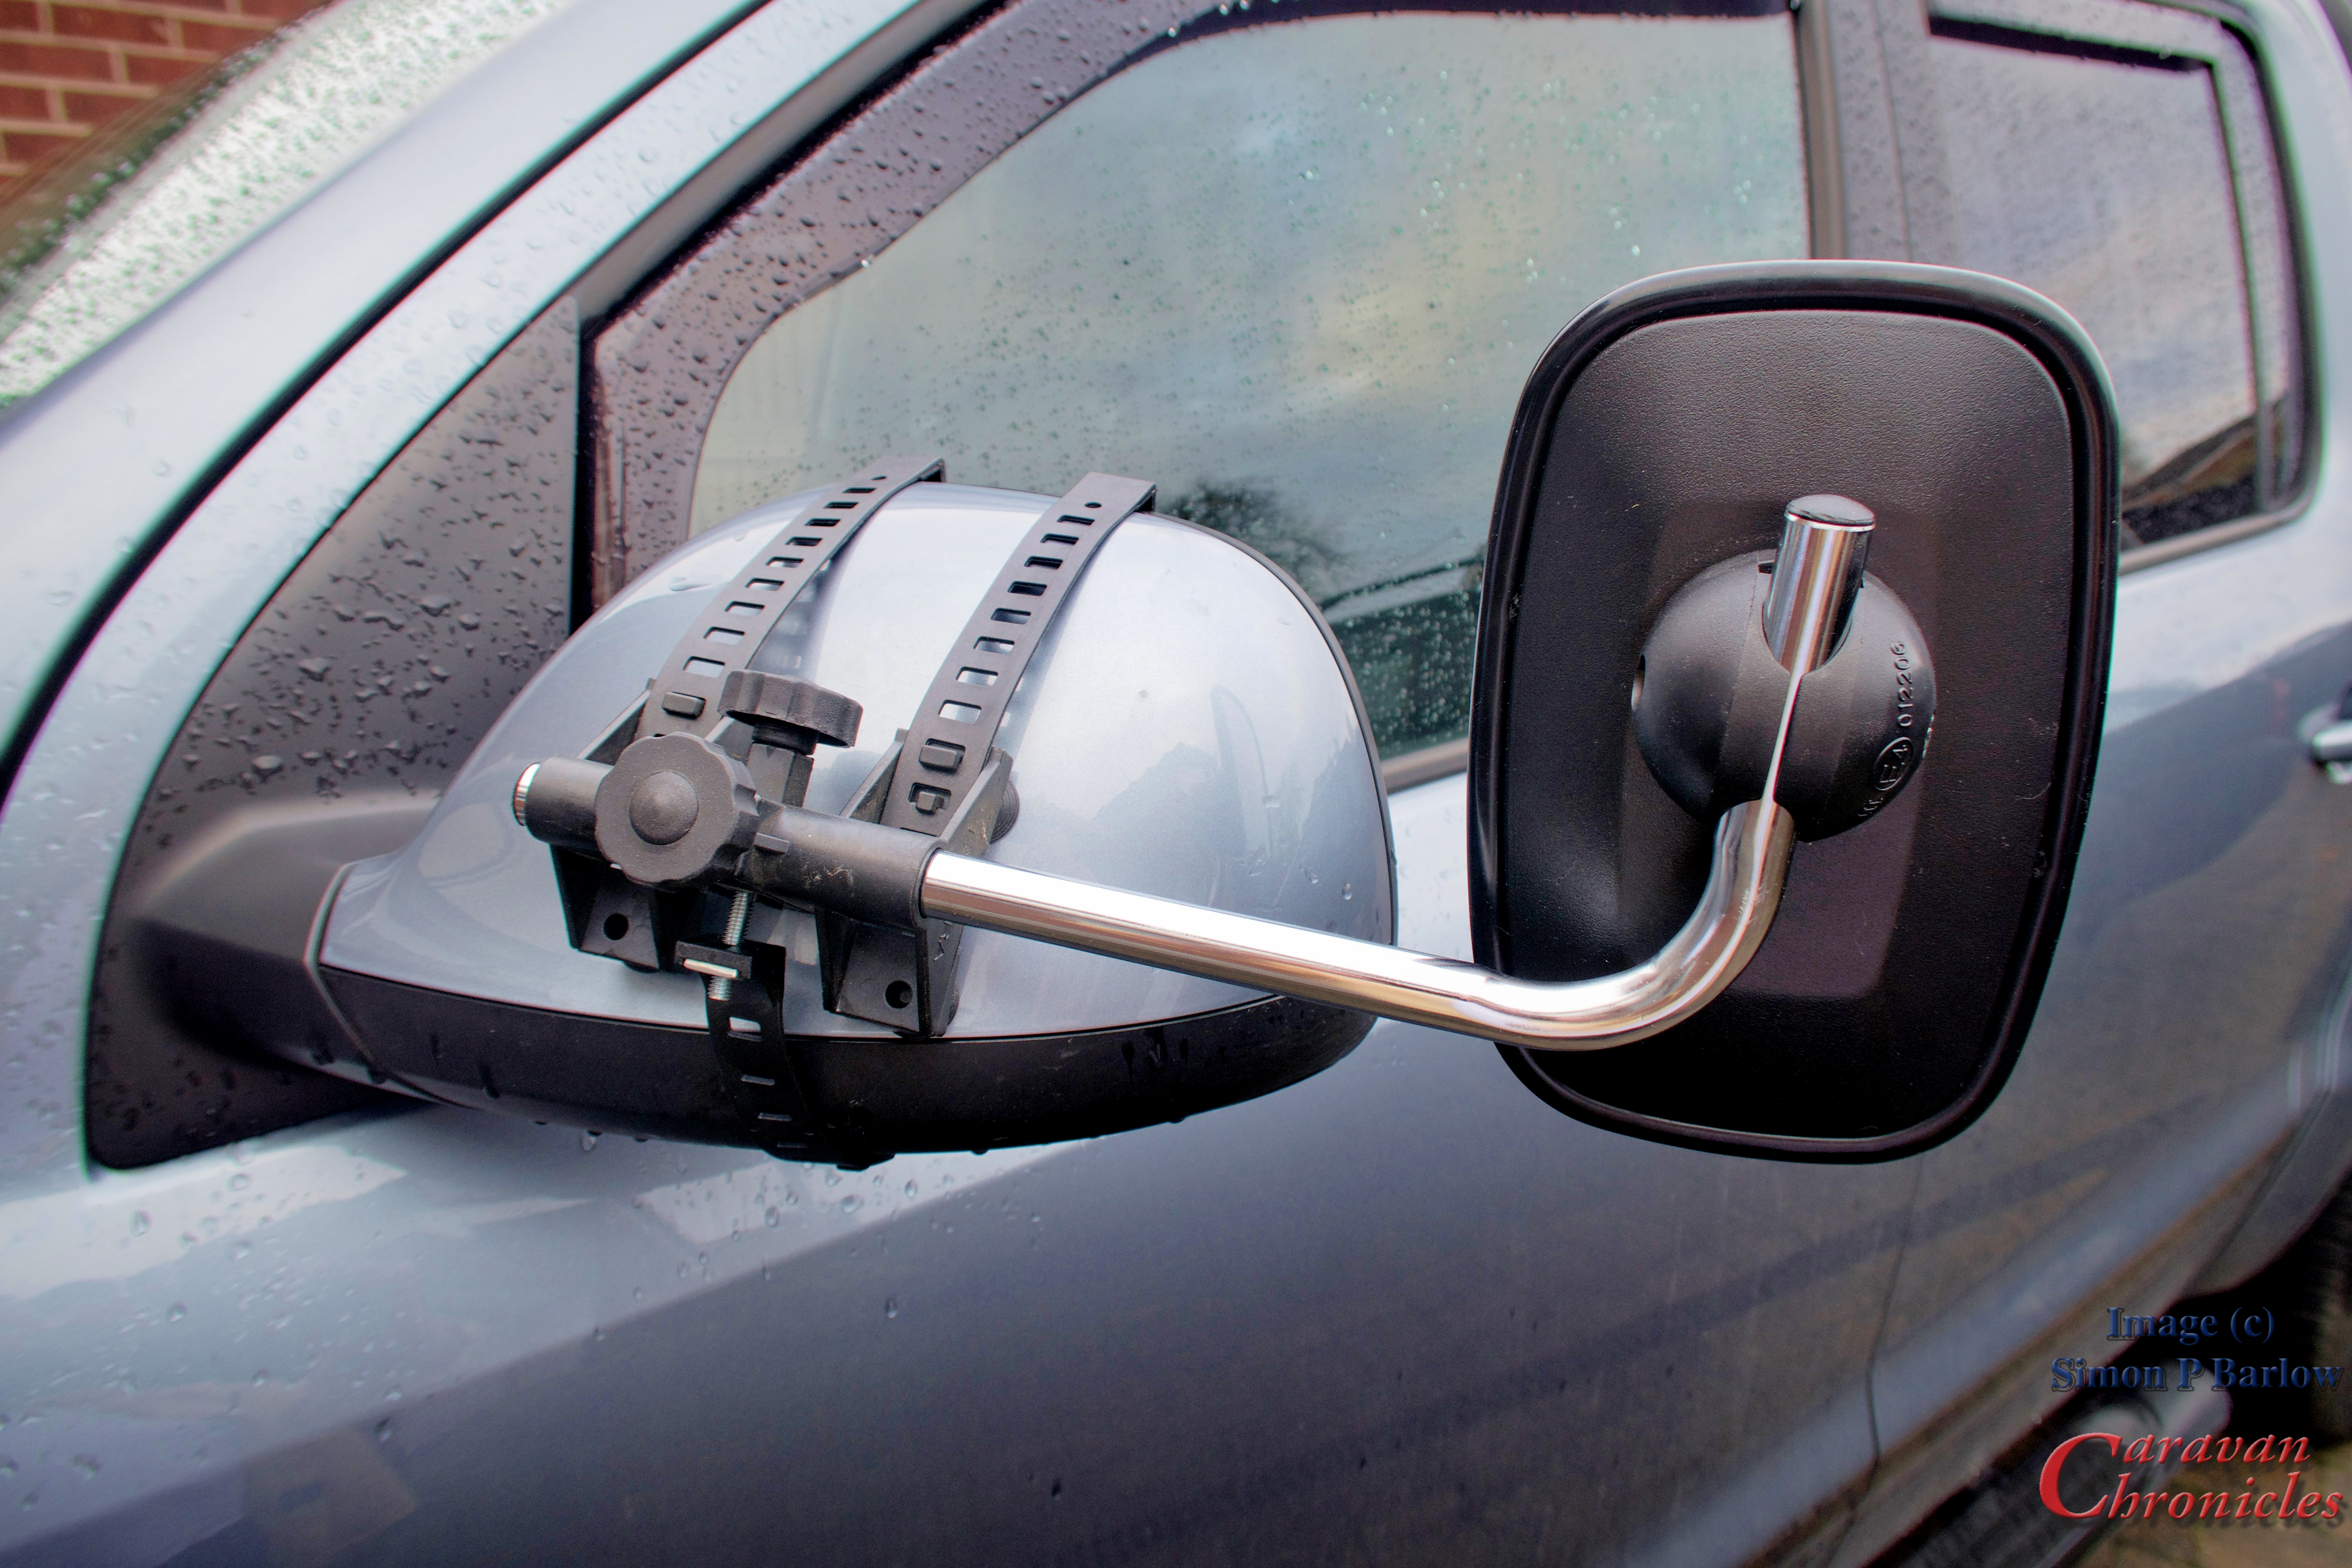
A couple of eagle-eyed mirror aficionados have spotted that we use Milenco Grand Aero 3 towing mirrors… but they also spotted that there was something different about the mounts. OK I’ll have to admit you are an eagle eyed bunch!
On the Amarok, the mirrors are quite big and if I get them adjusted about right I can just see down both sides of the caravan… we’re not 8 foot wide. However, driving without mirrors is more likely to attract attention and it’s easier and safer just to fit a pair. I first went for a brand that I’d used on the Land Rover Freelander, however the Amarok’s mirrors are quite deep and it wasn’t till I tried them that I realised how much of an issue that was….
The other issue I had… I didn’t particularly like the fitting….. it was about on the limits of extension and about 25% of the mirror was obscured by the Amarok’s door mirror… just at the point the would allow you to see the wheels of the caravan. Not ideal.
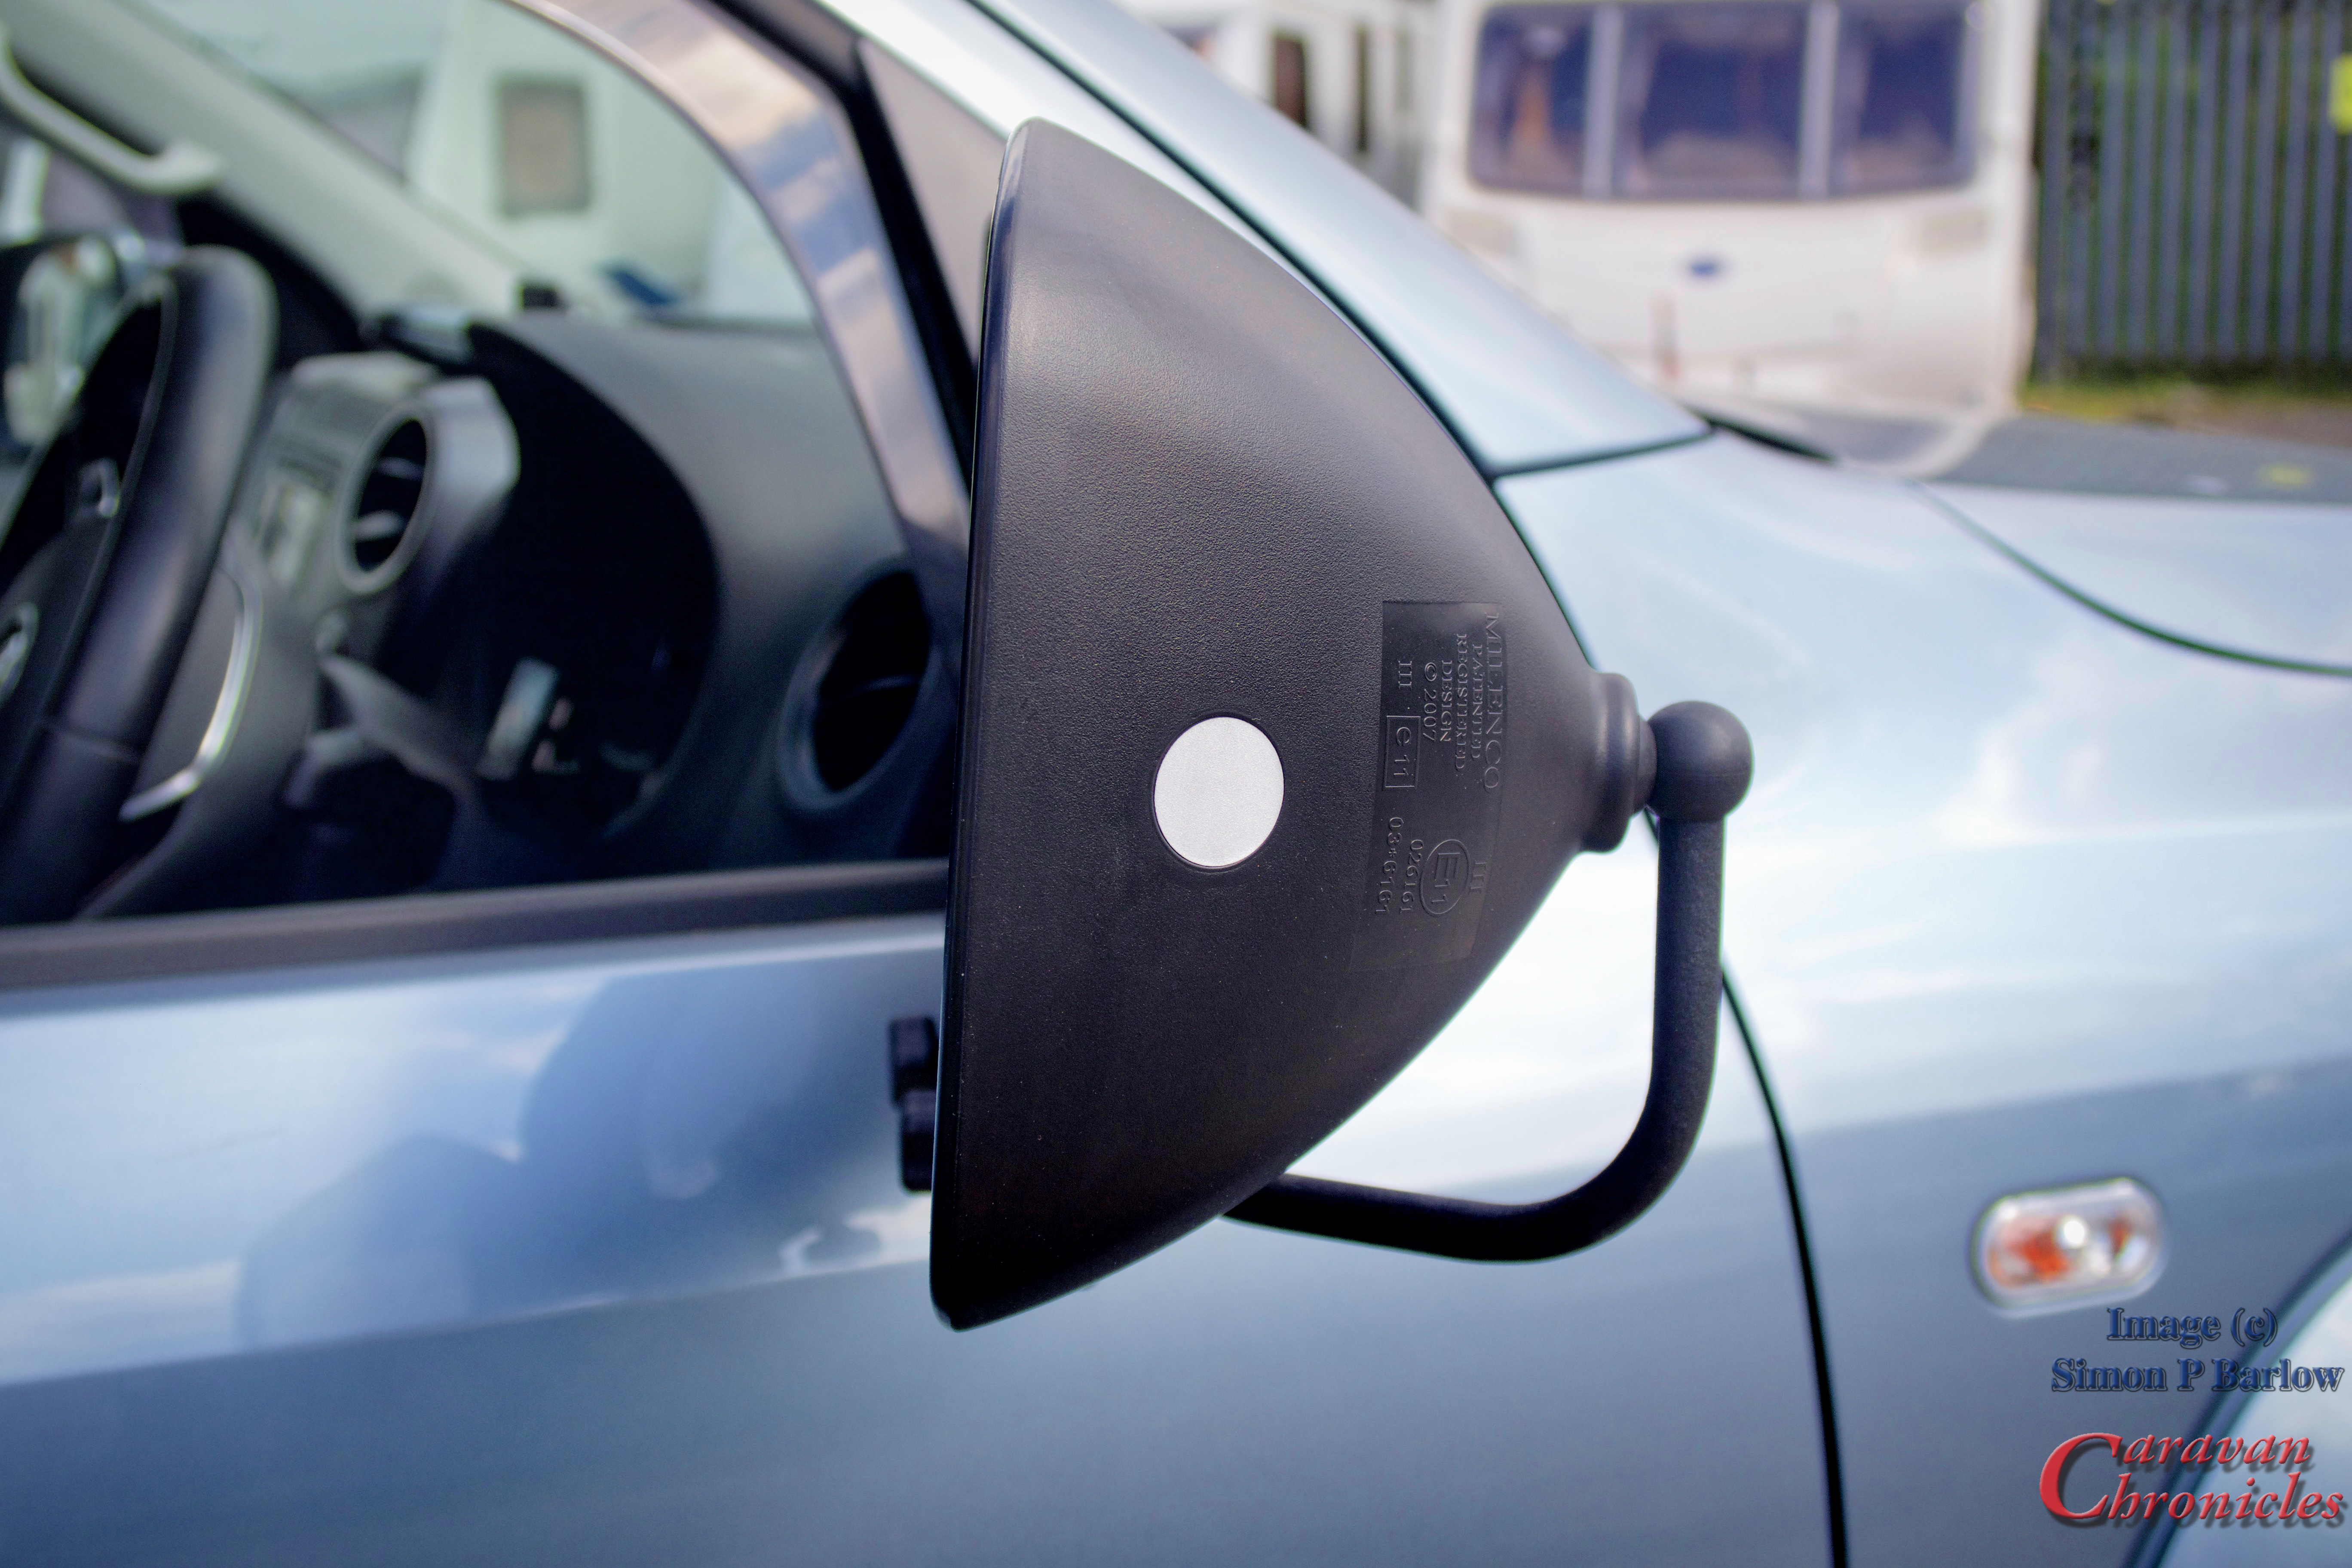
So I looked round for a mirror that would move the face of the mirror rearwards in about the same plane as the normal Amarok mirror. The added depth of the Milenco Grand Aero looked as though it would do the job perfectly.
Actually it was a little too much. As the mounting for the mirror was now on the door mirror plane, not as the previous mirror the back of the mirror housing it shifted the face of the Grand Aero too far rearwards. I liked the vision the Grand Aero gave and the mounting.
To the Bat Cave…
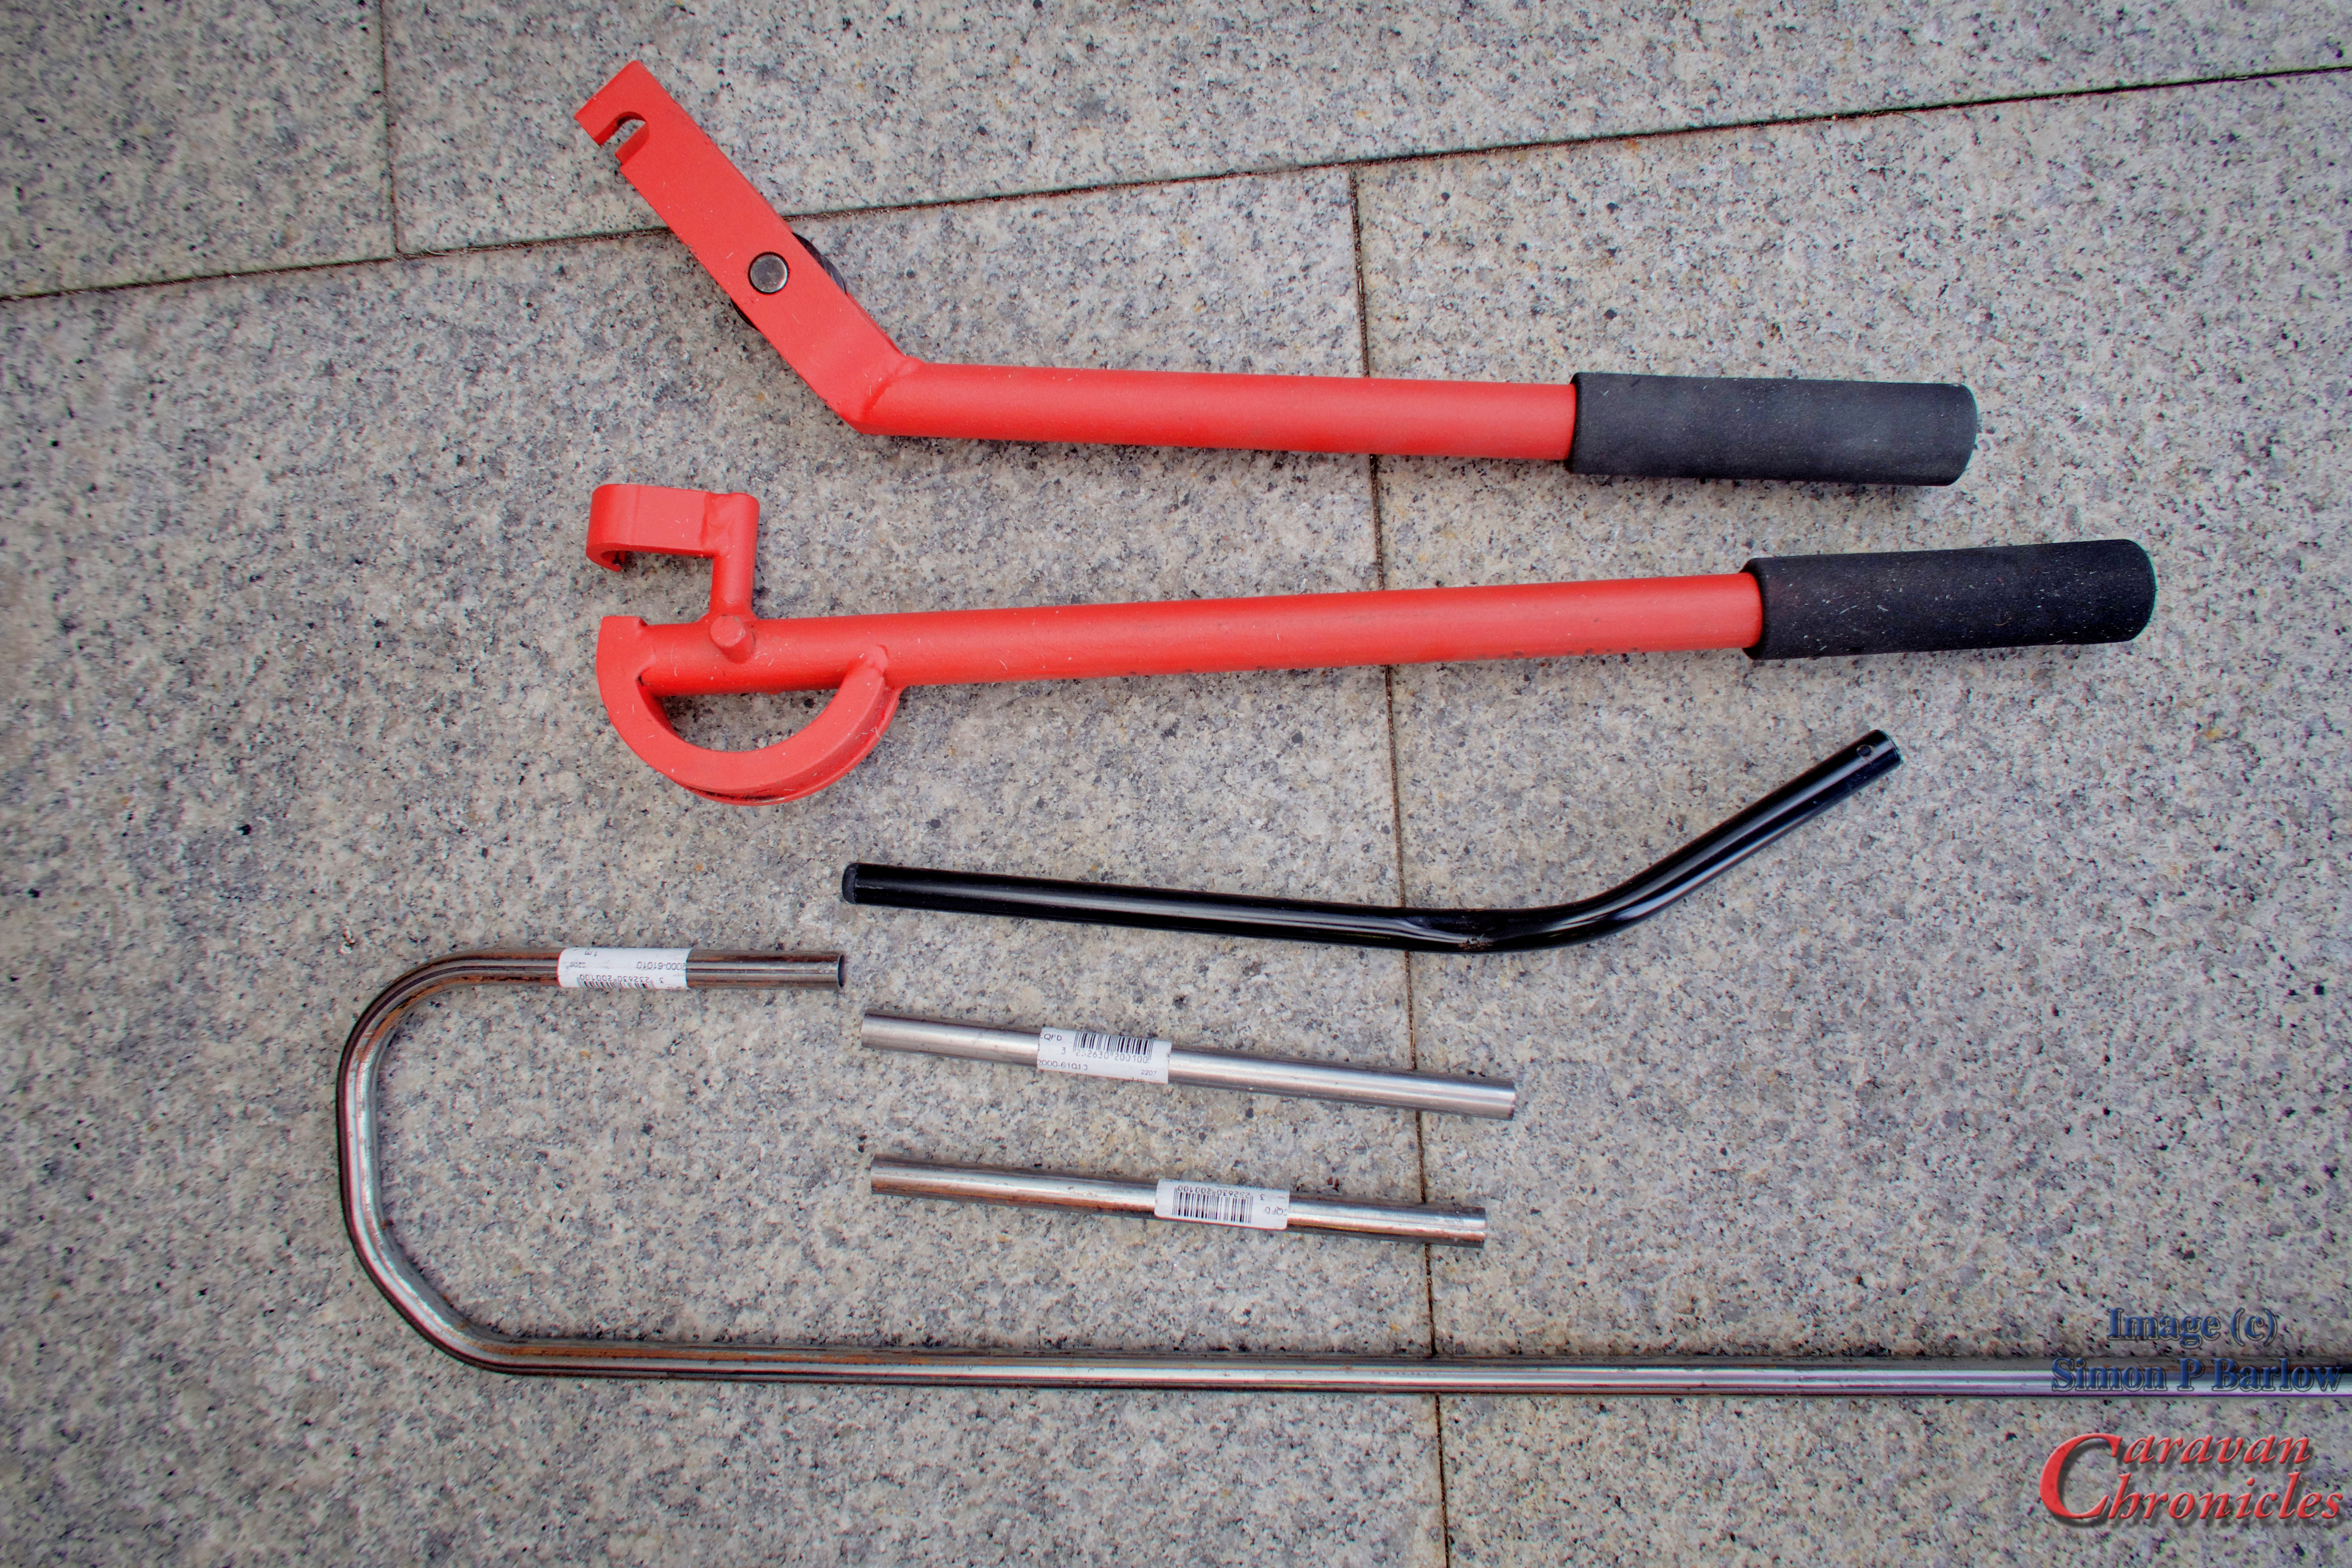
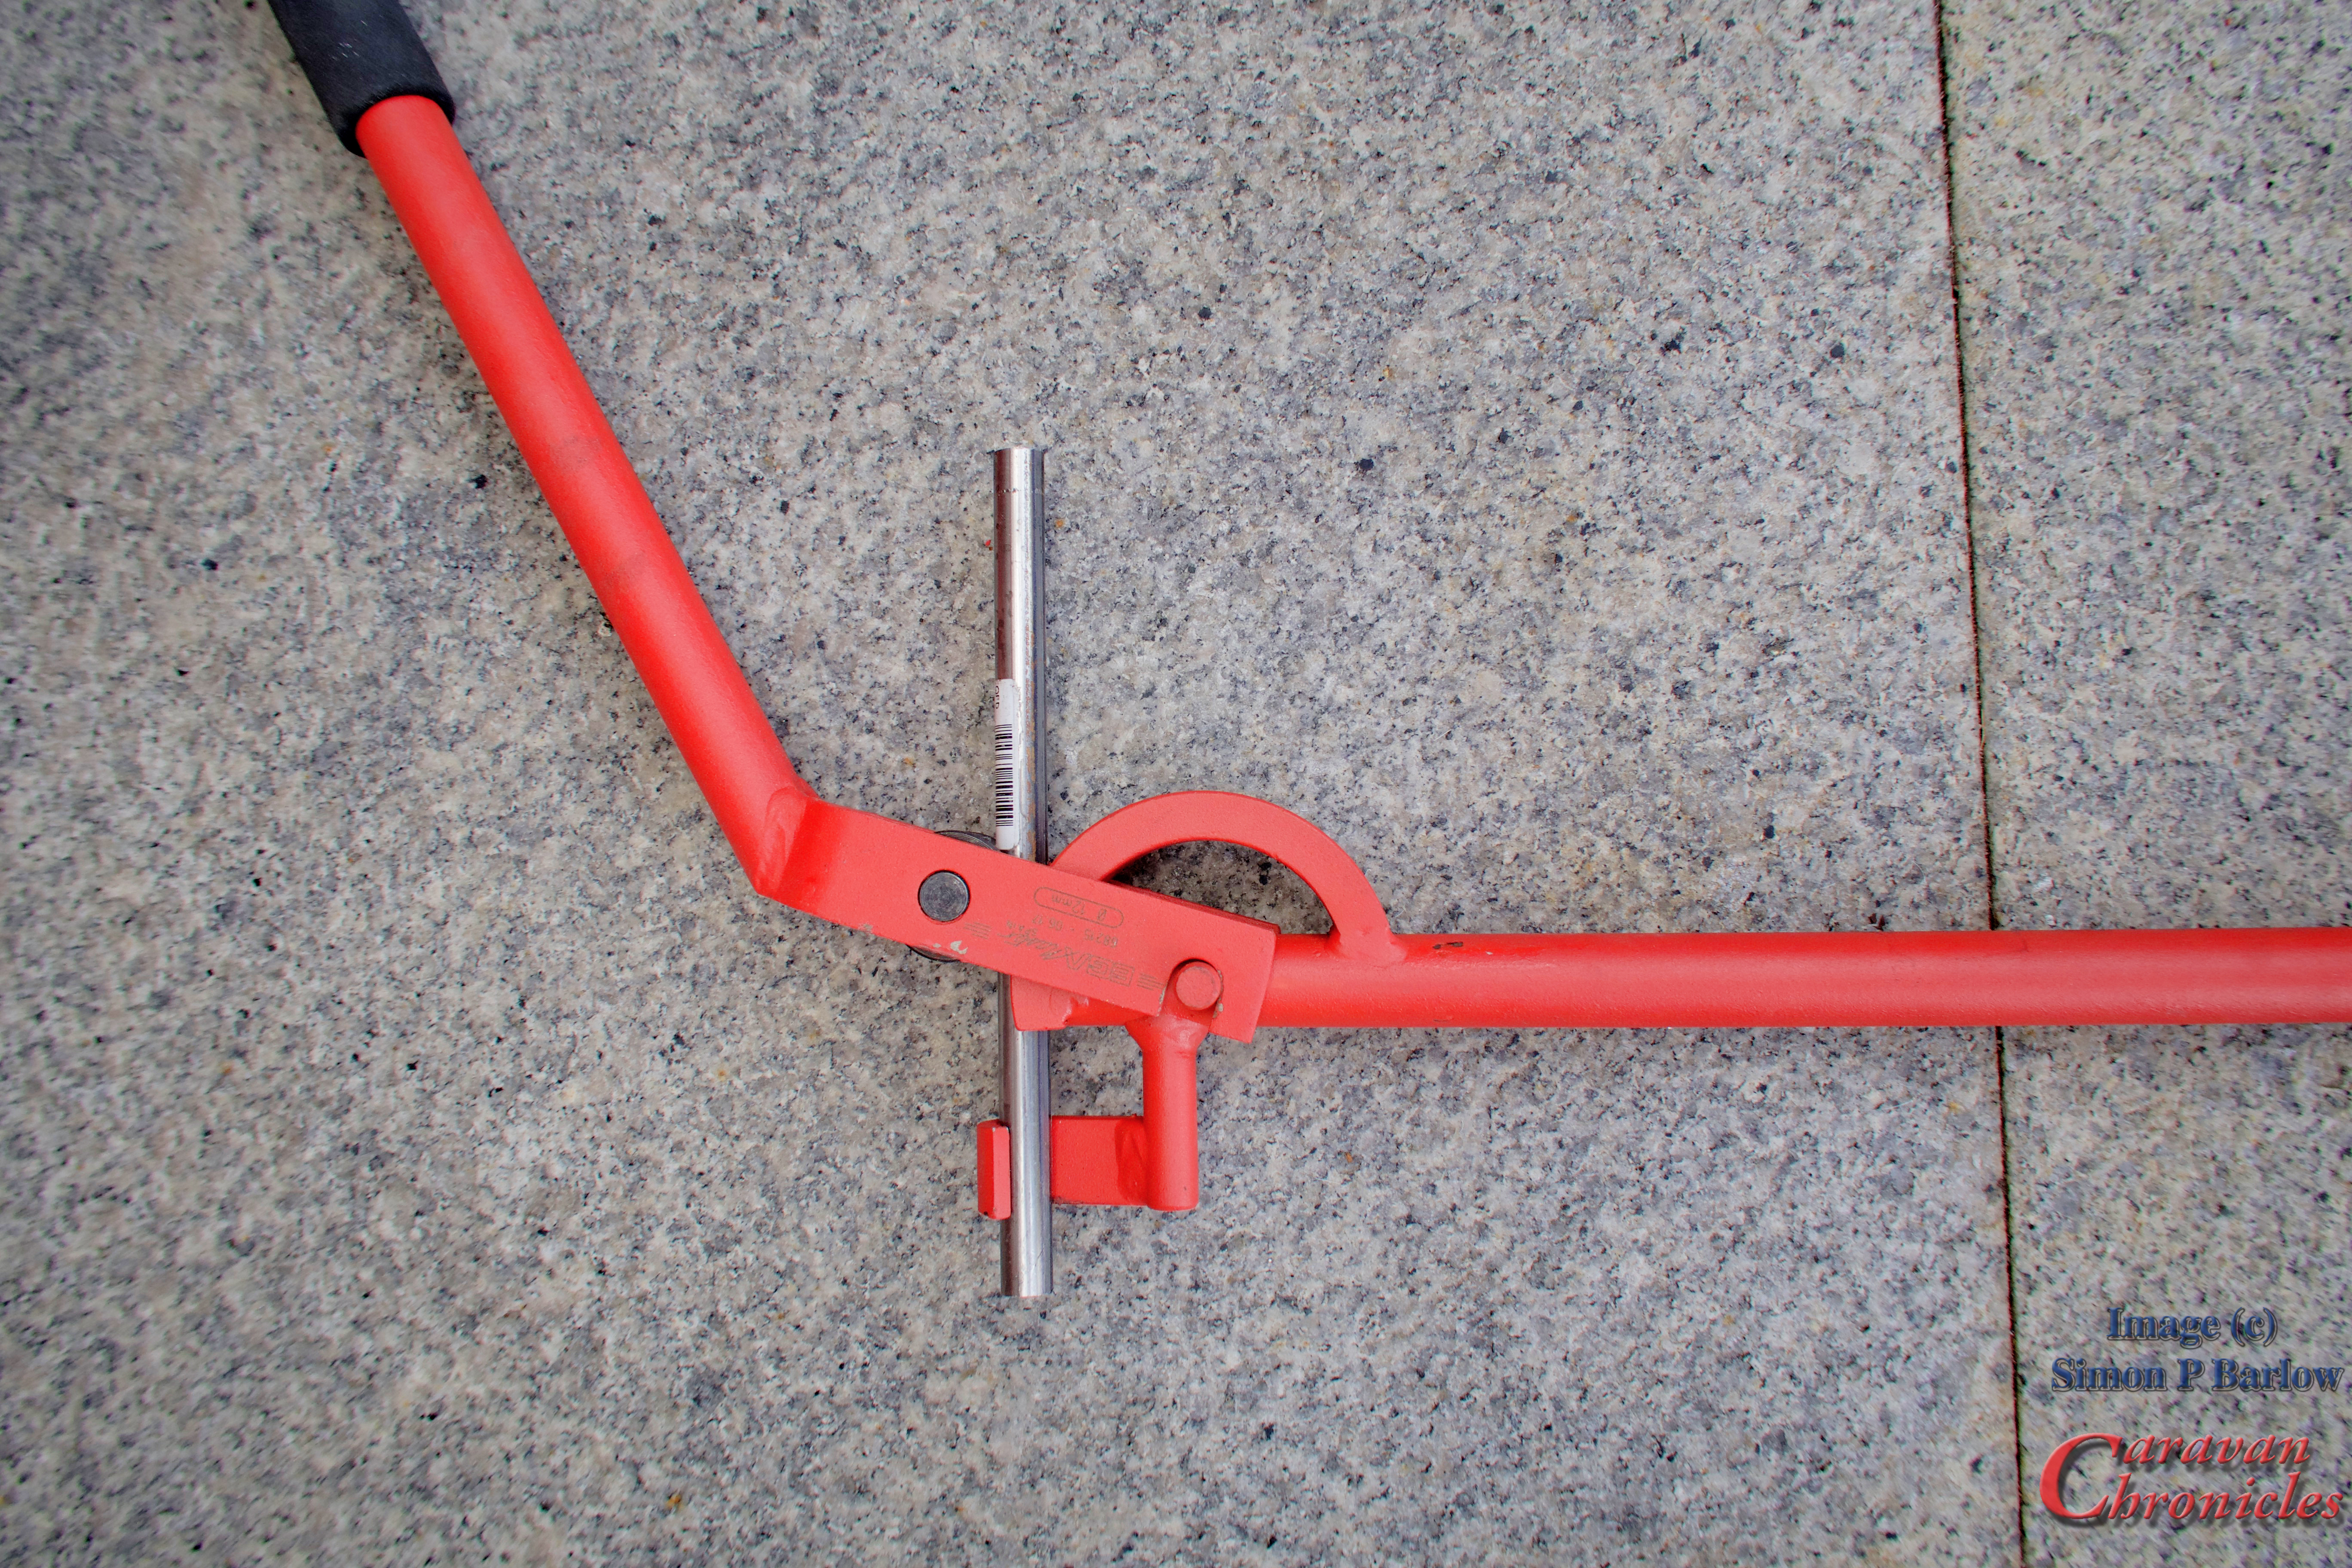
I just happened to have some lengths of 12mm steel tubing and a bending tool. Maybe I could solve the problem without searching round for other products.
I used a welding rod to hand bend a profile that seemed to put the mirror into the right position. I worked out I’d only need two bends to get the mirror in the right position.
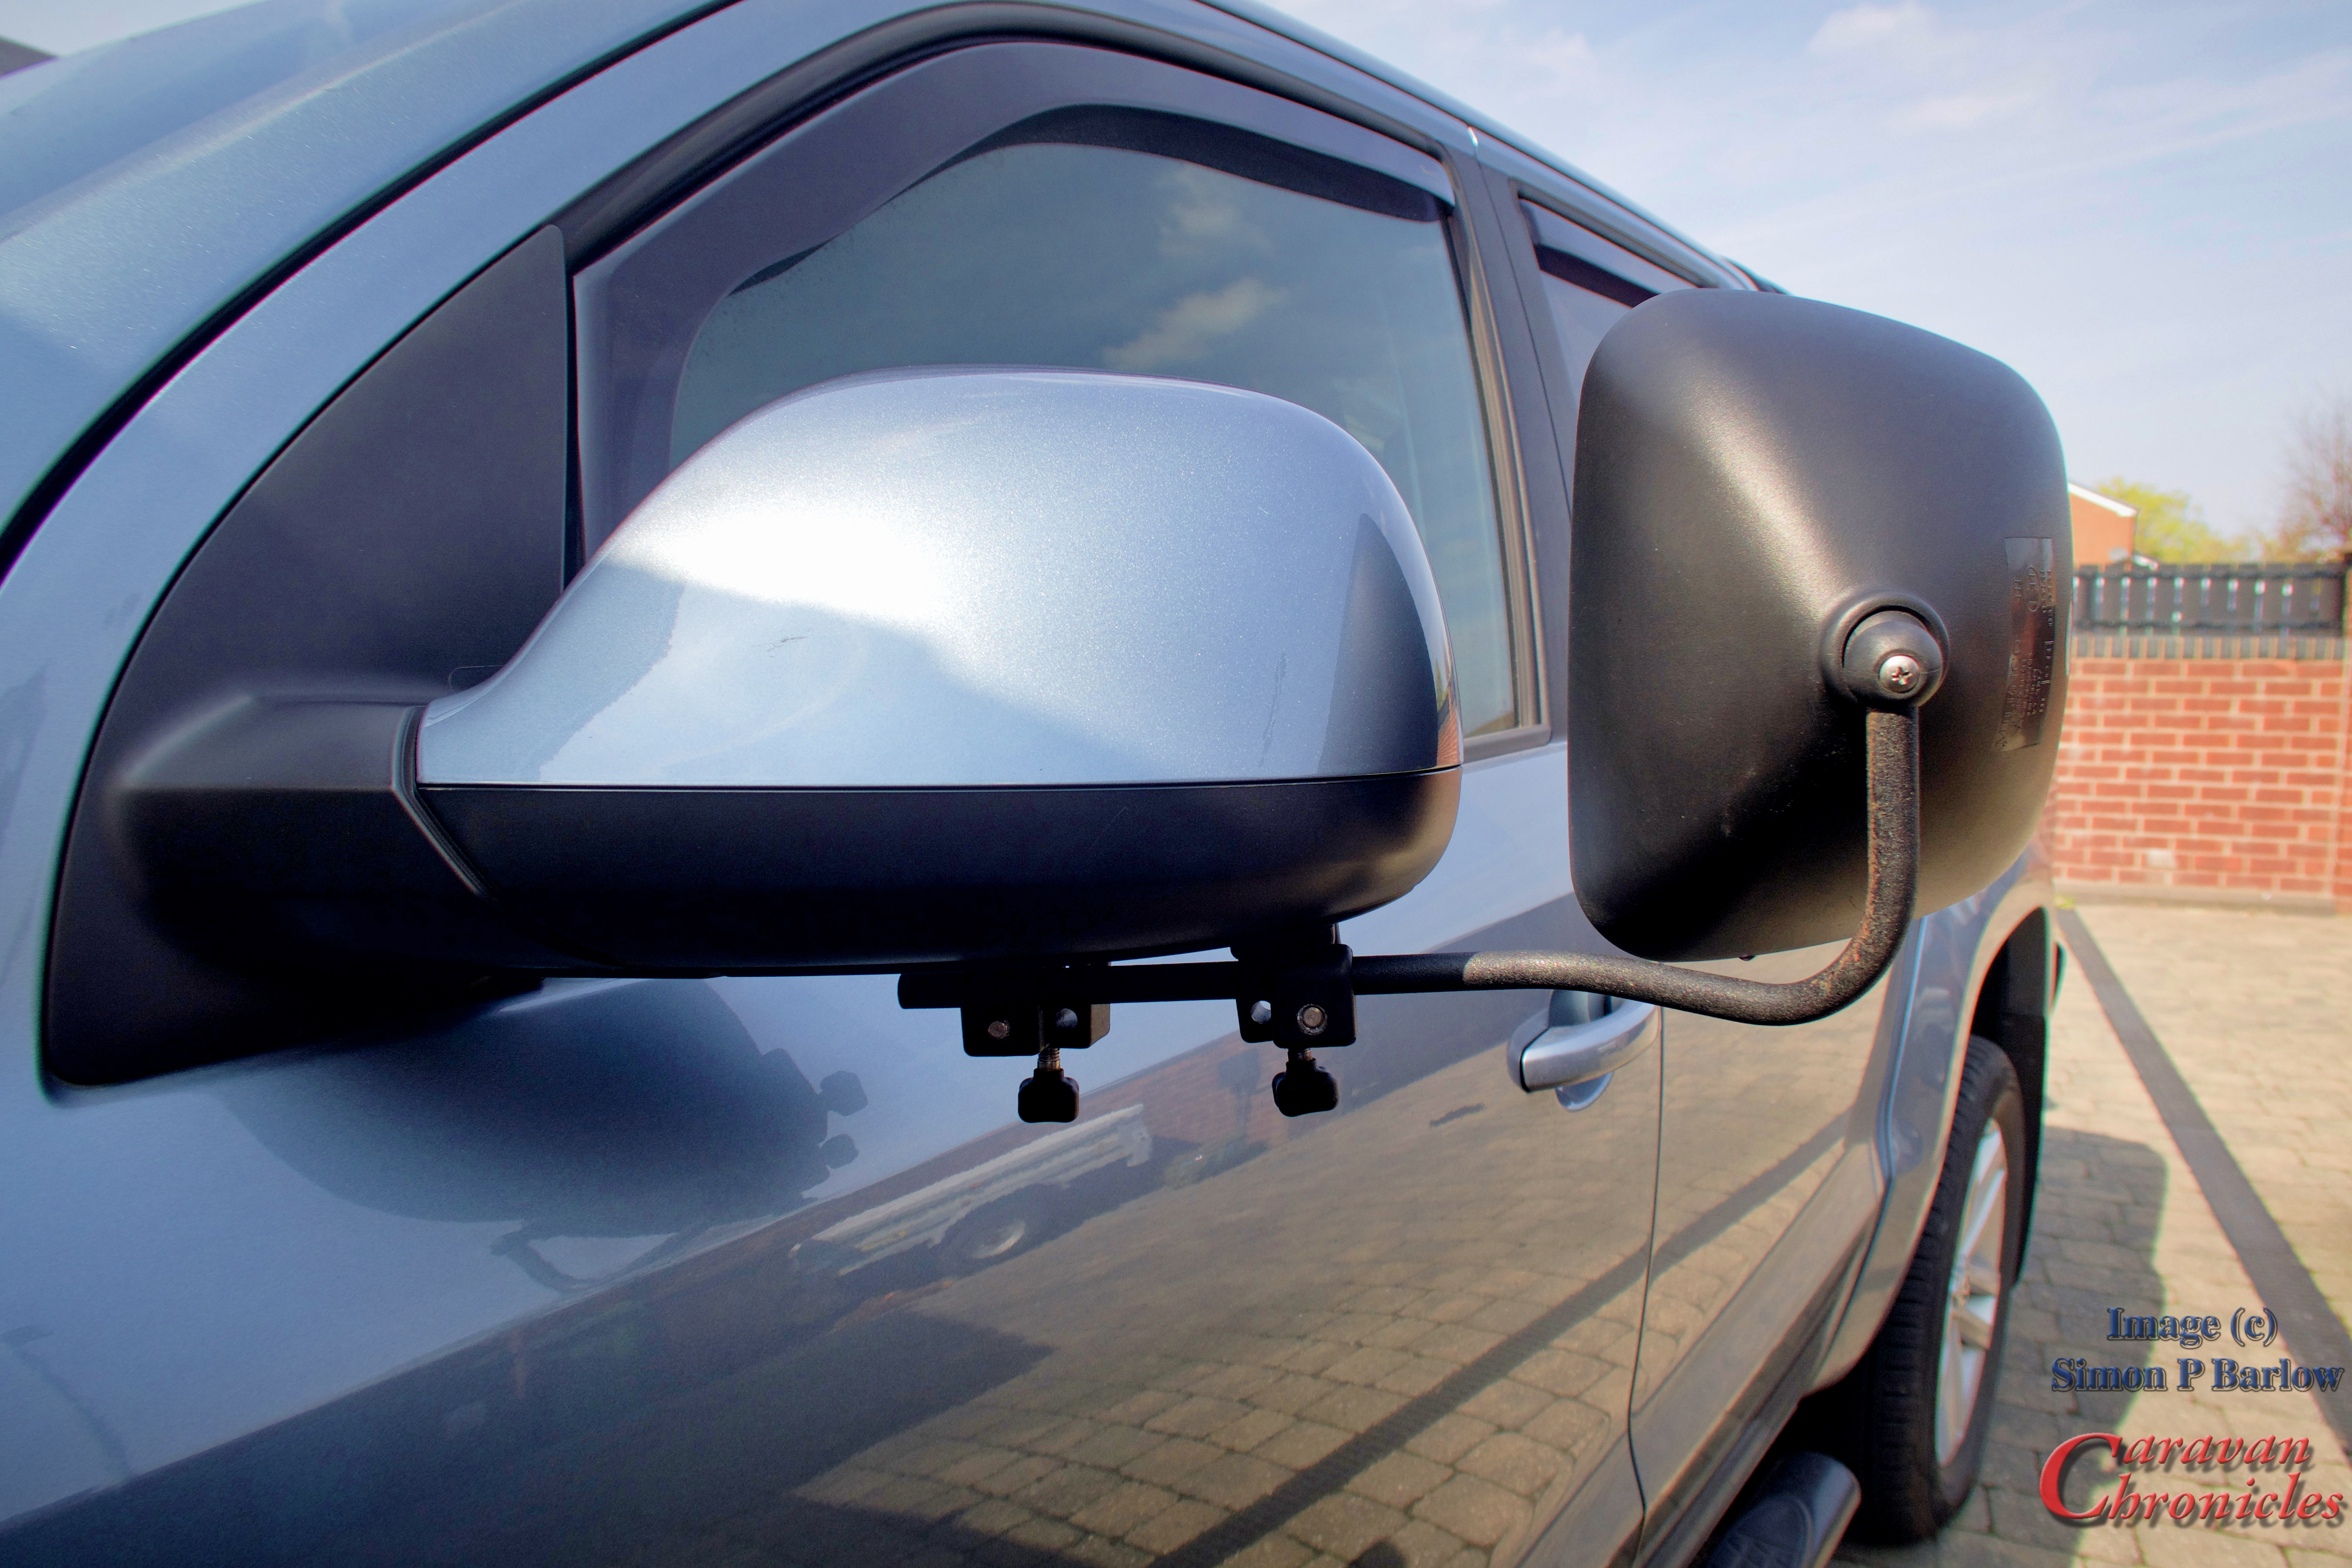
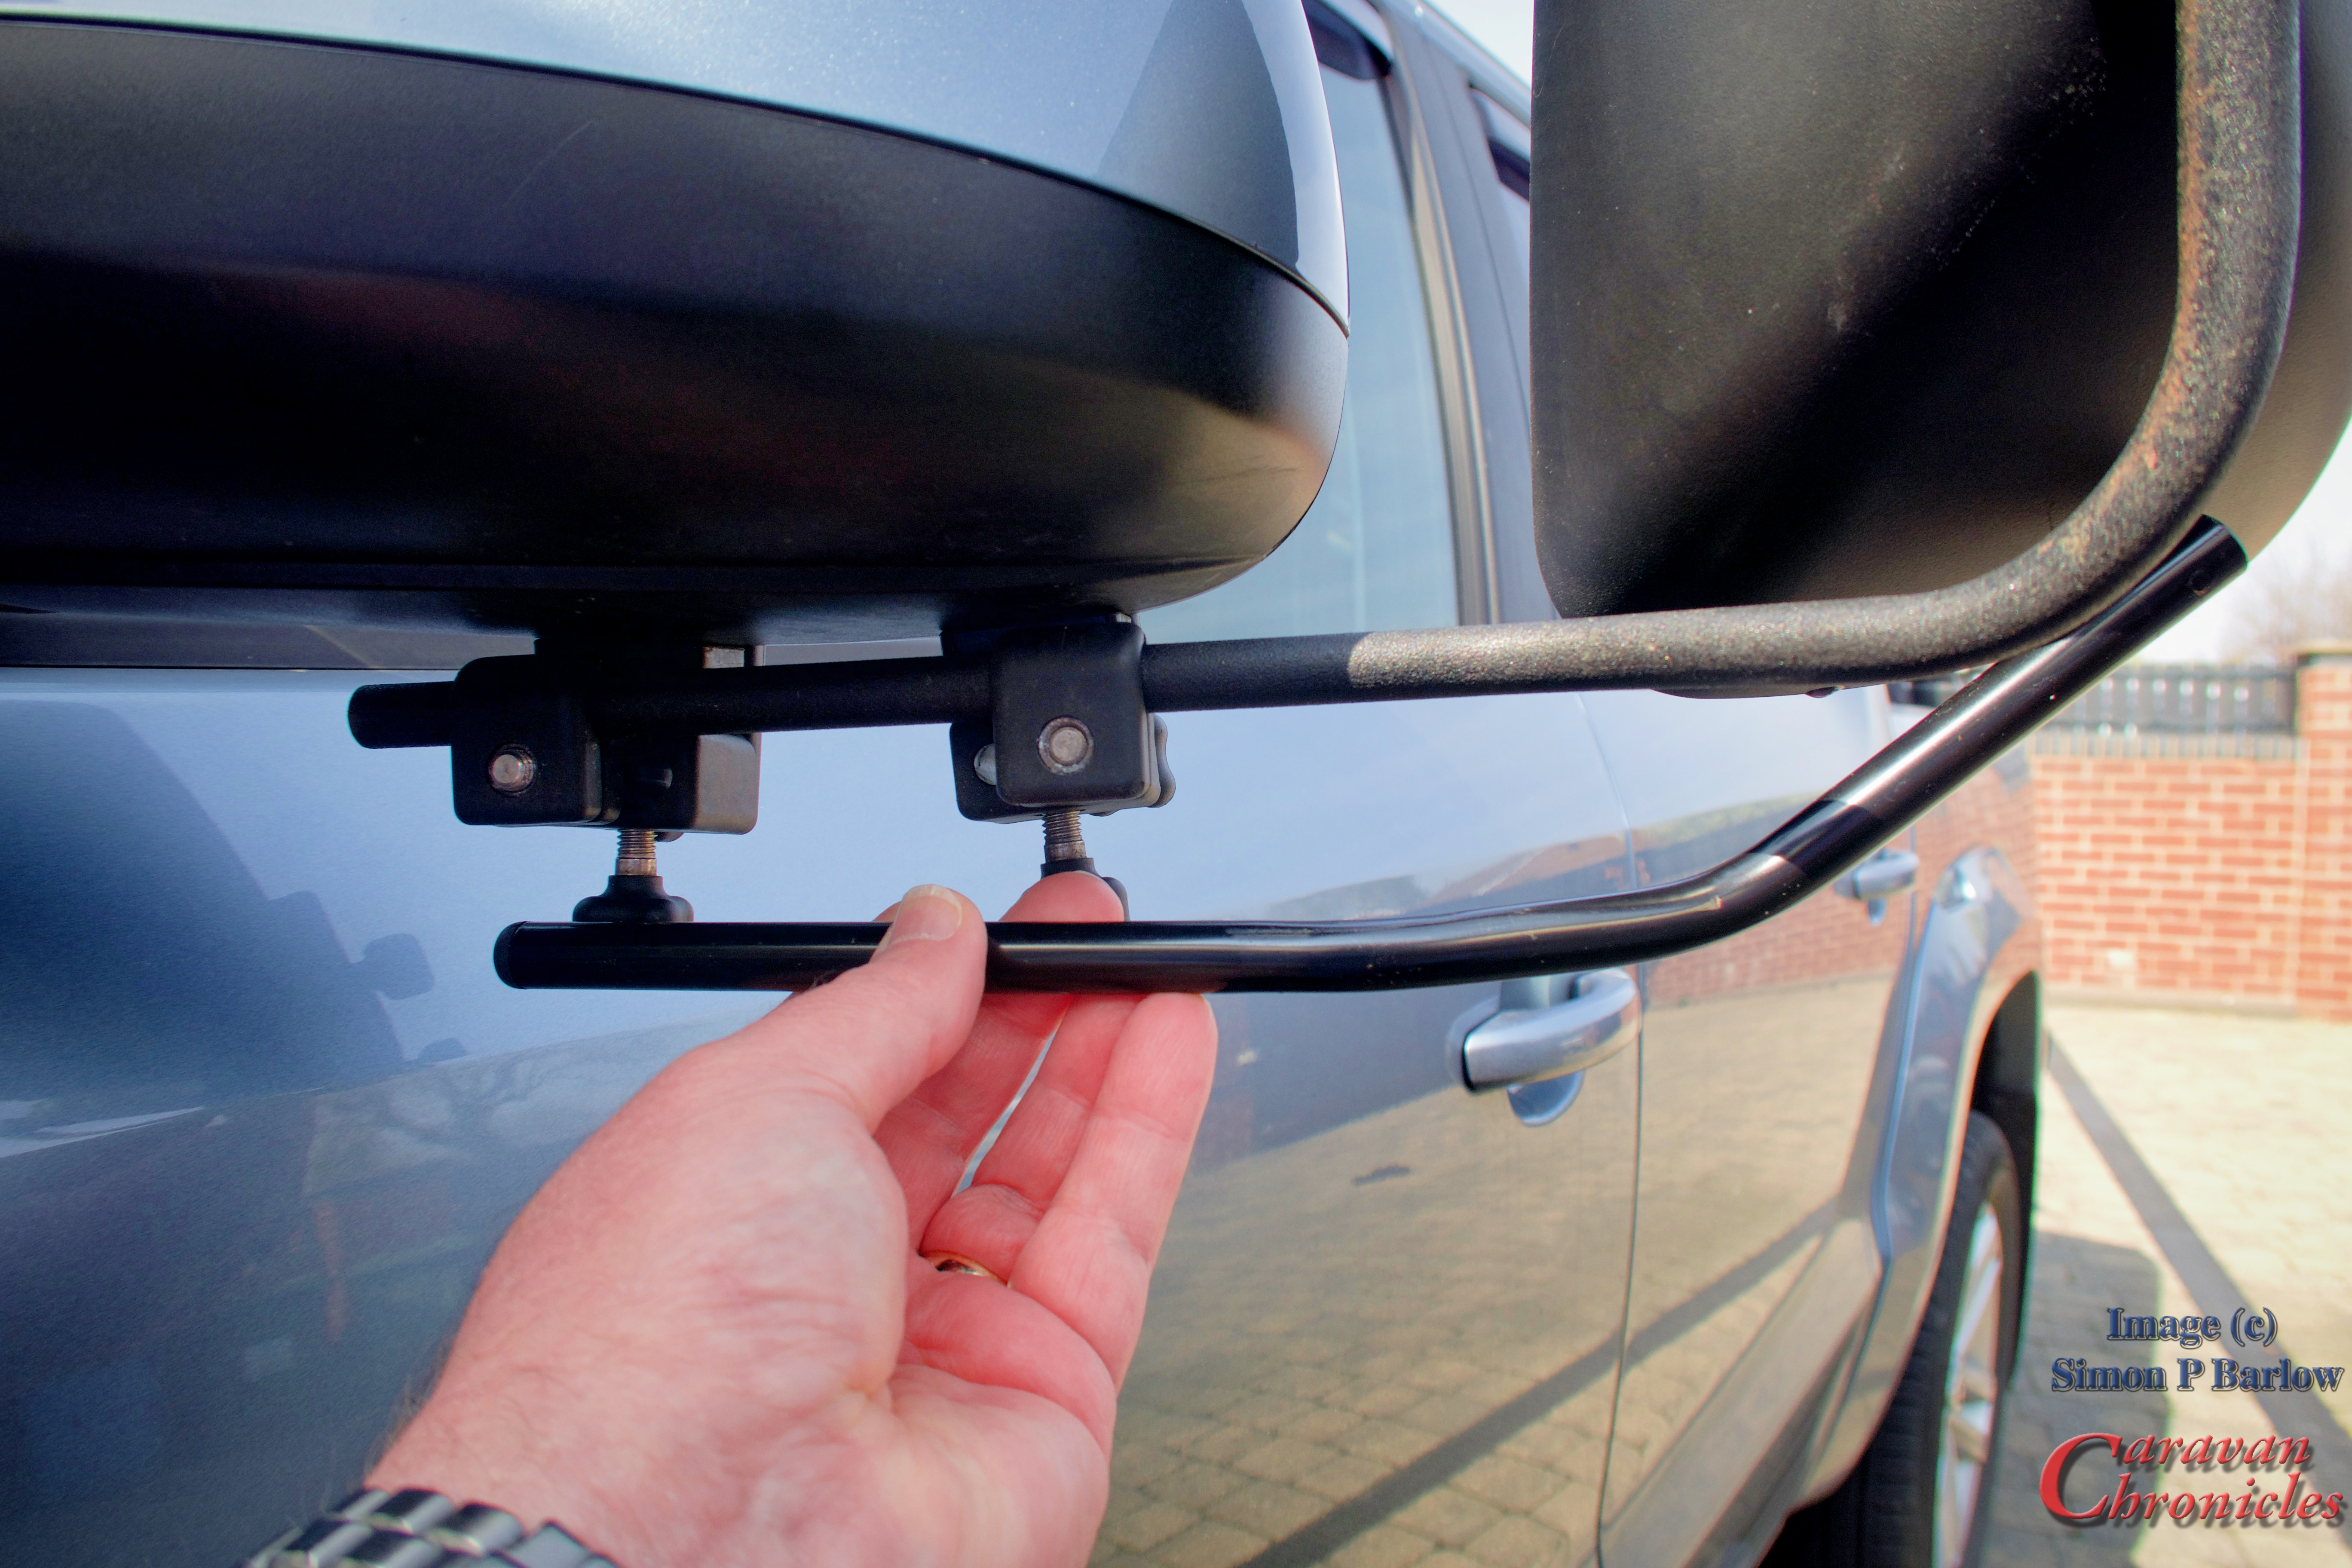
I installed the two mounting brackets on the door mirror in the final position I wanted them and slid a length of tube into them. Marking where I wanted the first bend to be and using an angle finder to approximate the angle that would move the mirror far enough forward so the face was in line with the door mirror face… this then gave me the point to start the bend upwards to get the mirror at the correct height.
Ok before I get a lot of comments asking why installed the mounts on the lower edge of the mirror… two reasons…. if they do move about or squish down on a bit of grit any scratches won’t be seen in the painted area of the door mirrors and from the driving position they don’t obscure my view if I have to look past the top of the door mirrors. I’ve also noticed when its raining I don’t get nearly as much water running down the face of the door mirror. And another reason…. the bottom of the door mirror on the Amarok is not quite as curved and the clamps fitted more securely. I’ve got everything dialed in now to the point where I don’t actually need to adjust the mirrors each time I fit them.
At this point I hadn’t cut the tube to length on the vertical section so I had the chance to adjust the height of the Grand Aero. After a bit of trial and error that involved a clamp and running round to the driver’s seat… and back again to adjust I got what I thought was the right height for me.
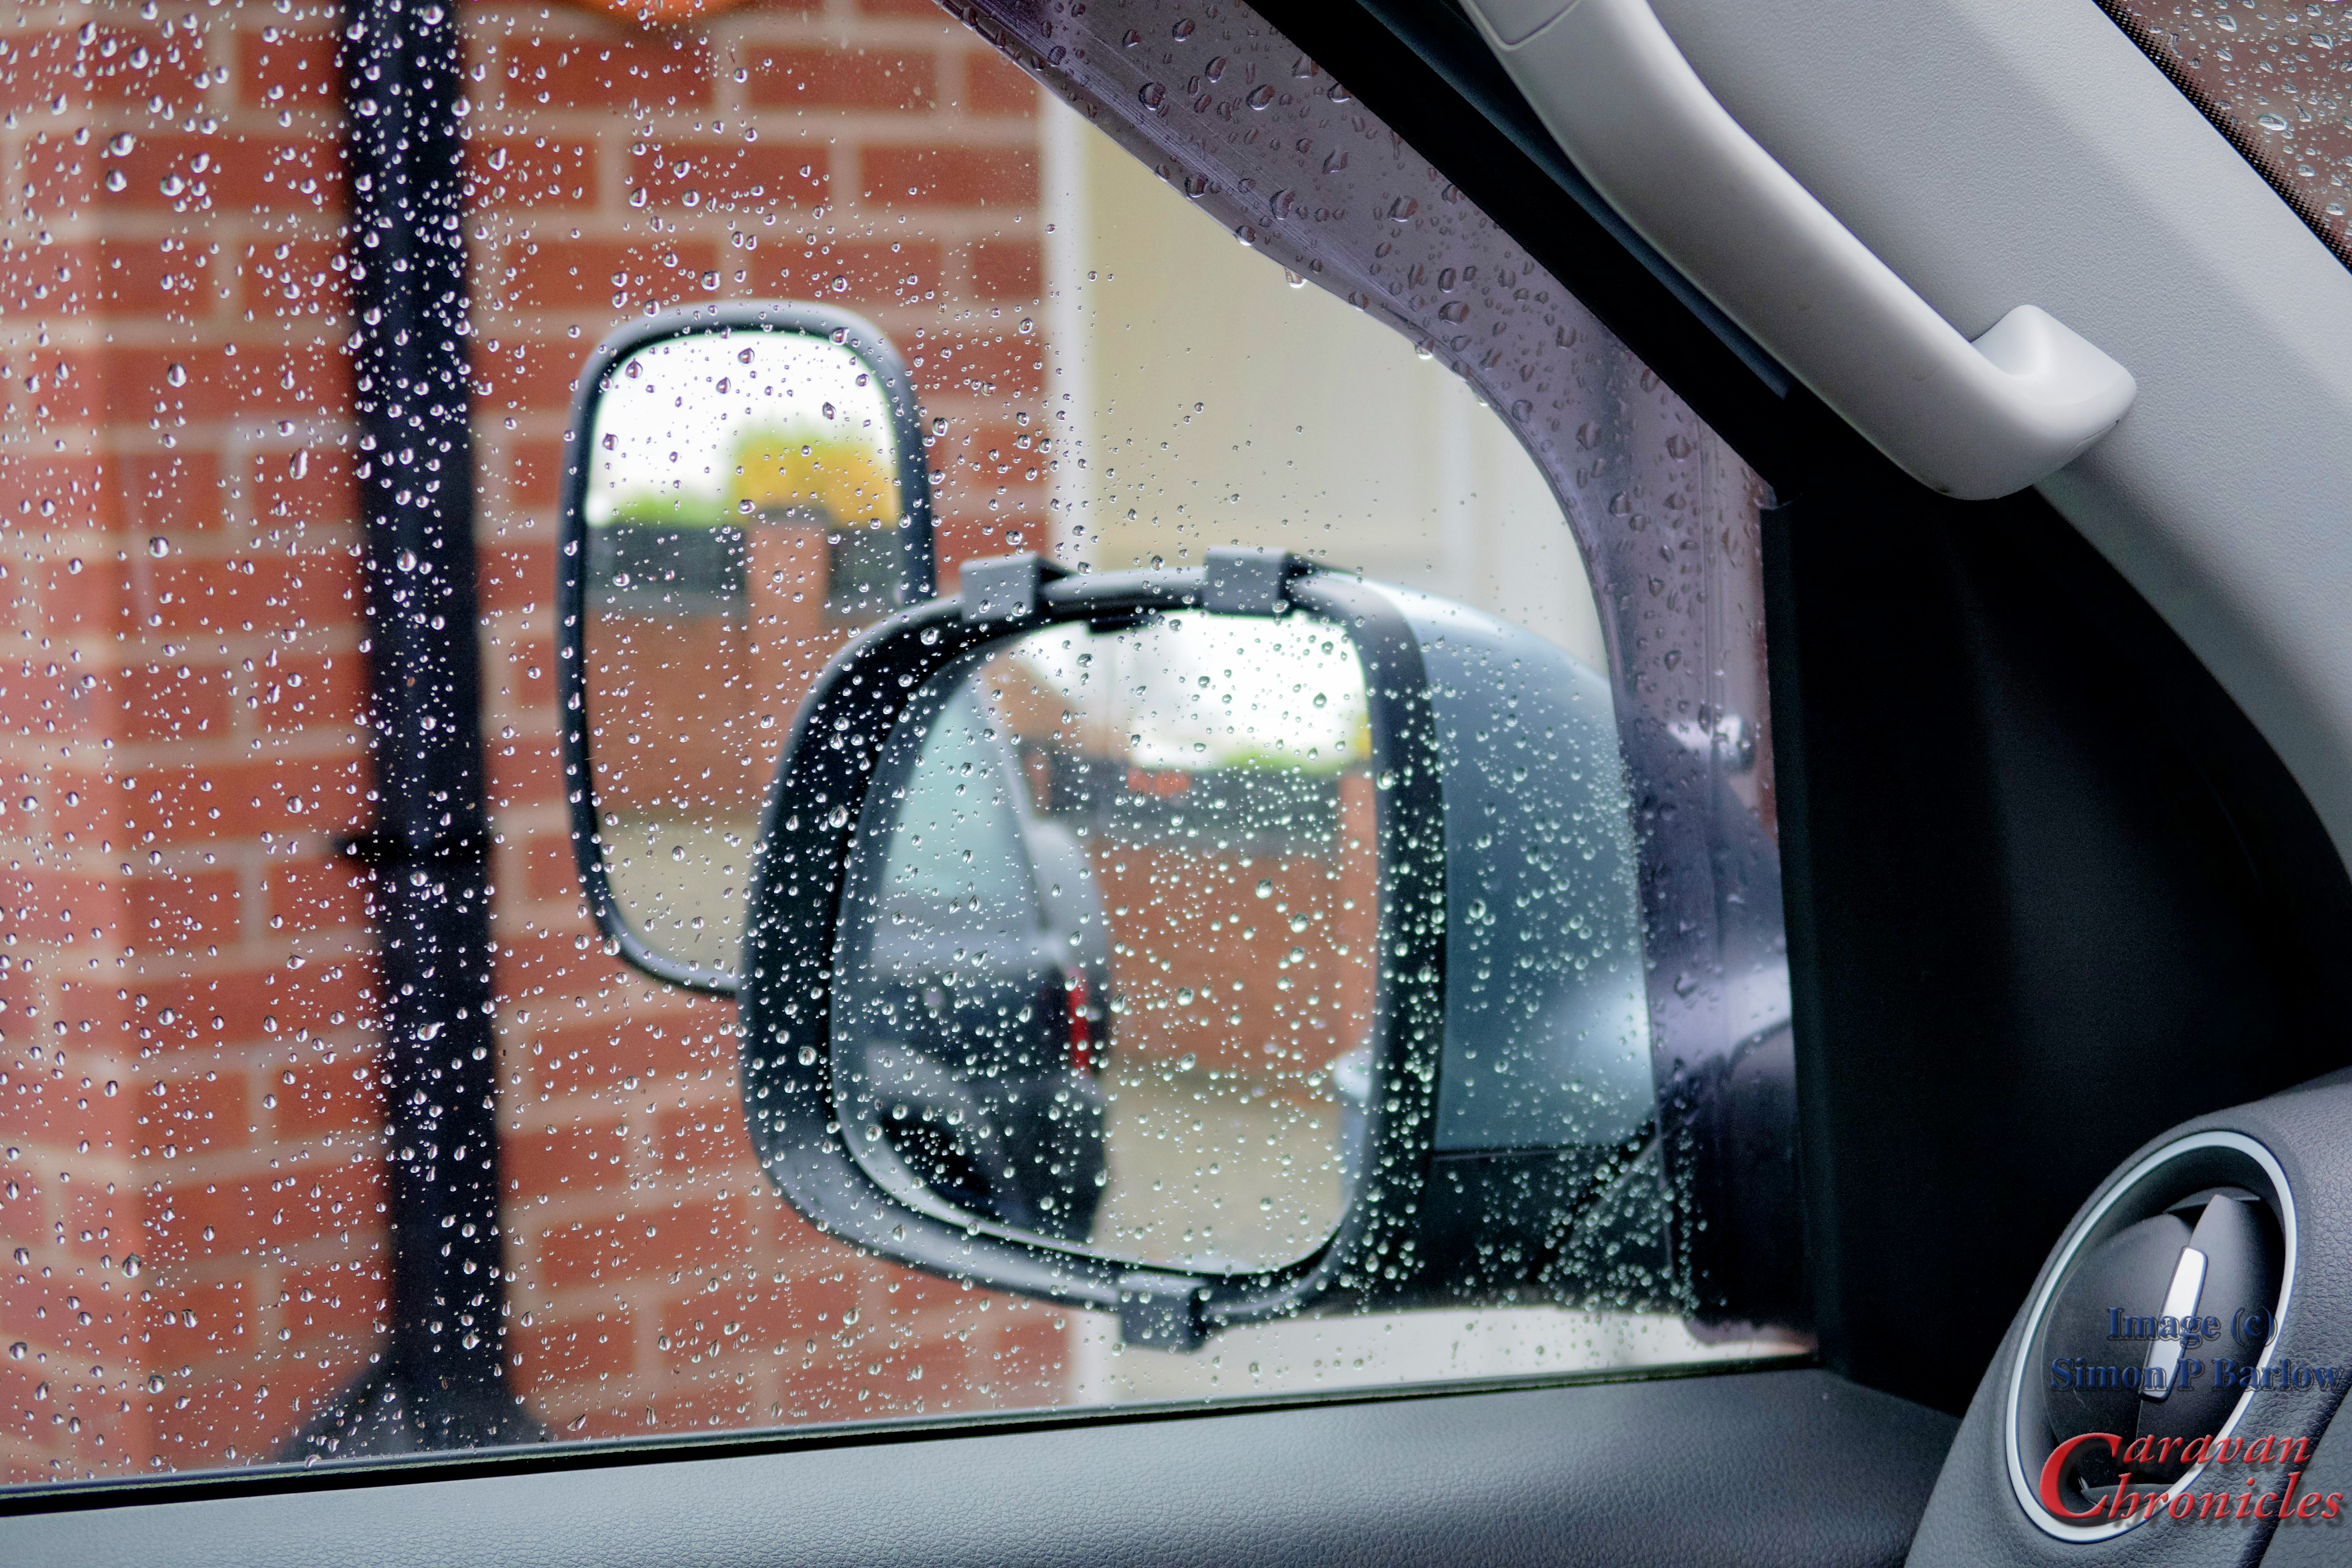
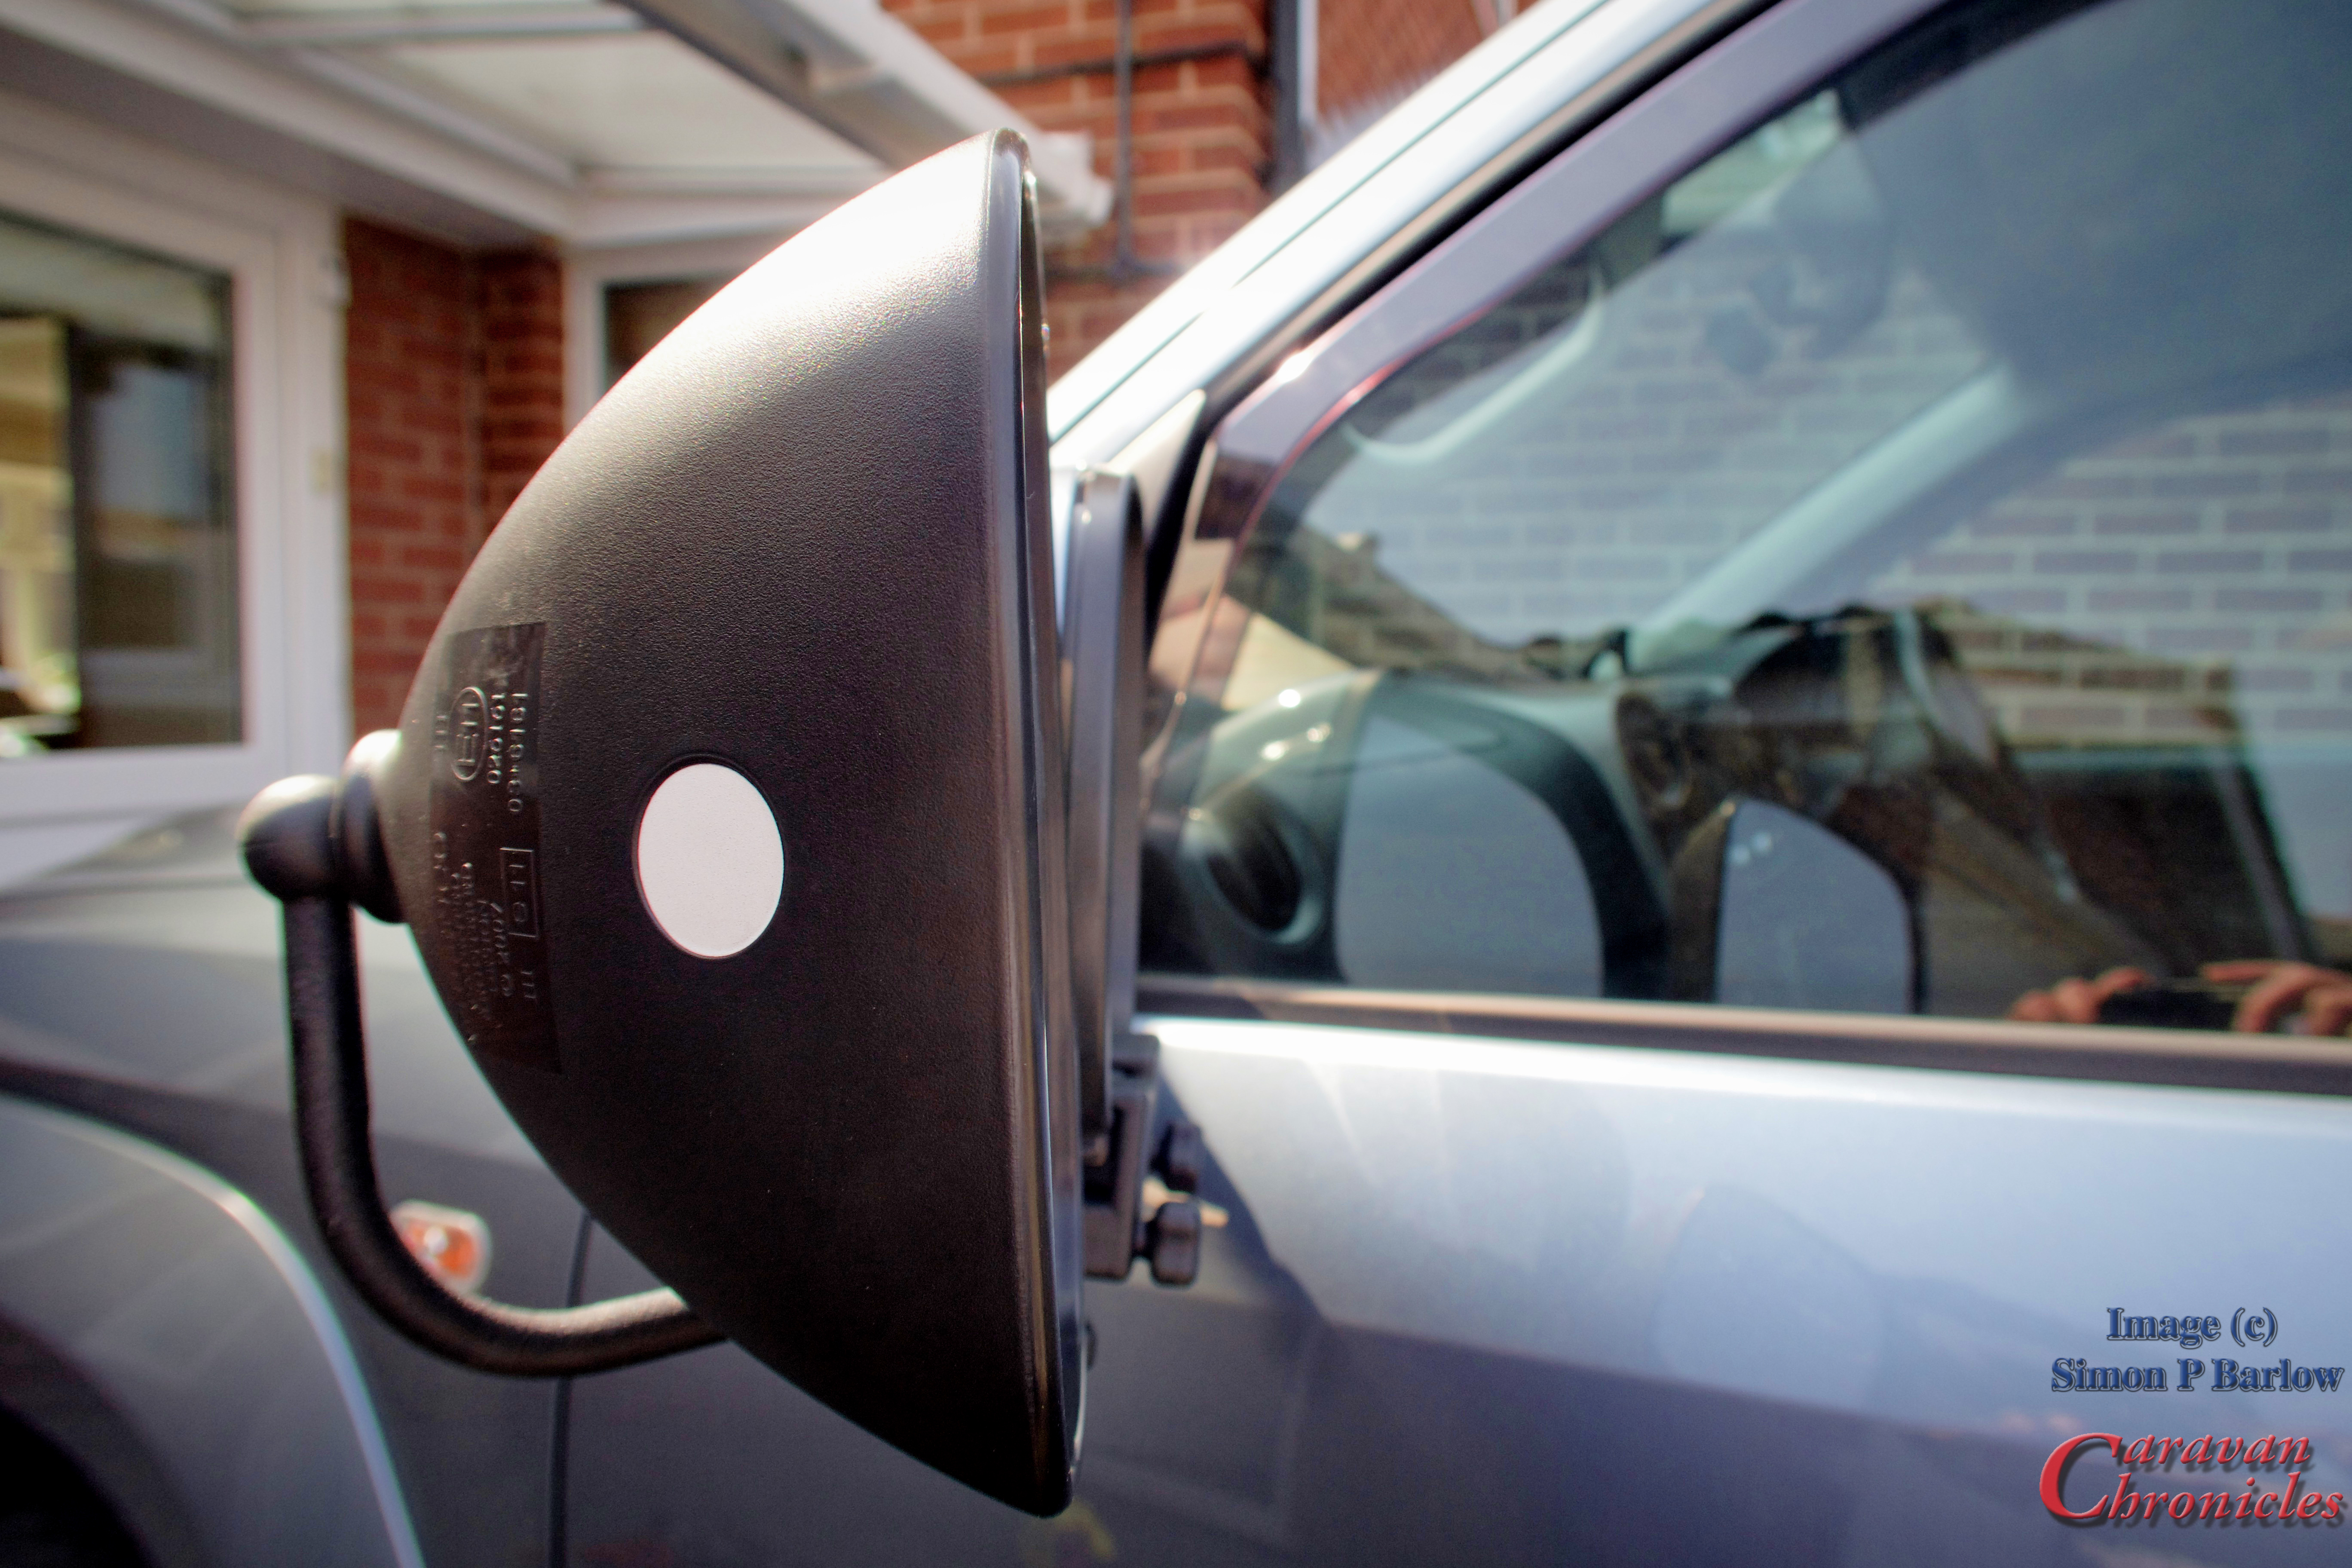
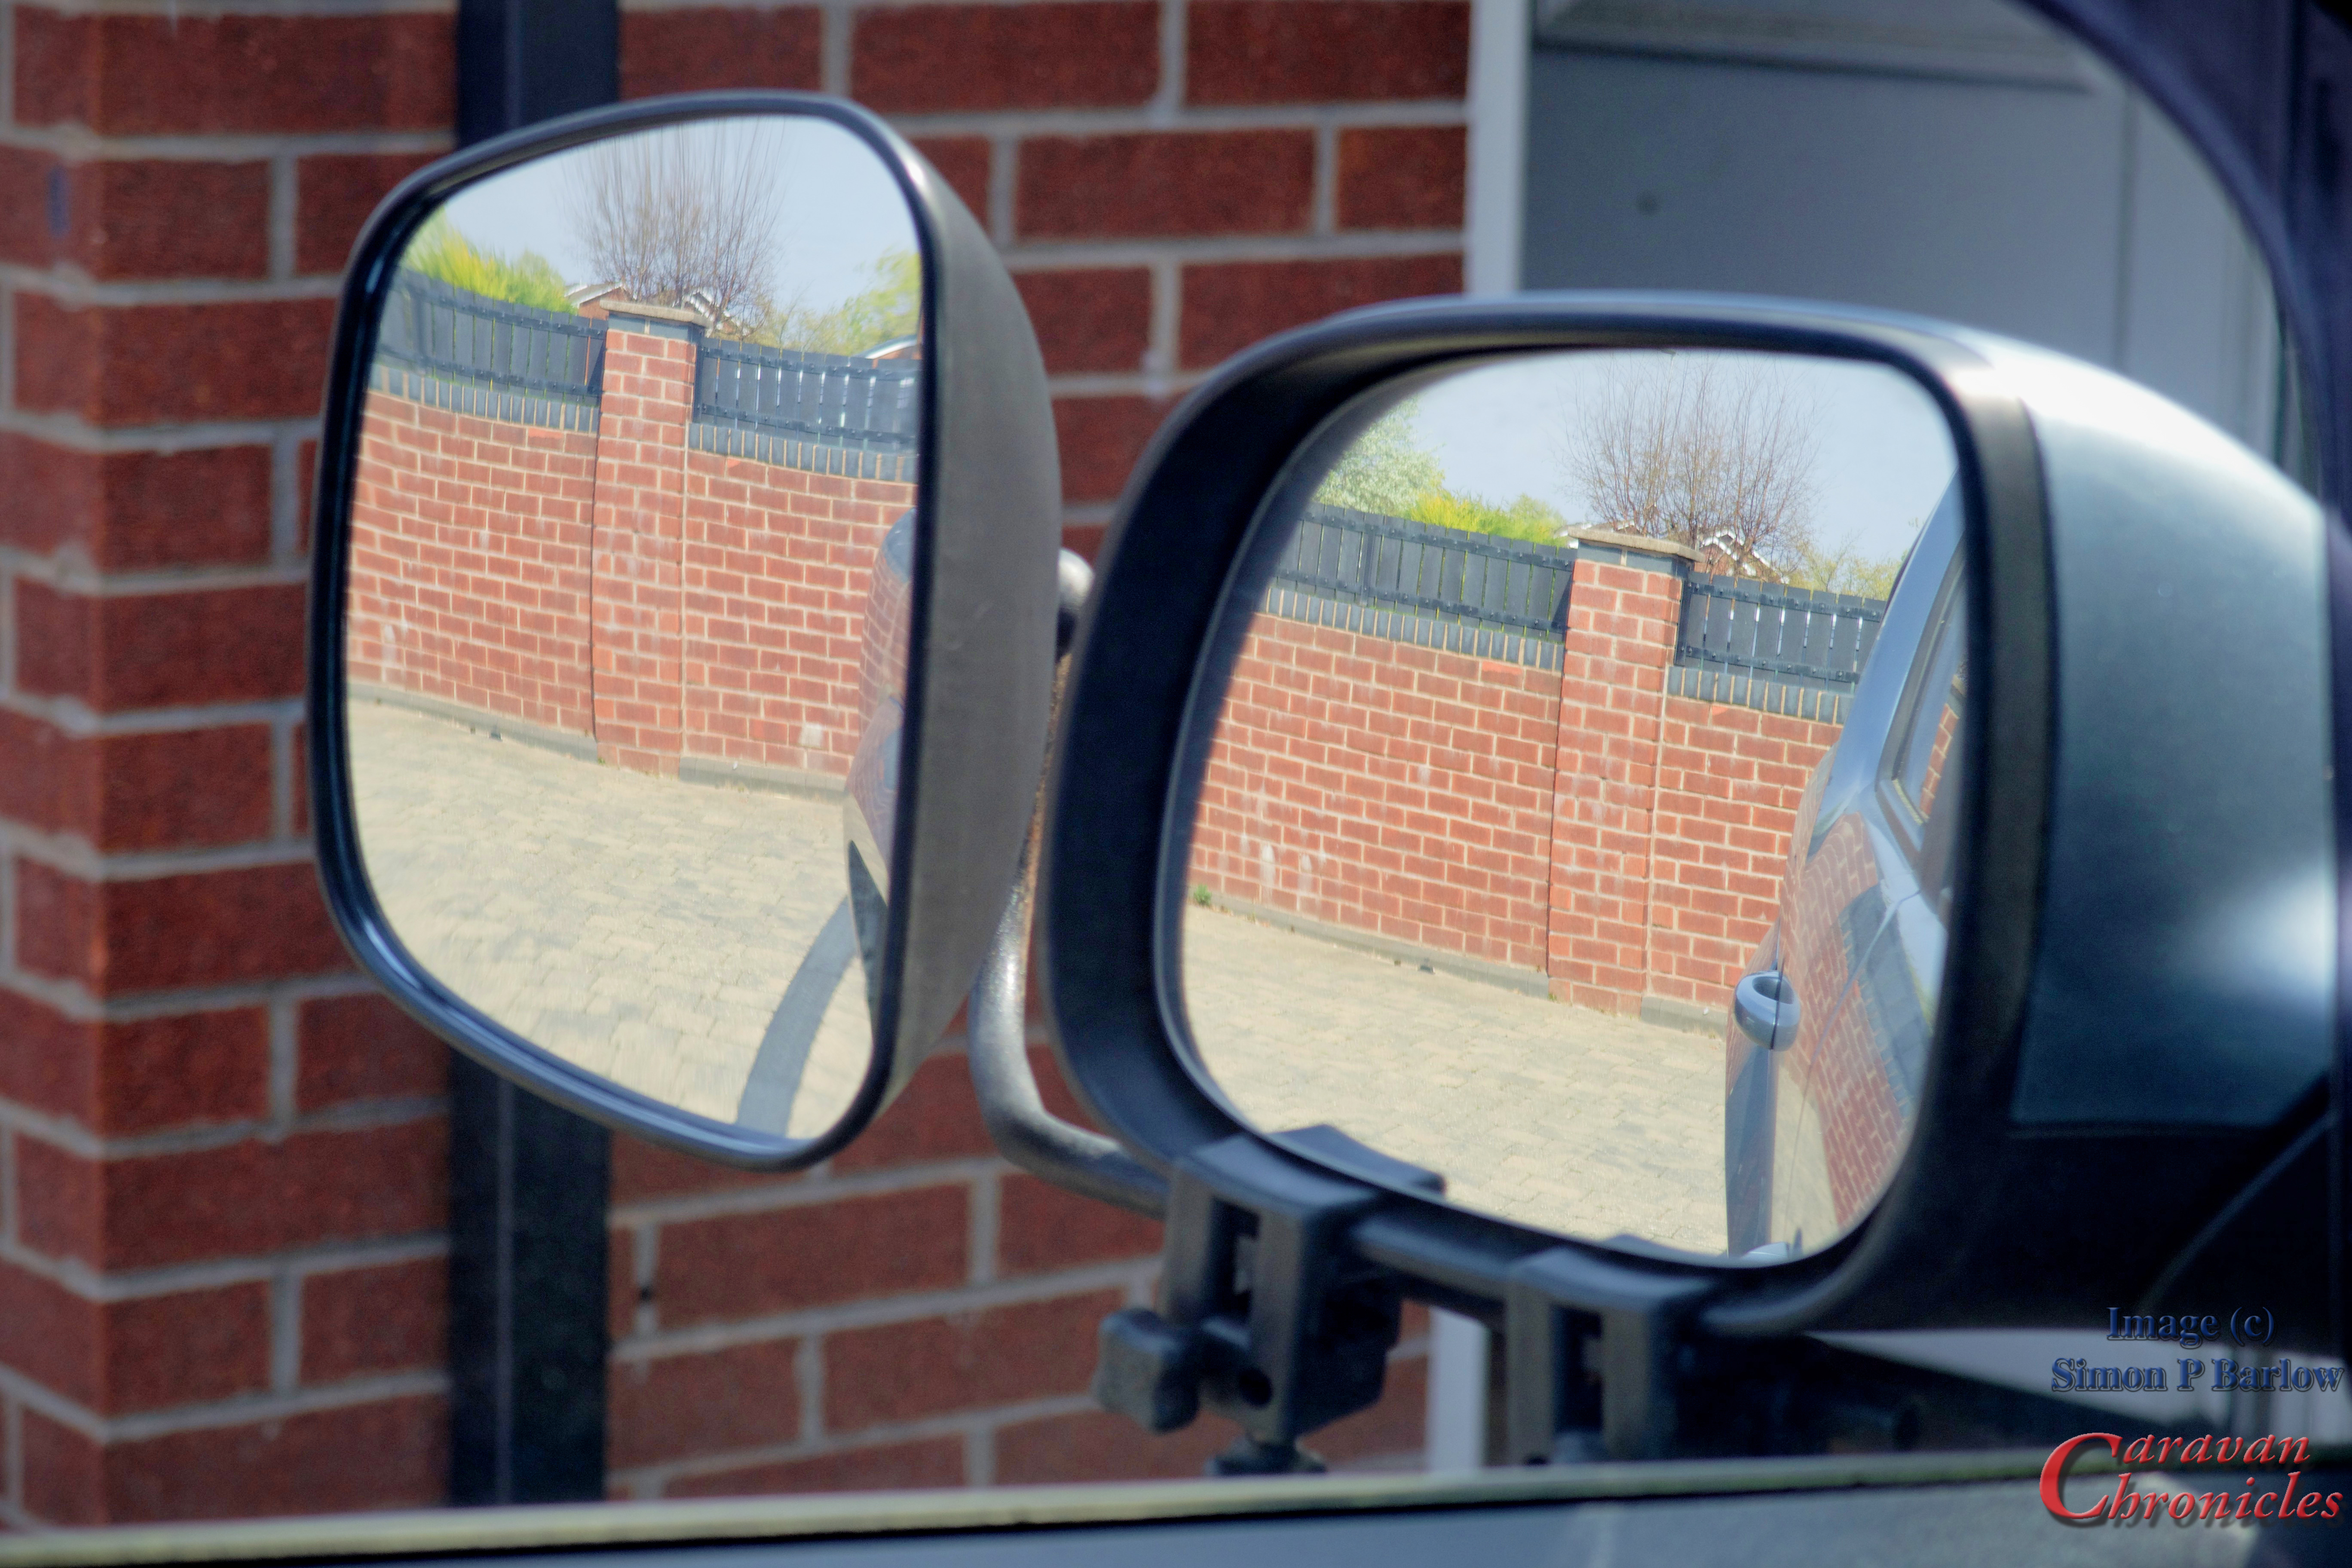
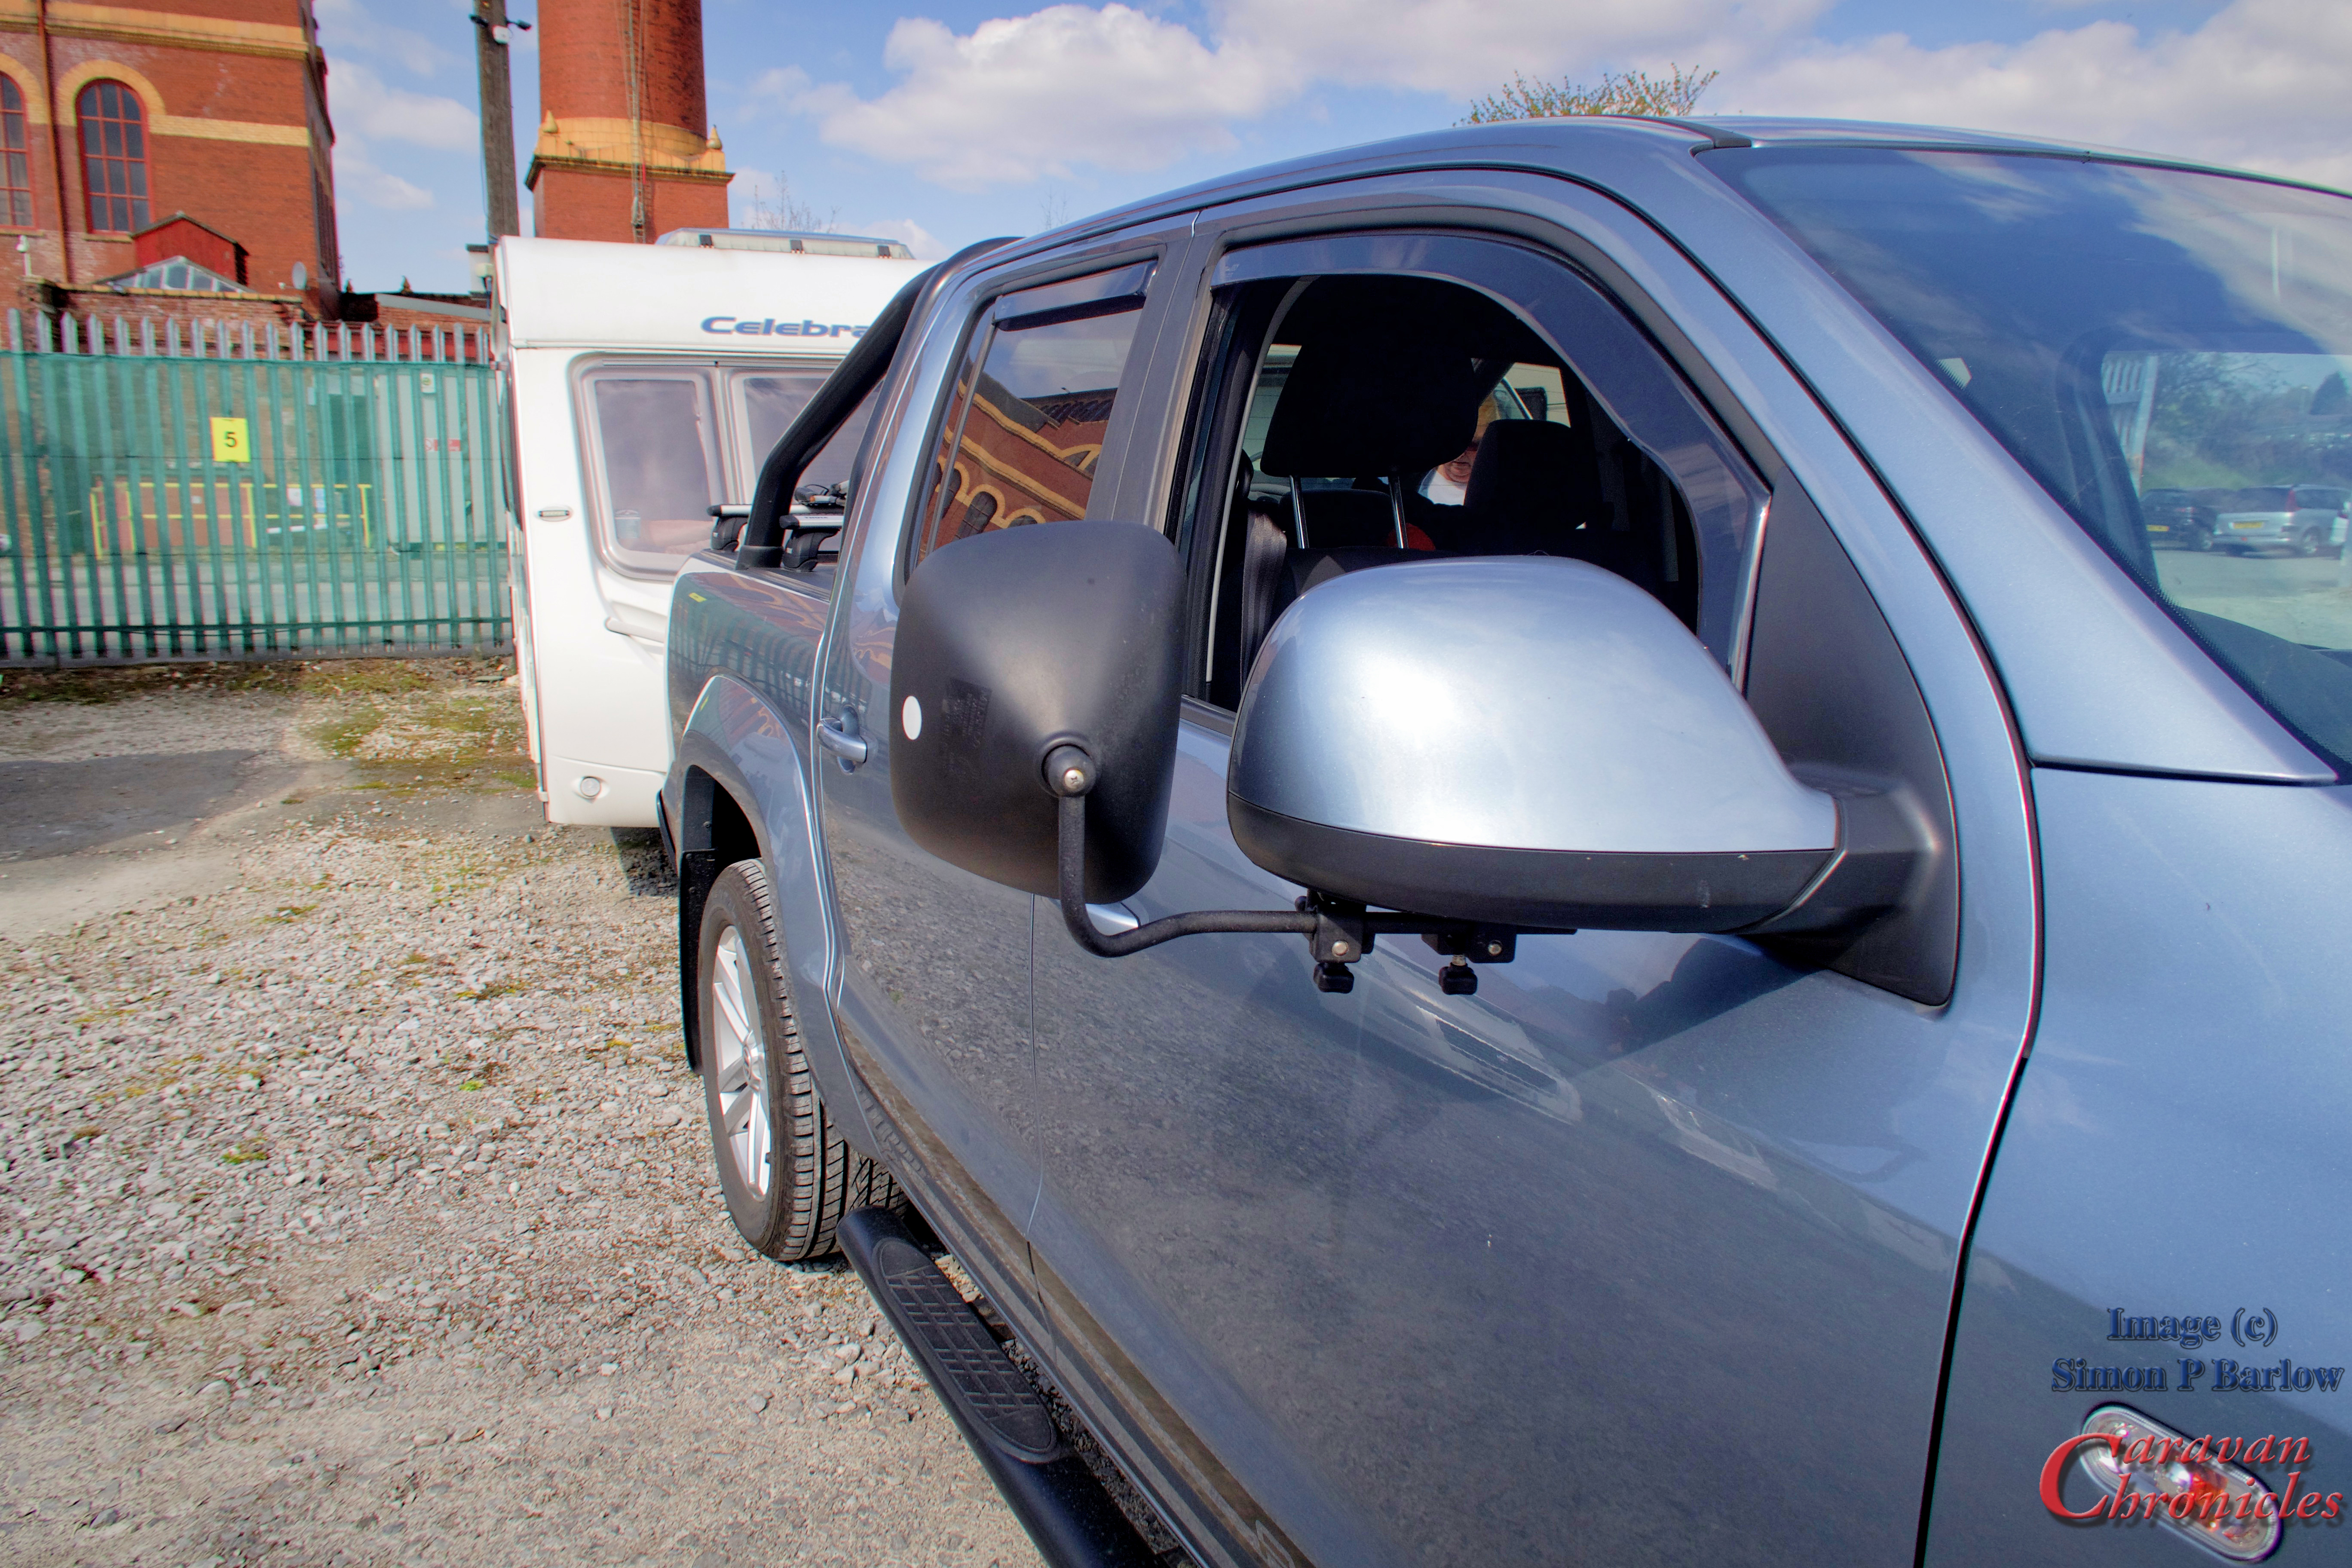
As you can see in the photo above, the reflective face of both mirrors is in near perfect alignment… and for me that makes it easy when driving as I don’t have any perceived shift in focus. The picture below is from the drivers position… I put the camera as close as I could to where my eyes are and I get a great view rearwards. Note that installing the mounting clamps on the bottom edge of the door mirror does not block the forward side view over the door mirror.
The driver’s side was bent the same… just opposite ‘handed’ and the length worked out right for the height too.
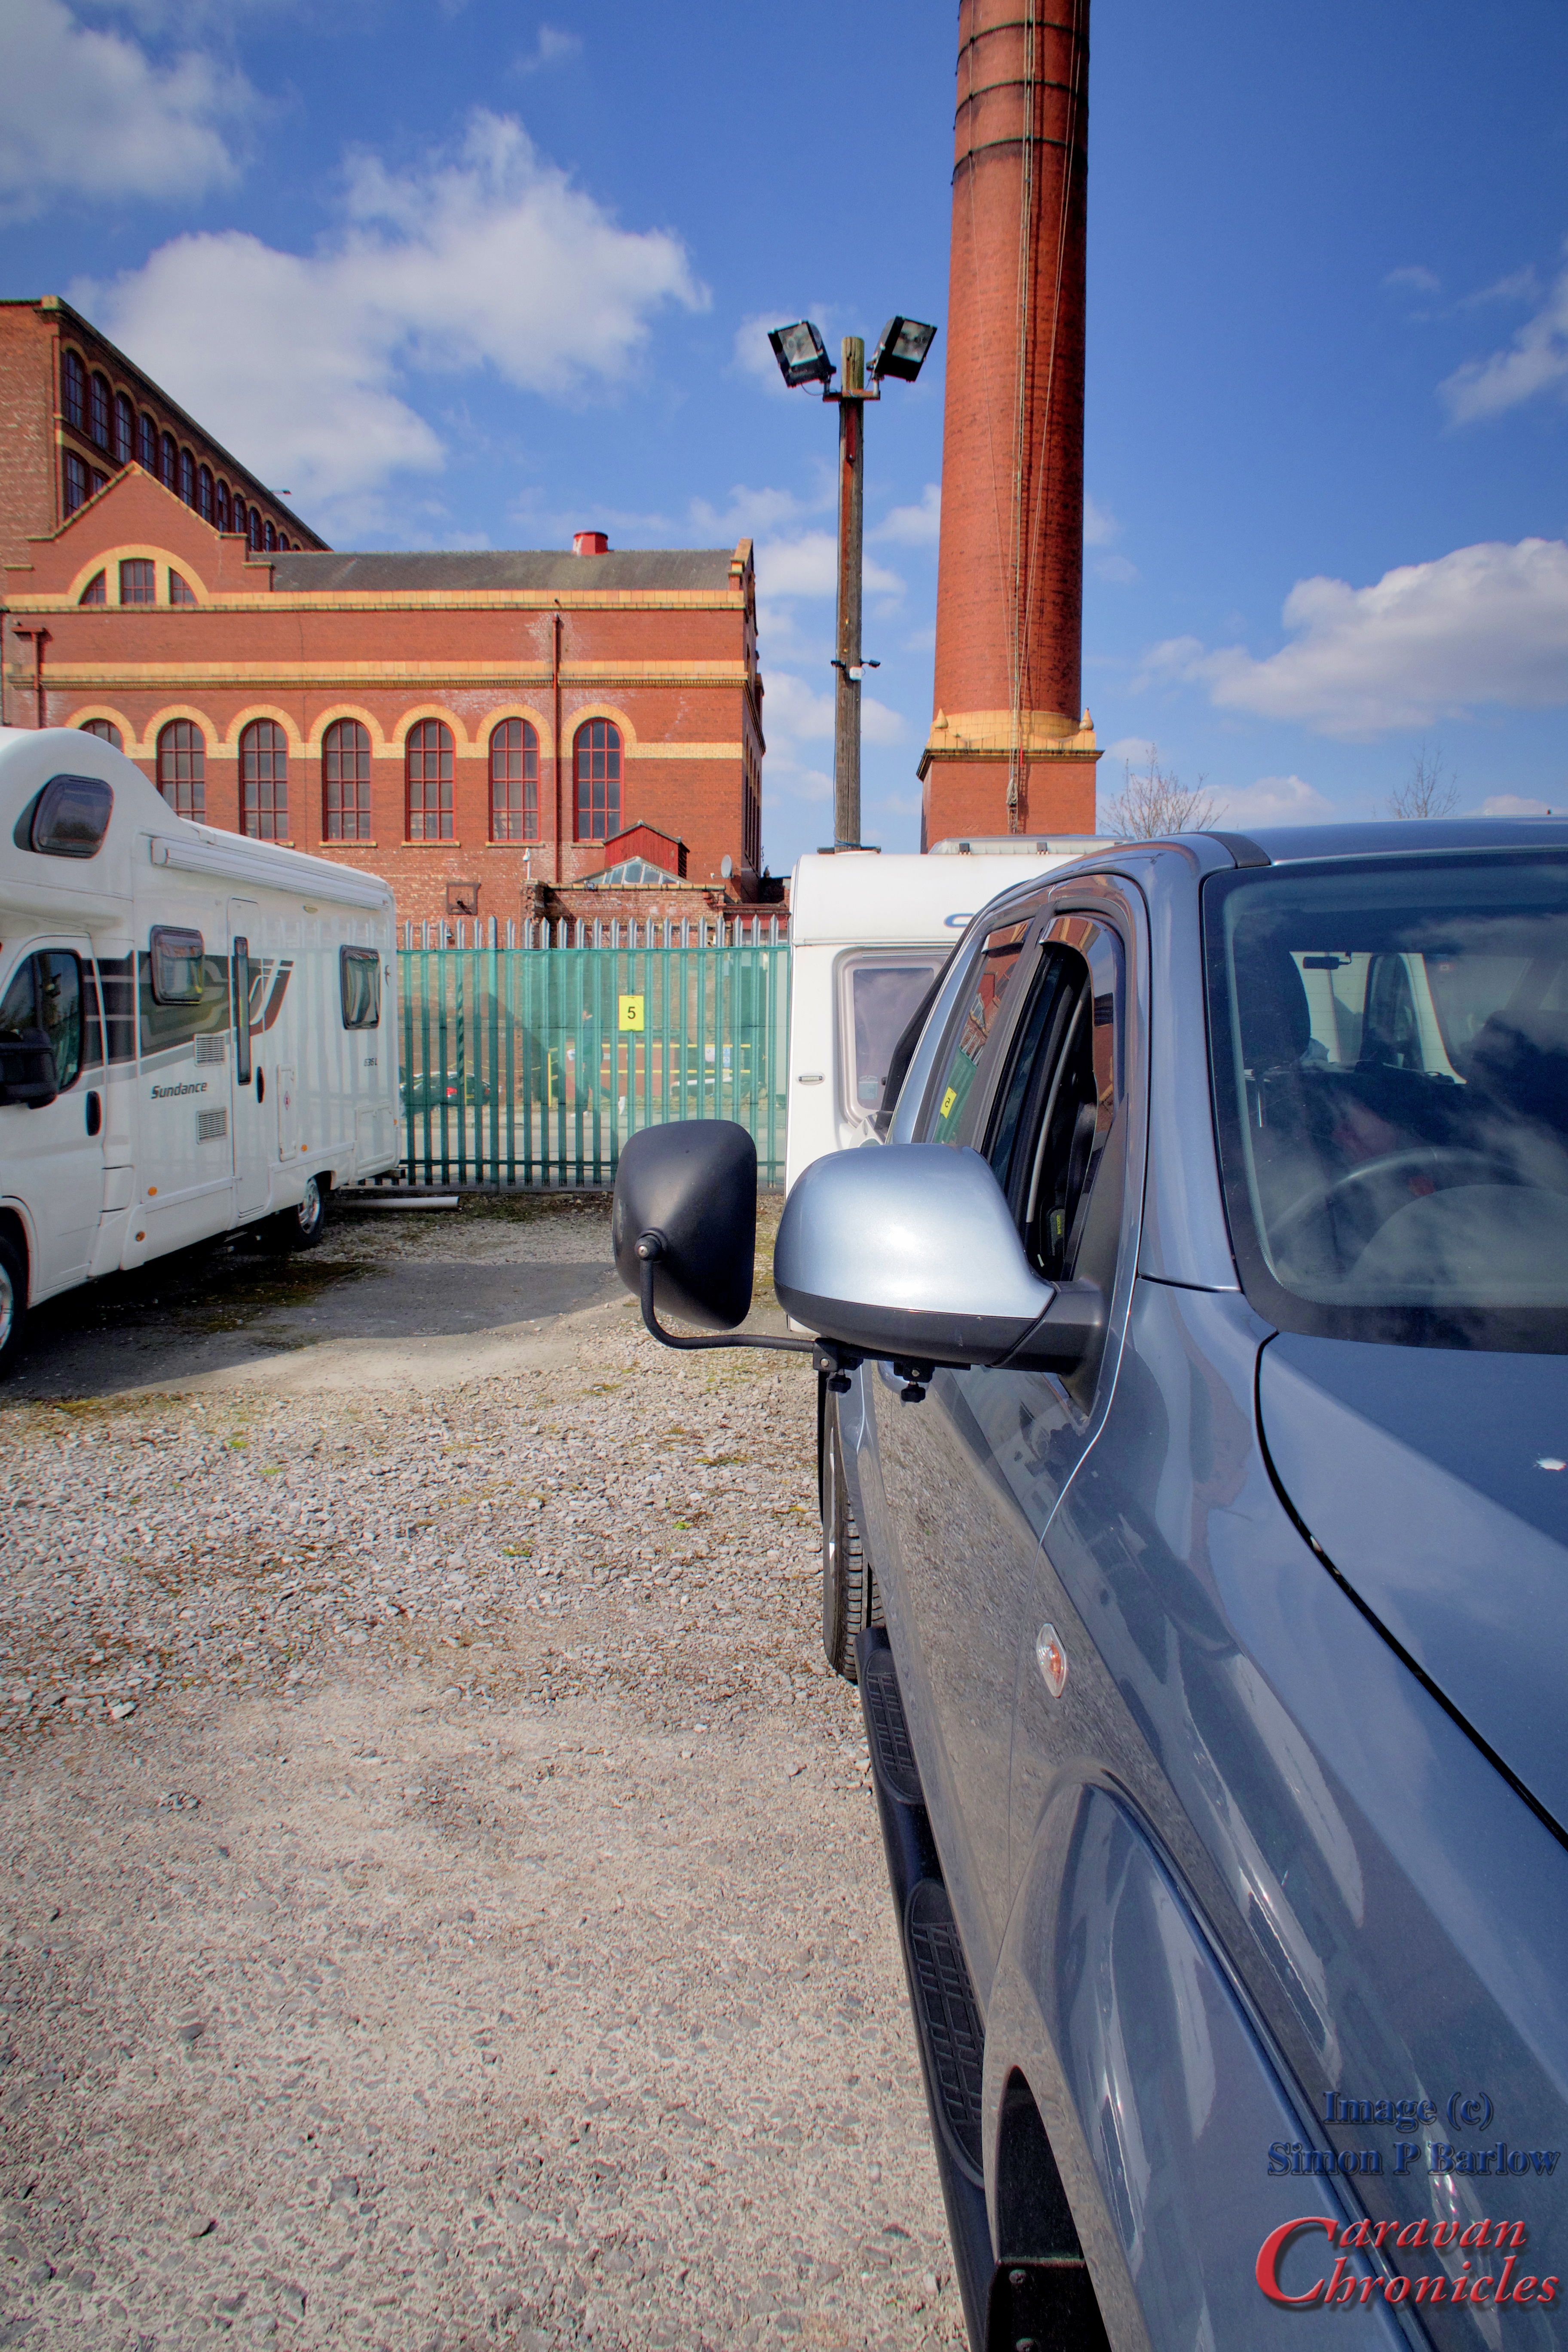
When seen from the front… even though I’m not quite ‘square on’ to the caravan, I’m angled slightly to the left when sat in the drivers seat, the mirror is fully outside the extended side line of the caravan giving me a great view.
To finish…
I gave the now bent and drilled tubes a light emery and de-grease followed by couple of coats of grey acid etch primer. This was topped off a few days later with a fine bed liner spray. This game the arms a durable coating plus the bed liner finish is quite ‘grippy’ and allowed the clamps the hold fast without too much yanking on the knobs.
We have been using these now for about two years and for me they work out just fine.
Shopping…
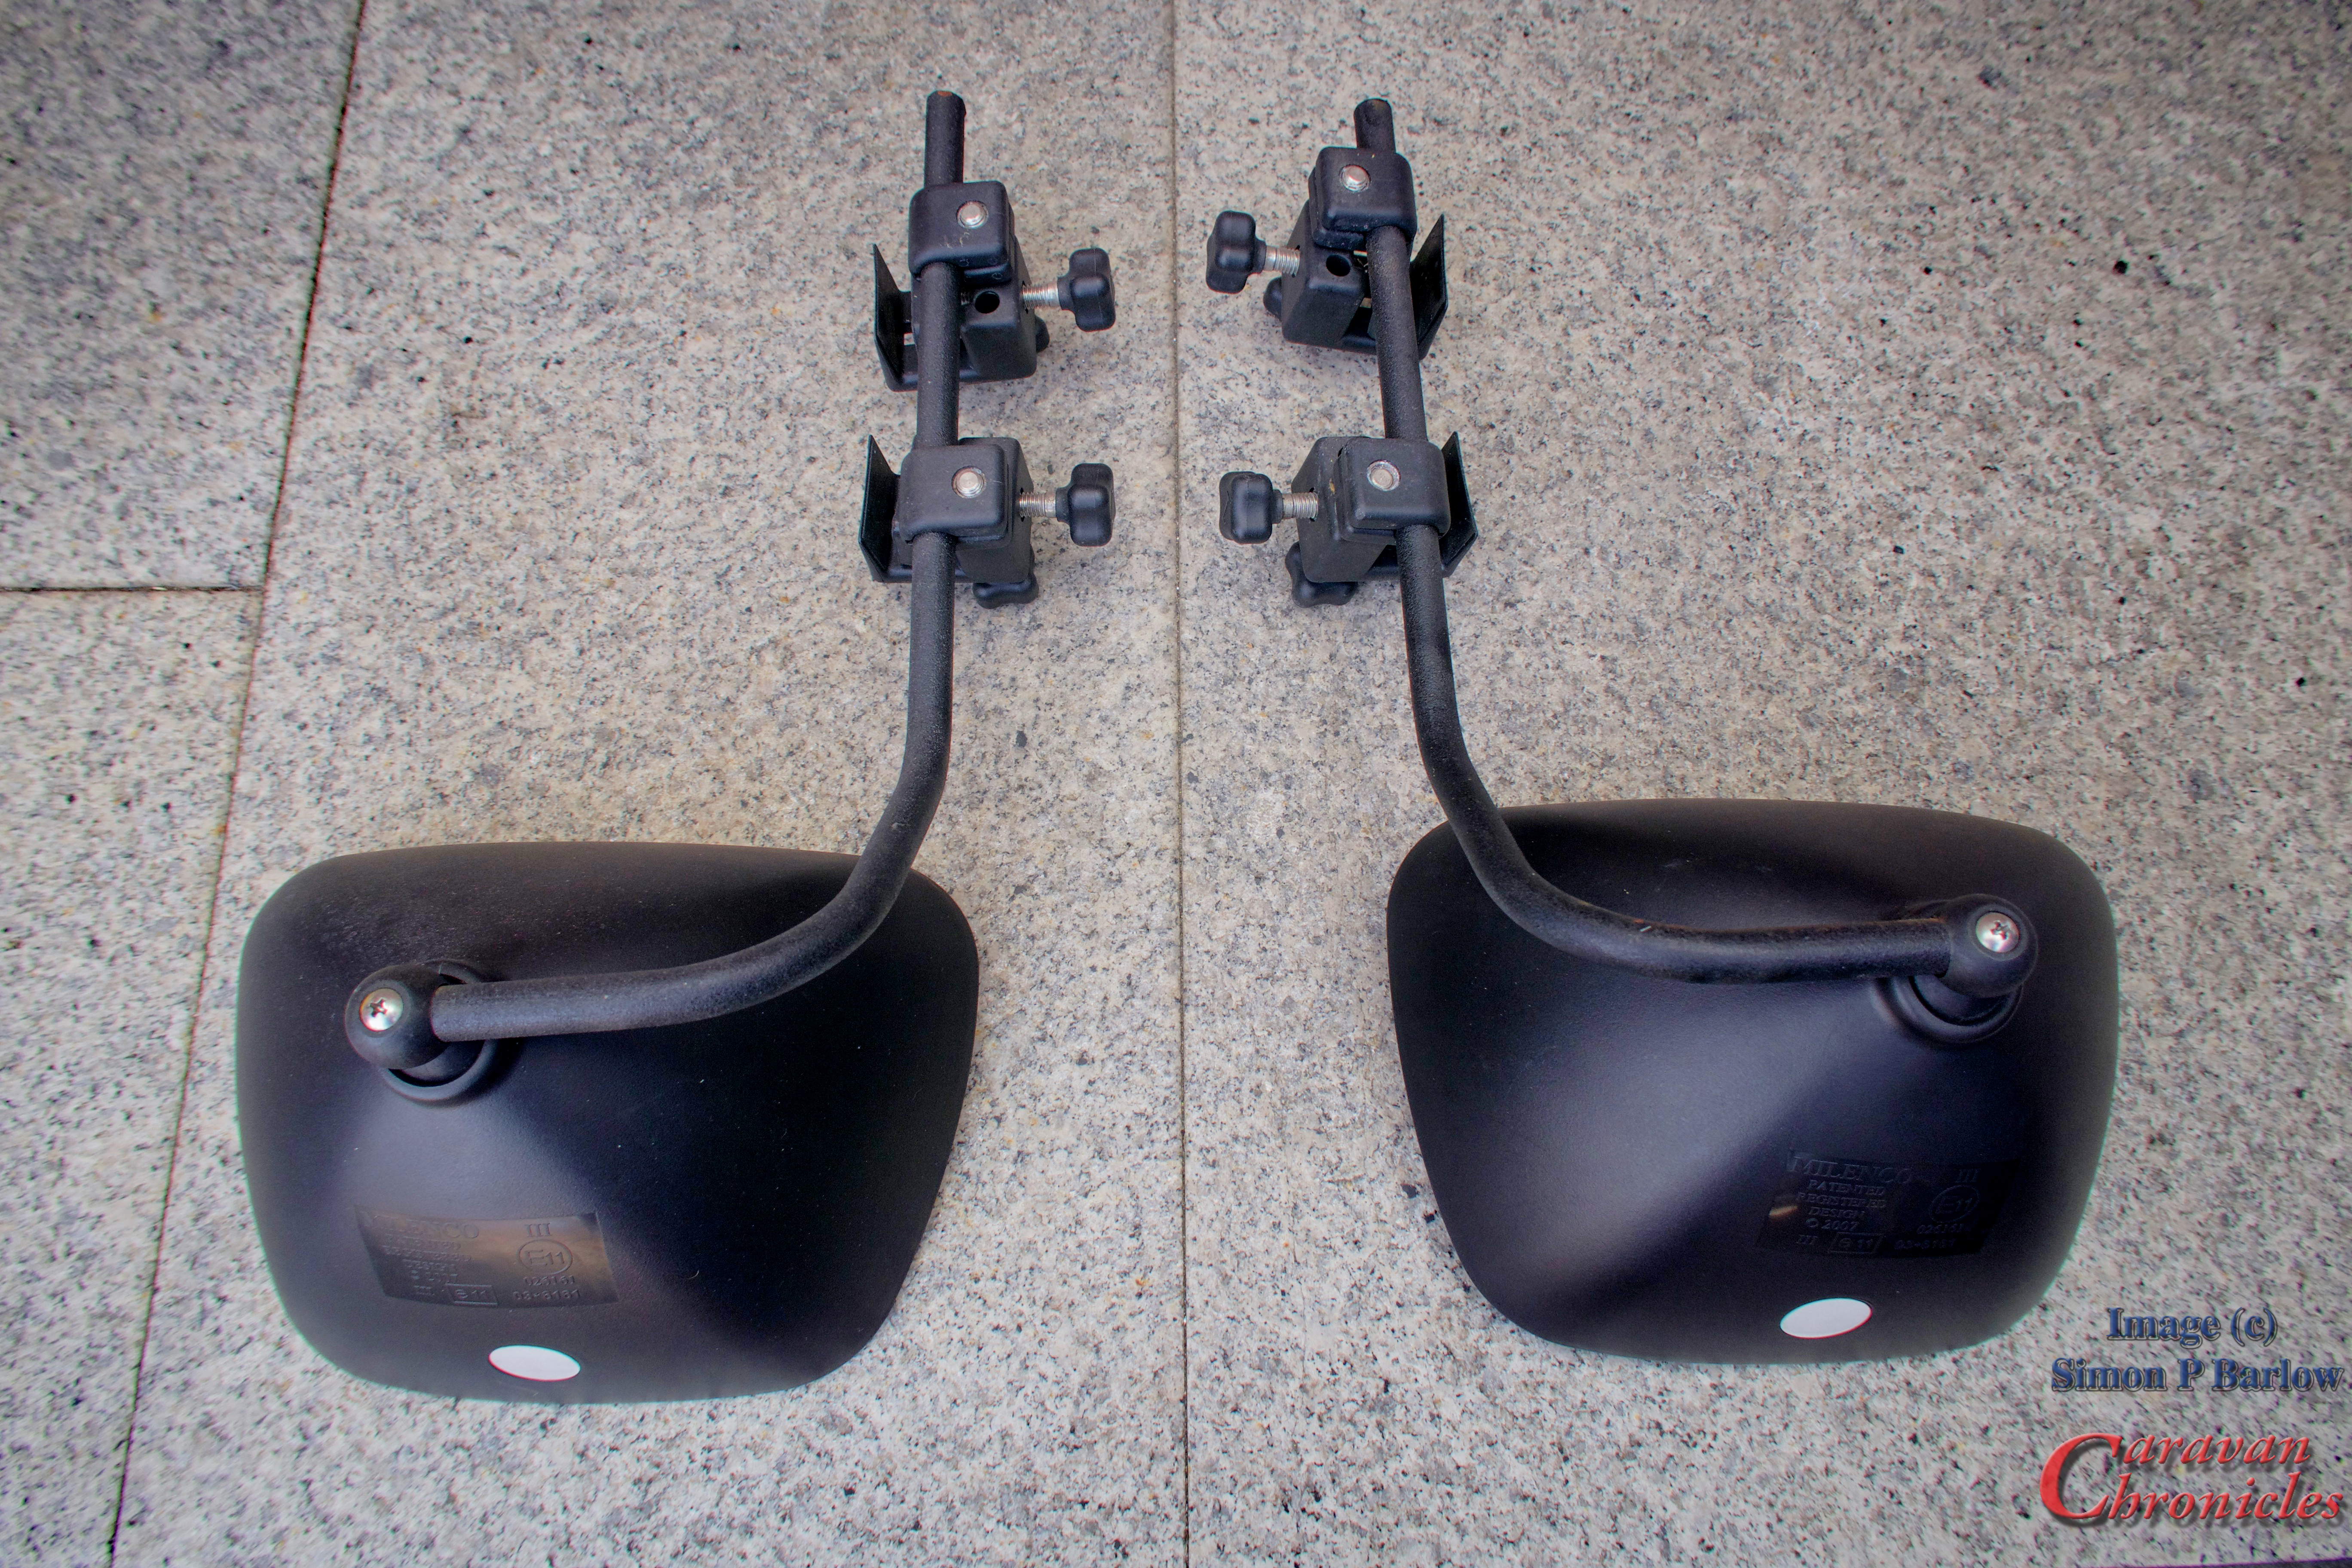
I had all this stuff in the Bat Cave as it was purchased for other projects, so the mirror arms didn’t really cost me anything. Both arms were made out of one 1 metre length of 12mm steel tube.
The tube bender I paid less than £30 for it about 12 months ago from Amazon. The 12mm Steel tube, again from Amazon was around £4 for a 1 metre length and the Truck Bed Liner paint was around £8.
Just for comparison…. the original supplied arm against my contrivance…. and yes… I have now sorted that bit of surface rust out! (I missed a bit when spraying)
Following on from my last post – Never Admit to Being a Caravan Designer (Well Not to Caravaners!) I was floored by the number of emails I received on the subject of design. So after our trip out to the Manchester Caravan & Motorhome show at Event City a few days ago, I thought I’d sit down and pen a few more thoughts on the subject.
I believe that if you store something where you use it, it will make your life easier. One of the big items that almost every caravan wrestles with is the Aquarol. its bulky, fairly lightweight when empty, often wet from the liquid sunshine we enjoy in the UK and sometimes muddy. Where do you put it when travelling? OK, so you buy a bag to sort out the wet and muddy bit and maybe just put it in the doorway… or in the shower tray. That seems like a good place. Just carry it through your nice clean van and put it in the shower tray. Sorted…. unless you have a mid bathroom shower that has the shower ‘conveniently” located over a wheel so the floor has a step in it. The designers sell it as a feature… “You can rest your feet on it when showering” they say. However don’t stick your Aquarol in there if you have bi fold doors!
A fellow caravan enthusiast who shall be nameless – I’ll call him George… decided that this would be perfect for storing the Aquarol. He put it in the shower of his previous rear bathroom outfit for years without incident so no need to change anything. Upon arrival at site in with the first outing of the shiny new caravan all was going well until Mrs George popped her head out of the door and exclaimed to George that she could not get the Aquarol out. “It’s in the shower dear” exclaimed George. Irritatedly “I know that I can see it but I can get it out” came the rather louder reply. On examination of the problem George discovered that the carefully placed Aquarol had somehow shifted and was now preventing the bi-fold door from opening therefore stopping it’s extraction and subsequent deployment and use for brewing that much-needed cup of tea.
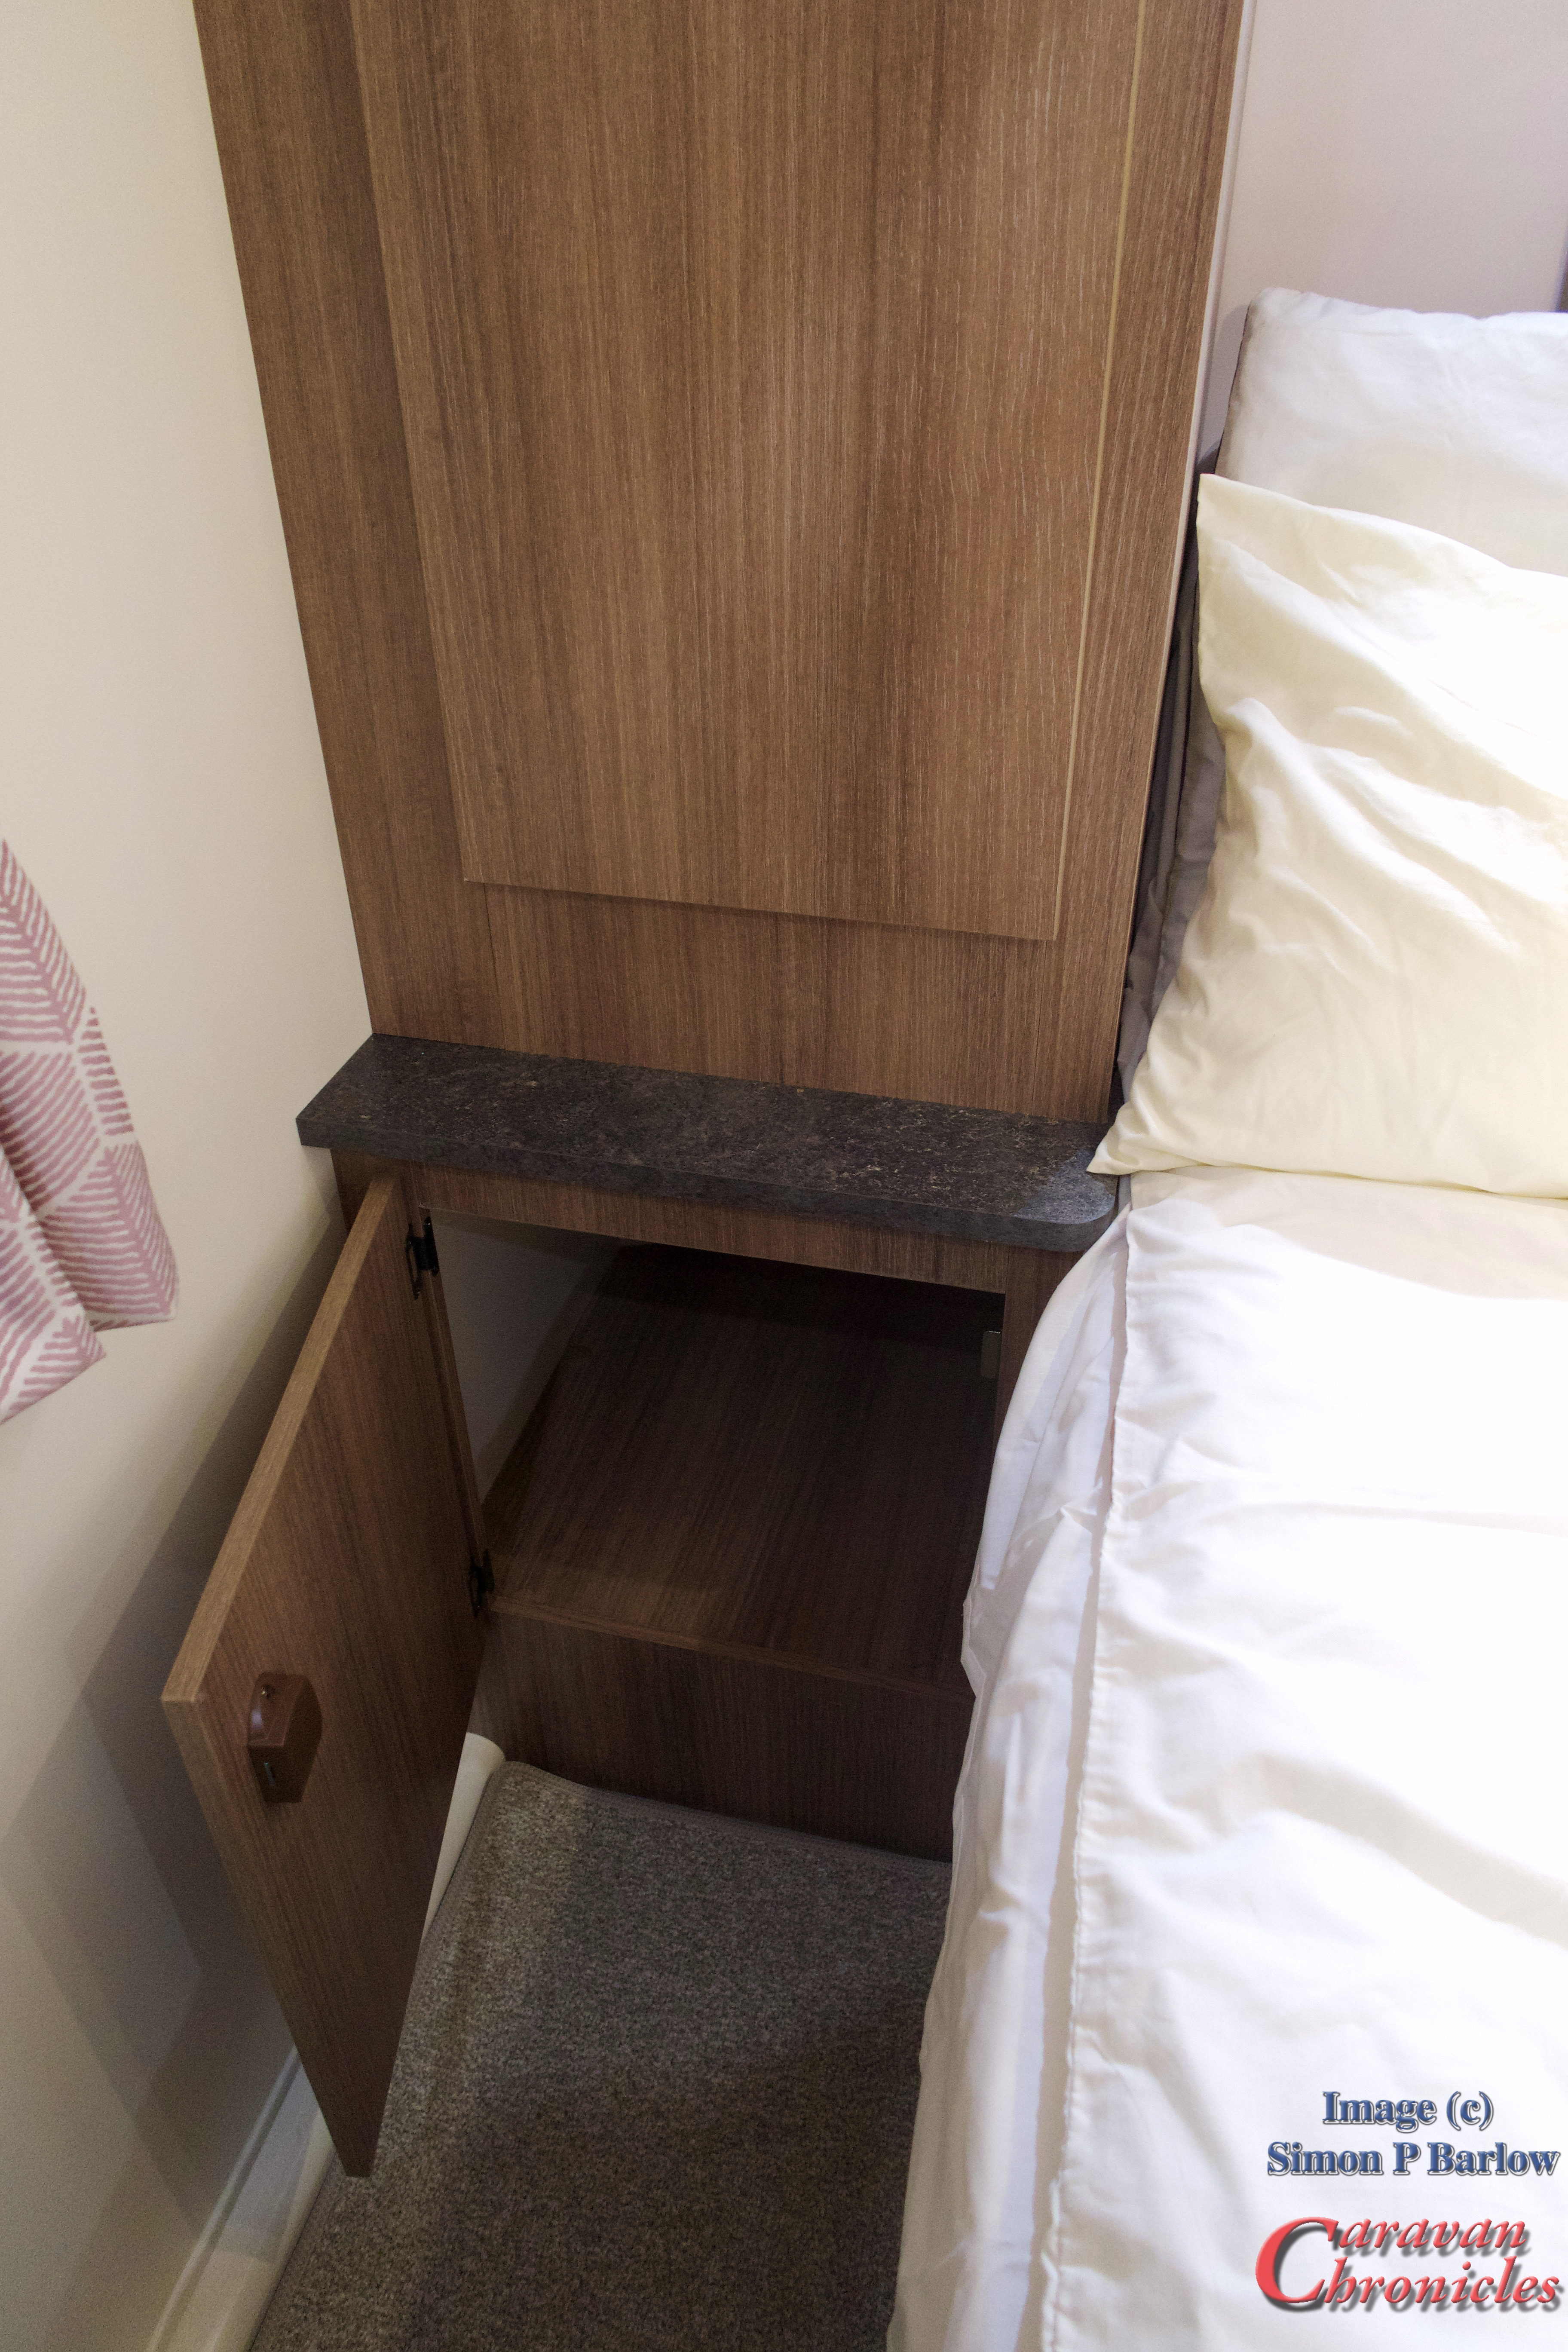
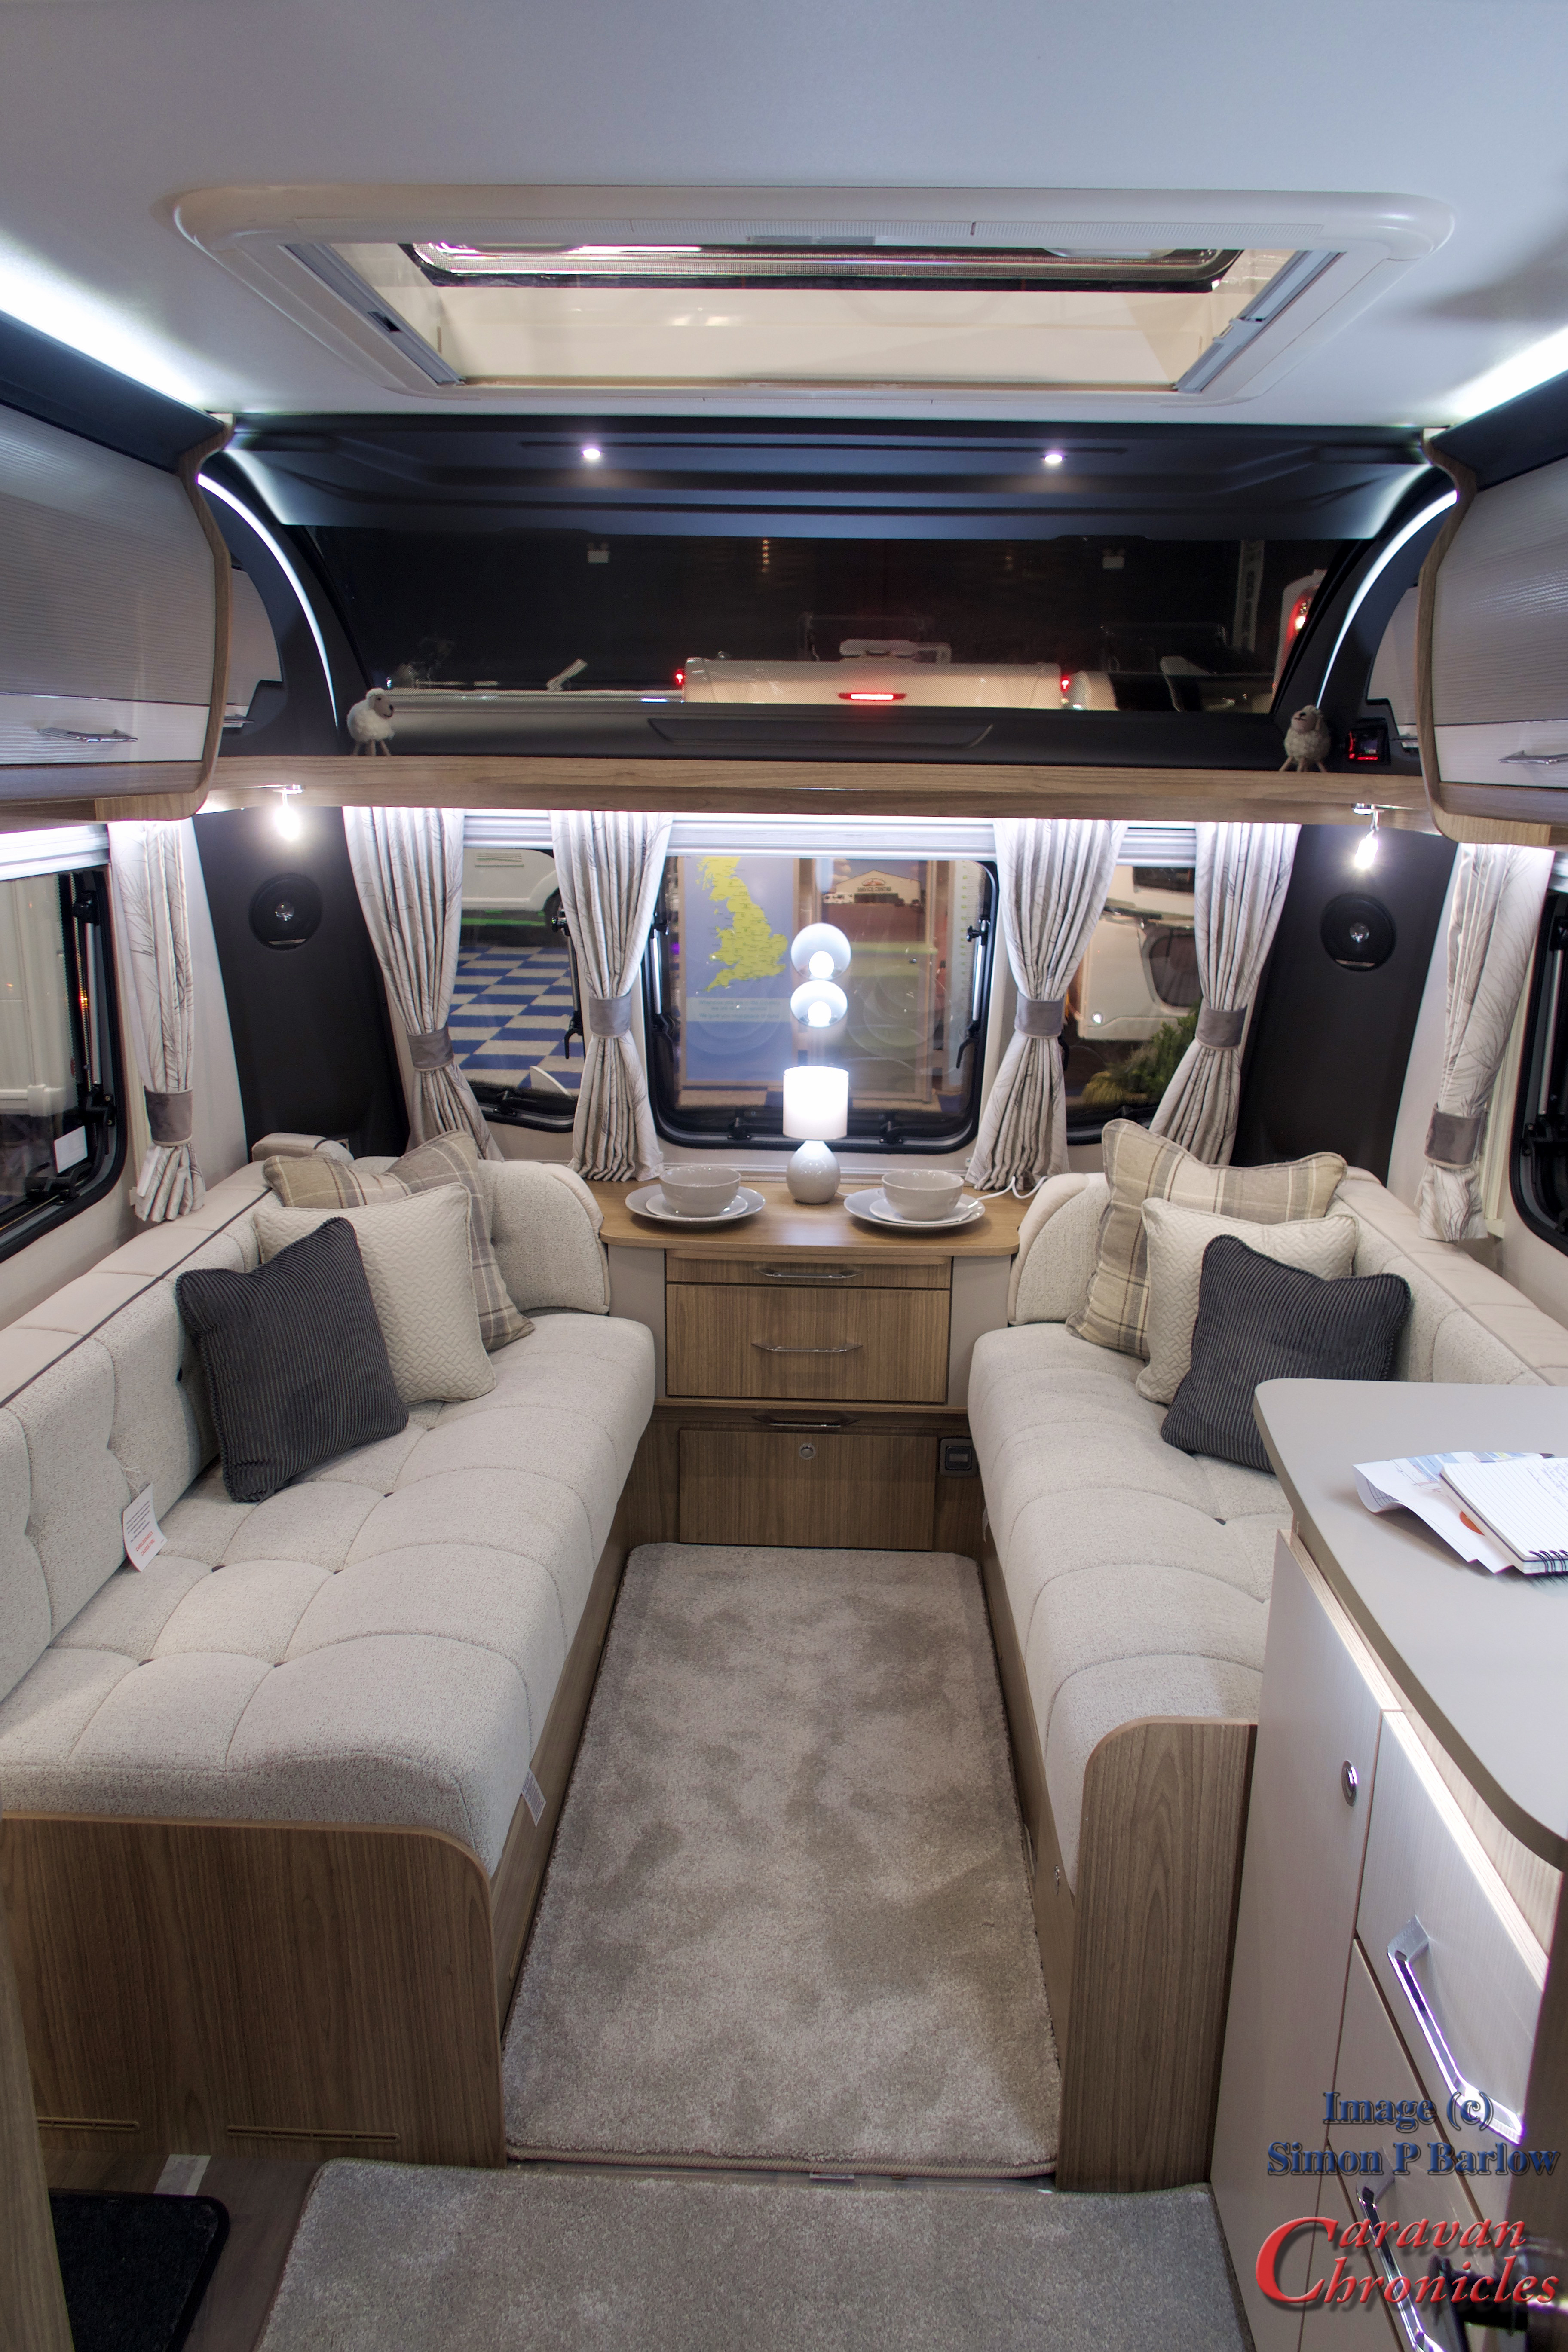
What’s the moral of this story? Well if you store something where you use it it will make your life easier. So as nearly all caravan users possess possibly one of the best inventions ever for transporting the splashy stuff about with ease why haven’t caravan designers thought about this? I was thinking of George when I was pondering the uses of this cupboard…..
There is a matching one on the other side funnily enough… but what did the designer have in mind for these cupboards… shoes (who would want to put wet shoes away in there?) Handbags…. maybe but I prefer to hang mine on a hook. It looks great… on a computer mock-up but as for use, well maybe I have a better idea. As they are right at the back of the caravan you really would not want to store your collection of beach pebbles in them.
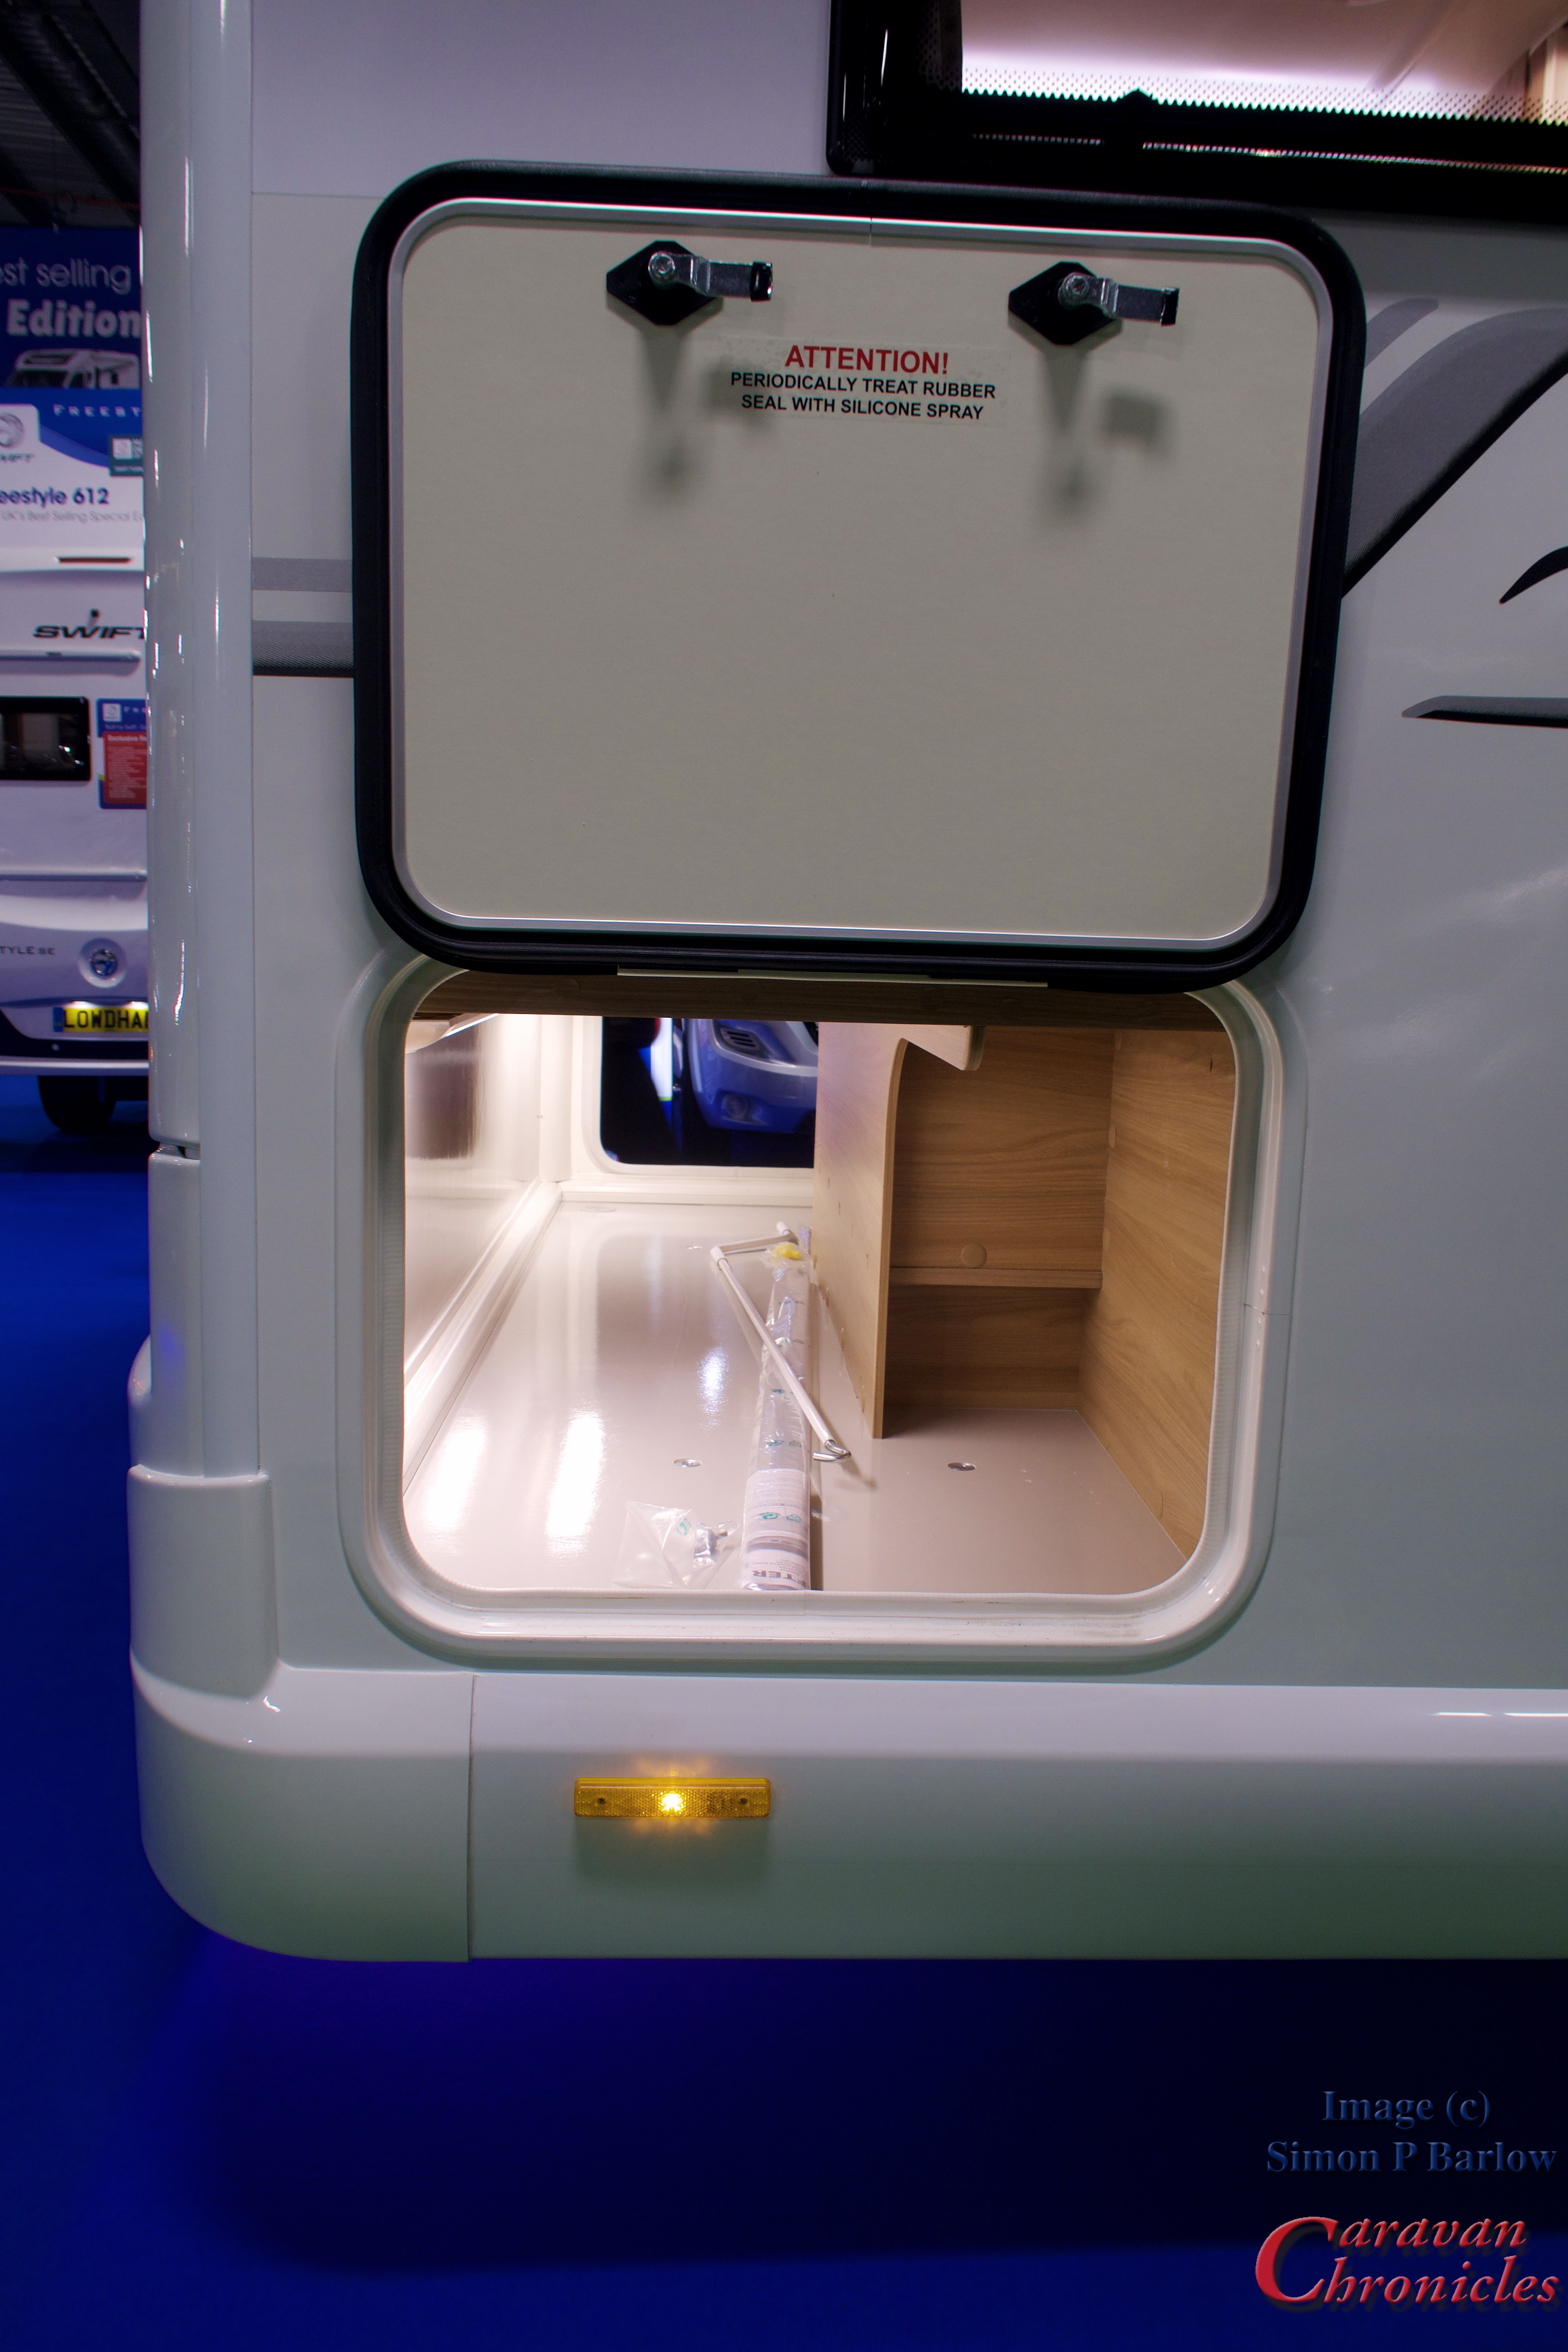
Instead of a cupboard, just block it off and instead create a wet locker across the back of the caravan and stick a door like this in it……
… it may need a bit of adjusting size wise but imagine a wet locker accessed from the side that you use the Aquarol and wastehog on that you can simply throw these two bulky but relatively light items in… and there would be room for your wet and muddy mains cable too! All right where you need them.
Now here is an idea…. put the water inlet in there along with the mains inlet and a small hatch in the floor…. save on cutting holes in the side of the caravan and it means we all might just get away with using shorter mains cables!
Caution Vehicle Reversing
In a galaxy far far away… oops wrong blog…. I recently watched a chap valiantly trying to manoeuvre his caravan onto an awkward pitch using his motor mover. Stone walled raised bed one side, overhanging branches, awkward access angle all on a short pitch with a stone wall at the back of the pitch. Normally I’d postulate that the chap in question would have been able to perform this manoeuvre on a sunny afternoon with remote control in one hand, a mug of tea in the other while carrying on a conversation with the couple two pitches down. However at eight o’clock on a winters eve in near wartime blackout conditions required the use of a head torch (flashlight for my US readers) and a lantern held aloft by his partner and much wandering side to side and swivelling of the head to direct the head torch in the desired direction.
We don’t have a motor mover… for some reason Sue seems to take enjoyment from me sweating like a traction engine driver at a summer steam rally when reversing on to a pitch… but if we did, the question I’d have to ask is why don’t they have a 13 pin socket wired in so that you could simply plug-in the caravan’s road lights and turn on the reversing lights, hazard lights… heck even get the marker lights and brake lights to work. I’m sure there are people out there that have to detach their caravans on the road and reverse them into their drive and having simple flashing hazard lights and operational marker lights would be a good safety feature.
I have a small cunning device waiting to be fitted…. it consists of a remote key fob and a couple of solid state relays to be mounted in the caravan. On selecting reverse while seated in the vehicle I can simply push a button on the key fob and it will turn on the awning lights and can be made to turn on under floor LED flood lights to light up either side of the caravan. It stays on for a pre-determined time that can be adjusted so if you have to pull forward for a second attempt (highly likely) the lights stay on. Just waiting for a suitable time to mosey off down to the caravan storage site to do a test fit.
The Perfect Caravan
For those go you that have been following the blog for a while will know we have been flip-flopping like a stroppy teenager over getting a new caravan. Well we were…. then we weren’t than we were, then we changed our minds about what we wanted. Then we couldn’t find one and we changed our minds again… anyhoo we managed to tick more boxes off our list with one of these than any other…..
So the question is….. will we or won’t we? Will there be a deal at the NEC in February to tempt us…. or will we wait until the August price slashing begins?
By the way if you wanted to know how George managed to retrieve the Aquarol…. it required a wire coat hanger and a length of paracord…. and about four hours of fishing to raise the Aquarol up above the step in the shower tray.
It’s that time of year again, a few days before the opening of the North’s biggest caravan and motorhome show and the first of the New Year at Manchester’s Event City and again we are sat thinking about changing the van this year. Mind you we were convinced last year… and the year before we were going to change the caravan.
In 2017 we went to the shows, round dealers and almost did the deal. However a few things just kept us from signing on the dotted line. We also came close last year, but again there were design elements that just didn’t sit right with me.. or t least would make me compromise more than I wanted to.
So here is my guide to any caravan designers out there working on the 2020 design that they hope is going to be the next winner.
Looks and sounds good…
A locker containing a TV swing out arm…. OK stop watching American RV shows right now. What were you thinking guys… We don’t sit round campfires watching TV in the middle of the Mohave… honestly we don’t. If people want to watch TV in their awning I’m pretty sure they will have come up with a way by now that suits them. It’s not even like you designed the thing so that you could leave a 24 inch TV permanently mounted and closed away securely in the locker.
While we are on the subject of TV’s…. stop putting the radio in a cupboard in the front of the caravan… put it near where you provide a TV mount. A lot of thin screen TV’s have poor speakers and a great solution that many caravaners opt for is connecting the TV sound to the radio AUX input… but a lot don’t because it becomes a major challenge routing a pair of screened wires round and through all the cabinets. Make it easy, put the radio near the TV, install a AUX jack and sell it as a feature!
Own Up….
Right, which designer is going to own up to designing a storage space in the wardrobe in the rear bathroom of a van to store the table. Did you design the van and at some point while you were stood at the coffee machine someone say to you “Dude I didn’t see where you stored the table in your design” and you immediately rush back to your workstation and in a panic put in the wardrobe in the rear washroom.
Have you ever had to get a table out, and set it up with a caravan full of people balancing drinks when some one is shooting “PLEASE SET THE TABLE UP NOW… DINNERS READY”
It’s on the other side…. or end!
Right I want all designers to go and stand on empty pitches at five caravan sites and look round. What do you see? Bollards…. you read that right Bollards… at the rear of the pitch. Why there you may ask? Well designing a site or upgrading a site if you can avoid digging across a pitch to install services it tends to be cheaper and easier to reinstate the ground afterwards, so most are laid out that way for cost and convenience. Is been like that for quite a few years. So why do you insist in keep designing the power, water connections at the front of the caravan… and some of you just for good measure put one on each side. If you take the common size pitch and park your caravan in the middle throw up a mahoosive flappy tent thing on one side and connect up your Aquarol (other water containers are available) then try to squeeze your tow car down the other side – that is if you have the room with an 8 foot wide van – avoiding parking so that vehicle door can actually open without bashing the water container or the passenger can actually squeeze past.
Here’s an idea….
Here’s an idea…. put the water inlet and power inlet on the rear off side corner and while you are at it check out how American RV’s have a locker with all the connections inside and a convenient opening in the floor to pass the connections through. That would save cutting holes and installing expensive fittings. While you are at it moving the water about, here’s an idea, install a simple Hozelock fitting with a check valve and pressure regulator so when on a device pitch, rather than expecting customers to buy expensive adaptor fittings, they can just buy a cheap food grade hose to hook up. Could this be the next USP I wonder?
To off grid or not to off grid?.. that is the question.
I applaud the designer that moved the leisure battery from a side locker to under floor mounting and moved the gas bottle from the front to the side. Heavy items, get them low and in the centre I say.
However, next year go one step further… make the battery locker bigger to accommodate two batteries and ready for Lithium… which may mean insulating them. Nearly all caravans are sold now with solar panels, but it would be nice to be able to choose to install an additional battery to take advantage of the solar without having to start installing aftermarket sealed and externally vented battery boxes.
It’s behind you…
…. well it might be but I can’t see it. It’s time to offer a rear view camera option on all caravans now I think for safety’s sake. A lot of motorhomes are offering it as an option or a standard fit. While it is fairly easy on a motorhome as the display choice is dictated by the designer. For a caravan it’s slightly more complicated as some vehicles have rear view systems built-in, some have nothing so how do you decide what to install? Simple really.. most systems use composite 1 volt peat to peak video and there are dozens of components out there on the internet that allow this to be digitised, scrambled, flipped and sent vis radio, bluetooth, over power feeds and via IR so it can’t be that difficult or expensive to install a system with a remote screen at a sensible price point. The biggest hurdle for anyone contemplating installing a rear view camera system is actually mounting the camera on the caravan body and running all the cables.
Electronic Brakes…
Unless you have towed a trailer with electronic brakes you will never know how horse and cart our current over-run hitch brake system is. In the land of the… that lot over the pond, have been using electrical braking systems for a while and in the land down under (Straylia… YESSSS….. for John Cadogan fans) ALKO have been offering a system for a number of years that is really just an extension of their caravan chassis ‘kit of components’ and could easily be adopted for European component chassis.
Now a lot of you know from my past volumes of scribblings I kind of enjoy delving into caravan dynamics and I really want a caravan with electronic brakes. OK before the comments come stating that under current regulations you are required to have over-run braking system etc etc…. yep I know. However from my poking around this subject for over 18 months now, it seems that you can fit electronic brakes as long as the existing over-run setup is retained.
If you are still reading this go and check this out from seven years ago about a system that was going to be produced….. if I was setting this cones out I think I’d be going changing my undergarments…. www.youtube.com/watch?v=pIB7Rmhll9s\
Right, I wanted to keep this down to a short 1000 words, and I failed as it’s over 1300 now. I hope you have all had a great Christmas and may 2019 bring you new touring adventures and memories. We’ll see you on Thursday 17th at:
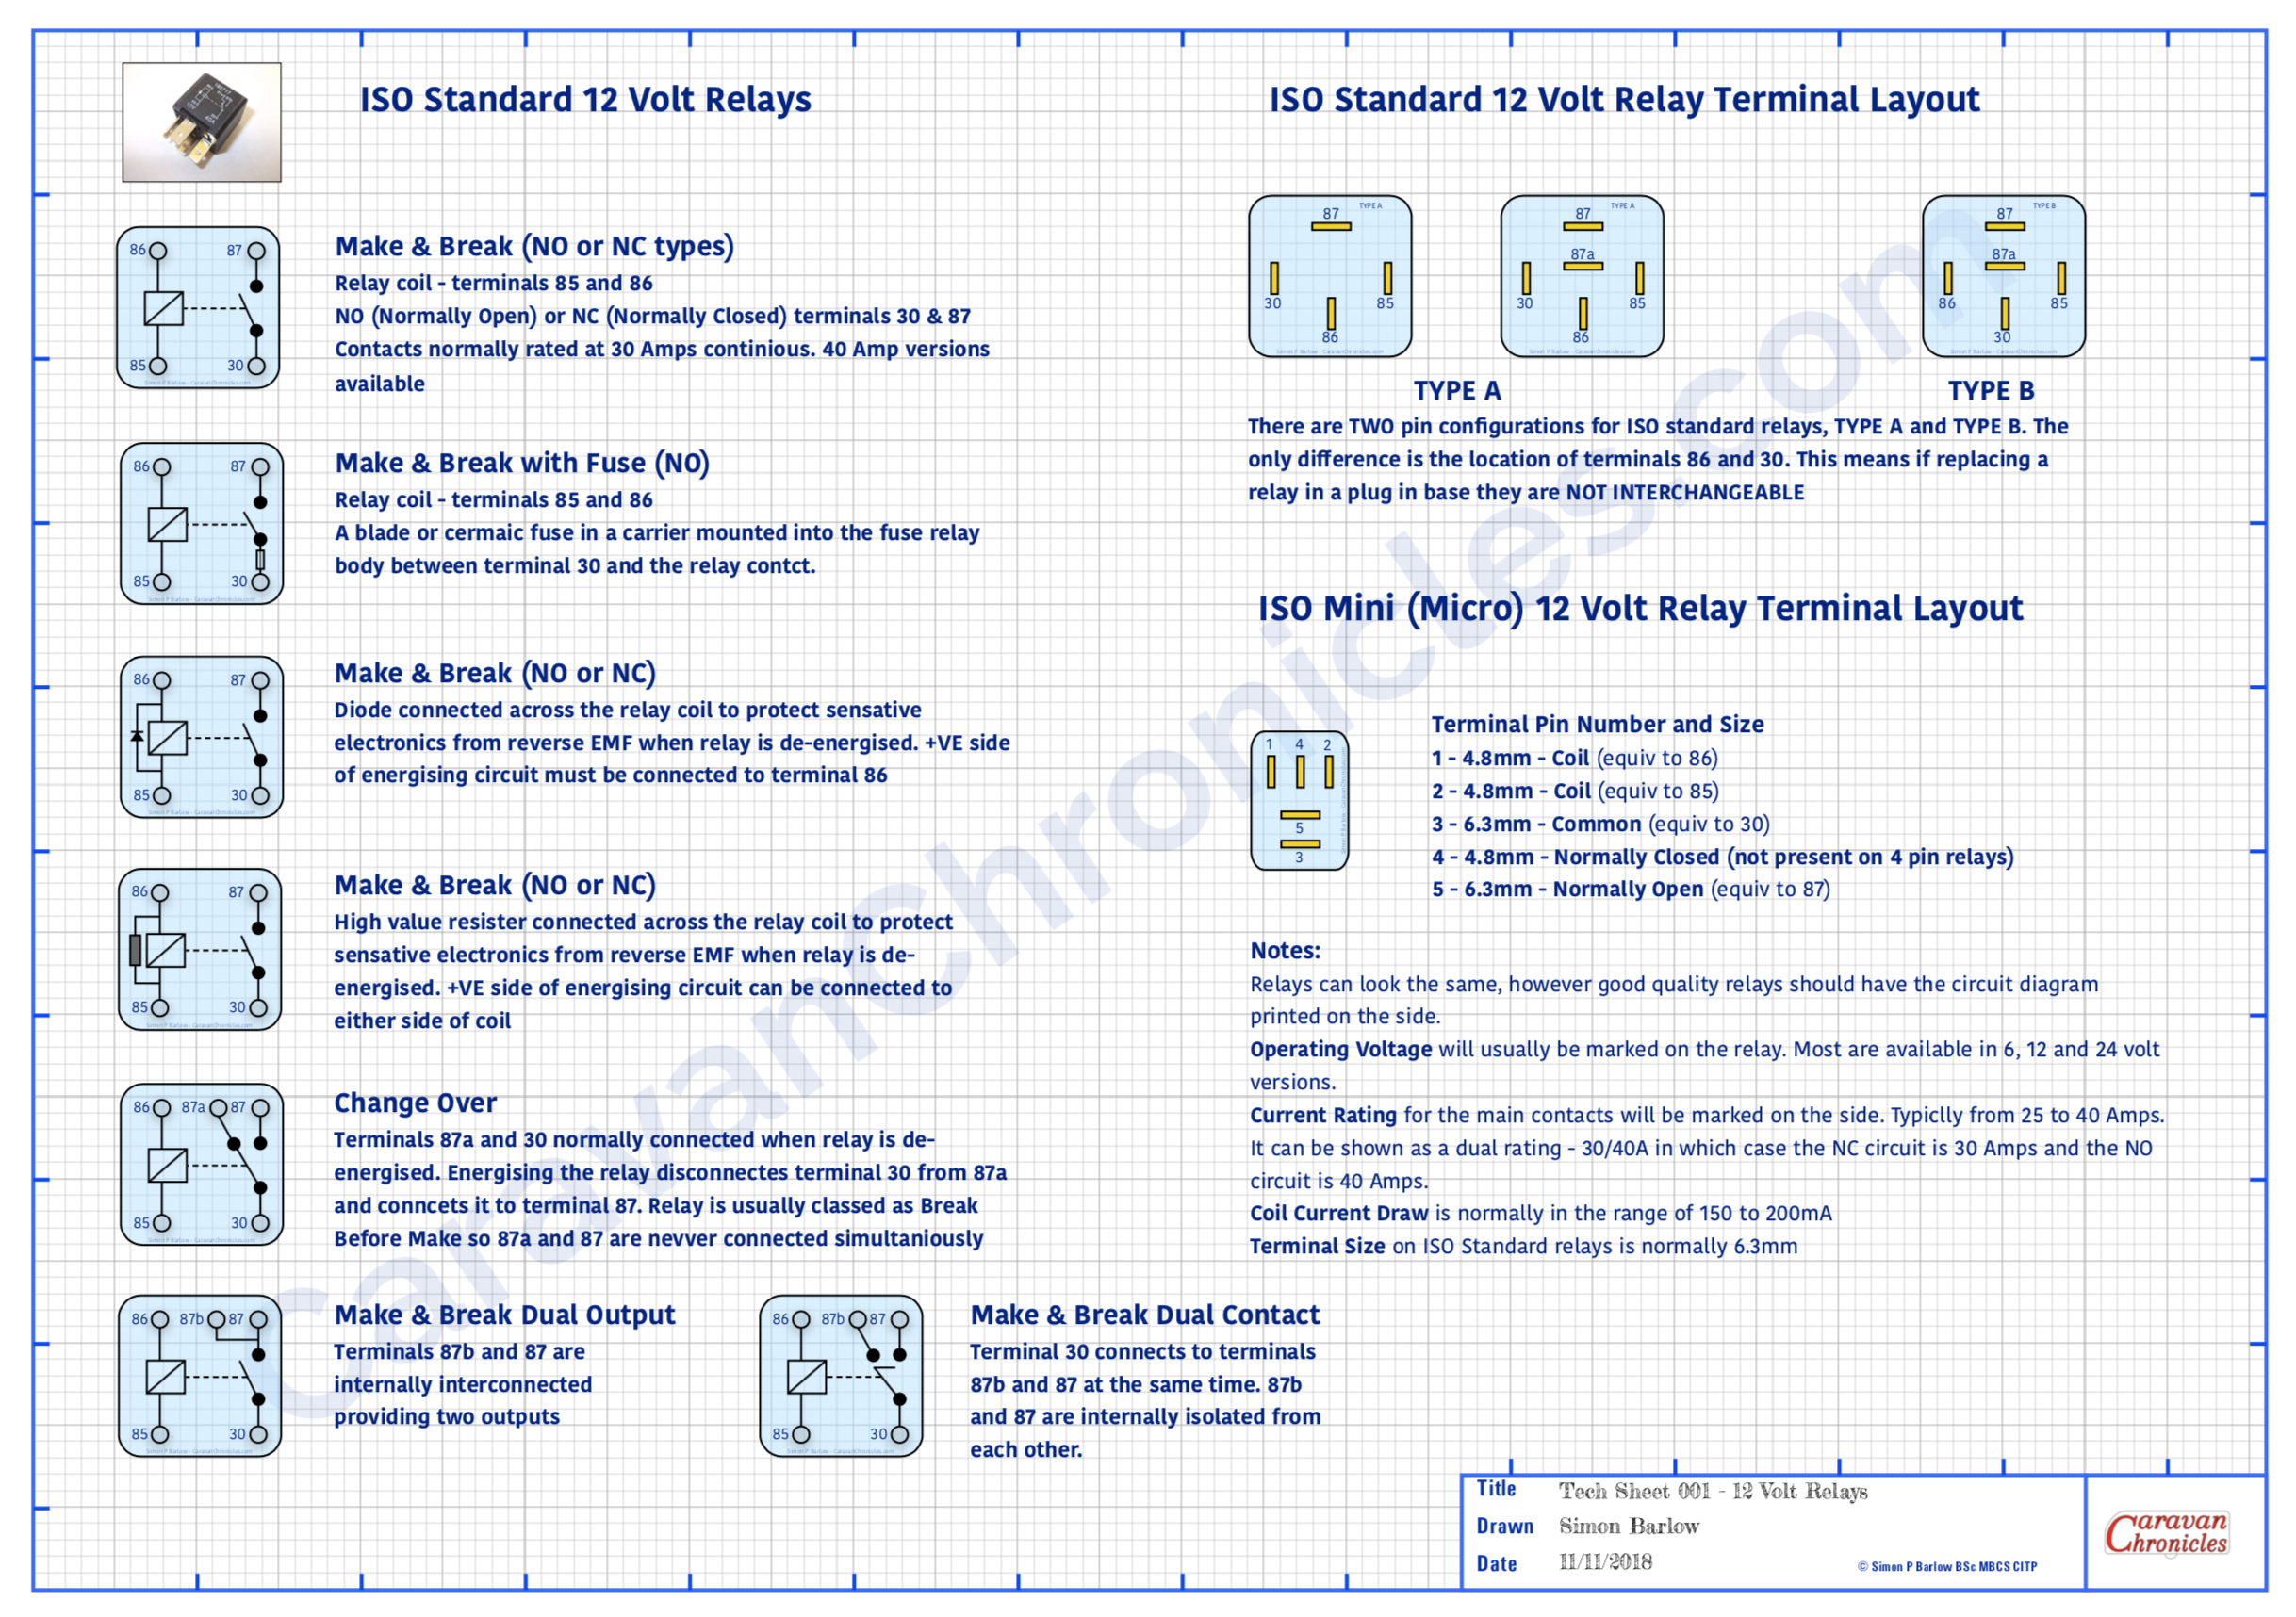
Ok, not one of my usual blog posts. I get a lot of email asking about various electrical items related to caravans and motorhomes and a few things seem to keep cropping up on a regular basis. One is to do with 12 volt relays… what types are there and what are the pin connections.
Another is to do with cable size relating to load and its relation to the length of cable…. “I have a 40 Amp load and its 3 metres from the battery… what size cable do I need?” type questions.
In the past I’ve emailed back with answers, but one caravan engineer asked me if I know of any information sheets that had this type of info that he could put above his workbench.
So I’ve produced a couple of A3 size PDF information sheets (they will print A4) that can be downloaded printed out and pinned up, shoved in your notebook, glued to the lid of your tool box or used to wrap that must have tool present for your beloved caravan or motorhome DIY enthusiast in your life (seasonal eh!)
(I have been told that Office World can print and laminate A3 PDF’s cheaply…. I never knew that!)
I have stylised them as technical drawings and I’ve had to watermark them and some of the icons as I found a lot of my drawings were ending up “as is” or edited on various sites and forums without any credit or link back to Caravan Chronicles. You are free to print out and use them for your own personal use, but if you wish to use them (or any of my drawings) for commercial use, inclusion in blog posts or forums please include a credit line back to CaravanChronicles.com and drop me a line to let me know.
We are just back from Chester Fairoaks after doing the Chester Christmas market and a bit of shopping at Cheshire Oaks Designer Outlet Village and will be adding off to York for a bit more Christmas Market action.
I have a couple of more information ‘posters’ in development but if you have any ideas for future offerings, drop a line in the comments below. Of course my legal advisor – Henry has asked me to point out E & OE
(Everything on the internet is improved by a cat apparently… so here’s Henry)
Its been quite a while since I did my first review of a TPMS (Tyre Pressure Monitoring System) back in September 2015 in fact, on a Tyre Pal system sent to me for review. I did like it but it did give me a few things to think about. Later on I got to test out the Fit2Go TPMS and I ran with that for about 12 months. However I still wasn’t convinced this was the one for me.
With the Tyre Pal I did like the information, but on a screen that size I would have liked to be able to see all the pressures and temps altogether rather than scrolling through each wheel. Although it did cross my mind at the time “do I really need all this info” and that’s why I liked the Fit2Go unit. It sat there quietly monitoring the wheels and just occasionally flashed at me to say everything was OK…. or beeped if there was something wrong. I did eventually miss not being able to see the pressure and temp of each wheel and started to think my earlier statement was flawed.
I had an issue with the Fit2Go unit at around nine months of using it. The batteries in one of the wheel sensors failed… and a couple of weeks later a second battery went down. This was a bit of an issue as the sensors on this unit were sealed and the batteries weren’t replaceable (a plus point for the TyrePal here!) Credit to guys at Fit2Go… now re-branded as Michelin – they sent me out a complete new unit and four sensors. I installed the replacement unit and sensors and ran with that for a while.
Going into work at around 04:45 in the morning, I pulled off our drive the unit started beeping, indicating a low pressure tyre. I pulled over and checked the small LED on each sensor… no flashing red indication. Tyres looked good, checked the pressure with the Fit2Go hand-held unit and all as they should be. I carried on. The beeping stopped. A few days later as I had just got onto the motorway it went off again, pulled onto the hard shoulder, checked each sensor and wheel… no flashing LED and all wheels looked OK. I also took the time to check the pressures again, all OK. On the fourth or fifth time this happened I gave up checking. It only seemed to happen with an early morning start and I started to doubt the info I was getting from the unit.
I started looking around for alternatives… mainly in the US for RV TPMS systems as they seemed to have a greater number of options. It wasn’t long after this that I got the e-Trailer unit to test. Which as well as checking the leisure battery voltage, monitoring the fridge temp and a host of other things had TPMS monitoring for your caravan wheels and sent alerts directly to your phone. With this fitted I had at least covered off the important wheels when towing. I just needed something for the truck. Looking around at what was available on Amazon.Com in the USA made me realise how much we are actually paying in the UK for this stuff. There were units branded for the American market that were identical to those in the UK for a lot less even with the poor exchange rate.
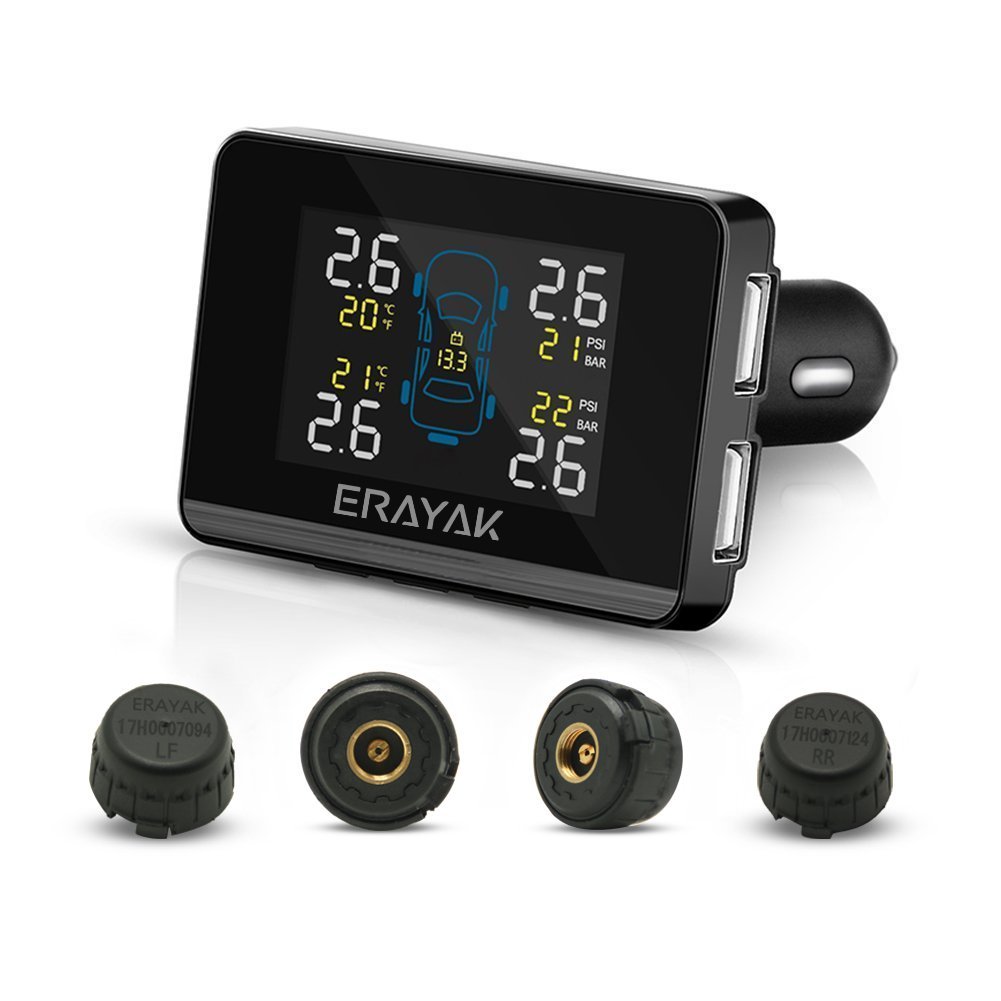
This set me thinking… could a cheap TPMS available in the UK be as good… were we paying too much? I found a unit on Amazon.co.uk for £50 and ordered one. https://amzn.to/2wv49TS
The unit had a couple of options for mounting. The sensors had replaceable batteries and were pre-coded to the unit. Each was marked with the correct location… FL, FR, RL and RR.
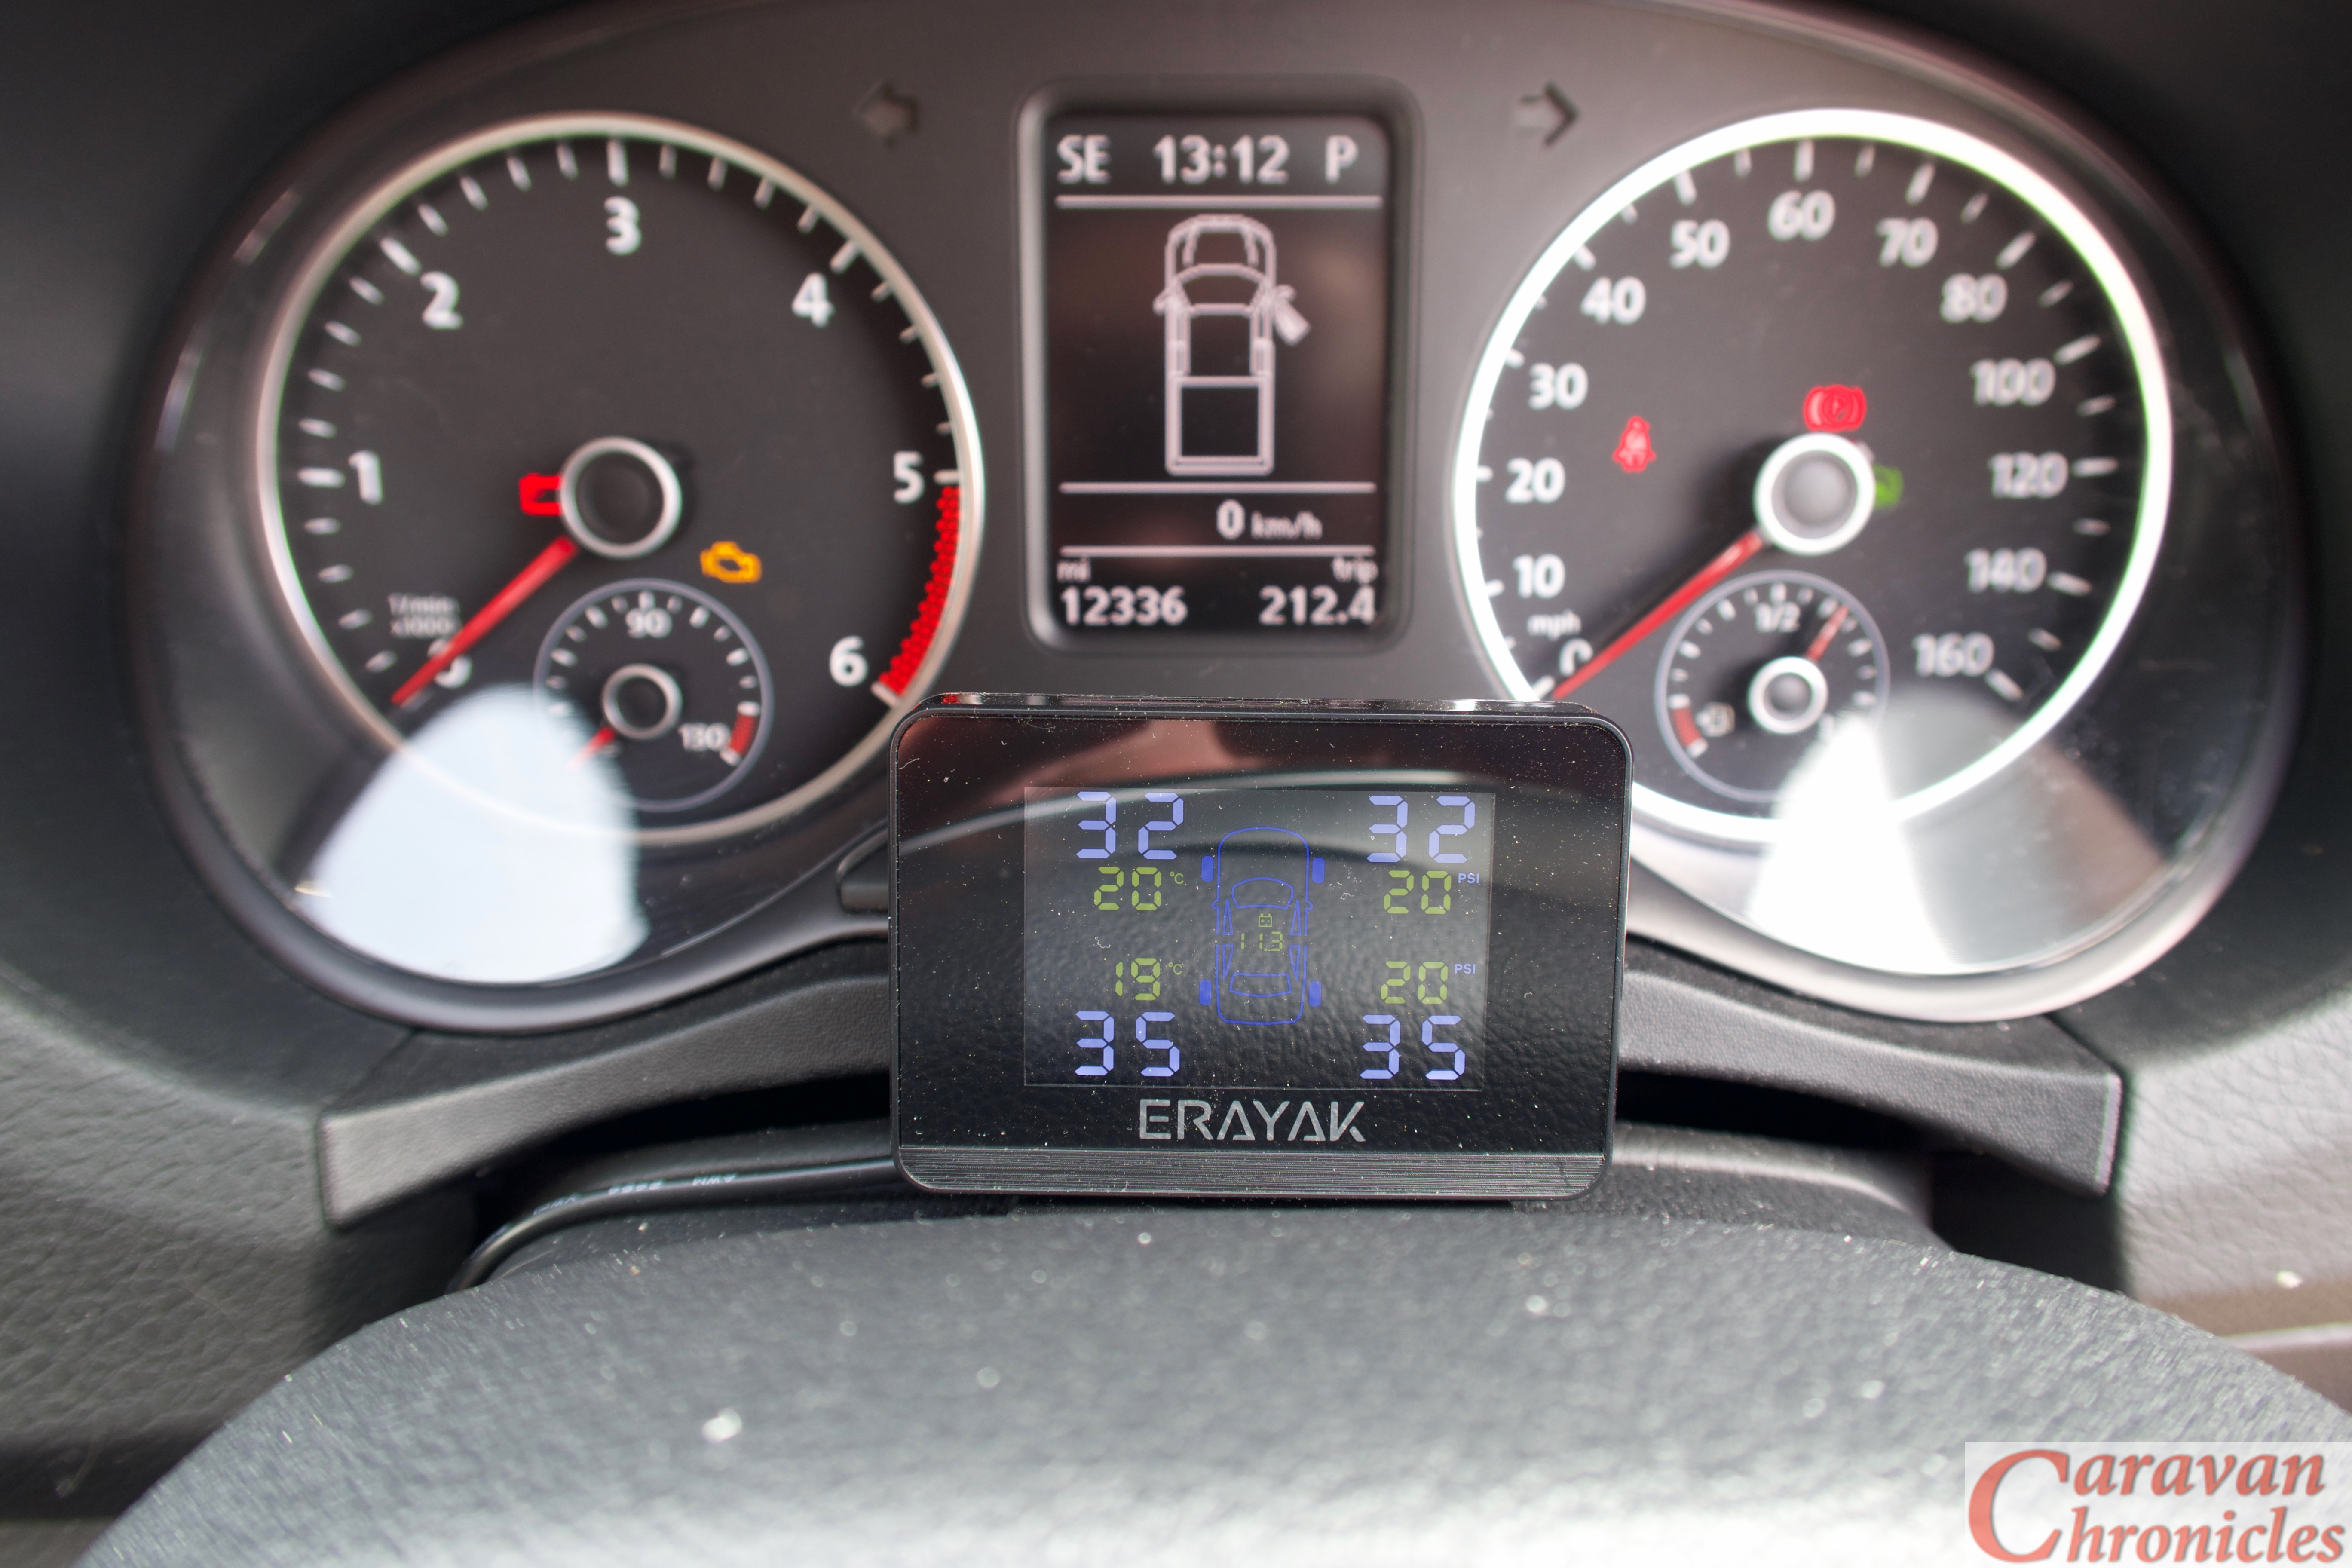
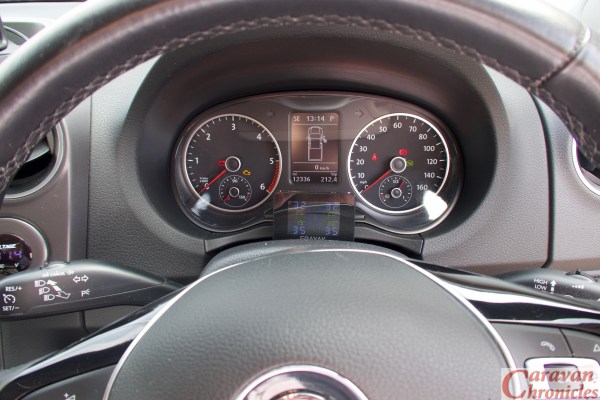
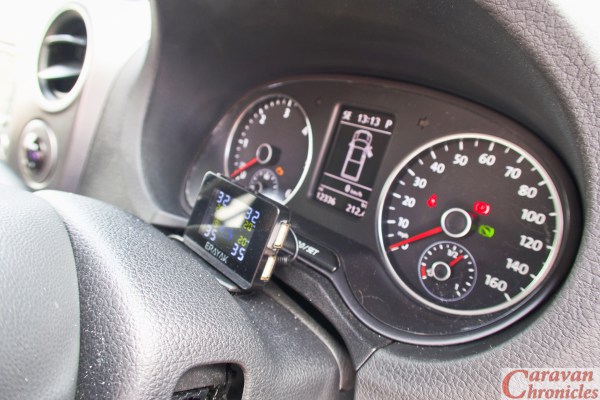
After much procrastination about where to put the display (it’s a man thing) I could not make my mind up so for the time being it sits on top of the steering column….
In the few weeks since I installed it.. which was really easy, it’s worked well. I can set the upper and lower limits for pressure and temp for each wheel and it is fairly accurate on pressure. To test it I used my digital tyre gauge fitted to my compressor in the work shop and checked with a standalone digital check gauge I used to use for aircraft tyres. It always matched the same PSI as both my digital gauges showed and as it didn’t decimal point readings on the PSI setting (you can change it to BAR, as well as from C to F for temp) it seemed to round-up from about .6 which seems acceptable to me. (32.4 PSI would be displayed as 32 and 32.6PSI would be shown as 33)
It comes complete with a small spanner for the lock nuts, a do-hicky for replacing the battery in the sensors and for £50 it seems like reasonable quality. It does what it states on the box, it’s small enough to put almost anywhere (and that’s my problem… where!) and if you have amazing eyesight… it even has a vehicle battery voltage display right in the centre! And if that didn’t clinch the deal… it even alarms when the batteries are low in the sensors.
So was my £50 well spent? Well at the moment I think so. (I reserve the right to change my mind in the future) You know me by now and if I thought it was a jockey wheel with out a handle…. I’d tell you!
So if you don’t yet have TPMS and don’t want to spend a fortune on one this might be a suitable option. If you want one… go on you know you do, here’s my affiliate* link on Amazon UK – https://amzn.to/2PX6a3a
*It won’t cost you any more but you will get that warm fuzzy feeling knowing Amazon are going to give Caravan Chronicles some of their profit.