• Home
  • Help Guides
    • Storage Sites
    • Equipment Reviews
  • Document Library
    • Electrical Drawings
  • Photo Gallery
    • Caravan Log
    • MPG
  • Trip Map
  • Shop
  • About Caravan Chronicles…
  • Contact
  • Links

Caravan Chronicles

~ not just another caravan blog

Caravan Chronicles

Tag Archives: Maintenance

Upgrading pre September 1998 Caravans to 13 Pin

06 Saturday Jun 2015

Posted by Simon Barlow in Caravan Electrics, Electrical, Help Guides, Maintenance, Modifications, Technical

≈ 2 Comments

Tags

13 Pin Plug, Caravan Electrics, Maintenance, Modifications, Towing

One of Caravan Chronicles long time readers and supporters, Colin “Snowy” Snowden, has sent me an excellent article he has written covering all aspects of upgrading pre September 1998 UK caravans to the 13 pin Euro Plug.

It’s very comprehensive article and goes into detail about the various problems and colour codes that were used and cover some of the changes that are required, habitation relays and details the steps required to actually do the upgrade with steps on fault finding.

If you have a pre September 1998 caravan and are thinking of replacing the original 12N/12S wiring with a 13 Pin plug, it’s an essential read.

The document can be downloaded and viewed here: Upgrading to 13 Pin

Colin has included contact details in the article, but if you have any questions that the answers might be helpful to others as well, you could also post them in the comments section below and Colin will be able to answer them.

Share this:

  • Click to share on X (Opens in new window) X
  • Click to share on Facebook (Opens in new window) Facebook
  • Click to share on Tumblr (Opens in new window) Tumblr
  • Click to share on Pocket (Opens in new window) Pocket
  • Click to share on Pinterest (Opens in new window) Pinterest
  • Click to share on Reddit (Opens in new window) Reddit
Like Loading...

A Readers Puzzle Answered…

04 Wednesday Feb 2015

Posted by Simon Barlow in Caravan Electrical Fault Finding, Caravan Electrics, Caravan Fault Finding, Electrical, Technical

≈ 21 Comments

Tags

Bailey Caravan Electrics, Bailey Senator, Caravan, Caravan Electrical, Maintenance

No, I’m not starting an Agony Aunt post..!

A couple of days ago one of Caravan Chronicles readers, Vic, posted in the comments section of “Understanding Caravan and Tow Car Electrics” that he recently flattened his car battery by leaving his caravan connected to his car. Here’s what he posted:

Hi Simon, while travelling across Spain I made an overnight stop and left the caravan connected to the car electrics I also hooked up to mains. The next morning the car battery was flat, I’m sure I’ve done this before with no consequence. All I can think is that european site wiring can be suspect.
brilliant article.

OK, that got me thinking…
Was it the car-off-van switch faulty? Was there another fault of some sort? I asked Vic for the details of his caravan and he replied it was a 2009 Bailey Senator California. I don’t know the exact details for Bailey electrical schematics, but it should not be too difficult to work out what might be happening. I started to think of various failure scenarios that ‘could’ account for Vic’s problem. At this point I have to say I’m indebted to David Rose for sending me information about the electrical services in Bailey Caravans.

Looking closely at the schematic of the control unit, it all hinged around the correct operation of four relays. Here is the schematic I have drawn out in a simplified form:

Bailey Caravan Relays 01

The drawing (above) shows the four relays – R1, R2a & R2b, R3 as they are set when the caravan is not connected to the vehicle and the master switch is off. The red lines show what part of the circuits are live. The master switch controls relay R1 and when energised by turning the Master Switch on allows current to flow to the caravans 12 volt electrical system via the 12 volt fuse board.

Bailey Caravan Relays 02

Above: We have now turned the Master Switch on and can see that relay R1 has energised and is allowing current to flow to the caravans 12 volt services. The caravan is not connected to the tow vehicle.

Bailey Caravan Relays 03Above: The caravan is now connected to the tow vehicle and the engine is running. The caravan master switch is off. With the fridge circuit powered from the running engine, it energises R3, R2a and R2b. Relay R2b disconnects the master switch circuit so that it cannot operate R1. Relay R2a connects the leisure battery to the 12 volt permanent feed from the tow vehicle. R3 energises, but only switches the feed for the master switch from the leisure battery to the permanent 12 volt supply from the tow vehicle. As this stage it cannot be used to supply the master switch due to R2b being energised.

Bailey Caravan Relays 05

Above: The caravan is still connected to the tow vehicle, but the engine is off. Relay R2a and R2b that are controlled by the fridge circuit are now not energised and revert to the default position. However as the caravan is still connected to the tow vehicle, the 12 volt permanent feed keeps relay R3 energised, therefore supplying the Master Switch – not from the leisure battery but from the permanent 12 volt feed from the vehicle.

This now leaves us in the following position:

Bailey Caravan Relays 06Above: The caravan is connected to the tow vehicle but the engine isn’t running. The master switch is on. The caravan now receives it’s 12 volt feed from the tow vehicle to power all the 12 volt services. I have greyed out the live circuits from the leisure battery. Even though the caravan is plugged into a EHU bollard, the 12 volt services will be run from the vehicle battery and not the mains charger/ leisure battery circuit. The fridge will continue to work on 240 volts as will any mains powered equipment.

So, it’s not a ‘fault’… it’s a ‘feature’ ! Leaving the caravan plugged into the car and turning the Master Switch on allows you to power the caravan’s 12 volt services from the car. Disconnect the lead from the car and the caravan will be powered from the leisure battery.

I hope this solves Vic’s puzzle.

.

Copyright © 2011 – 2020 Simon P Barlow – All rights reserved

Share this:

  • Click to share on X (Opens in new window) X
  • Click to share on Facebook (Opens in new window) Facebook
  • Click to share on Tumblr (Opens in new window) Tumblr
  • Click to share on Pocket (Opens in new window) Pocket
  • Click to share on Pinterest (Opens in new window) Pinterest
  • Click to share on Reddit (Opens in new window) Reddit
Like Loading...

Excellent News from Lodge Farm Leisure…

13 Monday Oct 2014

Posted by Simon Barlow in Caravan Servicing, General, LPG, LPG Refilling Info, Maintenance

≈ Leave a comment

Tags

Caravanning, Caravans, Lodge Farm Leisure, LPG, LPG Refilling, Maintenance, Safefill, Touring

obj7geo7pg8p19If you around the Nottingham, Mansfield or Grantham area Lodge Farm Leisure are now fully equipped to refill you Safefill, Gas-It or Gaslow systems having recently installed their own LPG refilling equipment. Chris and the guys have probably beaten all the other caravan servicing and even caravan dealers by being the first to install this equipment. With the increasing cost of conventional bottle exchange and the recent recall by one supplier of some of their cylinders it makes sense for caravanners and motor homes to move over to a refillable system. Currently their price for LPG is 65 pence per litre and they are aiming to be 5p per litre cheaper than other stations in the area, which is great news!

We have been using Safefill since we started caravanning and have easily covered the cost of the cylinder. With more and more caravans and motor homes now coming equipped with state of the art solar panels, moving over to a refillable gas system makes the task of planning ‘off grid’ stops so much easier as you can always start your trip with a full tank of gas and top up if required!

I’m sure in the coming months other caravan service centres and dealers will try to play catch up with Lodge Farm Leisure… in the meantime if you are in the area, you now know where to get a fill up.

Directions to Lodge Farm Leisure are on their website.

Share this:

  • Click to share on X (Opens in new window) X
  • Click to share on Facebook (Opens in new window) Facebook
  • Click to share on Tumblr (Opens in new window) Tumblr
  • Click to share on Pocket (Opens in new window) Pocket
  • Click to share on Pinterest (Opens in new window) Pinterest
  • Click to share on Reddit (Opens in new window) Reddit
Like Loading...

“Why do my sidelights flash when I indicate?”…

20 Wednesday Aug 2014

Posted by Simon Barlow in Caravan Electrical Fault Finding, Caravan Electrics, Caravan Servicing, Electrical, Maintenance, Technical, Tips

≈ 4 Comments

Tags

13 Pin Plug, Caravan, Caravan Electrics, earth fault, Maintenance, rear lights, Road Lights, side lights, Travel Trailer

That is one of the most common questions that I am asked about road light problems with caravan’s and trailers. Others are::

“Why do my side lights come on when I brake?”

“When I turn my side lights on why do the indicators glow dimly?”

“When I put my side lights on why do my reversing lights come on?”

“When I brake why do all my rear lights come on?”

The answer is fairly simple, and a lot of people will tell you “It’s an earth fault” So often said simply because they have heard someone else say it but really they don’t understand how it can be an earth fault. Trying to find a fault even if you know what it is can be frustrating if you don’t know a bit of theory behind it, but I’ll try to give you an insight into what’s going on. Lets have a look at a basic wiring diagram for the caravan or trailer road lights and their connections.

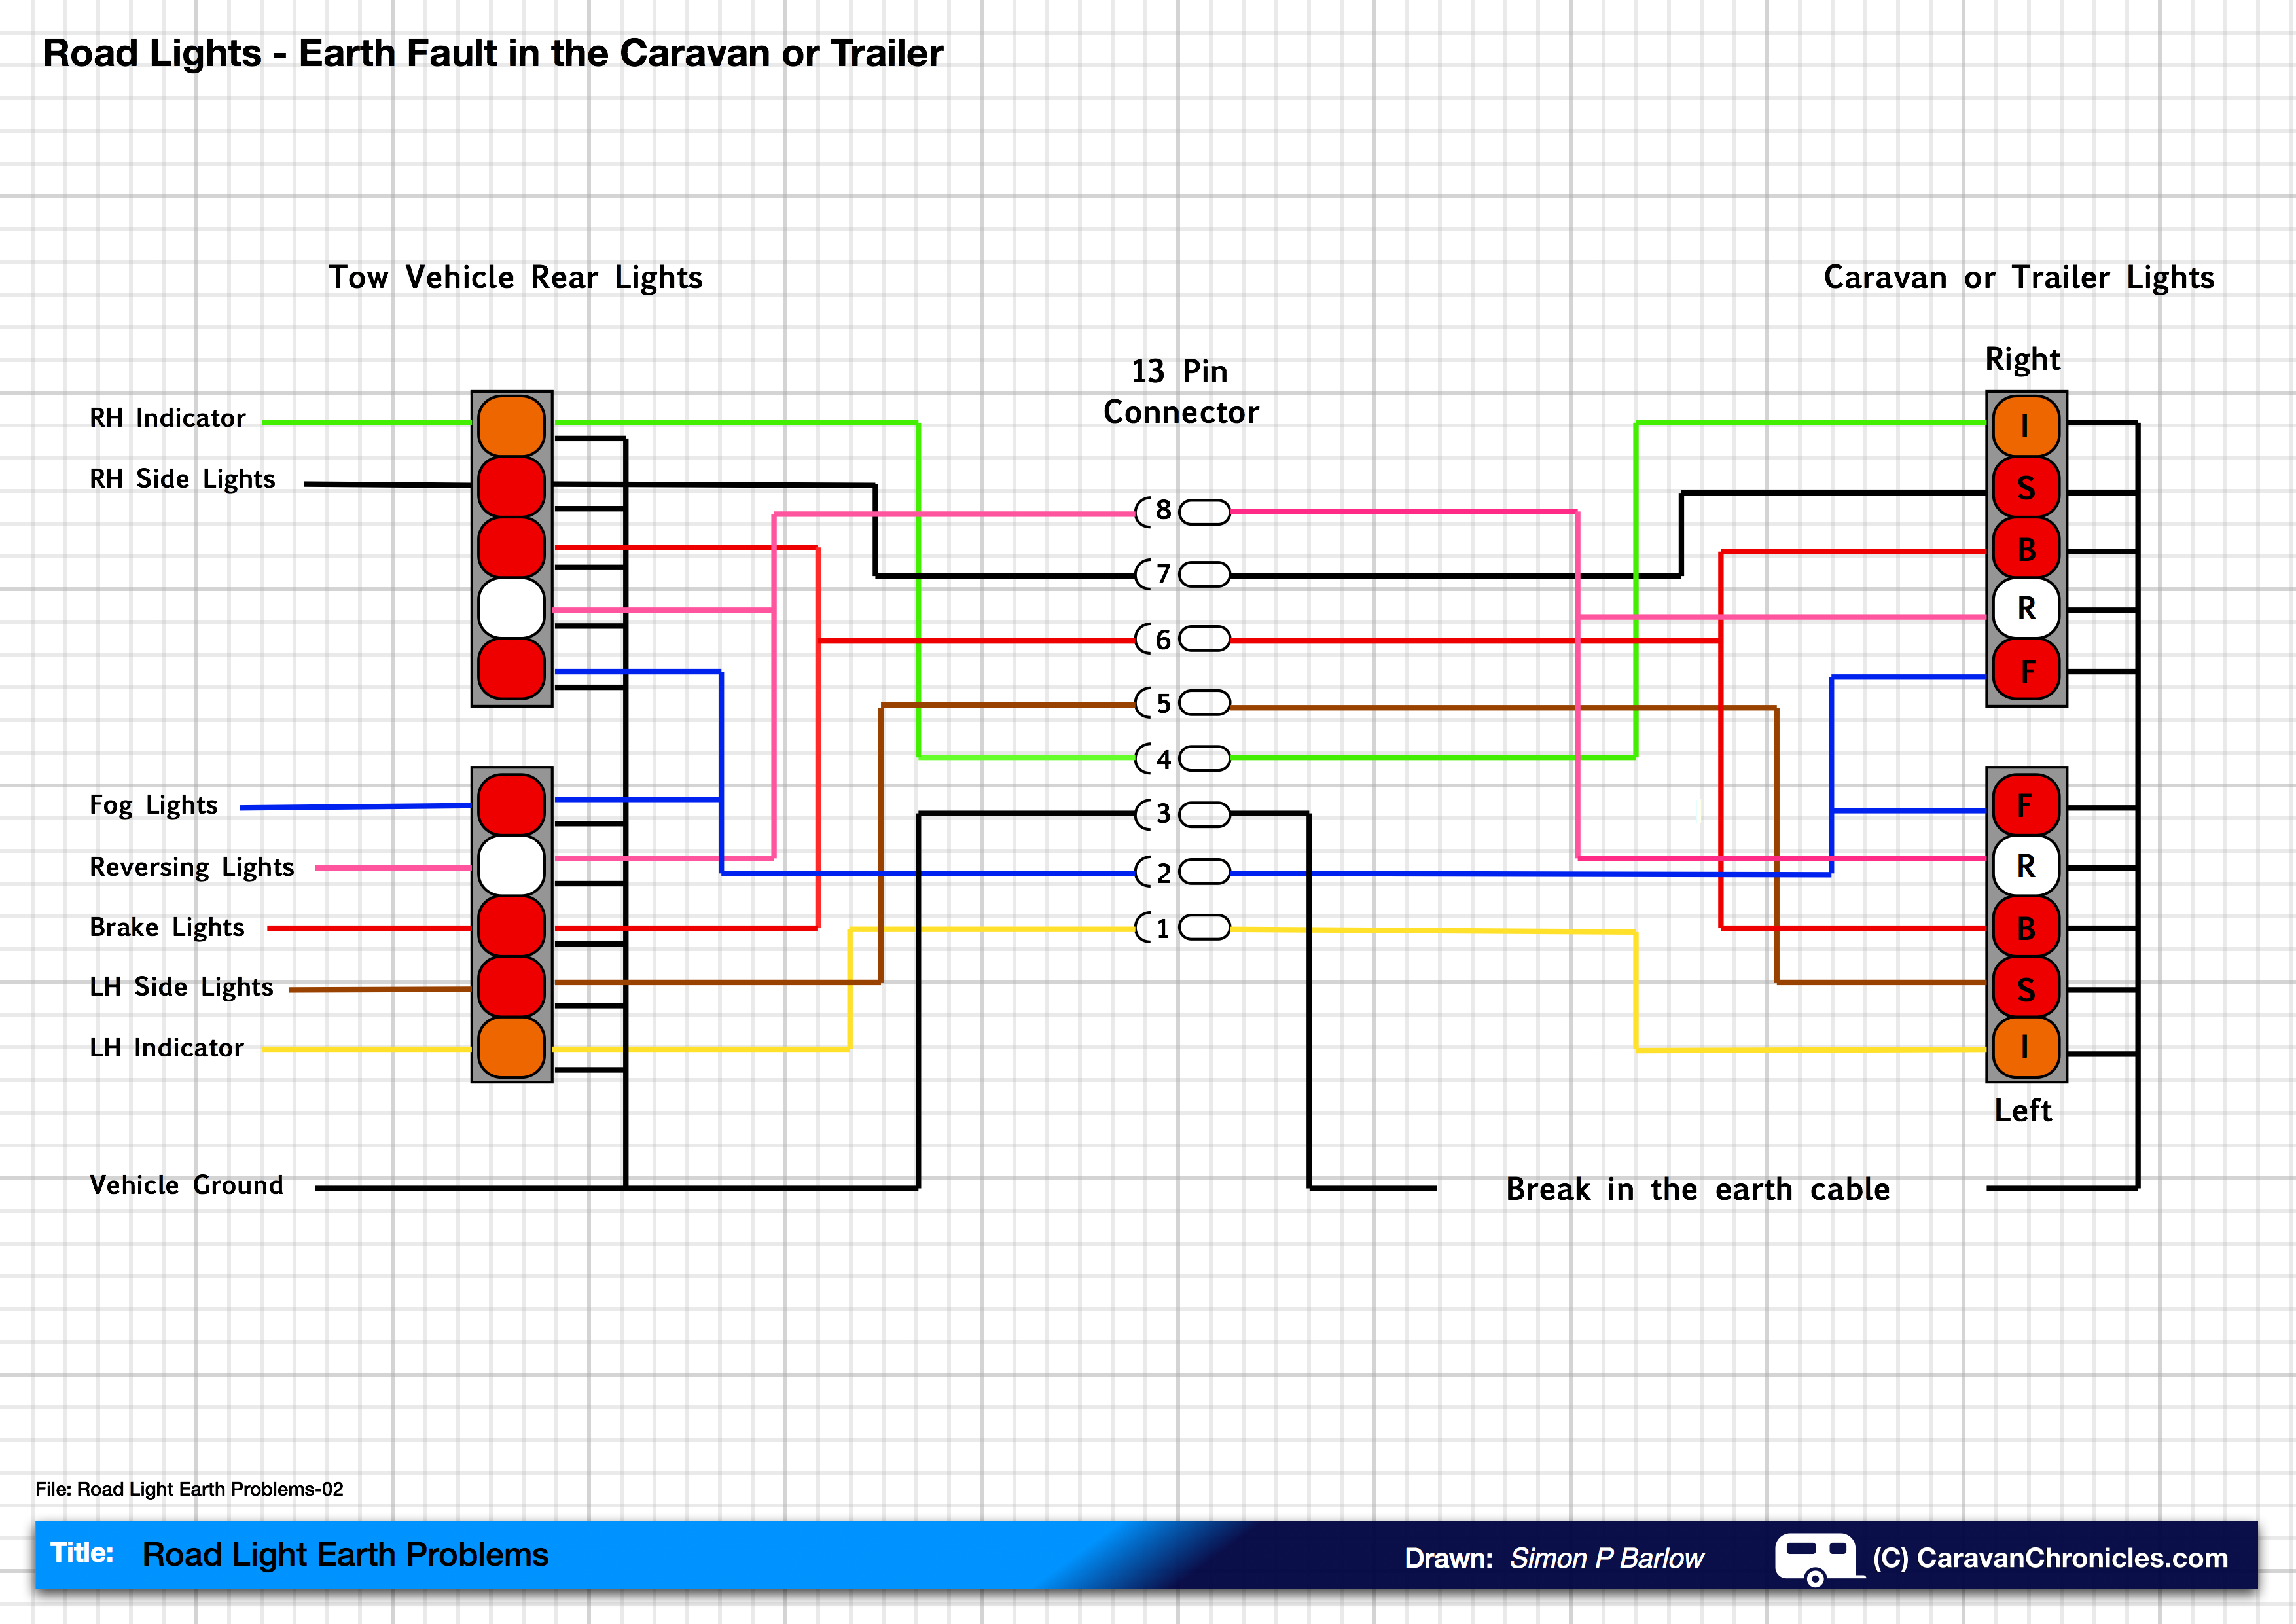
The term ground and earth are basically the same thing but the ‘earth’ refers to the cable and the ground is the termination of the earth cable to the car in this case.

Road Light Earth Problems-01

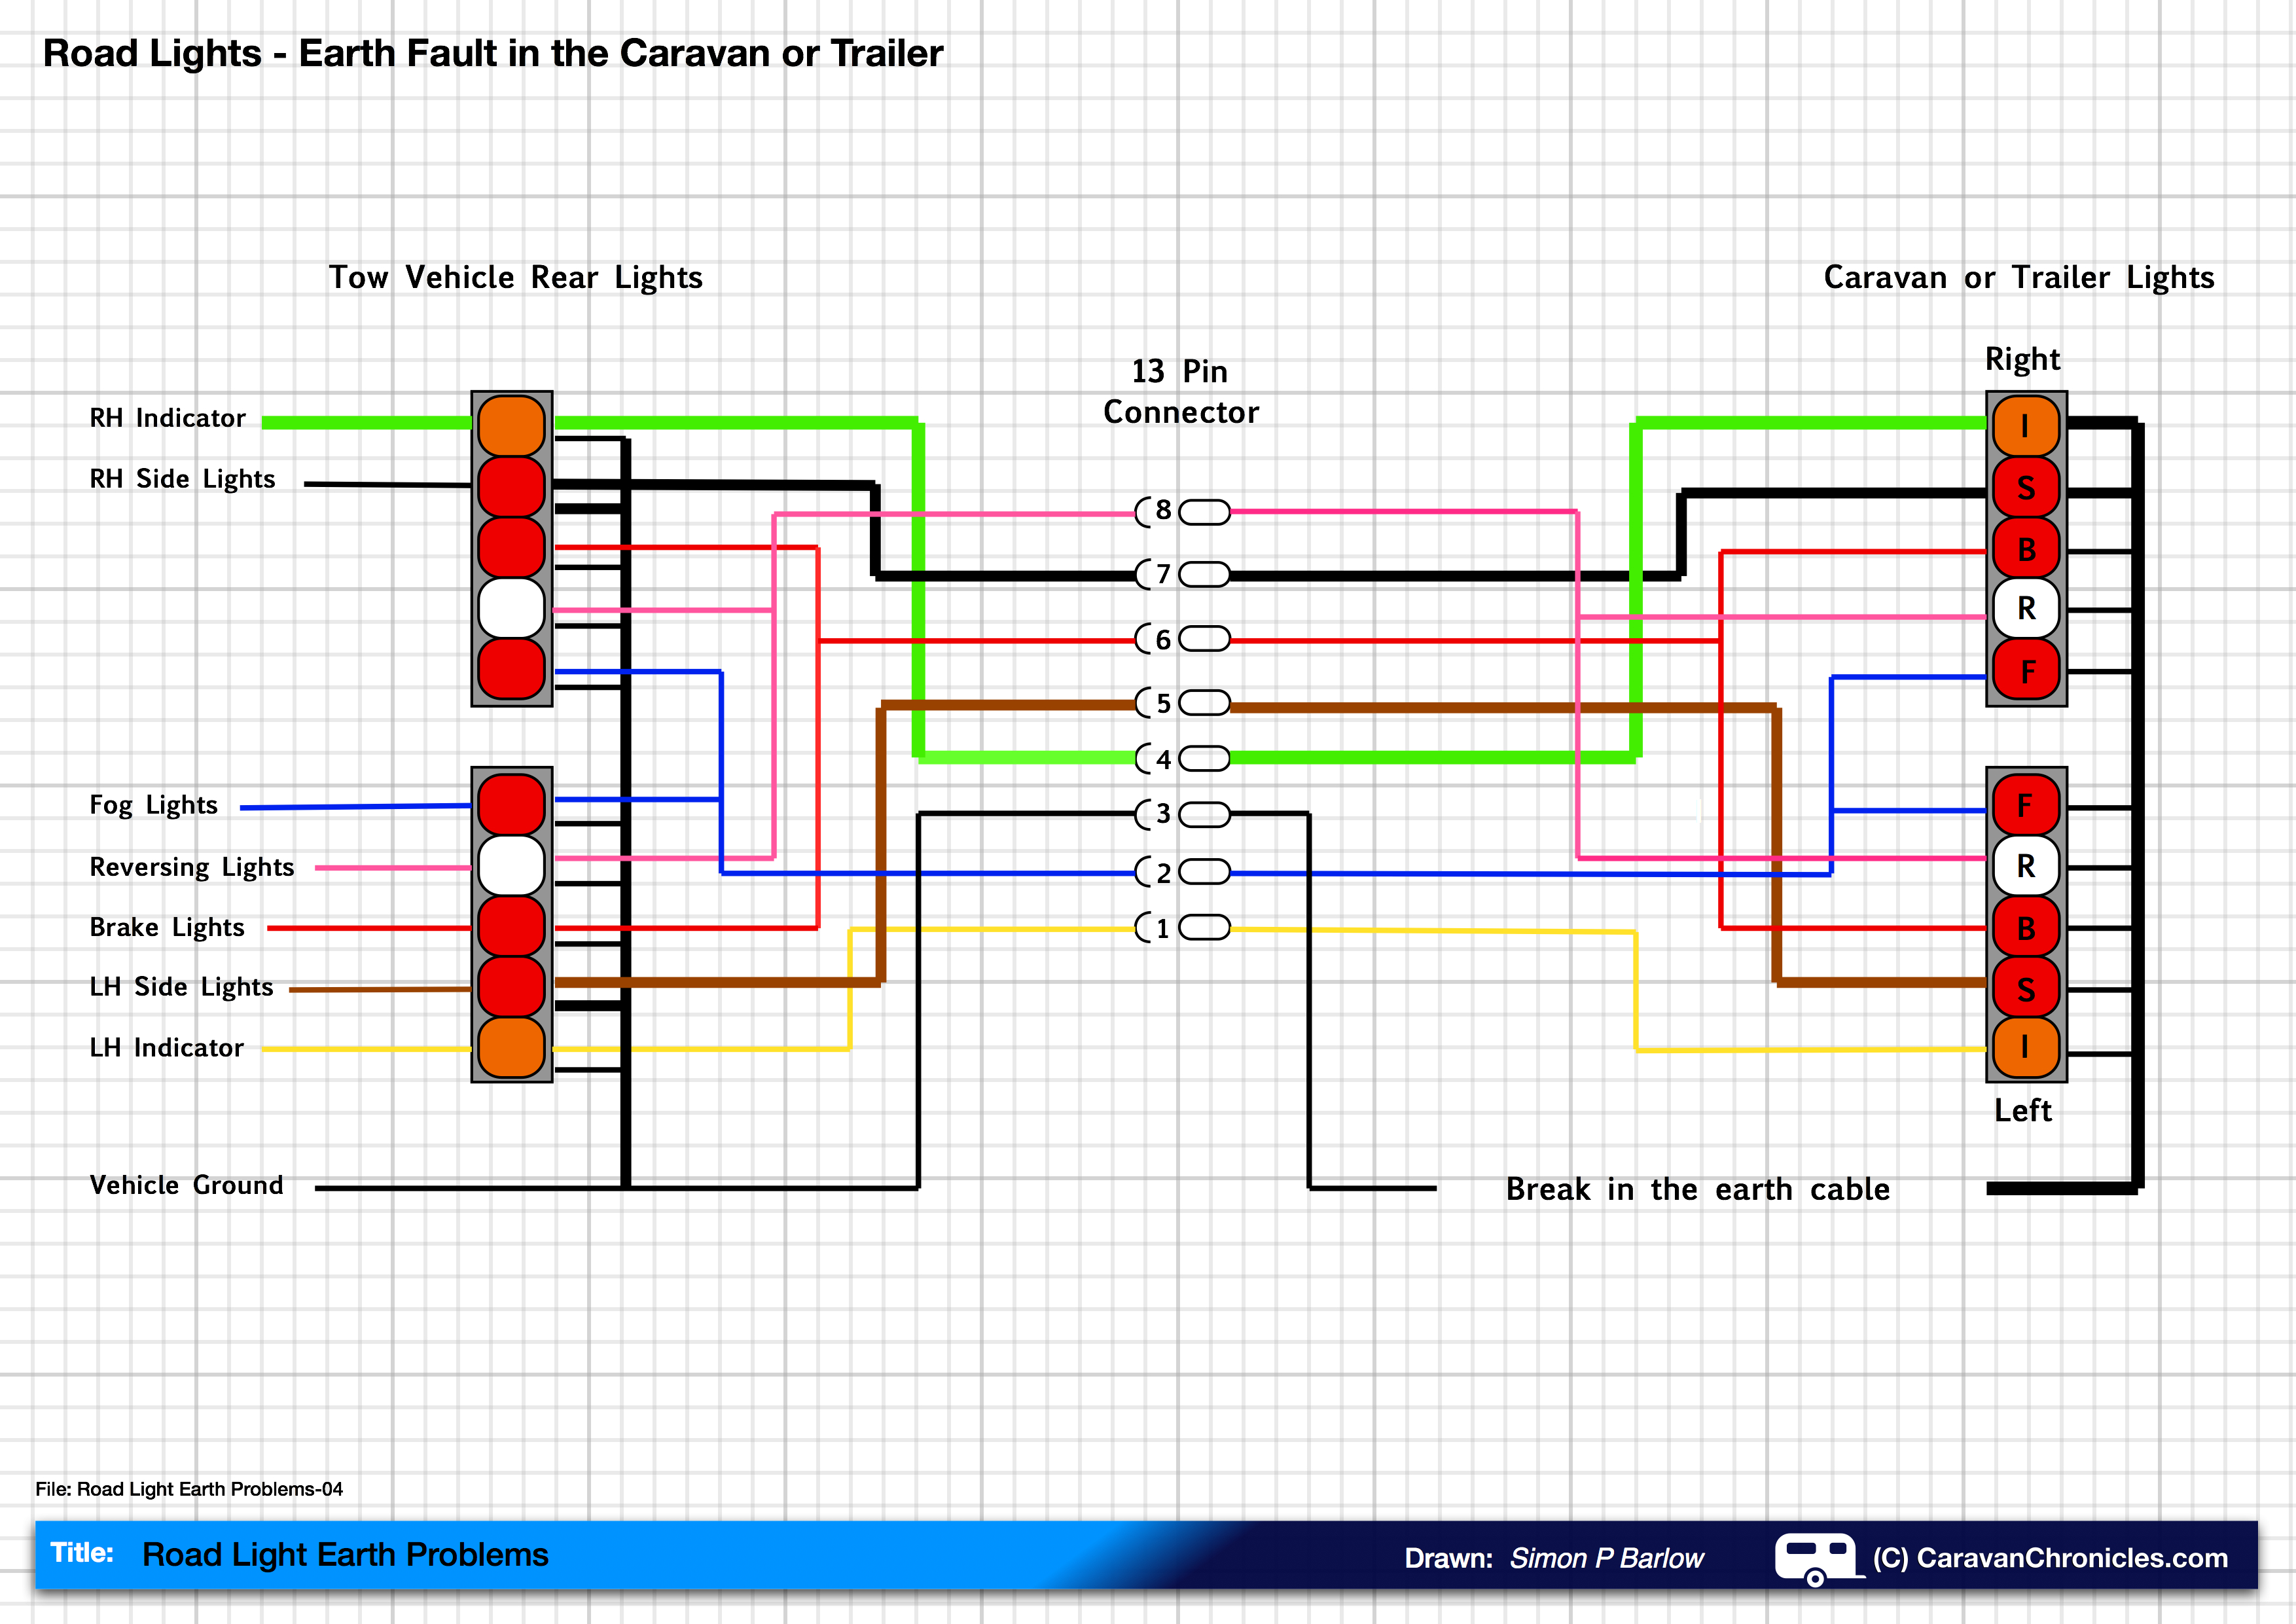
The drawing above shows the basic road light wiring. (Click on the diagram to enlarge it) You can follow each circuit through from the tow vehicle through the 13 pin connector to the rear lights of the caravan or trailer and then back through the return path (earth) to the 13 pin connector and back to the vehicle ground as shown in the diagram.

What happens when you operate the right hand indicator? Electricity flows down the green wire and lights up the right hand indicator on the vehicle and continues down the green wire through the 13 pin connector to the caravan or trailer right hand indicator. It then returns through the black earth wire to vehicle ground.

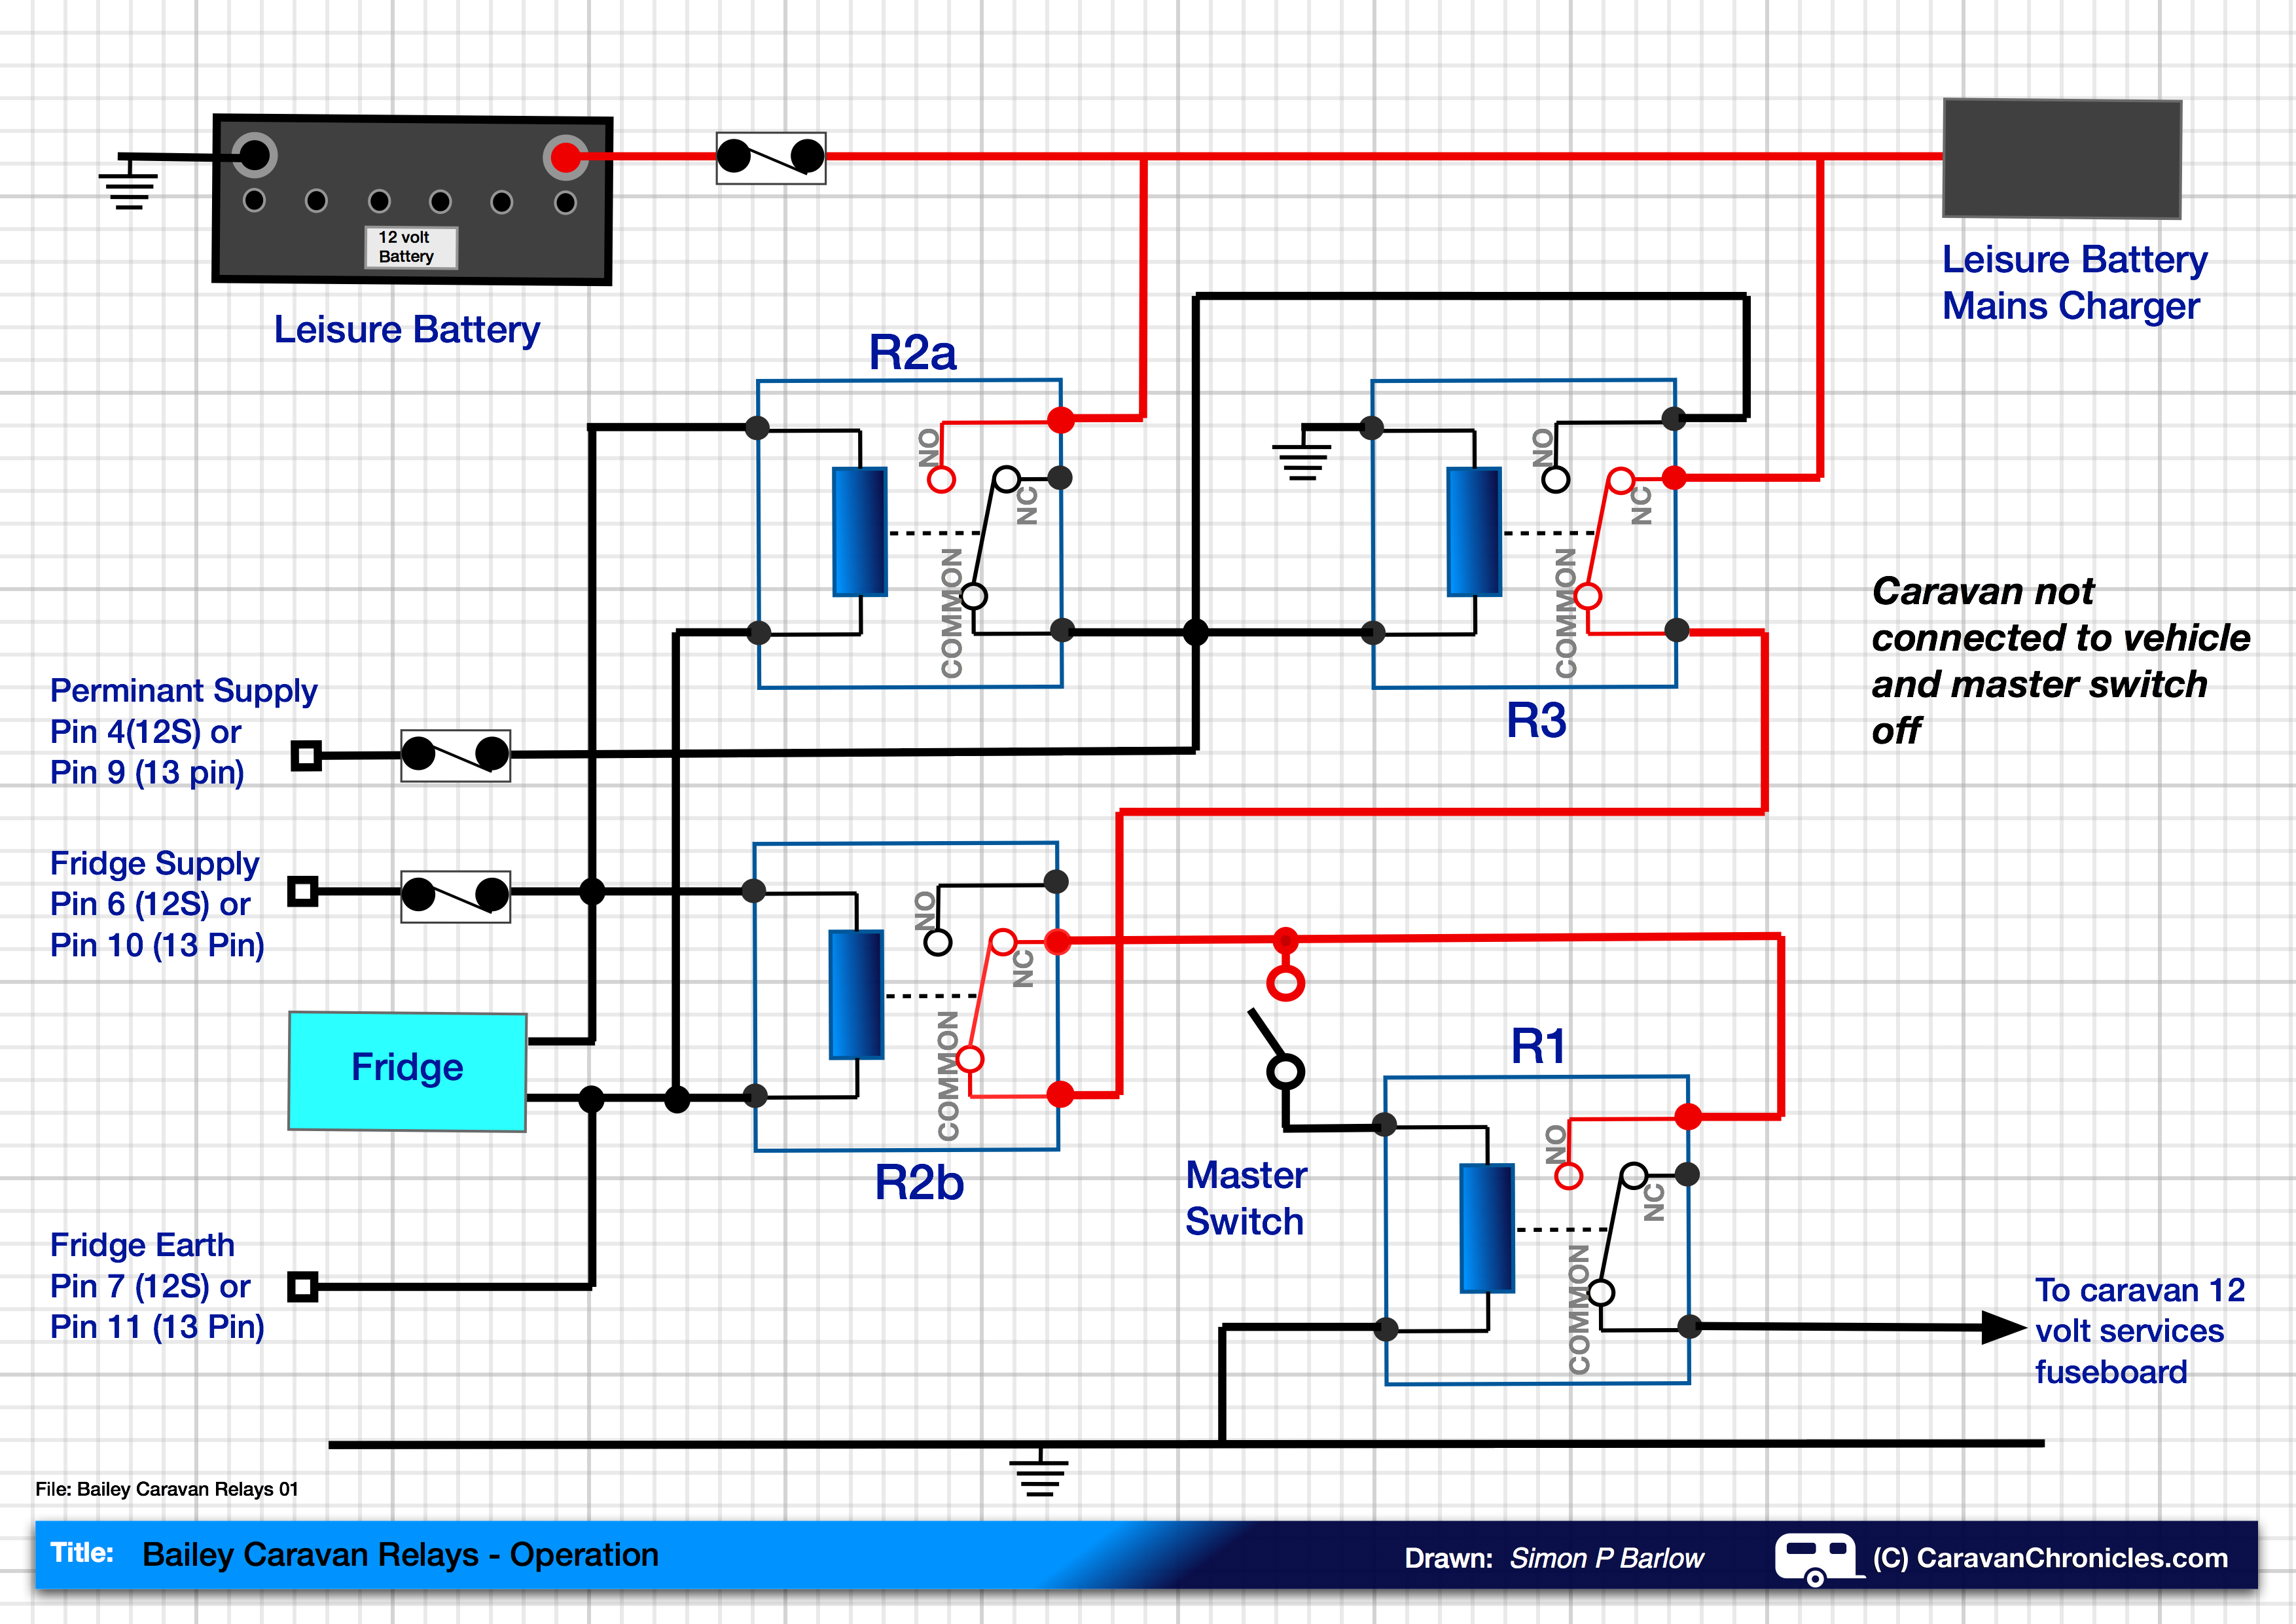
So what happens if we have an earth fault?

Here is the same drawing only this time with an earth fault.

Road Light Earth Problems-02

Now the return path for the lighting circuits is broken, but using the indicators now also flashes the rear side lights. So what’s happening?

In the diagram below we have again turned on our right indicator, electricity flows down the green wire (shown a bit thicker this time) to the rear caravan or trailer indicator. It flows through the bulb and should then follow the black line to the vehicle ground. But it can’t as there is a break in the wiring.

Road Light Earth Problems-03

Electricity really does like to go home!

As the return path through the black wire is effectively ‘blocked’ because of the break the electric current will try to find another way home. The only path it can find is back through another circuit, in this case  the right hand side light circuit all the way back to the tow vehicle and through the bulb in the rear light to earth, as illustrated below.

Road Light Earth Problems-04

So as your indicator flashes, it is also powering the side light on the caravan or trailer and the rear side light of the tow vehicle. Electricity will nearly always find a way home!

But it’s not quite that simple. In the diagram above I have shown one return path (the heavy black lines) but in fact the return path will be through all the light bulb circuits that are not powered. As there are multiple paths back to earth and only one path or circuit powering the indicator bulb, the indicator bulb will be at full brightness but the other bulbs may only be dim.

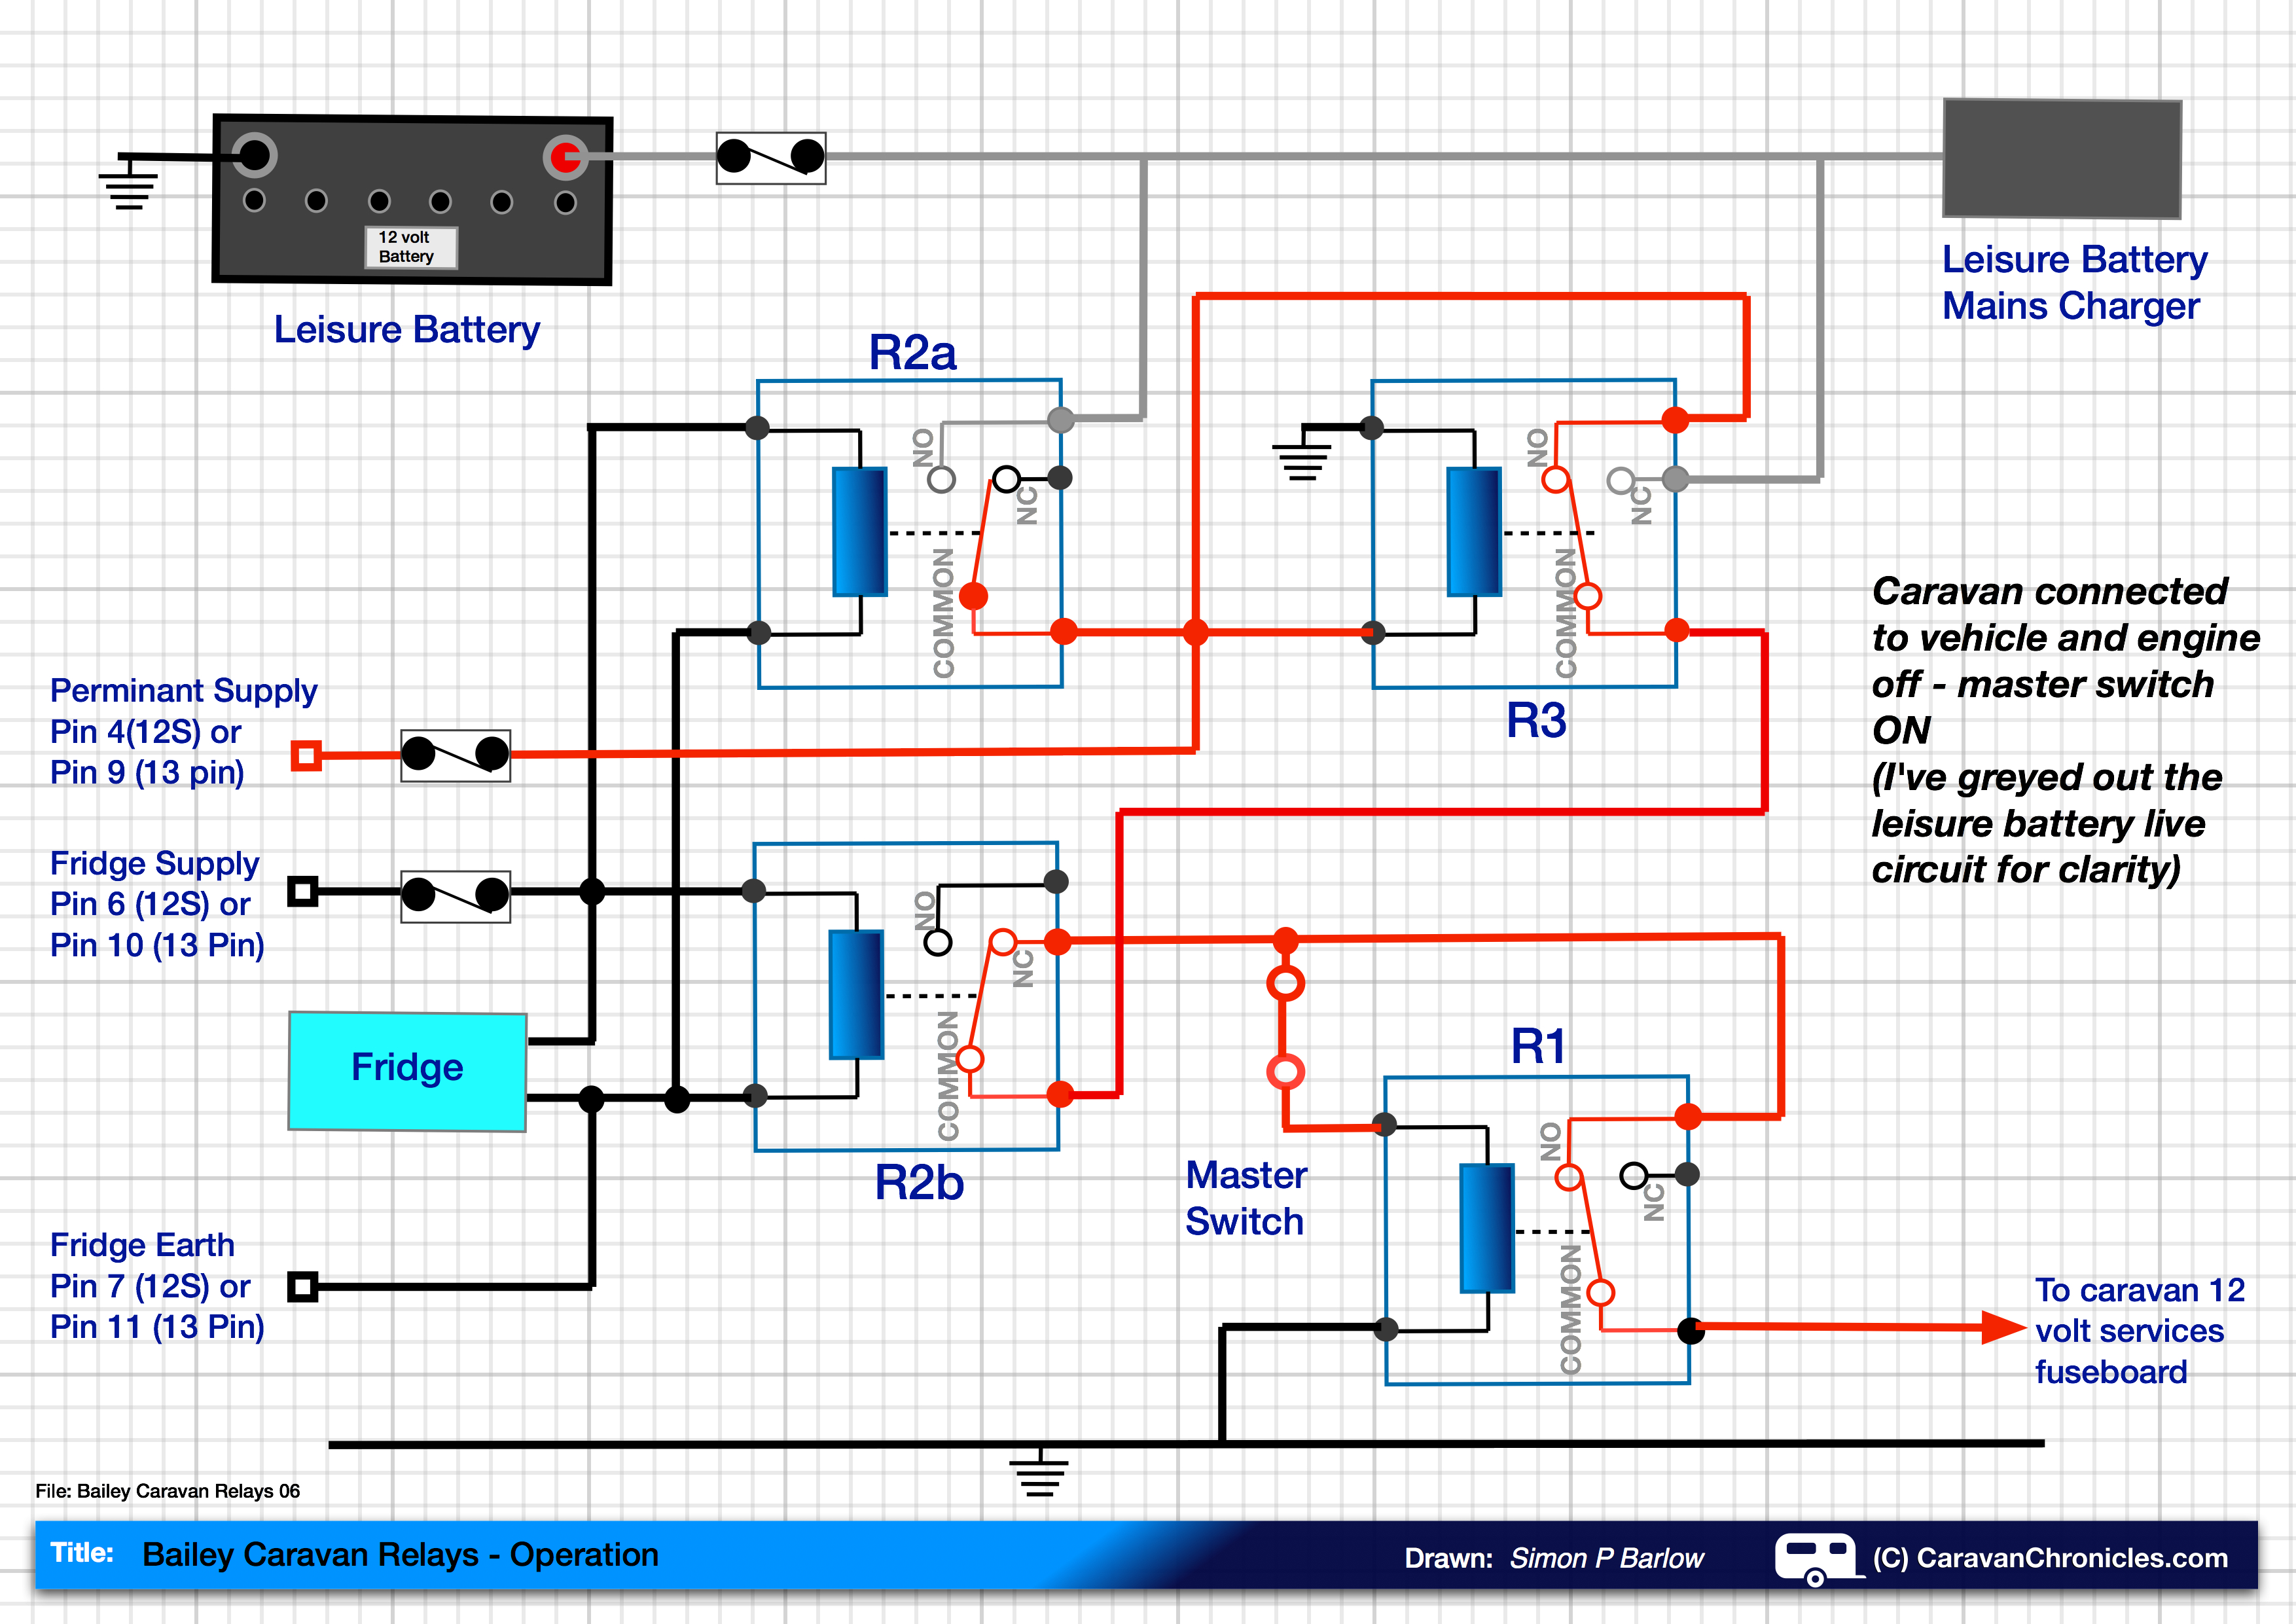
If you now turn on the side lights and indicate right, the current from the side lights and the indicator will follow the path of least resistance through the other lights that aren’t lit back to the tow vehicle earth.

So the original question of “Why do my side lights flash when I indicate” might now be expanded to “Why do my side lights flash when I indicate? It can’t be because there is anything wrong with the side lights because they work normally”

We now know that the side lights only appear to work correctly.

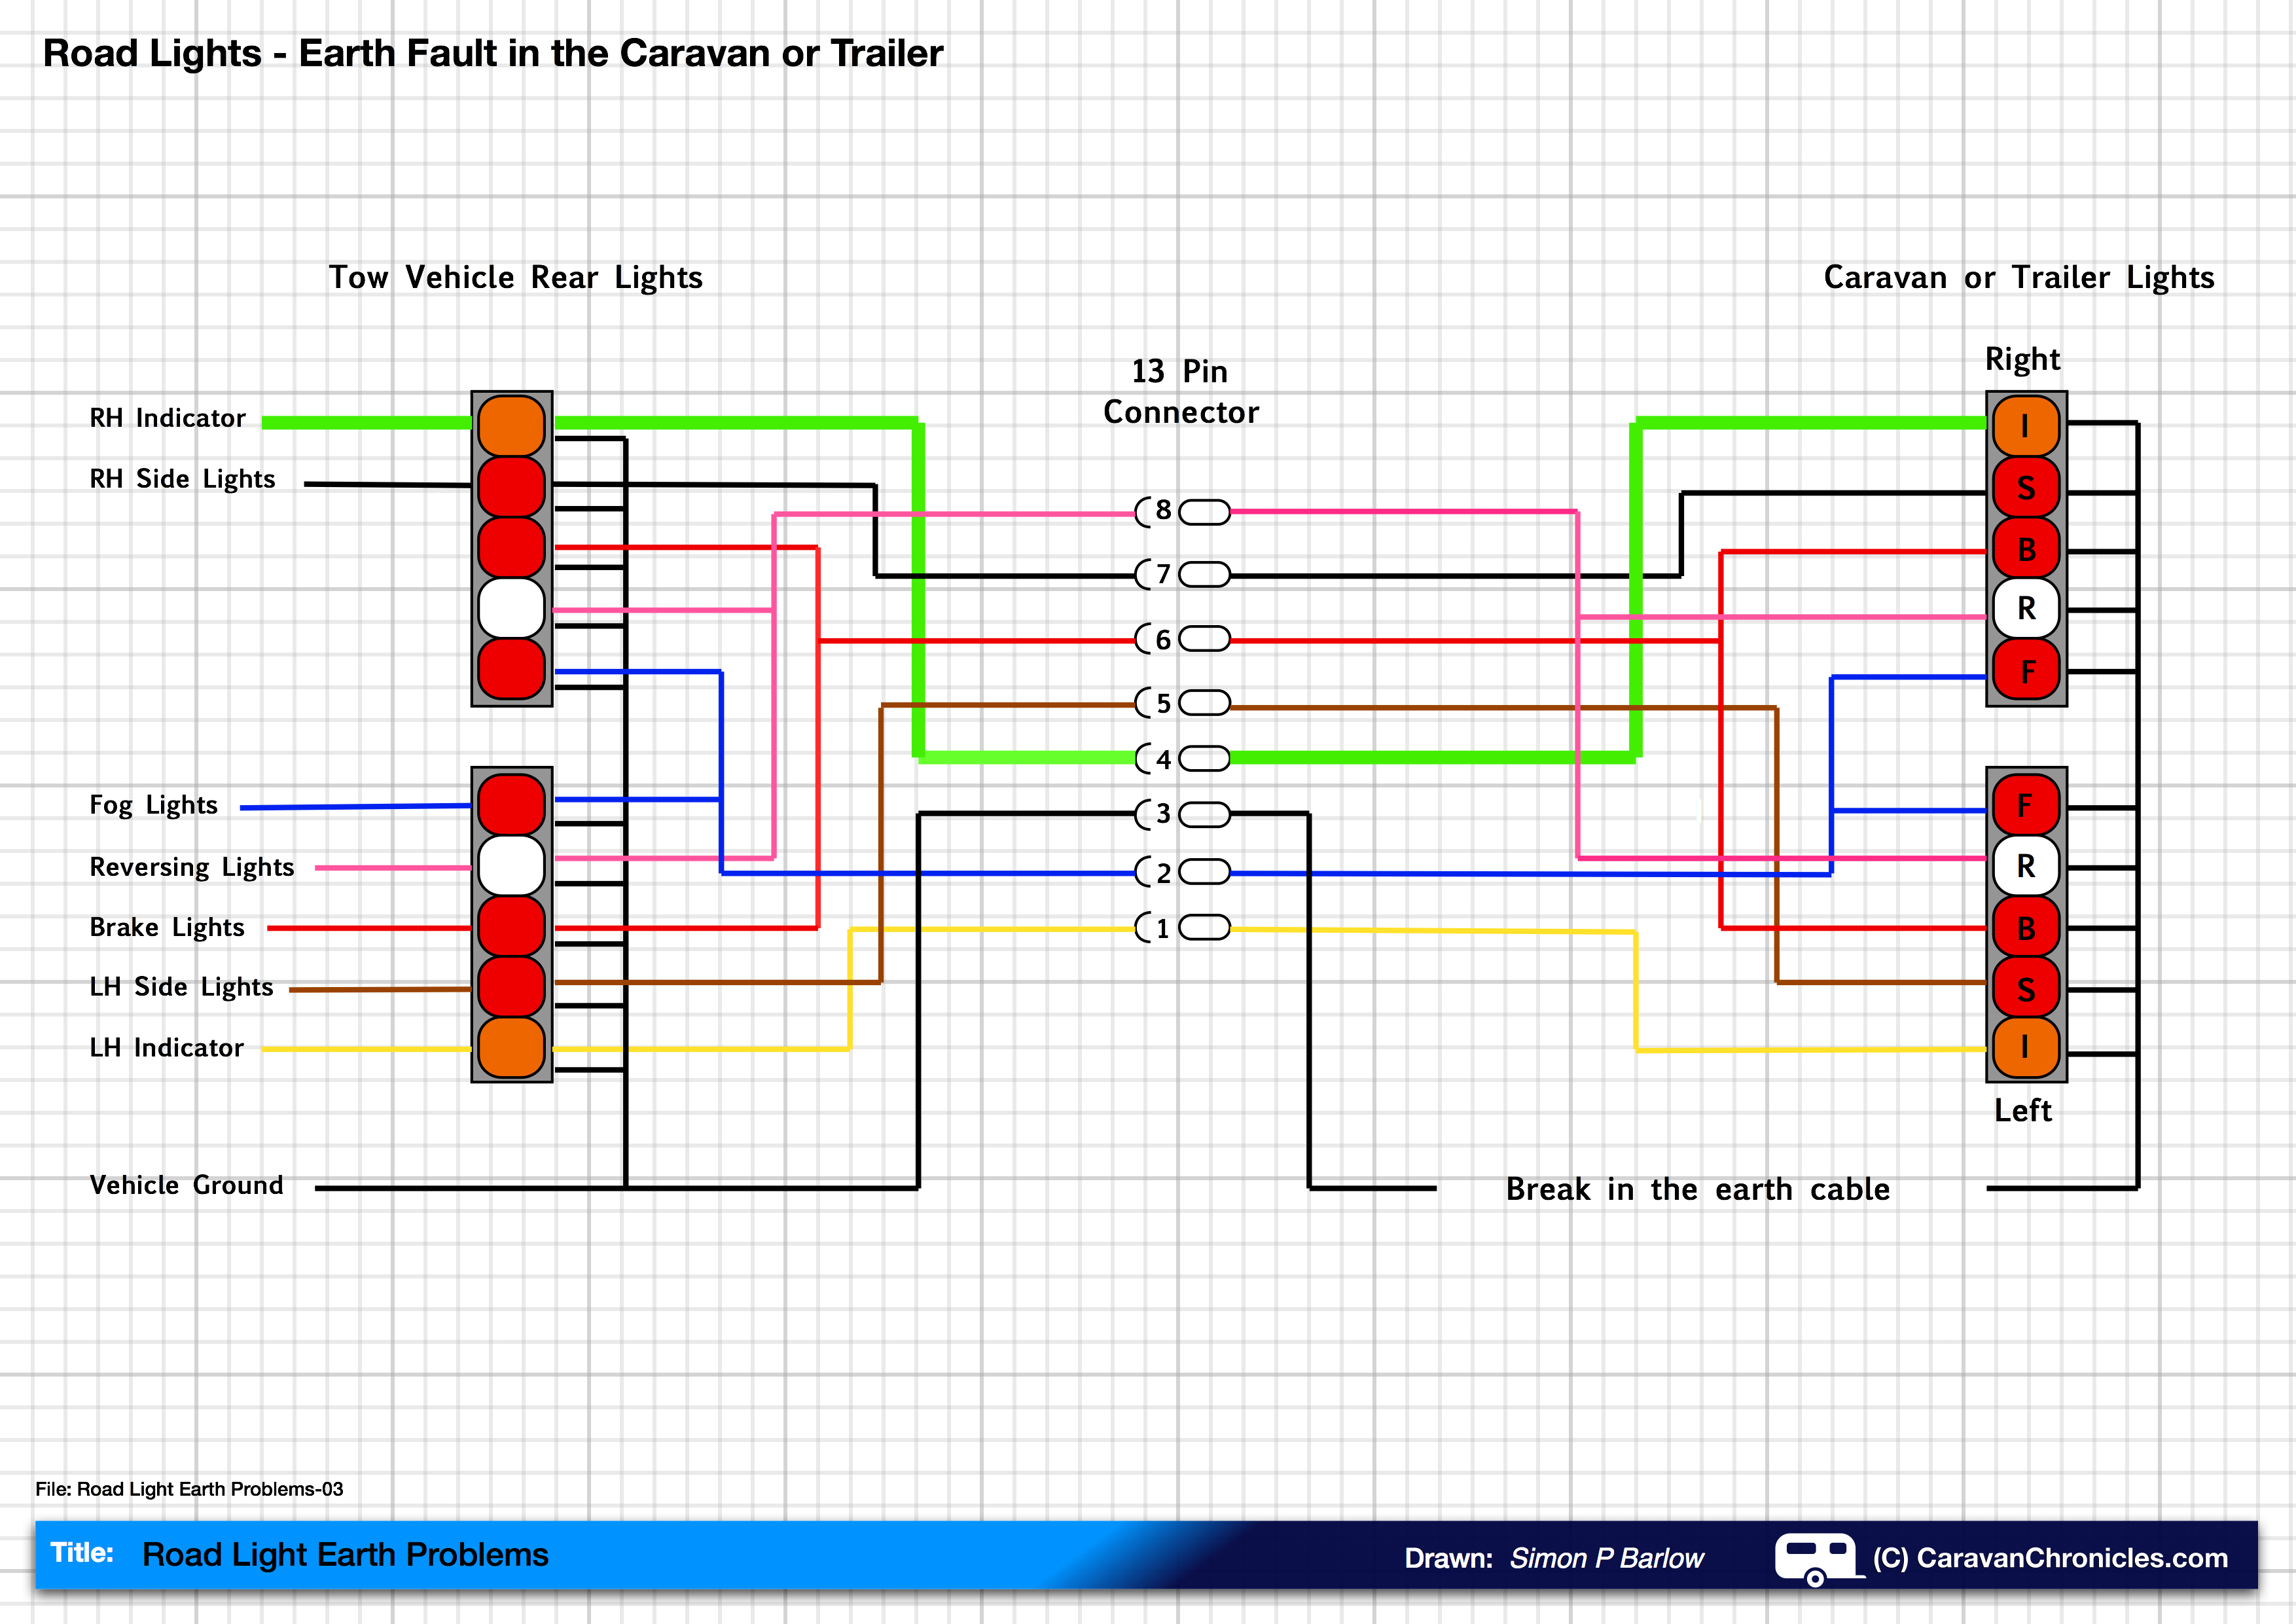
The diagrams all show a common earth from both sets of rear lights on the caravan or trailer. Sometimes for convenience the manufacturer will run a separate earth for each light cluster, so all the wires for the left hand lights run down the left hand side and all the wires for the right down the right hand side. The common point is usually a small junction box at the front of the caravan or trailer.

If we have similar symptoms as before but only affecting one side (the RH indicator is OK, but the LH Indicator also flashes the LH side light and LH brake light) then the break in the earth cable will be only on the left hand side earth wiring.

So now you know the theory behind earth faults on caravan or trailer road lights. If you want to do a bit more reading you might find these two articles interesting:

Caravan Road Lights – Basic Fault Finding – a simple fault finding guide using a multimeter to check your caravan or trailer road lights.

Caravan Road Lights – Tracing A Fault – step by step guide to tracing faults in your caravan or trailer road lights.

Share this:

  • Click to share on X (Opens in new window) X
  • Click to share on Facebook (Opens in new window) Facebook
  • Click to share on Tumblr (Opens in new window) Tumblr
  • Click to share on Pocket (Opens in new window) Pocket
  • Click to share on Pinterest (Opens in new window) Pinterest
  • Click to share on Reddit (Opens in new window) Reddit
Like Loading...

Another fault finding guide…

07 Thursday Aug 2014

Posted by Simon Barlow in Caravan Electrical Fault Finding, Caravan Servicing, Electrical, Help Guides, Maintenance, Technical

≈ Leave a comment

Tags

Caravan, Caravan Electrics, Caravan Fridge, Caravan Fridge Problem, Caravanning, Fault Finding, Maintenance

One of the questions that I’m asked from time to time is about the 12 volt circuit from the tow car to the caravan that powers the fridge, is how to find any problems that could be the cause of the fridge not working at its normal capacity. There are a few checks that can be done on the fridge first before having to start to look for other reasons why the fridge is not functioning to full capacity when towing.

I have written hopefully a simple guide to checking the circuit tracing the voltage drops and locating where the problem could lie. It will take some time and a basic understanding of how to use a multi-meter is required but it should either help you find the problem(s) or confirm that there is nothing wrong with the wiring and you can stat to look for other possible issues.

It’s in the “Help Guides” section and called “Caravan Fridge Circuit – Tracing A Fault”

I hope you find it helpful.

Share this:

  • Click to share on X (Opens in new window) X
  • Click to share on Facebook (Opens in new window) Facebook
  • Click to share on Tumblr (Opens in new window) Tumblr
  • Click to share on Pocket (Opens in new window) Pocket
  • Click to share on Pinterest (Opens in new window) Pinterest
  • Click to share on Reddit (Opens in new window) Reddit
Like Loading...

Lets be Practical…

05 Saturday Jul 2014

Posted by Simon Barlow in General, Maintenance, Modifications, Projects, Technical

≈ 4 Comments

Tags

Andrew Ditton, Caravan, Caravan Magazines, Caravanning, Caravans, Maintenance, Modifications, Travel Trailer, Travel Trailers

Some of the most popular articles on Caravan Chronicles are the “practical” type posts. Anything from the electrical stuff through to little modifications and projects I’ve done. A while ago I had the chance to look through some of the caravanning magazines from the late 50’s through to the late 60’s and they were full of projects. Installing a new roof light, repairing door hinges, updating handles and magnetic catches… in fact all sorts. One interesting early article was about upgrading your caravans road lights to install indicators using the ‘new’ 7 pin plug! Continue reading →

Share this:

  • Click to share on X (Opens in new window) X
  • Click to share on Facebook (Opens in new window) Facebook
  • Click to share on Tumblr (Opens in new window) Tumblr
  • Click to share on Pocket (Opens in new window) Pocket
  • Click to share on Pinterest (Opens in new window) Pinterest
  • Click to share on Reddit (Opens in new window) Reddit
Like Loading...

A Bit Of An Update…

20 Tuesday May 2014

Posted by Simon Barlow in Blog updates, Cleaning, General, Maintenance, Reviews

≈ 1 Comment

Tags

Caravan, Caravanning, Caravans, Cleaning, Inside & Out, Maintenance, OLPRO, Product Review

Back in February I wrote a post “Testing Testing…“ about trying out some OLPRO products. One in particular was their “Inside & Out” which I tried on the Freelander with great success, however I haven’t had chance to try it on the caravan… mainly due to the weather and I did promise back then to do an update.

So the day after we returned from our North Wales trip (A Pitch With A View…) The weather was co-operating so we loaded up the trailer with 3 x 25 litre containers of water, a hand pressure spray, a set of steps, long-handled soft washing brush and set off for the caravan storage compound.

Right.. where do we start? (Sue is wearing one of my mahoosive old polo shirts)

Right.. where do we start? (Sue is wearing one of my mahoosive old polo shirts)

Continue reading →

Share this:

  • Click to share on X (Opens in new window) X
  • Click to share on Facebook (Opens in new window) Facebook
  • Click to share on Tumblr (Opens in new window) Tumblr
  • Click to share on Pocket (Opens in new window) Pocket
  • Click to share on Pinterest (Opens in new window) Pinterest
  • Click to share on Reddit (Opens in new window) Reddit
Like Loading...

All wrapped up…

29 Saturday Mar 2014

Posted by Simon Barlow in General, Maintenance, Modifications, Projects, Technical, Tips

≈ 14 Comments

Tags

Caravan, Caravanning, Caravans, Foam Solutions UK, Maintenance, Modifications, Project, Travel Trailer, Travel Trailers

One thing we had noticed using the caravan all year round was the front wall between the caravan interior and gas locker and the window shelf above it always seemed noticeably cooler than the rest of the walls of the caravan. The cupboard under the front draws also was a lot cooler even though it had a blown heating pipe running through it. I’m not sure if it’s just a perceived thing that we think its cooler or if it’s down to the fact that the insulation in the front dividing wall my be a little thinner.

In an effort to try to cure this, I had been on the look out for some sticky backed foam insulation. Searching round the web gave a few results, but it was mainly for sound insulation rather than thermal insulation. However I did eventually discover Foam Solutions UK in Nantwich, Cheshire that offered a whole range of foam for various uses. When I started looking I wanted something that was anti-static and fire-retardant as it was being installed in the gas locker. Foam Solutions UK had just the product, a fire-retardant foam sheet that was designed for use under engine bonnets. I emailed Carole at Foam Solutions UK and she kindly sent out some samples, including a piece of the under bonnet material. A quick measure up and I ordered enough for the front gas locker and to cover the wheel arches inside the wardrobe and under the fixed bed.

First task was to empty the gas locker and give it a bit of a dust out…..

SPB_5D_097647I thought I’d work from both sides into the middle where most cutting would be required. I’d have to make sure non of the gas pipes would be covered so that they could be inspected when it came to the annual service. I also had to make sure that the safety labels and notices were visible, so a bit of careful peeling would be required.

SPB_5D_097649

Measuring the first section, the foam was cut with a straight edge and a scalpel in an Exacto knife. I’d taken a couple of large pieces of cardboard to cut on to make it easier.

SPB_5D_097650

It didn’t take long to get the first few straight cut pieces installed. One thing though, the sticky back is really sticky and it took a bit of manoeuvring to get the pieces into the locker without sticking them to anything they touched.

SPB_5D_097651

I made sure that I left enough gap to inspect the gas pipe or to get to any screw heads that might require checking for tightness in the future. Peeling the labels off in one piece was a bit of a chore… I will probably try to get new ones at some point in the future.

SPB_5D_097652

The completed locker….

SPB_5D_097654

… and the underside of the window shelf….

SPB_5D_097655

After a bit of a sort out and removing some stuff we haven’t used for a while (saving a couple of kilo’s in weight!), everything was replaced back in to the locker.

SPB_5D_097658

The next job will be to do the wheel arches inside the caravan.

Lucky or what!

When I was feeding in the second piece on the right hand side I had to take it out to curve it to get it in position. When I removed it I spotted something stuck to the bottom edge ( I did say it was really sticky!)….. it was my Wedding ring! I thought I’d lost it somewhere between our last stop in France – Camping Risle Seine and reaching home back in October 2012. It could have so easily dropped through one of the various vents in the floor in the couple of thousand miles of towing since then, but there it was, stuck to my piece of insulation.

So another little job crossed off the list. I’m not sure how effective it will be, only time and a bit of cold weather will tell. It might very well be a placebo thing…. but as the supermarket slogan say’s “Every Little Helps”.

Contact Info: Foam Solutions UK, Haymoor Hall, Wybunbury Lane, Nantwich. CW5 7HD or  http://www.foamsolutionsuk.co.uk or telephone 01270 842 228 or email Carole: carole_395@fsmail.net

Don’t forget you can follow Caravan Chronicles on Twitter and Facebook… the link do-hickey things are on the left hand side.

Share this:

  • Click to share on X (Opens in new window) X
  • Click to share on Facebook (Opens in new window) Facebook
  • Click to share on Tumblr (Opens in new window) Tumblr
  • Click to share on Pocket (Opens in new window) Pocket
  • Click to share on Pinterest (Opens in new window) Pinterest
  • Click to share on Reddit (Opens in new window) Reddit
Like Loading...

Relay, VSR, SCR… what’s the difference?

16 Sunday Mar 2014

Posted by Simon Barlow in Electrical, Help Guides, Maintenance, Technical

≈ 16 Comments

Tags

Caravan, Caravan Electrics, Caravanning, Caravans, Charging, Leisure Battery, Maintenance, Split Charge Relay, starter battery, Technical, Towing, vehicle battery, Vehicle Wiring

There is a lot of confusion over what the differences are and when to use each one. So what are they?  A relay is just a simple switch that allows a low power electrical circuit to turn on (or off) a high-powered electrical circuit. An SCR or Split Charge Relay is a switch that senses voltage and switches over from one circuit to another at a pre set voltage. Finally a VSR – Voltage Sensing Relay is similar to an SCR but turns on and additional circuit at a pre set voltage. So what do you use each one for?

Split Charge Relay – SCR

These are usually installed in 4 x 4’s that have a lot of accessories fitted especially electrical winches. The general idea is the winch is powered from a second battery so that using the winch should never flatten the main vehicle starter battery. As the winch uses a lot of power, it is necessary to be able to recharge this battery as fast as possible using the output from the vehicle’s alternator, so once the vehicle starter battery is fully charged, the output from the alternator is switched directly over to the second battery. Modern SCR’s are usually all solid state and some times have a bypass switch allowing both batteries to be directly connected for either starting the vehicle if the starter battery is flat or to allow the winch to be powered from the starter battery in emergencies.

SCR's are normally solid state, I have shown it as switches to make it clearer.
SCR’s are normally solid state, I have shown it as switches to make it clearer. Note: I haven’t shown any fuses or earth (neutral) cables. Never use the vehicle body as a conductor, always install correctly sized earth (neutral) cables.

How do SCR’s operate?

If you look at the drawing above, you can see the alternator output goes straight to the split charge relay. In normal operation the relay connects the output of the alternator to the starter battery. Once the engine is running and the relay determines the starter battery is fully charged, it switches the output of the alternator to the vehicle accessory battery. If the voltage on the vehicle starter battery drops, the relay switches back. However, these relays are slightly more sophisticated and have the ability to dual feed – i.e. charge both batteries at the same time or the ability to link both batteries for either vehicle starting or to power accessories under extreme load… heavy and prolonged winching for example. Expect to pay serious money for a good quality SCR with a remote bypass facility and battery monitoring.

A true ‘split charge relay’ is not suitable for charging your caravan leisure battery, but could be used for charging leisure batteries in motorhomes.

Voltage Sensing Relay – VSR

Voltage sensing relays were designed to sense the tow vehicles battery voltage and when the battery is sufficiently charged switch on a second circuit, usually the power to the caravan’s fridge. Some of the more sophisticated VSR’s allow the setting of the voltage the relay will operate at. The biggest draw back with these is if the electrical load with the tow vehicle suddenly increases – turning on the headlights, heated windows, air con etc, they can turn off the circuit to the caravan’s fridge until the electrical load is removed. It is for this reason they should be installed with an indicator light on the dash to confirm that they are actually supplying the fridge. With a caravan, if there isn’t a feed to the fridge, the habitation relay will not operate and therefore the caravan’s leisure battery will not be charged.

VOltsge
VSR’s can be a mix of solid state and mechanical switch or all solid state. Again, I have not shown fuses or earth (neutral) cables for clarity.

VSR’s work on the principle that they monitor the vehicles electrical voltage. The VSR’s sensor detects the voltage change when the vehicle battery is fully or near fully charged, it closes the contacts connecting the leisure battery in circuit and allowing it to be charged. However, if the vehicle voltage drops for some reason, the relay will open disconnecting the leisure battery.

Problems with VSR’s

Most of the time they are installed when the rest of the towing electrics are installed and are usually located behind a panel in the rear load area of the vehicle. Because of this, it is rare to see one that has a dashboard indicator light installed to show when it is ON and charging your leisure battery and consequently switching over the habitation relay allowing your fridge to work. The second problem is when they leave the factory the voltage that they are designed to switch on at is set at the correct level if it was installed near the vehicle battery. As it has been installed some distance away, the length of cable between the battery and VSR has its own voltage drop – dependant on length of cable and current through it. So one fault that is often reported is that the relay ‘vibrates’ or ‘chatters’. This is caused by the voltage drop on the connecting cable increasing below the “trigger voltage” when the leisure battery is connected and the relay is simply turning on and off repeatedly. Like most things you get what you pay for and the more expensive VCR’s have a timer circuit built-in so that they only switch over after a pre-determined time.

But wait…. there’s more!

Modern vehicles are sophisticated bits of engineering, electronics and software. In order to reduce emissions a lot of manufacturers removed things like hydraulic power steering pumps and air conditioning pumps and replaced them with electrical motors. This removed mechanical load from the engine and reduced the weight. The trade-off was the vehicle needed more electrical power, so larger alternators were fitted. As power steering and air conditioning wasn’t needed all the time and in order to prolong the life of the vehicle battery, the alternator is now controlled by the software in the vehicles ECU. So when the ECU detects the vehicle battery is fully charged it reduced the output of the alternator by reducing the voltage and therefore reducing the load on the engine and hence reducing engine emissions. If you have a VSR fitted, this drop in the vehicle voltage will stop the VSR working as it was intended to do. So even if the VCR has a timer circuit, it can still fail to work as intended.

Theres is an interesting letter posted in the September 2013 issue of Land Rover Owner magazine:

Article appeared in Land Rover Owner INternational September 2013. (c) LRO /  Bauermedia
Article appeared in Land Rover Owner International September 2013. (c) LRO / Bauermedia

How can we reliably charge the leisure battery in modern vehicles? Well the clue is in the article above. If we can fool the tow vehicle to ‘see’ the leisure battery as part of the vehicles own electrical system the software in the ECU won’t reduce the voltage until both the leisure battery and vehicle battery are suitably charged.

Ordinary Relay

The most straight forward way of providing the leisure battery with a suitable charging circuit is also the cheapest. A simple 30 Amp 12 volt relay can be bought for a few pounds and it will be a reliable way of charging your caravan’s leisure battery.

Ordinary 30 Amp relay
Ordinary 30 Amp relay. Again, I have not shown fuses or earth (neutral) cables for clarity.

The circuit above shows an ordinary 30 Amp automotive relay being used to switch the leisure battery charing circuit. The relay is controlled by the ignition circuit, so when the engine is running the relay is energised and the leisure battery is being charged. As the leisure battery is in circuit all the time the engine is running, the vehicles software in the ECU ‘sees’ just one big battery and will keep the alternator voltage high enough to charge both batteries fully before reducing the output in energy-saving /emission reducing mode.

Some vehicles including a number of Land Rover’s actually have a connection on the main fuse board specifically to control this relay.

I hope you have found this useful.

Share this:

  • Click to share on X (Opens in new window) X
  • Click to share on Facebook (Opens in new window) Facebook
  • Click to share on Tumblr (Opens in new window) Tumblr
  • Click to share on Pocket (Opens in new window) Pocket
  • Click to share on Pinterest (Opens in new window) Pinterest
  • Click to share on Reddit (Opens in new window) Reddit
Like Loading...
← Older posts
Newer posts →
Buy Me A Coffee

Blog Stats

  • 45,901,333 hits
Follow Caravan Chronicles on WordPress.com

Follow Caravan Chronicles and receive notifications of new posts by email.

Some previous posts you may like...

My last post….

Many thanks to all my friends. As I write this I’m in the Christi hospital hoping to go home in a few days. I was told about a week ago that I had about 3 months to live and should start preparing my affairs. Which Sue and I are trying to do. I have some…

A Bit Of A Tour…

Well not really a tour, only two locations. The first leg was down from Manchester to Glastonbury and a stay at The Old Oaks. We first went there in 2012 and had five or six more visits in the next four years. So it had been quite a while really. We were located in the…

What’s The Question I Get Asked a Lot?

“What’s in your toolbox when travelling?” Tricky one… I don’t have a tool box anymore. I recently started mooching around the internet for a smaller tool box… or rather a tool bag. I used to use up until a few months ago a Stanley Tool Bag. It was lighter than a tool box, I could…

#Tourfest North West

Tourfest North west was our first time attending anything like a gathering of bloggers, vloggers and the generally like minded. It was organised by The Caravan Addys with a little help from others I’m sure as it must be a time consuming task and hard work to bring everything together. We opted to arrive at…

More Jobs Ticked Off…

OK we are still working on a few bits and pieces but the weather on Friday and Saturday was ideal for cleaning the outside of the 5th Wheel. So while Sue made a start on the cleaning of the nose cap, I finished the first stage of the water pump relocation project and upgraded the…

A Few More Jobs Ticked Off The List…

Like any project, ticking the small stuff off a list is the way to move forward even if it seems like sometimes you have ground to a halt. A bit lacking on photos…. I’m temporarily unsure of their location… pilot speak for I’ve lost them! I’ll correct that in due course. I built a new…

A Few Little Jobs Done…

It seems such a long time since I posted anything. Last time out with the Dreamseeker I noticed that the charging voltage when we were hooked up to the truck was only about 12.1 to 12.3 volts as measured in the Dreamseeker battery box. I know that the VW Amarok puts out 14.6 to 14.8…

Happy New Year…

Happy New Year to everyone, I hope you have a great touring year ahead. I’d like to take this opportunity to give you a bit of an update on my personal circumstances and a look forward to a couple of projects I’m planning to kick off our year. First… … A HUGE thank-you yo everyone…

Sutton-on-Sea In September

Just like to say a huge thank you to so many people that have commented or emailed me over my last post. It has cheered me up no end…. it really has. Enough to rattle this post off! We recently went back to Cherry Tree Springs at Sutton on Sea for an 7 day break.…

This Might Be My Last Post…

Not clickbait…. Three weeks ago Sue and I were cycling between 8 and 10 miles each morning to get a morning coffee. Arrived back home and…. well time stopped. I had received notice that my test sample for Bowel Cancer screening had come back positive. Two days later I underwent a colonoscopy procedure which didn’t…

Something went wrong. Please refresh the page and/or try again.

  1. Dave Hart's avatar
    Dave Hart on How to: Connect two batteries in parallelAugust 27, 2024

    brilliant and so well explained! Thank you, love your work!!

  2. Simon Barlow's avatar
    Simon Barlow on Caravan Road Lights – Basic Fault FindingAugust 25, 2024

    Please look at my very last post on the blog

  3. Martin's avatar
    Martin on Caravan Road Lights – Basic Fault FindingAugust 25, 2024

    martin here caravan lights worked fine for two stop overs I had then hooking up again for my third trip…

  4. Emmy’s Camper Travels's avatar
    Emmy’s Camper Travels on My last post….August 25, 2024

    I’m so sorry. My sincerest sympathies go to you and your wife Sue. Your ideas and advice have been so…

  5. Steve Walsh-Jones's avatar
    Steve Walsh-Jones on My last post….August 22, 2024

    very sorry to hear this. Your posts have been very informative and enlightening providing an in depth view on different…

  6. thetwinaxletouringscouser's avatar
    thetwinaxletouringscouser on My last post….August 22, 2024

    Good heavens above Simon I am ever sorry to hear of such devastating news for both you yourself and Sue.…

  7. Eileen's avatar
    Eileen on My last post….August 22, 2024

    Simon and Sue, thank you both for sharing your passion for caravans with us. The news is extremely sad, our…

  8. Philip Parkes's avatar
    Philip Parkes on My last post….August 22, 2024

    Simon. So sad to read you last post today. Our thoughts are with you and Sue at this time. Whilst…

  9. Philip Parkes's avatar
    Philip Parkes on My last post….August 22, 2024

    Simon. So sad reading your post today. Our thoughts are with you and Sue at this time.

  10. Philip Parkes's avatar
    Philip Parkes on My last post….August 22, 2024

    Simon our thoughts are with you and Sue.

  11. Luke Tarrant's avatar
    Luke Tarrant on My last post….August 22, 2024

    Very sorry to read this and my thoughts are with you both at this time.

  12. Alan Smith's avatar
    Alan Smith on My last post….August 22, 2024

    Dearest Simon. I have never met you, but I feel as though I have some (limited) knowledge of you and…

CaravanChronicles.com Tag’s…

5th Wheel Caravan 13 Pin Plug Accessories AL-KO Avtex Bear Extender Bike Rack Blackpool Blackpool Illuminations blogging Cadac Camping & Caravanning Club Canterbury Caravan Caravan Blog Caravan Club Caravan Electrical Caravan Electrics Caravanning Caravans Caravan Show Caravan Talk Cheltenham Chirk Christmas Market Christmas markets Cleaning design Event City Factory Visit Fiamma France Freelander Glastonbury Glossop Caravans Humor Insync Jonic Bedding Lady Heyes La Tournerie Ferme Leisure Battery Leisure Battery Charging LPG Refilling Maintenance Manchester Caravan & Motorhome Modifications NEC North Western Caravans Ltd OLPRO One Hairy Caravanner Oswestry Oxford Product Review Project Review Safefill Sat Nav Sterling Caravans Sterling Power Wildside Swift Factory Swift Group Swift Talk Technical The Old Oaks Touring Towing Tow Vehicle Trafford Centre travel Travel Trailer Travel Trailers vacation VW Amarok Warwick Racecourse WiFI

Website Powered by WordPress.com.

  • Subscribe Subscribed
    • Caravan Chronicles
    • Join 672 other subscribers
    • Already have a WordPress.com account? Log in now.
    • Caravan Chronicles
    • Subscribe Subscribed
    • Sign up
    • Log in
    • Report this content
    • View site in Reader
    • Manage subscriptions
    • Collapse this bar
 

Loading Comments...
 

    %d