• Home
  • Help Guides
    • Storage Sites
    • Equipment Reviews
  • Document Library
    • Electrical Drawings
  • Photo Gallery
    • Caravan Log
    • MPG
  • Trip Map
  • Shop
  • About Caravan Chronicles…
  • Contact
  • Links

Caravan Chronicles

~ not just another caravan blog

Caravan Chronicles

Category Archives: Accessories

Fit2Go Tyre Pressure Checker…

05 Wednesday Apr 2017

Posted by Simon Barlow in Accessories, Gadgets, General, Maintenance, Product Review, Reviews, Technical, TPMS

≈ 6 Comments

Tags

Caravan, Fit2Go, Maintenance, Touring, Towing, TPMS, Tyre Monitoring, Tyre Pressure

Back in December last year I did a write up and little video with Andy Harris from RoadPro about the Fit2Go tyre pressure monitoring system. In the video he promised to send me one of the new Fit2Go Tyre Pressure Checker units as soon as they were released. Well Andy kept his word and yesterday I received a little package from Road Pro.

IMG_1112

I had seen a sneak preview of one of the first early production units available at the NEC show in February and managed to have a quick run through of it very simple operation.

IMG_1113

The unit comes neatly packaged and isn’t contained on one of those damn near impossible to open blister packs thankfully. It arrive complete with a set of AAA size batteries, a holder which has a pad of 3M VHB tape to allow it to be attached and stowed securely inside the vehicle. VHB if you don’t know stands for Very High Bond, so choose your storage location wisely… it might be a bit of a do-dah to move!

IMG_1114  Operation is really simple. Press and hold the on button for five seconds and the unit will power up and display the status of the units own batteries.

IMG_1116

To obtain a pressure reading, simply place the unit’s logo over the tyre pressure sensor and you will feel a slight pull as the internal magnet pulls it towards the sensor, it’s this magnet that ‘wakes up’ the sensor.

IMG_1118

29 PSI is correct for the Amarok running light, and this sensor is showing 3 battery bars.

After a few seconds the Pressure Checker will beep and you can read the pressure for that wheel… and cleverly, you can also check on the battery level in the sensor. The display is in good old PSI, however if you don’t work in PSI and much prefer BAR, while the Pressure Checker is turned on, simply press the on/off button five times in quick succession and it will beep and the reading will now be in BAR. To change it back, simply do the same again to revert to PSI. To turn the Pressure Checker off, simply hold down the power button for 3 seconds and it will beep and turn off.

That is about as complicated as it gets.. really. The only real challenge is to find a spot to stick the holder!

IMG_1115
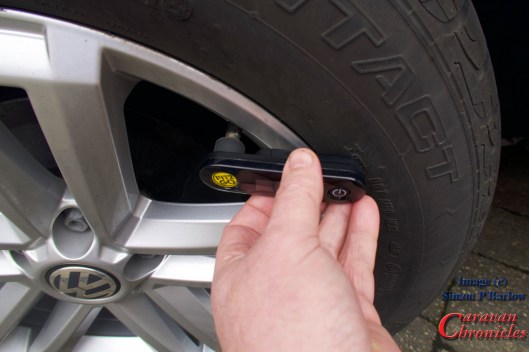
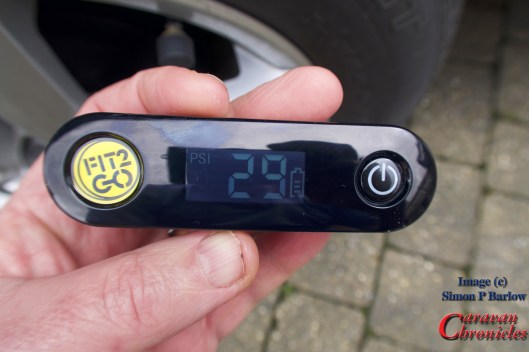
I have tried a few different TPMS ‘solutions’ over the past couple of years and all have plus points and minus points. As I am one of these people who likes to do walk rounds before setting off (throw back to my flying days I guess) I really didn’t want Formula 1 type information thrown at me all the time. I wanted a simple warning system and a simple way to check the pressure without having to remove any sensors. Fit2Go ticks these boxes.

If I did have a negative point about the Fit2Go system it would be the fact that the batteries in the sensors are not user replaceable. At least I do have a way to check the status of them now. The sensors are not too expensive when they need replacing, but  will be more expensive that replacing just a battery. Part of my brain is shouting “recycling” at me… and I do wonder why the manufacturer hasn’t come up with a recycling scheme… exchange your old sensors for new for a few pounds less than buying new and we will recycle them. Or maybe a discount voucher scheme when you recycle?

The Fit2Go Tyre Pressure Checker is available from RoadPro for just under £40 (exc shipping) or you can always find it on Amazon.

Share this:

  • Share on X (Opens in new window) X
  • Share on Facebook (Opens in new window) Facebook
  • Share on Tumblr (Opens in new window) Tumblr
  • Share on Pocket (Opens in new window) Pocket
  • Share on Pinterest (Opens in new window) Pinterest
  • Share on Reddit (Opens in new window) Reddit
Like Loading...

Fitting A Bike Rack to the VW Amarok – Finale…

12 Sunday Mar 2017

Posted by Simon Barlow in Accessories, Amarok, Bike Carrier, Bike Rack, General, Modifications, Tow Vehicle, VW Amarok

≈ 5 Comments

Tags

Bike Rack, Modifications, Touring, Towing, VW Amarok

It’s time to wrap up the bike rack install. I had to wait a few days for the final rack to arrive. Although I had ordered a twin pack of the Thule FreeRide 532 from Holdcrofts via Amazon and they had shipped out a twin pack, it would seem that their courier had ‘lost’ one and to Holdcrofts credit as soon as I emailed them they dispatched another… which the courier took four days to deliver.

IMG_1098 Continue reading →

Share this:

  • Share on X (Opens in new window) X
  • Share on Facebook (Opens in new window) Facebook
  • Share on Tumblr (Opens in new window) Tumblr
  • Share on Pocket (Opens in new window) Pocket
  • Share on Pinterest (Opens in new window) Pinterest
  • Share on Reddit (Opens in new window) Reddit
Like Loading...

Fitting A Bike Rack to the VW Amarok – Part 2…

04 Saturday Mar 2017

Posted by Simon Barlow in Accessories, Amarok, Bike Carrier, Bike Rack, General, Modifications, Projects, VW Amarok

≈ 3 Comments

Tags

Bike Rack, Maintenance, Modifications, Touring, Towing, VW Amarok

OK, so now to fit the actual bike carriers onto the rack I had previously installed a couple of days ago.

We had opted for the Thule FreeRide 532 over the ProRide version. What put me off the ProRide were a couple of videos on YouTube showing just how easy it was to remove a bike supposedly locked on to the rack. The FreeRide 532 has two arms supporting the bike and offered an option for additional security…. which I’m not going to go into for obvious reasons!

I had ordered a twin pack of the FreeRide 532, unfortunately I only received one. It seems the other was lost in transit somewhere according to my enquiries with the supplier. The other thing I found out was they (or it) didn’t come with the “T” track fixings. OK so a quick trip down to my nearest Thule dealer Northwest Towbars to pick up the elusive fixings. They would remain elusive… Northwest Towbars didn’t have any in stock. Not to be out manoeuvred I’d make my own.

To the bat cave again…

I just happened to have some 2mm aircraft grade aluminium handy and cut eight 21mm x 45mm pieces. The FreeRide 532 normally has three mounting locations, but as there was an additional hole that lined up with the “T” track it would be rude not to use it! So I made four for each rack.

img_1069For the threaded bolt I had some dome head bolts handy. The width of the dome head was wide enough so it would not pull through the slot on its own so I was not relying on a 2mm think aluminium plate entirly. To hold the bolts in place I drilled a slightly undersized hole in the aluminium…

img_1074

img_1075img_1077…and used my small press to force the square shoulders of the bolt through the aluminium plate to hold it in place.

img_1078The result was eight “T” track bolts. A quick dressing up on the sanding belt and fine grinding wheel to remove any rough edges finished them off.

img_1079 The excess length of the bolt would be trimmed later.

Fitting the FreeRide 532 Racks

Sliding four of the newly made “T” track bolts in to the WingBars I could place the FreeRide 532 on to the bars.

img_1080I used a couple of nuts to hold the rack in place while I test fitted one of the bikes. It was a bit too tight. The swing up frame section that clamps on to the bike only partially engaged on the bike frame. The whole rack needed moving rearwards by about 10 to 15 mm.

Not a problem, as the WingBar mounting is off set laterally compared to the “T” track, reversing the bar so it faced the other way would solve this and effectively move the “T” track slot rearwards by about 20mm.img_1081

With the WingBar mounted in the other direction the bike was a perfect fit. Also it made it easier opening the end caps of the WingBar as configured the correct way round they were a bit tight against the roll bar.img_1083img_1084img_1082The next thing to address was the overhang. I still had around 50 to 60 mm of adjustment I could make to the rails of the FreeRide rack. Removing everything again and a bit of ‘adjusticating’ with a small rubber mallet soon saw the rails in the correct position. I had not been able to get the rear of the mount flush with the pickup tailgate as was my original hope, but checking with a plumb bob…

img_1090img_1091… It was still shorter than the tow ball and only about 40mm longer than the rear bumper. So the overhang wasn’t anything to worry about.  Even with a bike on the rack it would be clear of the caravan in the tightest of turns. Next it was just a matter of squaring things up and tightening everything down.

img_1092

I ended up locating the rack more to the side than I first planned. This was for two reasons. Firstly, once the second rack is in place it leaves me with nearly 800 mm between the two racks which will allow for the option in the the future of having the ability to install a mesh tray, ski rack, surfboard rack (we don’t ski or surf… ho hum) or slimline roof box if we ever run out of storage in the Amarok. The second reason is it will give the rear view dash cam a relatively unobscured view rearward even with two bikes on the back.

Everything torqued to the correct settings, I topped off the nuts with an additional nylon lock nut to make sure they could not vibrate loose…

img_1093img_1094… and using a Dremmel I cut off the excess thread and ground off any sharp edges.  I need to find a suitable plastic or rubber push on cover for these then I can give them a quick coat of preserving grease.

One thing that I did think about was the prospect of the swing arms bouncing up and down when bikes were not on the rack. A quick rummage in my straps box produced a few of these little blue straps and a handy slot on the mounting plate seemed ideal…

img_1096… problem solved. A simple solution to something that may or may not be a problem.

So one rack fitted, all that is left is to repeat for the other side, when it arrives!

img_1097

Share this:

  • Share on X (Opens in new window) X
  • Share on Facebook (Opens in new window) Facebook
  • Share on Tumblr (Opens in new window) Tumblr
  • Share on Pocket (Opens in new window) Pocket
  • Share on Pinterest (Opens in new window) Pinterest
  • Share on Reddit (Opens in new window) Reddit
Like Loading...

Smart Alternators: how they affect Caravans and Motorhomes….

15 Wednesday Feb 2017

Posted by Simon Barlow in Accessories, Caravan Electrics, Electrical, Maintenance, Motor Home, Technical

≈ 43 Comments

Tags

Battery Charging, Caravanning, Caravans, Leisure Battery, Maintenance, Towing

I have been receiving a lot of emails over the last two or three months from people reporting issues around charging their leisure batteries after changing tow vehicles and a similar number from people who are having problems with performance of the installation of the electrical harness on their new vehicle tow bar.

I’ve spent quite a bit of time answering emails and thought I’d try to sum up what is happening. A lot of this is also going to apply to Motor Homes, especially if they have a new Euro 6 engine. Continue reading →

Share this:

  • Share on X (Opens in new window) X
  • Share on Facebook (Opens in new window) Facebook
  • Share on Tumblr (Opens in new window) Tumblr
  • Share on Pocket (Opens in new window) Pocket
  • Share on Pinterest (Opens in new window) Pinterest
  • Share on Reddit (Opens in new window) Reddit
Like Loading...

Fit2Go Tyre Monitoring Review….

26 Monday Dec 2016

Posted by Simon Barlow in Accessories, Product Review, Reviews, Technical, TPMS

≈ 23 Comments

Tags

Caravan, Caravan Tyres, Fit2Go, RoadPro, Tow Vehicle, Towing, TPMS

A couple of weeks ago while we were at the Chapel Lane Caravan Club site Andy Harris from RoadPro came over and brought a new product for us to try. It had been launched to the caravan and motor home market at the NEC show in October and while talking to Andy at the show he introduced me to a couple of people from Fit2Go to chat about the product. I really liked the idea of it as there were no wires involved, little set-up or programming and more importantly it was easy to install the dash display in any vehicle as the unit fitted on the windscreen and was the same size as the old tax disc. No suckers…. no bean bag thingy…. no screwing mounts to the dash or finding a space to install the display. Continue reading →

Share this:

  • Share on X (Opens in new window) X
  • Share on Facebook (Opens in new window) Facebook
  • Share on Tumblr (Opens in new window) Tumblr
  • Share on Pocket (Opens in new window) Pocket
  • Share on Pinterest (Opens in new window) Pinterest
  • Share on Reddit (Opens in new window) Reddit
Like Loading...

Feeling Festive and Shooting a Video…

20 Tuesday Dec 2016

Posted by Simon Barlow in Accessories, Christmas Markets, Gadgets, General, Gifts

≈ 1 Comment

Tags

Caravanning, Caravans, Maintenance, Touring, Tow Vehicle, Towing, travel, Travel Trailer, Travel Trailers

This time of year is great for getting away in your caravan or motor home and getting into the festive spirit. We have owned a caravan for 5 years now and every year to extend the season we have managed to take in a Christmas Market – Lincoln, Erddig, Cheltenham, Oxford, Birmingham to name a few. This year would be no exception and we had decided to re-visit Birmingham. Around the same time as we were planning this, Andy Harris, the TV presenter, owner of RoadPro and avid motorhome enthusiast had been in touch and had a product he wanted us to try out… and make a video!

Monday 12th December

We had booked in again to Chapel Lane Caravan Club site in Wythall on the outskirts of Birmingham. Its ideally located for getting into the centre of Birmingham via the car or train.

We picked up the caravan from the storage facility and set off at 10:50 for the 104 mile trip down to the site. The motorways were showing clear on the GPS. Slight delay through the roadworks on the M6, but no major holdup. Pulled into Chapel Lane Camping and Caravan site at  13.15.

Pitching the caravan is by now, a well rehearsed act… pink and blue jobs and we both get on with it. However my awning setup routine was interrupted by Sue announcing “the loo won’t flush” You can read all about that in the previous post: Flushed With Success…. Eventually.

Twinkly lights under the full moon

Twinkly lights under the full moon

Tuesday 13th December

A little trip out to CAK Tanks for a spare part was the order of the day after ringing to confirm they had the part in stock. Before we set off Sue prepared the evening meal in the slow cooker (crock-pot). Sue recently ‘re-discovered’ our slow cooker and has been trying different recipes. It really is ideal for the caravan…. prepare everything in the morning, turn it on and set off for the day knowing there’s going to be a hot meal ready when we come back. Absolutely ideal for caravanning in the colder months.

We punched the address for CAK Tanks into the sat-nav and set off. It took us about 25 minutes to get there. This was our first visit to CAK and let me just say YOU GUY’S NEED A BIGGER SHOP! The existing shop was packed to the roof with products and I guess they only had a tiny percentage of what they actually stock on display and I would have loved to have spent hours browsing (and a small fortune probably) and chatting to the staff.

We arrived back at the caravan and I set to sorting out the ‘repair’…. which wasn’t really a repair, more putting right someone else’s mistake.

Wednesday 14th…. the video man cometh!

We were up fairly early to make sure everything was tidy… not that it usually isn’t, ready for Andy arriving. He was due to arrive about ten and had already got permission from the Caravan Club to shoot video on site.

Thankfully we were lucky with the weather. The previous days gloom and drizzle had given way to clear sky and in the morning bright sun. As for the video and what it was all about…. well you will just have to wait a few days but needless to say I ain’t going to win anything in the talent stakes!

Thursday 15th December

Wednesday night the temperature dropped and the fog started to appear. We were up early again and peering out of the caravan window.  After our showers it still didn’t seem like daylight had arrived properly. At least it wasn’t raining. We set off a little after nine to walk the mile or so down to Wythall station to catch the 09:57 train to Moor Street station which is perfect for visiting the centre of Birmingham.

Waiting for the train at Wythall Station in the morning mist

Waiting for the train at Wythall Station in the morning gloom

img_0684

Walking down New Street

Leaving the main entrance of Moor Street, if you cross over the road and climb the steps opposite it brings you out at one end of the Christmas Market on New Street and you just follow the stalls. We dropped in to a Costa Coffee to stock up on caffeine and followed  the trail of stalls. The stalls run along New Street and into Victoria Square where a number of the food and drink stalls are located.

img_0680

Some of the stalls in Victoria Square

img_0683

img_0681

From Victoria Square follow Fletchers Walk toward Centenary Square where all the Christmas Craft market stalls are located, opposite the building that houses the Library and Birmingham Repertory Theatre. (You can use the loo’s in here if required). There was an excellent stall dispensing hot cider with sloe gin… well it would seem rude not to!

img_0682

The big wheel in Centenary Square next to the ice rink and library

Back at Victoria Square we partook of the first festive continental sausage… washed down with mulled wine (Sue)… and a hot chocolate with whipped creme (Me) and it wasn’t even noon yet!

We walked part way back down New Street past the stall on the other side and eventually cut across to New Street Station and the shopping malls for a spot of window shopping and in search of a late lunch.

 Friday 16th December – British Motor Museum, Gaydon

Last year, our efforts to visit the British Motor Museum were shorted lived. When we arrived it was shut. Not doing any checking about opening times was down to me. If I had, I’d have discovered that there was a £1.1 Million refurbishment being undertaken. This year however, I did check and it was open (well the first floor of the ‘Collections’ centre was closed while the floor was being repaired) and after a thirty minute drive from the site we arrived spot on 10:30. It’s well worth a visit if you have any interest in British car manufacturing, however I was a little disappointed that there were not as many Land Rovers on display as I had expected… plenty of Jaguars (well it is owned by Jaguar Land Rover) but a bit thin on Landy’s. Here are a few photos rather than me waffle on….

img_0965

img_0988

img_0967

img_0975

Sue’s second favourite car

img_0987

img_0986

Above & Below: Laura Croft’s Tomb Raider Landy

img_0984

img_0969 img_0968

img_0990

Sue’s favourite car…. I’d better start saving!

A highlight was this 1935 Royal Winchester caravan. I managed to get a couple of photos through the windows without too much reflection. With a lot of the cars the door windows were open, and although you are asked politely not to touch the exhibits… you can almost put your head through the window for a closer look and to sniff the interiors… its surprising the memories this triggered. Unfortunately the caravan had all it’s windows firmly shut and I would have loved to have been able to at least have a closer look (and sniff) at the interior.

This did get me wondering, as we have been building caravans almost as long as we have been building cars, do we have a national collection of caravans anywhere?

img_0976 img_0979 img_0978 img_0977

On the way back we called in to Hatton Shopping Village, the place we found last year. The shops were fairly quiet as it was Friday and obviously the schools hadn’t finished for Christmas yet. There were over a dozen Christmas stalls set up outside in addition to the many specialist small shops. As it was about lunch o’clock we dropped into Spinning Jenny, the restaurant, bar and tea room. Sue opted for fish cakes and I plumped for the gammon.

img_0688

However it arrived on a routed and planed scaffolding plank. My pet peeve is food served on planks, shovels, roofing slates or for that matter anything that is not a plate or something that can be suitably washed. OK I can accept a cheese board on wood, but grilled meat… unless they have a butcher’s apprentice trained to scrub a butchers block for twenty minutes with water and bleach washing up… I have a problem with it. That said… it was very nice.

As are most of our caravanning trips it had come to an end and the following day it was time to go home.

If you havent thought of using your caravan or motor home out of season, or thought about visiting a Christmas Market, start thinking about it now. Using your caravan or motor home in the winter isn’t an issue, they are all designed for all year use and have good insulation. Our tip is when you arrive put the heating on full blast and get the living space up to a comfortable temperature as quick as possible. Don’t fall into the “Keep the heating low to save gas/electric and let it warm up slowly….. use the “blast furnace” setting and get the heat into the van quickly, once it’s comfortable reduce the setting to maintain the level of warmth you are happy with.

Sites are usually quiet this time of year and you won’t have too many problems booking somewhere…. the hardest thing is deciding on which Christmas Market you want to visit… or visit two! Spend a few days at one then move on to another, that’s what caravans and motor homes were designed for, moving about. Remember you can go everywhere like a local!

OK that’s it for our travels this year, we are already looking forward to 2017 and the caravan and motor home show at Event City in Manchester in January…. then the NEC in Feb…

Merry Christmas and Happy New Year.

Simon & Sue

Share this:

  • Share on X (Opens in new window) X
  • Share on Facebook (Opens in new window) Facebook
  • Share on Tumblr (Opens in new window) Tumblr
  • Share on Pocket (Opens in new window) Pocket
  • Share on Pinterest (Opens in new window) Pinterest
  • Share on Reddit (Opens in new window) Reddit
Like Loading...

Little Things….

04 Sunday Dec 2016

Posted by Simon Barlow in Accessories, Caravan Electrics, Electrical, Maintenance, Modifications, Technical

≈ Leave a comment

Tags

Caravan, Caravan Electrics, Maintenance, Modifications

One of the little things that has been on my “must do something about that” list for a while is to address the problem we have with not enough places to plug things in and charge them. When we are in the caravan in the evening the front looks like a tech gadget table top sale… Macbook Pro, WiFi router/MiFi device, two iPhones, camera battery chargers, Fitbit charger and all these needed plugging in. The 4 way surge protected power strip I put there just wasn’t cutting it any more.

It was time to do something about it. A couple of years ago Swift supplied a kit to modify the drop down TV system that was installed in a range of their caravans. Our caravan already had the upgrade, however they did supply a new piece of wood to replace the installed piece as some of the holes had moved when they upgraded the latches. Always wanting to repurpose things I thought that this could be the basis of an upgrade… not to the TV drop down but to the rear of the draw unit. I wanted to install USB charging ports but still required a couple of 240 volt sockets and a brief search on Amazon I came across what I needed. The other thing I wanted was a couple of 12 volt sockets so that I could use our 12 volt plug-in USB chargers if we were pitched off grid.

To The Bat Cave…

The build was fairly simple. I had already converted the draw top from a slide and swing open operation to a pull out so the addition was straight forward.

The top being assembles in the workshop

The top being assembled in the workshop

It was a simple matter of cutting out the two rectangular holes for the 240 volt face plates and opening up the two existing holes intended for the new latches to the right size for the 12 volt sockets. I did intend to use the same electrical fittings as are already installed in the caravan but pricing everything up it came out at nearly four times the cost of what I eventually used here.

The two 240 volt sockets are wired with 2.5mm multi-strand cable and have slim line back boxes to protect them and the 12 volt cabling is all done with crimp connections and protected with heat shrink tubing.

The whole project including installation only took me a couple of hours and made me wonder why I’d been putting it off for so long!

I didn’t want to fasten anything to the structure of the caravan so the piece seems to ‘float’ above the front sill. The wiring was all pre done in the workshop and was easy to connect up to the caravan services as we had a 240 volt and 12 volt outlets nearby in the base of the draw unit.

img_0916

img_0918

img_0921

Plenty of room even with the blind down.

The upgrade now gives me 3 x 240 volt sockets and 6 x USB charging points plus 2 x 12 volt sockets. The space under the sockets can be used to tidy any excess charging cable away while in use.

Shopping...

Use the following bits from Amazon…

Knightsbridge SFAV7USB4MB 13 A 1G Screwless Switched Socket with 5 V DC 5.1 A Quad USB Charger with Chrome Rocker – Matt Black

Knightsbridge SF9902MB 13 A 2-Gang Screwless Switch Socket with Dual USB Charger – Matt Black with Chrome Rocker

The back boxes came from B & Q and the 12 volt sockets came from Go Outdoors caravanning section.

Share this:

  • Share on X (Opens in new window) X
  • Share on Facebook (Opens in new window) Facebook
  • Share on Tumblr (Opens in new window) Tumblr
  • Share on Pocket (Opens in new window) Pocket
  • Share on Pinterest (Opens in new window) Pinterest
  • Share on Reddit (Opens in new window) Reddit
Like Loading...

BlackVue Dash-Cam Fitted…

17 Thursday Nov 2016

Posted by Simon Barlow in Accessories, Dash Cam, Gadgets, General, Modifications, VW Amarok

≈ 2 Comments

Tags

Dash Cam, Modifications, Tow Vehicle

A few days ago I fitted the Black Vue DR650S-2CH 16GB twin camera dash cam to the Amarok. All in all it was a vey easy install taking me less than two hours to accomplish. The longest part was actually tucking the wires in along the edge of the head liner so they can’t be seen. Helpfully Black View supply a little blue tool that helps you do this without damaging any of the interior trim. I also installed the Black Vue Power Magic PRO that allows permanent connection to the vehicles electrical system and gives you the ability to use “Parking Mode” which records continuously when you are parked with the engine off.

If you have considered a dash-cam but don’t know where to start, one of the best introductory guides to Dash Cams that I have seen is by Techmoan.com. Just click on the link to watch it. There are also dozens of dash-cam reviews on His channel.

The electrical side of add the camera was made easy by using “Add A Circuit” fuse holders. (I’ve put links to everything on Amazon at the bottom of the post) Crimp the Add A Circuit on to the correct cable on the Power Magic unit then simply identify which circuit is permanently live in the fuse box, select a fuse, pull it out and insert it into the Add A Circuit fuse holder along with a fuse of the correct rating for the Power Magic and push the Add A Circuit into the space where you removed the fuse from. You will need two as the Power Magic requires a permanent 12 volt supply and an ignition switched 12 volt supply…. and a ground of course.

From the driving position very little of the front camera can be seen.

From the driving position very little of the front camera can be seen.

There are several switches on the Power Magic to set before you install. The first set the minimum voltage the unit will turn the cameras off at, this stops you flattening the vehicle starter battery, the second set sets a time for the cameras to stop recording after 24 hours, 48 hours or you can set it to infinity. There are several combinations and it’s all explained in the instructions.

The rear camera is installed at the top of the window avoiding getting one of the heating elements in view

The rear camera is installed at the top of the window avoiding getting one of the heating elements in view.

A few installation tips….

  • Try to install the camera so that the lens is as central as possible so you capture as much of the road as possible.
  • Try to install the front camera so that the area in front of the camera is swept by the windscreen wipers so you can clear the rain.
  • If you install a rear view camera, try to make sure it is not positioned directly in view of one of the heating elements, but close enough so that the window is cleared when the screen heater is on.
The front camera tucks up behind the rear view mirror

The front camera tucks up behind the rear view mirror

Editing the video…

I used iMovie on my MacBook Pro, I’ve never tried editing any video before, so here is my first attempt…

I have a feeling that I might have to create a YouTube account in the near future…. that’s going to be a whole new adventure!

Shopping Guide on Amazon UK:-

Black Vue DR650S-2CH 16GB

Power Magic PRO

Add A Circuit Mini Blade Fuse Holder

Add A Circuit Standard Blade Fuse Holder

Share this:

  • Share on X (Opens in new window) X
  • Share on Facebook (Opens in new window) Facebook
  • Share on Tumblr (Opens in new window) Tumblr
  • Share on Pocket (Opens in new window) Pocket
  • Share on Pinterest (Opens in new window) Pinterest
  • Share on Reddit (Opens in new window) Reddit
Like Loading...

Ecocamel Shower Head…

09 Sunday Oct 2016

Posted by Simon Barlow in Accessories, Gadgets, General, Modifications, Product Review

≈ 14 Comments

Tags

Ecocamel, Modifications

A few weeks ago Abigail from Ecocamel contacted me asking if we’d like to test out the Ecocamel water saving shower head. I’d seen adverts for these and noted that some caravans were now having them installed but I never really gave them a second thought until Abigail contacted me.

The shower heads arrived just in time for me to fit one of the Ecocamel Jetstorm shower head to the caravan for our trip to Leek.

Now, sometimes you subconsciously prejudge things and I really wasn’t that excited about a new shower head, after all what amazing things can you do spraying water about. The first time I went to use it I turned on the shower in the caravan as normal and adjusted the temperature by swivelling the tap into the position I normally use and lift it for the flow. What surprised me was the water seemed much hotter than I’d thought it would be. I re-adjusted the tap, and as the shower head had a better spray pattern (who thought that adding air to water would make that much difference!) I could reduce the flow and this meant I had to adjust the temperature down a bit. So what does this all mean?

Well, reduced flow saves water and as you are not using as much hot water for a similar spray pattern your hot water lasts longer. This was borne out by the fact Sue could have a shower straight after me without waiting for the hot water tank to come back up to temperature as it filled up with cold. Admittedly they were ‘navy’ showers but it took away that early morning decision…. whether to dig out all the shower stuff… brew a cup of coffee… stare out the window for a bit and pluck up the energy to schlep over to the site facilities or just hop out of bed straight into the shower.

Home again, I decided to replace our rather expensive and heavy shower head in the upstairs bathroom. Again, I was a bit taken back by the improvement a simple device could have. We have a combi-boiler and when the old shower was turned on max flow, it did struggle to keep up temperature wise. The water was hot but not really skin reddening hot. What a difference, as we could now turn down the flow a bit, the water was HOT and I had to adjust the temperature knob down on the tap from almost max to about half way.

So why has it taken a few weeks for me to pen this review? Well I like testing things and I wanted to know just how much water/energy we were saving so over the course of a few weeks I did some measuring and recording… not good enough for detailed analysis but just enough to satisfy me we were indeed saving water and that should mean energy too as we are not heating up as much water per shower. As long as you can turn the flow down a bit from your normal setting with your old shower head and  you get the same spray/deluge you will save water and hence energy.

Are there any downsides? Well they are a bit noisy as the head sucks in air and mixes it with the water, however its only as noisy as one of these power shower do-hickys.

Are we happy with them… you bet Ecocamel is the only way to go now!

If you are going to the NEC show this week, stop by Ecocamel for a chat, they are on Stand 11.03 or checkout there website Ecocamel.com

Keep an eye out on the blog, as I have TWO of the Jetstorm shower heads to give away. I’ll post the details after we come back from the NEC!


Share this:

  • Share on X (Opens in new window) X
  • Share on Facebook (Opens in new window) Facebook
  • Share on Tumblr (Opens in new window) Tumblr
  • Share on Pocket (Opens in new window) Pocket
  • Share on Pinterest (Opens in new window) Pinterest
  • Share on Reddit (Opens in new window) Reddit
Like Loading...
← Older posts
Newer posts →
Buy Me A Coffee

Blog Stats

  • 45,910,279 hits
Follow Caravan Chronicles on WordPress.com

Follow Caravan Chronicles and receive notifications of new posts by email.

Some previous posts you may like...

My last post….

Many thanks to all my friends. As I write this I’m in the Christi hospital hoping to go home in a few days. I was told about a week ago that I had about 3 months to live and should start preparing my affairs. Which Sue and I are trying to do. I have some…

A Bit Of A Tour…

Well not really a tour, only two locations. The first leg was down from Manchester to Glastonbury and a stay at The Old Oaks. We first went there in 2012 and had five or six more visits in the next four years. So it had been quite a while really. We were located in the…

What’s The Question I Get Asked a Lot?

“What’s in your toolbox when travelling?” Tricky one… I don’t have a tool box anymore. I recently started mooching around the internet for a smaller tool box… or rather a tool bag. I used to use up until a few months ago a Stanley Tool Bag. It was lighter than a tool box, I could…

#Tourfest North West

Tourfest North west was our first time attending anything like a gathering of bloggers, vloggers and the generally like minded. It was organised by The Caravan Addys with a little help from others I’m sure as it must be a time consuming task and hard work to bring everything together. We opted to arrive at…

More Jobs Ticked Off…

OK we are still working on a few bits and pieces but the weather on Friday and Saturday was ideal for cleaning the outside of the 5th Wheel. So while Sue made a start on the cleaning of the nose cap, I finished the first stage of the water pump relocation project and upgraded the…

A Few More Jobs Ticked Off The List…

Like any project, ticking the small stuff off a list is the way to move forward even if it seems like sometimes you have ground to a halt. A bit lacking on photos…. I’m temporarily unsure of their location… pilot speak for I’ve lost them! I’ll correct that in due course. I built a new…

A Few Little Jobs Done…

It seems such a long time since I posted anything. Last time out with the Dreamseeker I noticed that the charging voltage when we were hooked up to the truck was only about 12.1 to 12.3 volts as measured in the Dreamseeker battery box. I know that the VW Amarok puts out 14.6 to 14.8…

Happy New Year…

Happy New Year to everyone, I hope you have a great touring year ahead. I’d like to take this opportunity to give you a bit of an update on my personal circumstances and a look forward to a couple of projects I’m planning to kick off our year. First… … A HUGE thank-you yo everyone…

Sutton-on-Sea In September

Just like to say a huge thank you to so many people that have commented or emailed me over my last post. It has cheered me up no end…. it really has. Enough to rattle this post off! We recently went back to Cherry Tree Springs at Sutton on Sea for an 7 day break.…

This Might Be My Last Post…

Not clickbait…. Three weeks ago Sue and I were cycling between 8 and 10 miles each morning to get a morning coffee. Arrived back home and…. well time stopped. I had received notice that my test sample for Bowel Cancer screening had come back positive. Two days later I underwent a colonoscopy procedure which didn’t…

Something went wrong. Please refresh the page and/or try again.

  1. Dave Hart's avatar
    Dave Hart on How to: Connect two batteries in parallelAugust 27, 2024

    brilliant and so well explained! Thank you, love your work!!

  2. Simon Barlow's avatar
    Simon Barlow on Caravan Road Lights – Basic Fault FindingAugust 25, 2024

    Please look at my very last post on the blog

  3. Martin's avatar
    Martin on Caravan Road Lights – Basic Fault FindingAugust 25, 2024

    martin here caravan lights worked fine for two stop overs I had then hooking up again for my third trip…

  4. Emmy’s Camper Travels's avatar
    Emmy’s Camper Travels on My last post….August 25, 2024

    I’m so sorry. My sincerest sympathies go to you and your wife Sue. Your ideas and advice have been so…

  5. Steve Walsh-Jones's avatar
    Steve Walsh-Jones on My last post….August 22, 2024

    very sorry to hear this. Your posts have been very informative and enlightening providing an in depth view on different…

  6. thetwinaxletouringscouser's avatar
    thetwinaxletouringscouser on My last post….August 22, 2024

    Good heavens above Simon I am ever sorry to hear of such devastating news for both you yourself and Sue.…

  7. Eileen's avatar
    Eileen on My last post….August 22, 2024

    Simon and Sue, thank you both for sharing your passion for caravans with us. The news is extremely sad, our…

  8. Philip Parkes's avatar
    Philip Parkes on My last post….August 22, 2024

    Simon. So sad to read you last post today. Our thoughts are with you and Sue at this time. Whilst…

  9. Philip Parkes's avatar
    Philip Parkes on My last post….August 22, 2024

    Simon. So sad reading your post today. Our thoughts are with you and Sue at this time.

  10. Philip Parkes's avatar
    Philip Parkes on My last post….August 22, 2024

    Simon our thoughts are with you and Sue.

  11. Luke Tarrant's avatar
    Luke Tarrant on My last post….August 22, 2024

    Very sorry to read this and my thoughts are with you both at this time.

  12. Alan Smith's avatar
    Alan Smith on My last post….August 22, 2024

    Dearest Simon. I have never met you, but I feel as though I have some (limited) knowledge of you and…

CaravanChronicles.com Tag’s…

5th Wheel Caravan 13 Pin Plug Accessories AL-KO Avtex Bear Extender Bike Rack Blackpool Blackpool Illuminations blogging Cadac Camping & Caravanning Club Canterbury Caravan Caravan Blog Caravan Club Caravan Electrical Caravan Electrics Caravanning Caravans Caravan Show Caravan Talk Cheltenham Chirk Christmas Market Christmas markets Cleaning design Event City Factory Visit Fiamma France Freelander Glastonbury Glossop Caravans Humor Insync Jonic Bedding Lady Heyes La Tournerie Ferme Leisure Battery Leisure Battery Charging LPG Refilling Maintenance Manchester Caravan & Motorhome Modifications NEC North Western Caravans Ltd OLPRO One Hairy Caravanner Oswestry Oxford Product Review Project Review Safefill Sat Nav Sterling Caravans Sterling Power Wildside Swift Factory Swift Group Swift Talk Technical The Old Oaks Touring Towing Tow Vehicle Trafford Centre travel Travel Trailer Travel Trailers vacation VW Amarok Warwick Racecourse WiFI

Website Powered by WordPress.com.

  • Subscribe Subscribed
    • Caravan Chronicles
    • Join 672 other subscribers
    • Already have a WordPress.com account? Log in now.
    • Caravan Chronicles
    • Subscribe Subscribed
    • Sign up
    • Log in
    • Report this content
    • View site in Reader
    • Manage subscriptions
    • Collapse this bar
 

Loading Comments...
 

    %d