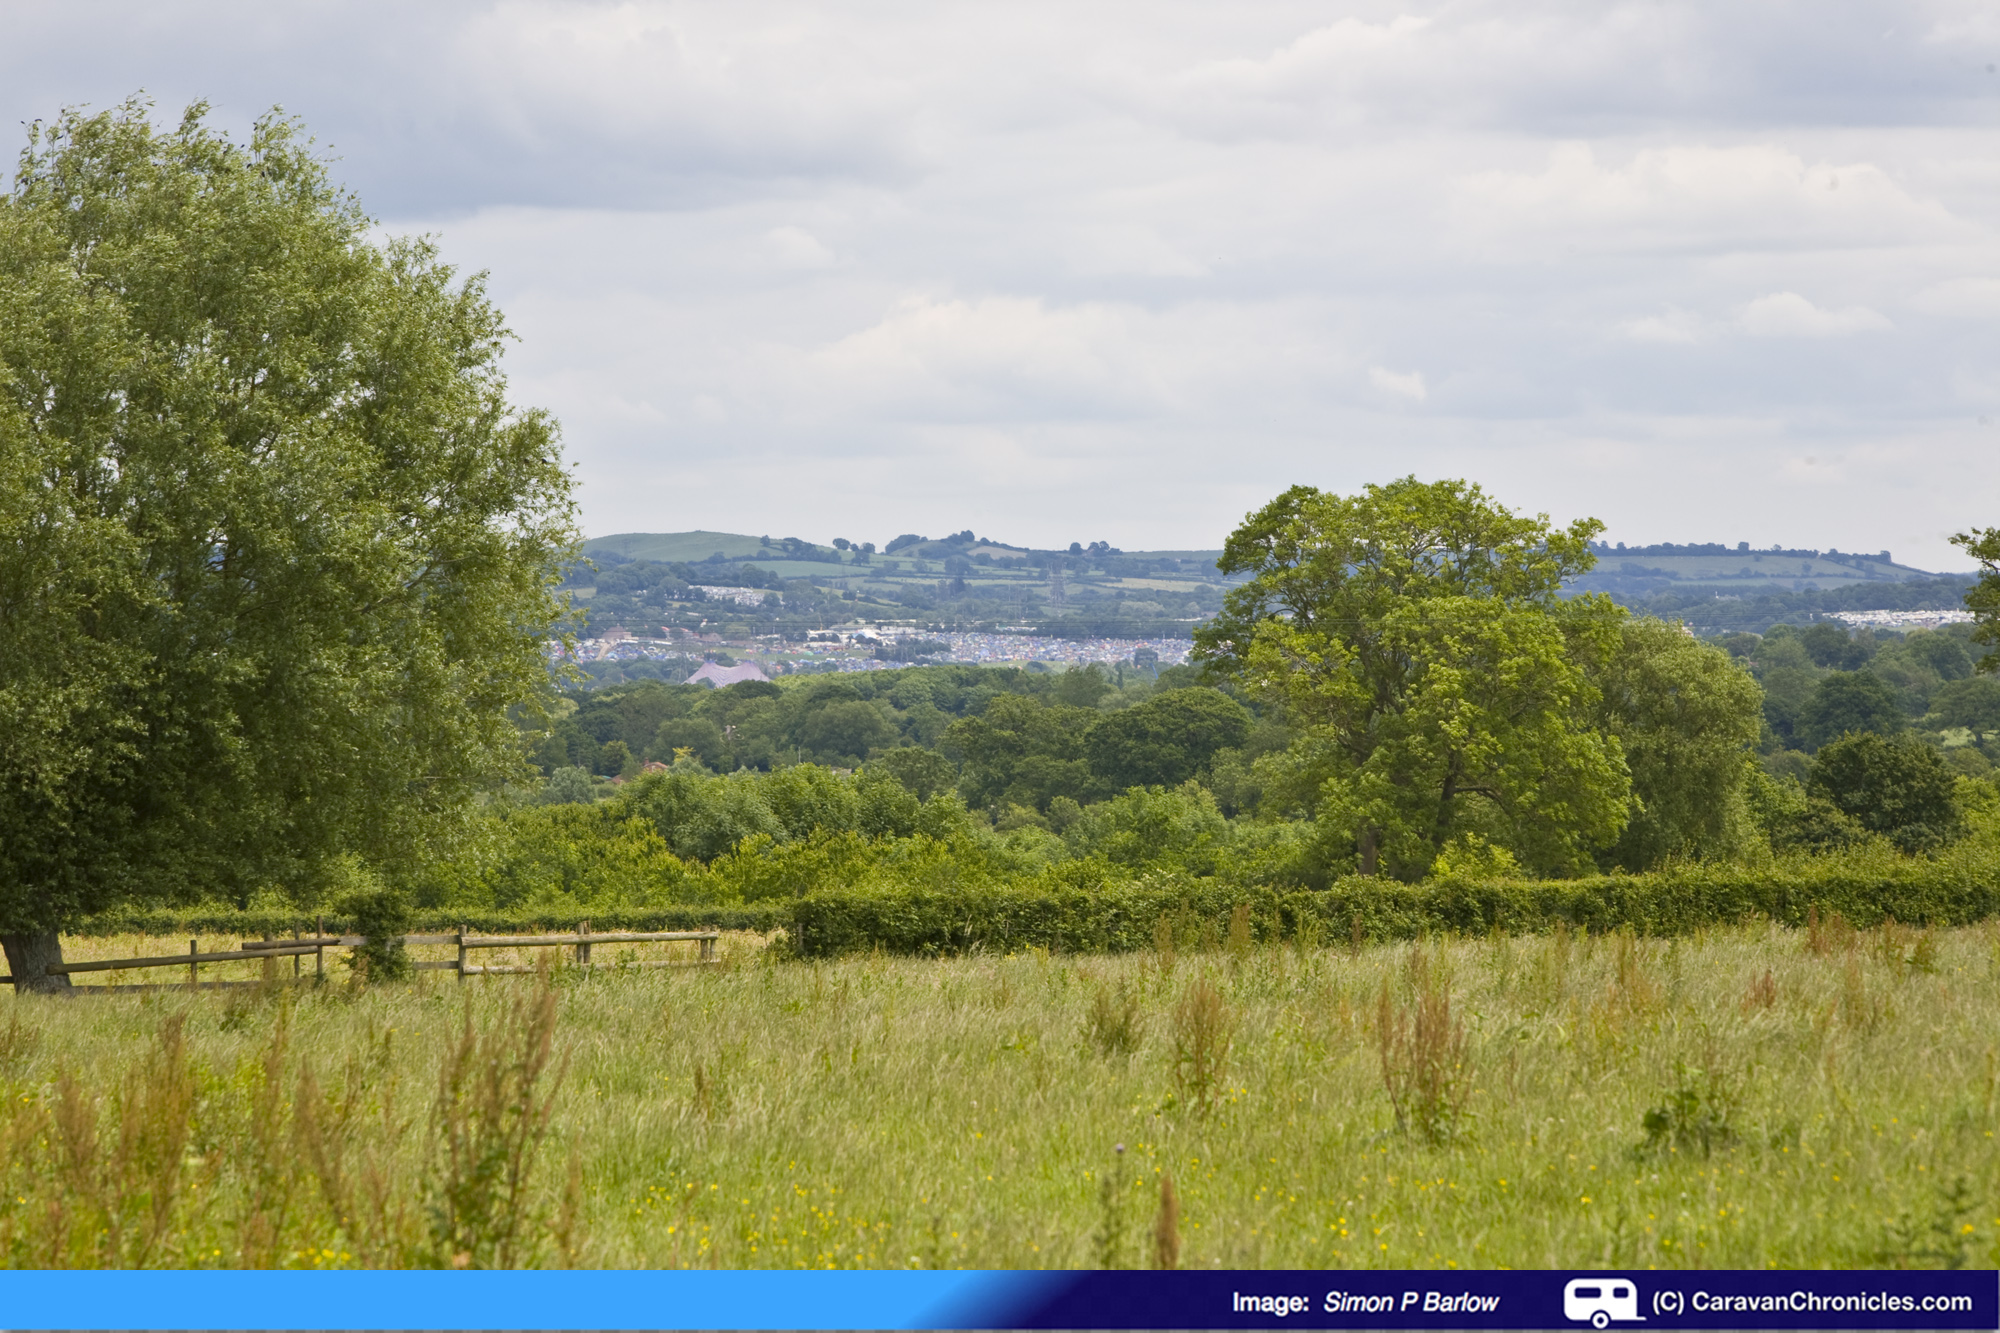
We wandered down the main drive to the camp site, past the dog exercise field and turned right on to Wick Lane. Following the lane to the south we heard a couple of jets in the distance. Since arriving on site we had heard quite a few helicopters making their way in and out of the festival site, I guess taking artists in for their sound-checks and providing some of the aerial shots seen on the news. They weren’t obtrusive and it wasn’t constant and even after hanging up my flying gloves I still turn to look up at them. We wandered further down the lane stopping at the entrance gates to each field to look at the view, each field giving a slightly different vista. We could hear a jet doing a high energy turn somewhere in the distance.
A different view through every gate… the Festival site is in the distance
Our next little ‘adventure’ happened quite by accident. A Twitter follower of Caravan Chronicles ‘tweeted’ about an article that I’d written a while ago that appeared on Caravan Talk about towing, which I subsequently expanded into two articles and posted on Caravan Chronicles (Understanding the Dynamics of Towing), and I ‘tweeted’ back a quick thanks for promoting it. Out of curiosity I had a look at their website – The Old Oaks
They were the 2012 runner-up to Caravan Talk’s Campsite of the Year award and from the website, it looked like a place to include on the list of “must visit”. Within an hour I’d booked us in for four nights and so we wouldn’t have two long tows I also booked us in at the Caravan Club’s Warwick Racecourse site for a couple of nights on the way home. Continue reading →
In the first 5 months and 8 days of this year, Caravan Chronicles has beaten the total number of views for the whole of 2012 and taken the total to over 73,000
Many thanks to all that have visited and especially those that have commented, rated posts, tweeted and linked some of my pages to Facebook and caravanning forums.
Here’s hoping I can double last years figures before the year-end.
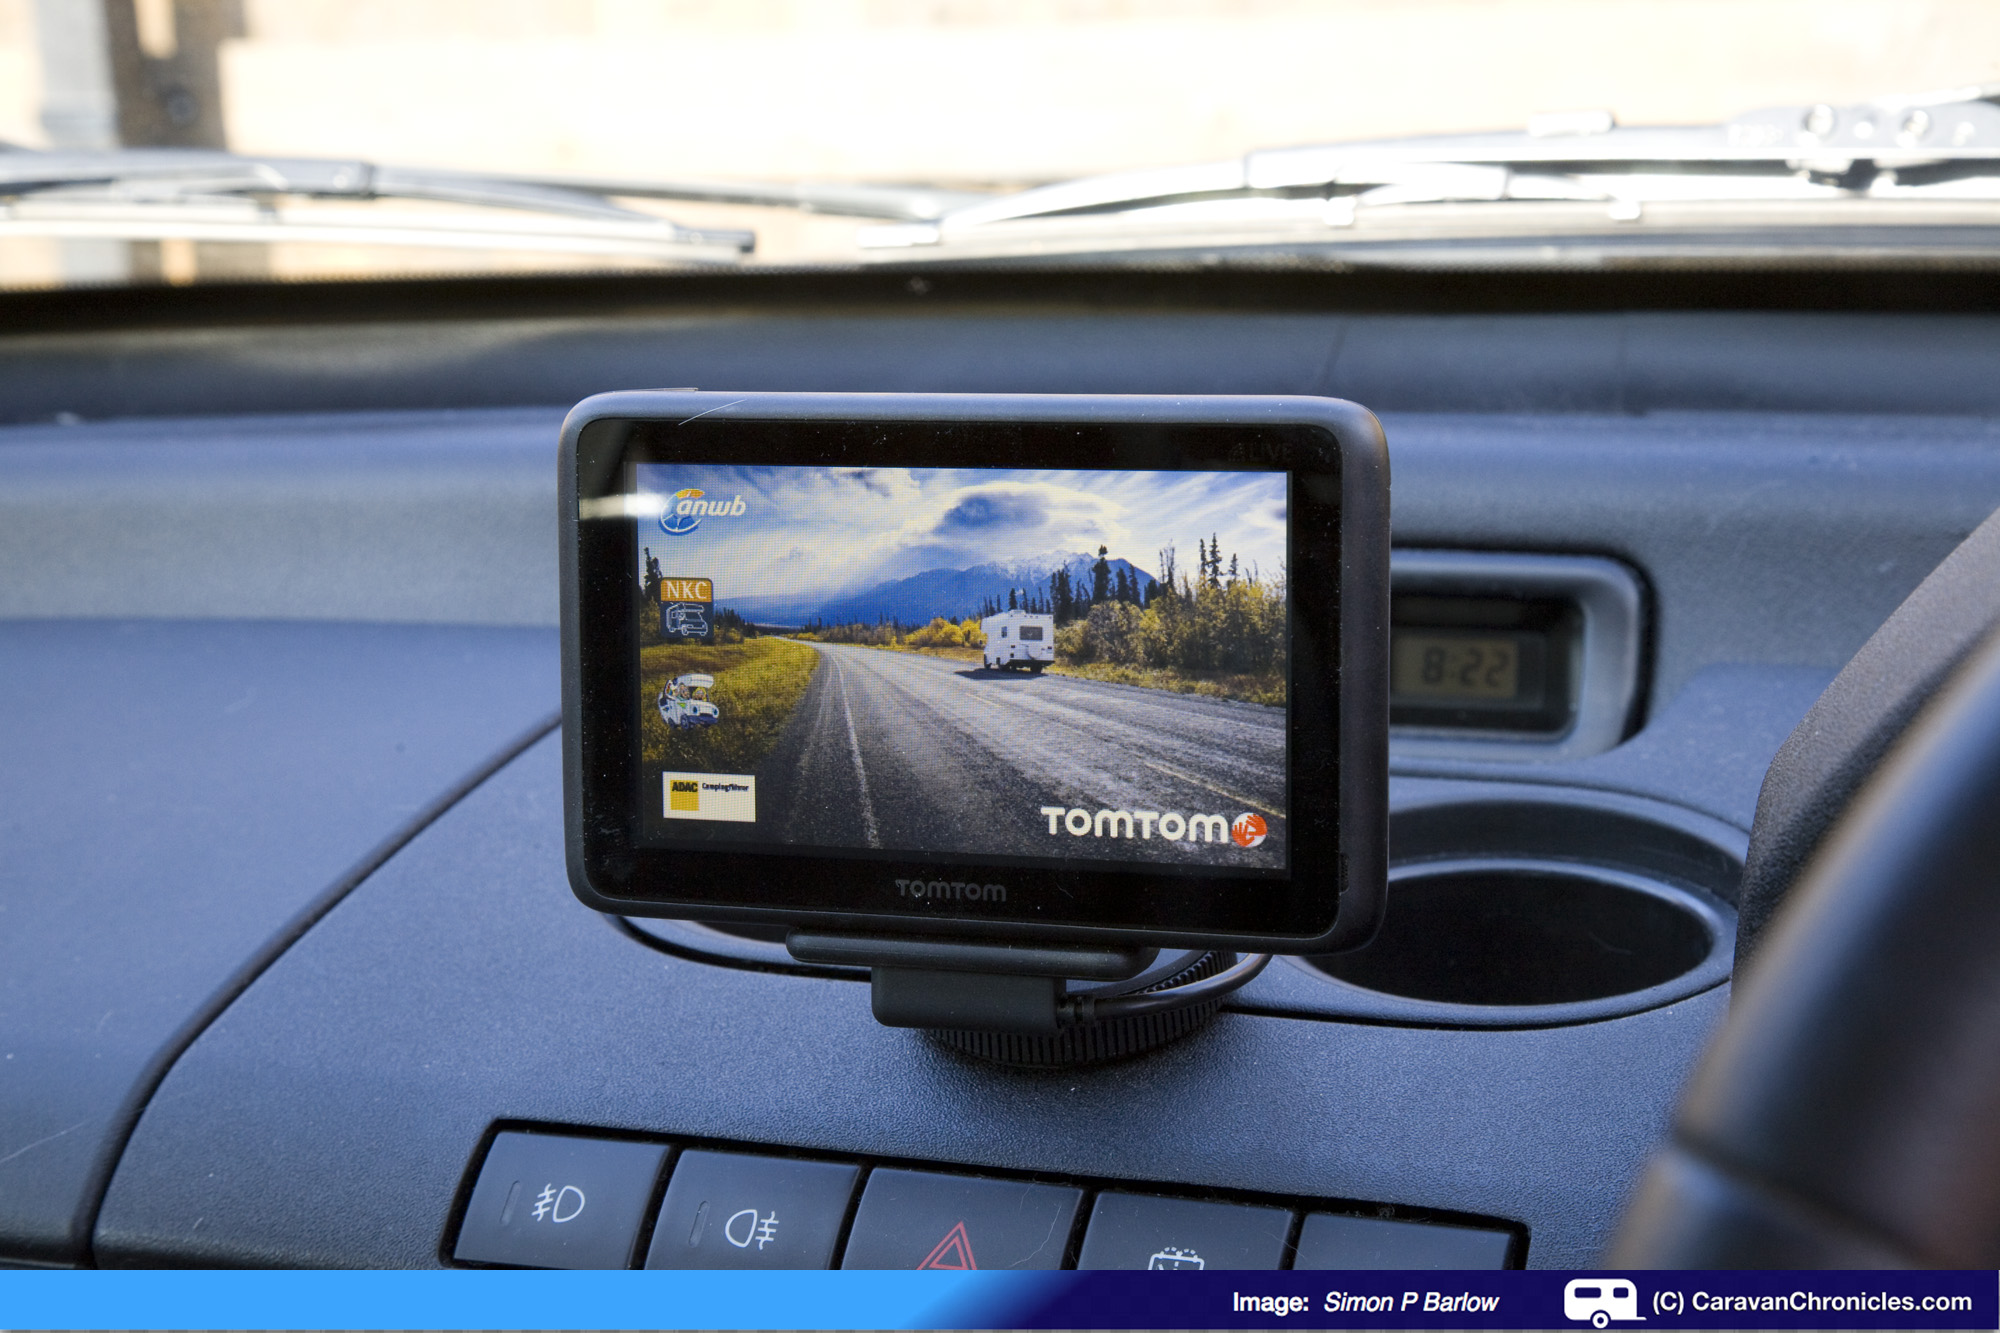
If you are thinking of buying a new sat nav, particularly the TomTom Go LIVE Camper & Caravan version, as promised in an earlier post, I have completed our review of the unit.
It’s not a detailed specification review but hopefully it will give you a bit more information that’s not been covered by others.
If you want full specification on the device it can be found here on the TomTom web site. The current list price is £329.99 from TomTom which is slightly more than some others, but for us (well me) it ticks all the boxes. The full review can be foundhere.
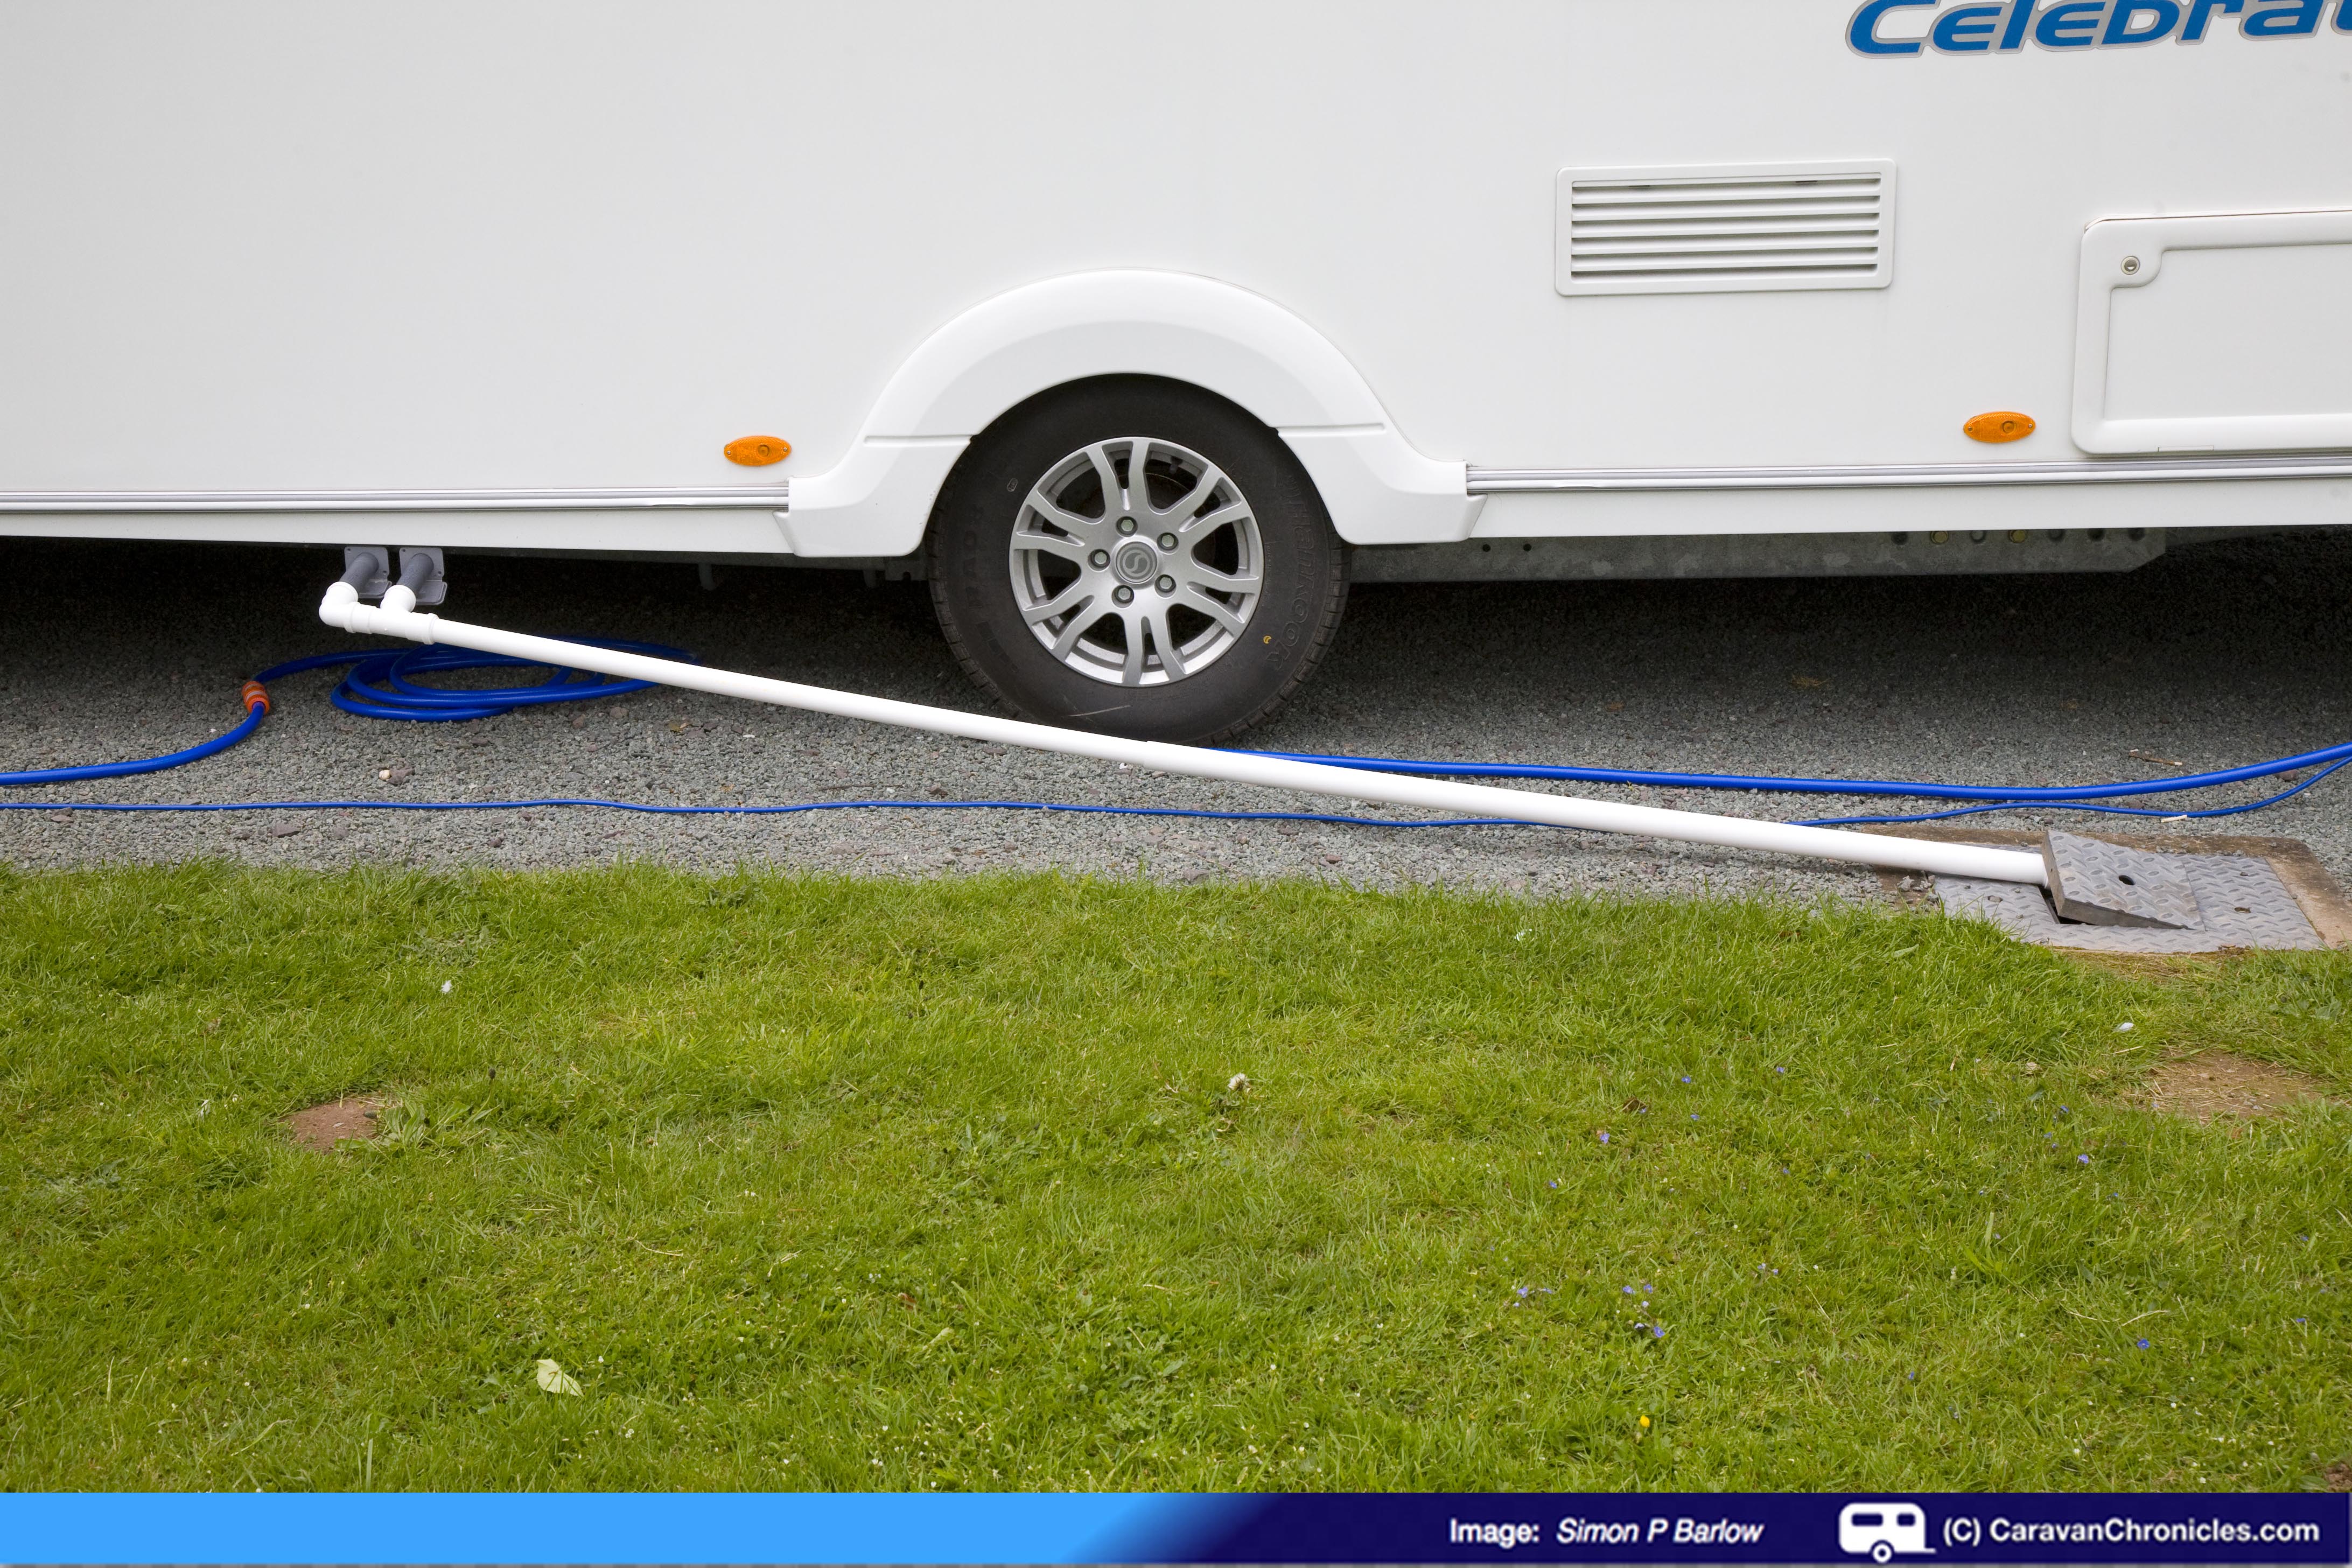
Fully serviced pitches are becoming increasingly popular. With the facilities in caravans including showers that can actually be used as showers rather than just to hang wet clothes the only downside was the water supply and disposal.
The supply side is catered for quite easily and there are a number of commercially available kits on the market to adapt your caravan’s internal water system to either a direct feed via a pressure regulator or a controlled feed to top up your Aquarol. It’s easy to understand why commercial kits are available, all they have to do is connect from a tap to your caravan’s water system via a length – or multiple lengths of hose and 99% of the time this can be achieved.
However, a system for the drainage is a little different. The problem is water has an annoying habit of only wanting to flow down hill. Before deciding on how I was going to tackle the drainage for our caravan when on sites, I looked what other people were doing. Nearly all were using a length of the standard grey ribbed flexible hose to connect the Y piece to the drain. This seemed OK if the hose length was one or two metres, but after watching one fellow caravanner keep wrestling with what seemed like a 300 foot length of springy pipe which most of it was just coiled round and round on the ground and every time they did the washing up he had to come out and lift sections of it to drain…. that was the way I didn’t want to go. I would have thought cleaning it afterwards would be a bit of a chore as well.
I wanted to go with a rigid pipe and still have the ability to adjust the length without resorting to short lengths of pipe and adaptors. On a trip to the local Screwfix Direct store I checked out the plumbing section. I wanted to use cheap standard pipe and parts where possible. The choice of sink drainage pipe seemed the way to go. There are three colours generally available, Grey Black and White. The Grey and Black have UV stabilisers so that years of being clipped to the outside of houses doesn’t degrade them. The white however is designed only for interior use, but it did offer an advantage. White is easier to see on dimly lit caravan sites and for the amount of time it would be outside I don’t think the UV element will be a factor.
There are two diameters of pipe available and one slides neatly inside another. So using the smaller diameter ‘upstream’ I could effectively have a variable length of pipe. A few elbows and angles should allow me to easily adapt for most conditions.
They say a picture is worth a thousand words….
‘My’ drainages system being used at Stanmore Hall
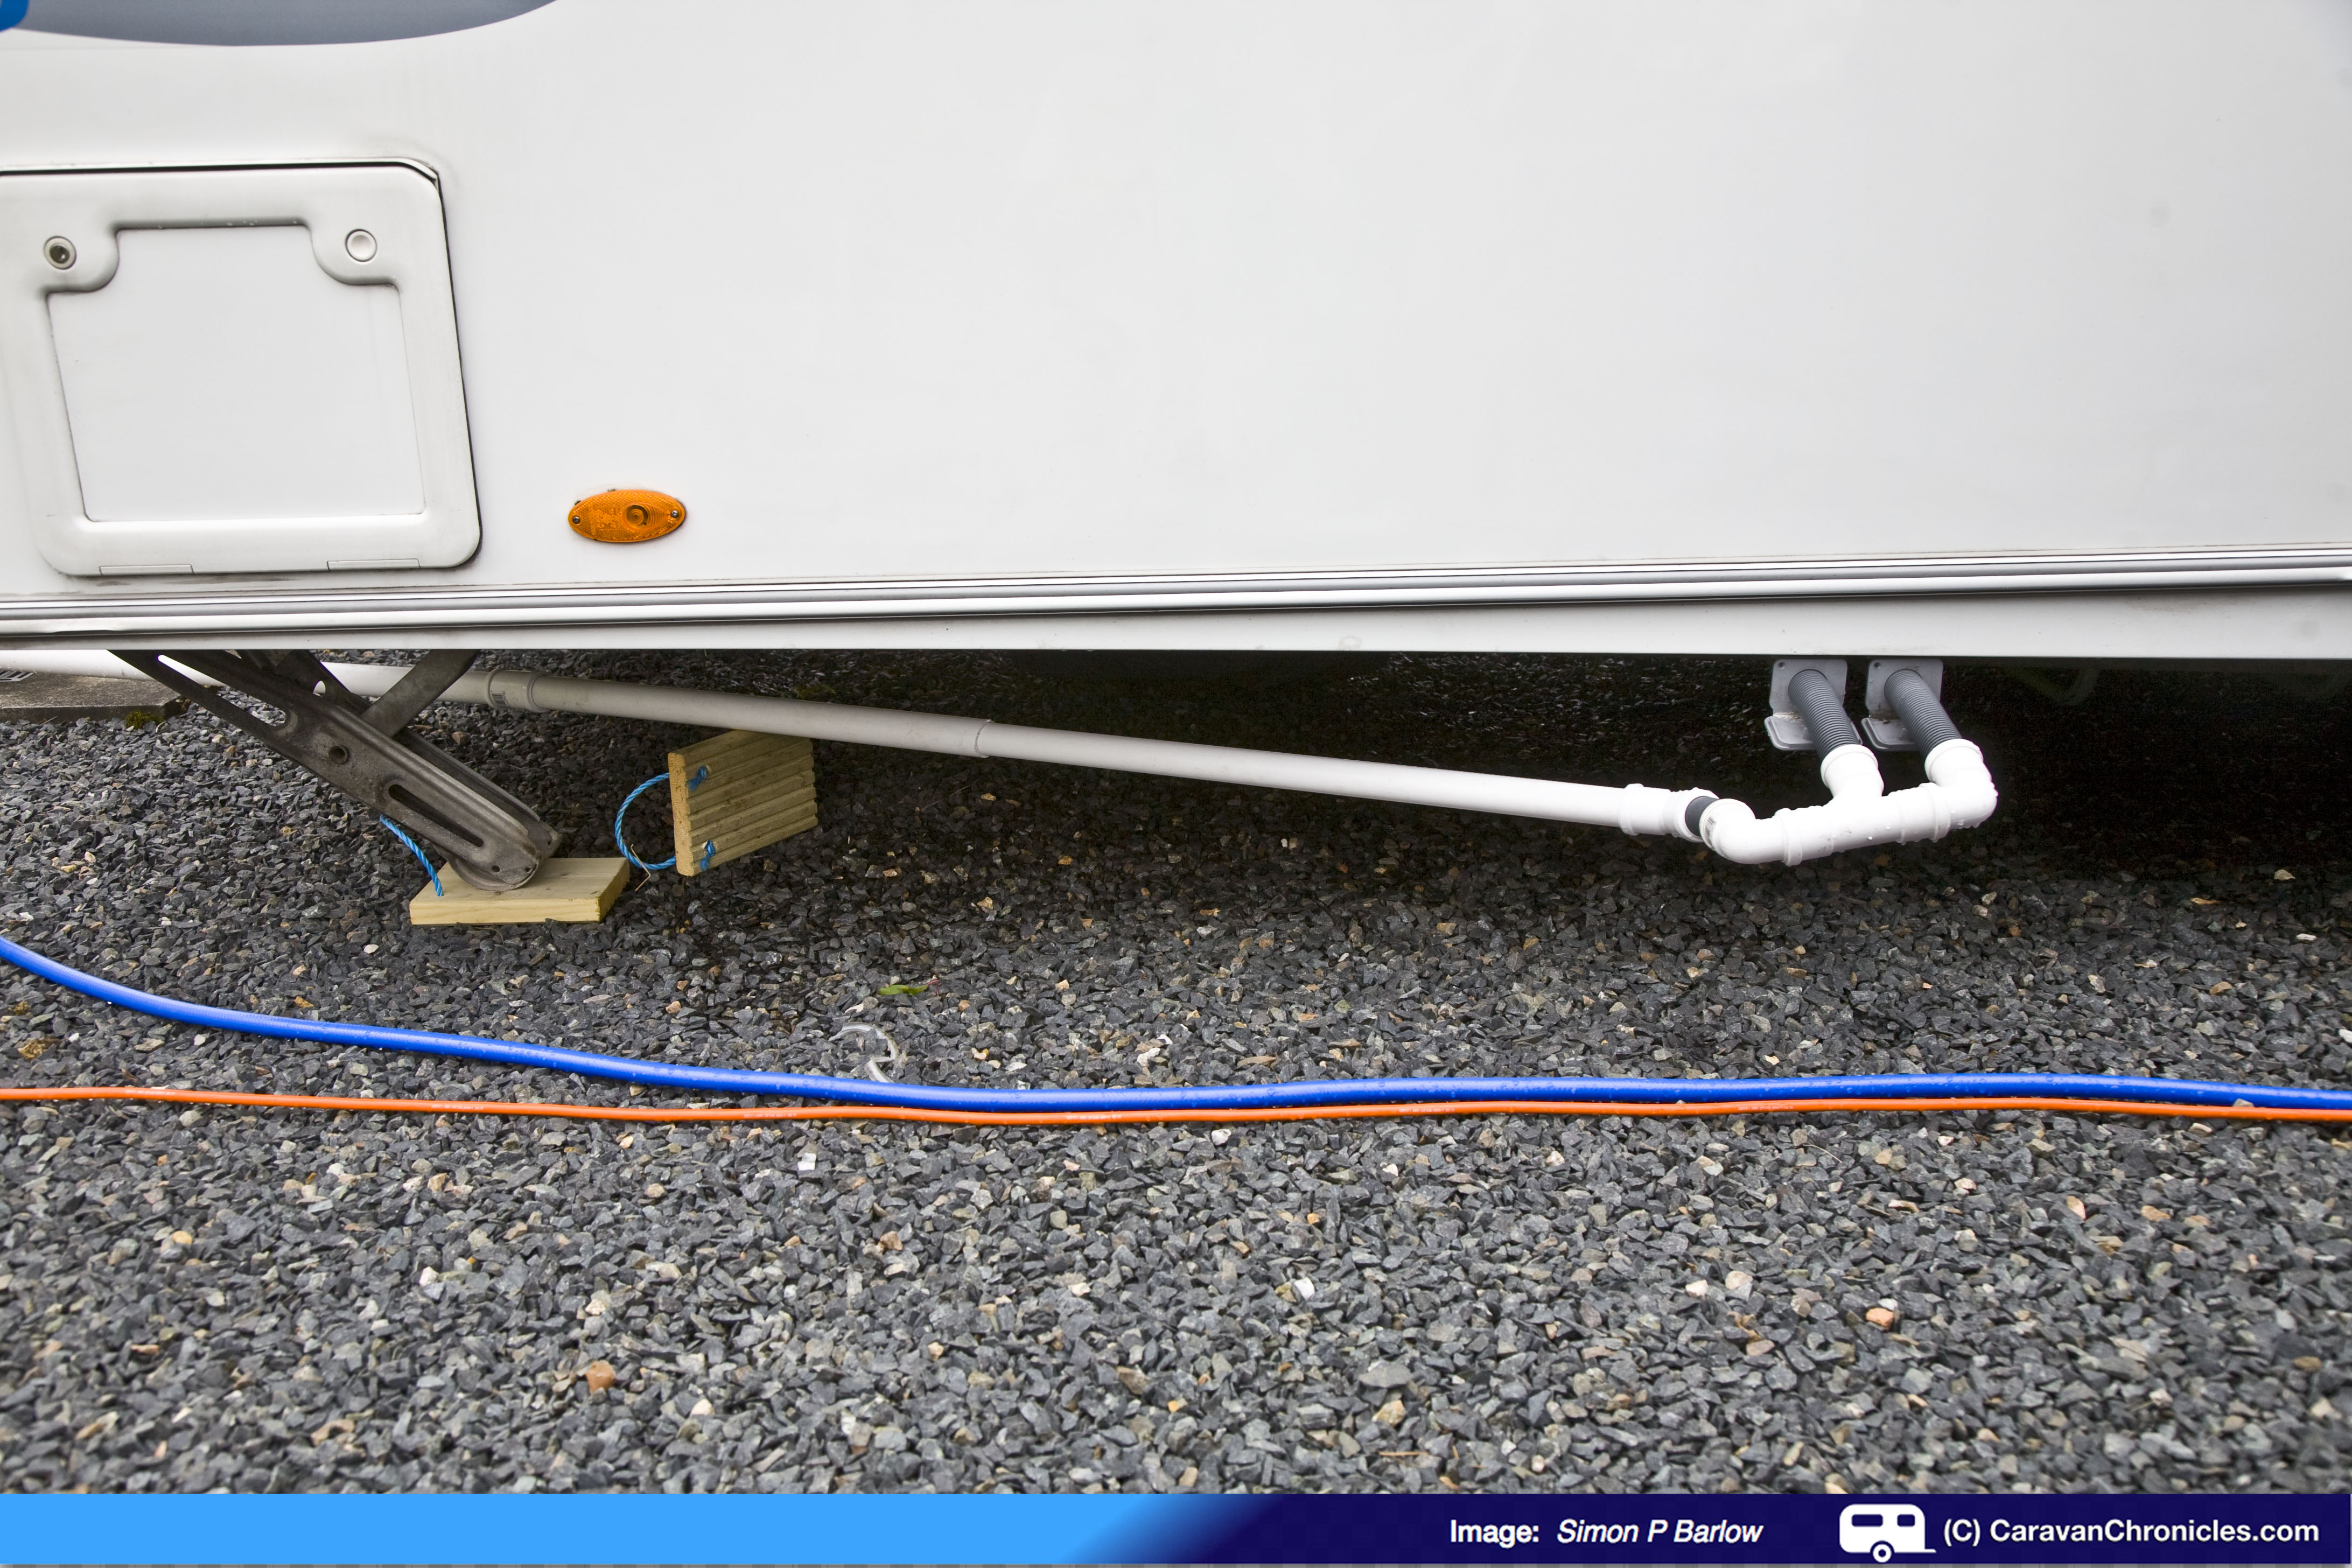
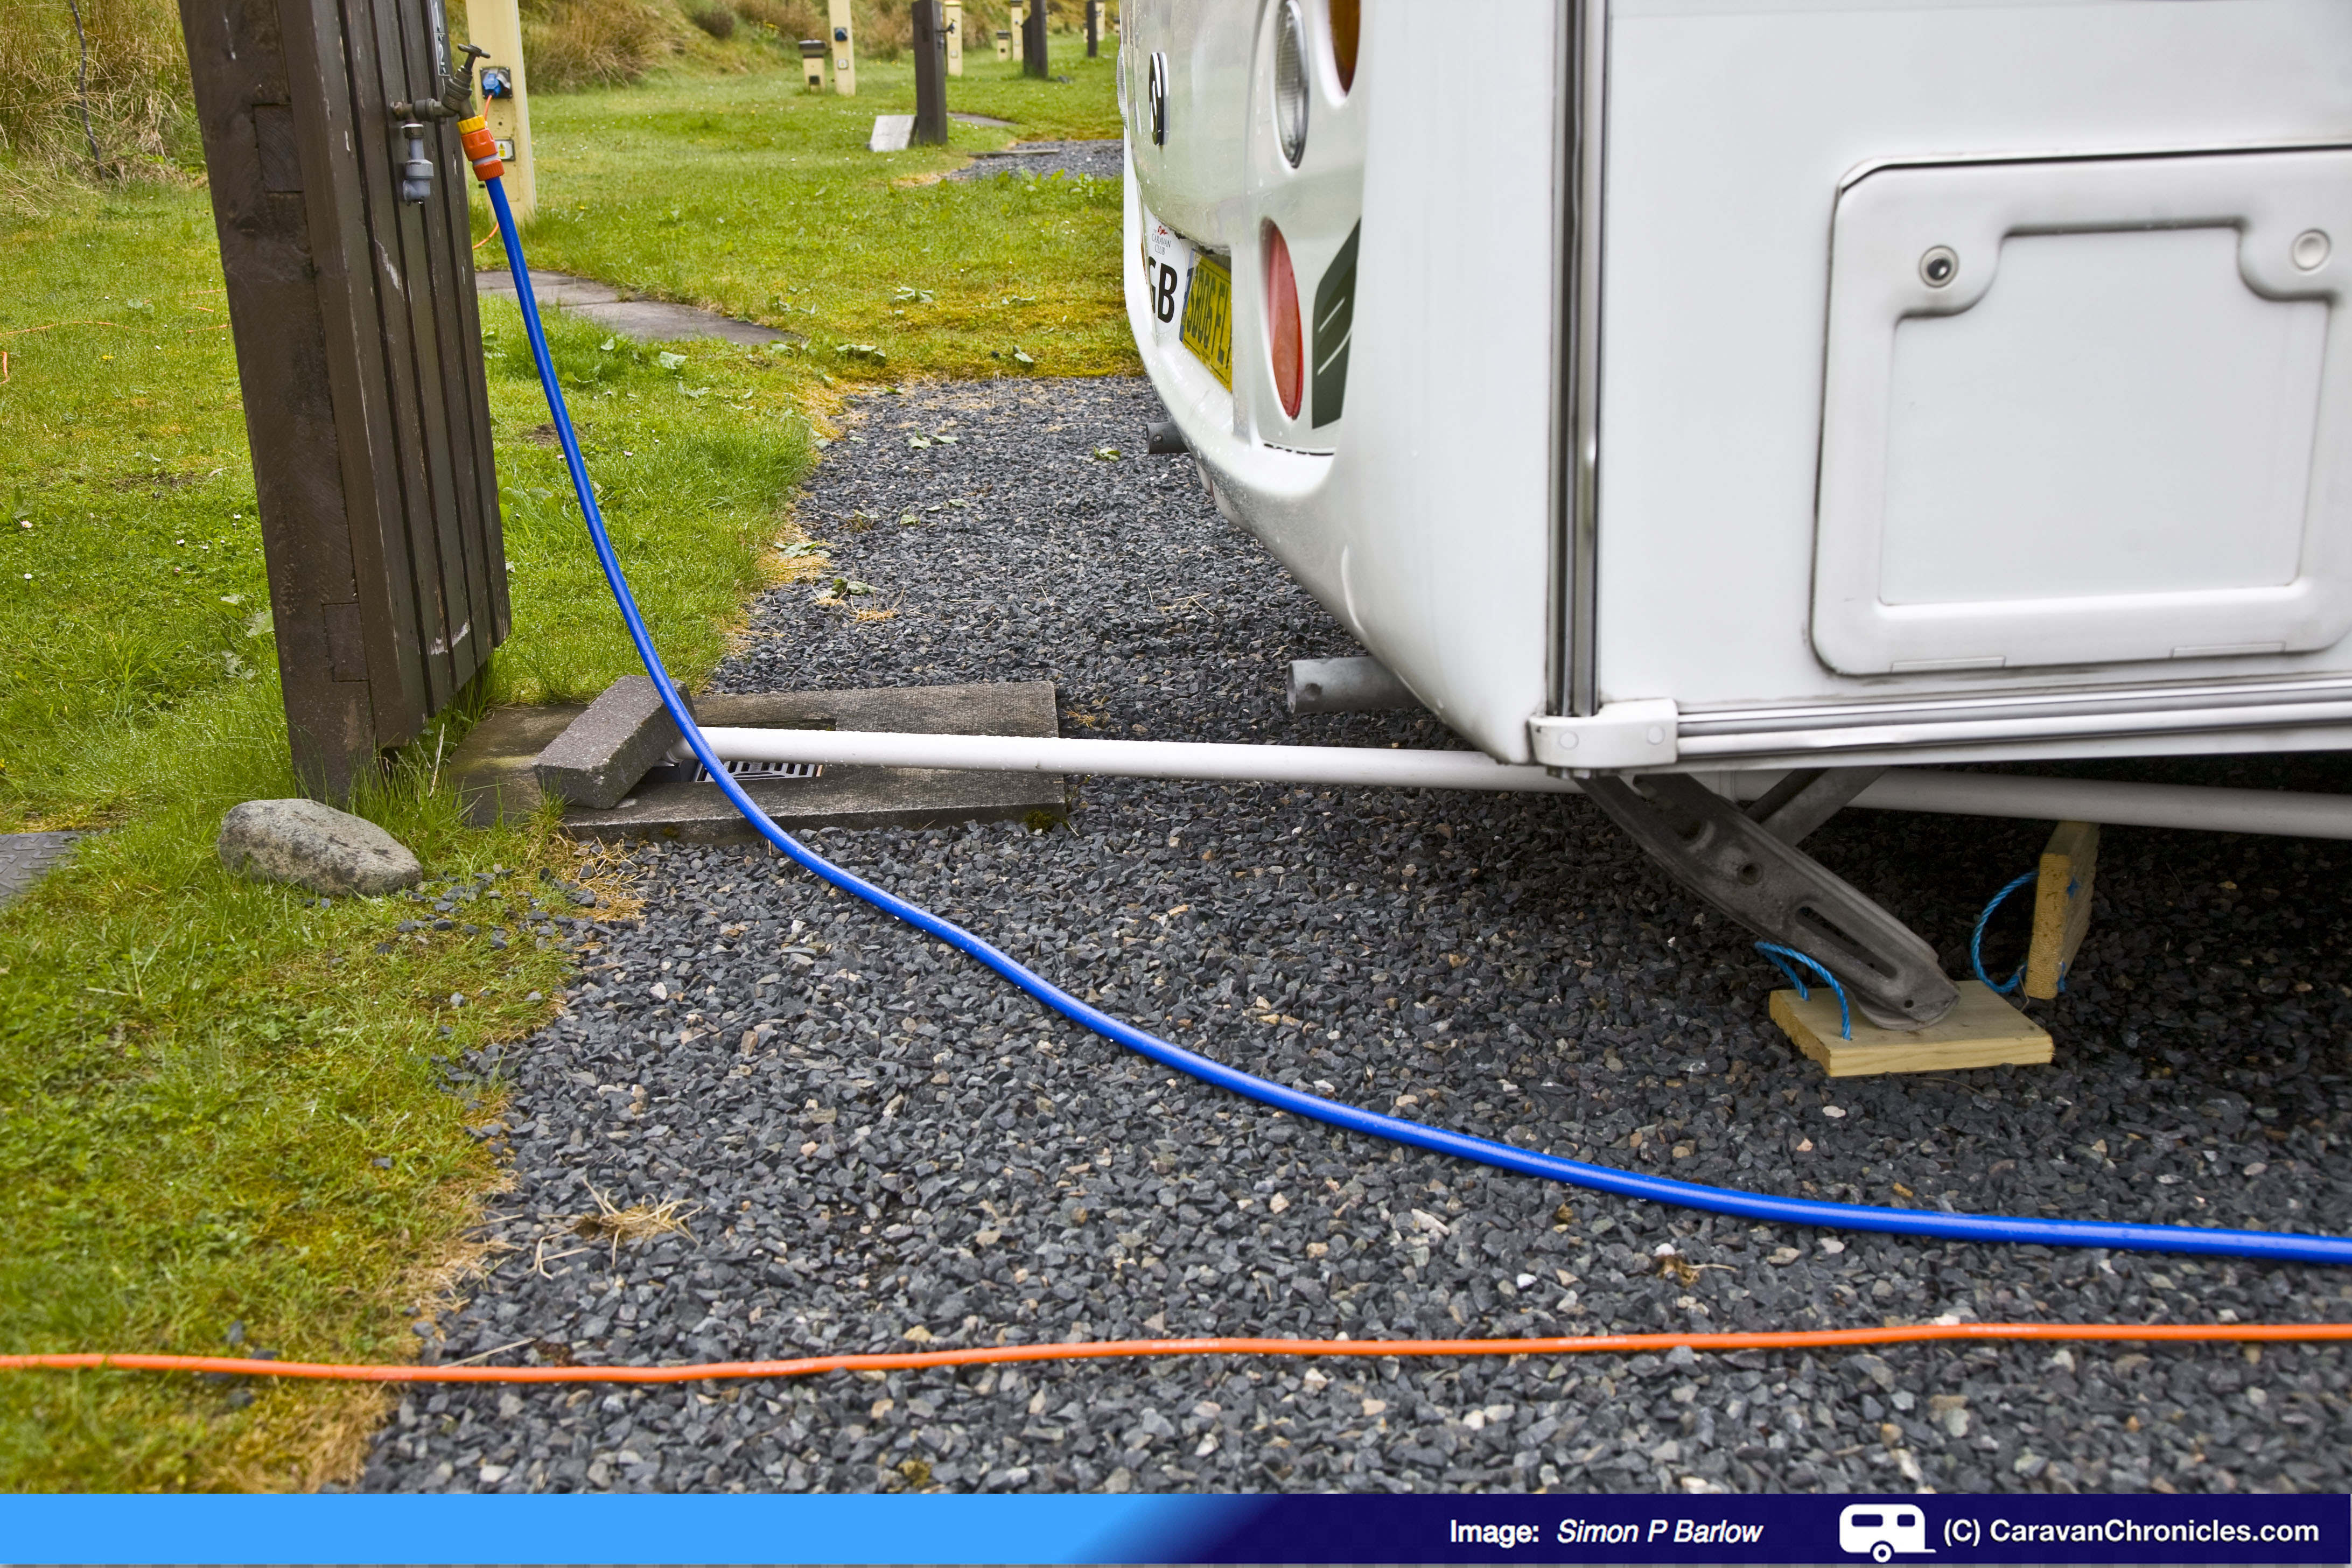
I used the flexible pipes of the ‘Y’ adaptor that came with the caravan to connect up a manifold to join both caravan drain outlets. There is enough flexibility in these pipes to enable the outlet run to be skewed away from the van. I cut the two 3 metre lengths of pipe down so they could easily fit in the gas locker.
This is the set up used at Troutbeck Head CC site….
As the drain for the pitch was directly at the rear of the caravan, I used a length of flexible to add on a 45 degree bend so the pipe would run rearwards…..
I joined on a short length of pipe to my main “trombone’ sliding section with an adaptor and for good measure, I used a spare block of wood to support he extended length….
At the drain end, I use a 90 degree bend to point the flow down into the drain….. with a handy brick to keep it in place!
The original collection of fittings and lengths of pipe came to less than £12, and so far this system has allowed us to use all the serviced pitches we have been on, with one exception… Lady Heyes… for some reason the two pitches we have been on there, the EHU post and drain have been on the awning side of the van. Ho Hum…. you can’t win them all.
In use we haven’t had any problems and both the main sink, bathroom sink and shower drain easily. When we are breaking camp, the pipes are easily cleaned with running water and being white, its easy look down them to check they are clean. All the fittings are kept in a bag in the gas locker along with the two 2 metre and two 1 metre lengths of pipe. As the two sizes slide inside each other there is only really two lengths to deal with.
I hope it gives you some ideas on how you can connect up to a fully serviced pitch. If you have any ideas that would improve my system… let me know, anything to make things easier!
I already had a 2 into 1 adaptor supplied with the caravan that used the normal ribbed flexible pipe, so I used two of the three lengths of flexible pipe off this to make the connections between van and my system. I can always revert to the adaptor in the future if required. By using the flexible pipe as a connection to my ‘manifold’ it allows me to use it with the wastehog if required and I can just bend the manifold upward to remove the wastehog for emptying without having to disconnect anything.
The biggest advantage of using standard plumbing items is I can always go to a DIY store and add to the system if we find a pitch that I can’t connect too. I’m just looking now for something similar to a small awning pole bag that can take pipes at 2 metres length… or even the possibility of storing longer lengths along one of the caravan chassis rails.
Total price for this setup was £11.60. You can find everything here at Screwfix Direct
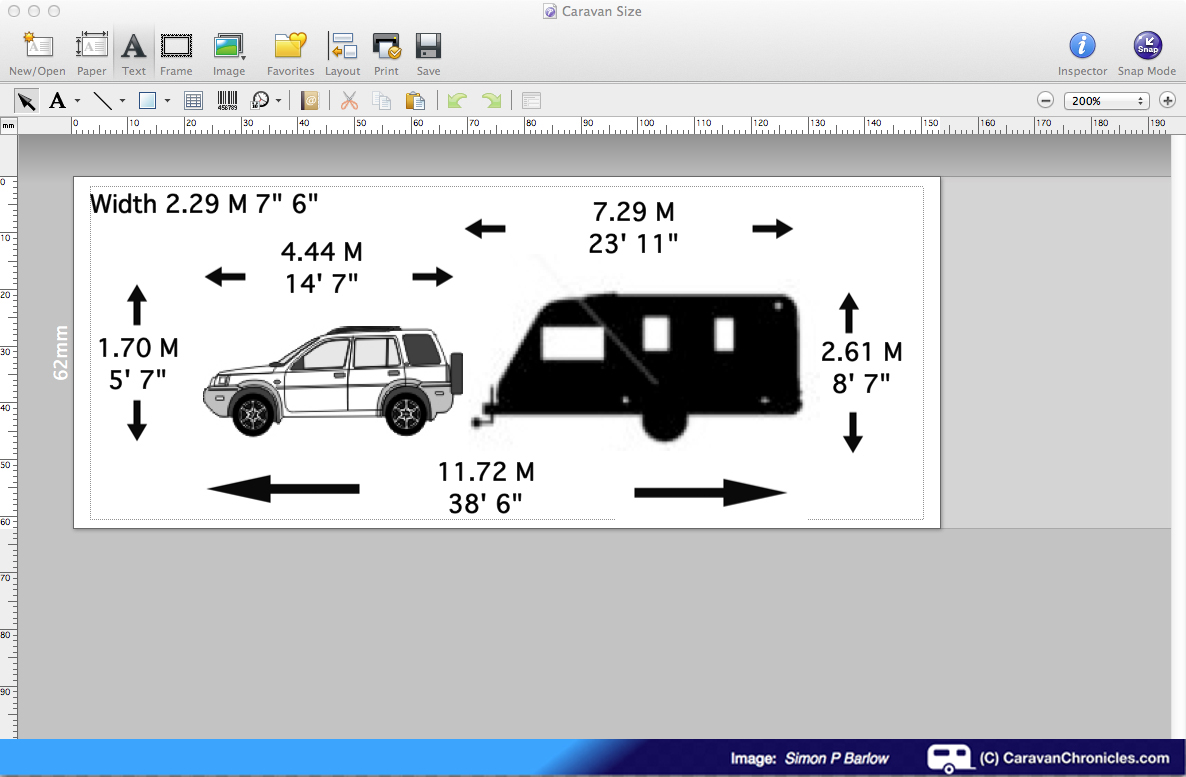
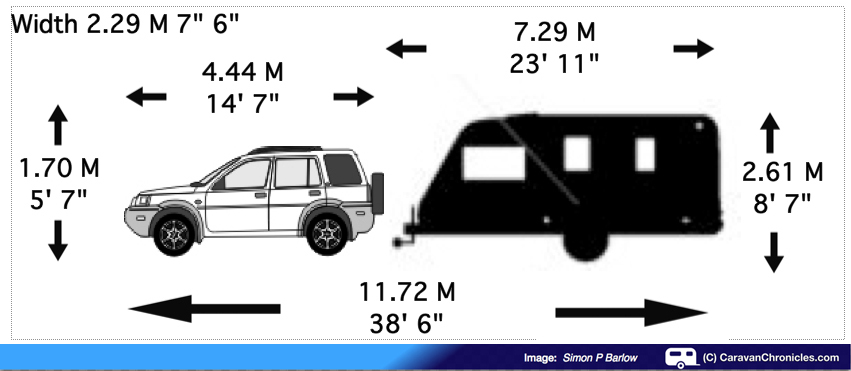
OK so you are driving along following your sat nav and you come up on a road restriction. Right, hands up those that can tell me the height, width and length of your towing vehicle and caravan? No hesitating now!
Hands down. I’ll bet not many of you could. Not wanting to appear on YouTube as the next “fail” trying to extract my caravan from a low bridge or narrow road, a while ago I made a small ‘aide memoire‘ to stick on the back of my sun visor.
In the Caravan Chronicles office we have a Brother QL560 label printer that just happens to come with a bit nifty label creating software and it only took five minutes to produce a label that Leonardo would be proud off….
Creating the caravan size label
I included all the relevant sizes for the tow vehicle and caravan and the total length of the combined outfit. It is thermally printed on a self adhesive label and securely attached to the rear of my sun visor. Here’s a close up:-
So it’s easy to check on both the tow vehicle (it’s amazing how many car parks have a barrier that I can only just squeeze under!) and on the caravan. It also gives me the total length of the outfit when coupled.
So if you have nothing to do this weekend because you’re not away in the ‘van, get the handbooks out for the tow vehicle and caravan and make yourself a label.
In the next version I make I might include the tyre pressures and axle weights too. Although then it can become a bit cluttered… maybe another label for the passenger side…. Hmm.
After a week of ‘iffy’ weather in the north-west, Friday 17th was forecast to be at least dry and a promise of the sun making an appearance from time to time. We loaded up the Freelander and set off to pick up the caravan. By 9.30 we were hitched up and pulling out of the storage compound. Sue, while winding up the corner steadies with the Makita, had managed to get a mouthful of Makita battery when the torque twisted the drill out of her hand, which apparently was my fault. She was definitely not a happy camper. With hindsight, she was extremely lucky that she did not end up with broken teeth and a fractured nose. I think there is a lesson to be learned here. If you use any sort of drill to wind your steadies, you need to be certain of the setting before you start. Continue reading →
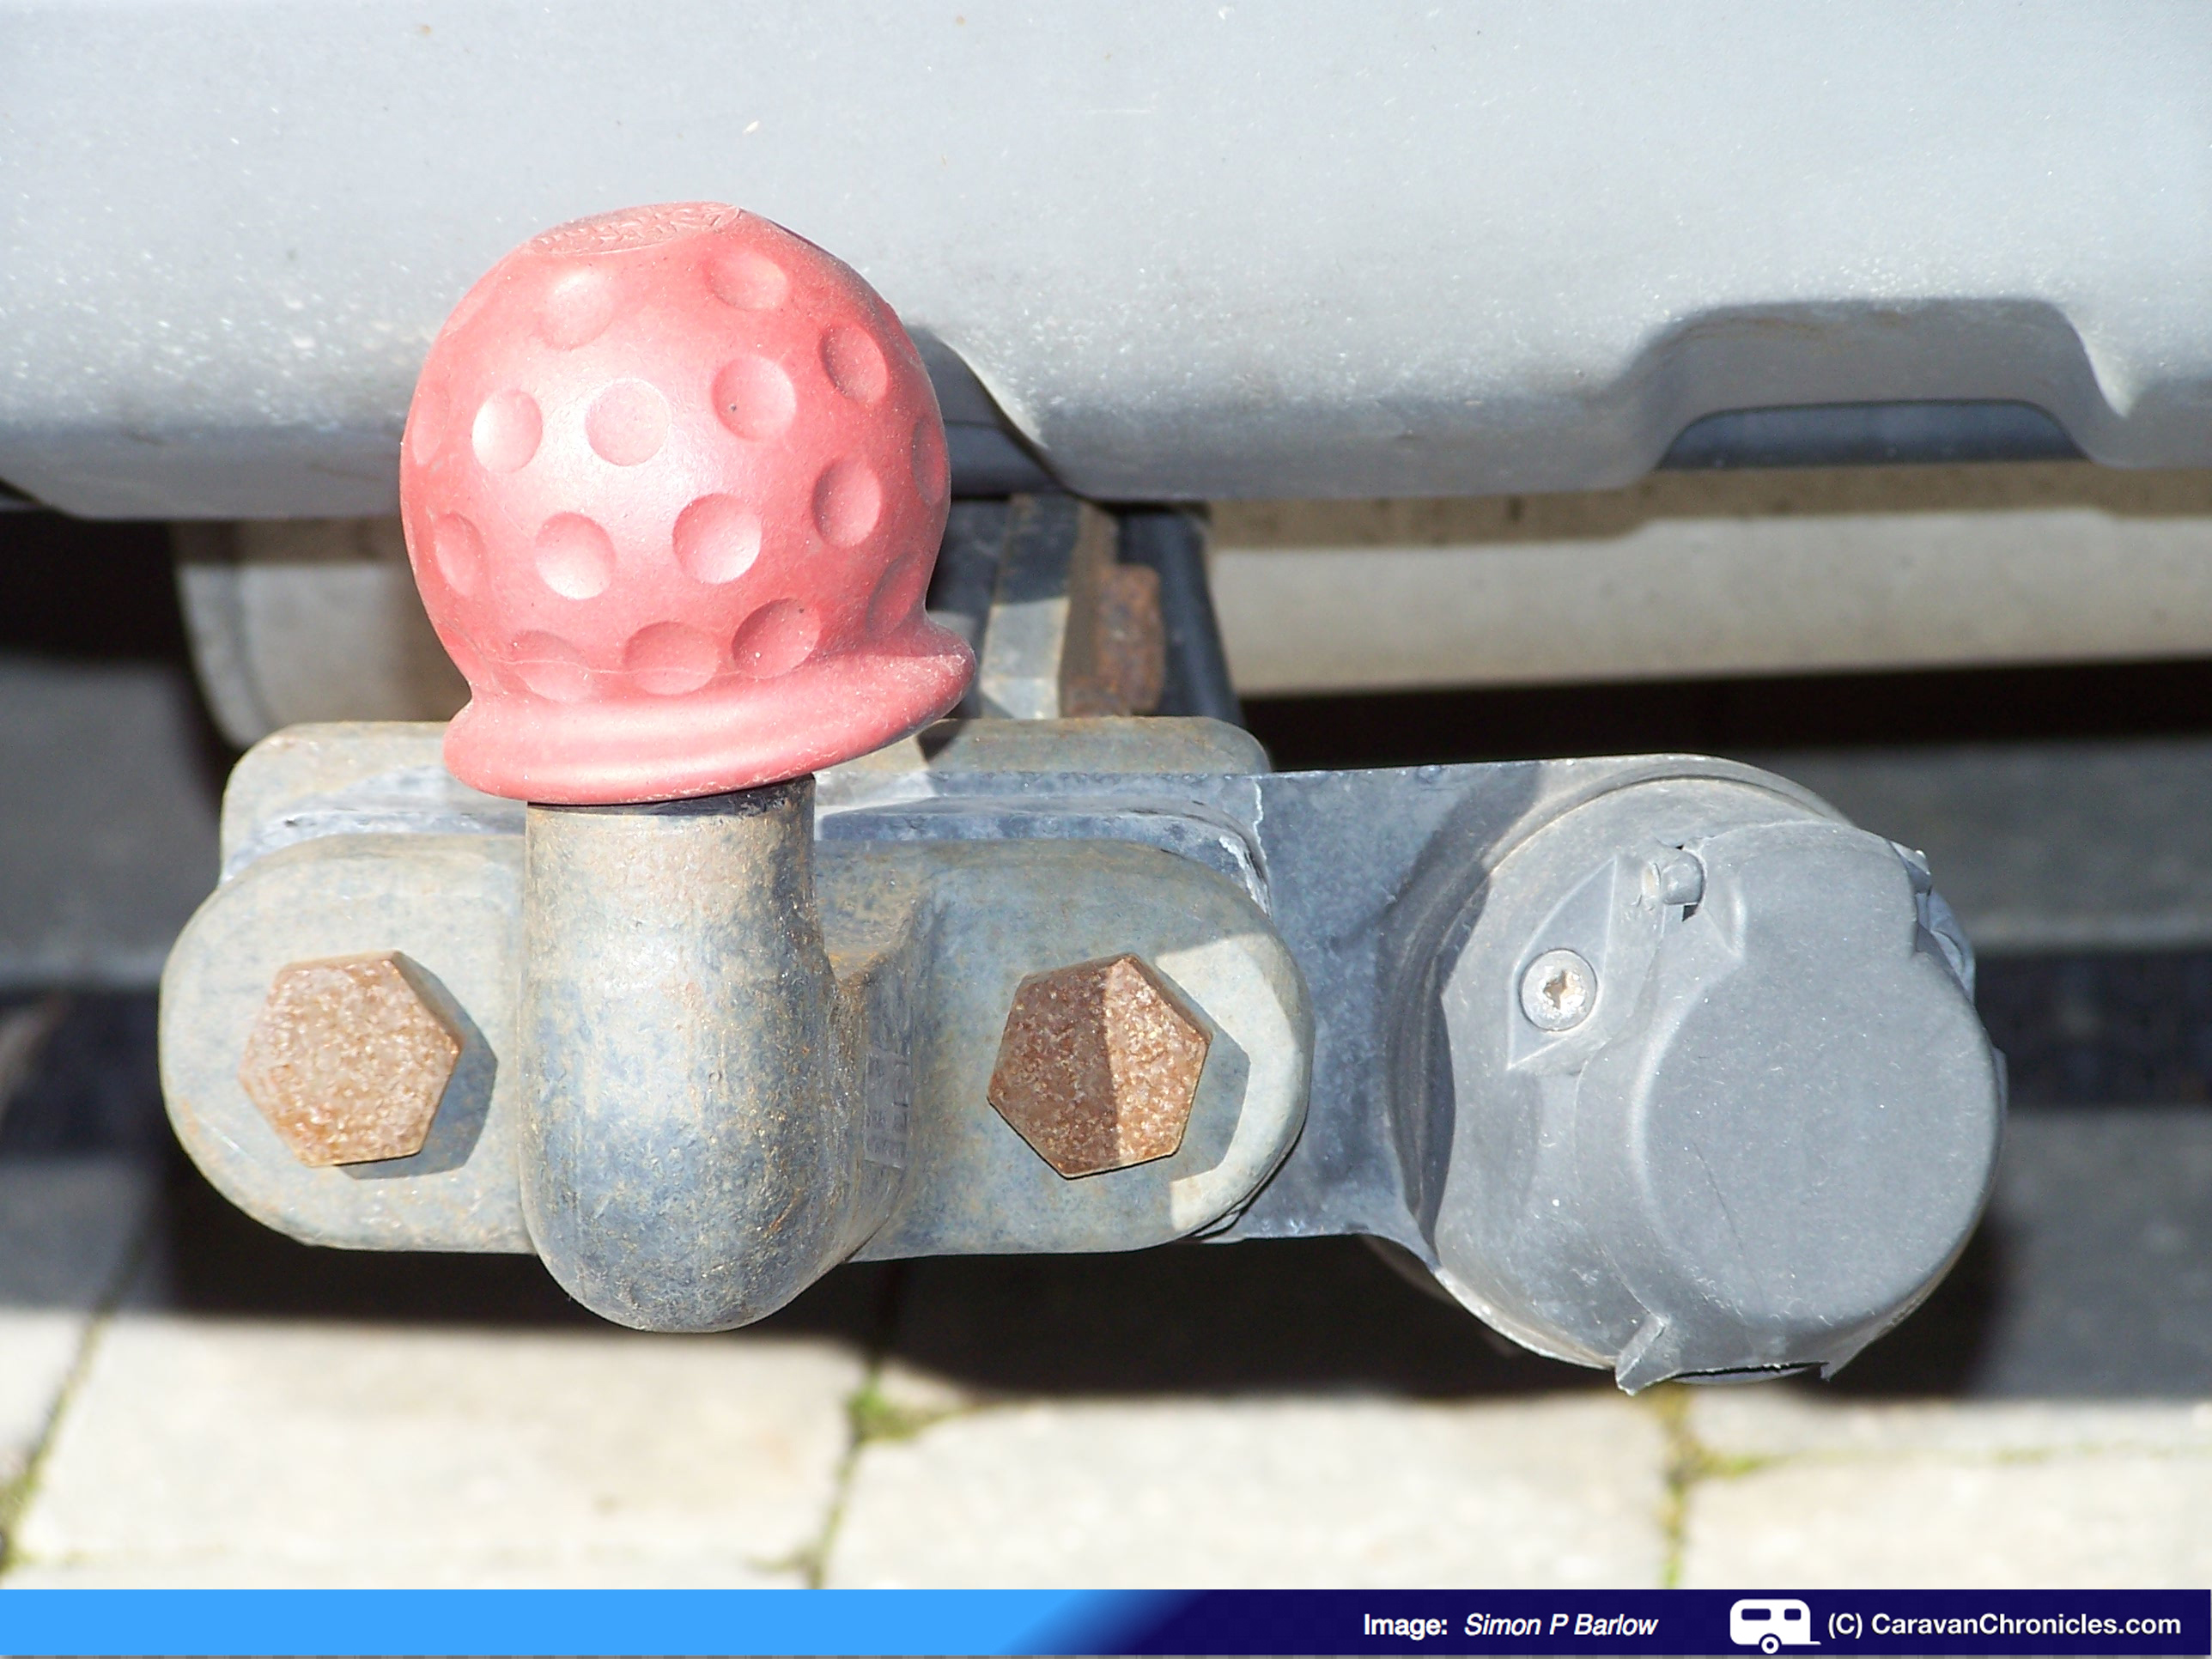
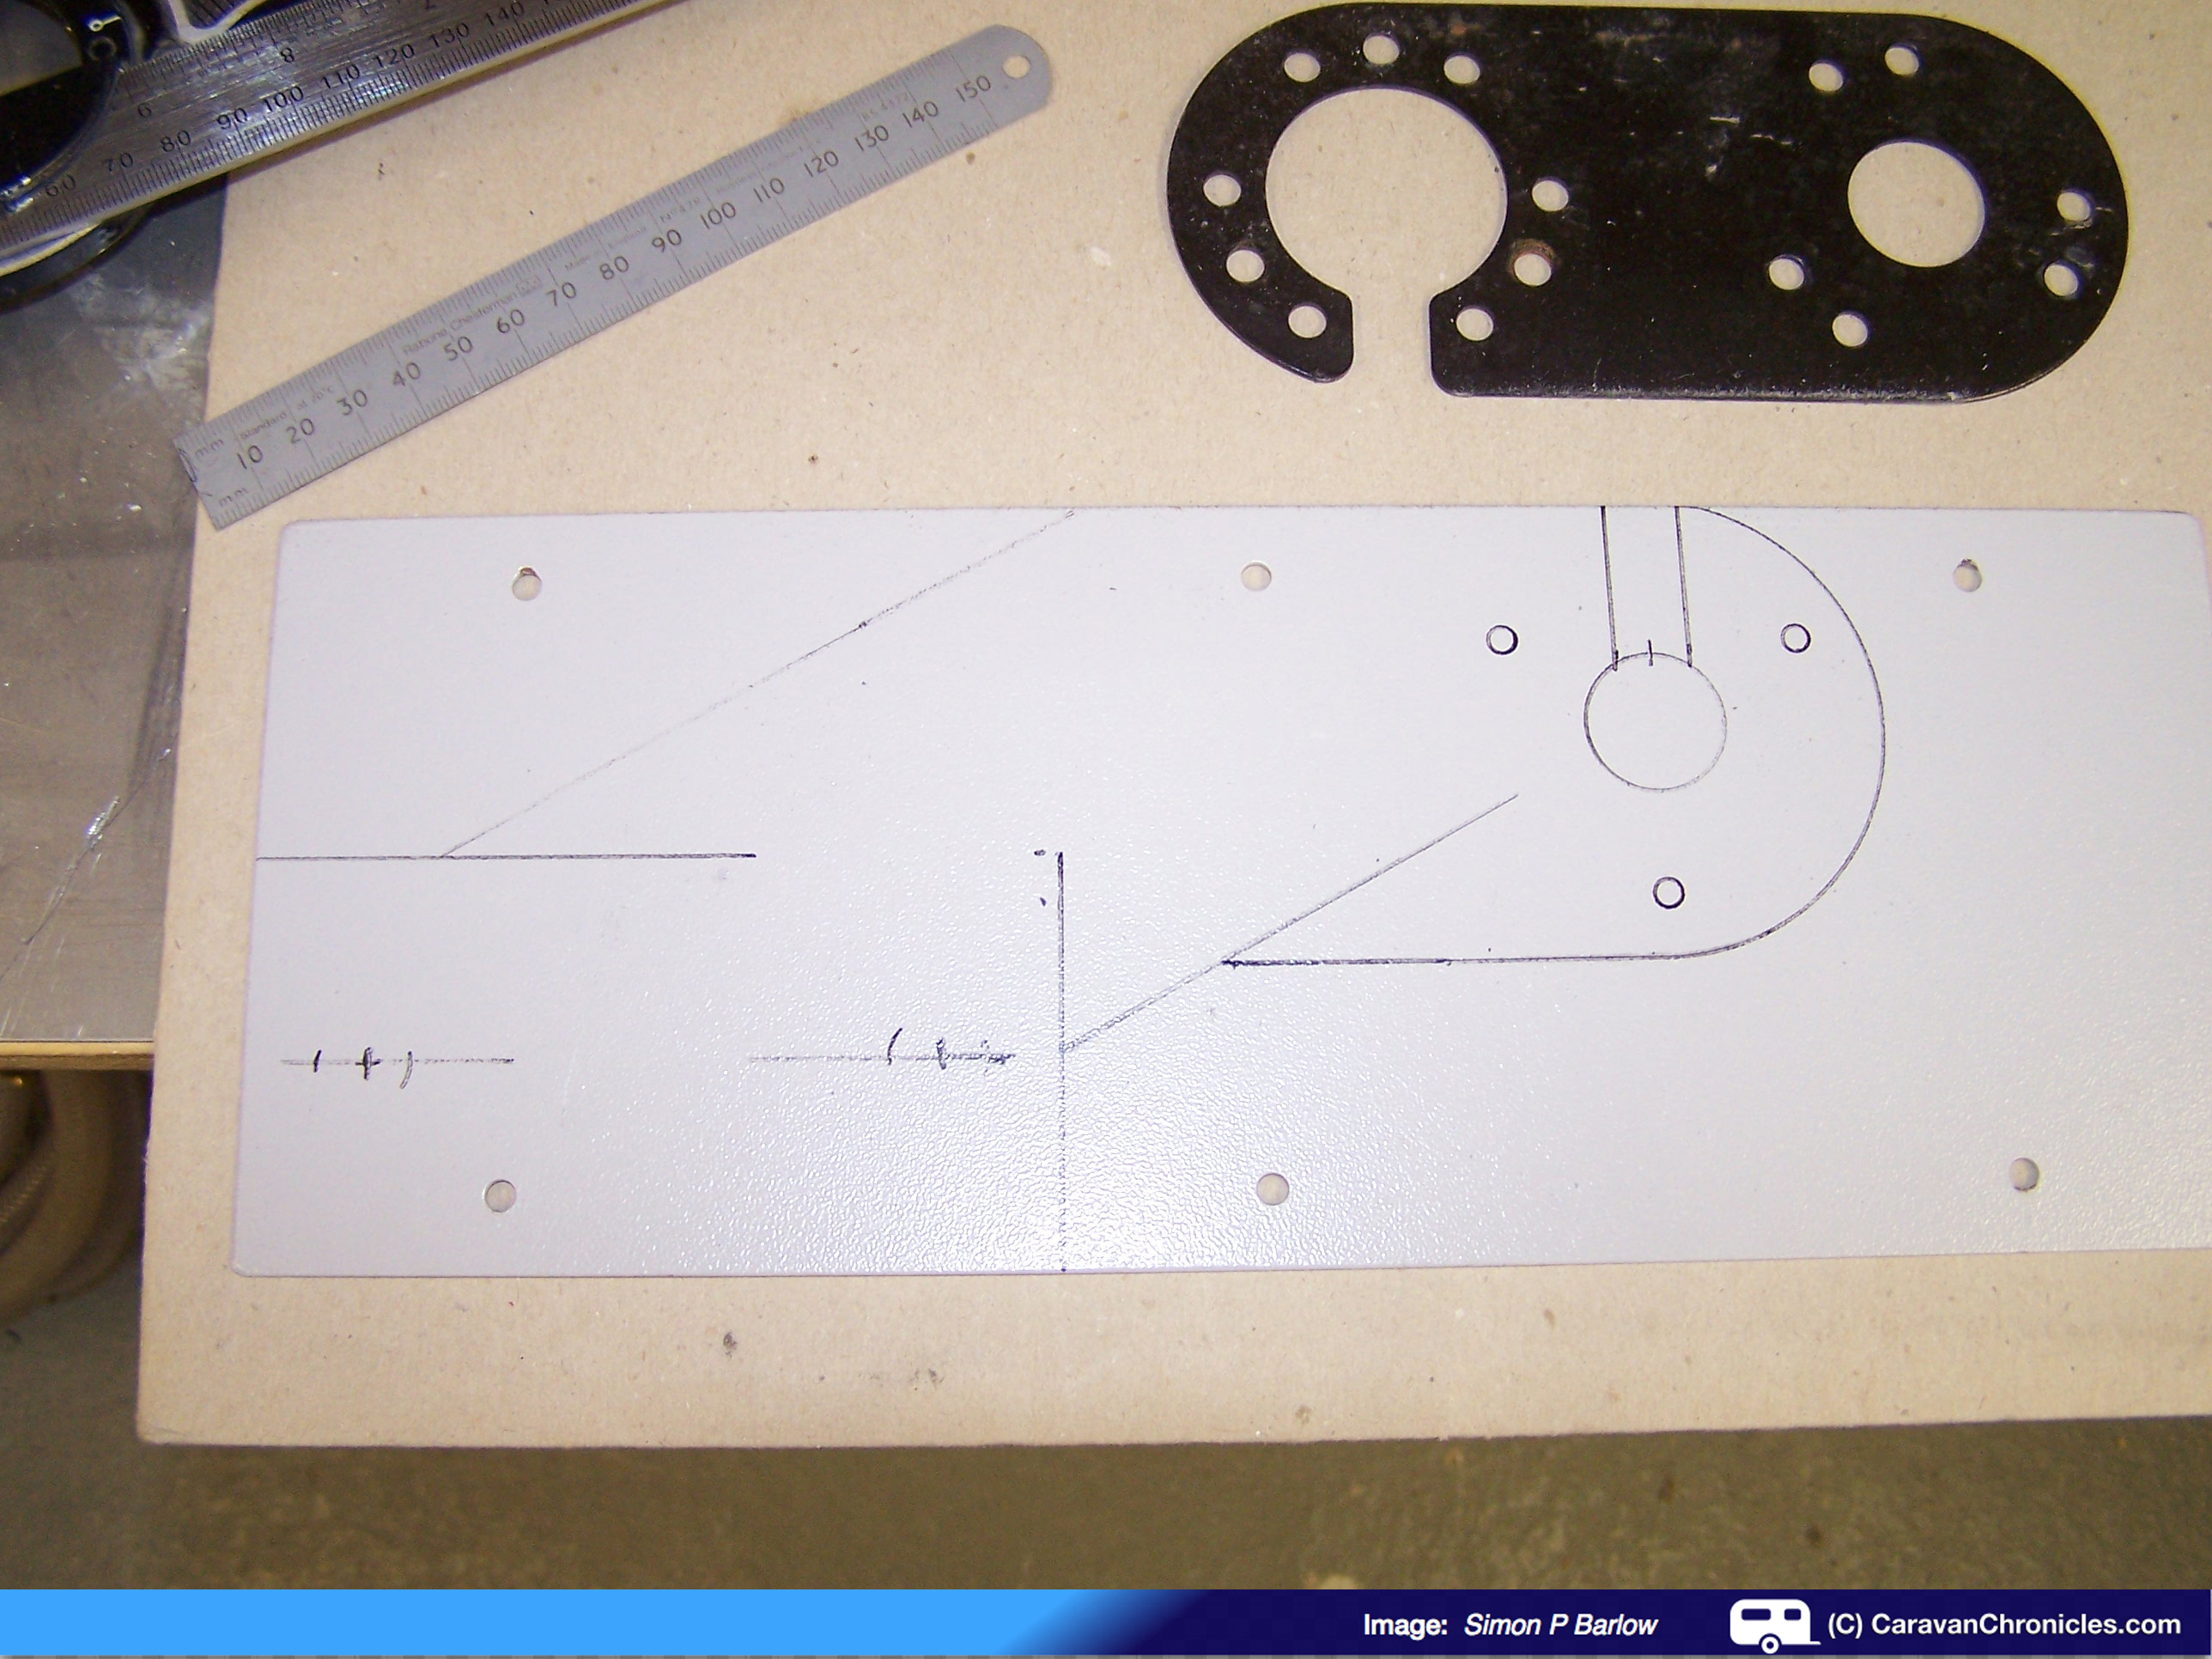
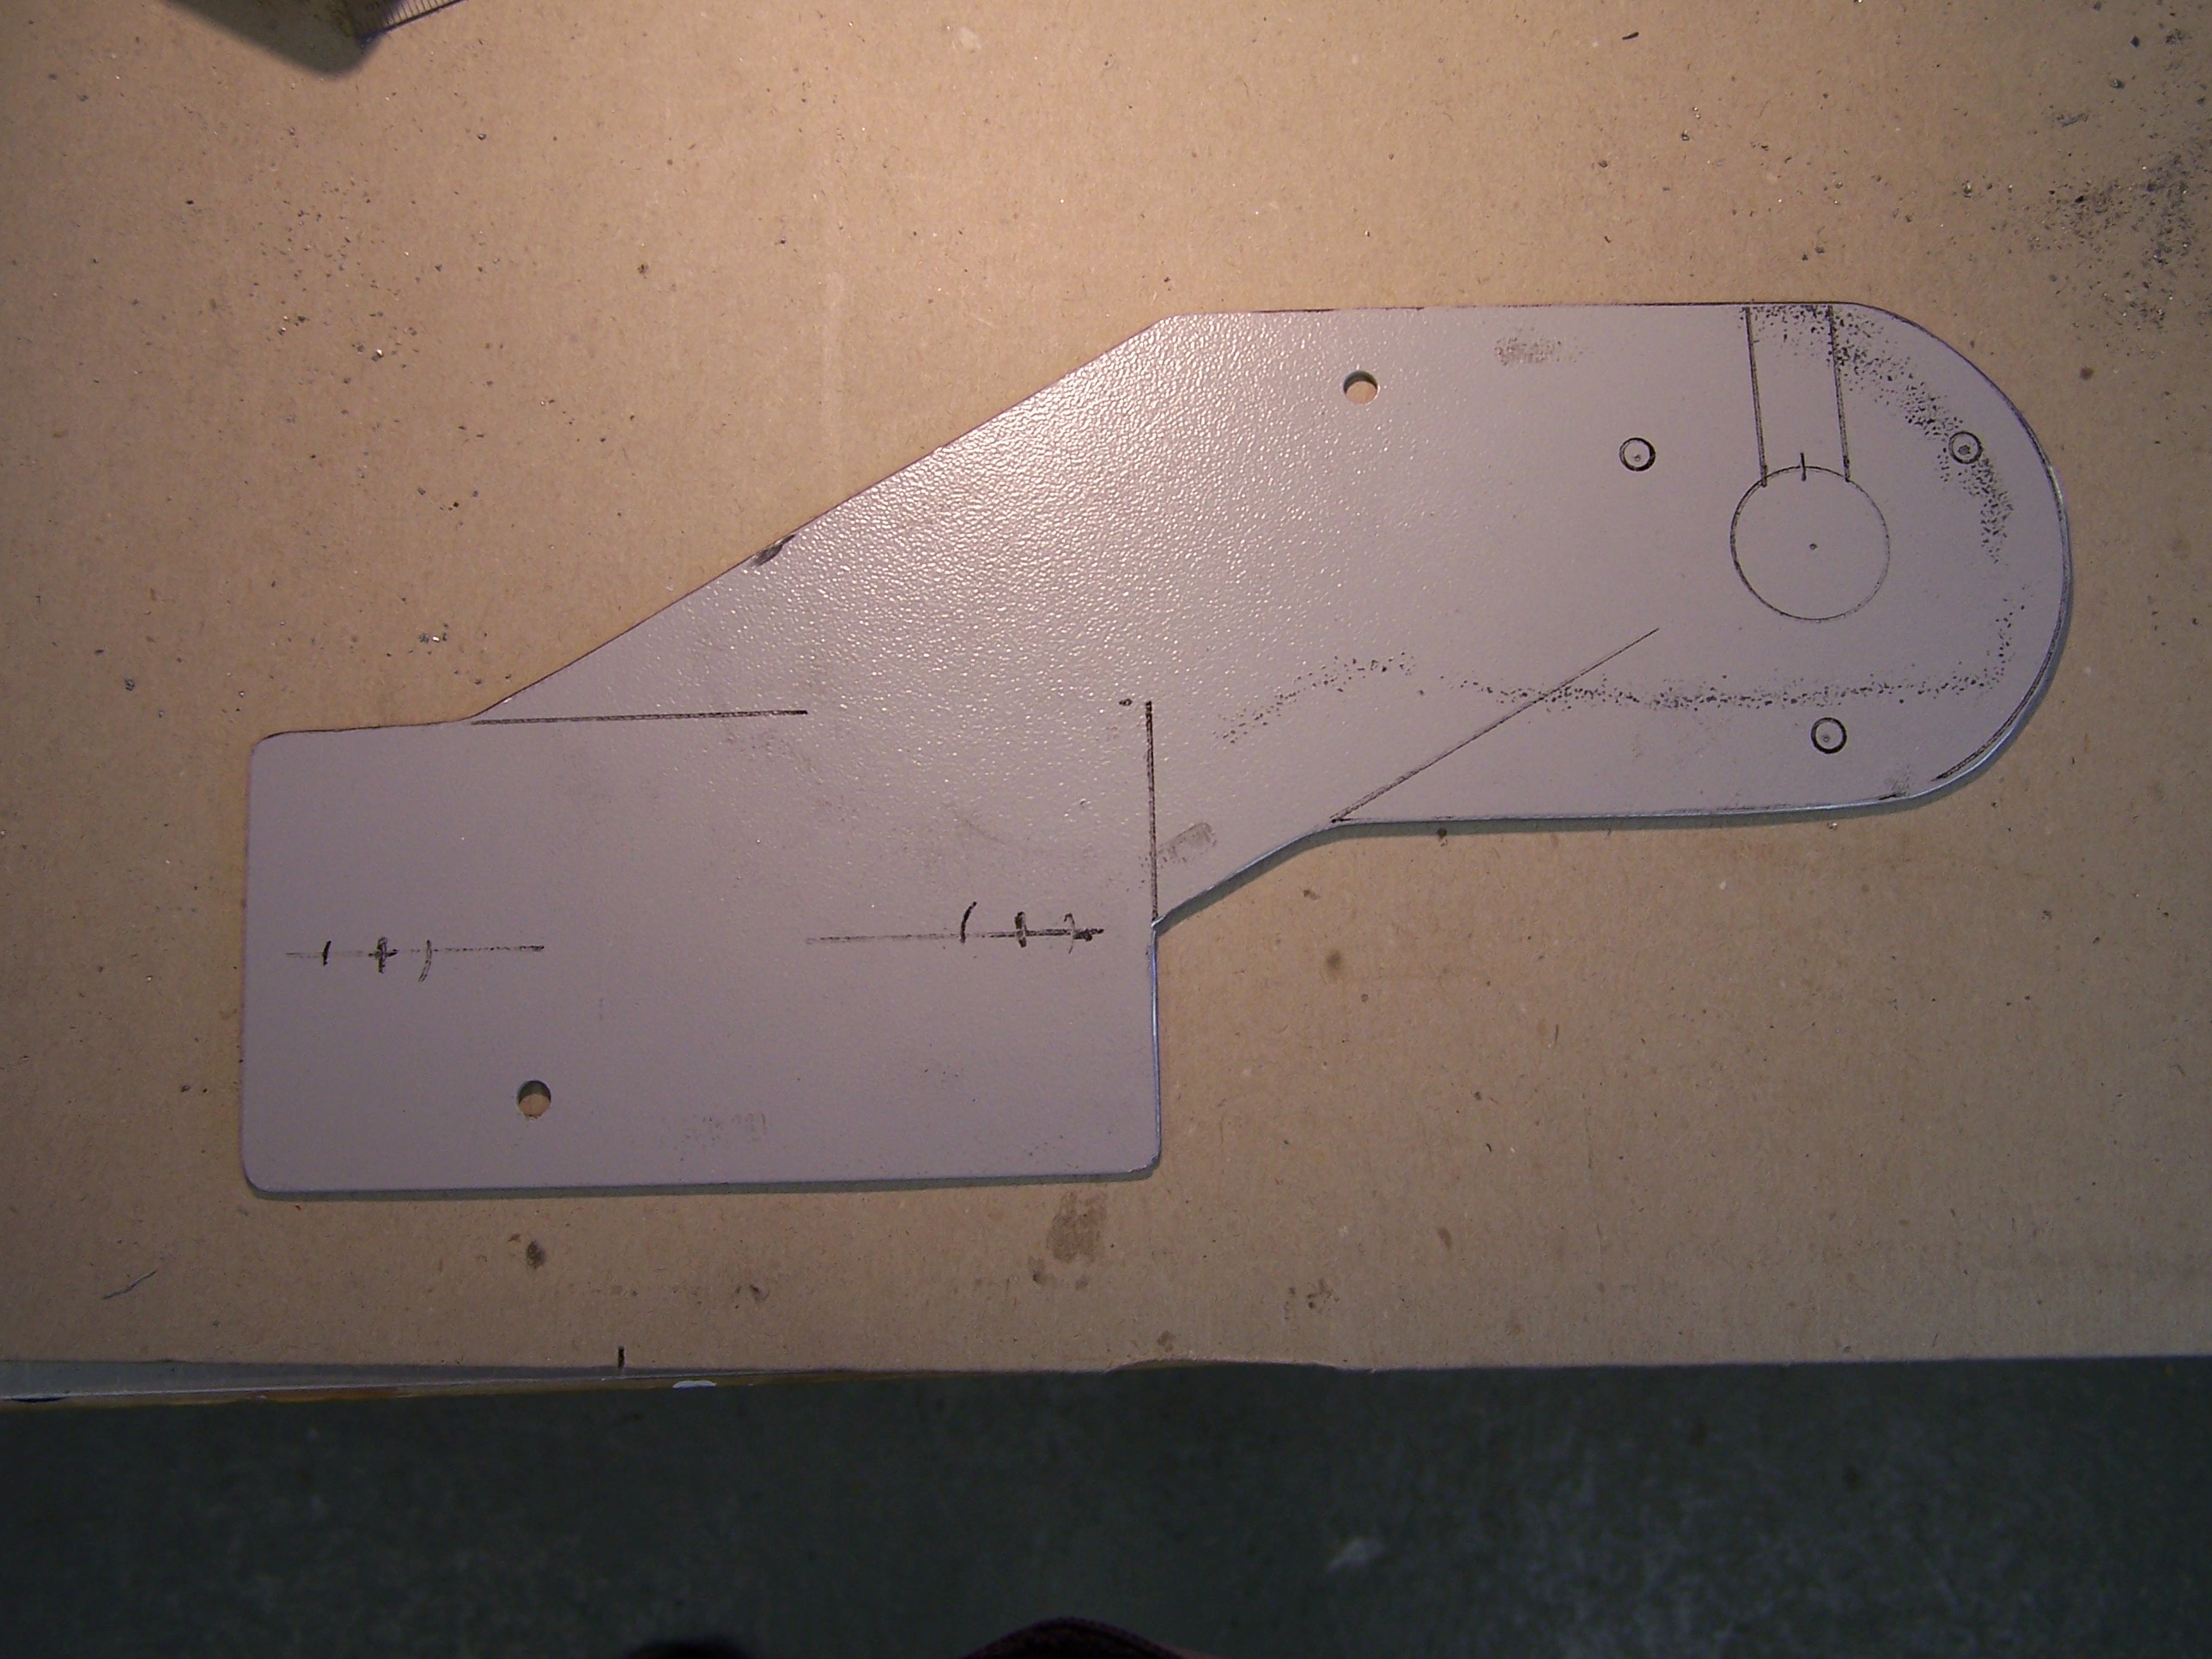
No, I don’t mean getting your departure instructions from ATC….! One of the little jobs on my list was to make a new bracket to hold the 13 pin socket to the tow bar. The existing one was slightly bent from having to reverse the Rotary Christmas Float into a tight space last Christmas and it was also a bit low. I didn’t want the bottom of the socket to be the first point of contact with the ground if travelling down a deep rutted track.
The old bracket was slightly bent and low
I wanted to move the socket up so it would be at least above the bolts for the tow ball and at the same time distance it from the tow ball so there was less chance of the 13 pin plug coming into contact with the A frame of the caravan (or Santa’s sleigh!) when manoeuvring.
The original bracket was pressed out of 1.3mm thick steel and I guess it was designed to have a bit of ‘give’ in it so it would bend rather than be rigid enough to cause damage to the plug and socket.
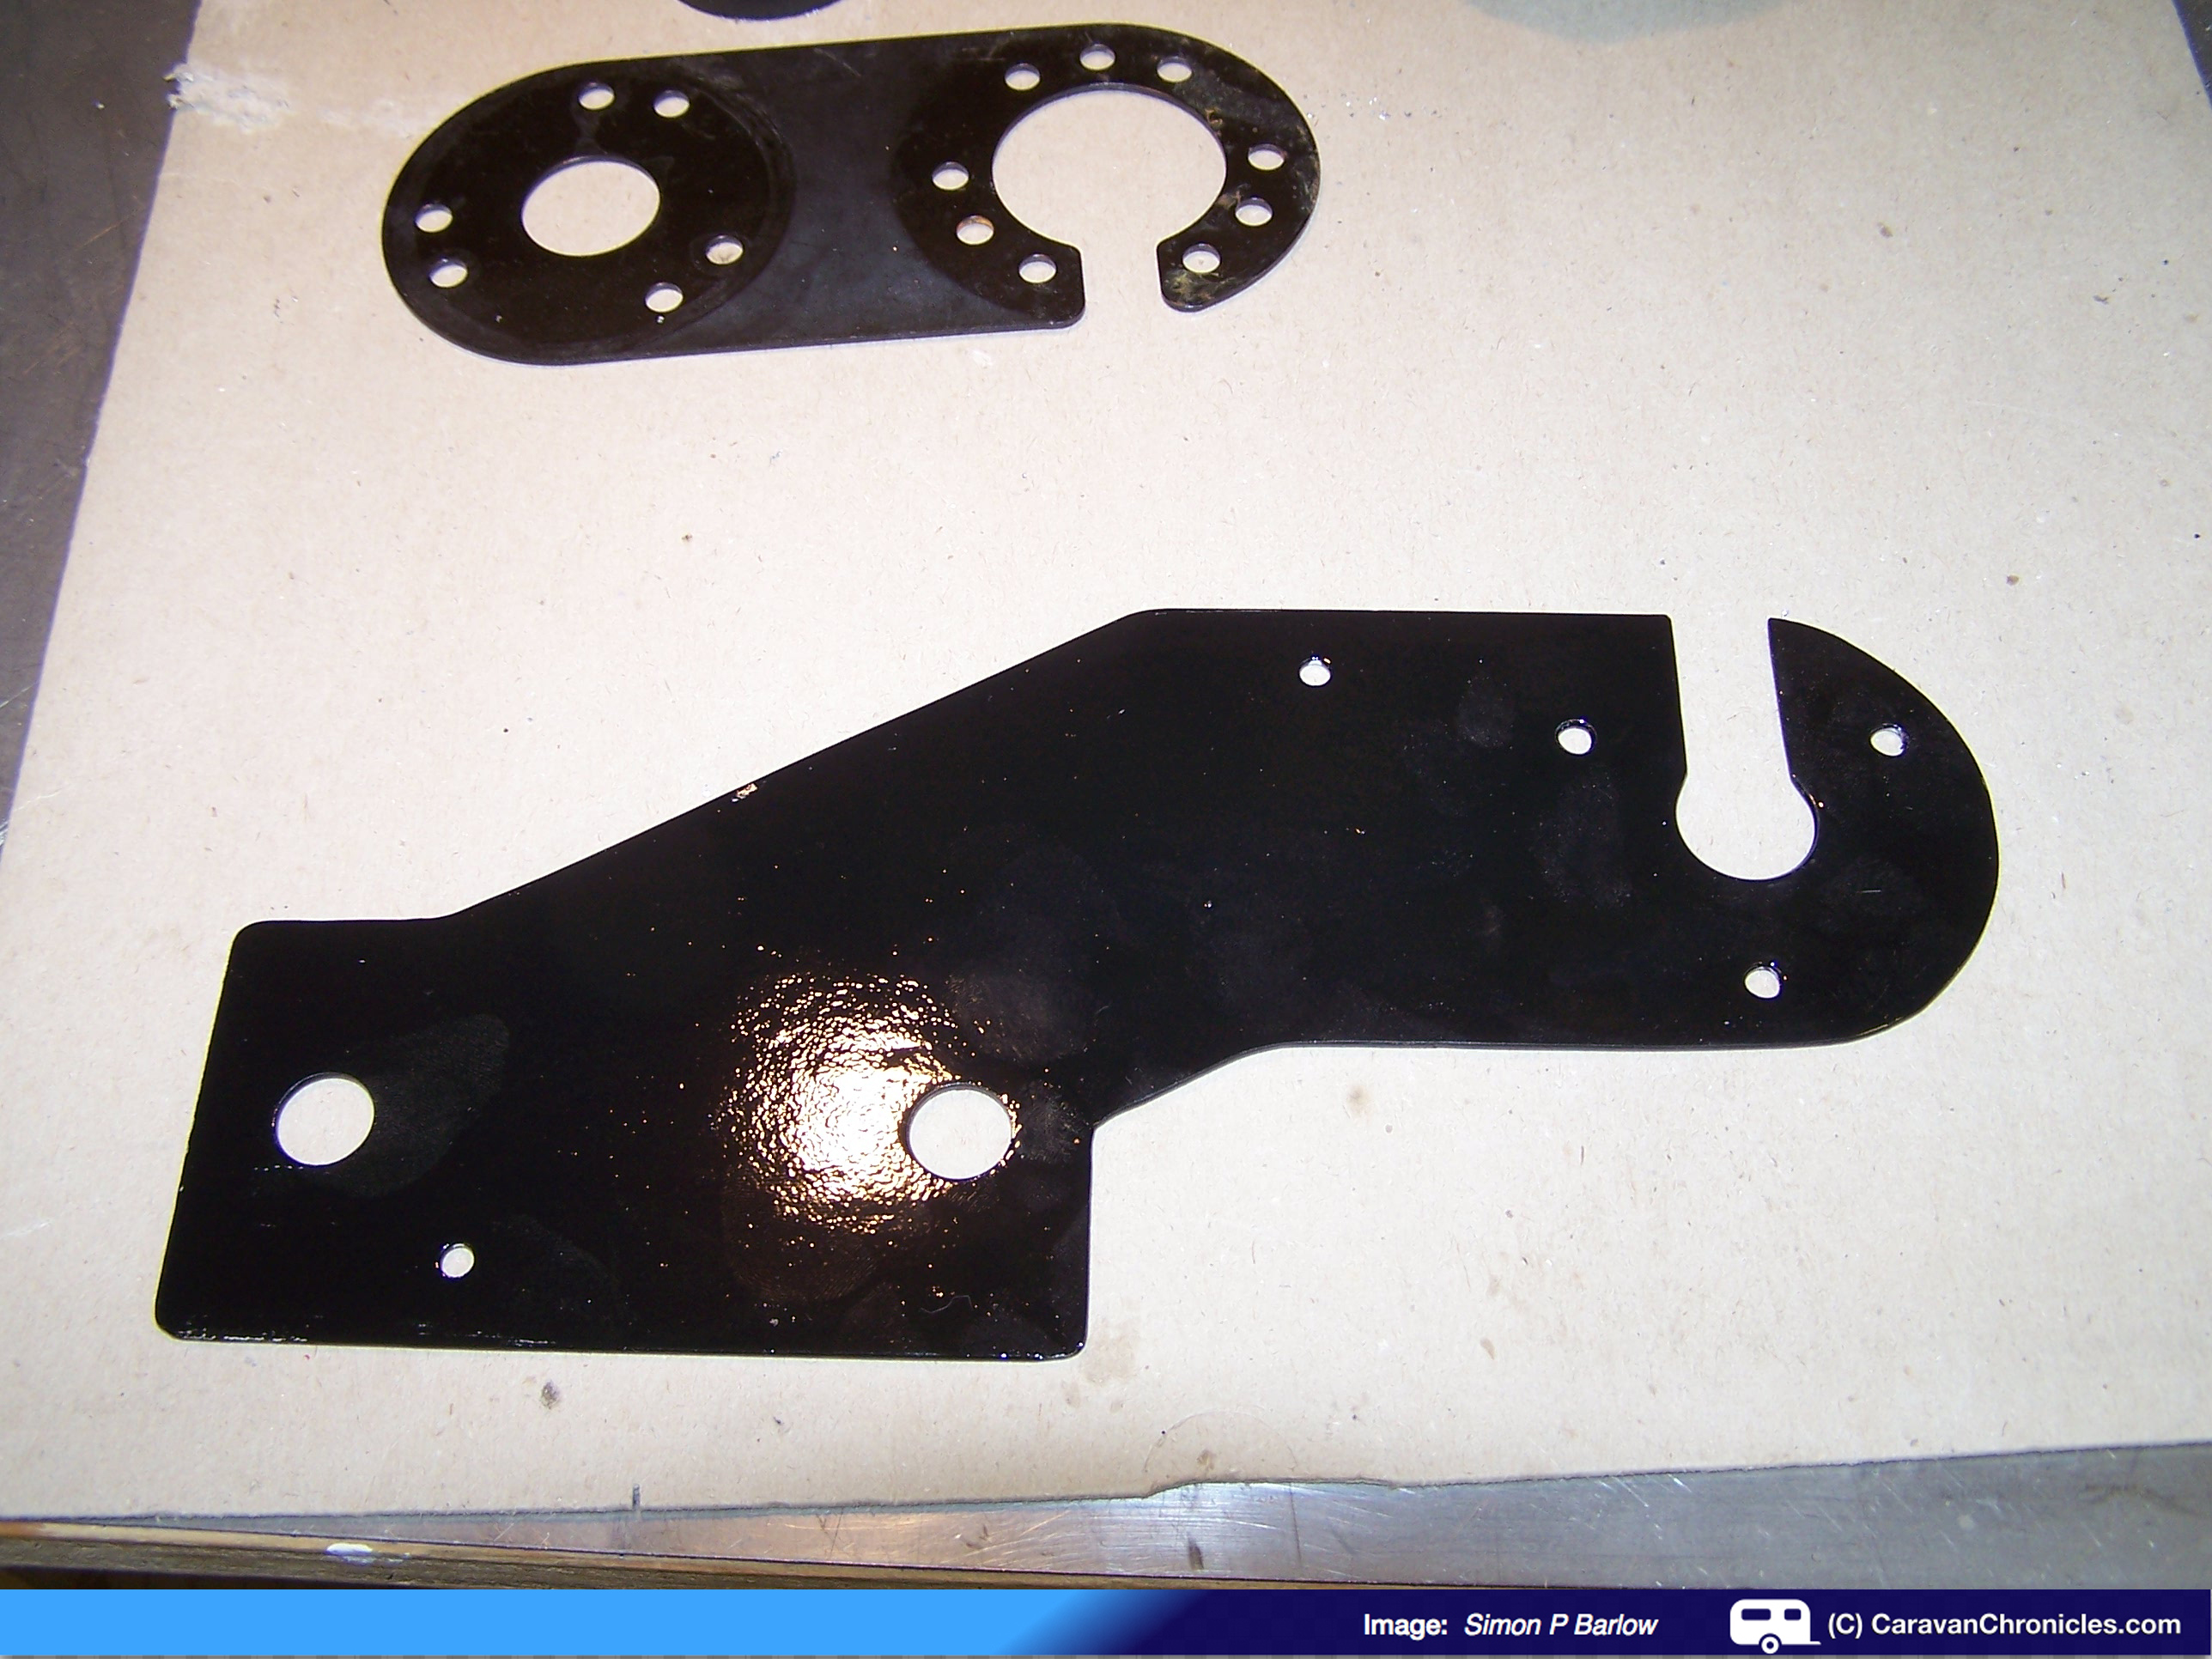
I needed something a bit more substantial due to the extended distance the socket was going to be from the main tow bracket mounting, but still retaining enough ‘give’ if required. I happened to have some pieces of 1.9mm thick steel that were originally cable entry plates for computer racks.
I measured the mounting plate that the tow ball fits onto, 65mm x 135mm, and using a plate that was originally for adding a 12S socket to an existing 12N fitting as a guide marked out the position of where I wanted the socket to be. Again using the extension plate as a guide for width, I marked two lines at 30 degrees… one up from the centre line of the tow ball mounting bolts and the other the same width as the plate. Fortunately the steel stock I had was just the right height! I also marked out the slot I would need to slide the cable through as I wanted to make it so it could be installed/removed without having to disconnect the 13 pin socket.
The next step was to cut out the plate. The easiest way would have been to use a plasma cutter…. unfortunately not a bit of kit I have in my workshop (Sue thinks I already have more kit than ‘International Rescue’) so it was a bit trimming with a band saw.
Once cut out, I could now mark on the locations of all the holes and centre punch them ready for drilling, and set about draw filing all the edges. Once all the edges were flat and rounded off it was over to the pillar drill to create some holes. I used a stepped taper drill as there was less chance of grabbing that a large diameter drill bit would do.
With the holes drilled, back to the band saw to cut out the slot and some more filling to smooth and round off the edges of the slot so it could not cause chafing on the cable.
When assembled, there is a small plate that mounts on the back between the two top mounting bolts for the 13 pin socket. This effectively bridges the gap caused by cutting the cable slot.
A quick coat of FORTRESS Black Gloss Metal Paint and it was left a few hours to dry.
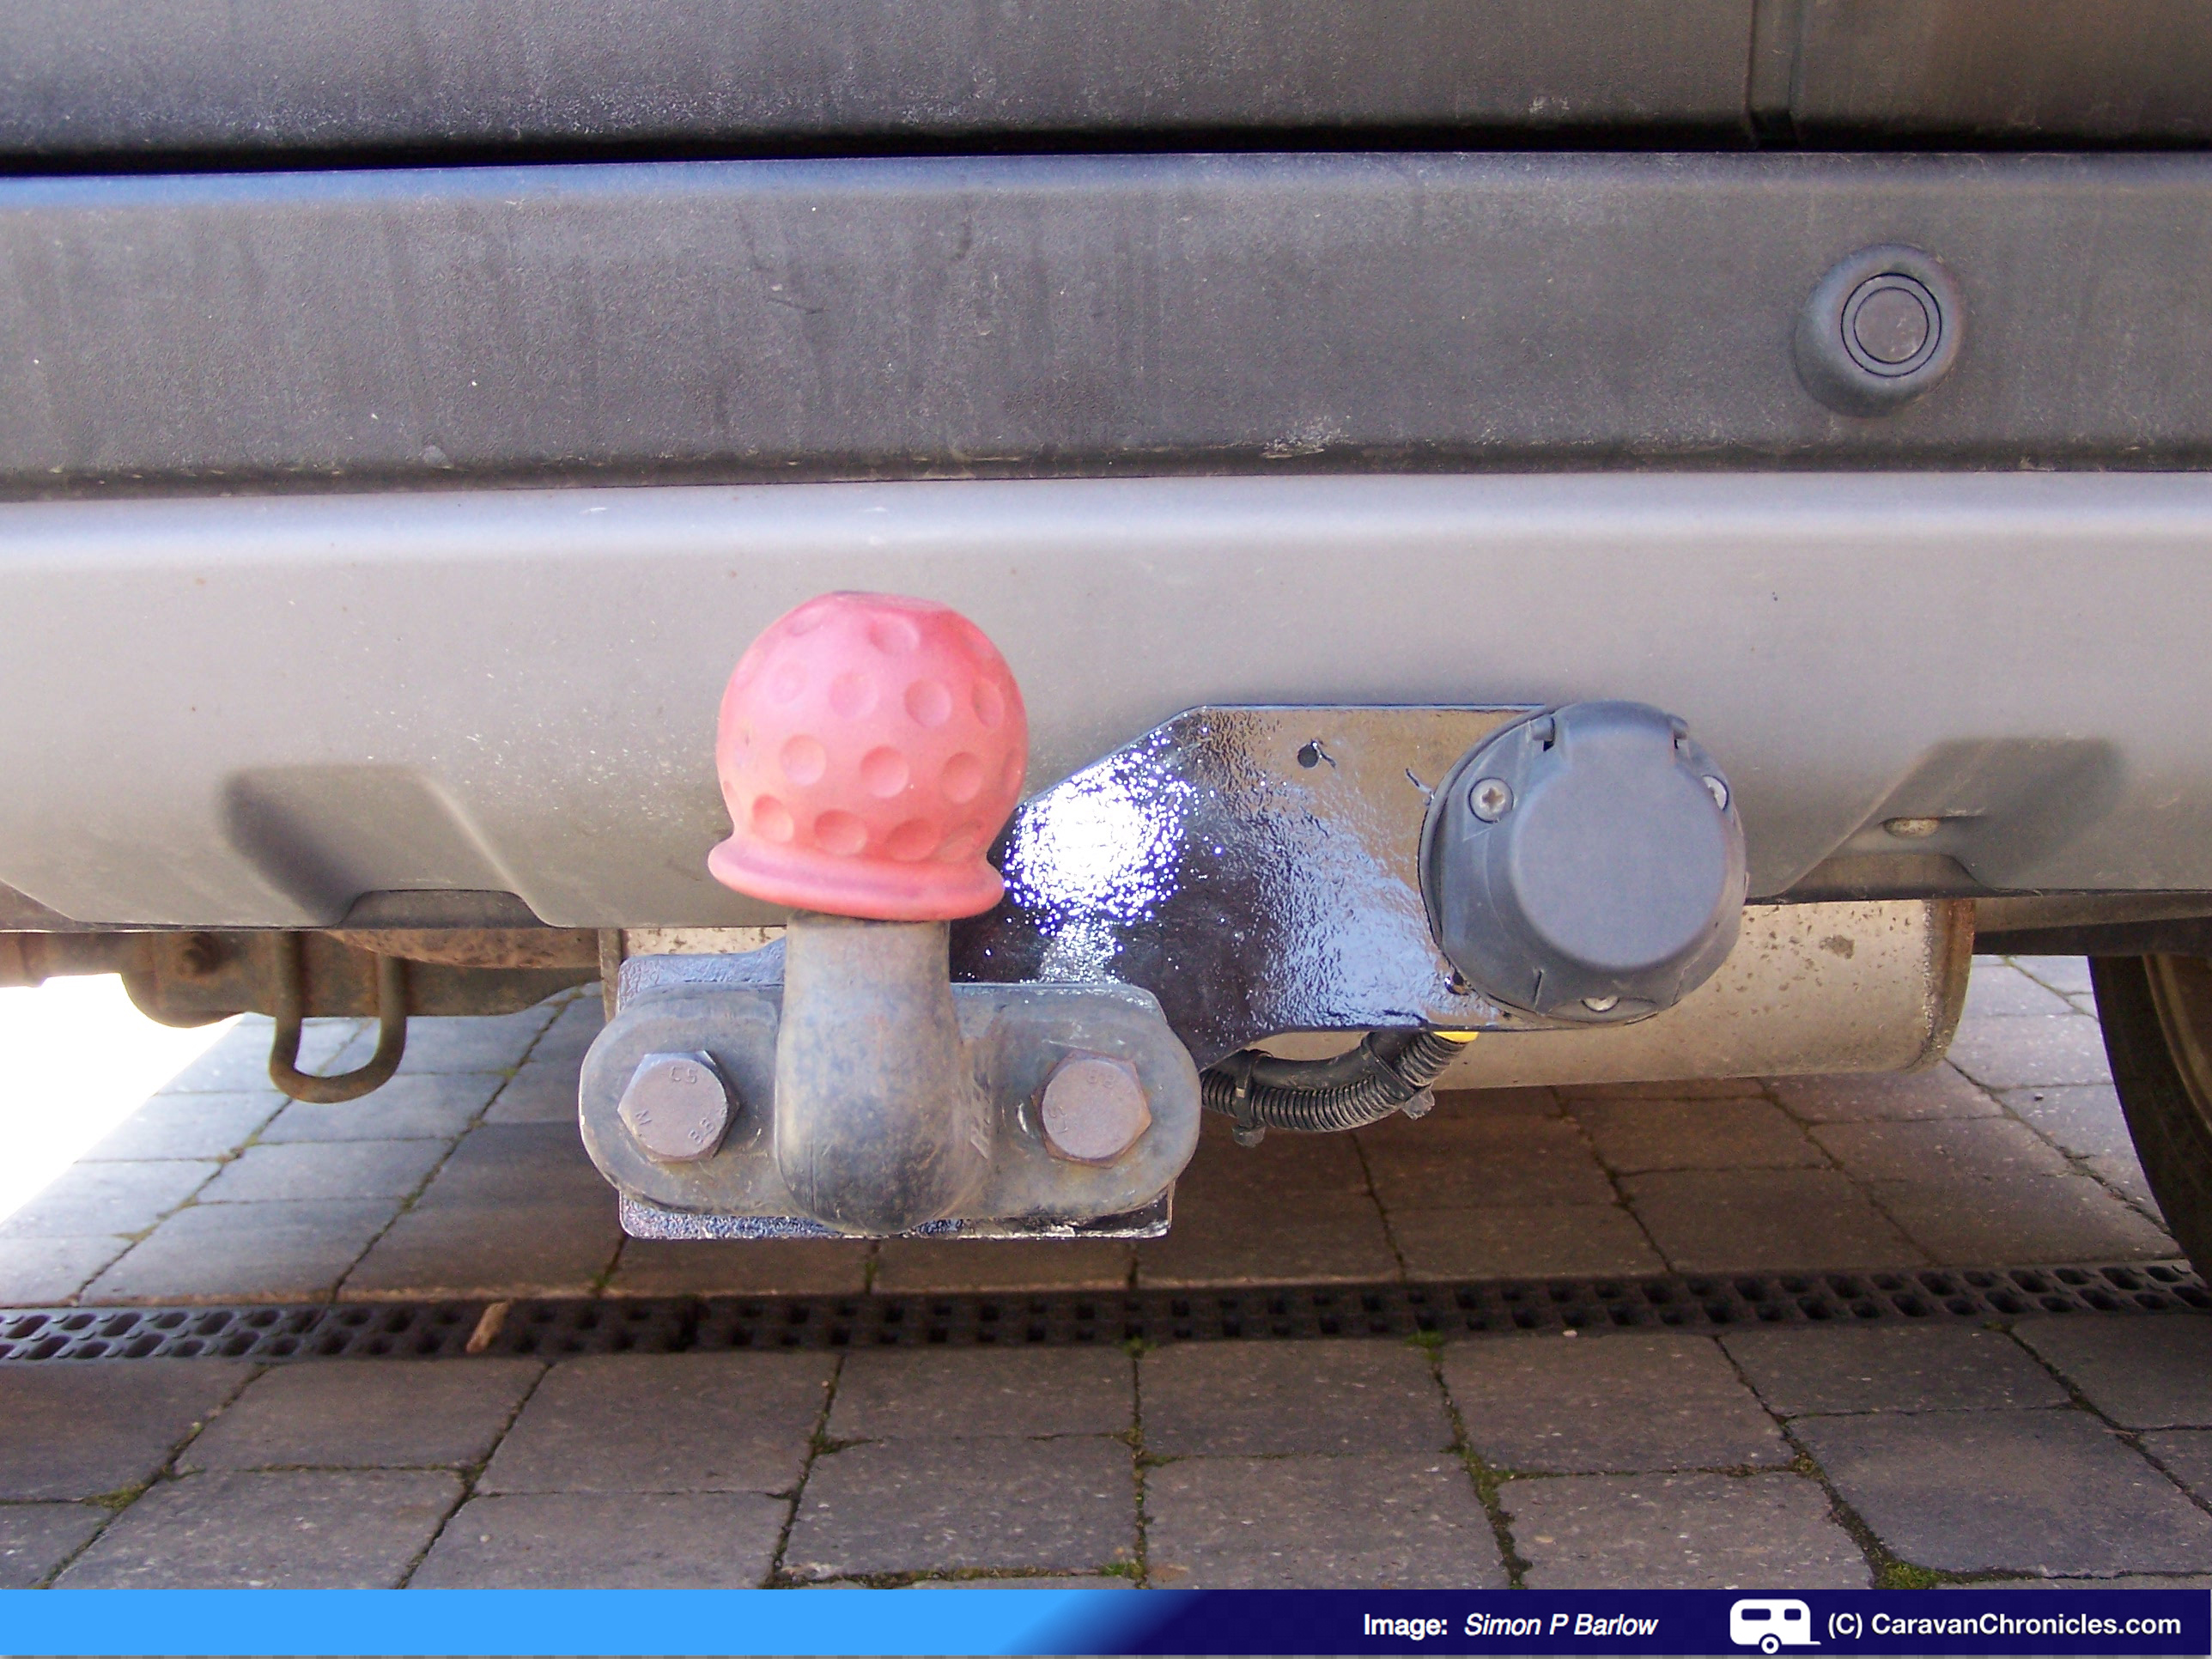
The finished bracket installed on the Freelander. The whole job only took and hour (excluding paint drying) and the result is now the socket and cables are clear of the bottom of the tow bracket so there will be less chance of catching it when off roading. The extra spacing will also allow a bit more articulation of the caravan’s A frame without touching socket. The distance is not too much so that the cable from the caravan risks hanging below the coupling too.
The other advantage of raising the 13 pin socket up is the fact it is now less likely to get sprayed with water from under the vehicle when travelling on wet roads, so hopefully reducing future maintenance.
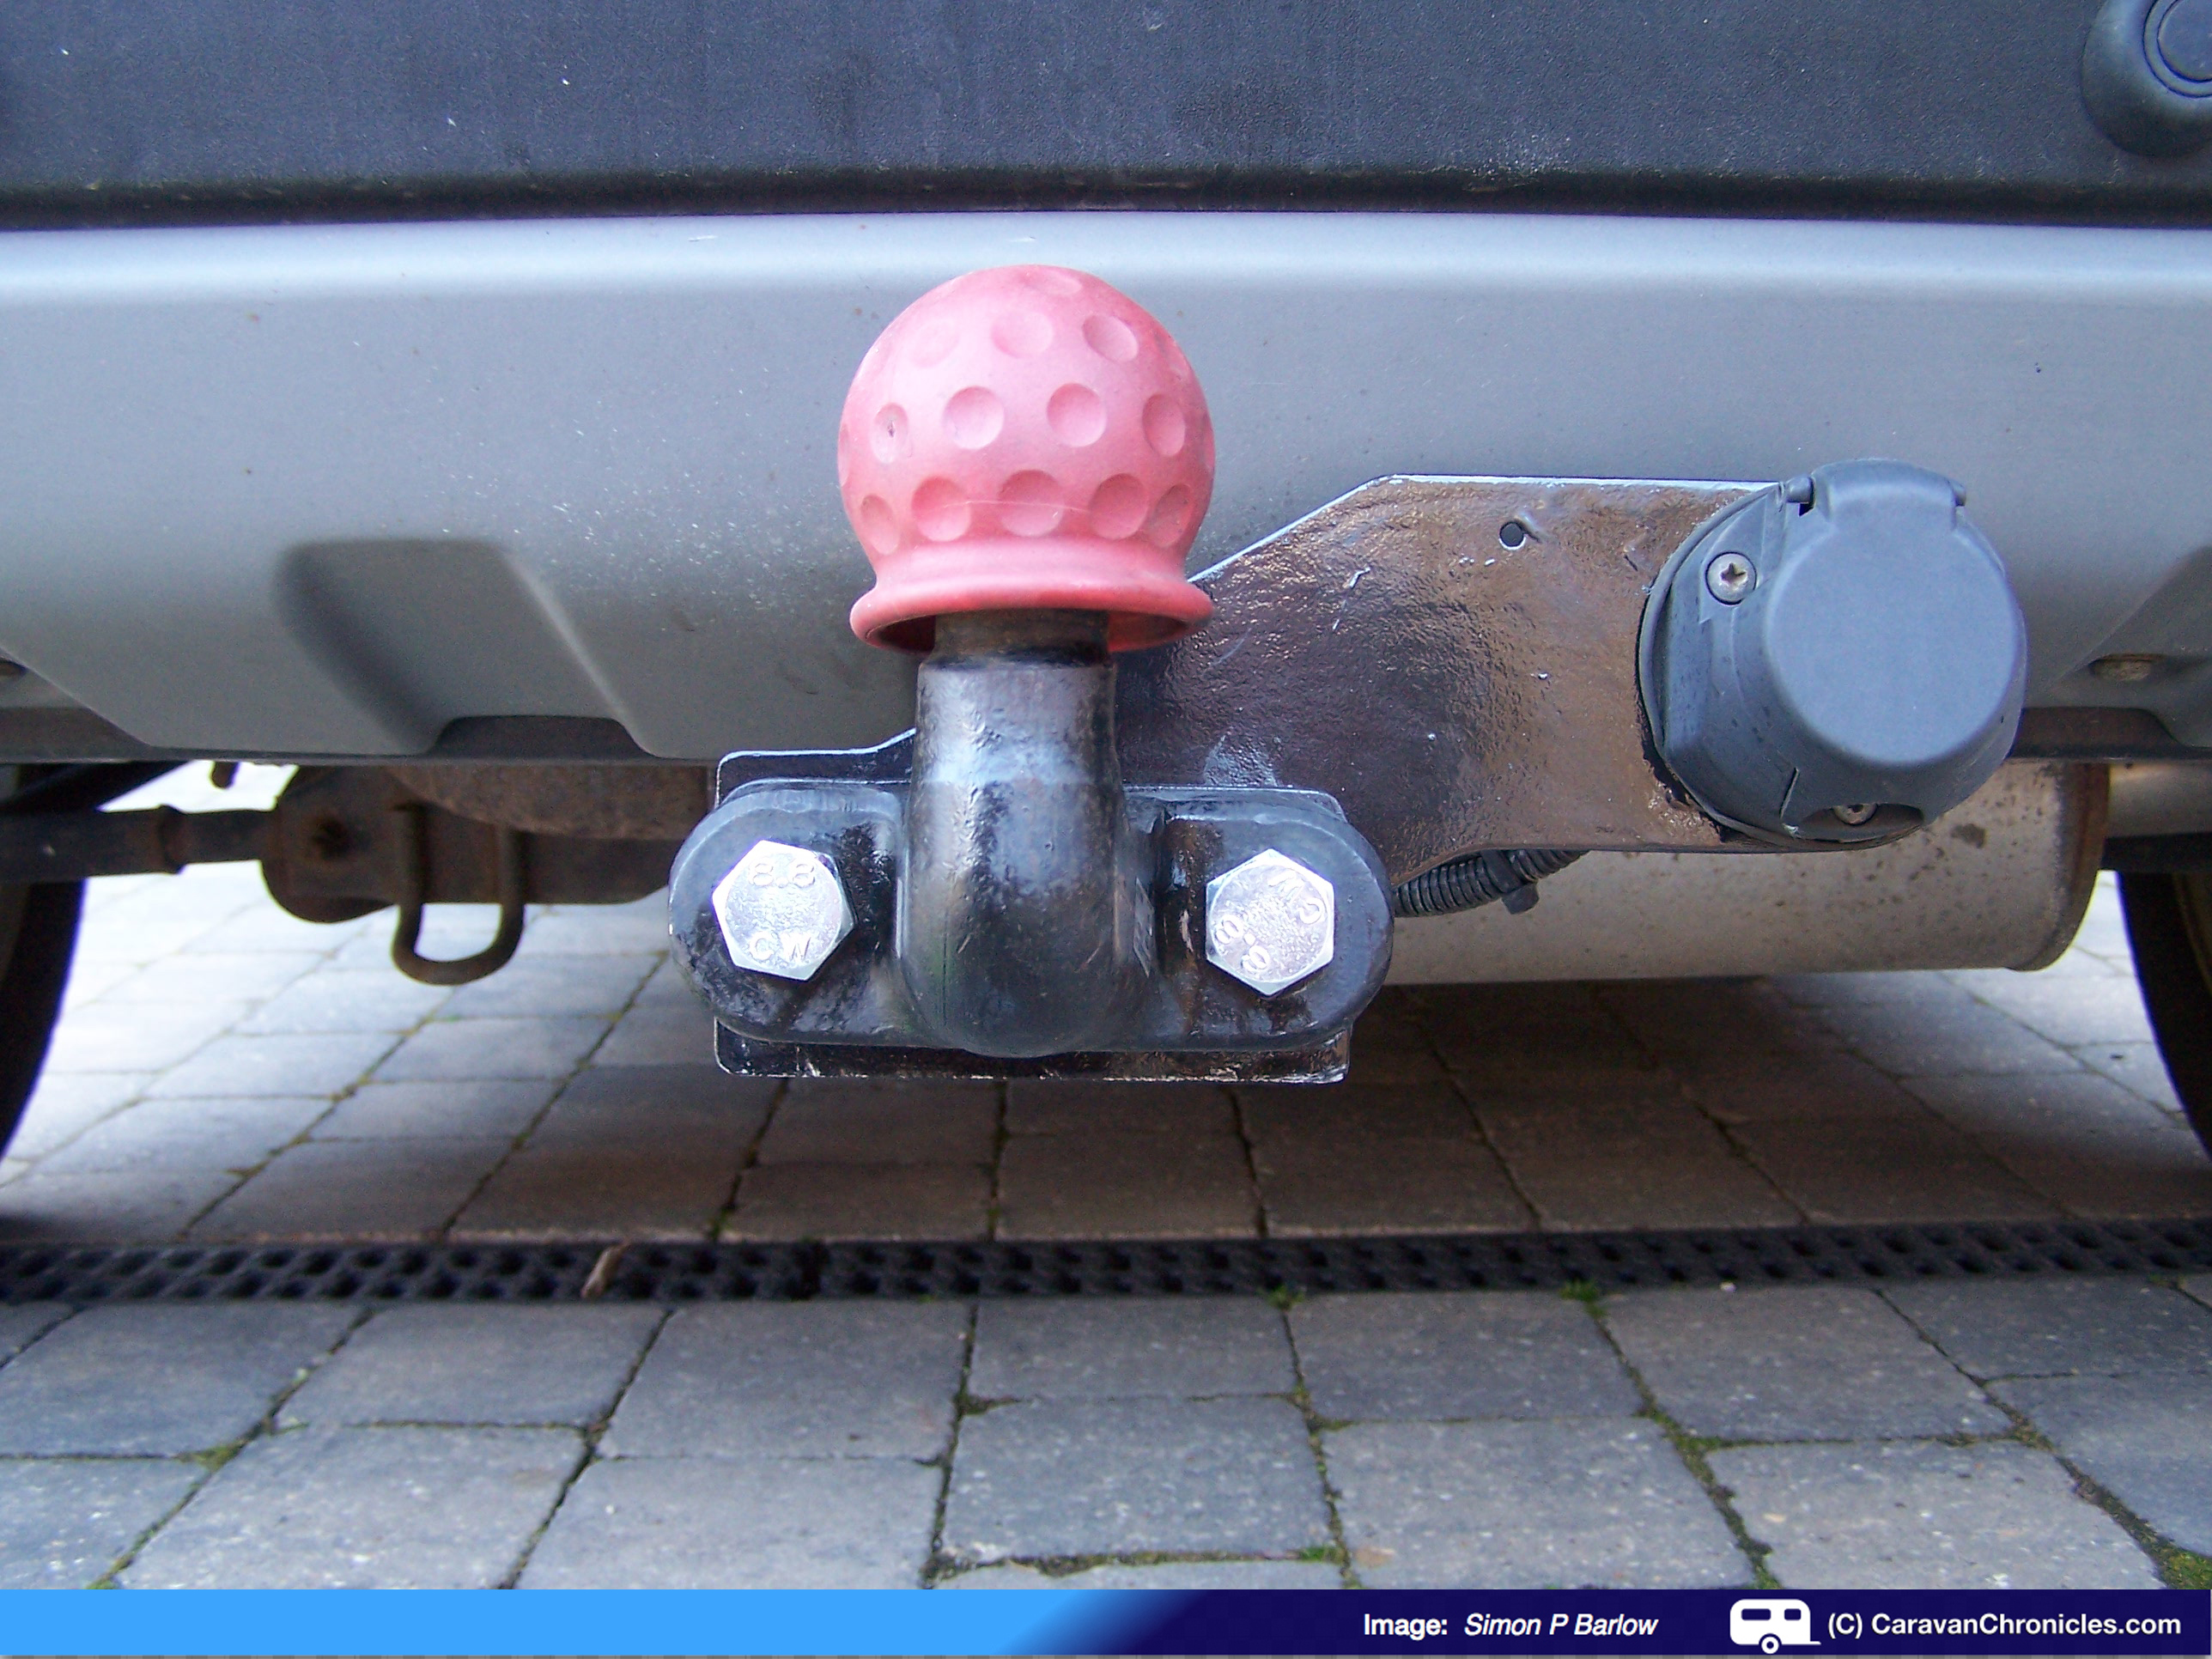
One thing I did find in removing the tow ball to mount the bracket is one of the split washers on the back of the bolts holding the tow ball on had a crack in it. Split washers for this type of application are not reusable items and each time the tow ball is removed and replaced, the split washers should be replaced. I inspected the bolts and nuts closely as they were installed back in 2006 when we bought the Freelander. There was a slight amount of surface rust on the shanks. I used a rotary wire brush in the pillar drill to clean them up and inspecting with a magnifying glass I could see slight pits in the surface. As these take all the strain of towing, I’ve decided the next job this weekend is to replace them with two new bolts and nuts, and of course new split washers. For the sake of a few pounds, it’s better to be safe than sorry.
Before the new bolts are installed and the cable tied up securely
Hope this was a useful little project.
S
UPDATE – 4 May 2013
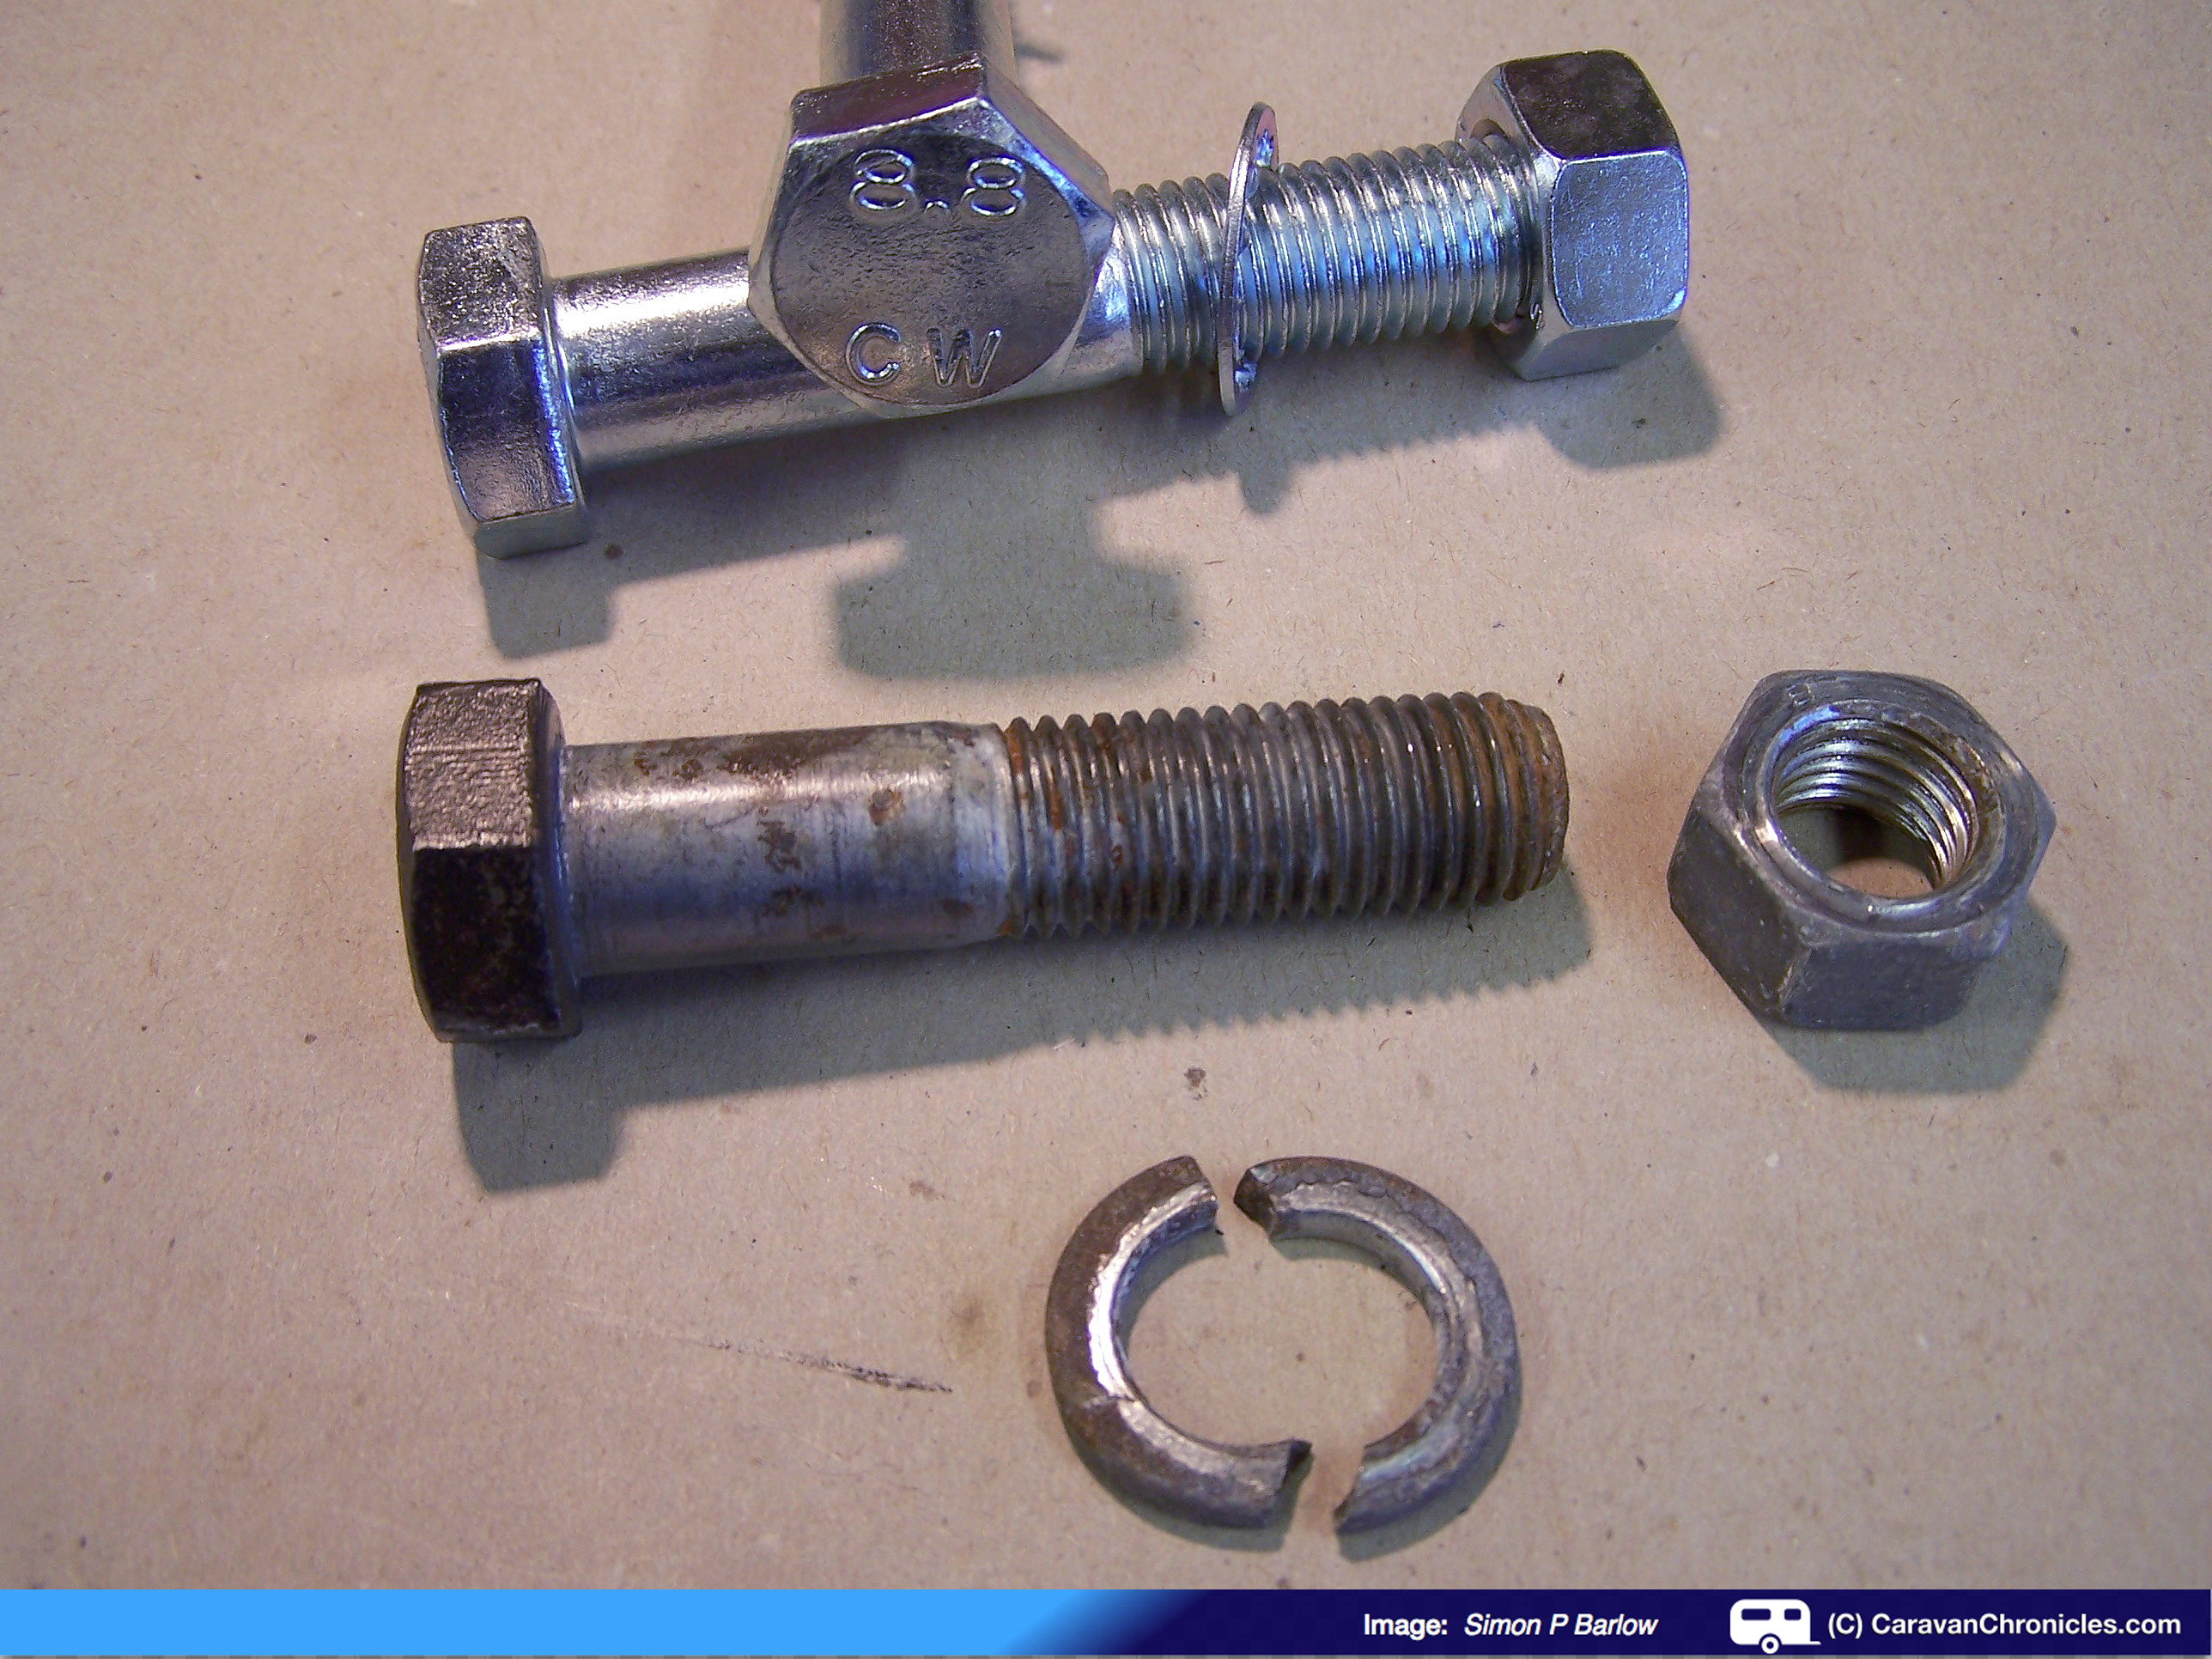
I have just replaced the bolts holding the tow ball casting on to the tow bar frame. When slackening off one of the old bolts, the split washer that I’d noticed a crack in yesterday fell to the floor in two pieces.
Click on image to enlarge
I checked in my “machinist’s handbook” for the correct bolts to select. The original bolts were M16. As the original bolts were only 60 MM, I wanted to make sure the shank of the new bolts passed through as much of the holes as possible leaving the shortest amount of thread in the hole. The correct bolts were 90mm, M16 x 2 8.8 High Tensile. You can see the difference in the new and old bolts in the photo above, along with the old split washer that fell off. I also checked on the correct washer for the application, and again referring to my machinist’s handbook as I would be tightening to the maximum torque of 214 Nm (76KN) it recommended using star washers.
Job done. All I have to do now is check the torque after about 25 to 50 miles of towing once the star washers have bedded in a little.
Only a few days to wait as we are off to Troutbeck Head CC site in a few days time.
The second part of our weekend was to return to Cambridge. I think I mentioned in part one that the last time we were both there was back at the end of June 2009 the day before My fellow pilot Feroz and I set off on our round the world flight. I had flown the Bonanza into Cambridge airport and Sue had driven over so we had a couple of days together in Cambridge before I met up with Feroz and we flew to Austria for the start of the trip.
Sunday 21st April
Another sunny cloudless sky greeted us as the filter coffee machine was hissing into life. We didn’t have a planned departure time for Cambridge as it was only about 22 miles away and should only take 35 to 40 minutes to drive there. Continue reading →