Not clickbait…. Three weeks ago Sue and I were cycling between 8 and 10 miles each morning to get a morning coffee. Arrived back home and…. well time stopped.
I had received notice that my test sample for Bowel Cancer screening had come back positive. Two days later I underwent a colonoscopy procedure which didn’t work out too well as there was a mass occluding my colon and they could not proceed further. A few days later I had a CT Scan.
This morning Sue and I met with a consultant from the Colorectal Surgery department at Manchester Royal Infirmary. We were told the results from the scan and biopsy lead them to the conclusion I had cancer, stage 4, and it was also showing up on my Liver and Lungs.
The pathway was laid out….. MRI Scan to accurately plot the cancer followed by a stent to stop the mass blocking my colon, then a course of Chemotherapy at Christies Hospital and follow up body scans to reassess the cancer.
Once that was done, further surgery to remove the mass from my colon.
Tomorrow I meet with an Oncology Consultant.
Today as I write this I feel like I’m still in that tunnel without a torch…. but I know help is on its way.
Once I can see the light again…. maybe I will continue with Caravan Chronicles. But for now just understand I might be hitting you up for a bit of sponsorship for a cancer charity…. I’m thinking of a “Grumpy Old Man Park Bench Sitting” marathon.
Take care friends, and remember GET YOURSELF CHECKED OUT…FOR EVERYTHING… NOW !!!
As Arni said “I’ll be back”……… followed with a bit of Vera Lynn….. “Don’t know where, don’t know when”
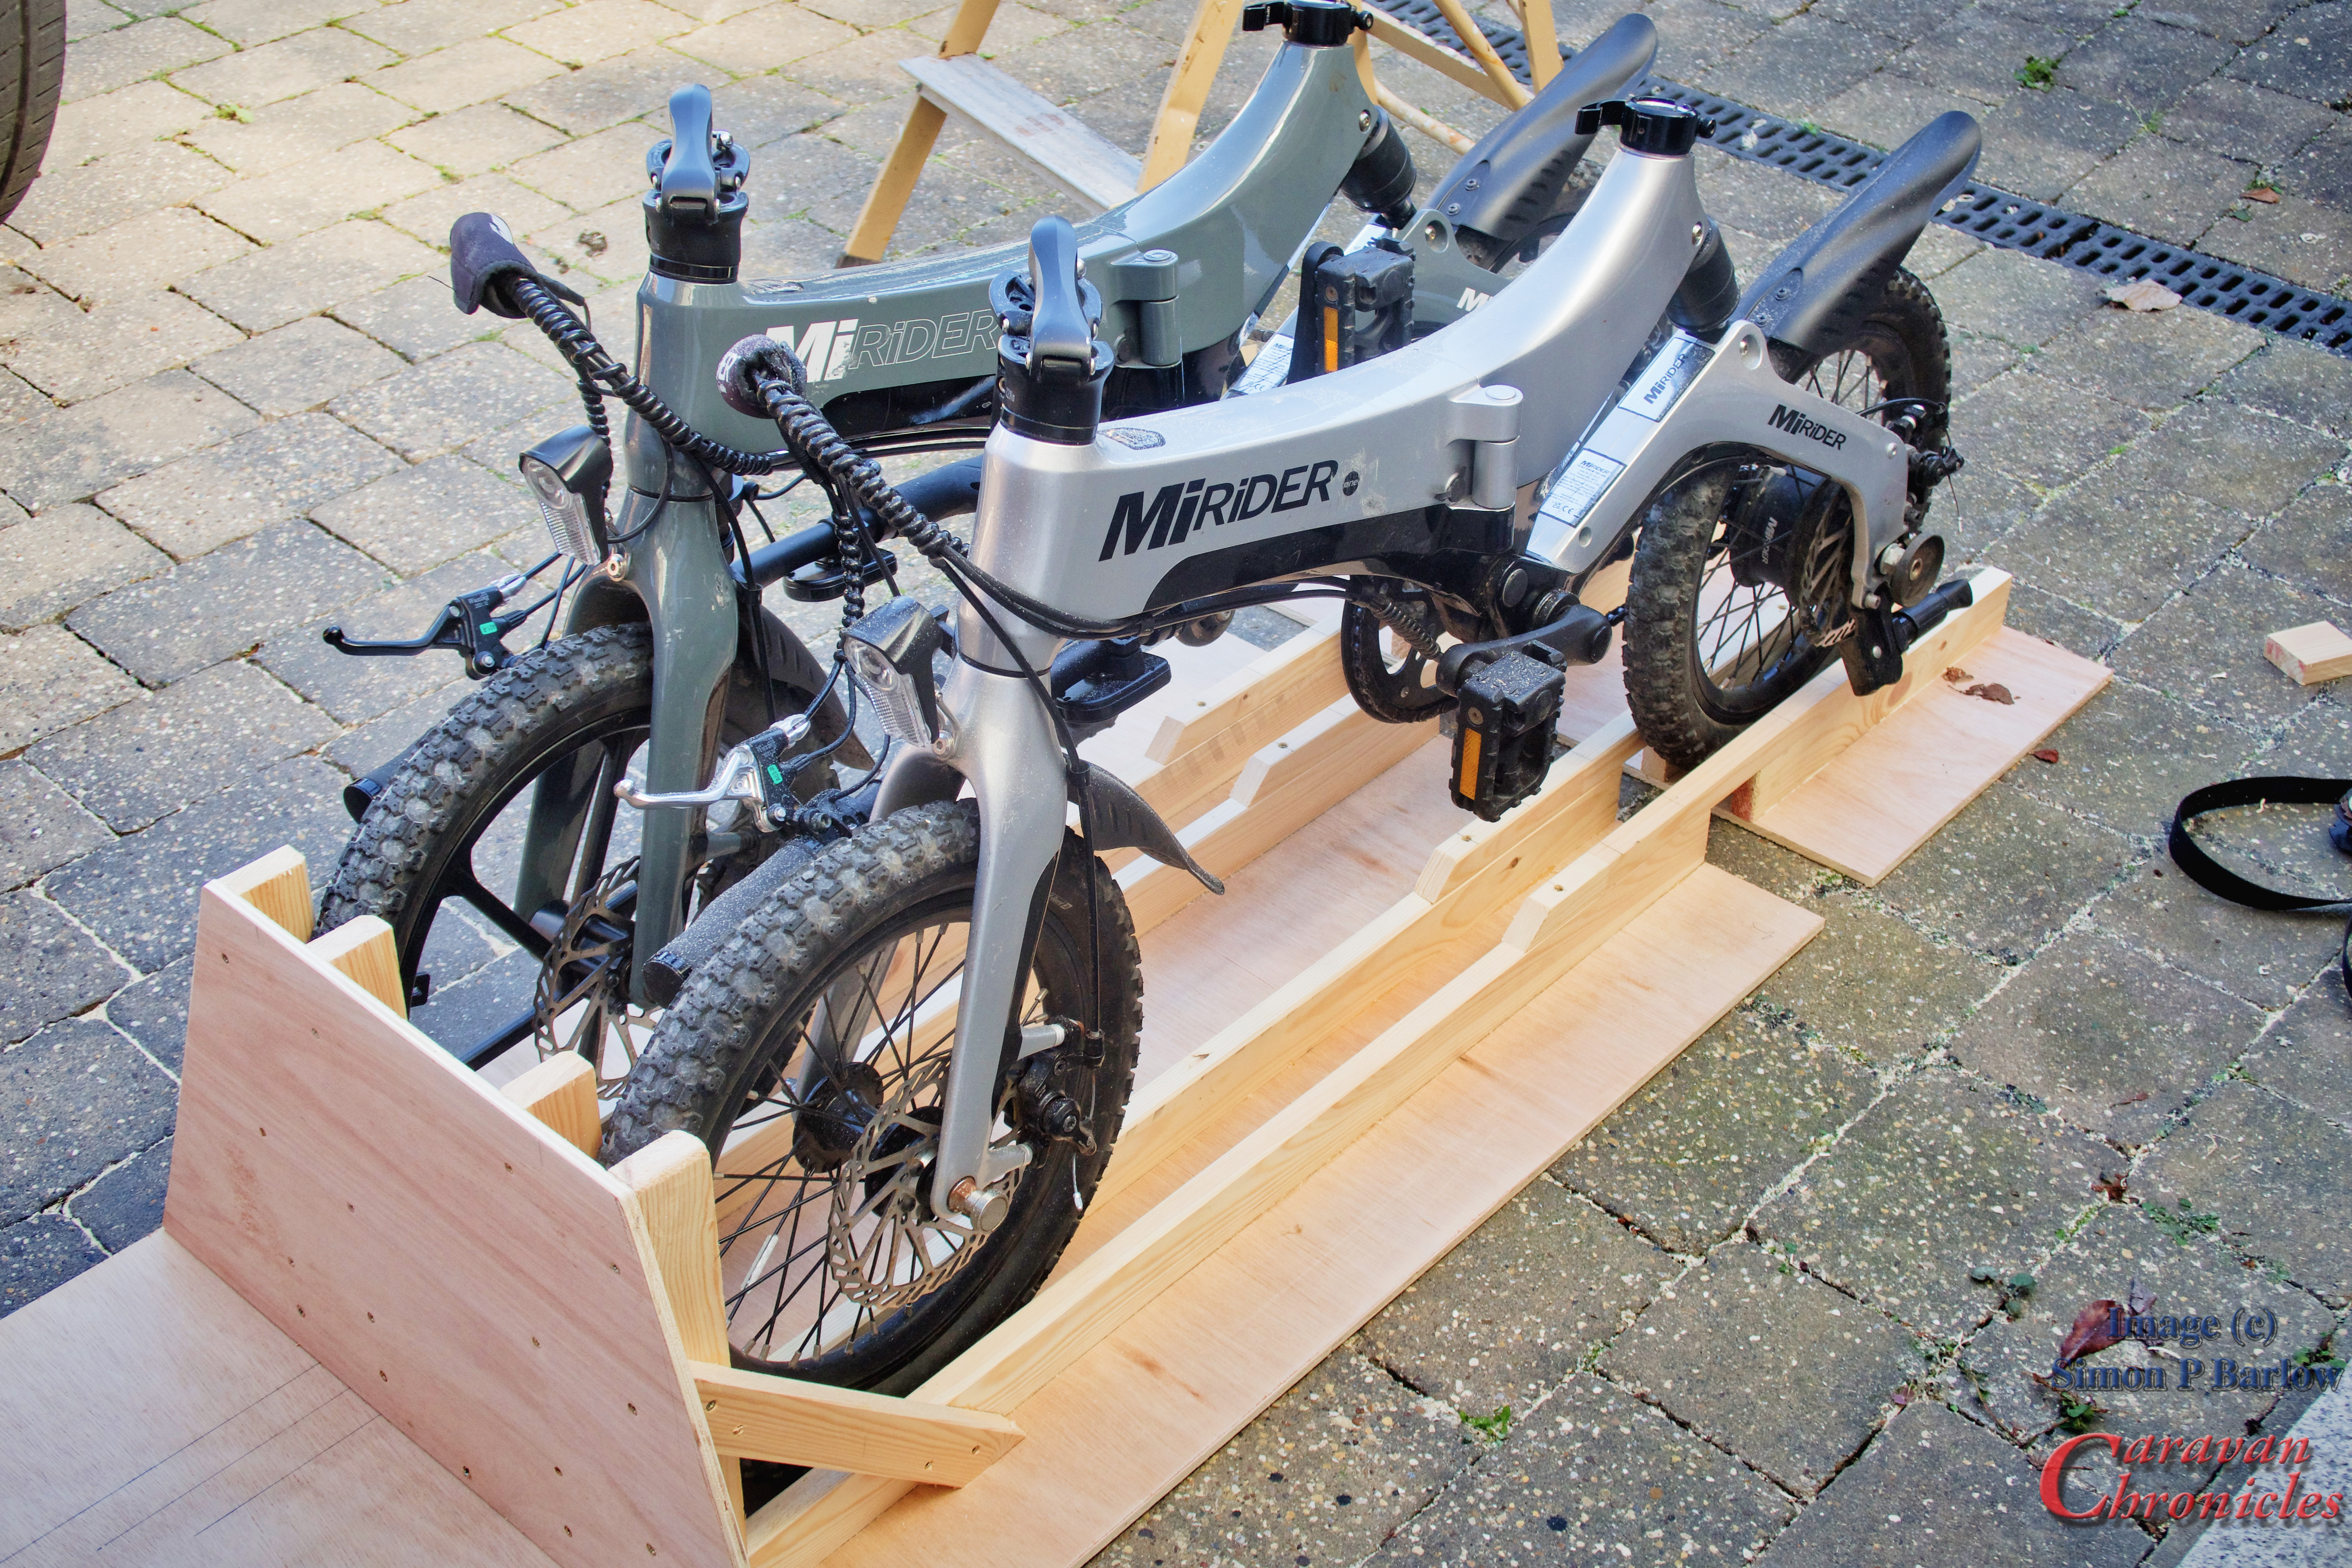
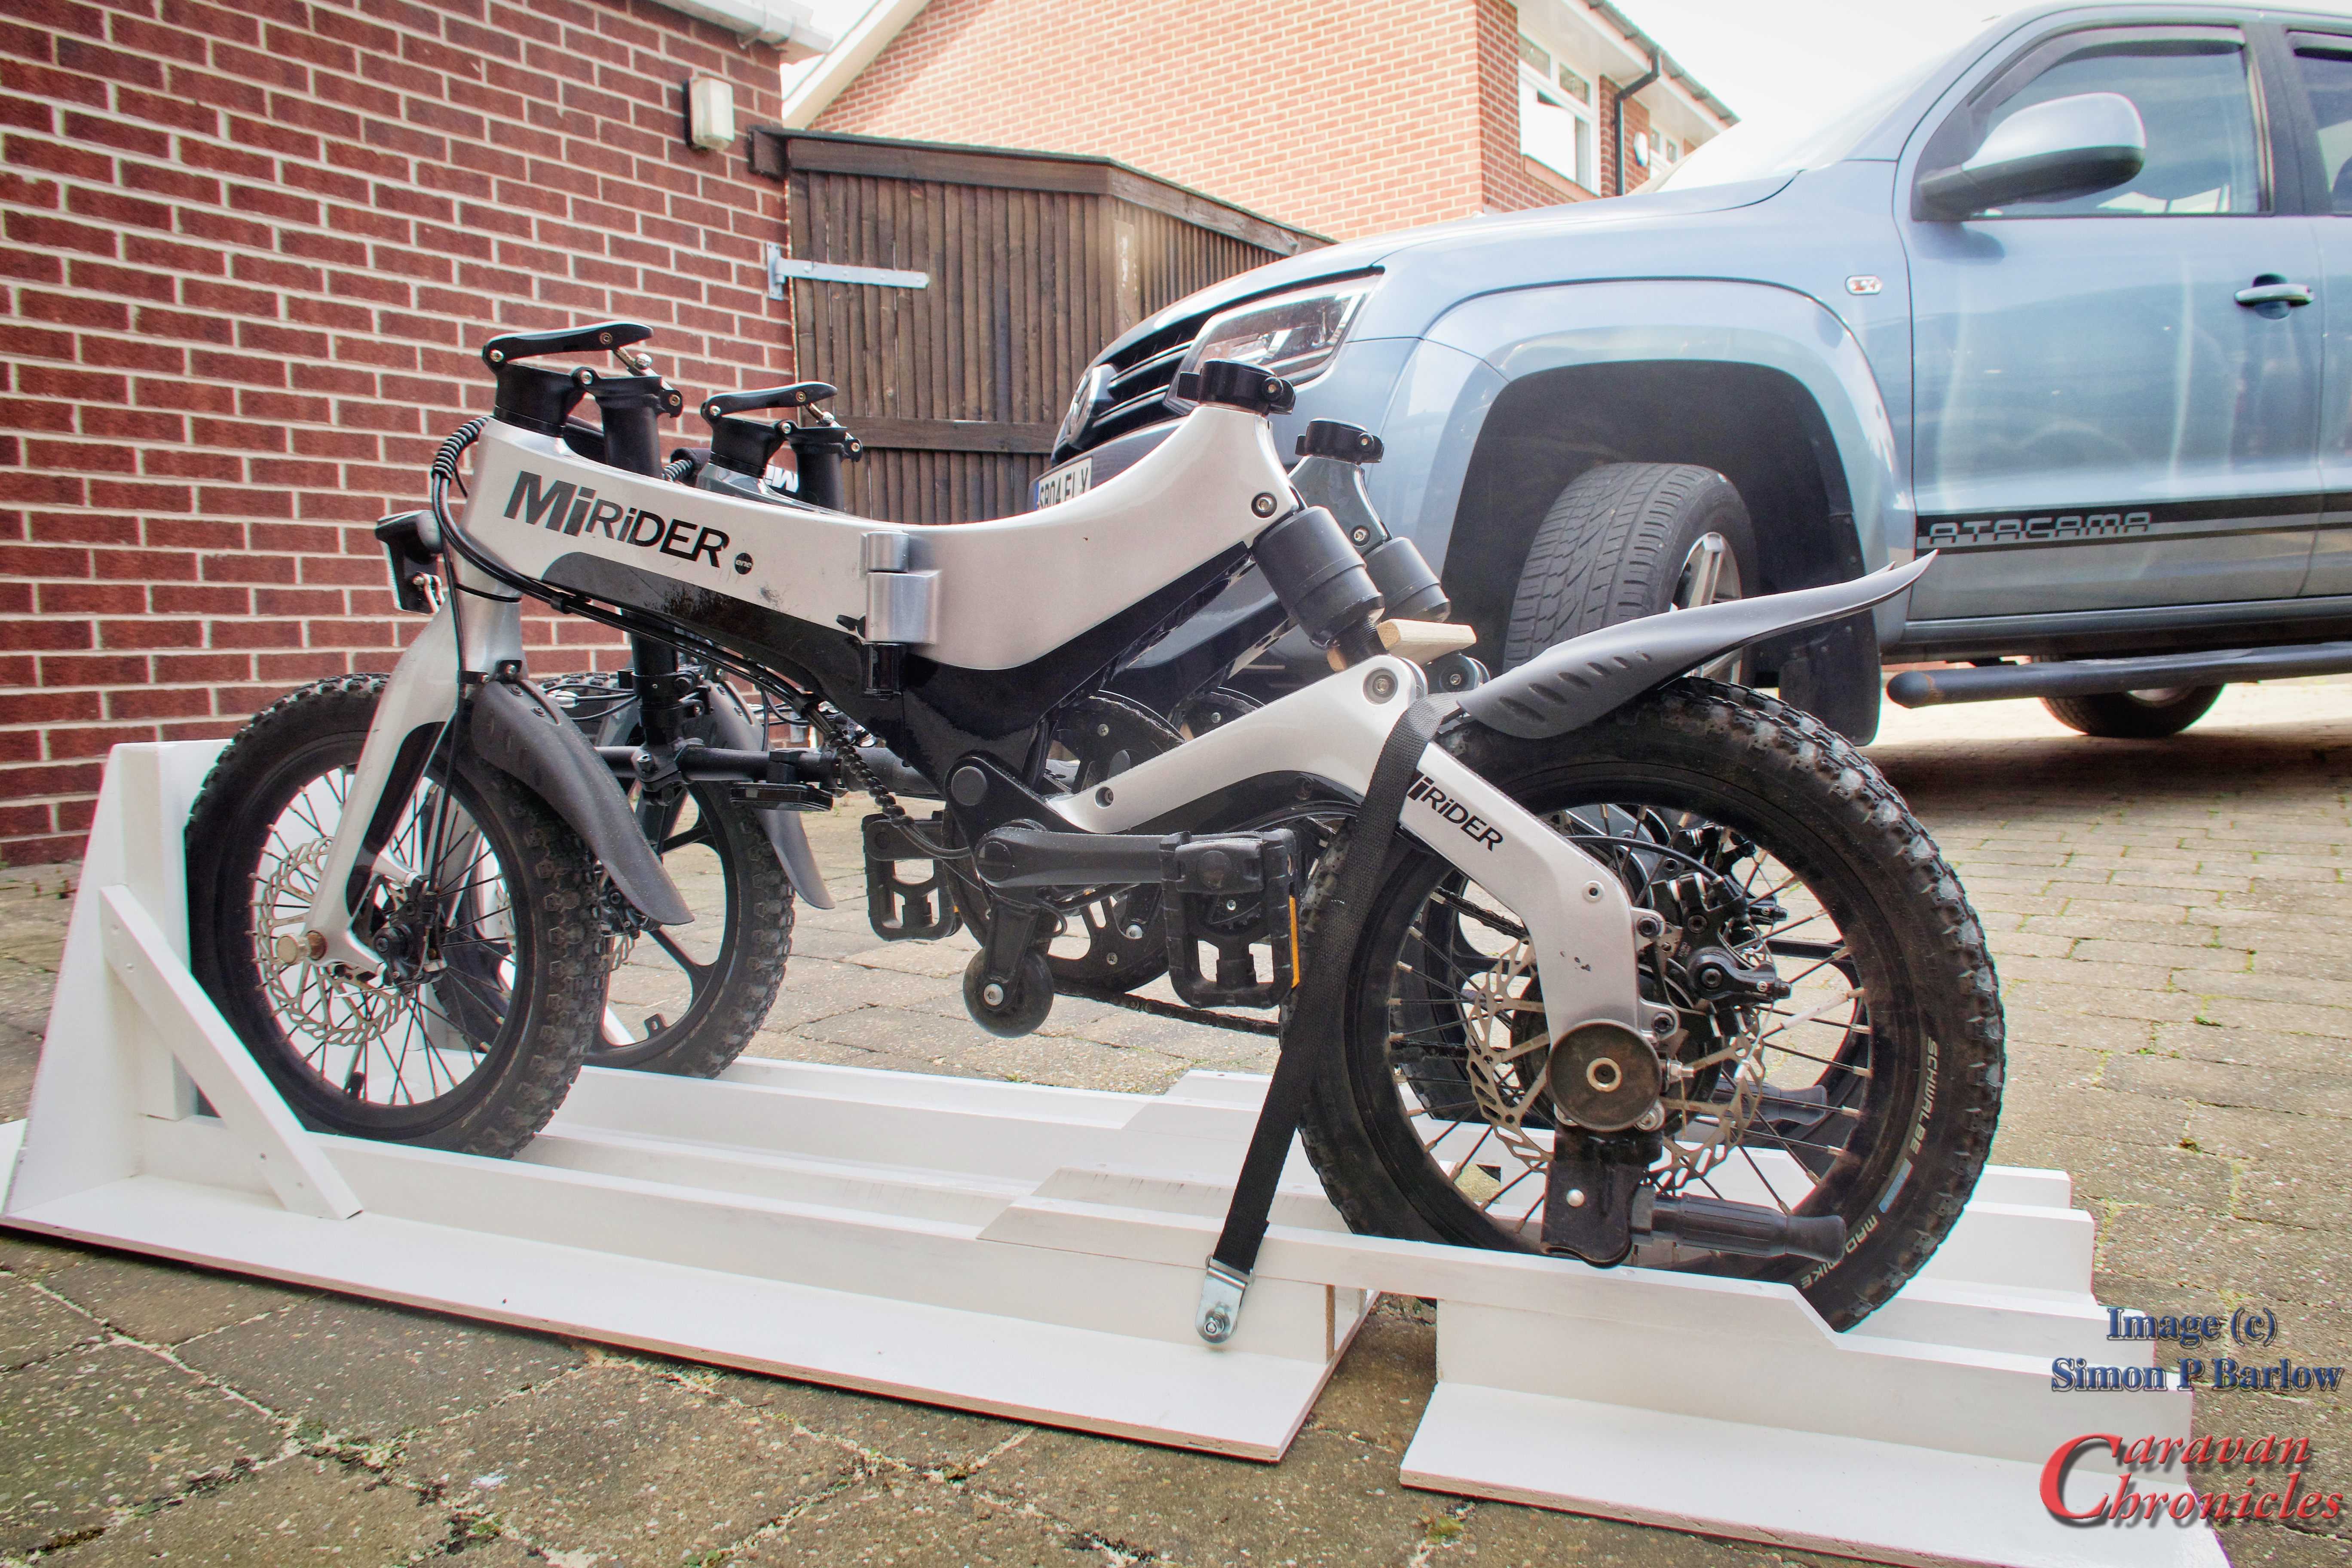
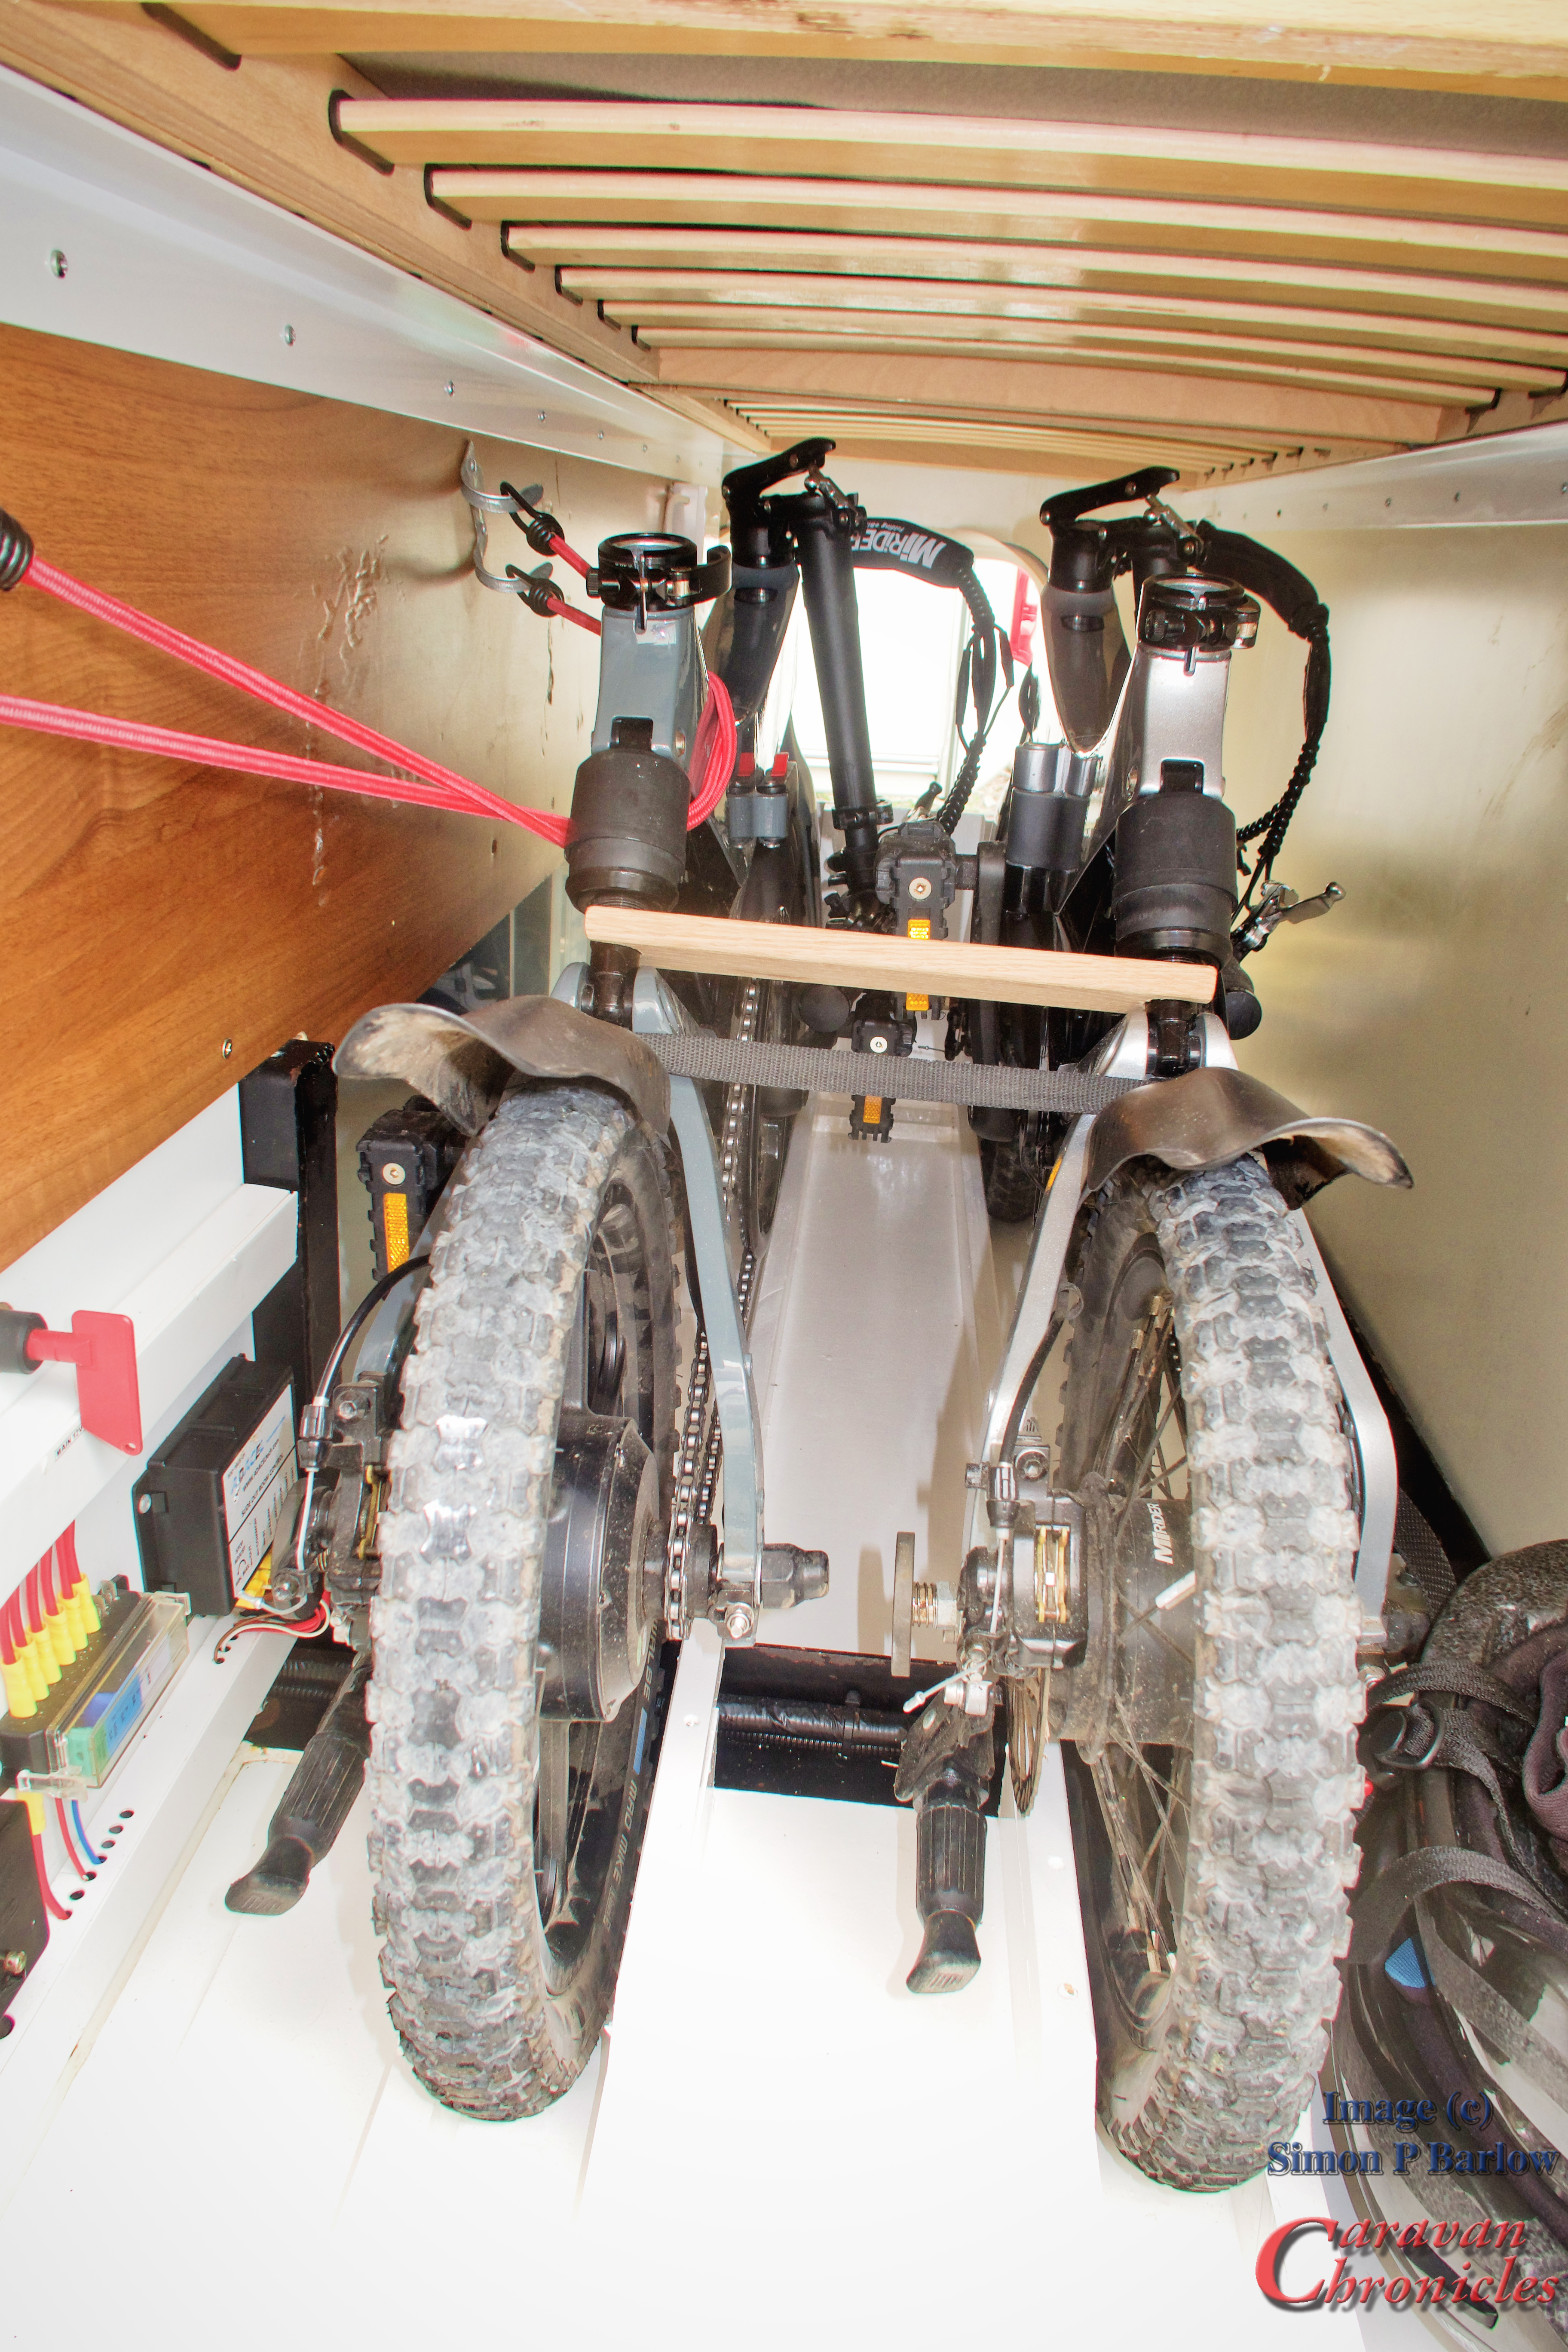
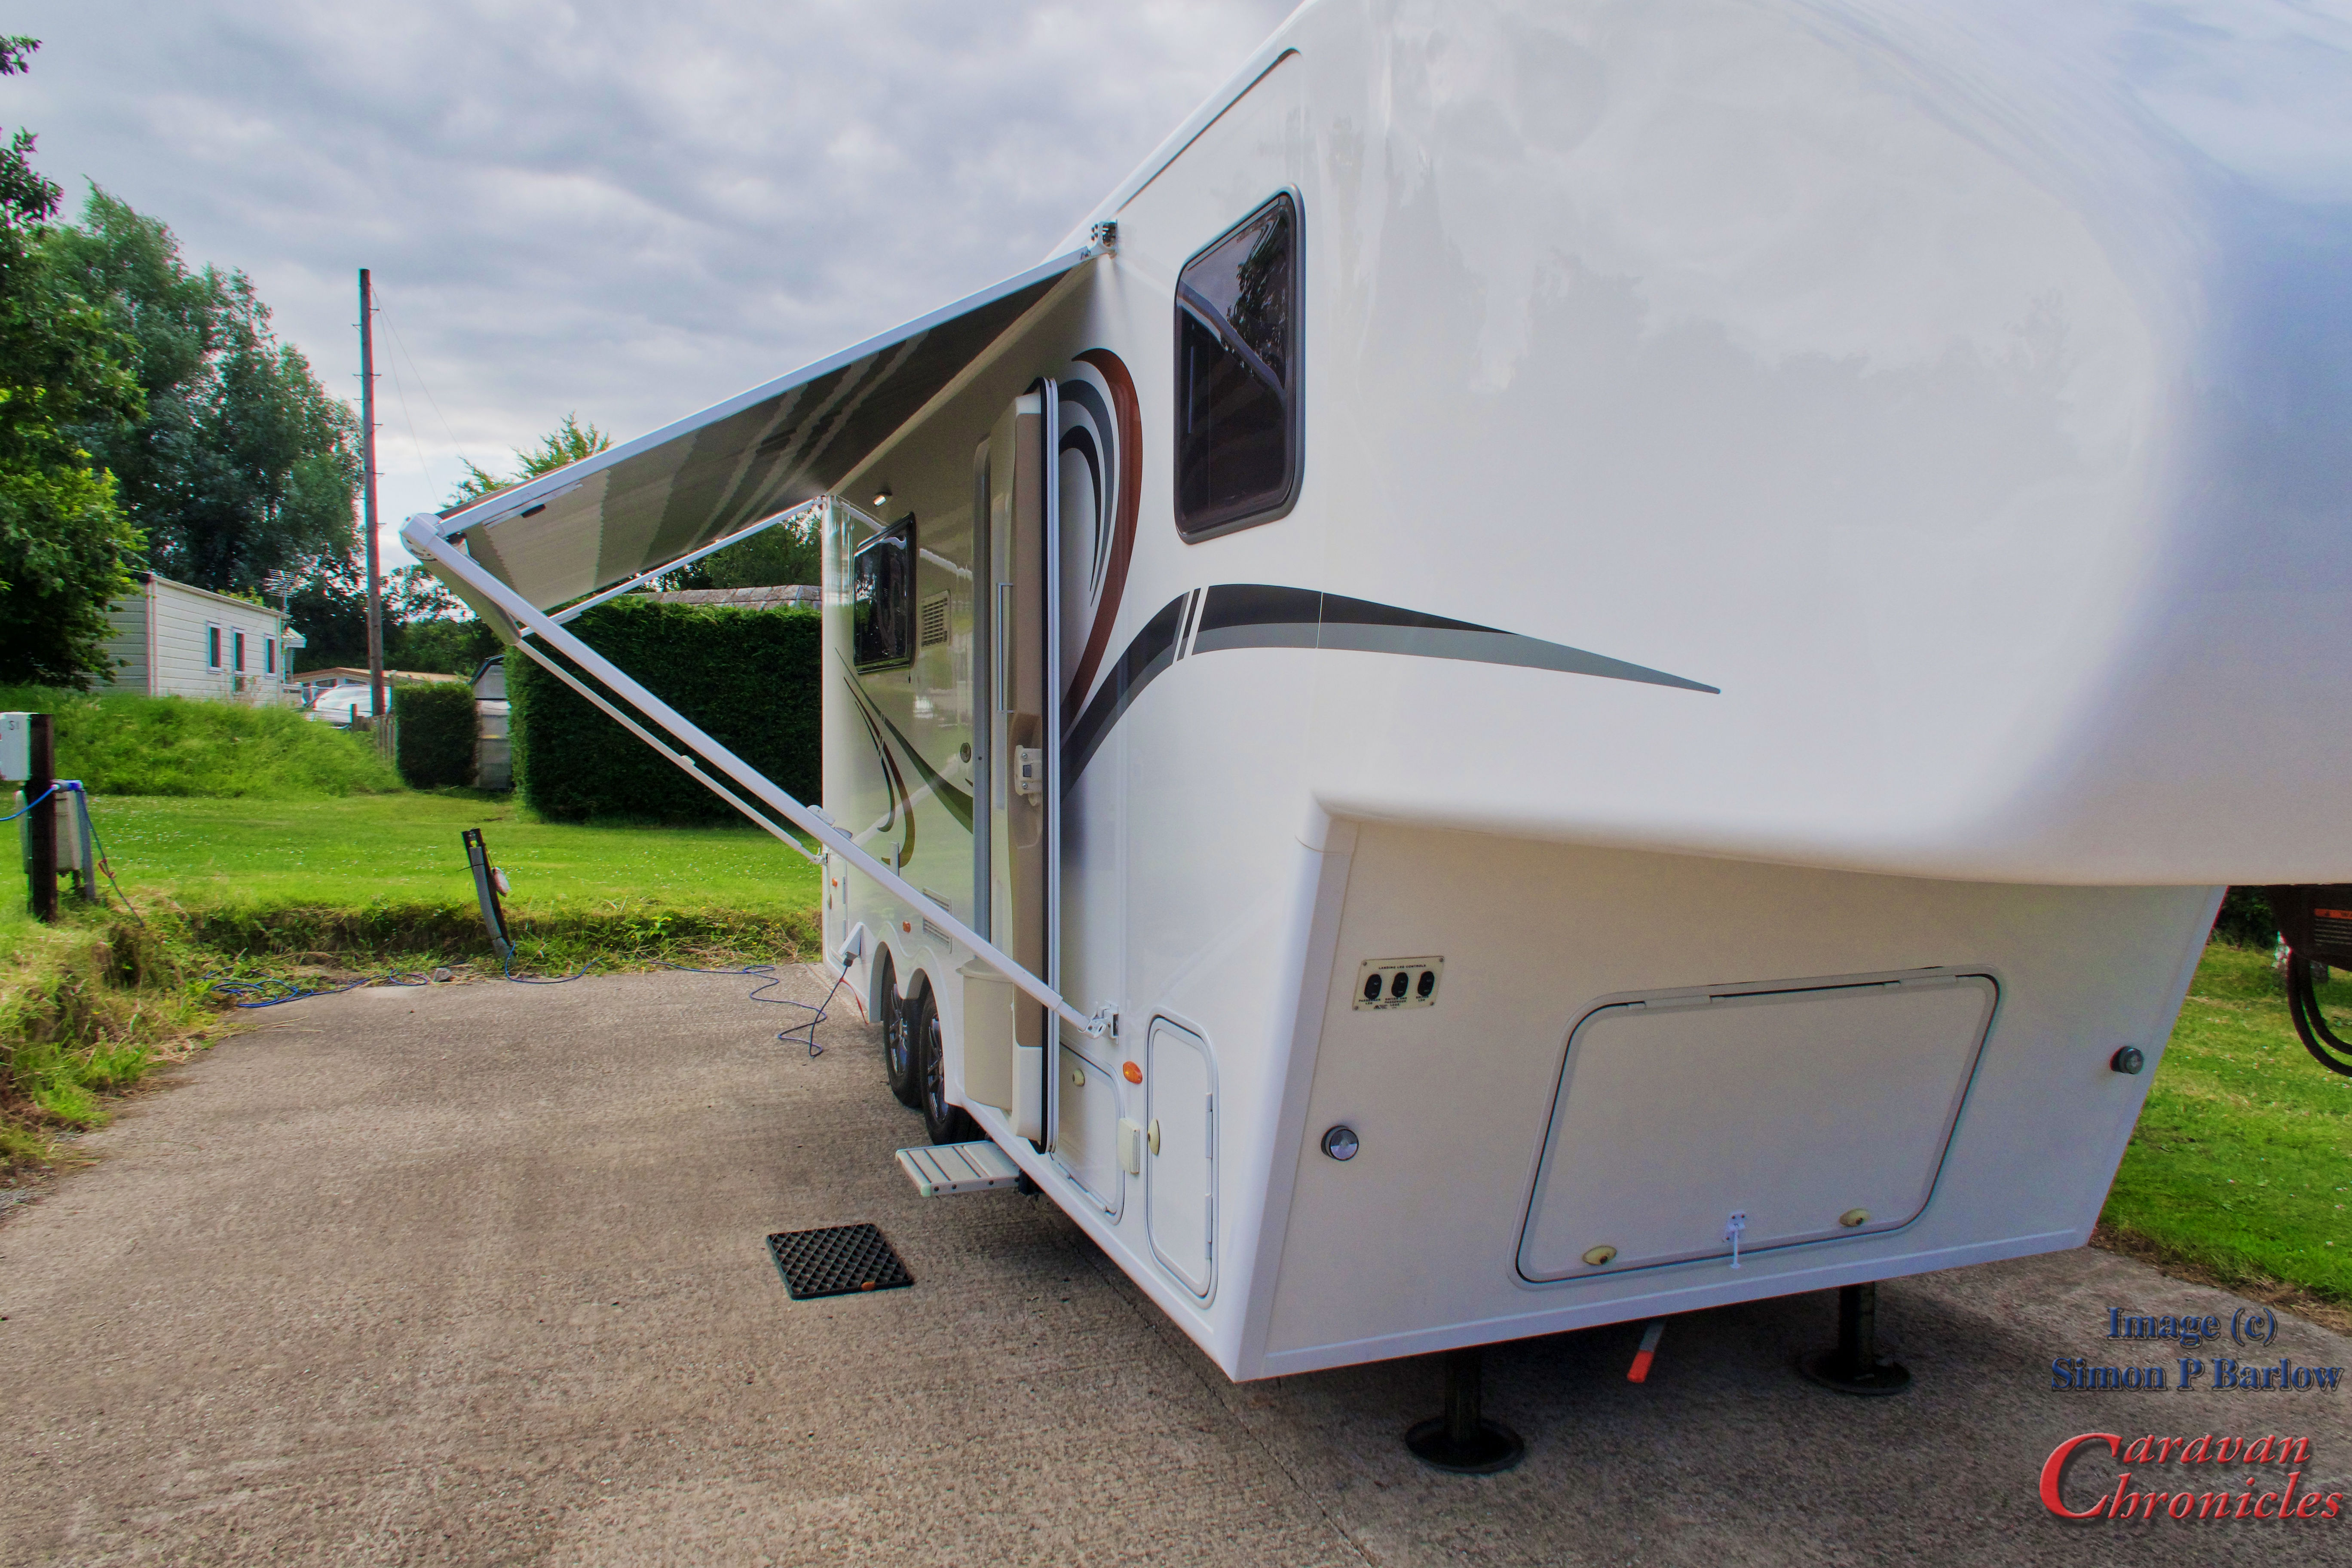
One of the huge advantages of having a 5th wheel caravan over a bumper pull caravan is the payload and space. It’s as good as a large motorhome… we have around 960Kg of payload available to use. One thing we wanted to do was move our two MiRider e-bikes into the ‘garage’ locker of the 5th wheel. Although I built a great rack for the VW Amarok towing a 5th wheel means I had to take that off. When I designed it I aways wanted it easily removable just in case I ever needed the full capacity of the pickup.
The garage space in the Dream Seeker is big enough to fit the two bikes without having to remove any wheels. On the pickup we already removed the seats and dropped the folding handlebars so this is the same with the garage space. I needed something that would allow me to ‘wheel’ the bikes in keeping the front wheels straight and at the same time retaining either one of the bikes in an up right position while the second bike is loaded.
I wanted something that could be installed and removed easily and could also be used in my workshop to store the bikes if required.
After a bit of mooching around the workshop I initially thought of using an old bike rack we had for the rear of our Land Rover Freelander…. a day spent disassembling and reassembling resulted in a heavy and awkward contraption that didn’t really do anything I wanted except hold the bikes.
Mk II
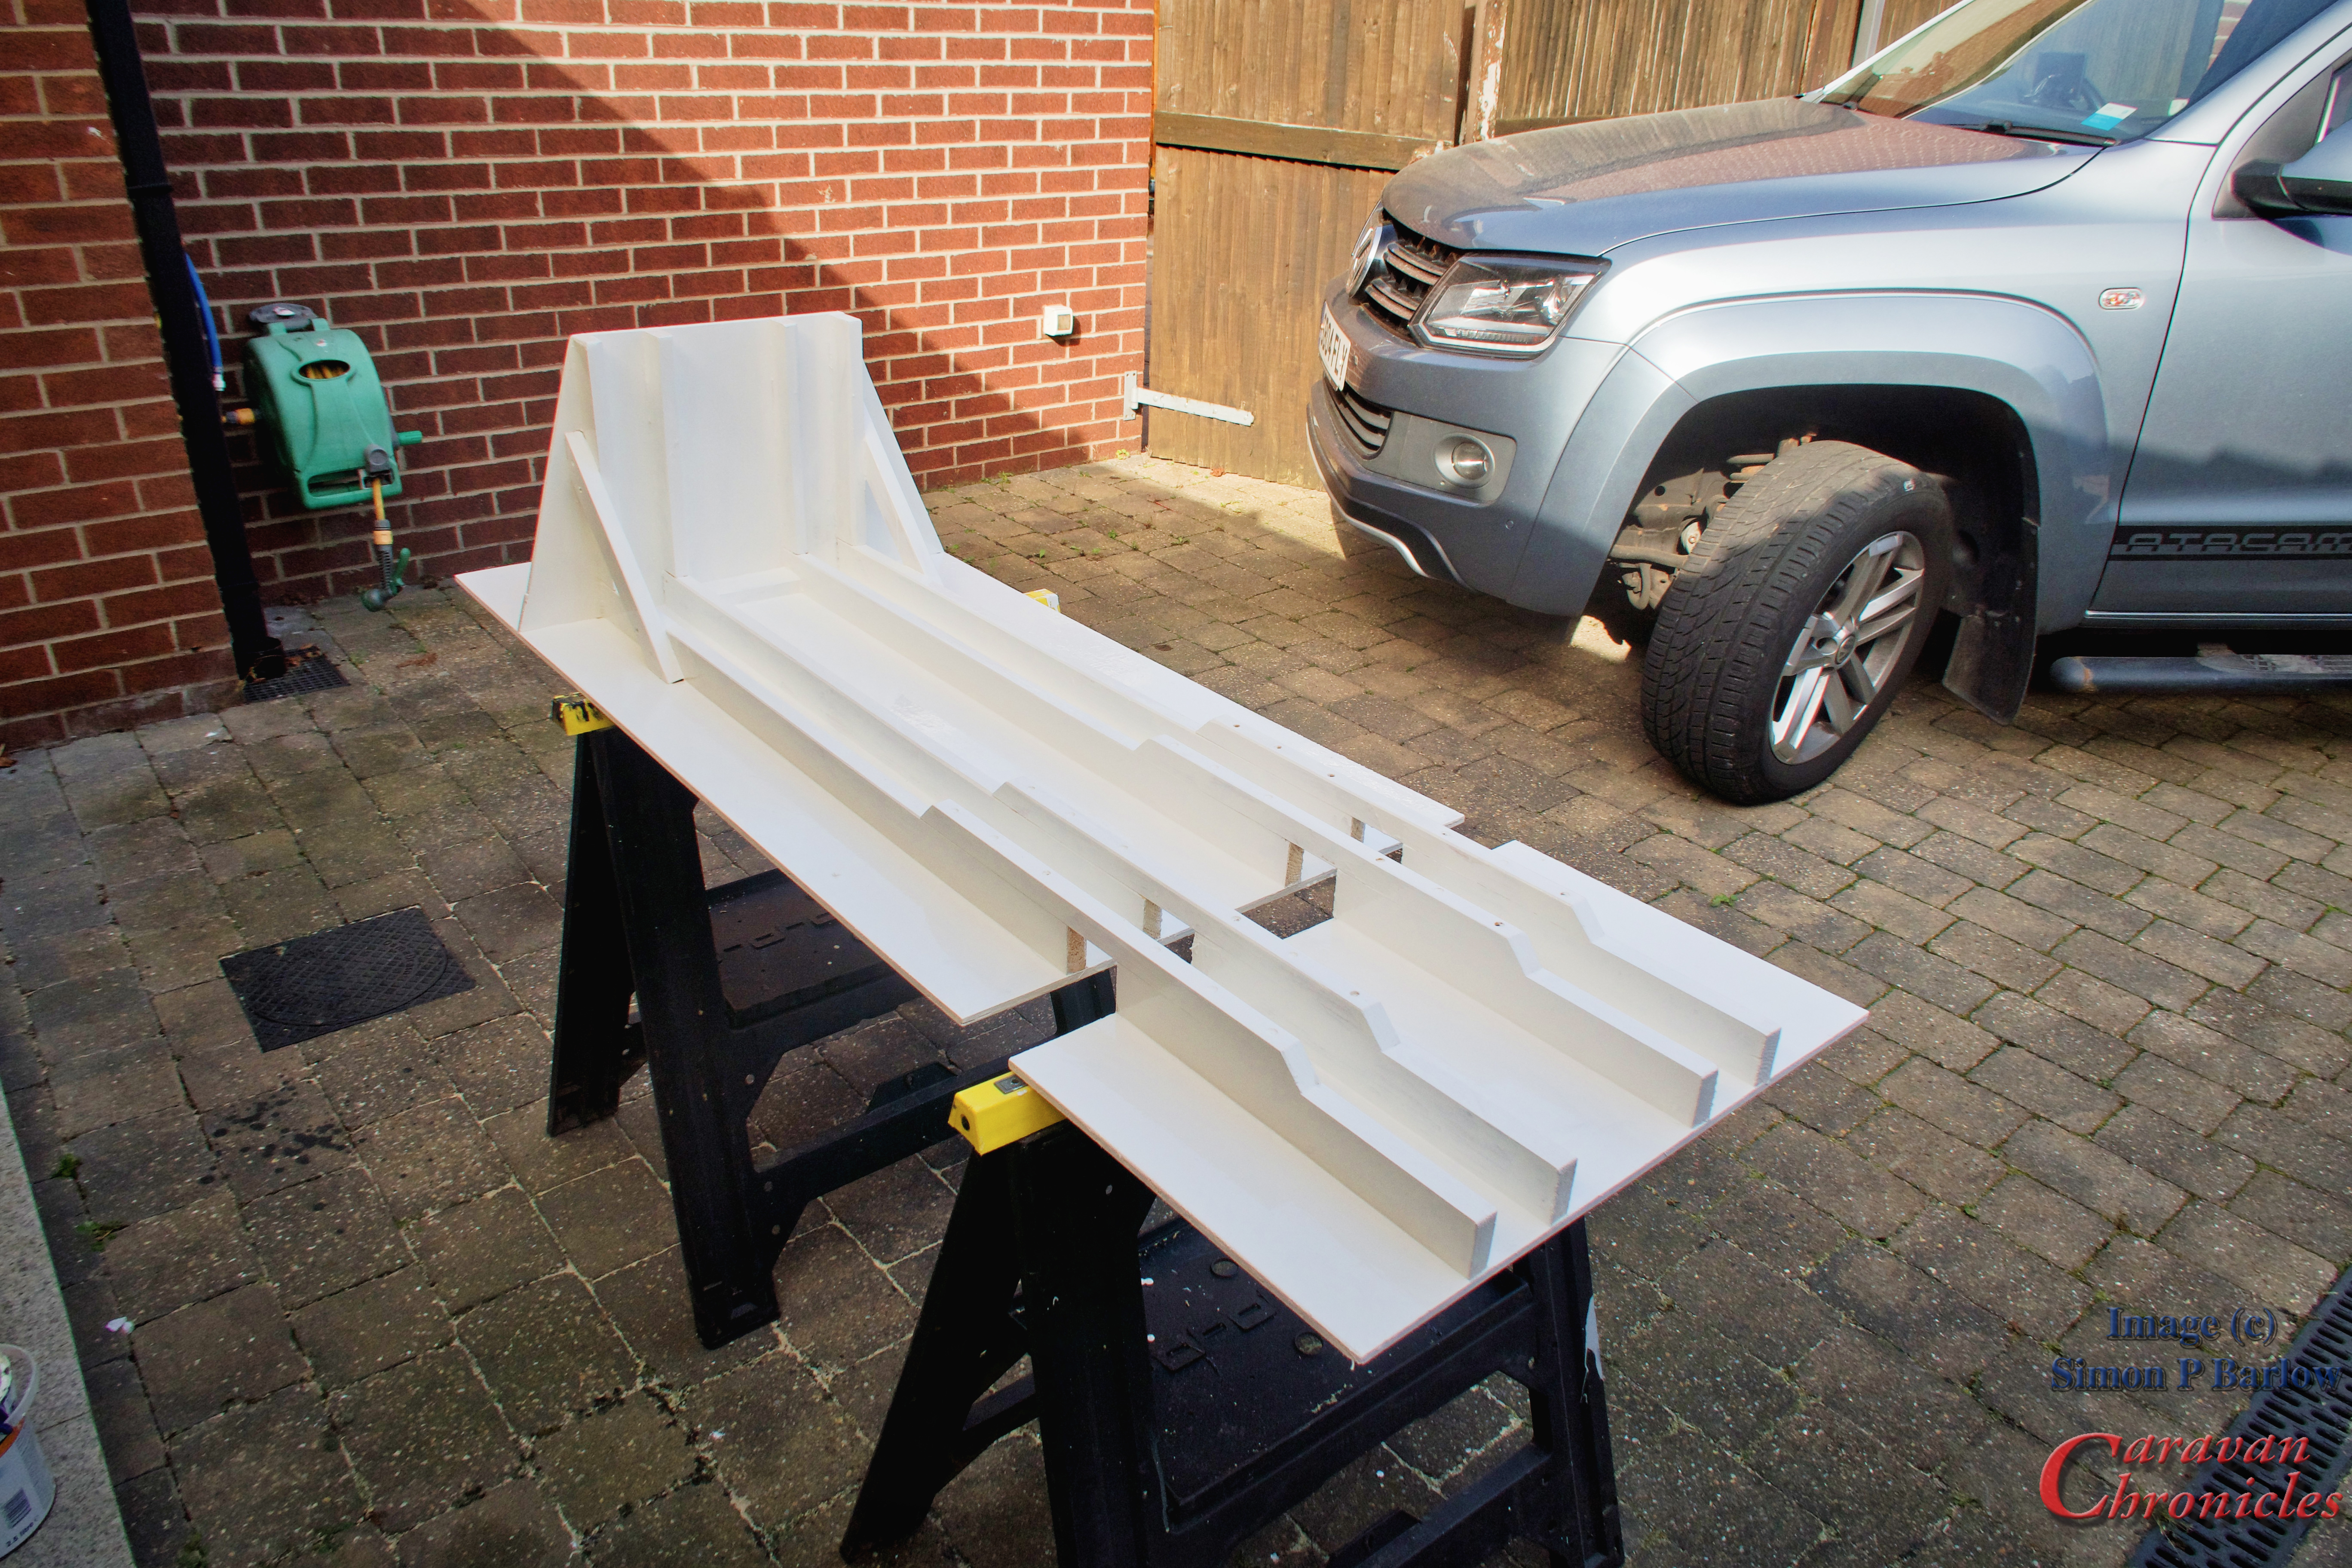
OK, time for coffee and a rethink. Day two. A flat sheet with rails seemed like a good start…. with a small end wall to stop the bikes going in to far…. extend the rails up the wall to hold the front wheels upright would work. I needed to leave a gap for part of the steel chassis of the 5th wheel…. a plan was forming… more coffee.
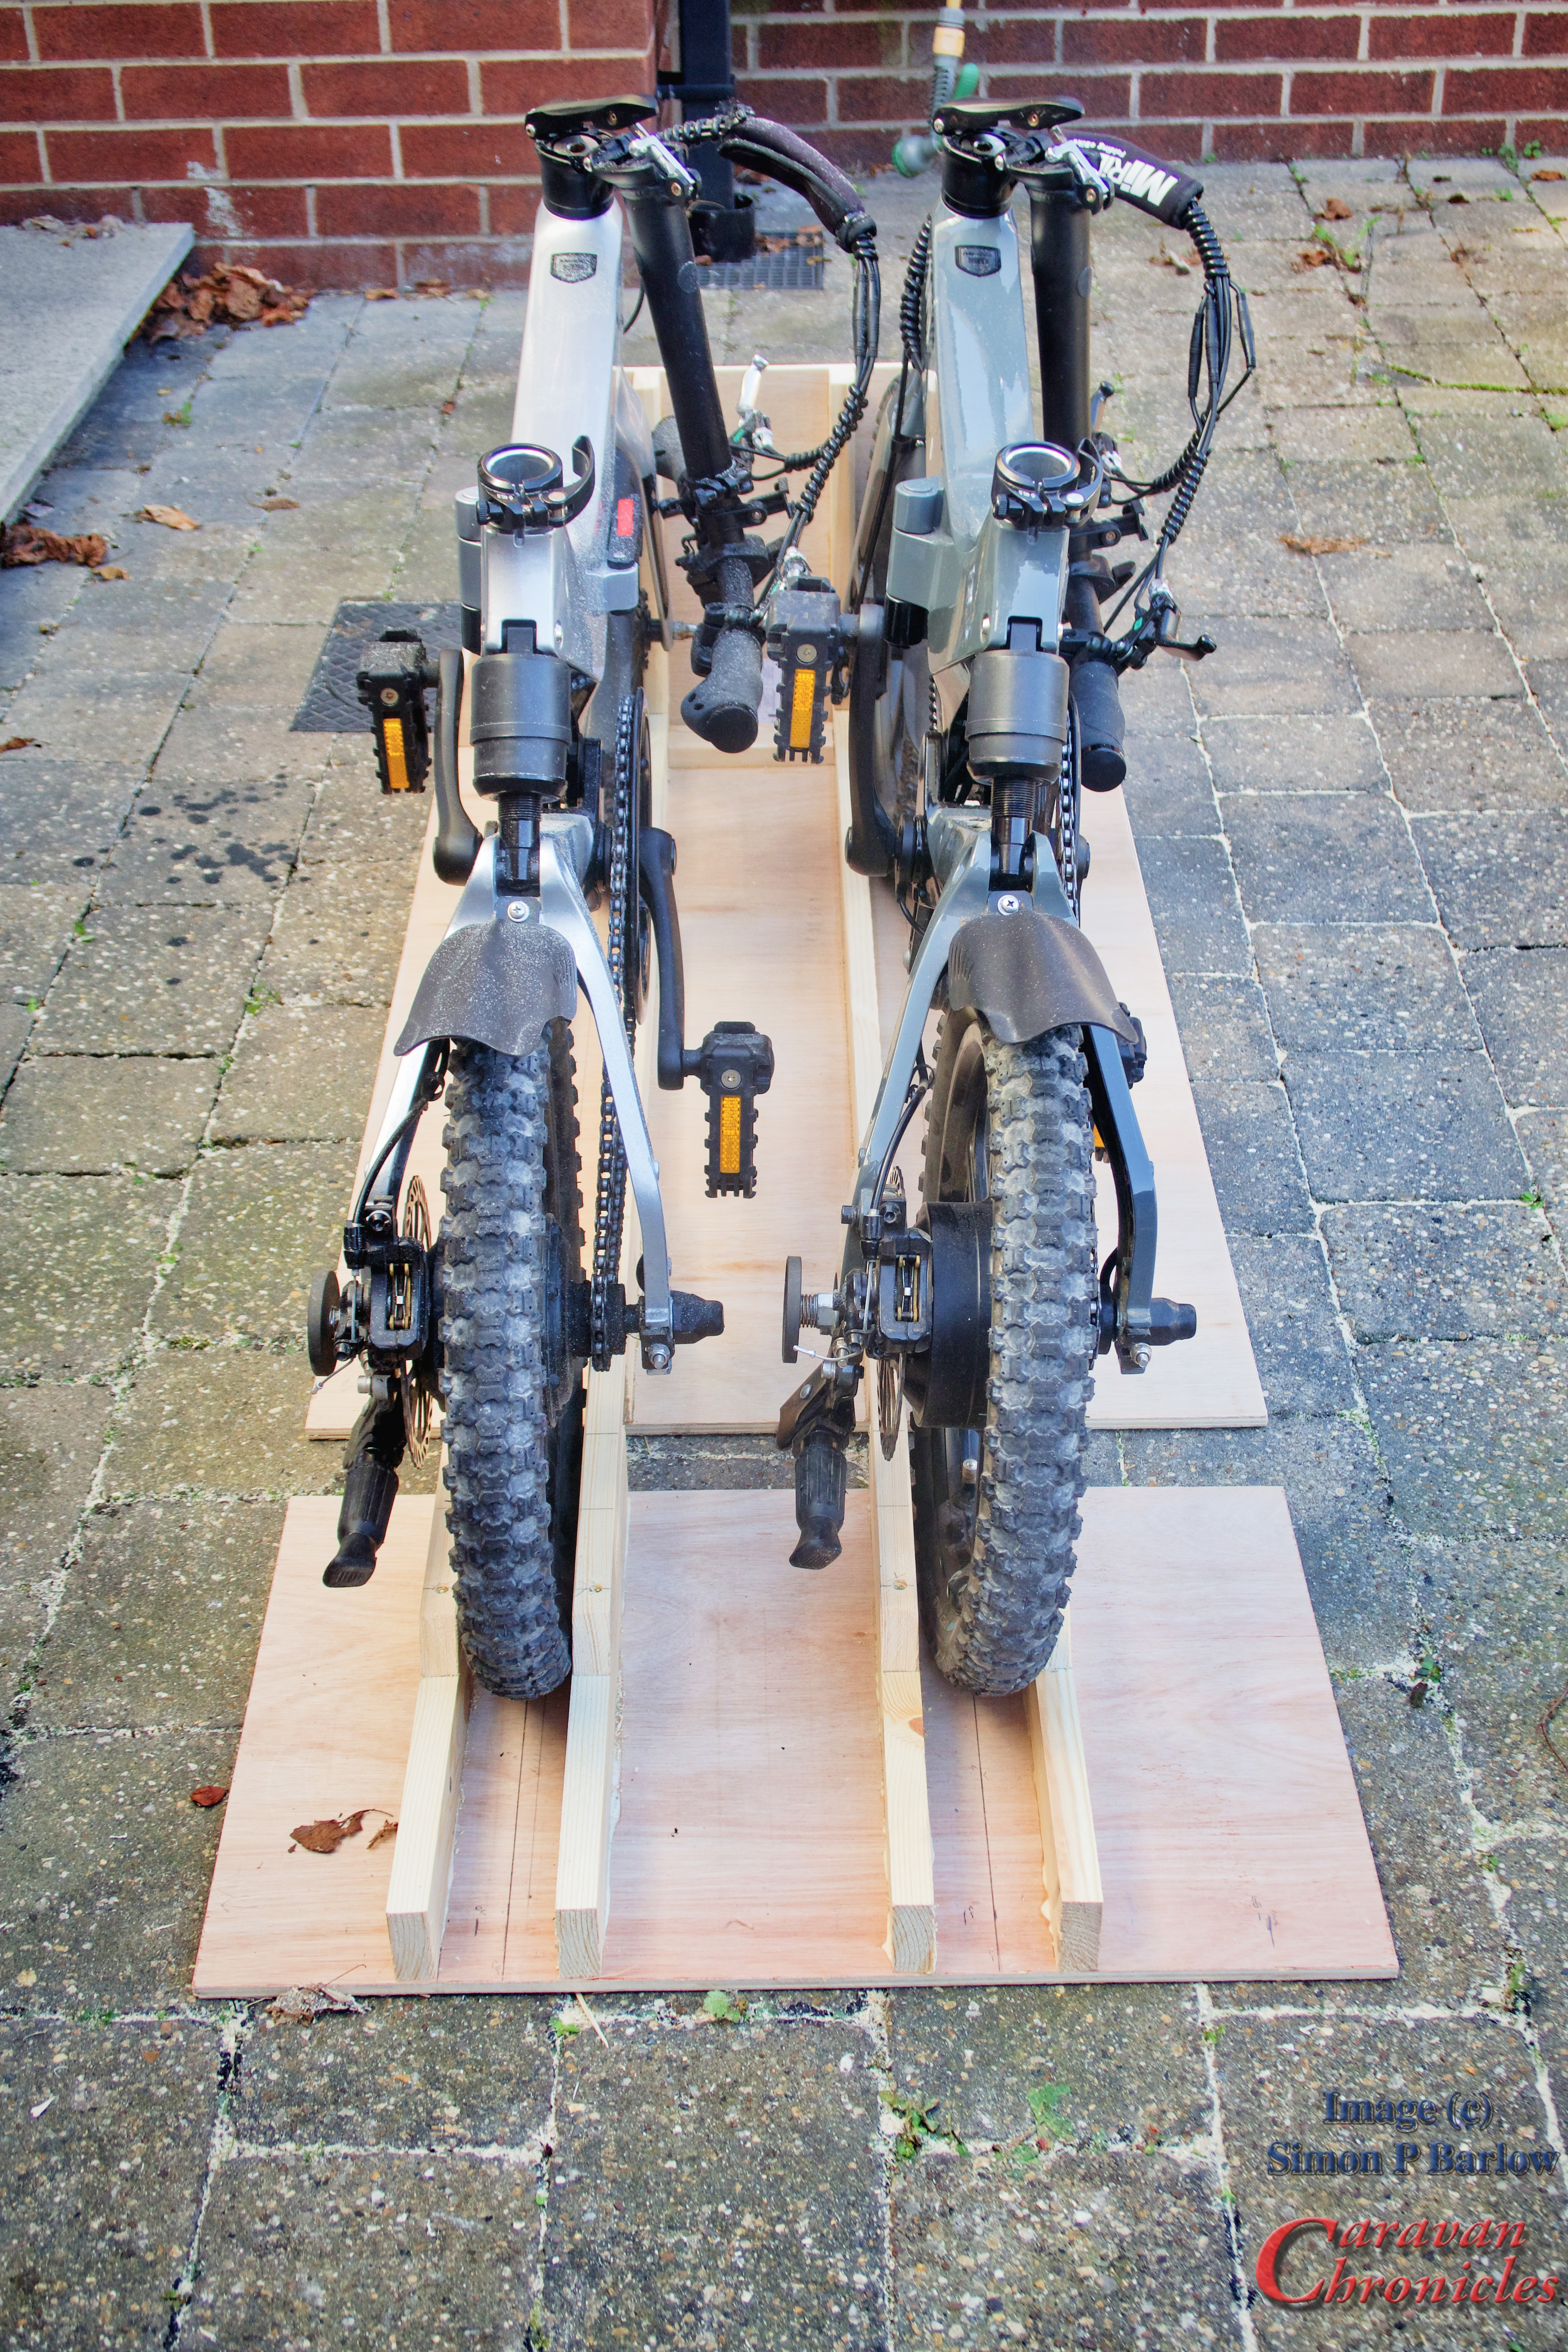
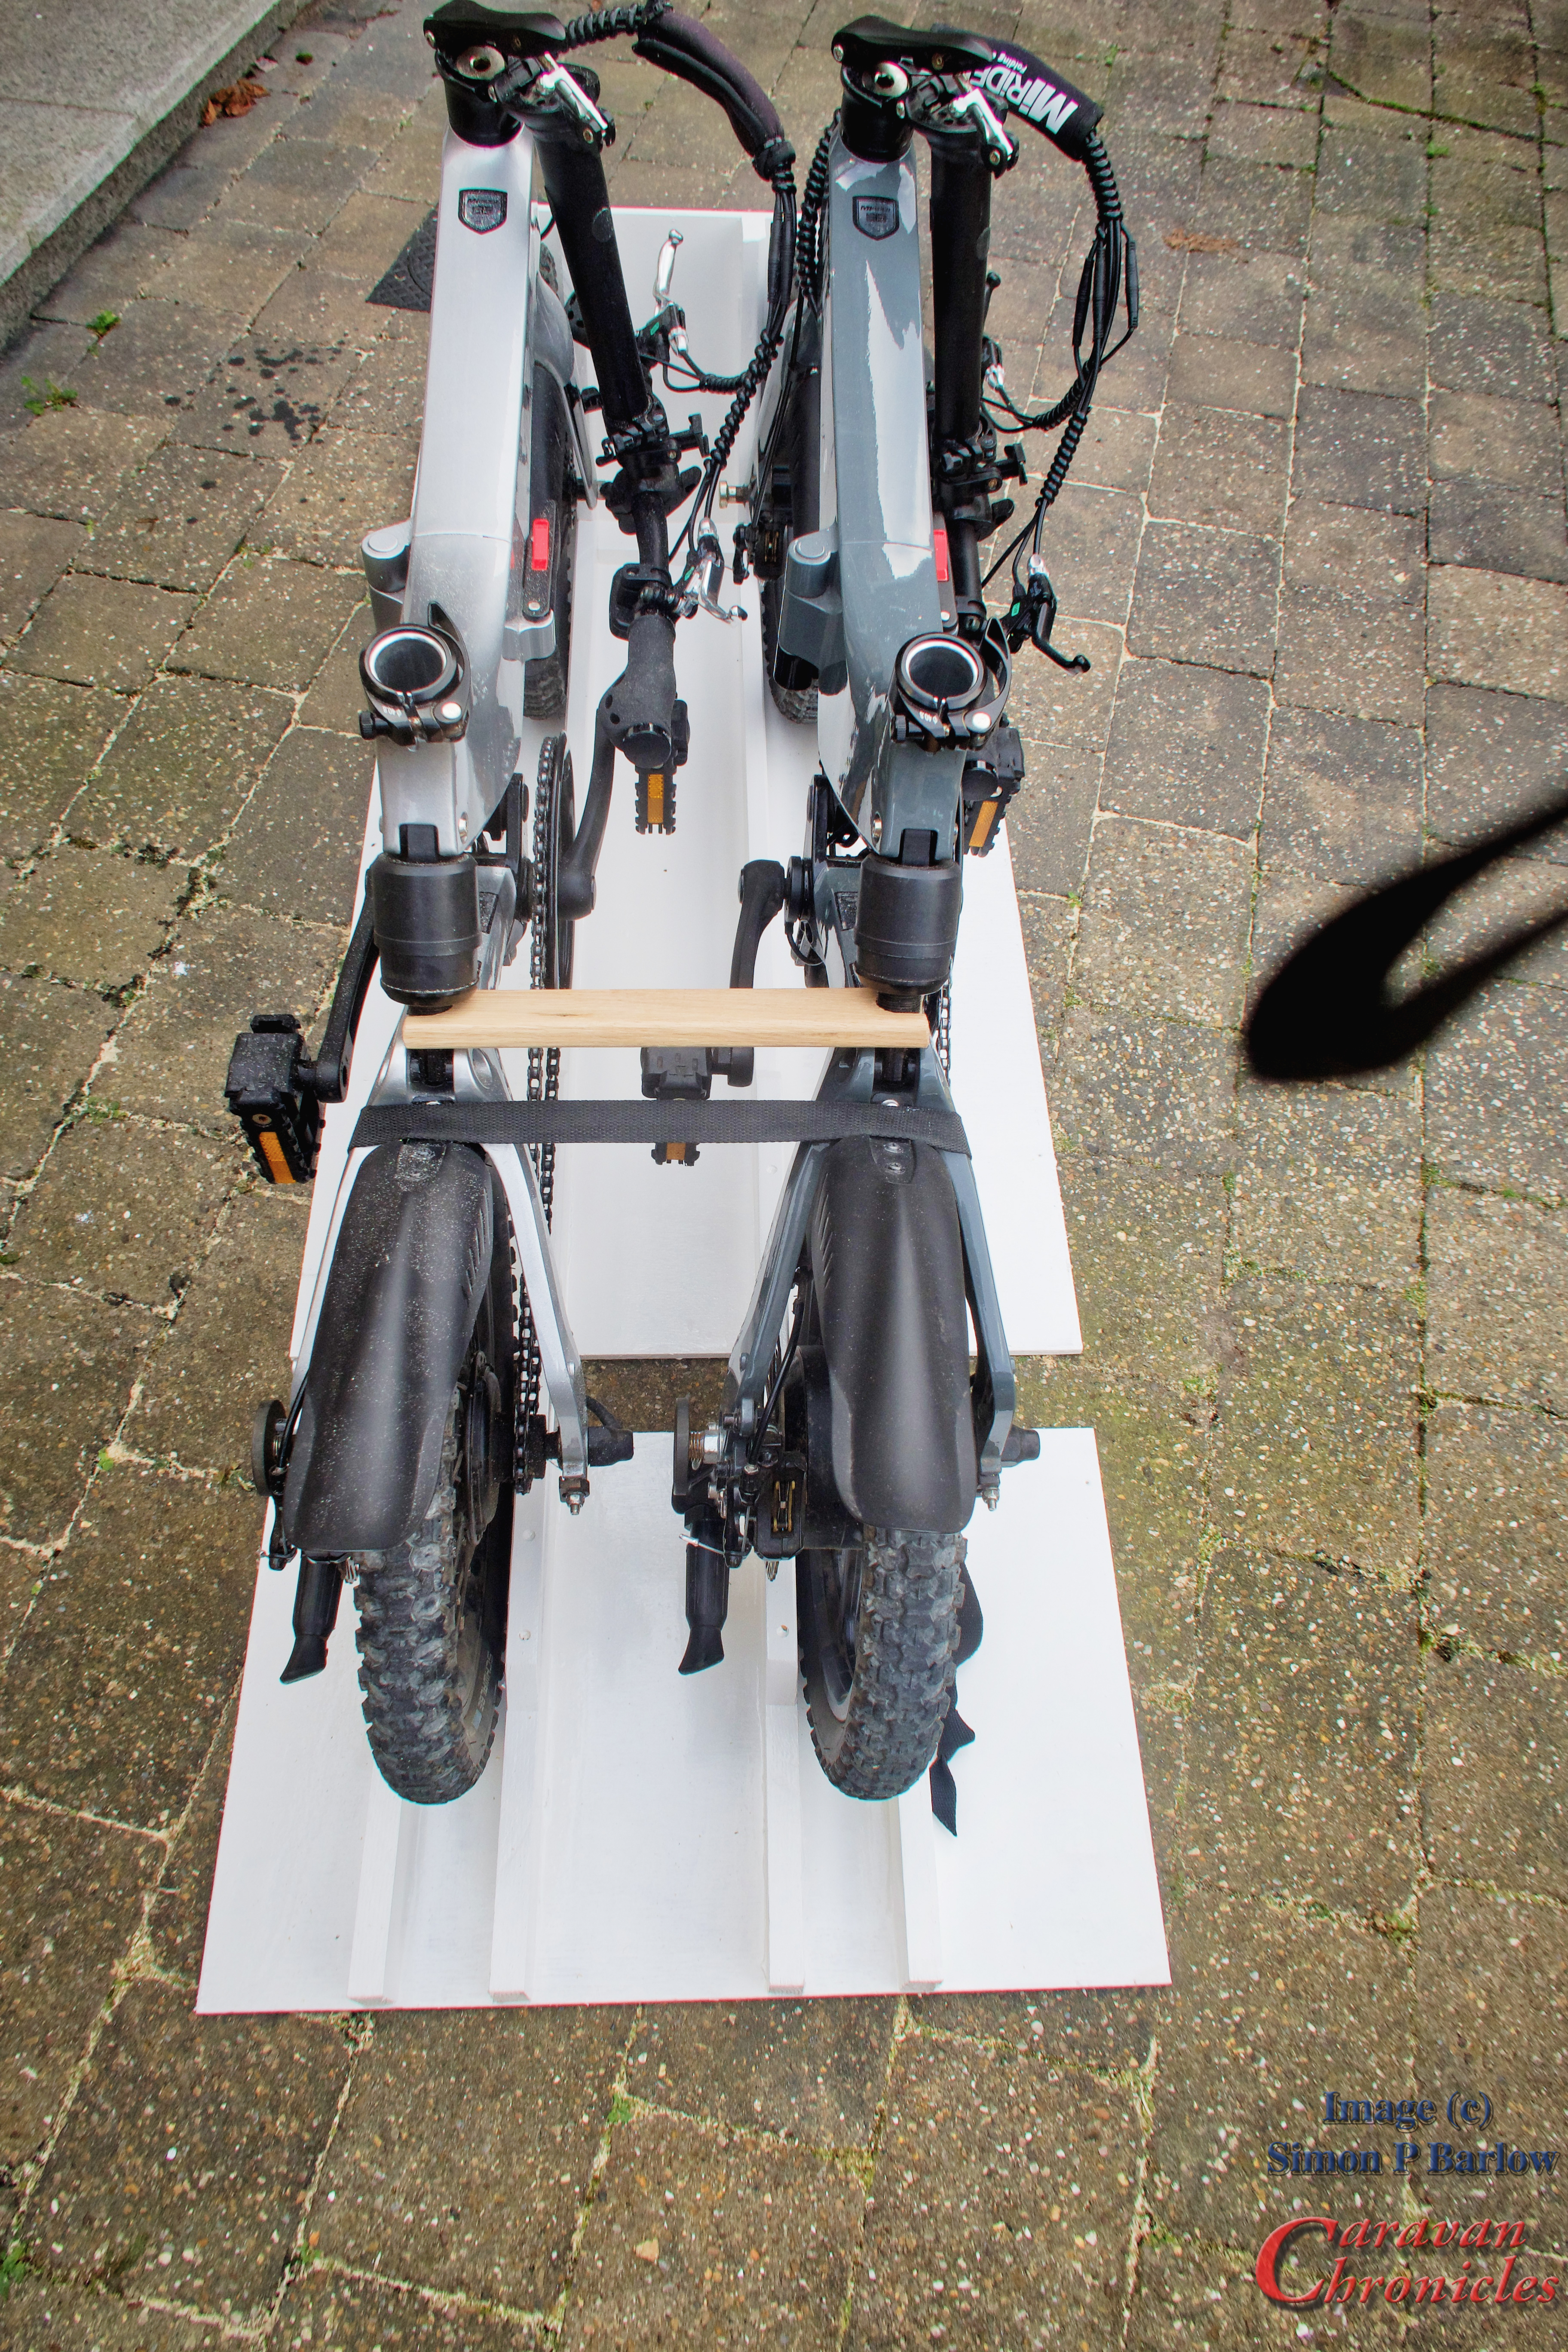
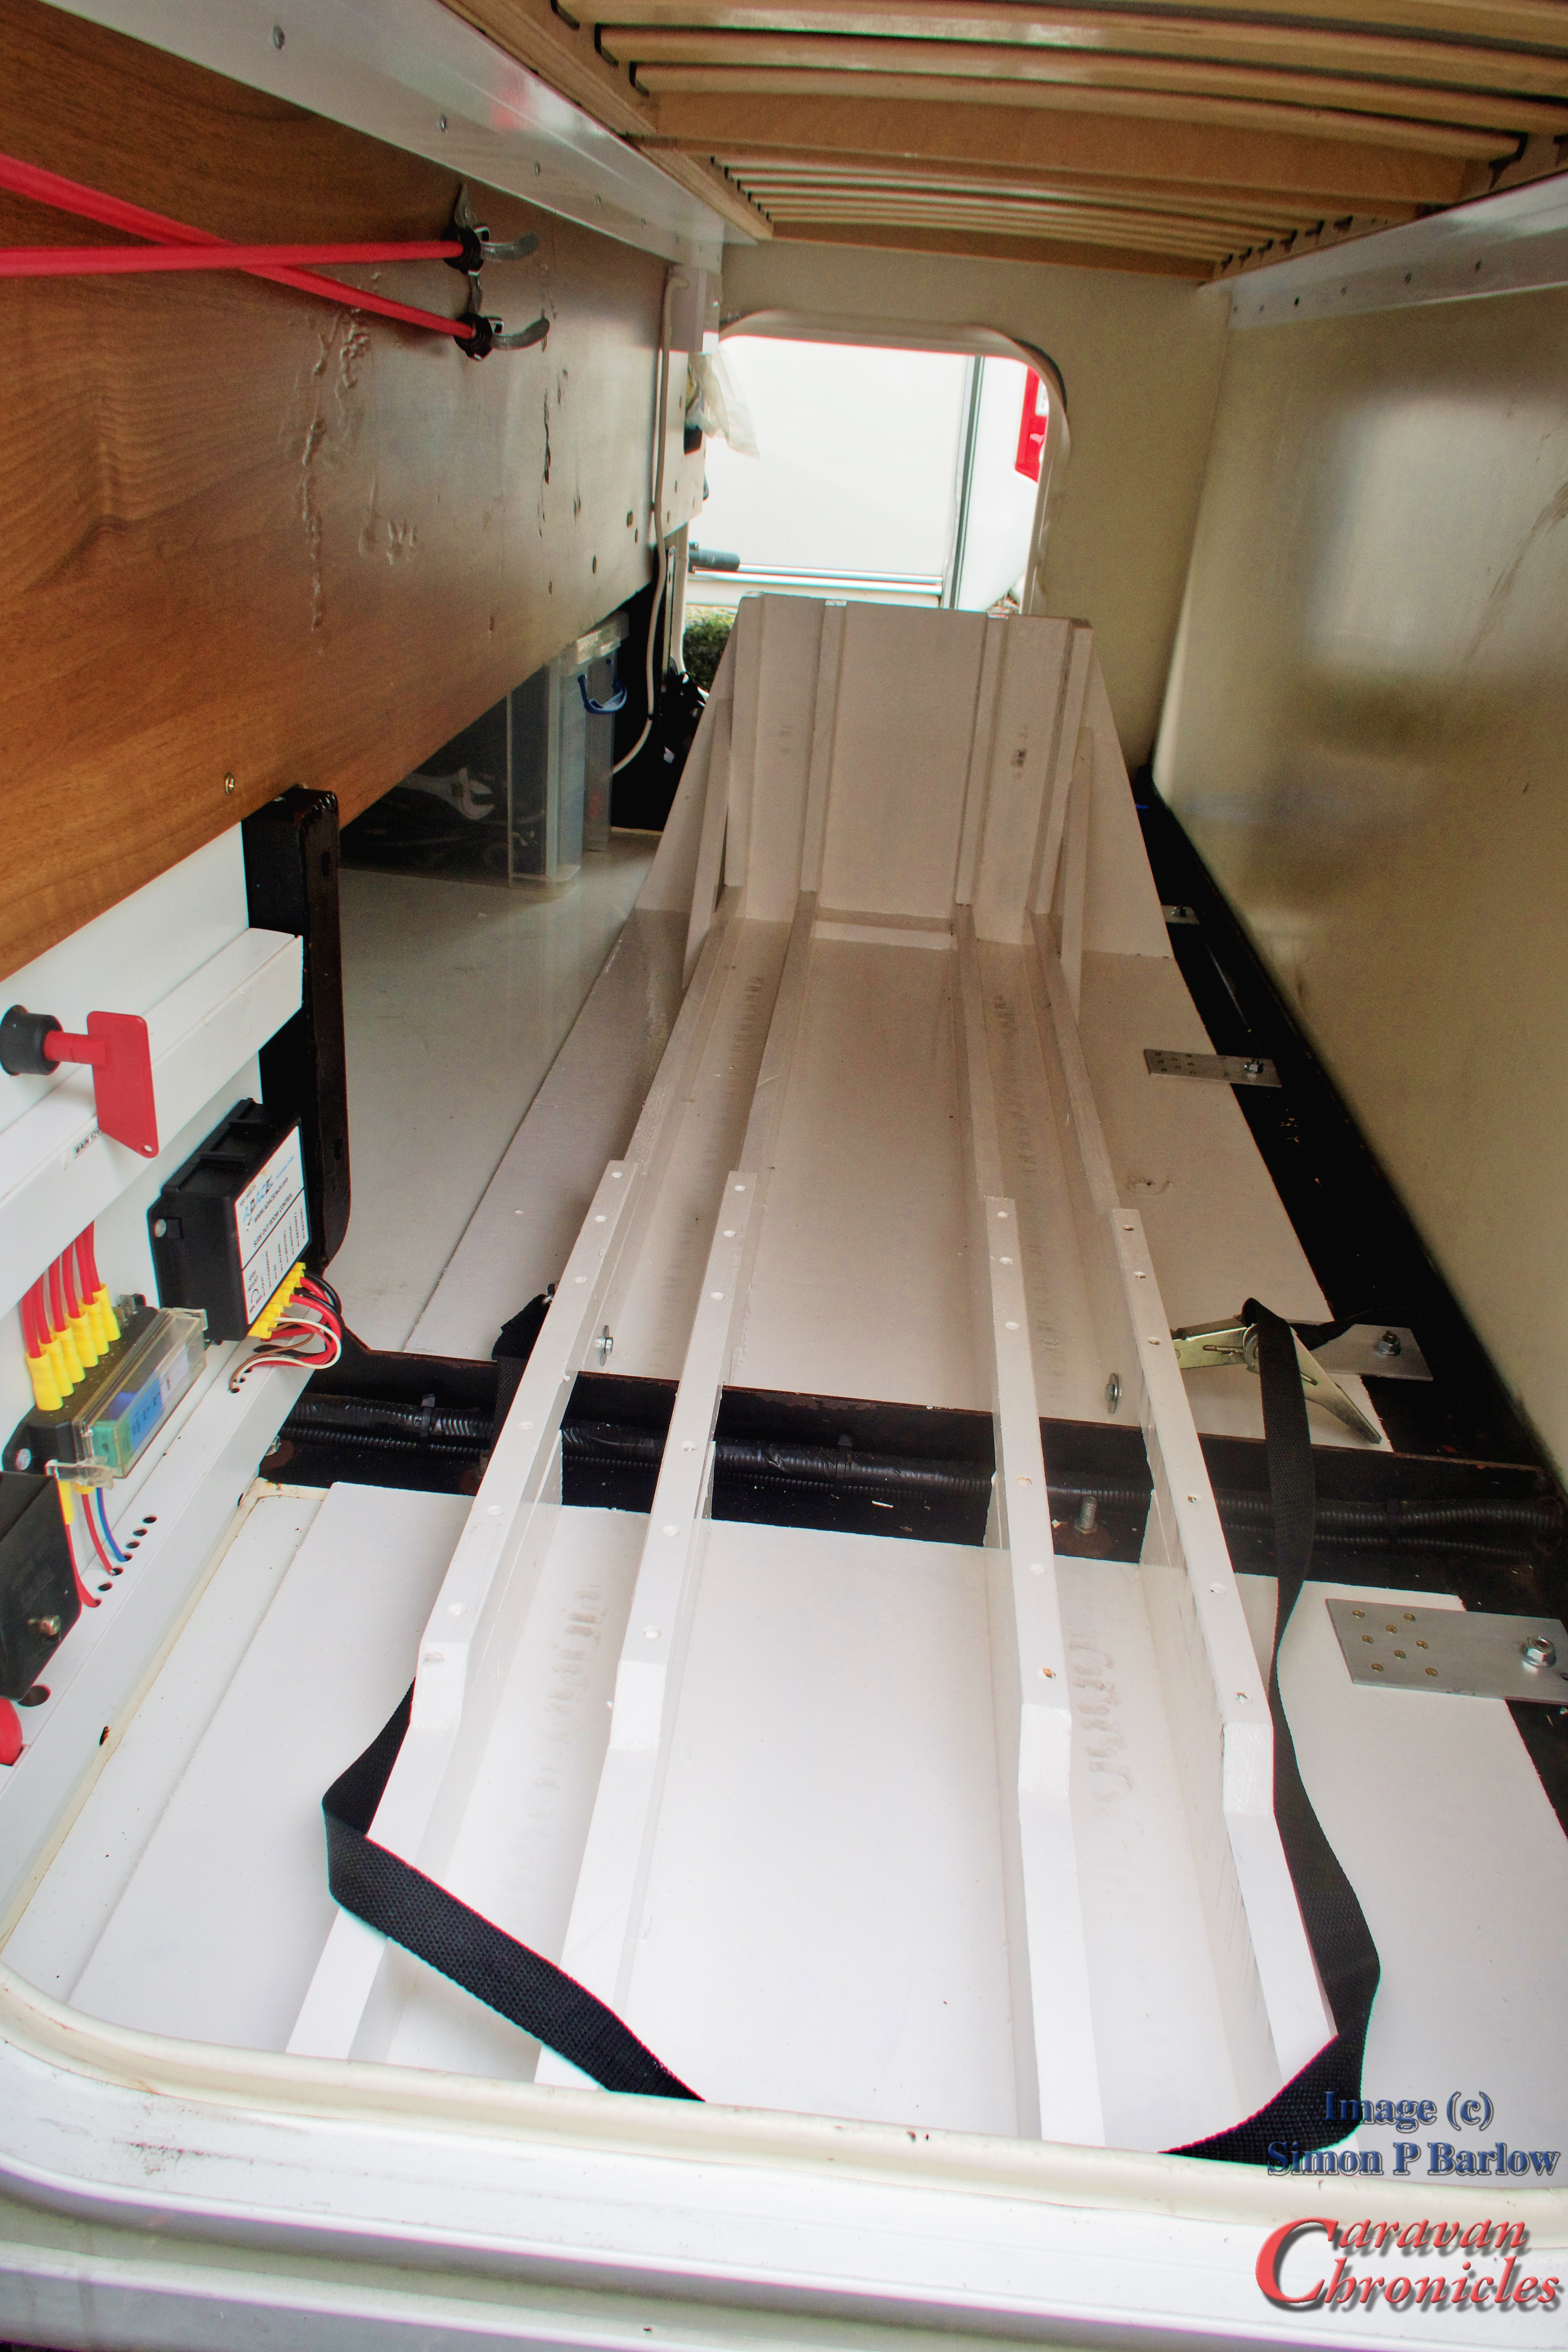
I’d worked out that if the bikes were 250mm apart, with the pedals folded and the handlebars folded they would pass each other with ease. I off set this slightly so the edge of the plywood would lie flat right next to the rear chassis cross member and left a gap so the short rear chassis rail would pass through the middle. The front wall was tapered either side so I could install the rack through the door vertically and then twist it 90 degrees to lie flat on the floor. To hold it in place I fabricated 4 aluminium plates that would drop onto the existing bolts in the rear chassis crossmember. These bolts were just long enough to allow me to drop a plate on and a second nut. This way I didn’t have to touch the original bolts… they were still to the factory torque.
I thought about clear coating the stand…. then thought about a brush on wax shaded to match the Dream Seeker’s woodwork…. In the end I use some old exterior white hard coat gloss… several coats in fact. One less old paint tin in the workshop! I think that it looks OK and installed in the garage looks bright and clean… for the moment!
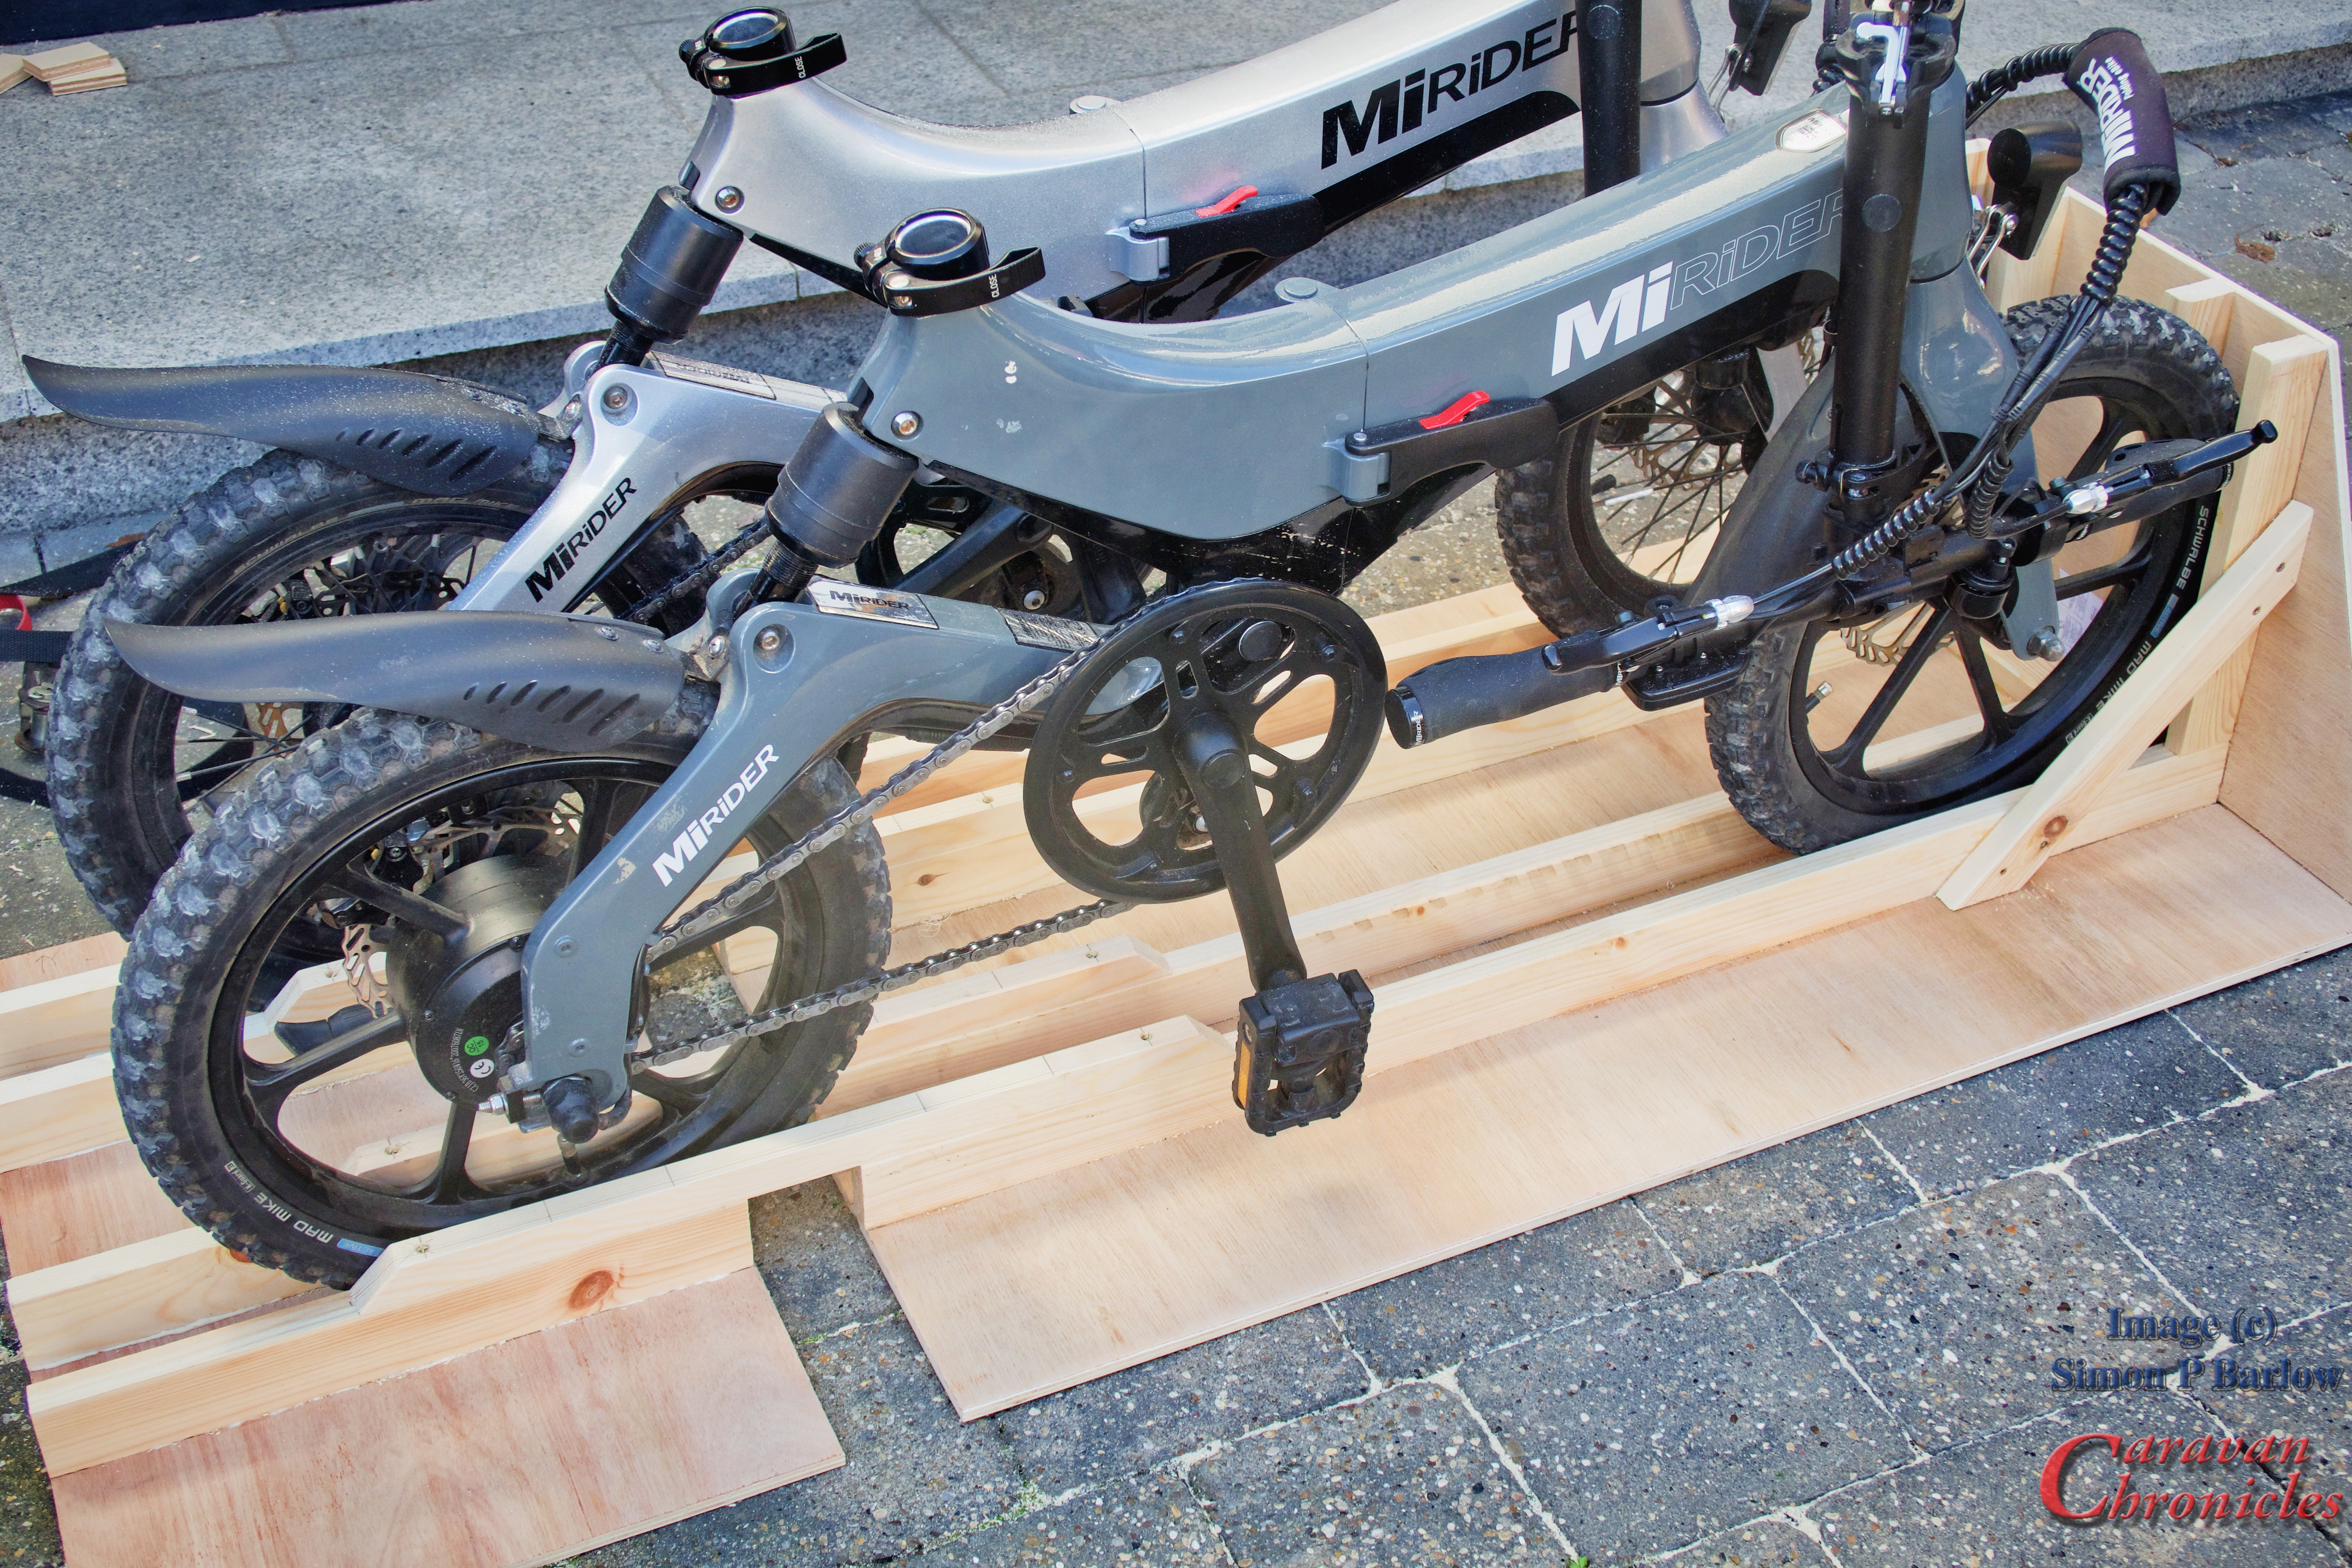
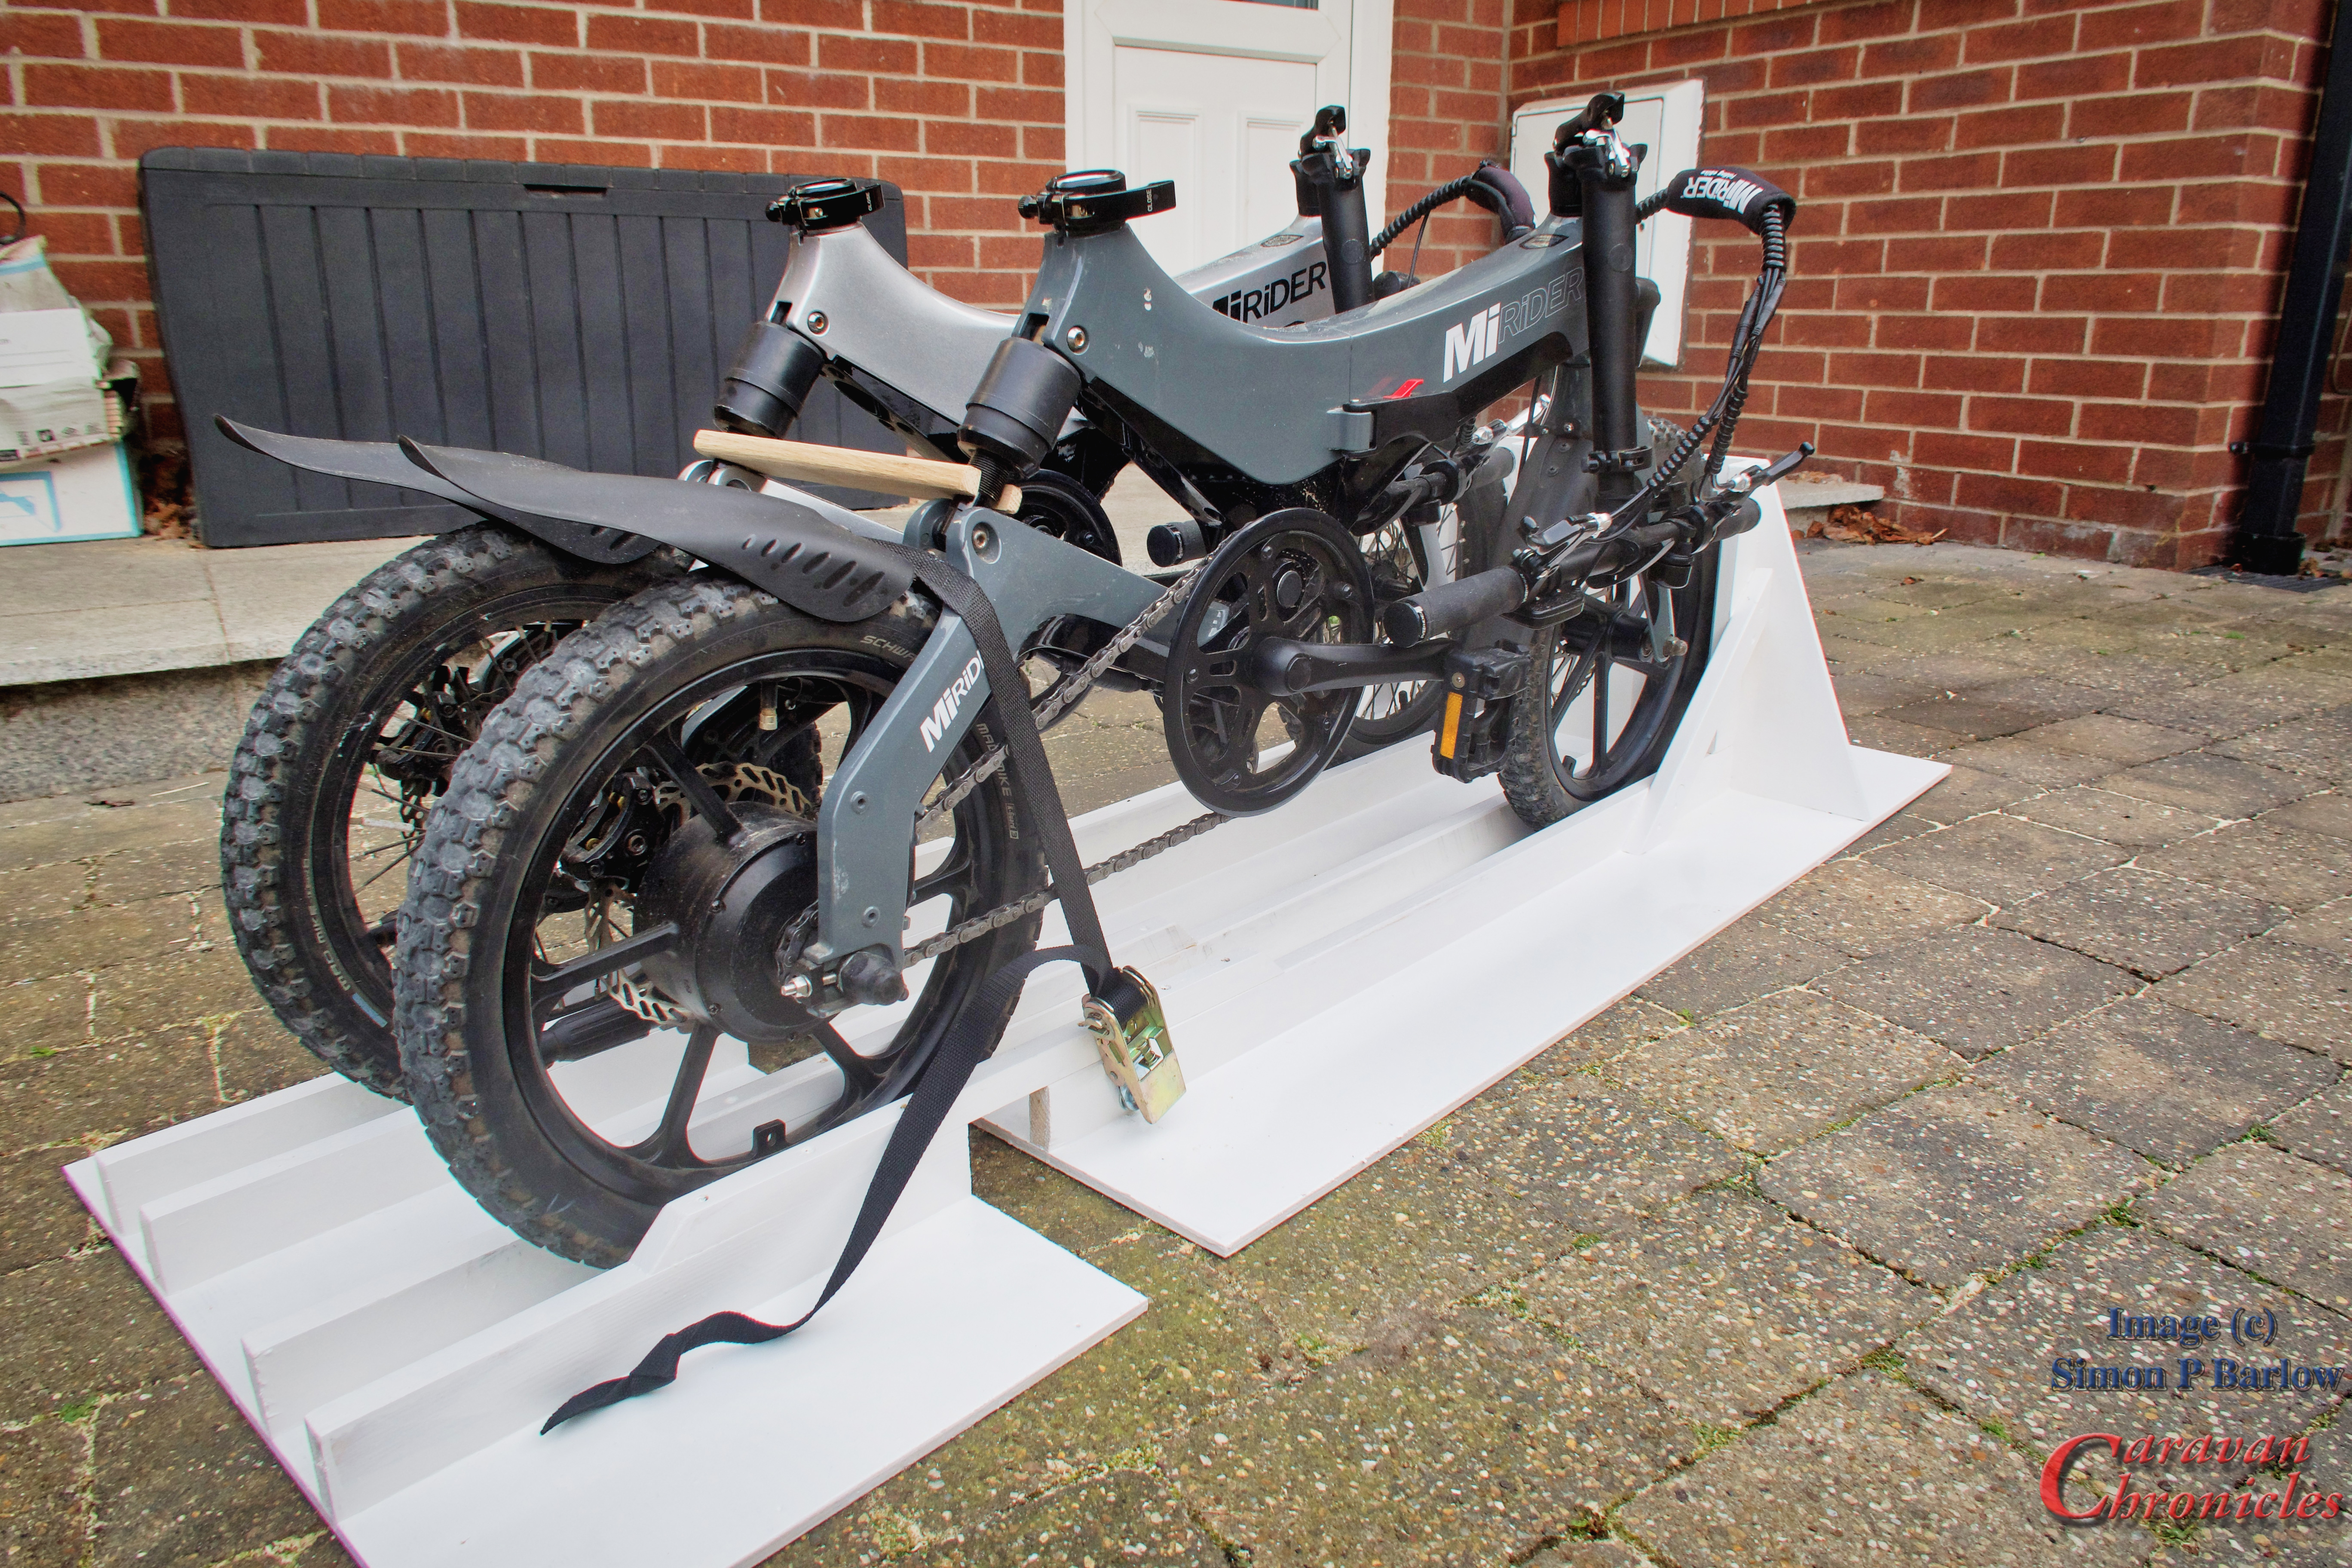
I added a ratchet strap, secured at both ends and cut short enough to allow me to hold the bikes down but not get in the way when loading or unloading.
To stop the two bikes pulling together a simple length of oak with a round cut out in each end holds the bikes 250mm apart.
Fitting into the Dream Seeker was easy enough and I installed the fixing plates once I was sure everything fitted in OK.
The bikes fit in perfectly and are held securely. For security I have taken measures that secure the bikes directly to the chassis in two locations and with the bikes in the garage make it damn difficult to even get access to try and defeat them. Obviously I’m to going to show this.
Bikes installed…. and still a bit of space to fit locate the two seats and bike helmets. So off to Sutton-on-Sea soon to test them out!
P.S. While I was at it I also installed two 240 volt sockets in the garage so we can plug the chargers in if needed. Although my preference for safety is to charge the bikes outside the Dream Seeker. I installed the sockets near the opposite door so they will reach the bikes while they are under our awning…. or allow us to power an electric griddle plate under the awning. Always thinking.
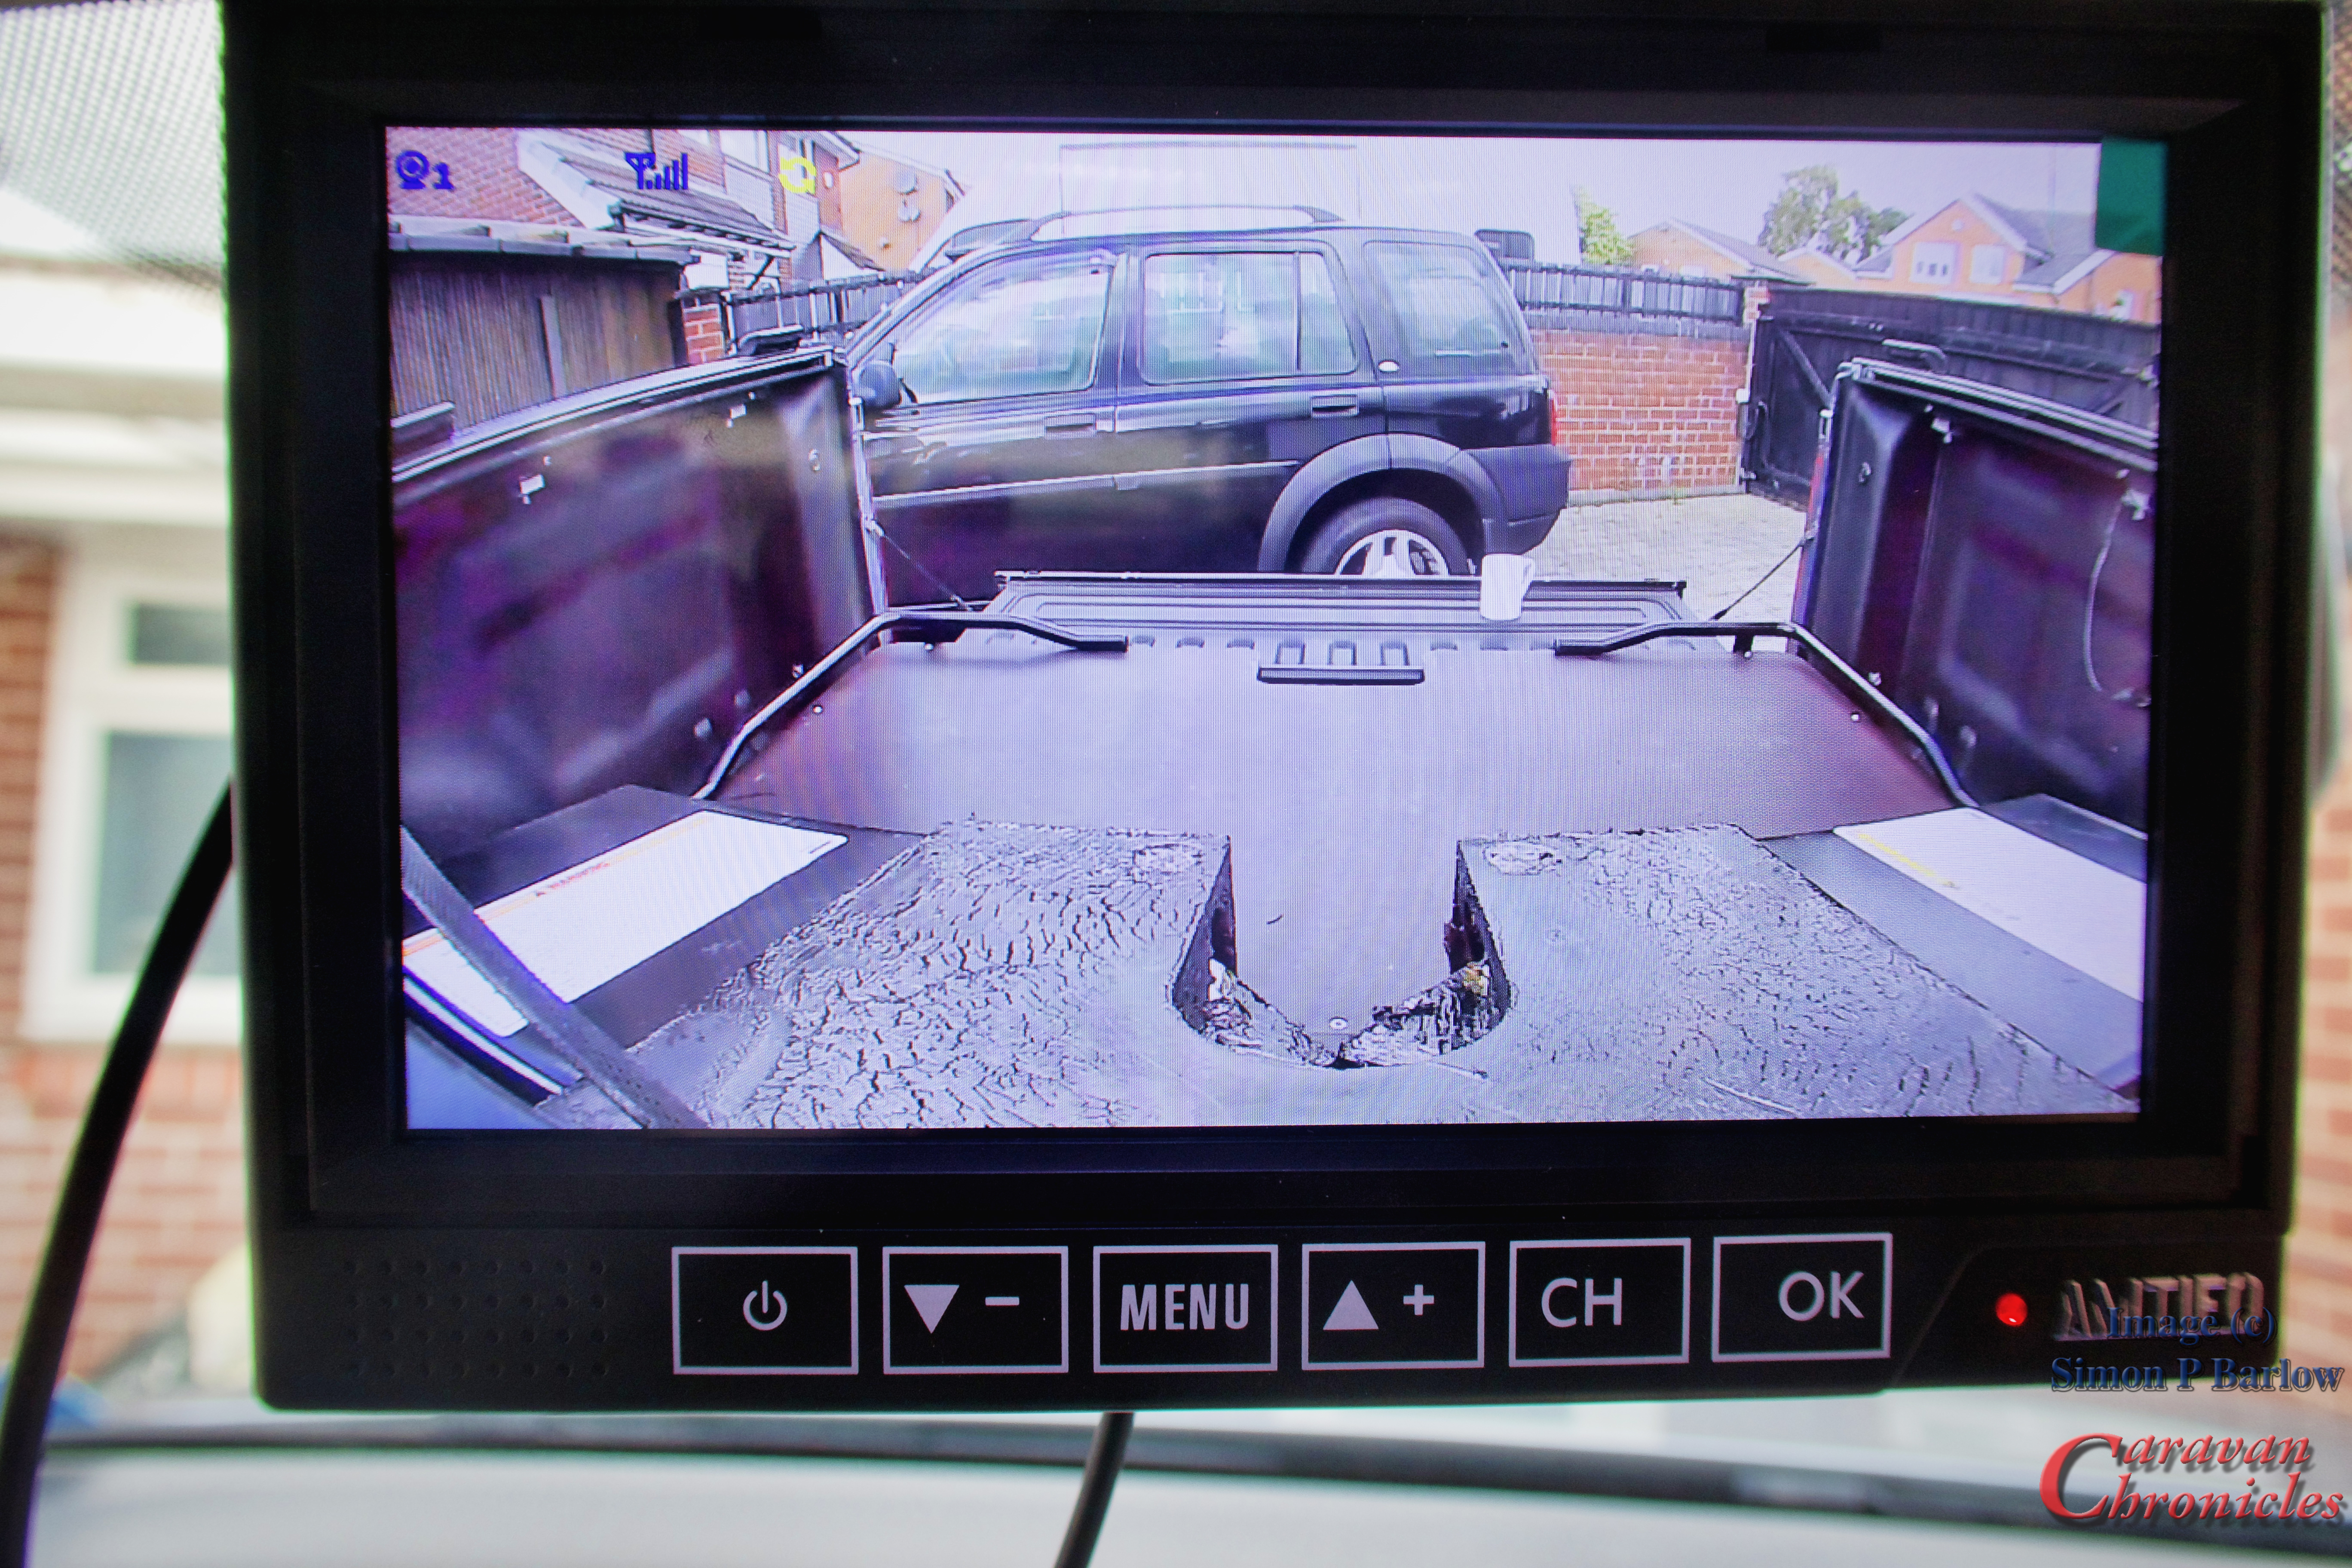
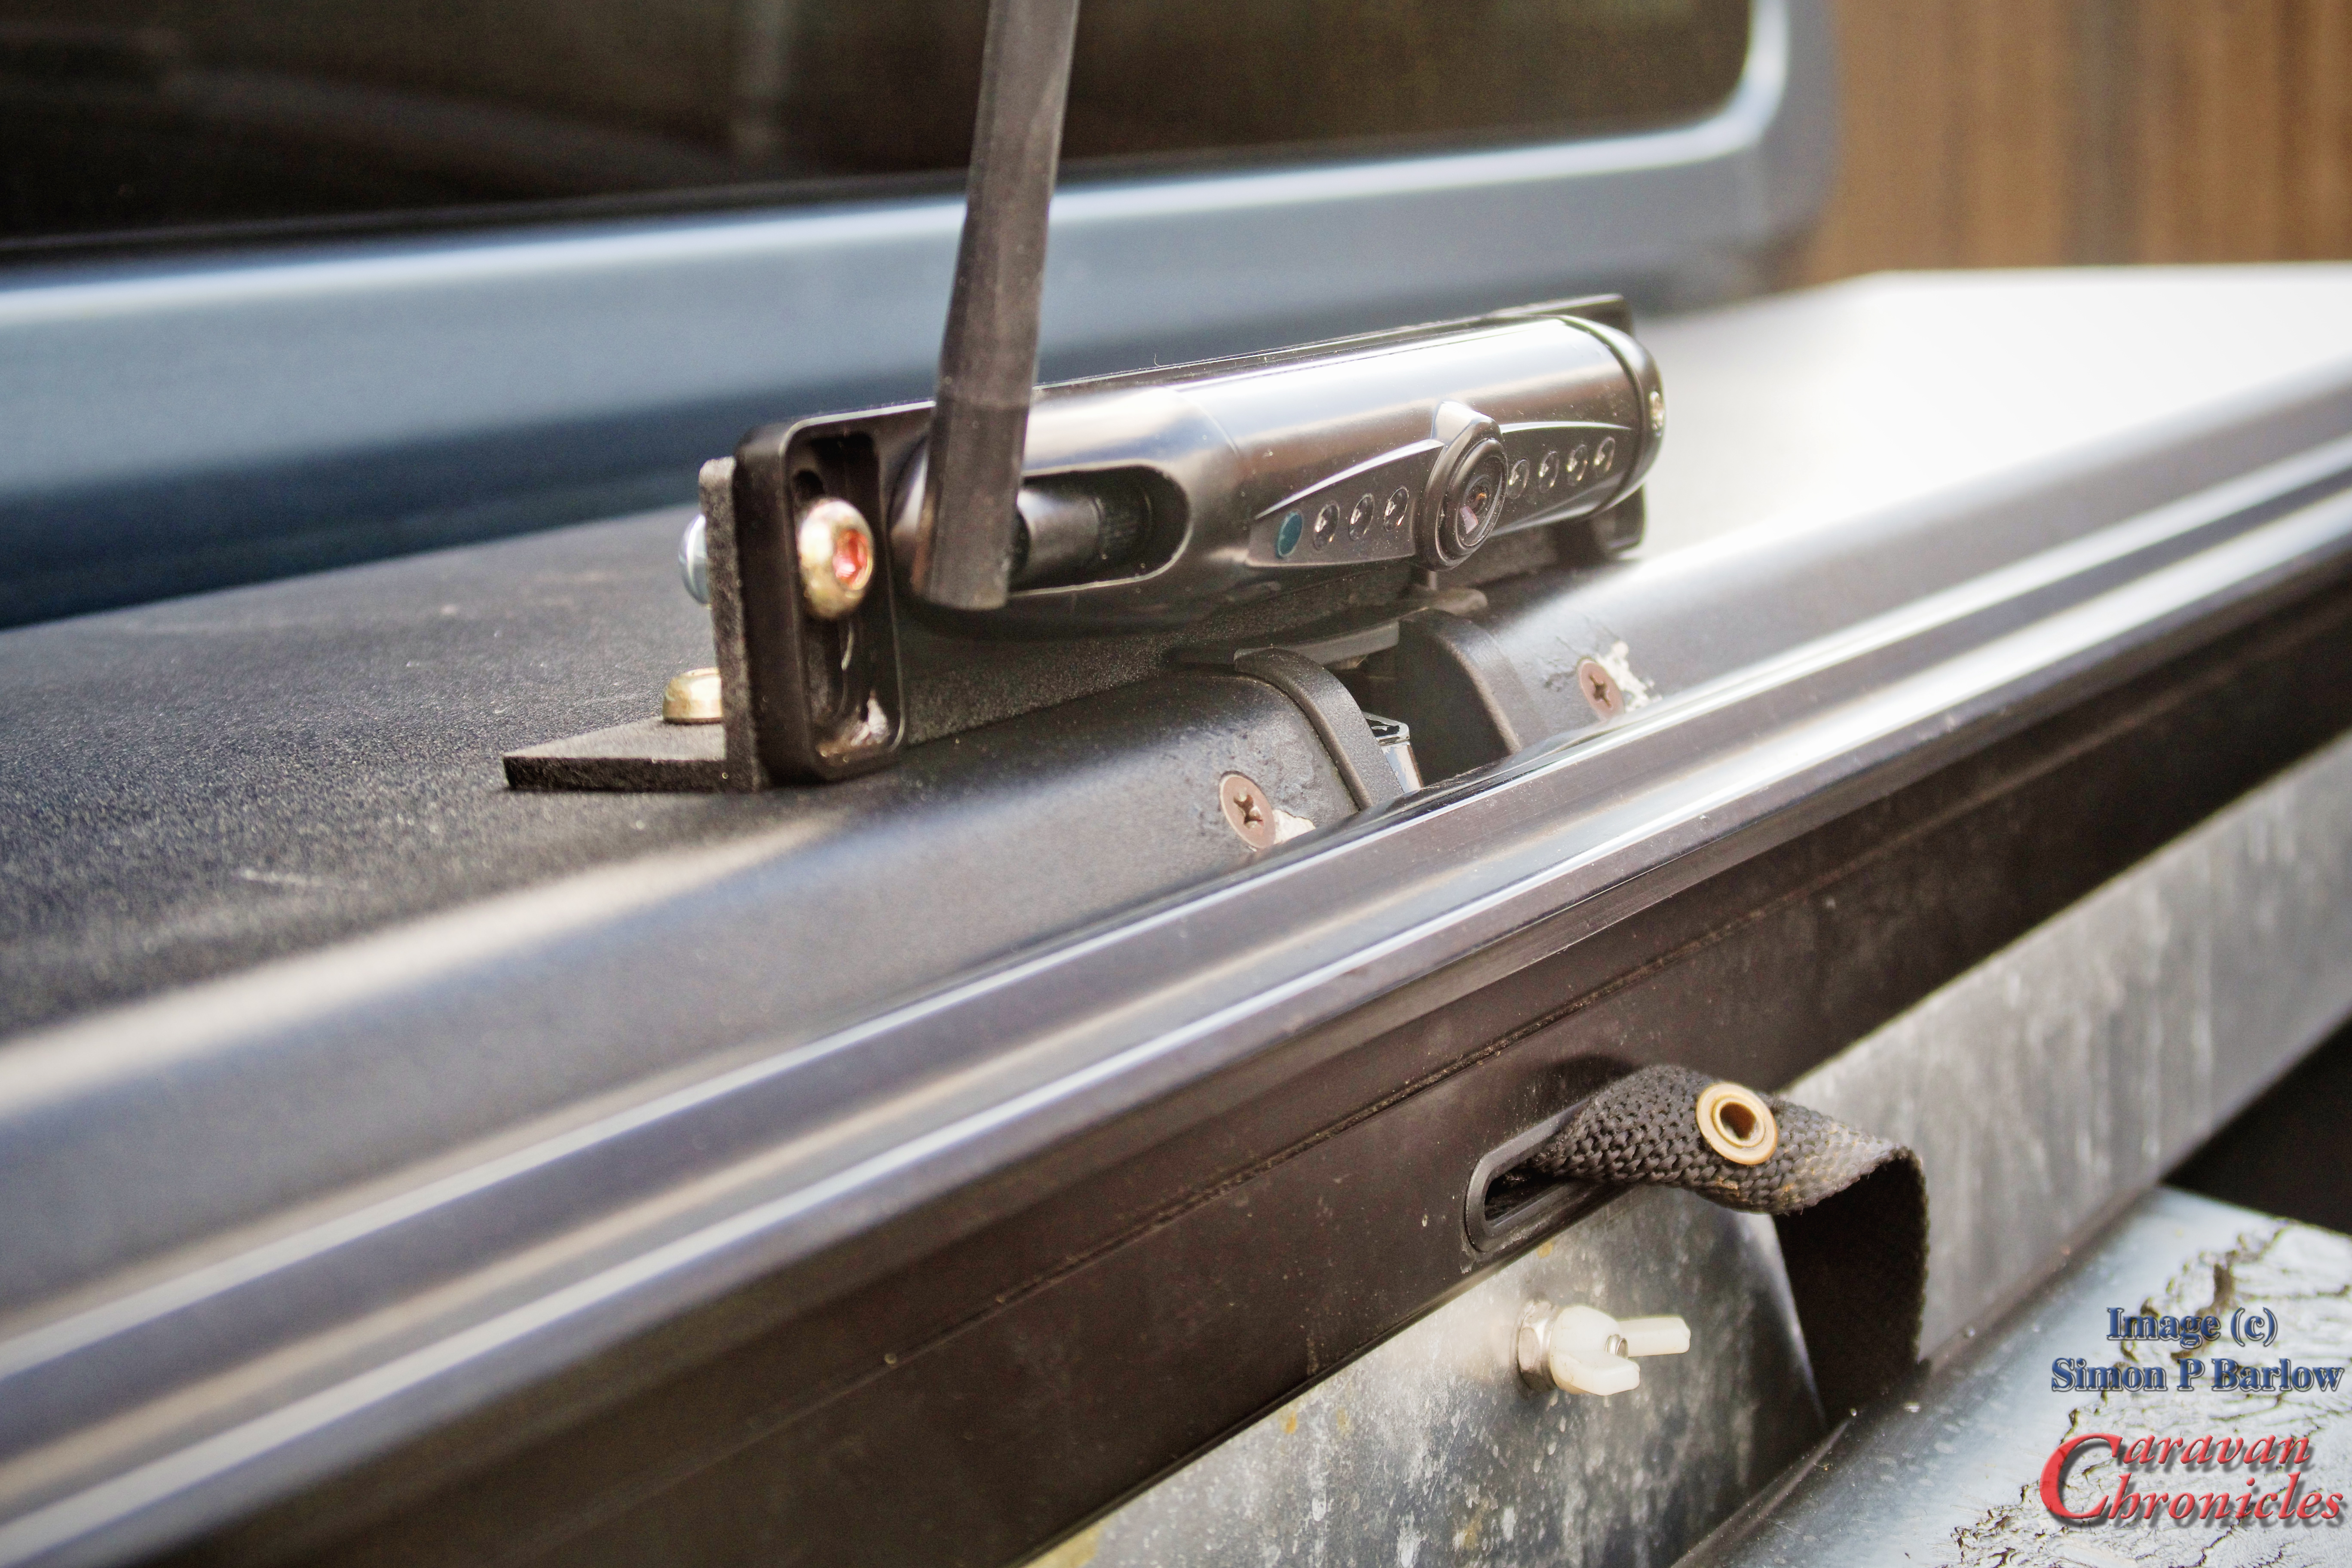
This is just a bit of a follow up to A Bit Of An Upgrade… really. After installing the new camera on the 5th wheel, I went ahead and installed a new camera for hitching up. Now obviously hitching up a 5th wheel is a bit different to a tow ball and having a camera in the right position makes it so much easier… So the view in the ‘mirror’ is now a bit different!
The cameral is aligned with the hitch centre line so it should make reversing back on to the pin a doddle…. OK I have square it up a bit since taking the photos! The system I opted for allows the addition of up to 4 cameras to the screen and I have the option of displaying any combination of these cameras in single camera, two camera or four camera in various patterns, all easily configurable from the screen. So for the moment I have it configured so that each camera is displayed full screen and I can simply swop between them using the CHannel button.
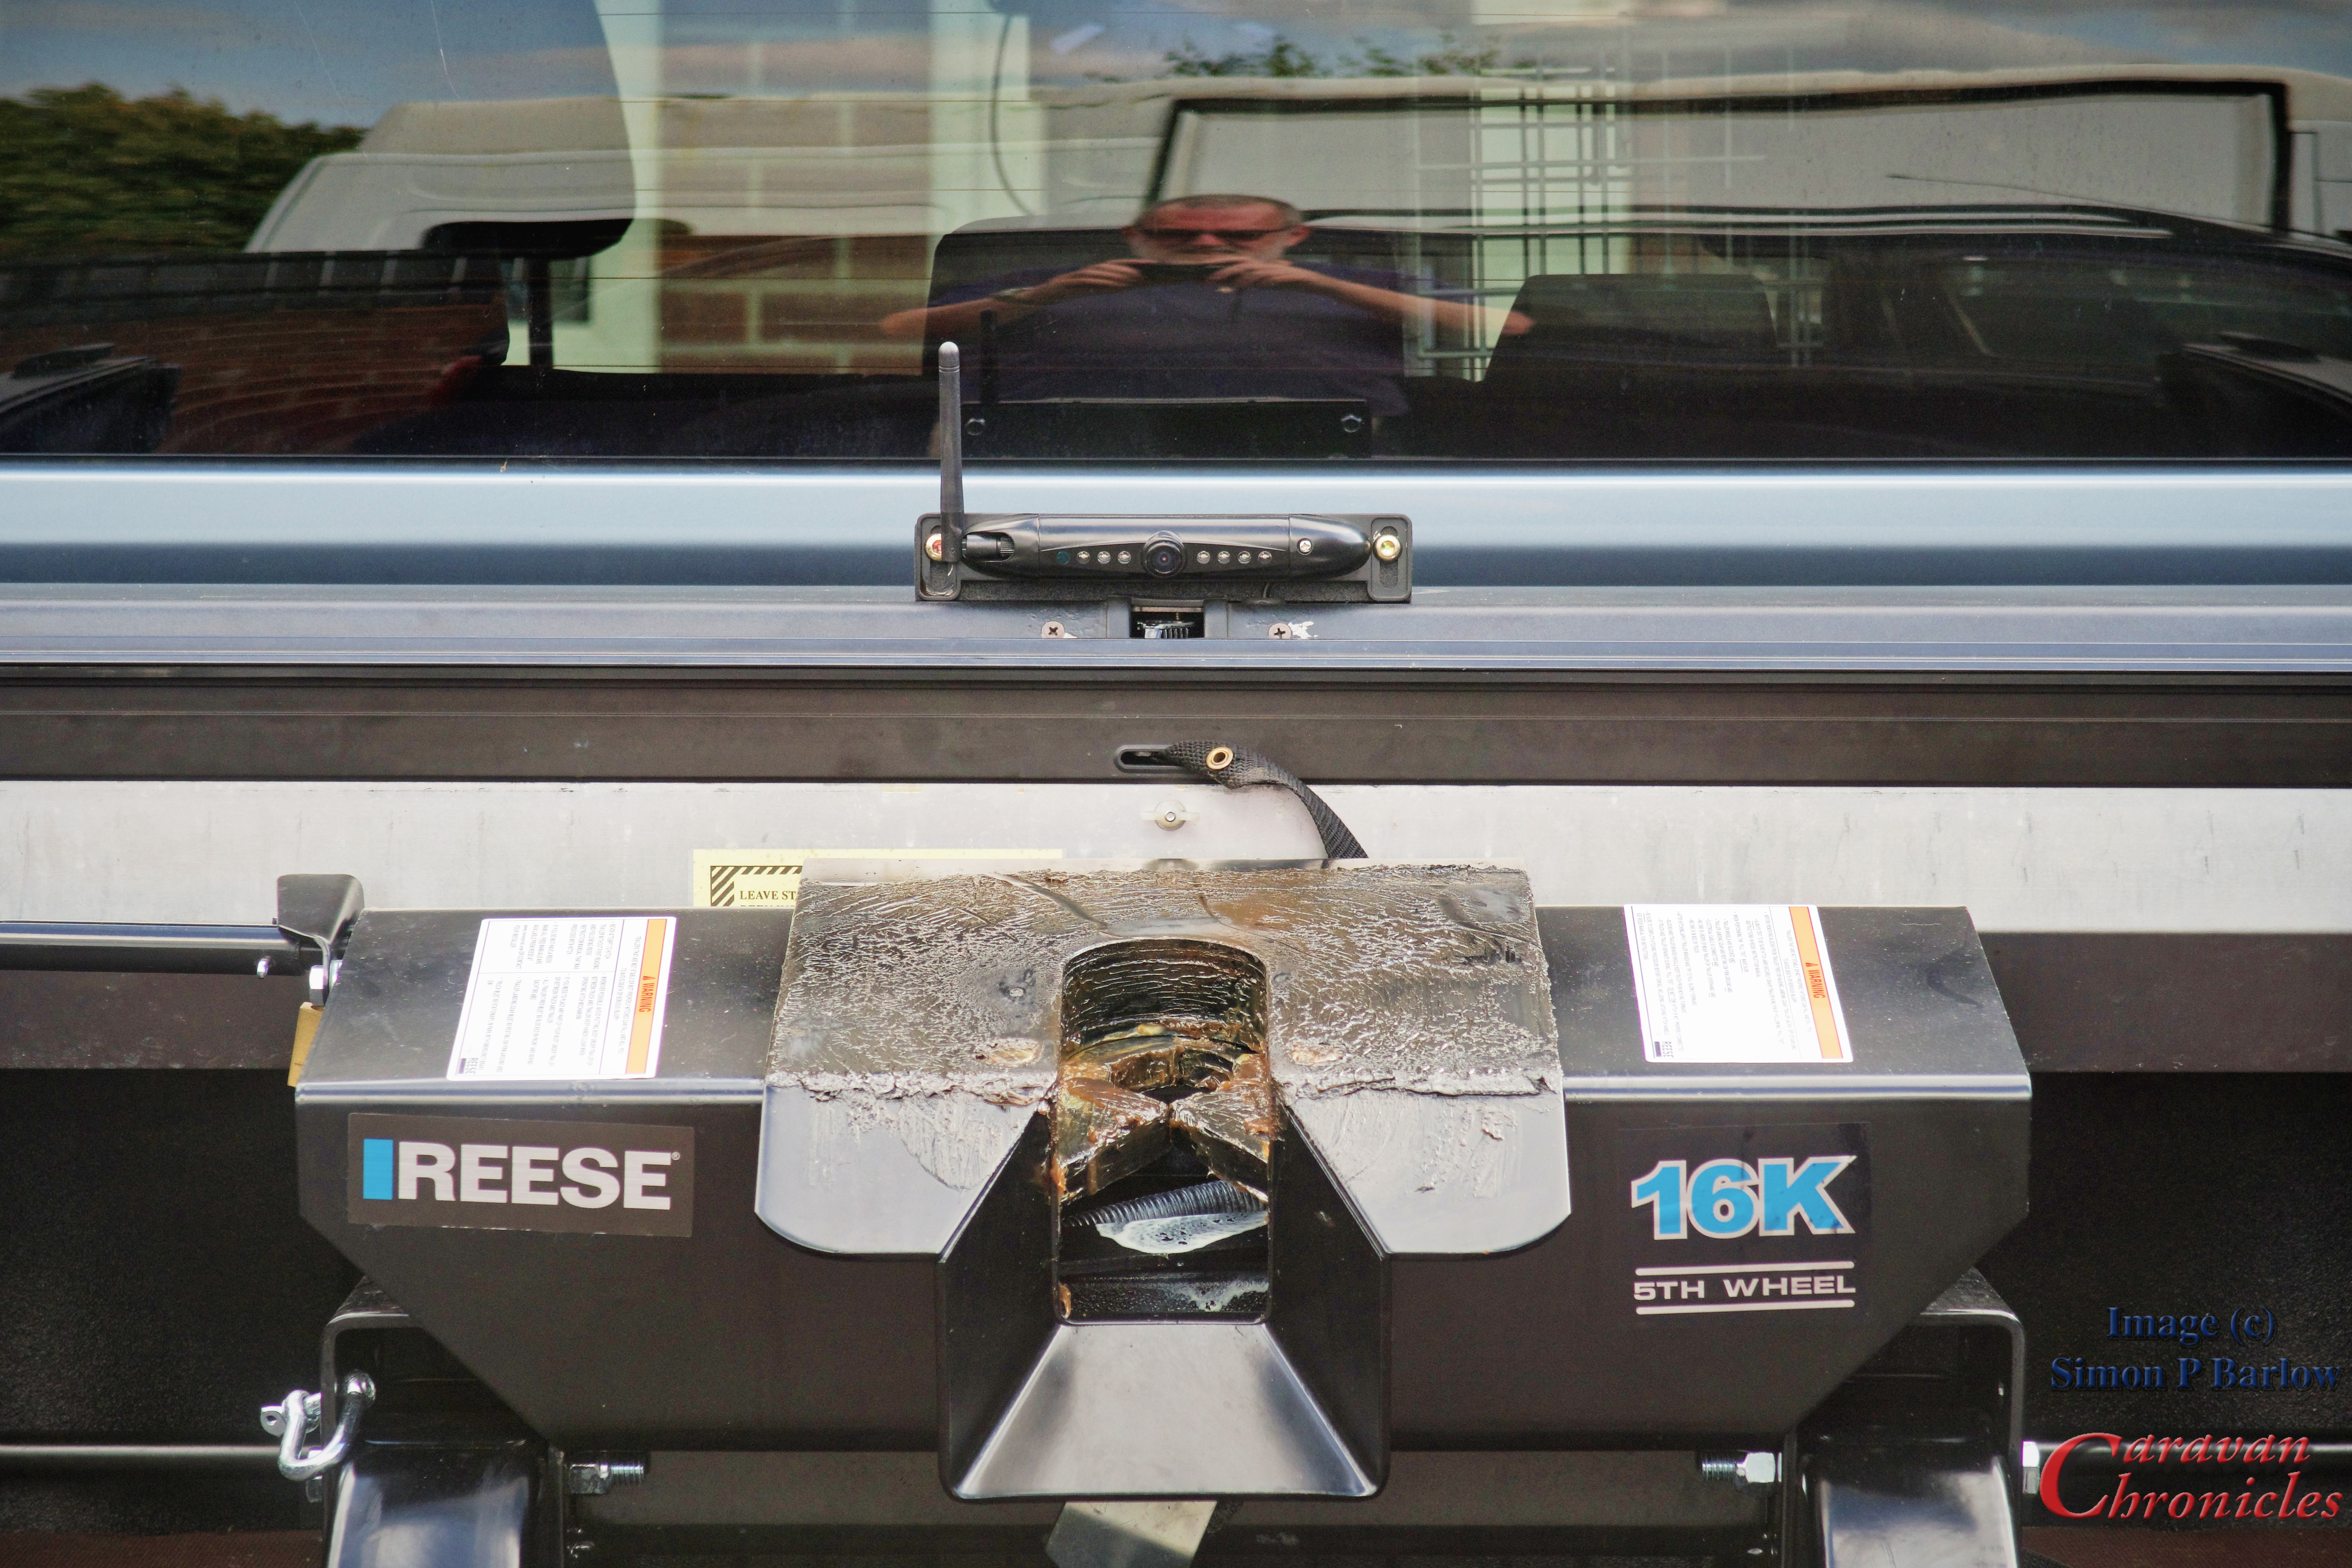
Mounting the camera was pretty easy…. I used a short length of 50mm aluminium angle and with a deft bit of drilling in the right places it allowed me to mount the slim licence plate style camera on the top of the Roll-N-Lock cover.
From a distance it doesn’t stand out too much. I sprayed the aluminium angle with etch primer then a couple of coats of black bed liner so it almost matches into the black of the Roll-N-Lock… but a quick glance I don’t think you would notice it from the rear.
So I think that is that project finished…. until I decide to do the trailer side view cameras that is!
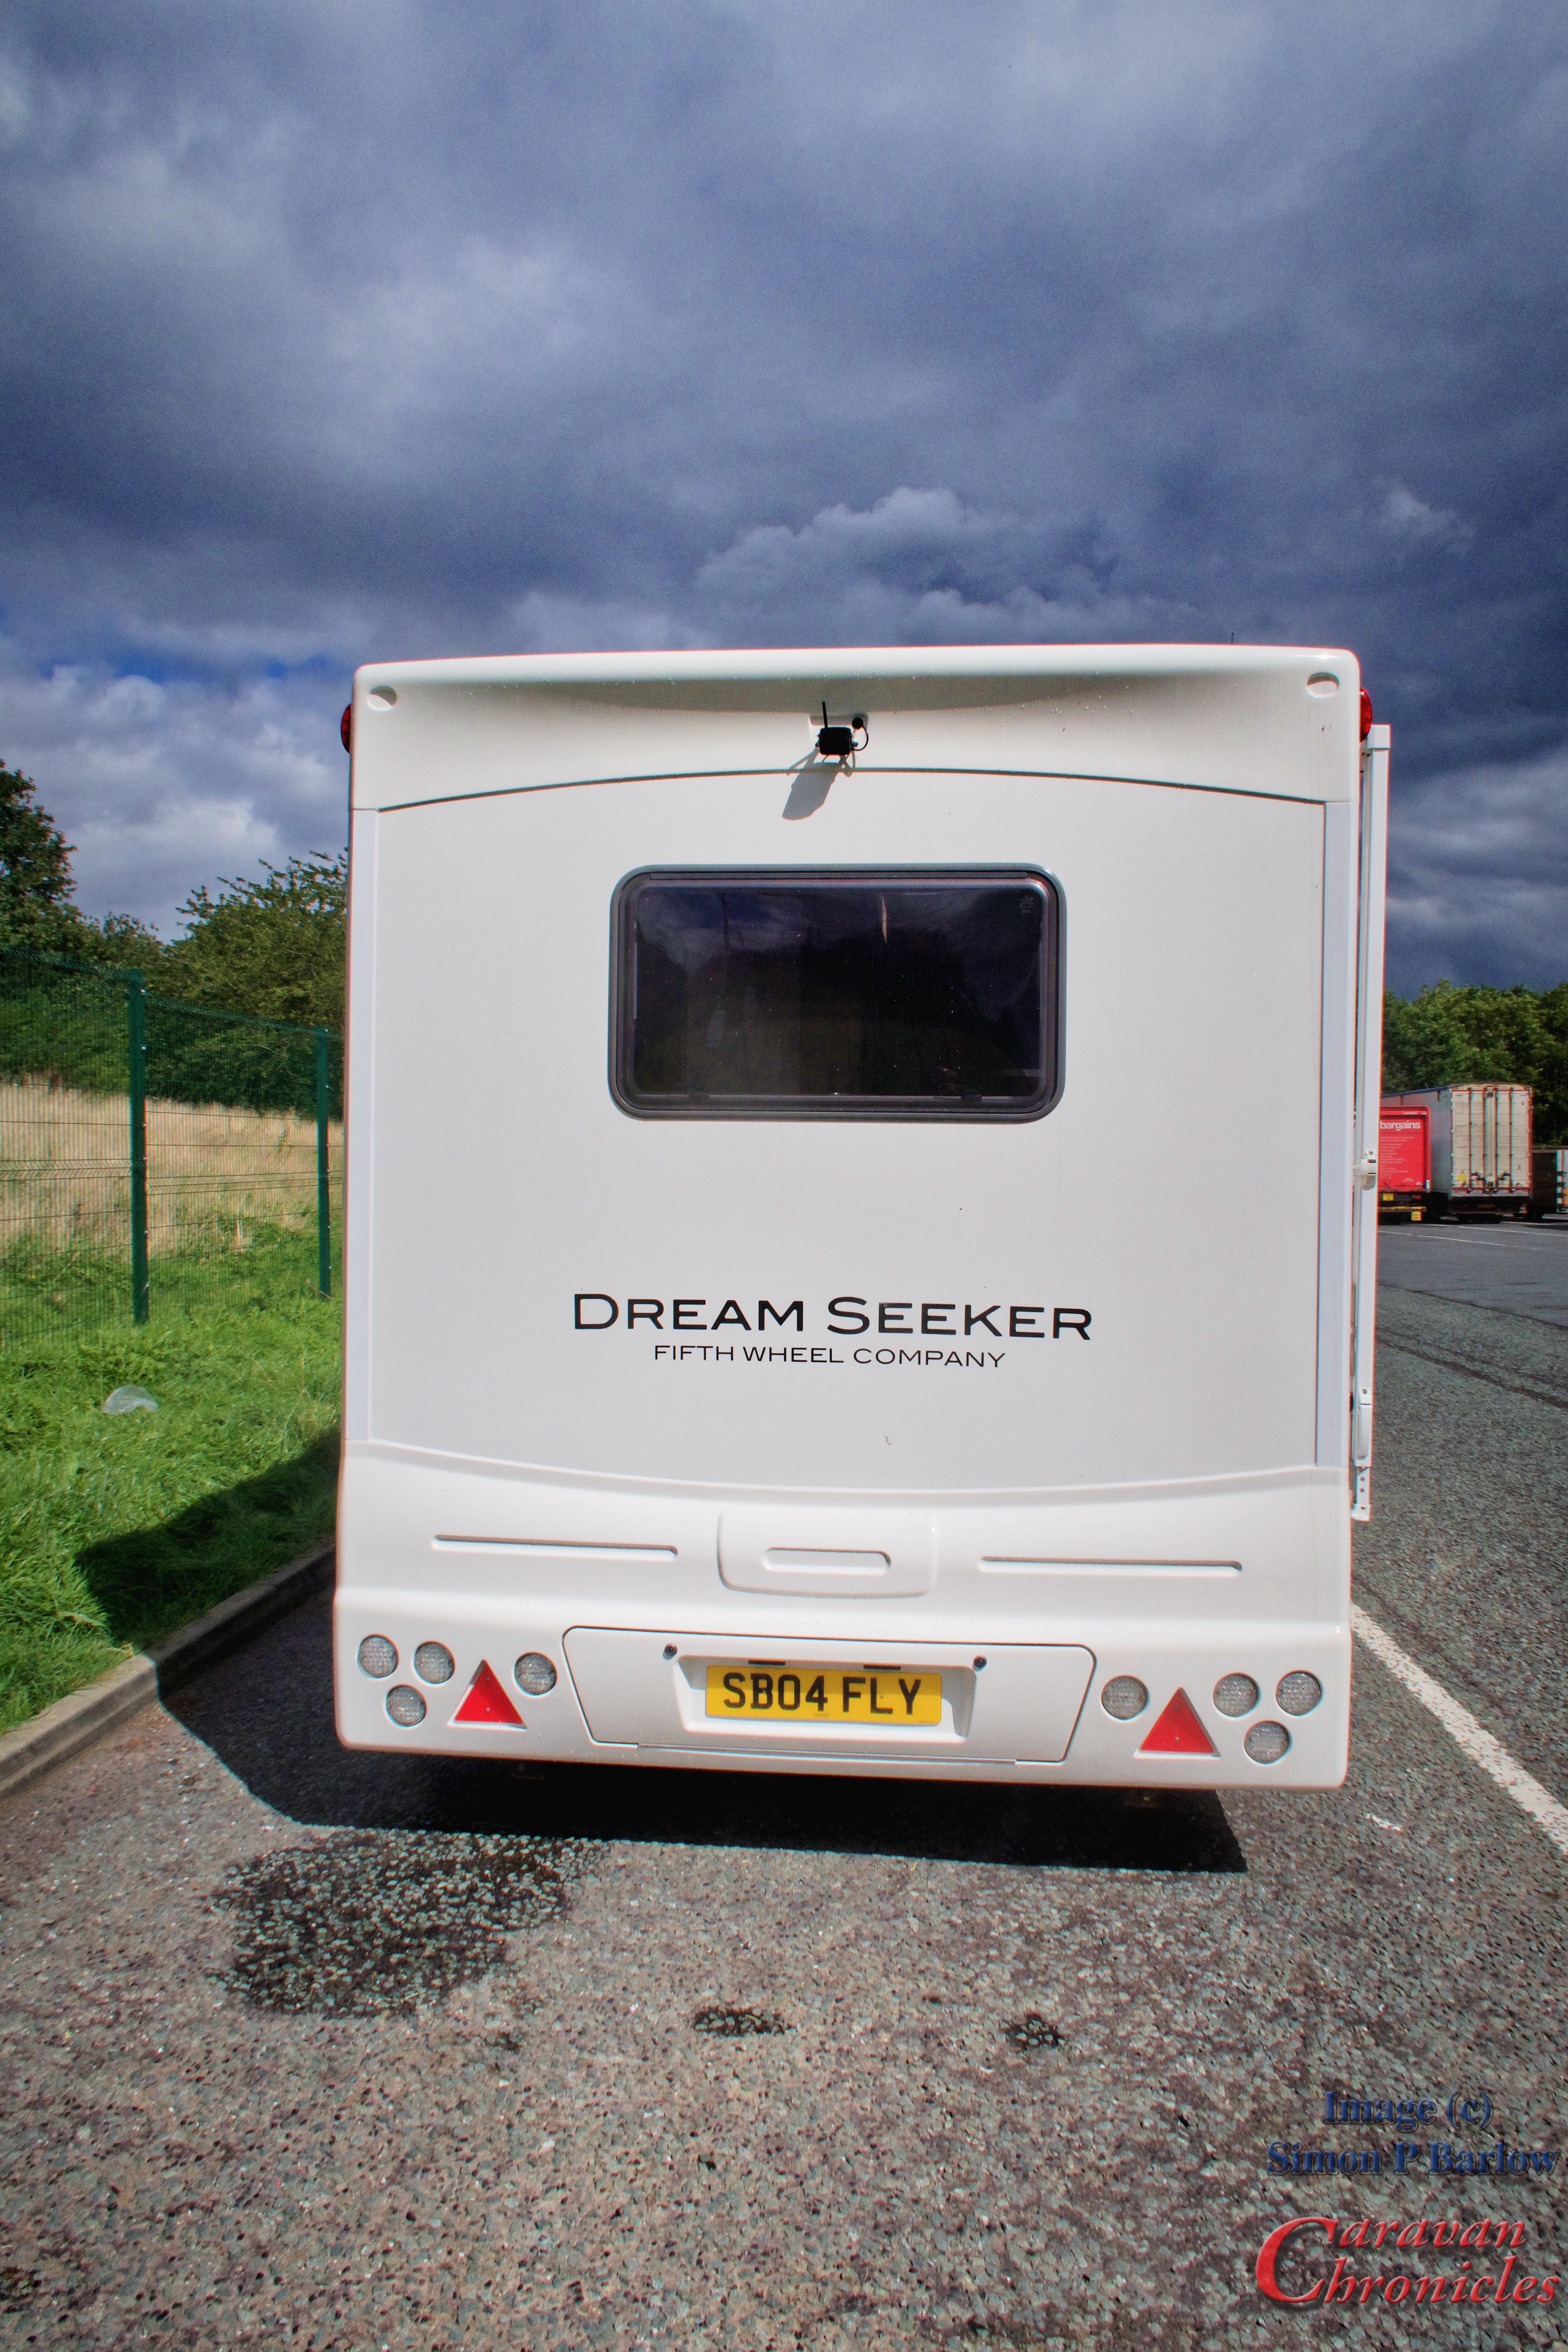
One of the upgrades I wanted to do to the Dream Seeker was to install a good rear view camera. Looking round for options it seemed that you could easily spend a lot of money and end up with something that didn’t achieve what you wanted in terms of reliability and quality.
I did a little research and found that there were options from several manufacturers on Amazon that would fit the bill that seemed to match my basic requirements of being reliable, good vision day and night and durable with the option to upgrade or add to the system in the future.
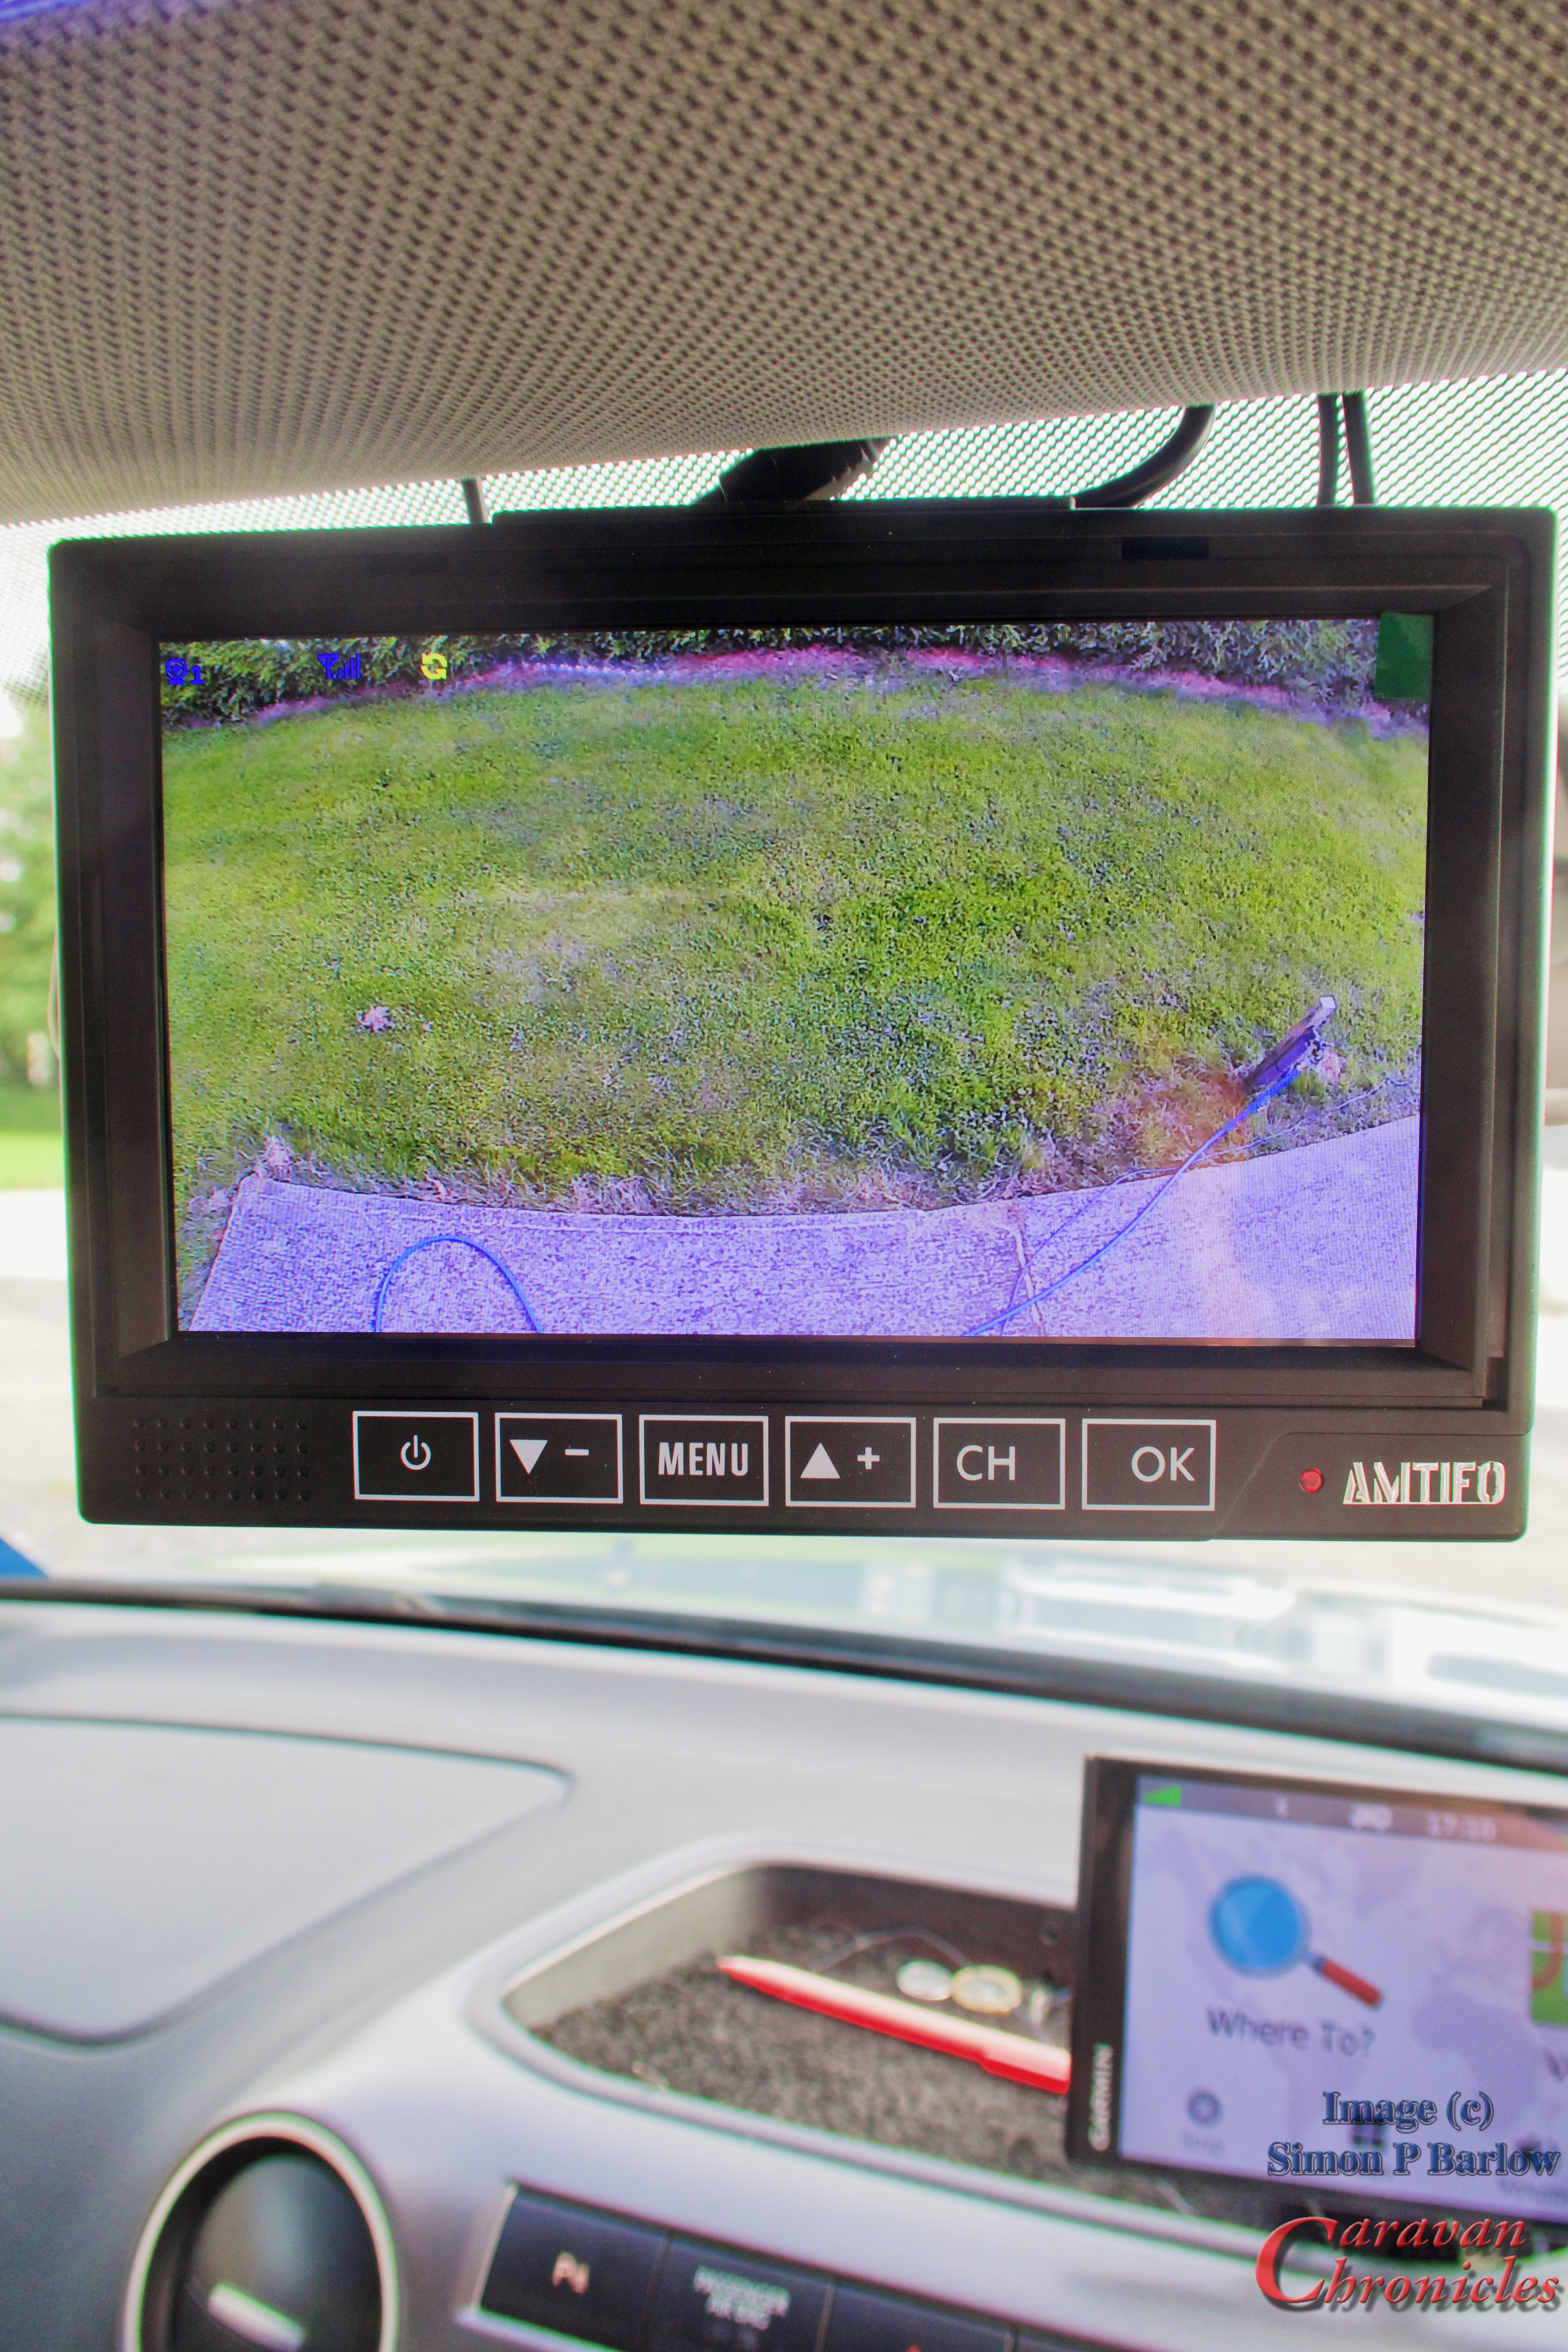
I chose a wireless AMTIFO kit, 1080P 7 inch LCD display with a range quoted as up to 320 feet with a 150 degree rear camera. I’m not doing unboxing or installation, although installation was really easy and all the hardware you needed comes in the box. The system also records onto an SD card (not included) and the screen can accept up to 4 cameras.
Quick note: I bought this from Amazon, I paid just under £110 for the screen and one camera. This is not a sponsored post and the link to it is here https://amzn.to/44pOB0x if you want to see it and you can also see my review on Amazon… I’m SP
Fitting on the Dream Seeker was quite easy… except I realised just how tall it was!… and it was wired to come on when the vehicle supplied power to the trailer. This means as long as the engine is running the camera is active. I may opt to change this in the future if I add more cameras and a screen in the caravan.
I set the angle of the camera slightly different to convention. Most people set them so they can see the rear bumper, I set it so the bottom of the screen is about two feet from the bumper. My thoughts are if an object is at the bottom of the screen I’m still two feet away and that is close enough! The secondary advantage this gives me is that the top of the screen is effectively seeing further behind… about a cars length in fact. Due to the height of the camera and the angle of view on the motorway for example I can actually see both lanes either side of me and this helps when judging when to pull in after an overtake as I know if I can’t see the vehicle I have overtaken I must be at least one cars length in front of it. Mind you I don’t do much overtaking!
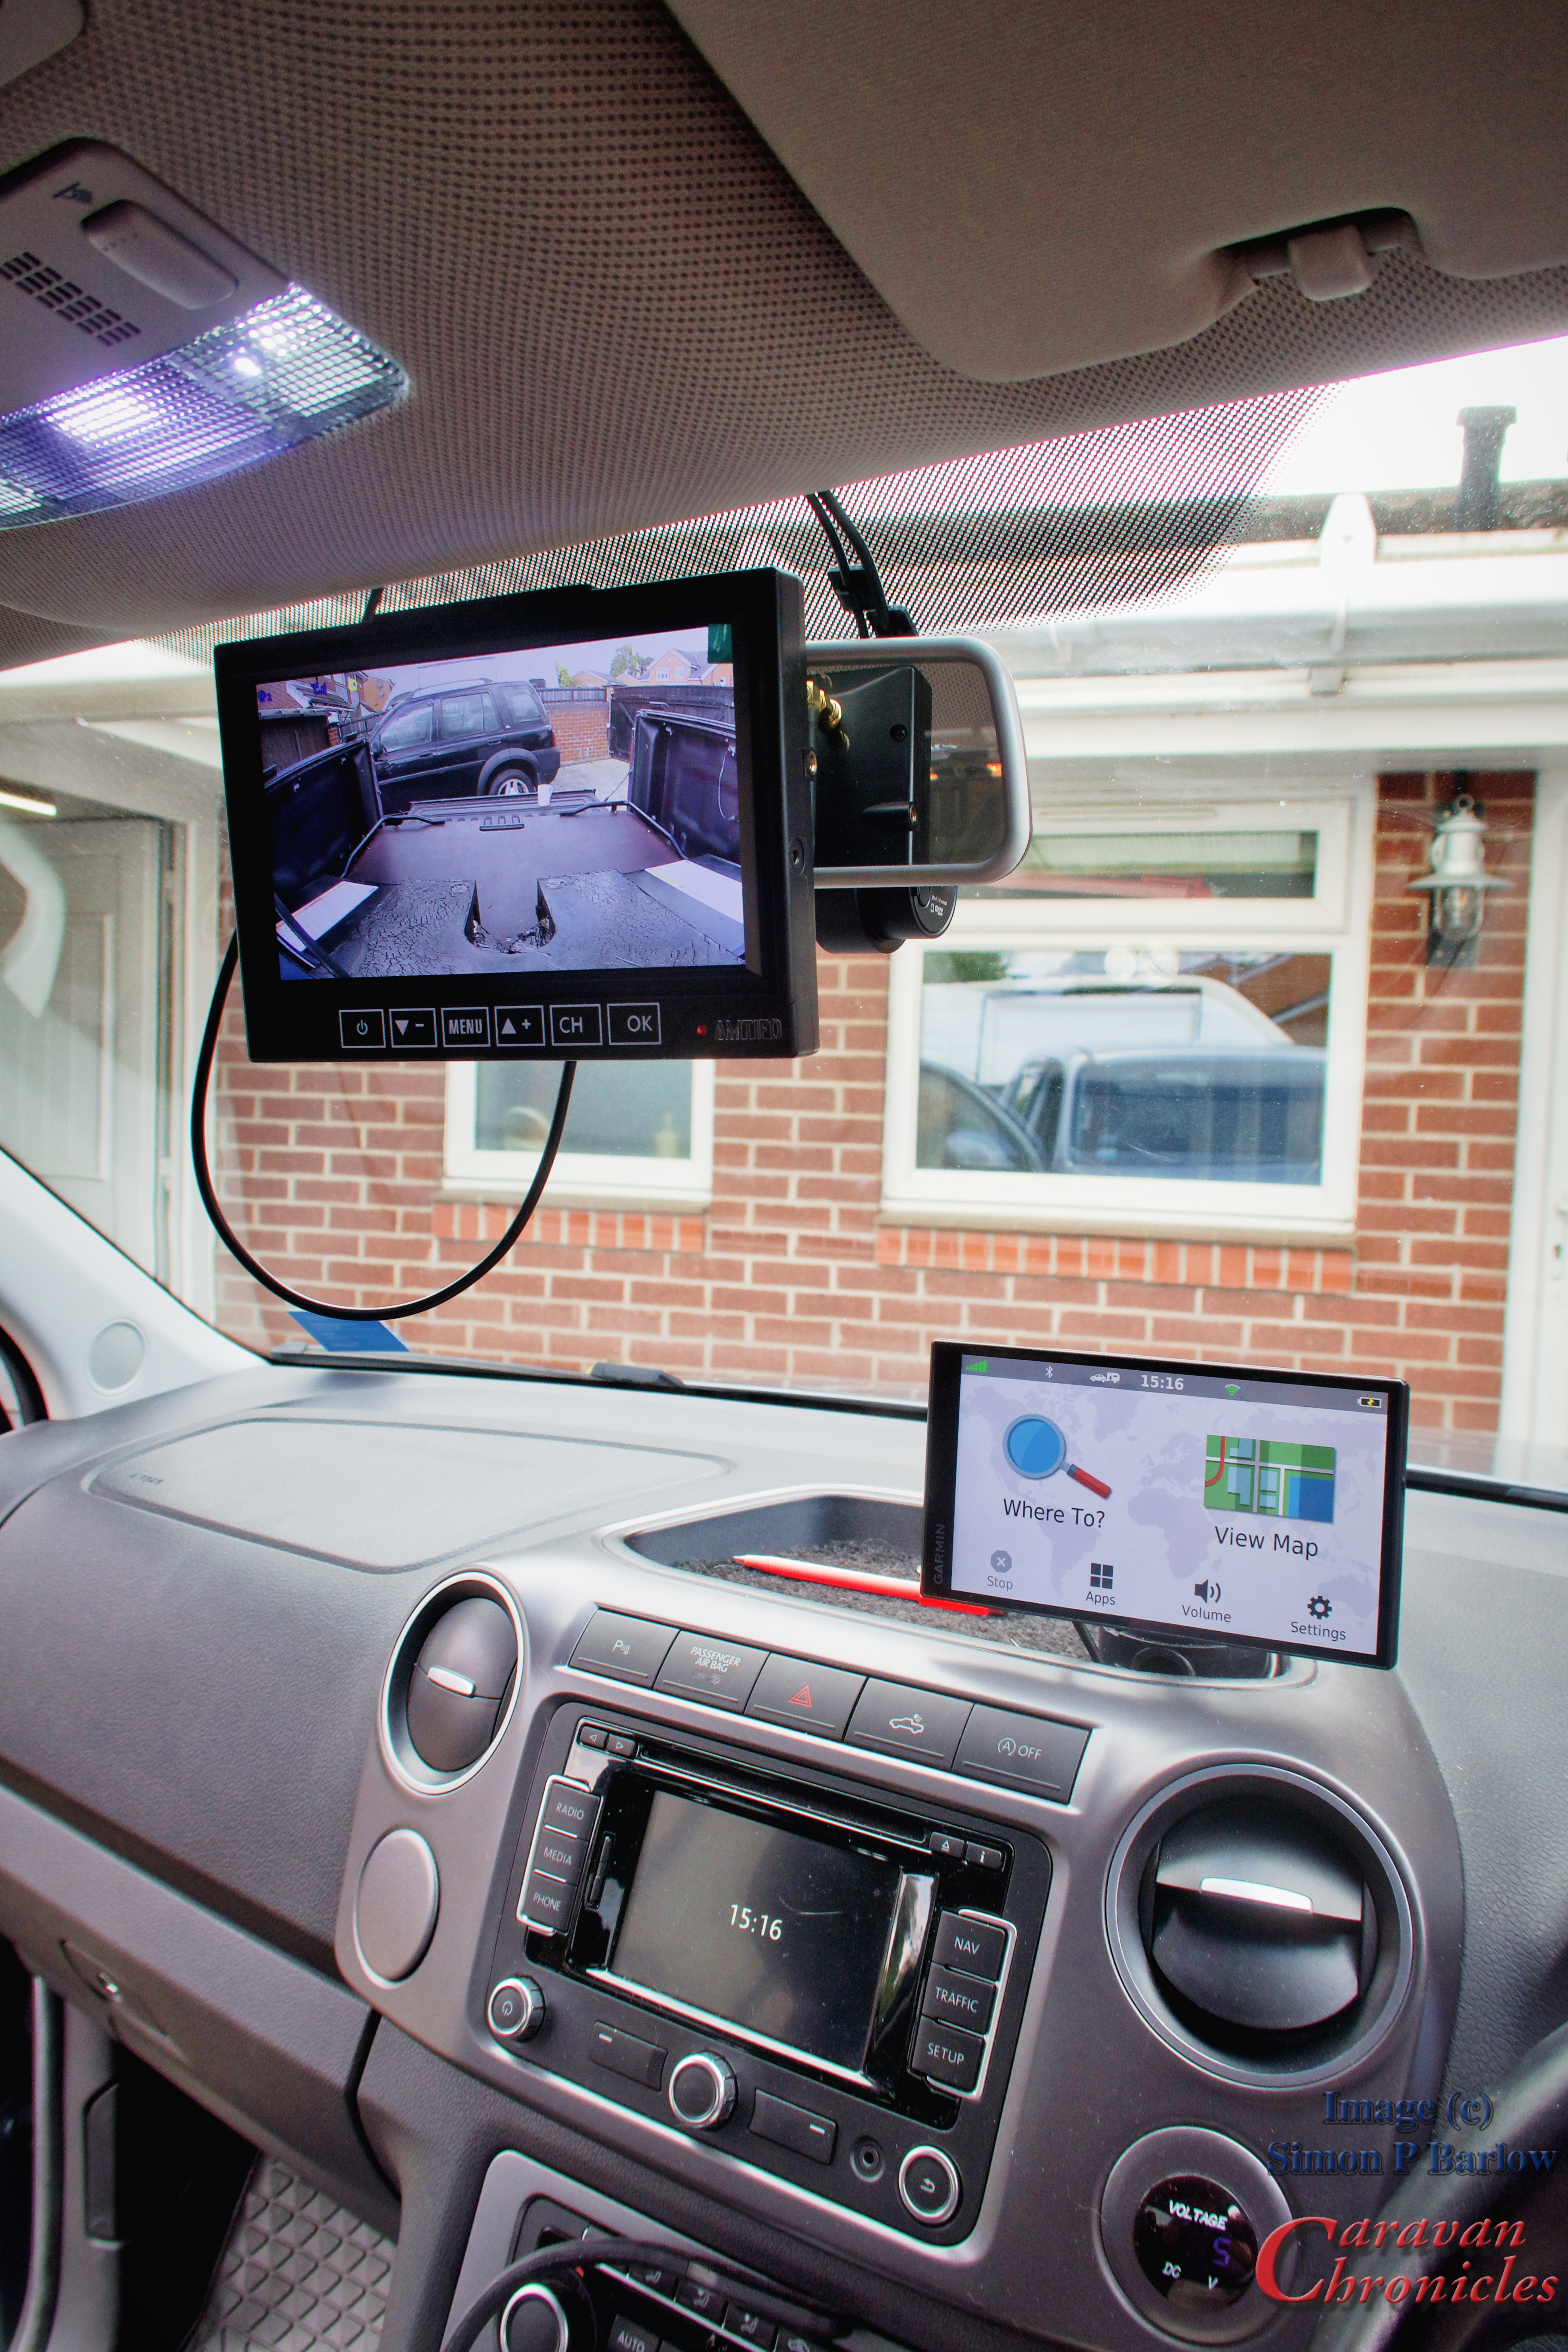
Mounting The Screen…
In the box comes a couple of options for mounting the screen… fixed dash mount or sucker on the windscreen mount. I sat in the truck for ages moving the screen about… then thinking of moving the Sat Nav somewhere else so I could locate the rear view screen in its place. Then I had one of those “Doh” moments…. why not put it where the rear view mirror is as the mirror is really just full of caravan nose cap when towing. I know they do make mirrors with screens in them but I looked at a couple of these at the caravan show and they seemed really small… a honking seven inch screen on you mirror is much better IMHO. I’ve also discovered that located there its still natural to glance at it as you would normally look at your mirror and its also unaffected by sunlight reflections.
I came up with a simple solution that used a tiny elasticated cord and a pad…. it kept the screen off the mirror and gave enough room to angle the two small aerials downwards behind the screen. I installed a power feed via the roof lining and can simply unplug the screen and remove to stow safely when not towing.
Mounting it on the mirror also has a secondary advantage… I can angle the mirror so that Sue in the passenger seat can also see the screen… just incase!
I had never towed with a rear view camera before and after fitting I really can’t understand why caravan manufacturers aren’t fitting these as standard.
How’s It Working Out?
Picture is clear and bright, no drop out or freezing, there are options to change screen layout, number of cameras displayed etc. etc. Even my unconventional screen mounting with the two aerials pointing down doesn’t seem to affect things. The screen recording works great…. I can see this being a great help especially if you have side cameras to compliment your dash cam system in your vehicle.
Adding To The System…
I said that you can add to the system… up to 4 cameras. Well after using it for a few weeks now I will be adding a left and right side rear facing camera so I can see down the full length of the trailer, but first I think I will be adding a rear view camera on the pickup bed to make hitching up a lot easier.
Would I recommend a rear view camera?…. most definitely. Would I recommend this rear view camera?… well based on my experiences so far, yes. For the money… £110 is not a lot to invest in something like this.
OK a quick heads-up… I have moved away from X(Twitter) to Mastodon. This morning Elon Musk decided that TweetDeck, which I and many others have used free since it’s release, was changed and could only be used if you paid for a ‘blue tick’ on your account. In my case about £130 per year.
So, due to the insane amount of tweets that are totally irrelevant and the equally insane amount of advertising tweets that come through and as you can’t filter on the native X(Twitter) platform I have moved everything over to Mastodon. I can be found here:
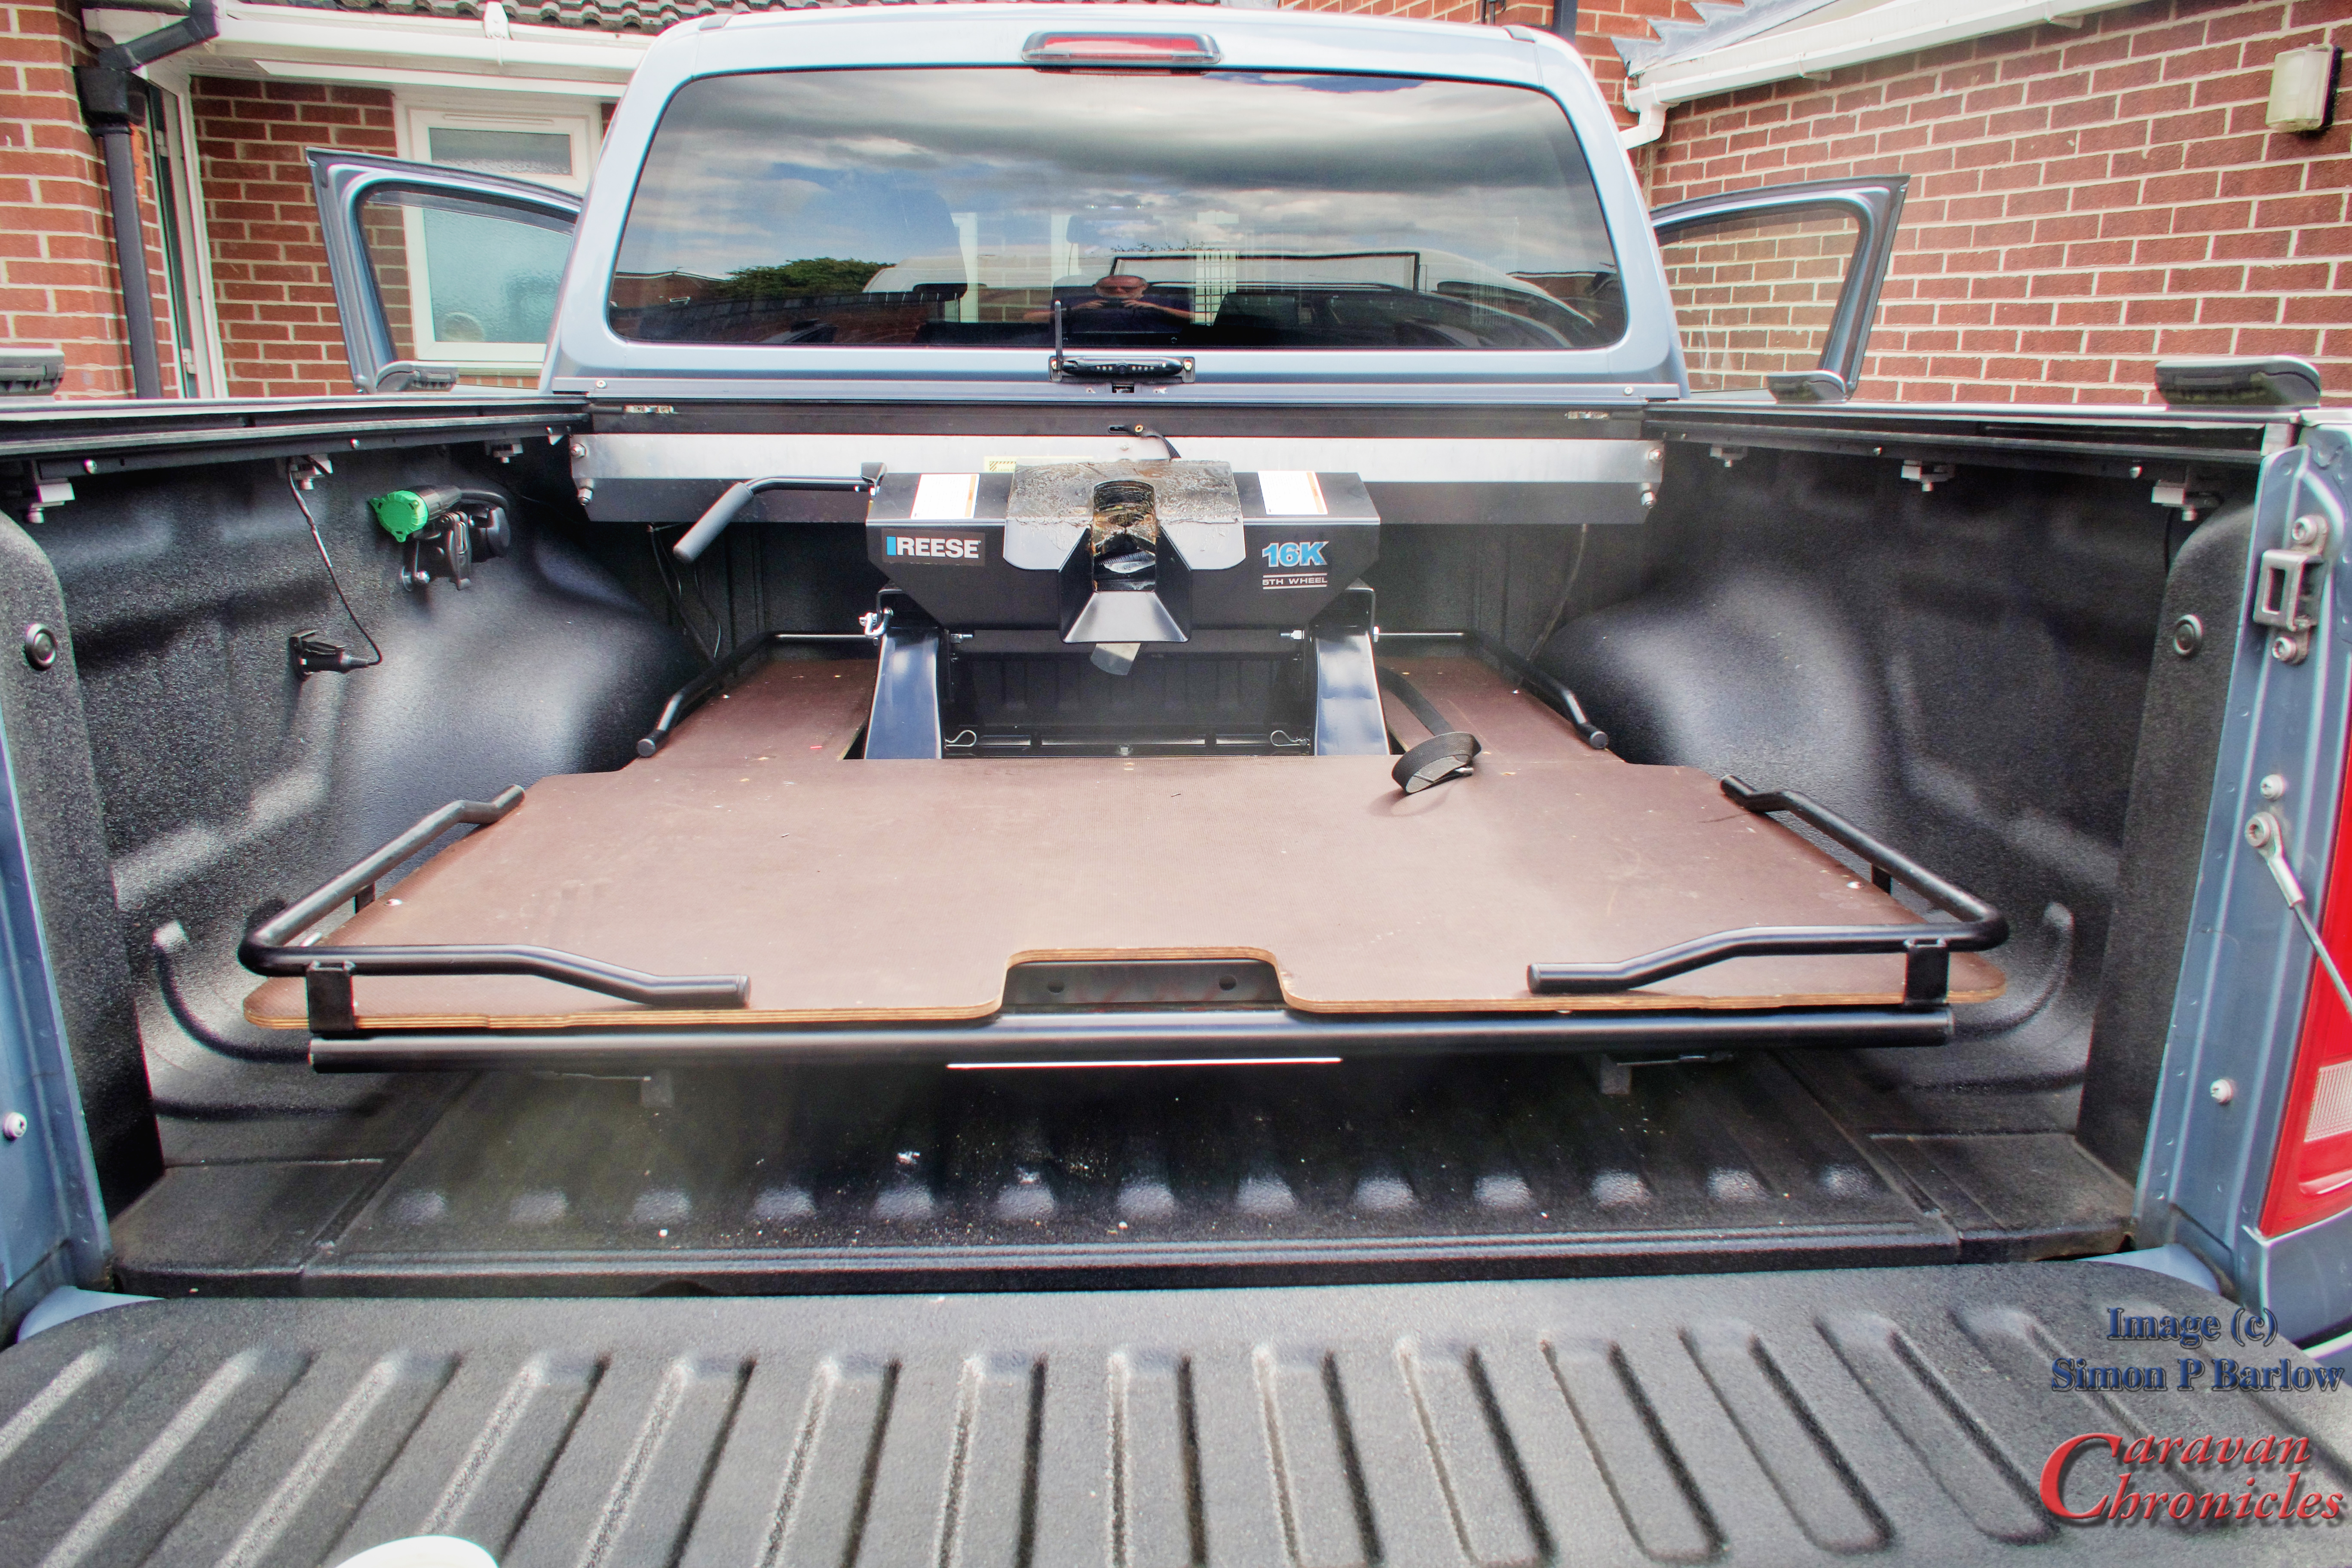
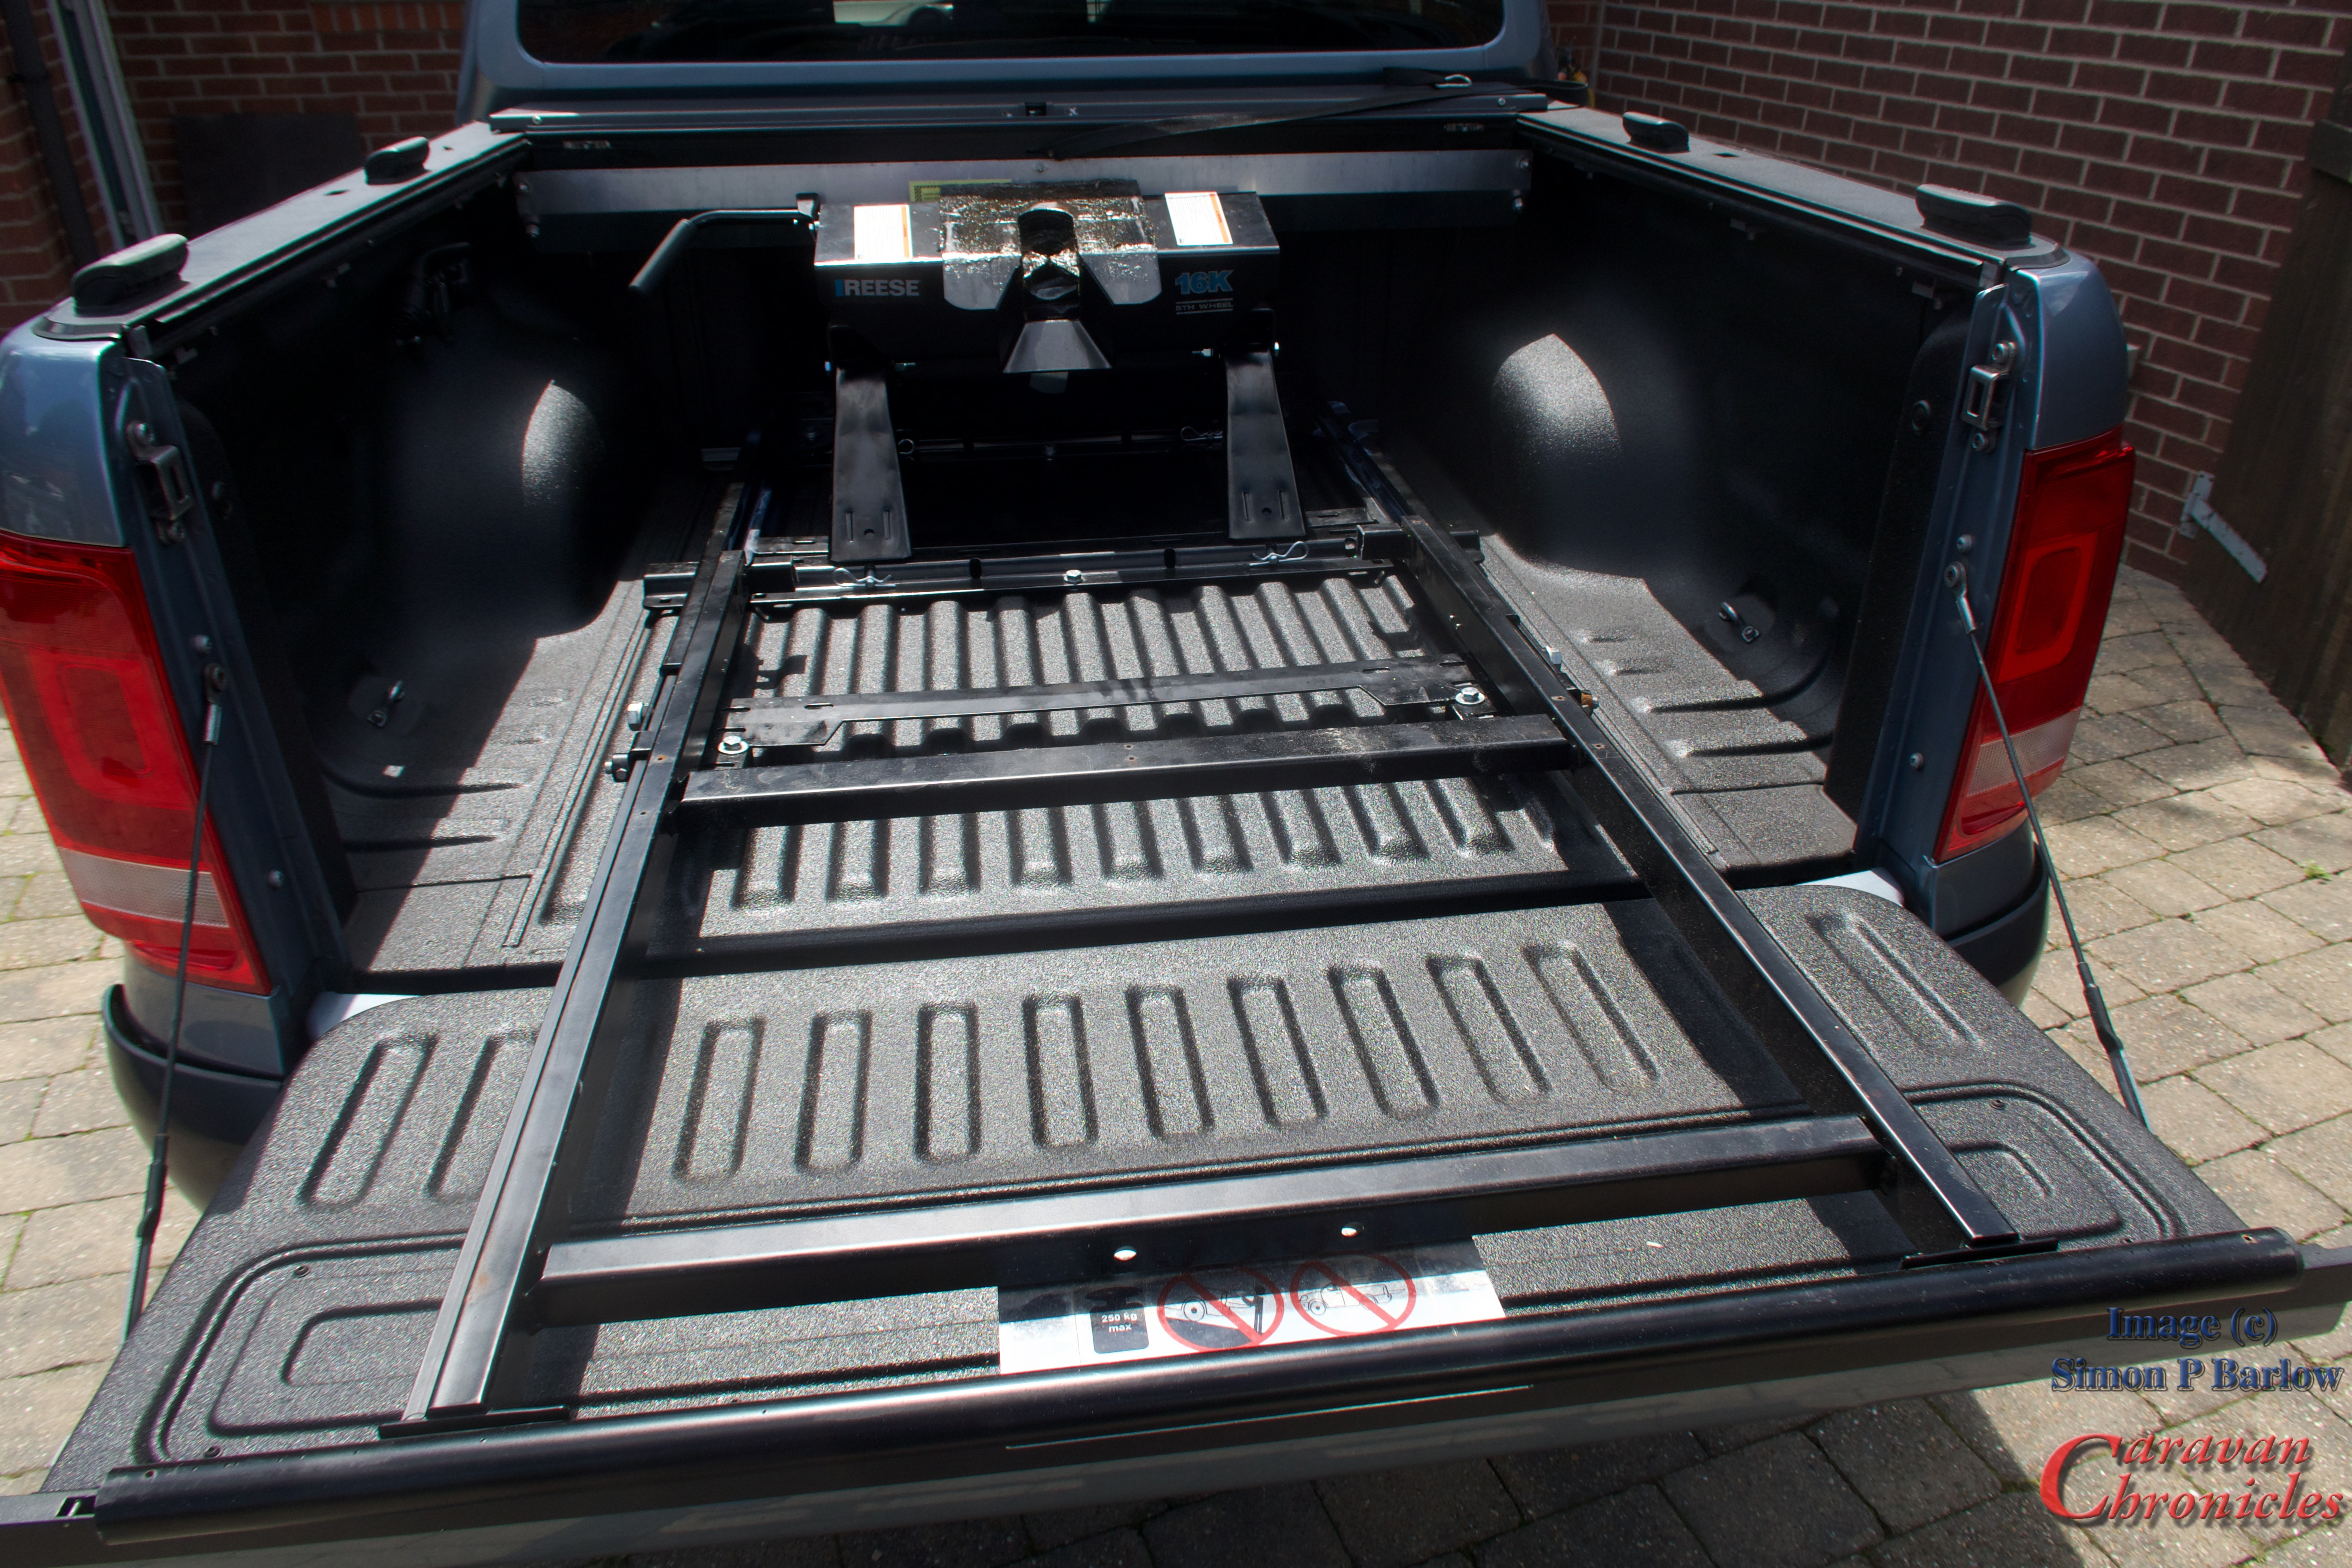
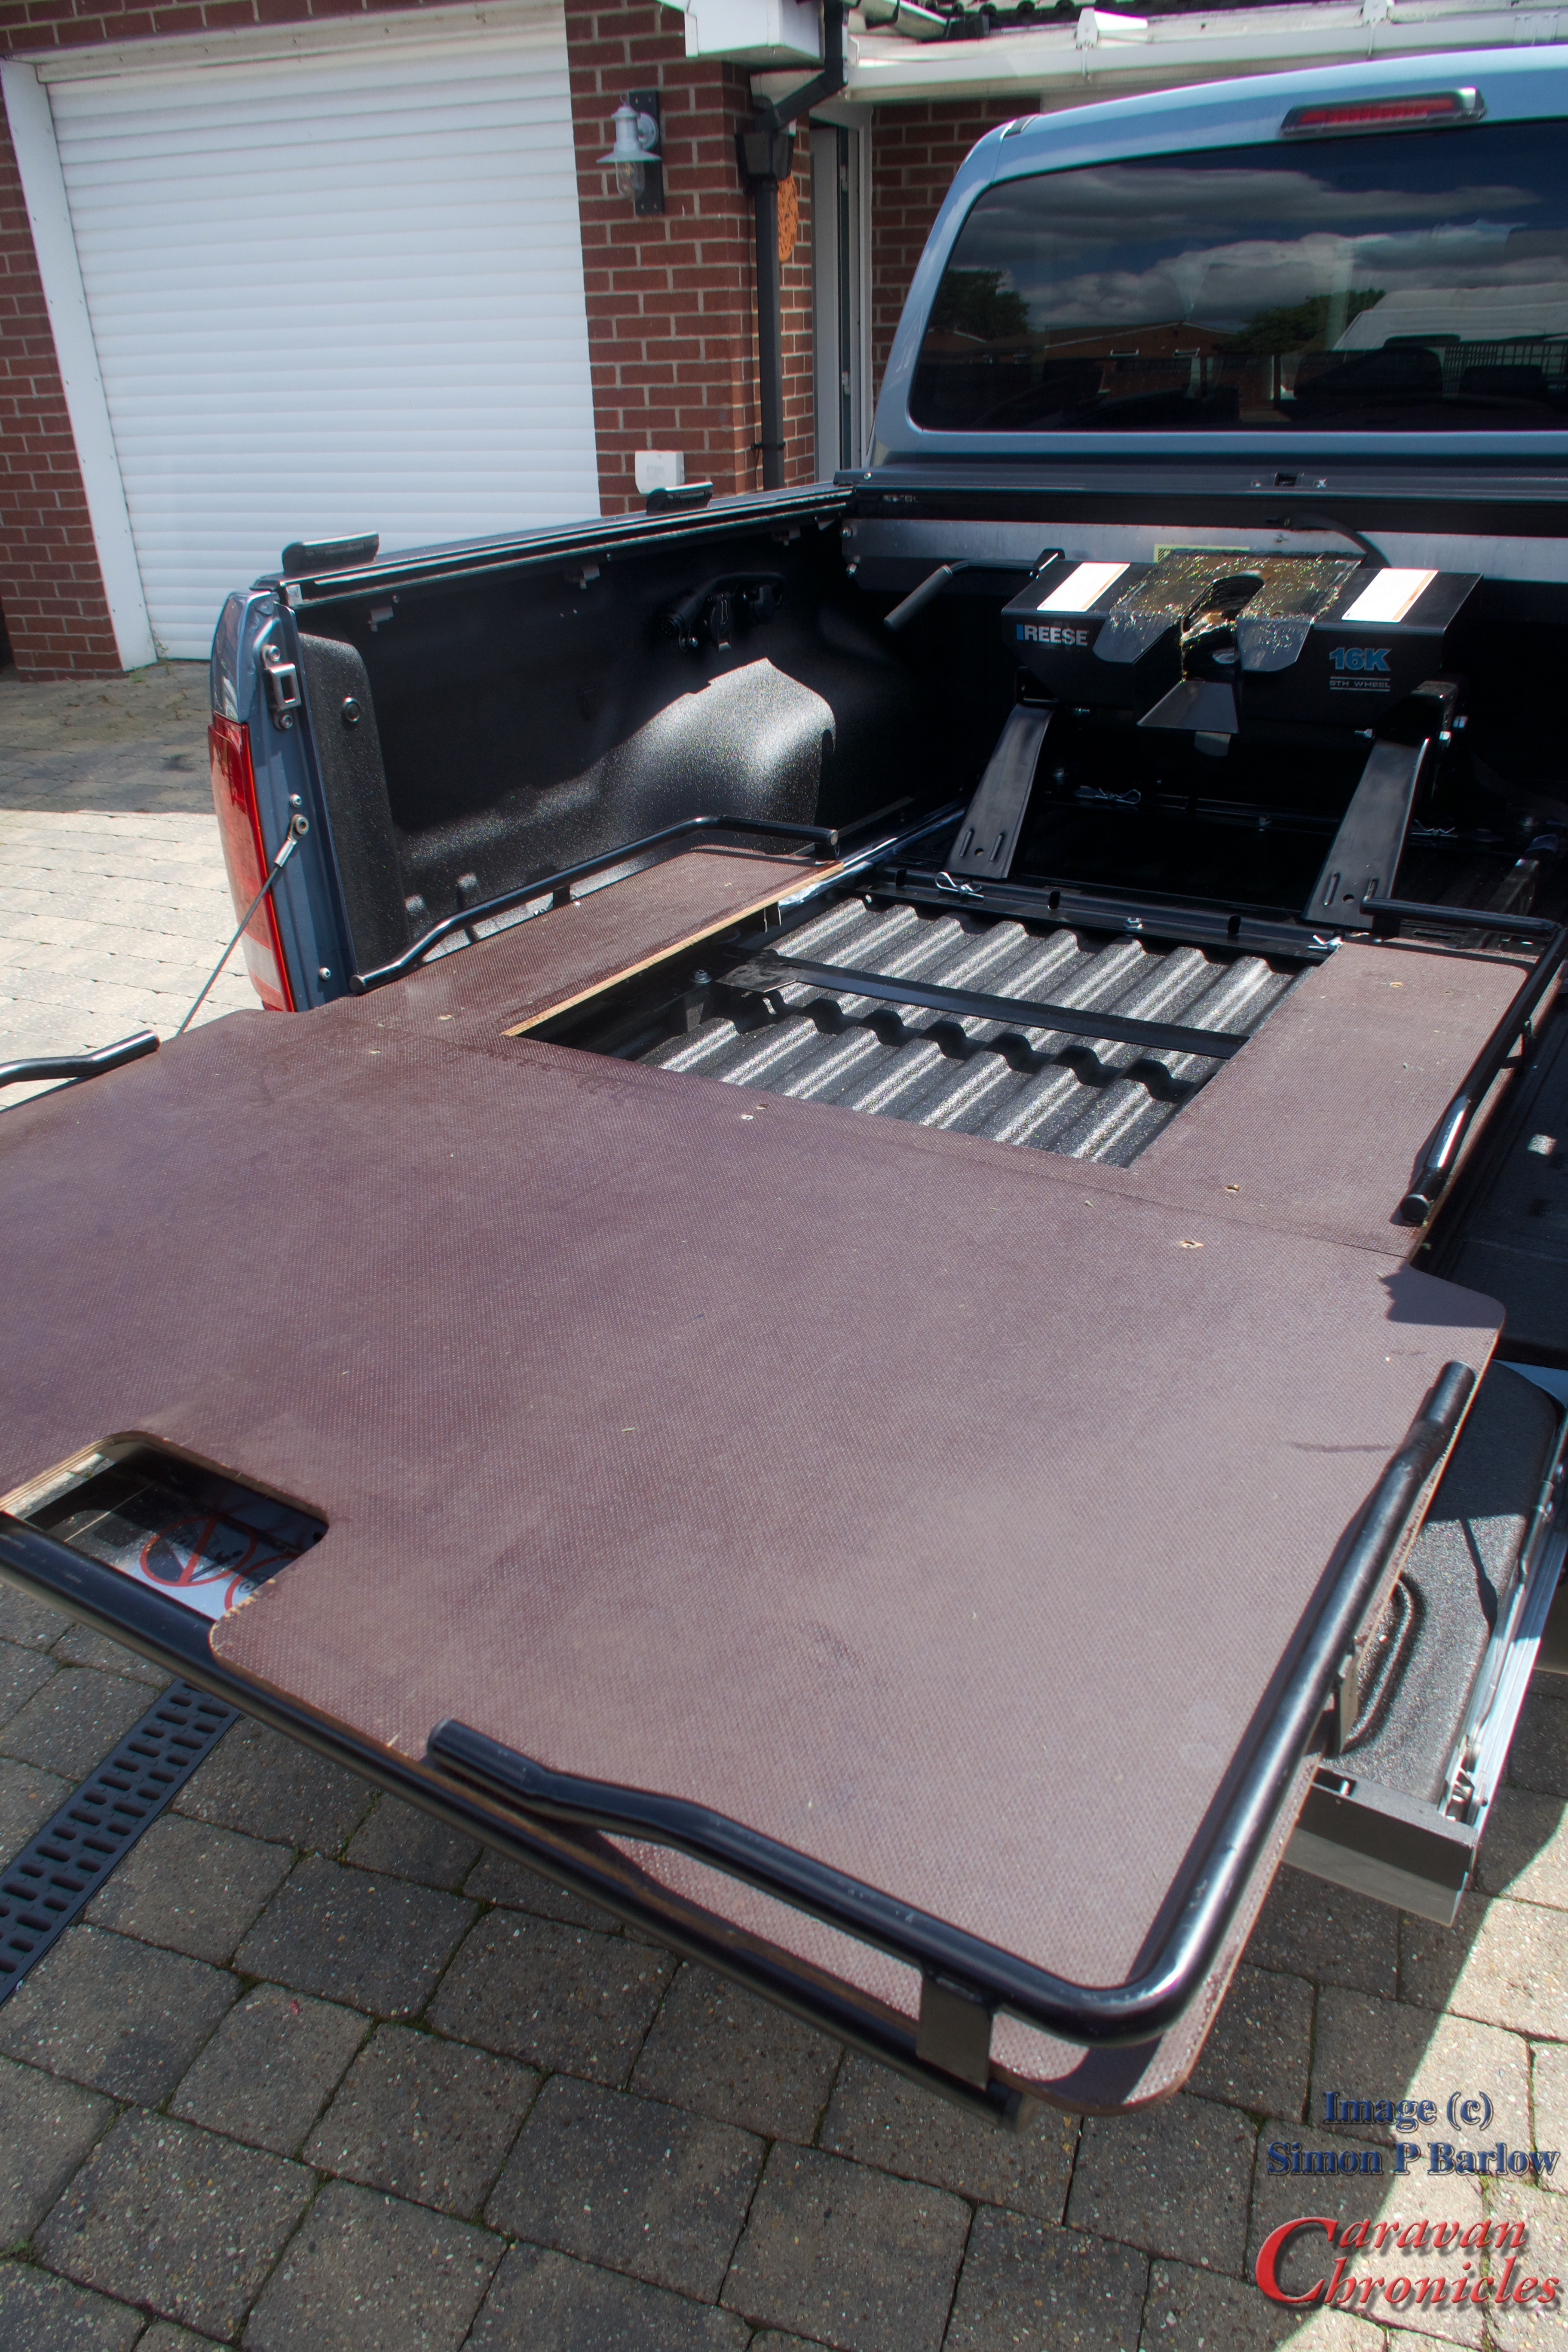
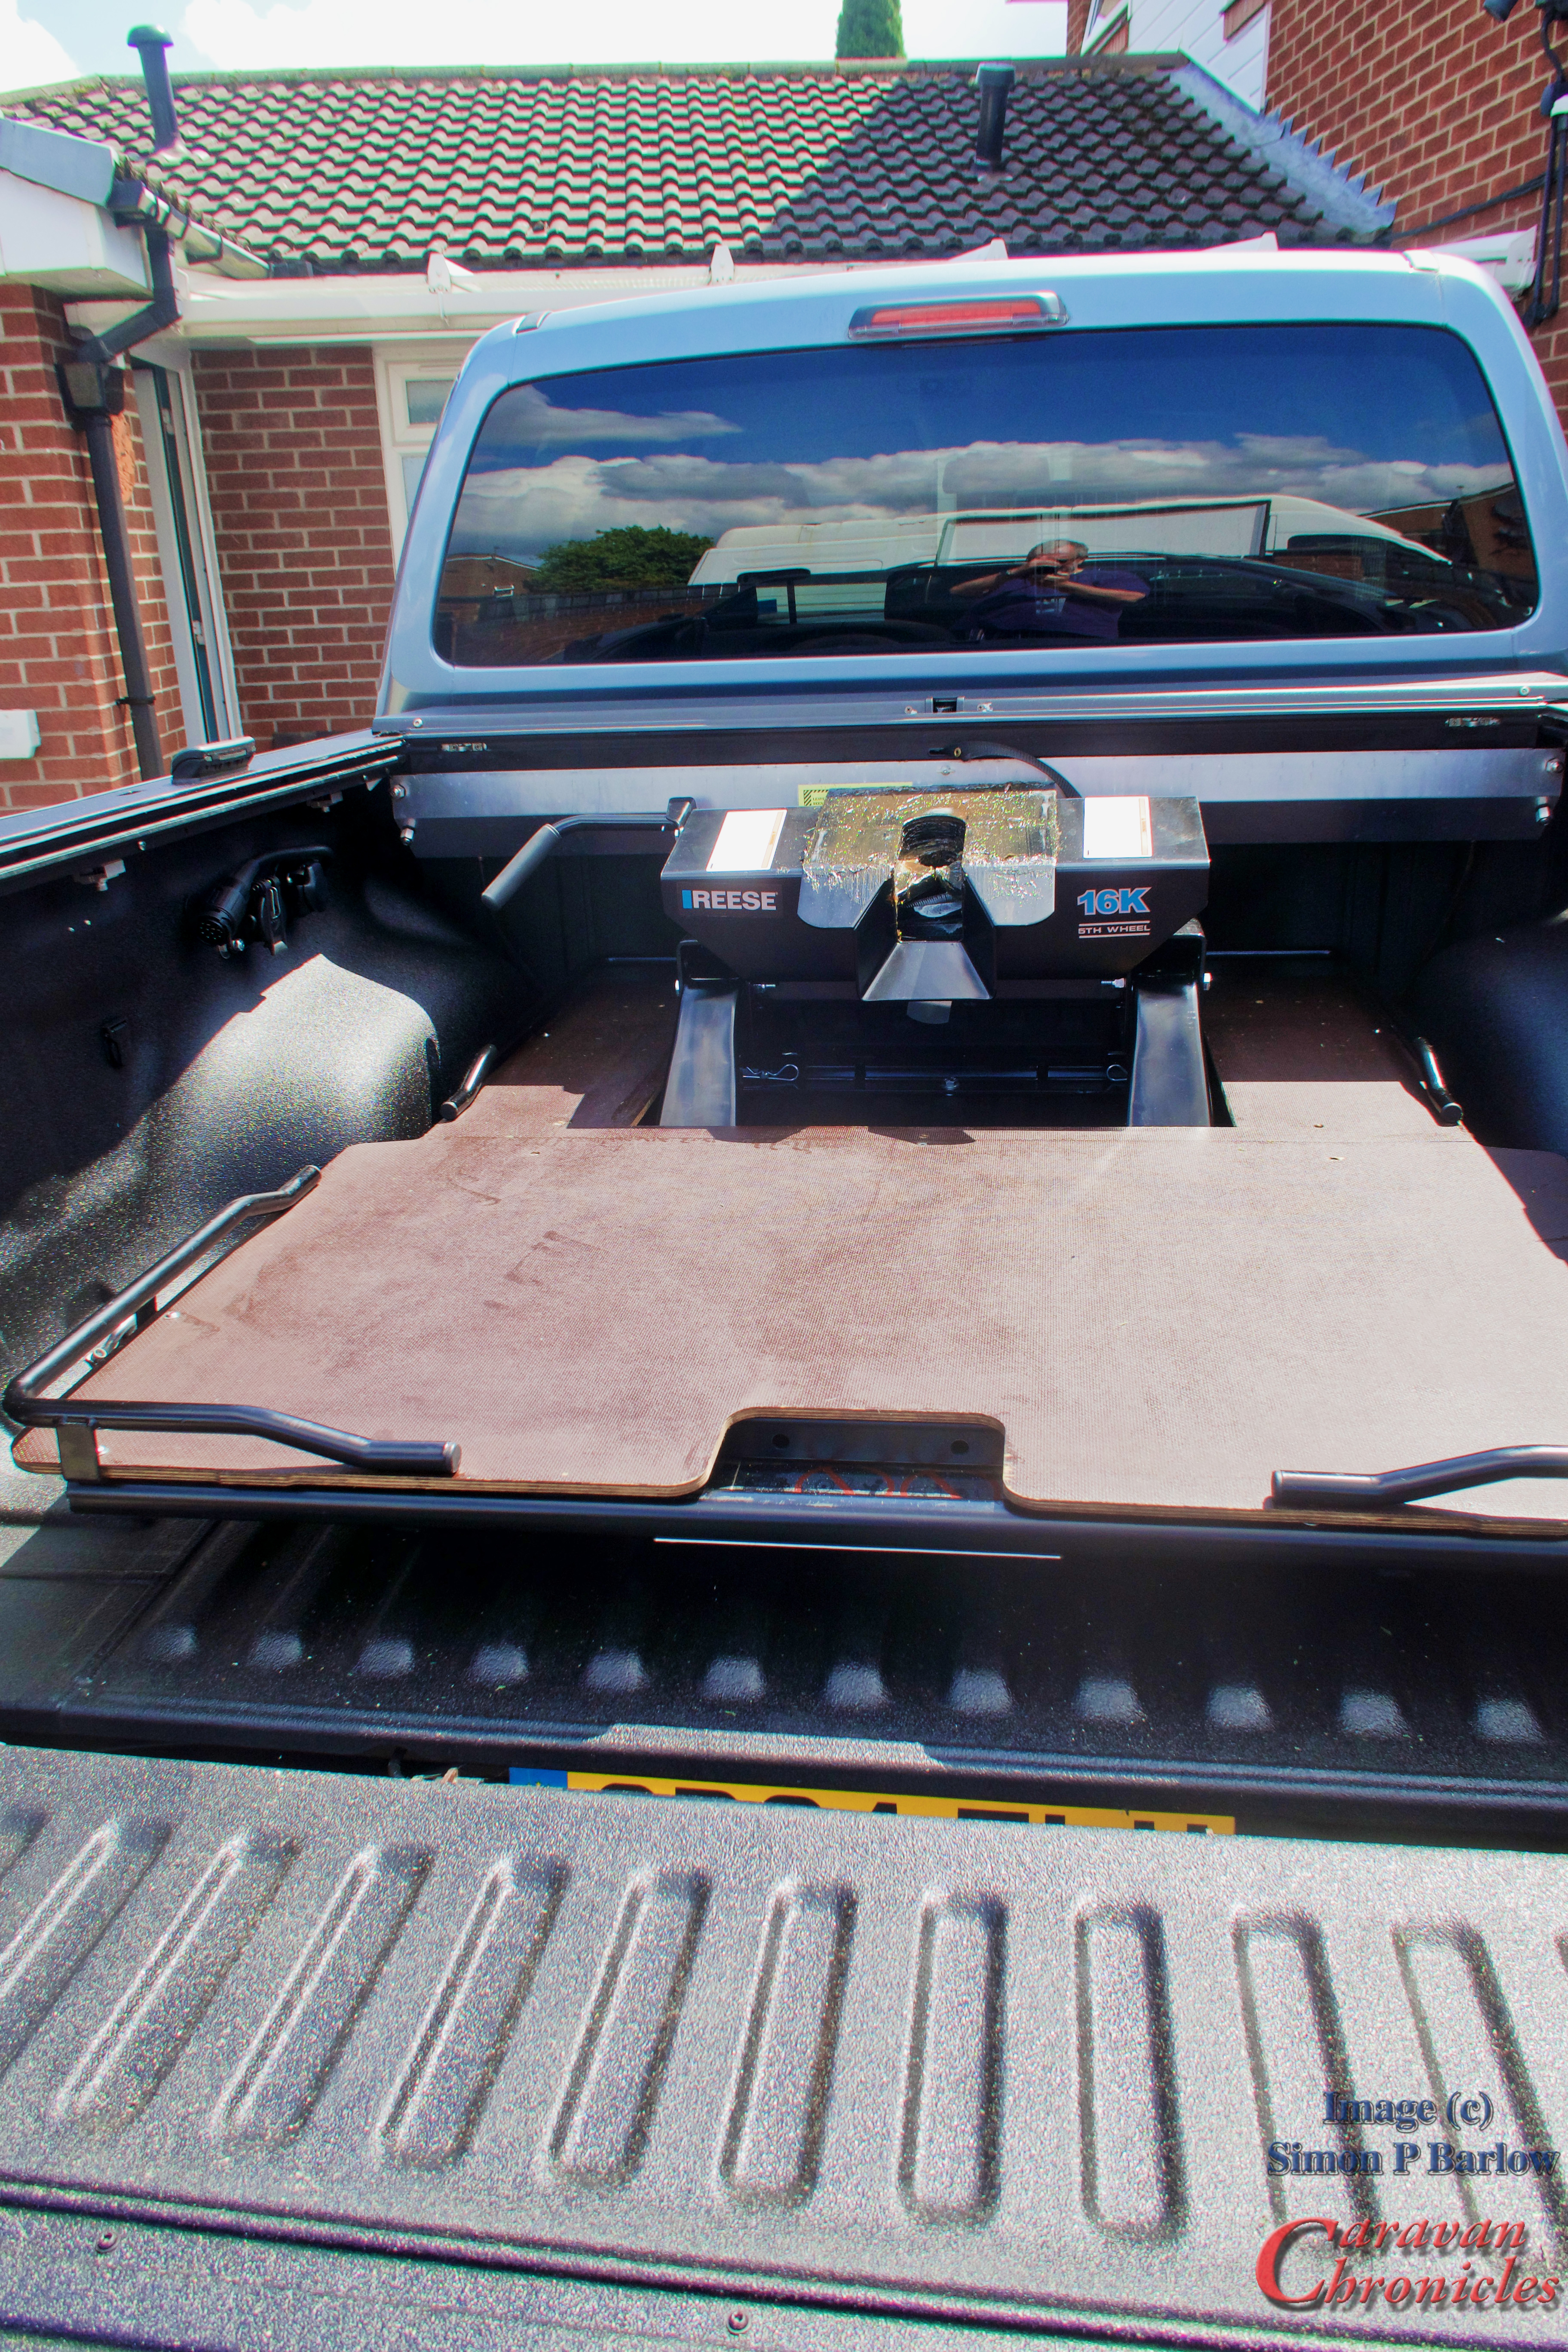
After our trip out to Donkey Creek Farm I started procrastinating about the slide out bed we used to have in the Amarok. Did I need it… was it worth it….. should I put it back in? Well my body kind of made the decision for me after loading and unloading some heavy boxes from the bed reaching over the opened tailgate it kind of said “We ain’t doin’ that again big boy“.
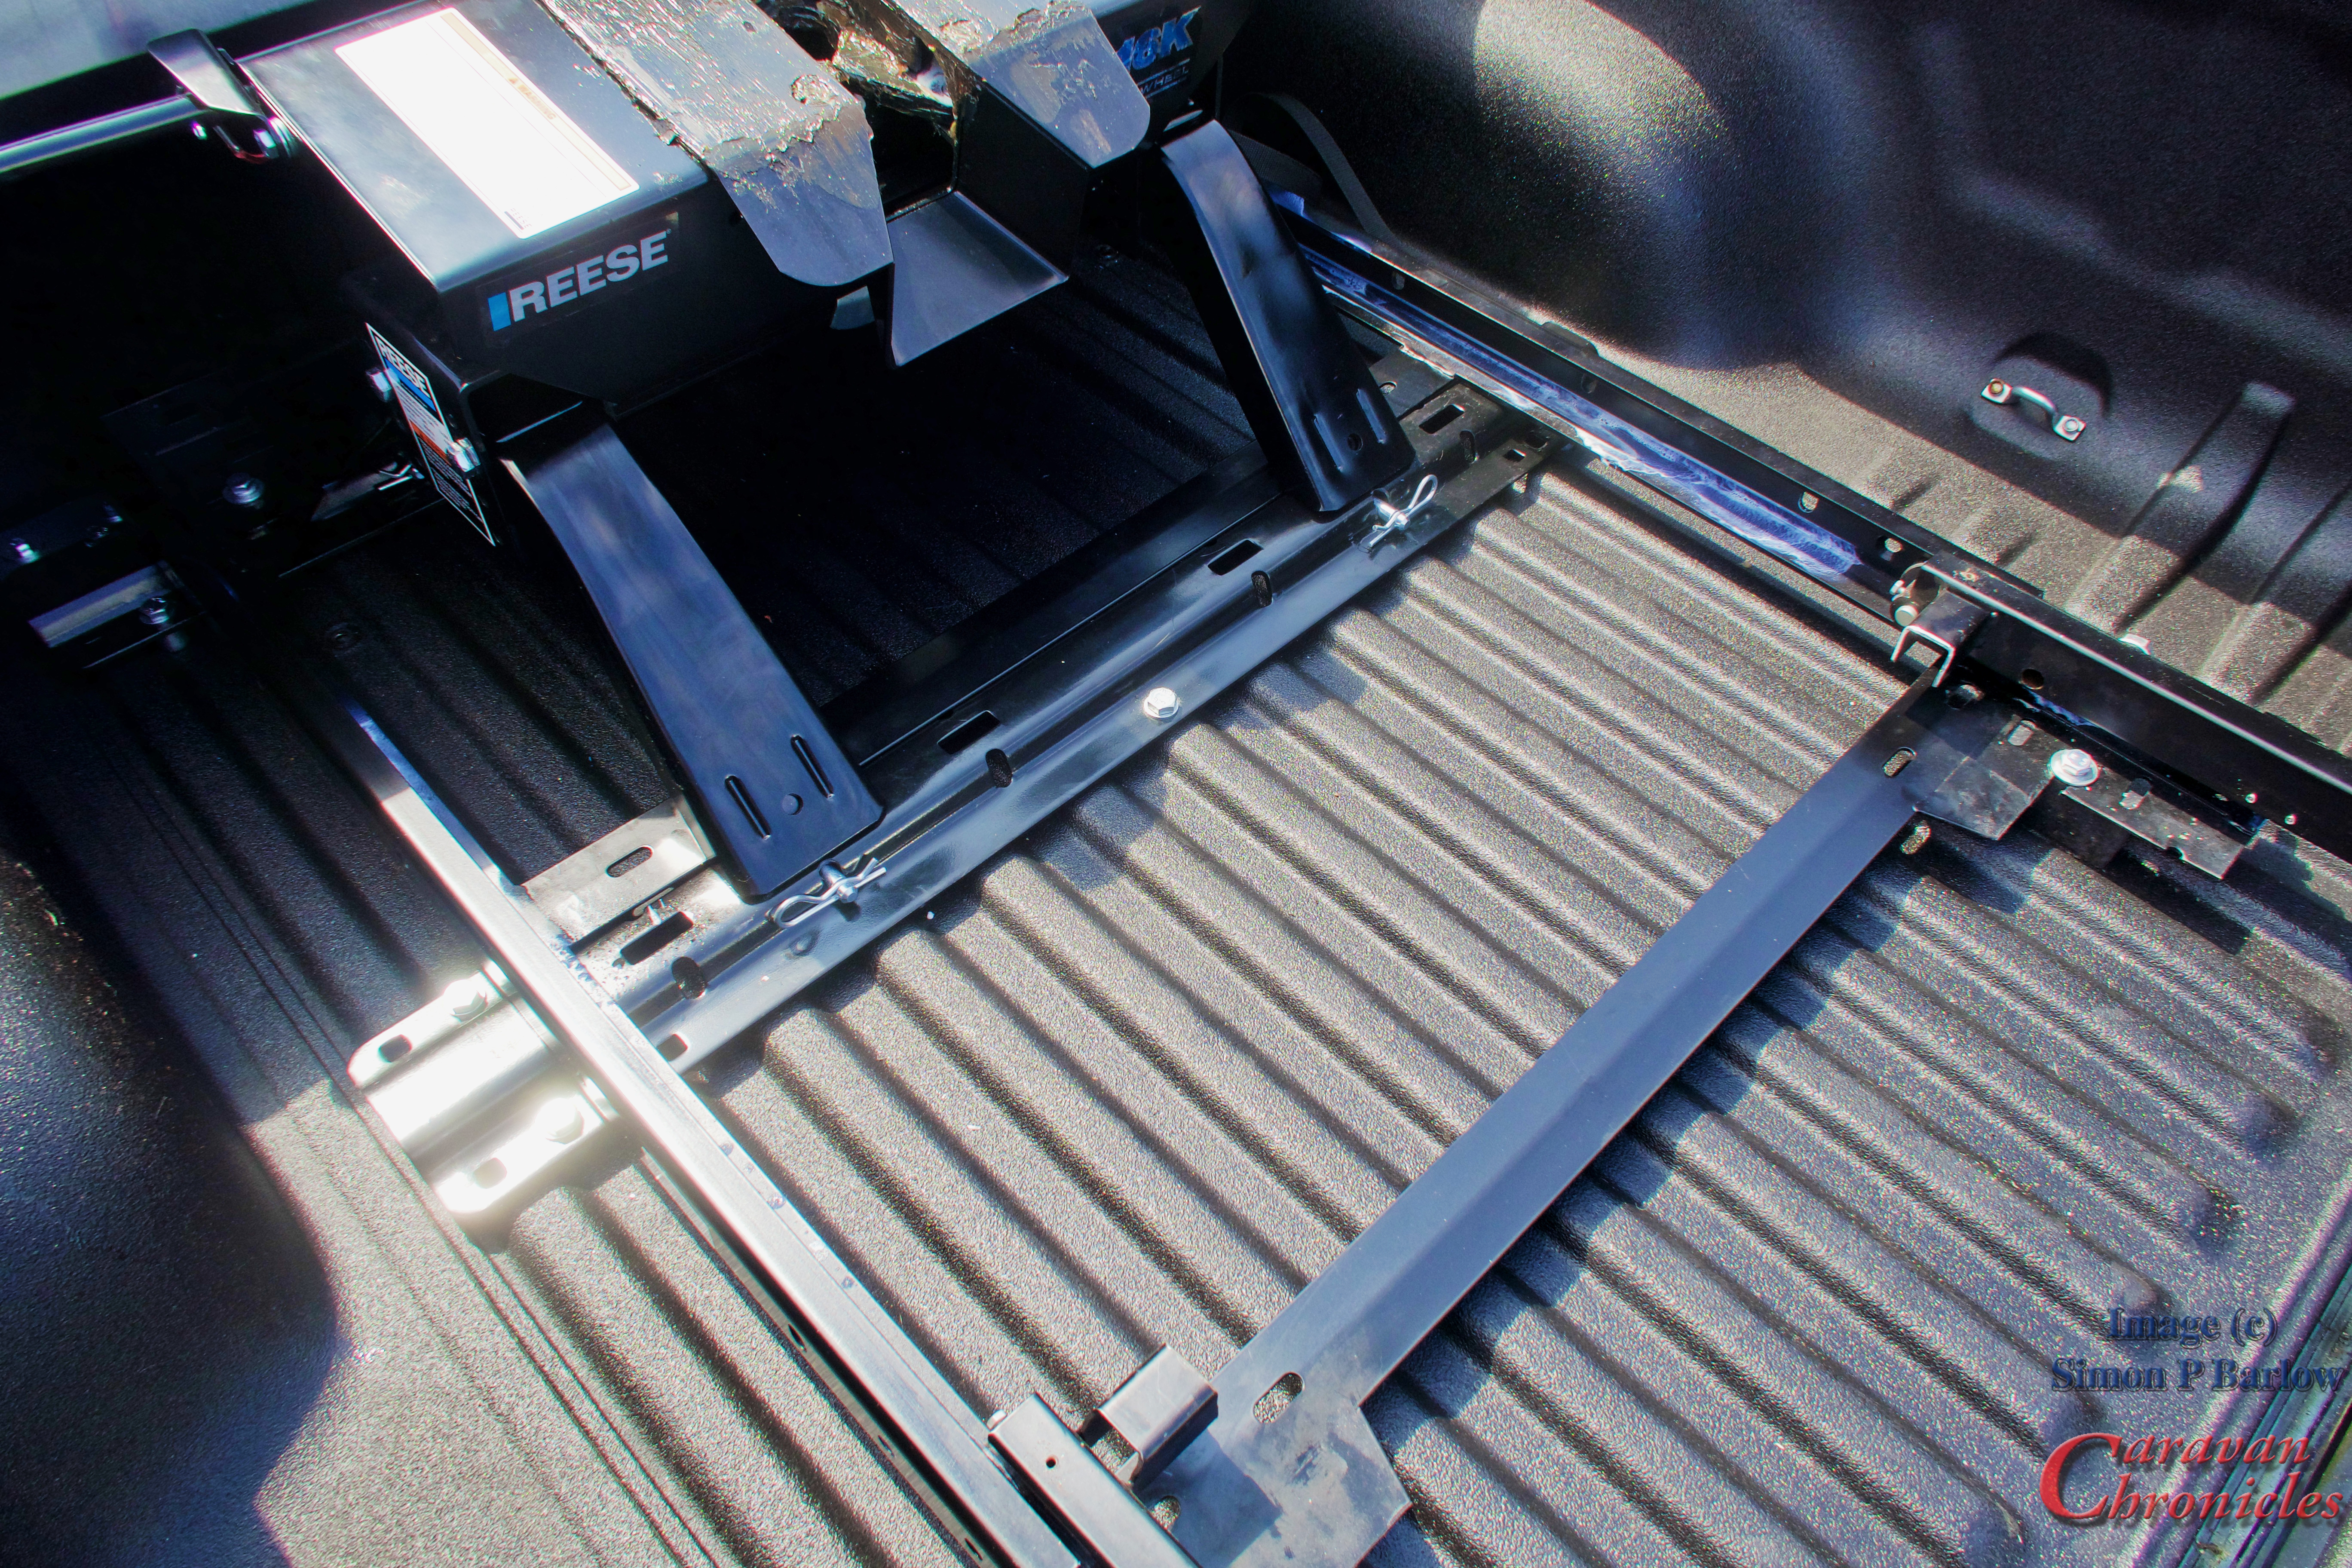
I had to set about working out how to install the base of the slider in and around the Reese 5th wheel hitch and where it could be mounted. It also needed to be raised up 35mm so it would pass over the 5th wheel hitch cross rails and still allow me to pull the pins so the hitch could be lifted out if required.
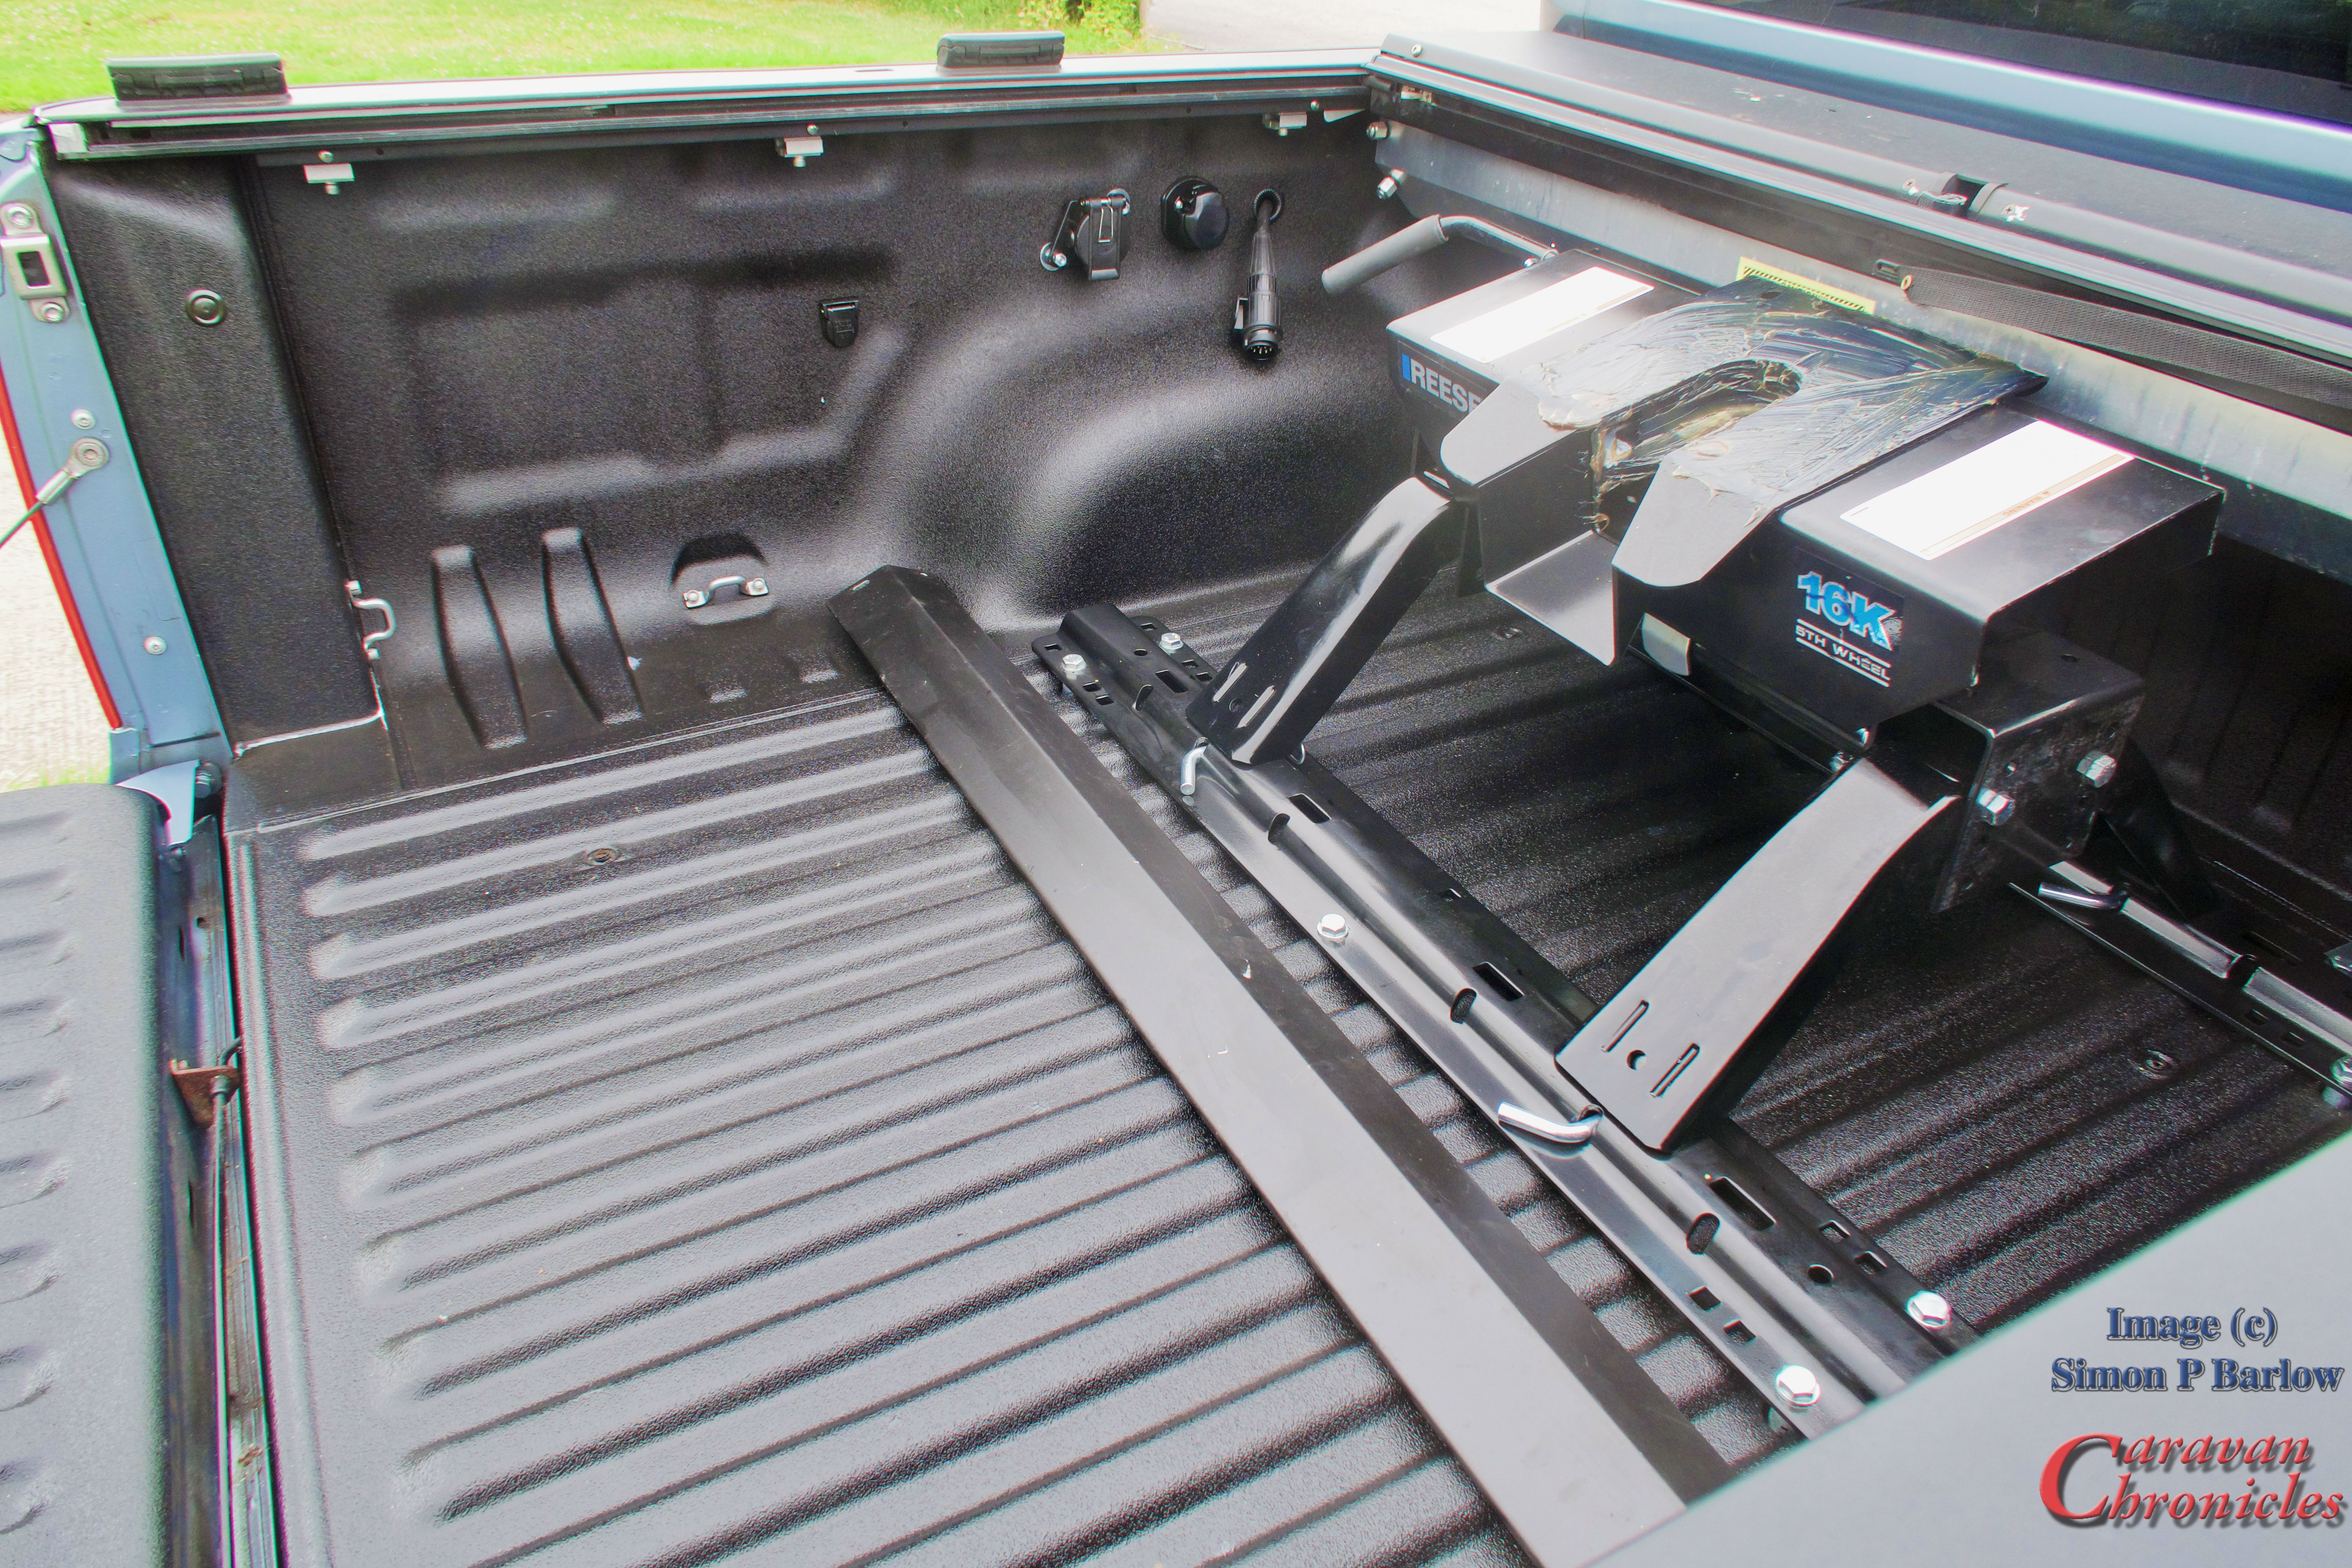
I got lucky…. with only having to cut out the rear cross bar the slide bed would fit and the original mounting holes lined up with the holes I drilled in the truck bed when I first installed it. Next step was to fabricate some spacers to raise it to the correct height.
I just happened to have a couple of blocks of high density poly in black so cut 4 100mm long by 35mm wide slats to fit under the frame and drilled 10mm holes through them for the mounting bolts. A quick trip to Francis Kirk – my local engineering fastening company. (I’ve been going there since 1976 for all my fastenings) got me four M10 grade 8 bolts of the correct length… I even splashed out on coated ones and nylock nuts.
A test fit of the sliding frame allowed me to see where I needed to cut so it would clear the hitch. A bit of quick work with a four inch grinder and cutting wheel and it slid in without any problems. I needed to remove the original locking pin system and a couple of coats of black rust preventative paint on cut areas that I’d smoothed off with a fine grinding disc soon had the sliding tray ready to be fitted again.
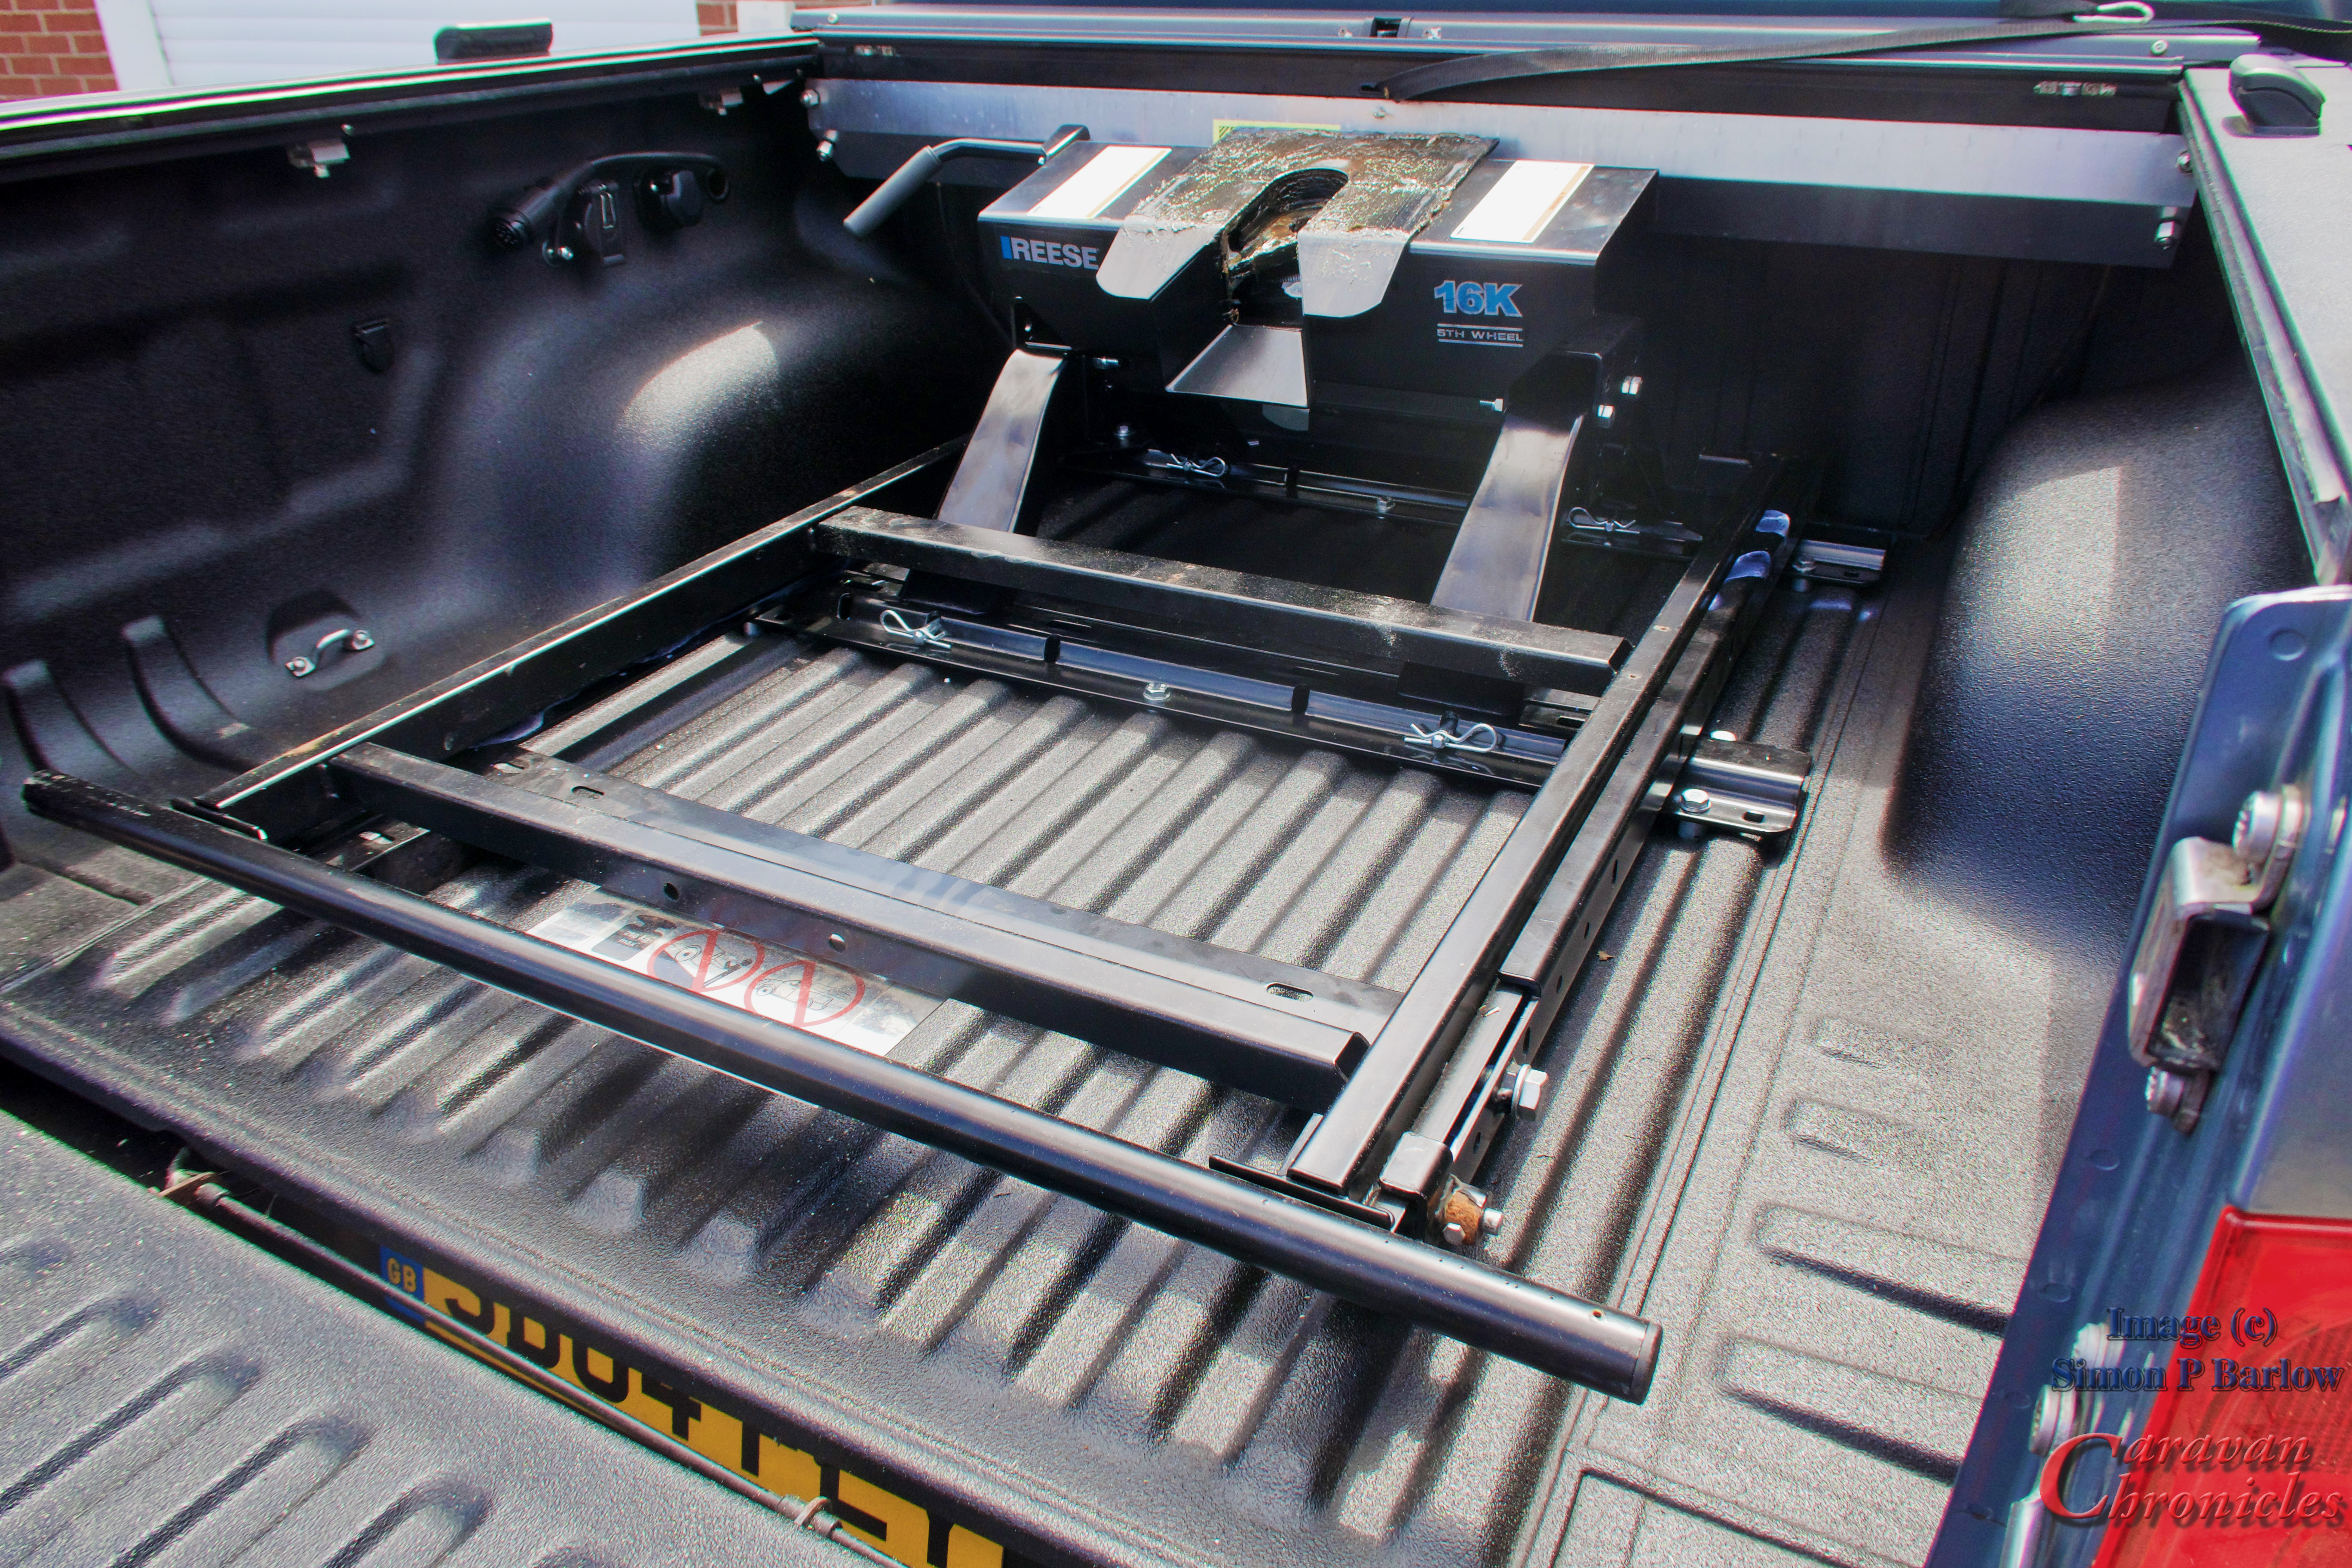
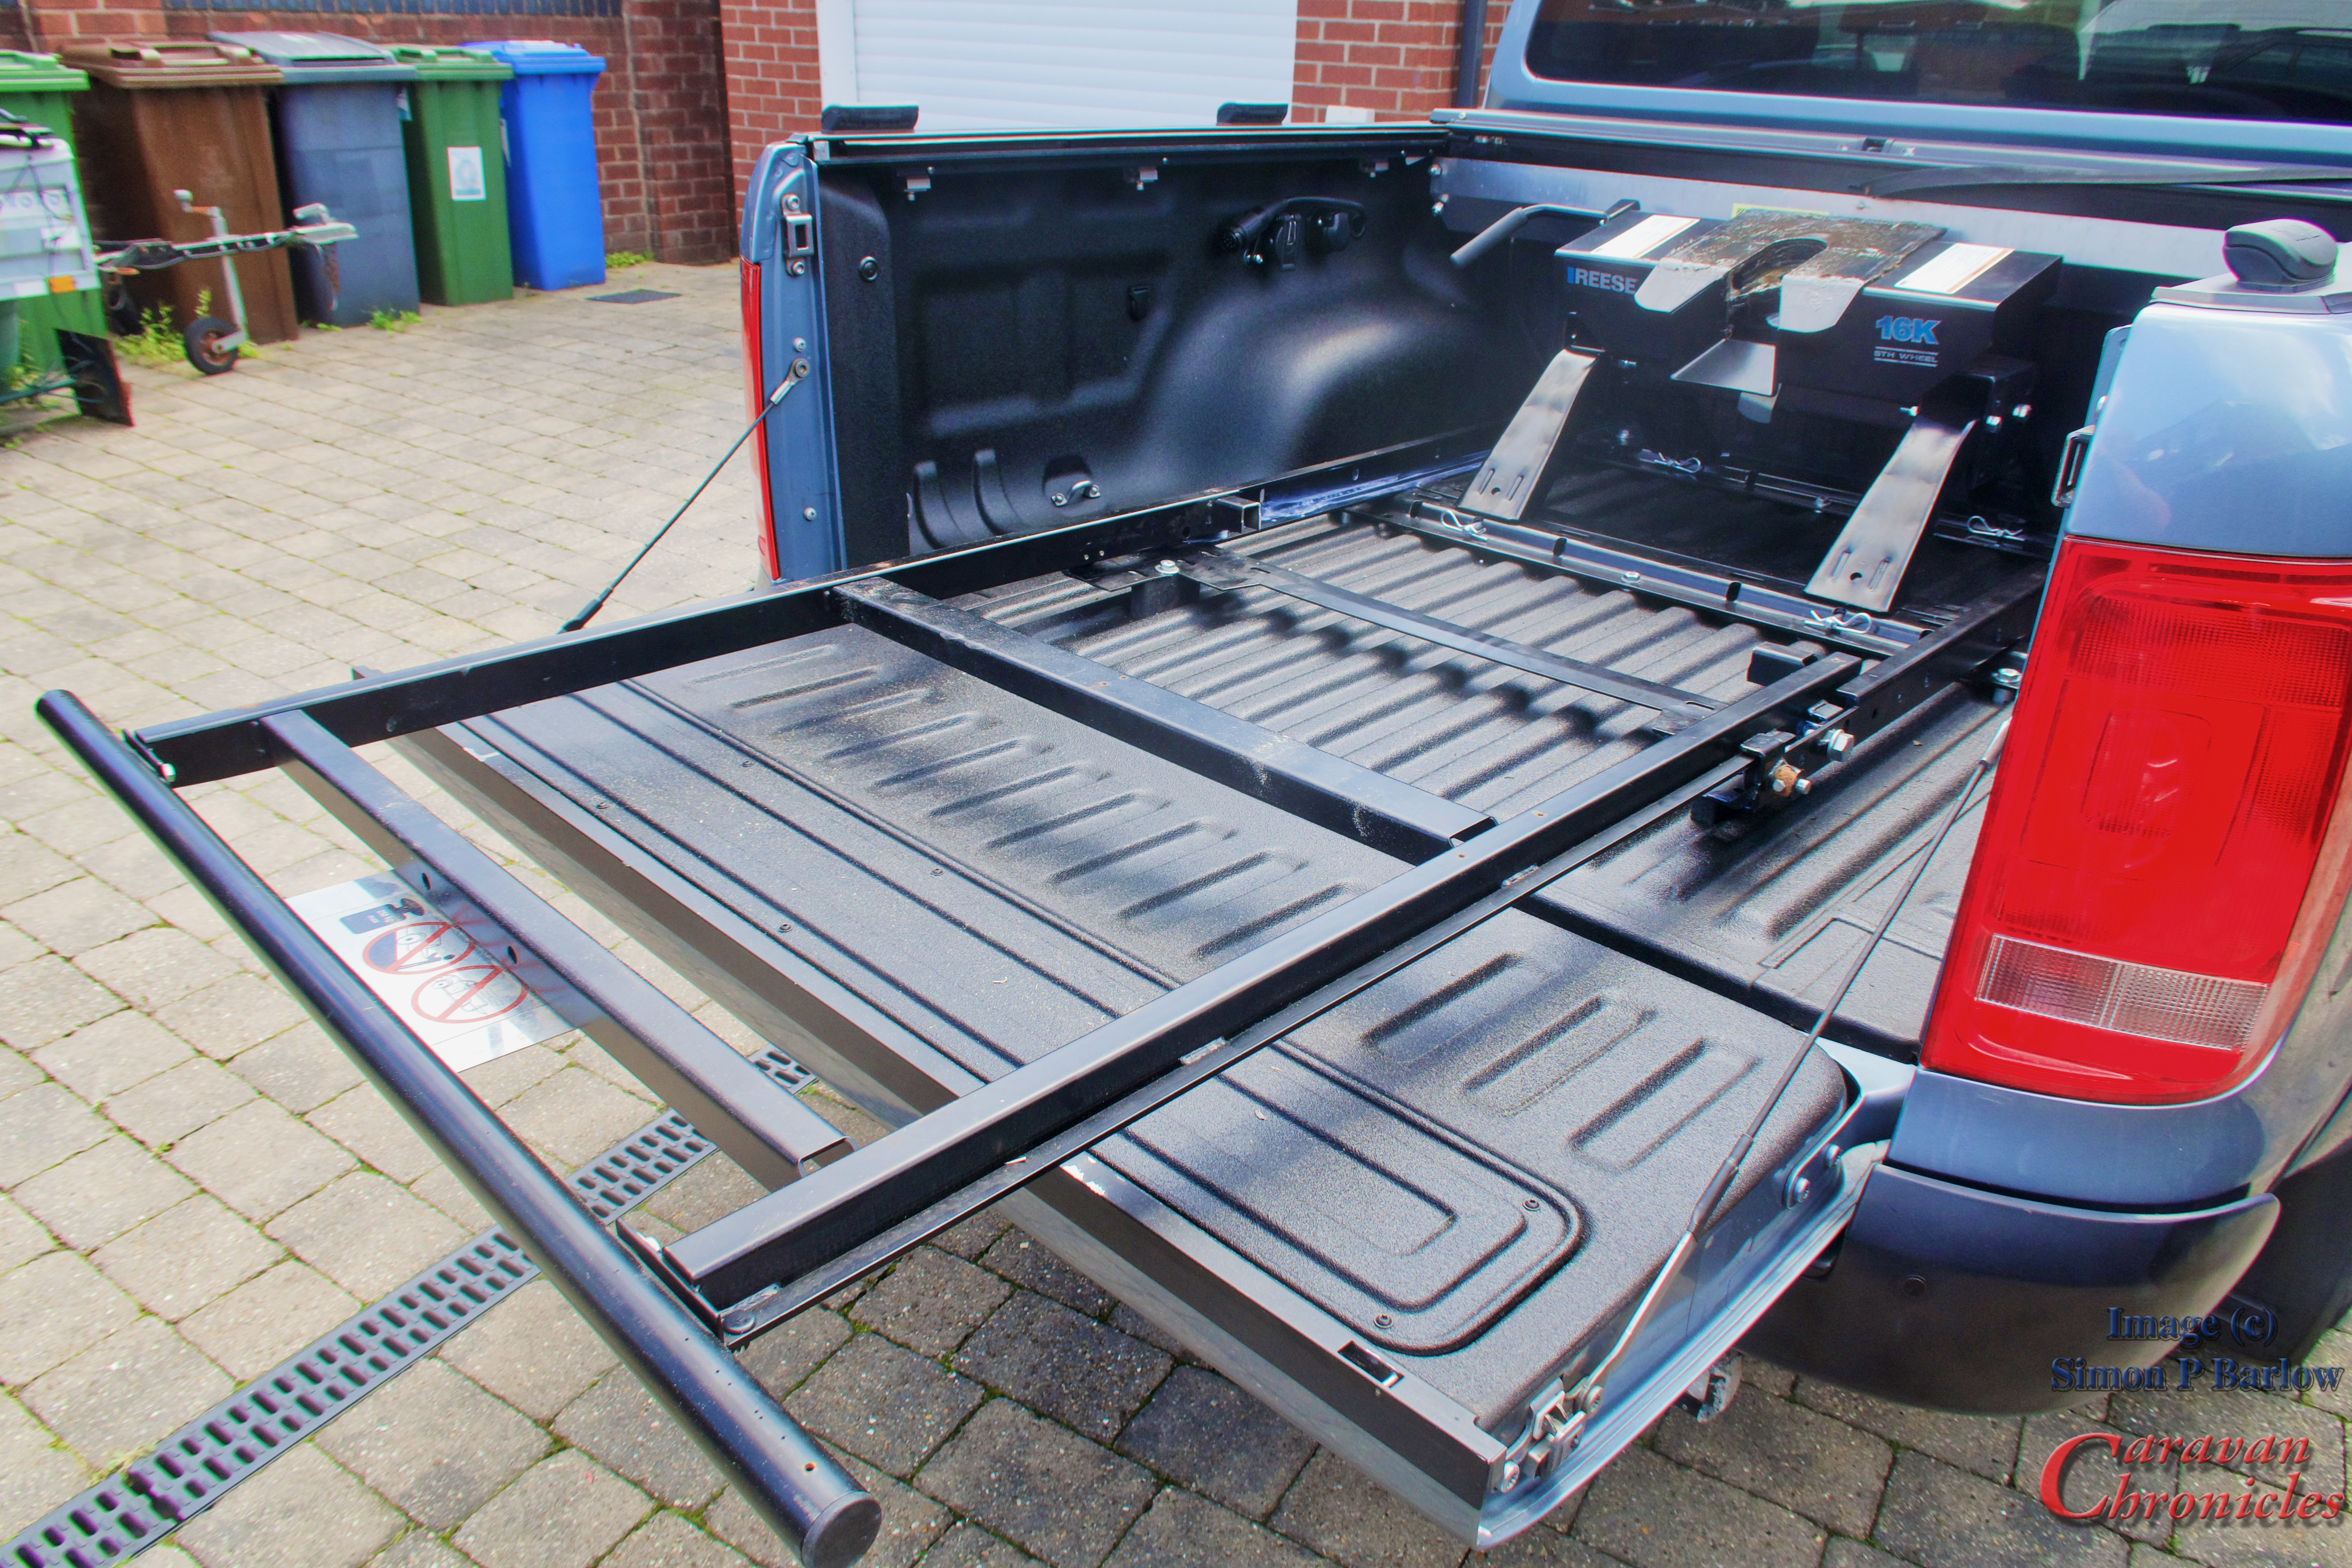
I did a couple of other mods that allowed the ray to slide out further. Previously it only came out about an inch past the tail gate, now it comes out about 10 inches which will have a great advantage… more on that later.
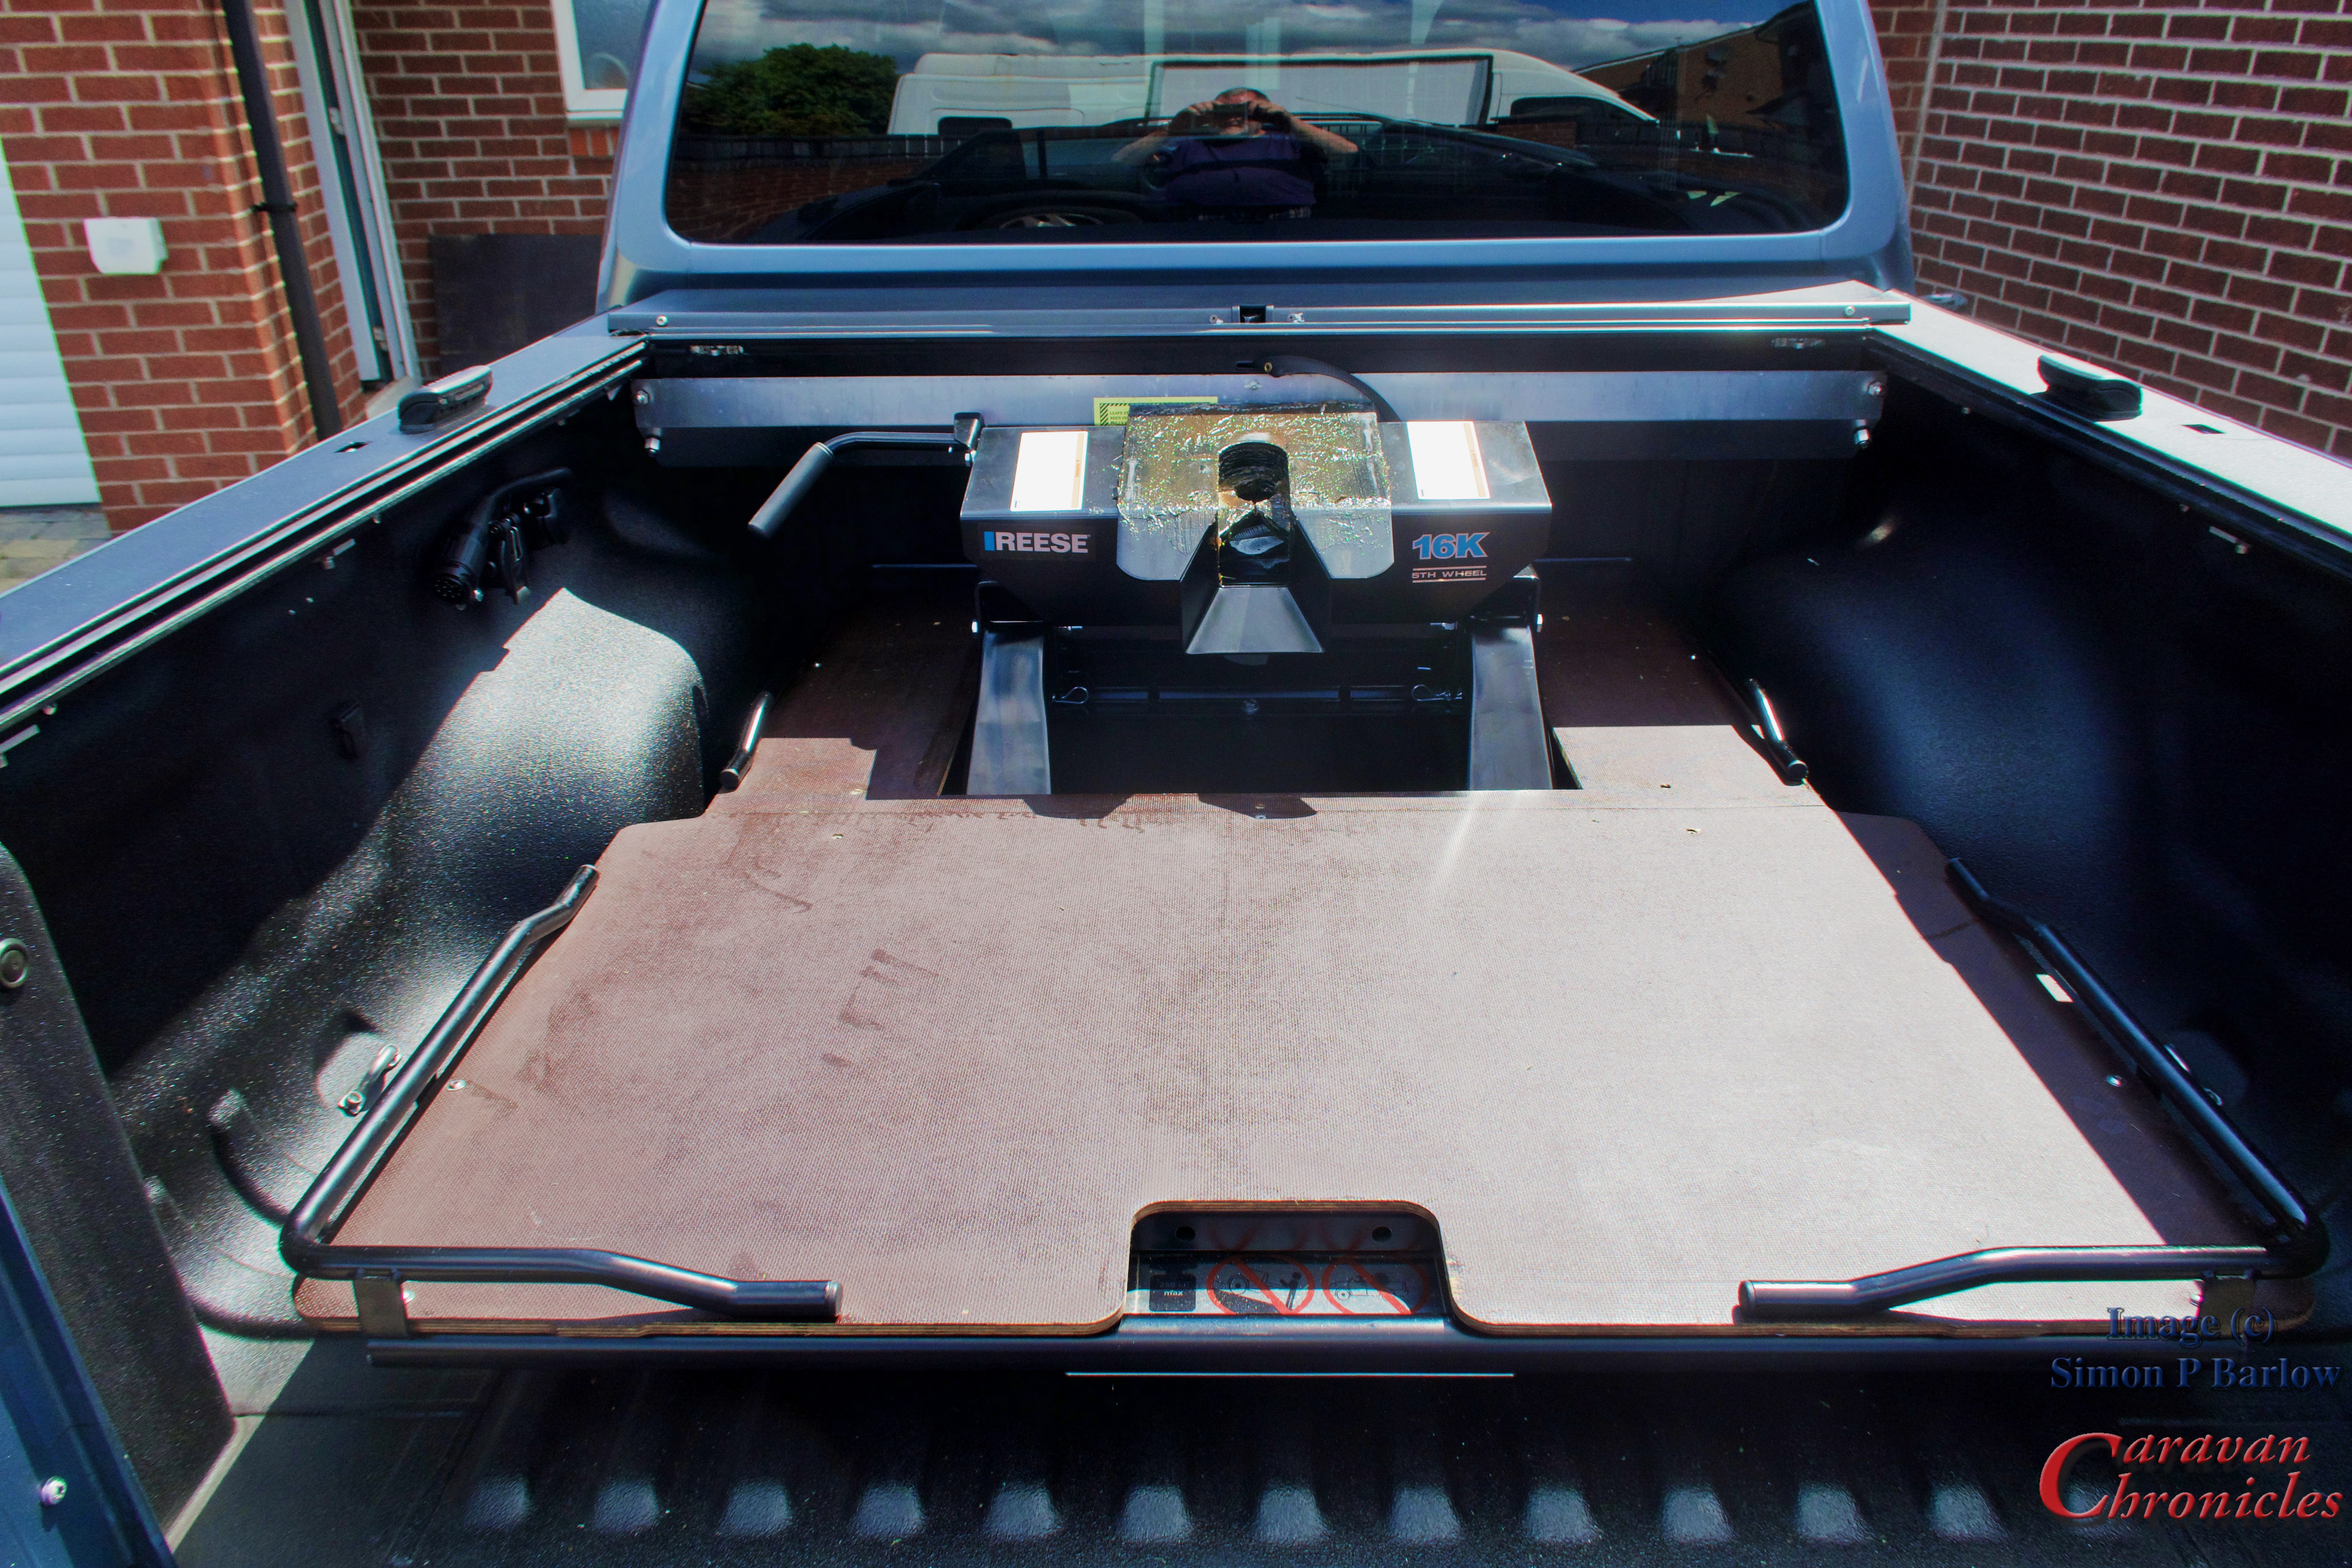
It was now time to refit the decking and do some trimming as required so it would fit around the hitch.
I cut the sheet so that the section in the truck would remain in one piece and if I needed to the hitch could be lifted out and the cut section replaced giving me a full size sliding bed once again. I do like having options!
The trimming was actually quite easy. The board is Phenol faced marine ply and quite easy to trim. I gave all the edges, especially the new cut edges several coats of clear brush on wax and let it soak into the ply. I’ve found that this is usually better than any polyurathane edge sealant when it is in an area that is prone to dinks and abrasion. The wax penetrates quite a lot and soaks into the layers protecting them from water.
Everything was given a spray and rubdown with Boeshield as a protective against the elements and looks as good as the day I installed it.
Next little job is to find two waterproof boxes to mount on the sliding bed either side of the hitch for my recovery kit and straps. This is why I wanted to make the slide tray come out further than it originally dis so I would have better / easier access to the two “fingers” either side of the hitch.
I need some low profile narrow boxes 200mm wide, 200mm high and about 600mm long with a hinge lid. I did start looking around at what is out there but I suspect that they might need to be fabricated out of aluminium diamond tread plate.
A couple of bonus things…. there is enough space under the 5th wheel hitch to allow me to store two of the “Really Useful Box” company’s boxes under the hitch which will be fairly secure when the slide tray is stowed.
The second is there is now enough room under the sliding bed to be able to store some kit and it pulls out far enough for me to sit the Cadac on for a bit of tail gate BBQ’ing.
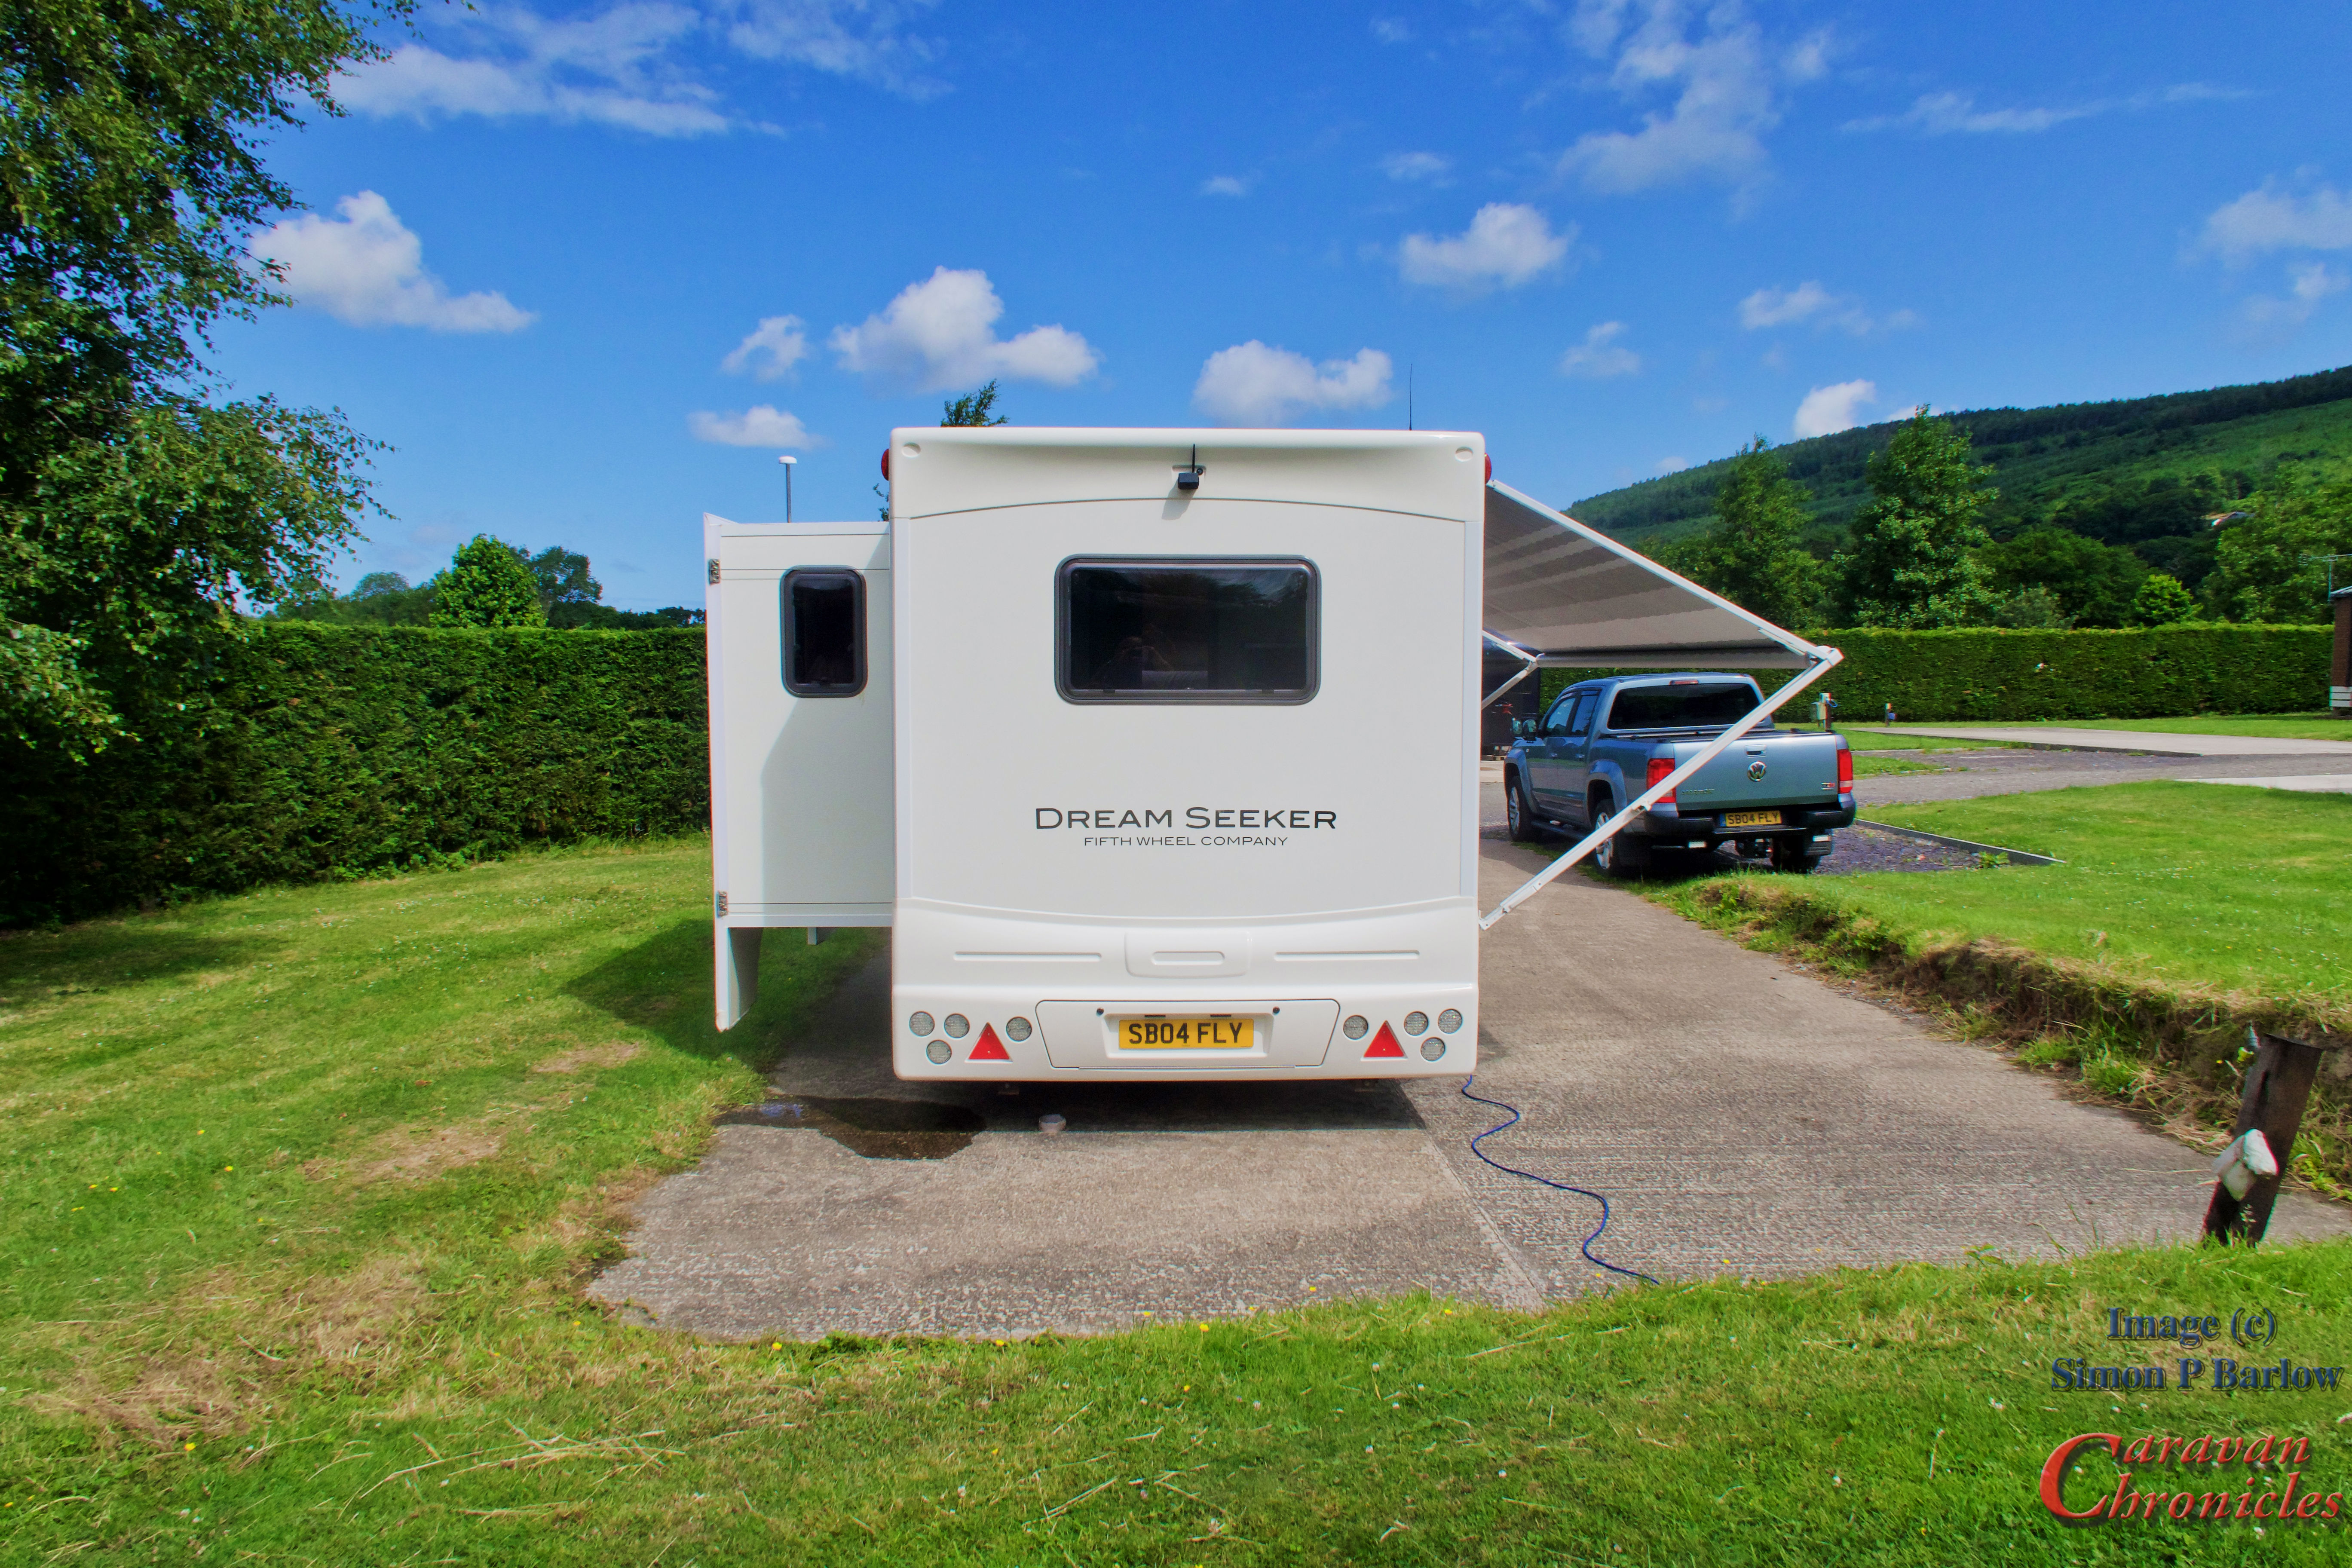
Well, I never expected so many questions as to the weight, size and towing our 5th wheel Dream Seeker. So here are the stats…. now these are for OUR Dream Seeker, and as each one is virtually custom made to the buyers specification, then there will be differences.
As our DreamSeeker is currently configured with an Avtex 4G/5G antenna on the roof it stands 2950mm tall (for bridge clearance my check is 3.2m minimum I would ever attempt and then only with a spotter).
From the rear bumper to the very front of the hitch, uncoupled, it is 7638mm long and 2292mm wide. Now that is not the whole story. The pin box (the bit that sticks out the front and connects to the 5th wheel hitch in the truck) can swing out of the way when on a pitch, so the actual length when pitched is 7517mm, so exactly the same as a 7.5m motorhome.
Now when we are hitched up to the truck, the effective length behind the vehicle becomes 6630mm, which is actually shorter than some twin axle bumper pull caravans.
The Weighty Stuff…
Our Dream Seeker runs on two 1500Kg rated axles and we have a MTPLM of 3750kg. So at max weight we would have 3000kg on the axles and 750kg on the hitch pushing down into the bed of the truck. The hitch in the truck is positioned directly over the rear axle so this mass bares directly onto the rear axle. Our Amarok is rated for 1000kg in the rear pickup bed so we are easily within limits.
Our Dream Seeker as bought was weighed and had 2210kg on the axles and 570kg on the pin hitch totalling 2780kg. If you subtract that from the MTPLM of 3750kg it gives us a user payload of 970kg.
The hitch is installed directly over the rear axle and has plates underneath connecting it directly to the chassis rails and suspension mounts. This Reese hitch is rated up to 800kg pin weight and 4300kg towing capacity.
Now here’s what confuses a lot of people… our Amarok is rated to tow 3200kg and we are hitching up a potential max of 3750kg…. 550kg more than we are rated to pull. Ahh pull… that’s the key word. The rating is based on the vehicle manufacturers tow bar pull capacity. With a 5th wheel hitch you are also carrying some of the weight so for every 1kg of weight that the truck carries on the pin hitch that is effectively deducted from what you are pulling. So at MTPLM of 3750kg I am carrying 750kg and pulling 3000kg (OK I know that we are moving a mass of 3750Kg but that is how the figures are assessed for 5th wheel towing… not a clue as how this calculation was decided on!)
GTW…. Gross Train Weight
On the face of it we are ok… however there is one last thing to take into consideration. GTW or Gross Train Weight. This is the absolute maximum weight the vehicle and trailer can weigh together in any combination of the mass being shared between the vehicle and trailer. Because we were approaching the GTM max for the Amarok if we had the trailer at MTPLM I wanted some extra safety margin and we opted to have the Amarok uprated to a GTM of 6400kg and the rear axle load rating increased to 2180kg. This was a fairly simple process that involved removing the hard rubber bump stops and inserting air bags, which are currently inflated to 7psi. They have increased the hight of the truck at the back be about 20mm but hitched up the truck and caravan are dead level. The only other thing is a new weight plate stuck to the door pillar of the Amarok. All the weight upgrade installation and paperwork were done by the wonderful guys at the 5th Wheel Company for us.
So there you are….
That’s it, on a pitch we are no longer than some motorhomes at 7.5 metres and when hitched up it is only 6.6 metres in additional length…. which is less than some single axle caravans!
As for drivability, well doing 60mph on the motorway and having big vans steam past at 70+ it doesn’t move or even impart any sideways forces I can feel when driving. Road bumps you can just about feel but no where as much as I could towing our single axle caravan.
On corners you just have to be mindful the the rear wheels of the trailer will scribe a smaller arc than the rear axle of the tow vehicle so for example a 90 degree left turn into a street means you need to move more to the right hand side of the lane before the left turn…. but all you class one HGV drivers know this and can definitely teach me a thing or two about 5th wheel driving.
And as for driving round tight spaces…. can you get your caravan 90 degrees to your car?
I’m still new to this and a blind side reverse does have your head swivelling a bit and I can now see why a lot of American 5th wheels have side mounted rear view cameras. I’m just getting used to the novelty of a rear view camera…. so all in good time.
Brakes…
The brakes are something else. They are Electric-Hydraulic units working on 4 massive drums. Once you get the feel of them and learn to keep an eye on the red LED in the truck that lets you know when the brakes are operating, then within a few miles it becomes instinctive. I can now judge how much pressure to apply to get the brakes to just let me bleed off a little speed or apply with some gusto then ease off so the LED goes out and we coast to a gentle stop without giving Sue whiplash at the moment we do stop. I have not tried an emergency stop and intend trying to drive so that I never have to.
While we are still on the subject of brakes…. yes it does have a handbrake that works on all four wheels and like on you over run break away cable we have something similar…. it’s a cable that is attached to a switch… pull it out and a separate 12 volt lead acid battery powers the hydraulic pump and applies pressure to all four drum brakes and maintains that pressure. The other end of this safety cable is clipped exactly as you do a normal break away cable to a secure part of the vehicle. In my case the floor mounting rails of the 5th wheel hitch.
PS…
I’m currently writing this sat in our Dream Seeker at the wonderful Donkey Creek Farm near Freckleton. It’s one of those sites that I don’t want to tell you about so I can just keep it to ourselves. (and no, before The Caravan Vlogger ask’s…. this isn’t a sponsored link!)
EOE (Errors and Omissions Excepted) As I said earlier these figures are based on OUR Dream Seeker and OUR Amarok do not take any of these figures to be a basis of working out any load capacity for any potential vehicle or caravan purchases. Speak to your vehicle dealer and caravan dealer.
It’s Wednesday 28th June, and we have an appointment in Rhuallt… we are going to the Fifth Wheel Company for the big handover when we collect our 5th wheel caravan. This not just a handover, it’s a Fifth Wheel Company handover. Which means 3 days of training, acclimatisation and adjustment to a 5th wheel caravan and the all important hitch installation in the VW Amarok which will be completed by the technical guys at the Fifth Wheel Company.
The previous week…
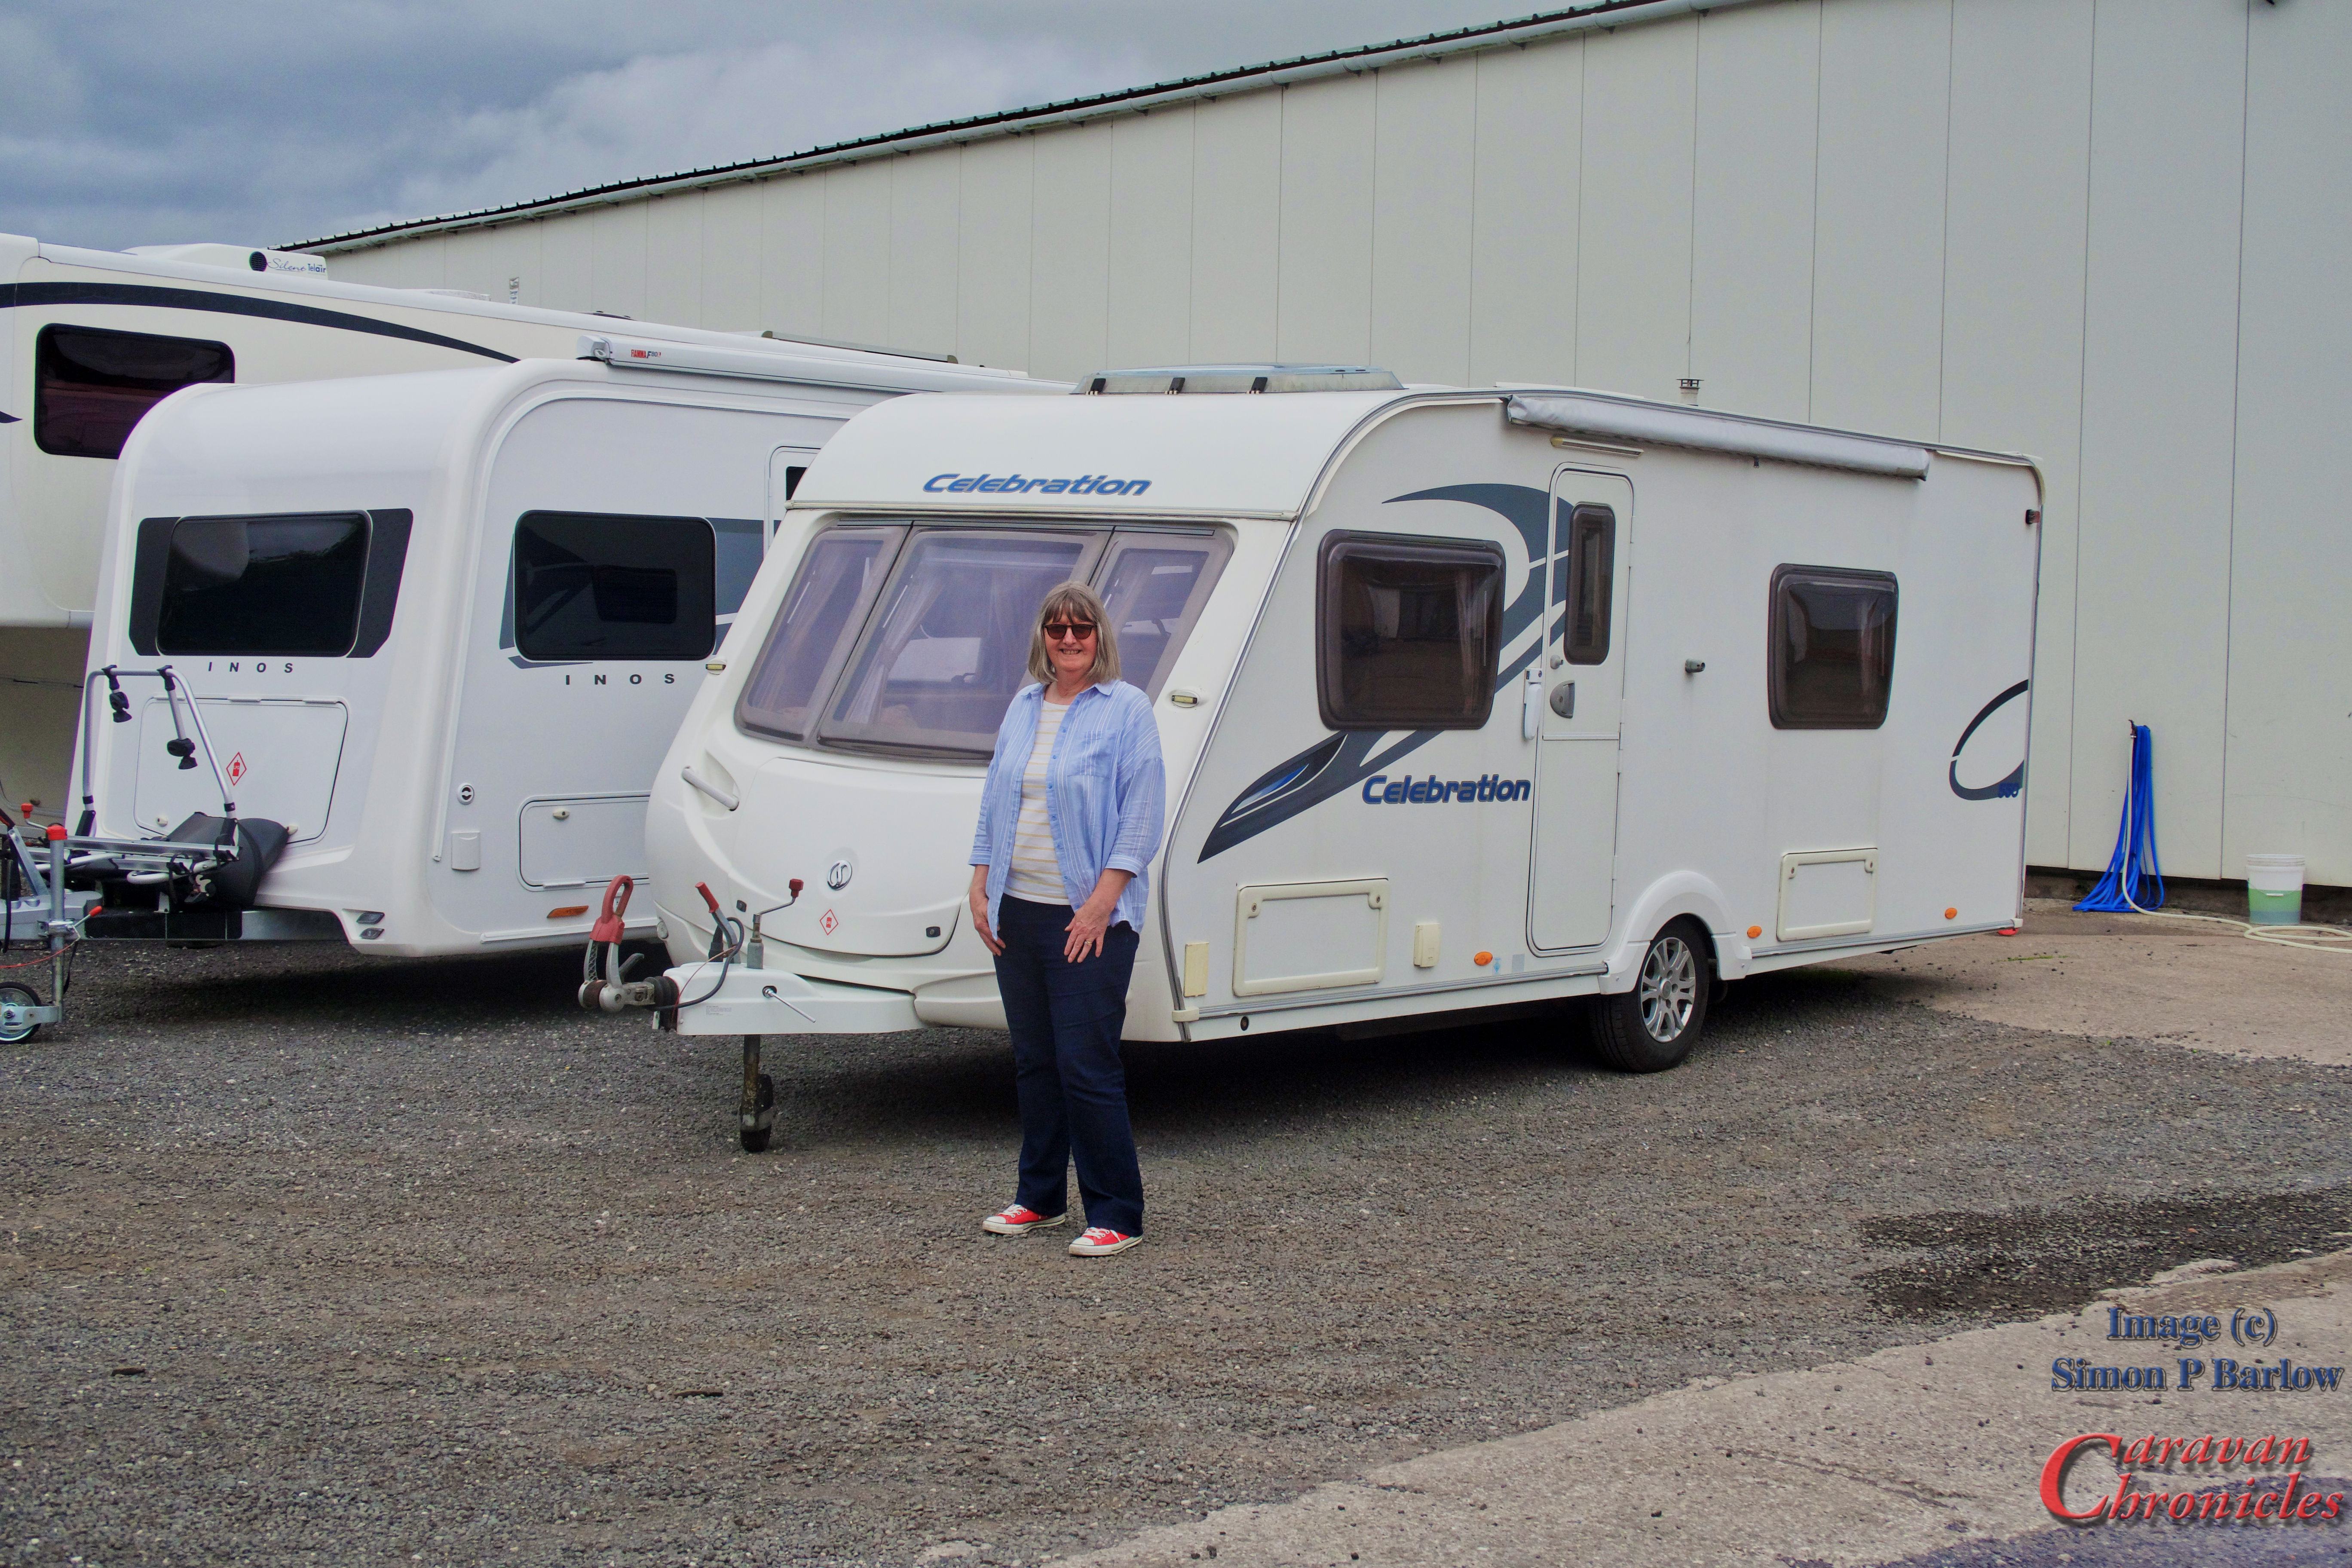
We had spent the previous week unloading our Swift Celebration 550 of its contents…. 12 years worth of touring “stuff” which initially didn’t seem like much, but stacked up it filled my workshop, I mean really filled my workshop. I had also tackled removing the sports bars from the Amarok, along with the bike carrier as well as the sliding bed and inbuilt tool box. I was now out of space in the workshop.
What followed was a cleaning frenzy.. Sue tackled every surface of the caravan, the loo, shower and sinks were cleaned and polished. The carpets were brought home cleaned and vacuumed to within an inch of their lives and returned to the caravan. We removed the Safefill gas cylinder and I started collecting all the original accessories for the caravan…. Alko Hitch Lock, Alko Wheel Lock, Alko Jack (still in its original protective wrapping) and I even had the original braided gas hoses along with the steady winder. As we were leaving the Fiamma sun canopy on it I found all the original bits to go with it. All the original paperwork from Glossop Caravans along with the Folder from Swift that came with the caravan contains all the manuals for the installed equipment was put in the front draws.
The big day…
Even though the pickup bed was completely empty we could not get everything in the truck that we needed to take over so we boxed up everything we thought we would need and loaded the boxes on the floor of the caravan. It was a lot of stuff. It filled the caravan floor forward of the axle and the truck bed.
Henry was put in his carrier and secured in the Amarok. He seems to have got quite used to the journeys now spending his time either looking out the window at passing cars or sleeping. The run over to Rhuallt from our storage site was a little over an hour as the traffic was light especially along the North Wales Expressway.
We pulled into the carpark and leaving Henry in his carrier… with both back windows three quarters down so he could see out and had a bit of a cross breeze went in to meet Simon again. In the reception area was a sign welcoming us by name to the Fifth Wheel Company (We didn’t get that when we picked up our other caravan) Simon showed us into the showroom where our caravan was parked up all shining and the lights on inside. Time for some paperwork to be exchanged along with the required number of beer tokens.
All change…
I pulled our old caravan… that technically was now not ours, up to the showroom roller door and we started the process of transferring all the boxes from our ‘technically not ours” old caravan to the 5th wheel caravan. The plan was to get everything out of one caravan into another then Simon would tow the 5th wheel caravan a couple of hundred metres along the road to Rhuallt Campsite which adjoins The White House Restaurant and Hotel where we could spend the rest of the day transferring everything over from the Amarok and putting everything away.
We parked up our old caravan next to a rather splendid Ineos caravan next to the factory and said our farewell’s to it. Even Henry watched it through the back window as I unhitched and pulled away. I think really he was thinking it was snack time and that is where his snacks usually materialised. 12 years of caravanning, and the reason this blog came into existence was ending but a new chapter was starting. One that had more wheels in it than you could shake a stick at!
We followed Simon the short distance up the road and pulled into the carpark of the White House which leads through to the camp site. First snag… there was a conference on in the hotel and the car park was packed and Simon could not make it round the 90 degree bend due to two vehicles parked in areas that were not marked parking bays. A short delay, cars were moved and Simon finally got it on to the pitch. There are a number of pitches reserved for 5th Wheel caravan as this is where you can overnight when you bring your caravan for servicing. We went briefly through the unhitching process and then in a little more detail the actual setting up, connection and operating the slide out and a run through of powering up everything. He then left up to start putting everything away and said he would come back in a couple of hours to answer any questions we had and run through anything we were unsure of.
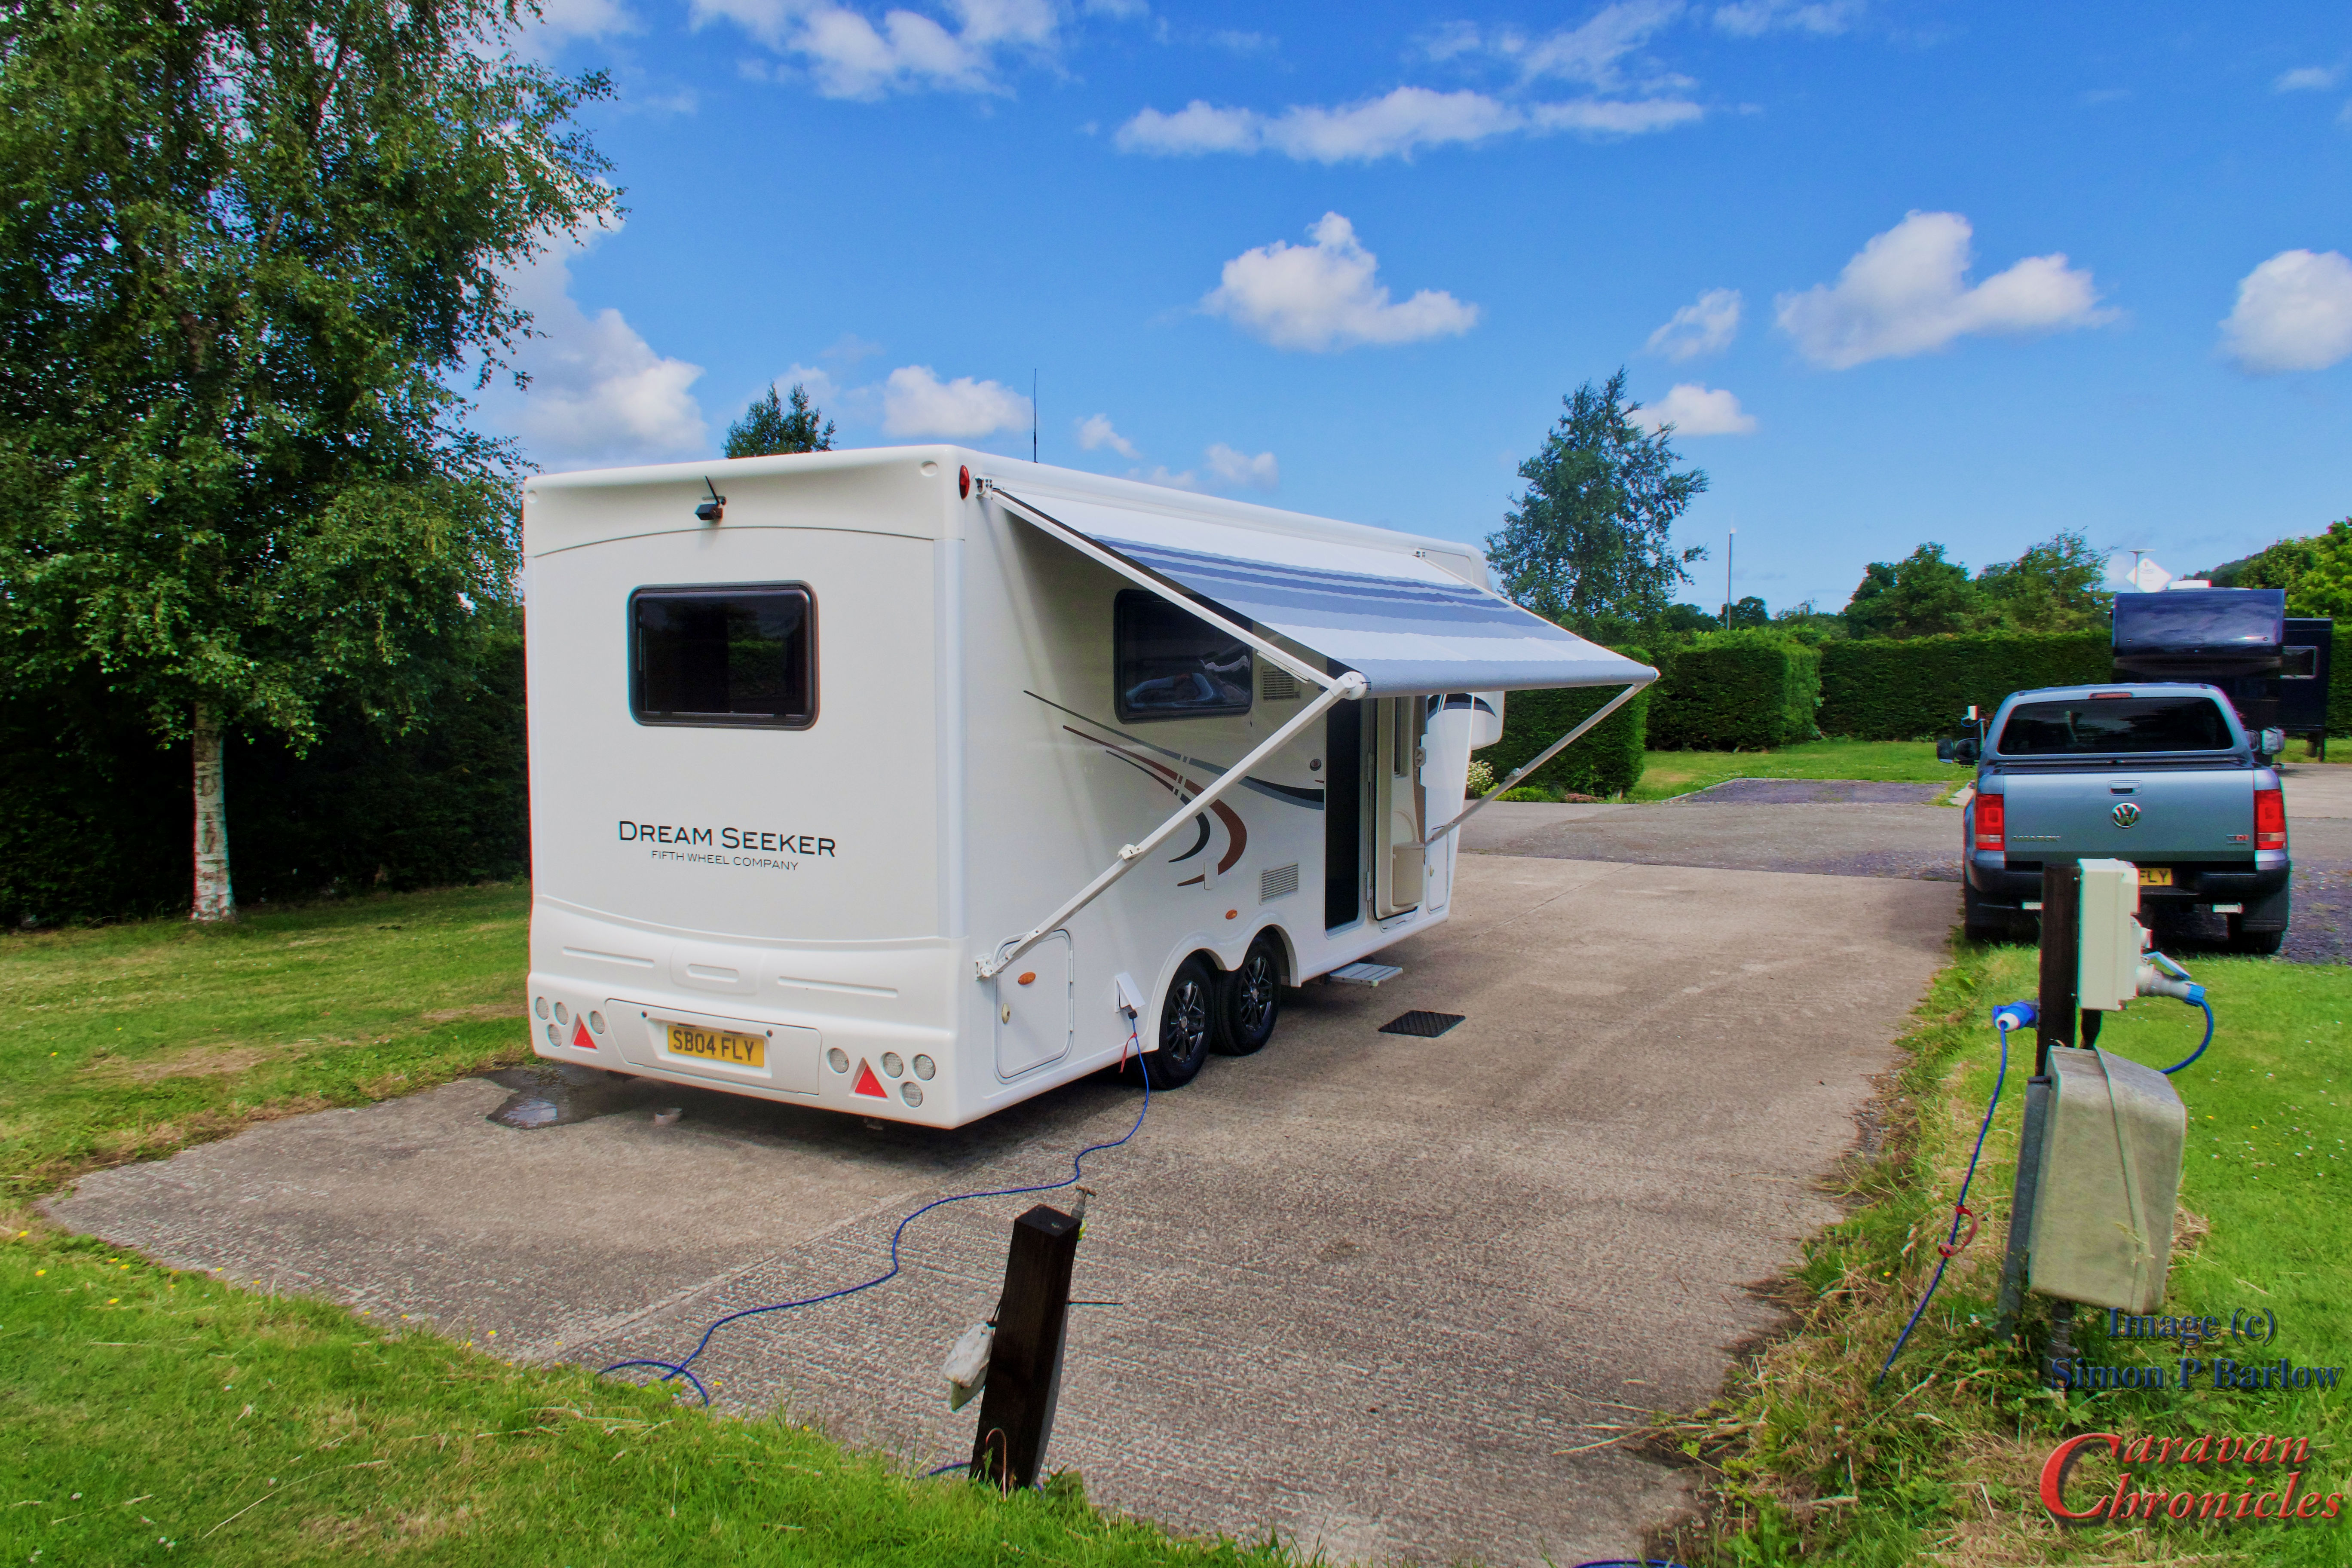
The pitches were obviously designed for 5th wheel units. With power, water and drains set up for dumping grey water tanks. We filled up the 230 litre fresh water tank and turned on the water heater. Our unit is not a new caravan, but it has gone through a full factory refurbishment that included a brand new Truma Combi 4E with iNet controller, brand new Thetford N4000 fridge, new twin 11 litre GasLow refillable bottles and a full reseal as well as lots of other details. It was also fitted with a SOG fan system on the Thetford toilet. It came with a Samsung TV and LG Sound bar installed. The brake system is electric over hydraulic and I was later to find out just how good this was.
Storage… OMG the storage!
We eventually got everything stowed away… everything we had brought with us… and we had not really filled any storage compartment or cupboard. In fact we has storage cupboards and compartments that were still empty. Then we found more storage under the seats in the slide out… and even more behind the wardrobe. It also has a huge under floor locker (As we are now currently set up our available user payload is around 960kg.
Simon called back to see how we were getting on and if we had any questions. I’d noticed a couple of things and he headed off to the factory and returned within 20 minutes with replacements. I will probably repeat this several times but I can’t get over just how good the service and all our dealings have been with everyone from the Fifth Wheel Company. It is exceptional to say the least.
Simon left us to enjoy the rest of the day in our caravan. Tomorrow (Thursday) we have the day to ourselves… which would include a run out to to do a bit of shopping. Friday Simon was going to collect the Amarok and take it down to the factory to have the Reese hitch installed, the electrical conversion and additional systems installed for the electric over hydraulic brake system and air assist bags installed on the suspension which would allow the Amarok to be plated to a GTM of 6400kg.
Henry just checking in with Sue and making sure She knew where the cat biscuits were stored.
During the course of Thursday we had new neighbours arrive in their Celtic Rambler… Gary and Helen, who were also newish to Fifth Wheel life having taken delivery of their unit last November but it was really great to chat to them as they had some really helpful tips about things they discovered since starting out with a 5th wheel. It was also great that Gary spent a little time going through some of the things he had come across hitching and unhitching…. useful information if we ever come up against similar situations.
Friday morning and Simon appeared early to collect our Amarok. As it drove off we set about re-organising stuff we had previously put away as talking the evening before we realised the whole way we had caravanned before would change. I took the opportunity to do a test dump of the grey tank using our colapz waste pipes from the previous caravan and swopped fittings on our blue water hose so I could connect to the tank filler.
That afternoon Simon returned with one of the company vehicles and we went through hitching up and unhitching a couple of times until we had… saying mastered it would be wrong…. become familiar with the sequence might be a better way of putting it. I think we will be using the checklist for a while longer! There are quite a few more steps to hitching, but I’ll swear it is easier than hooking up a caravan on a tow ball. Sue called the list out as I went round going through the process. I guess if I can remember the Emergency checklists for aircraft I’ve flown then this will become as easy as that.
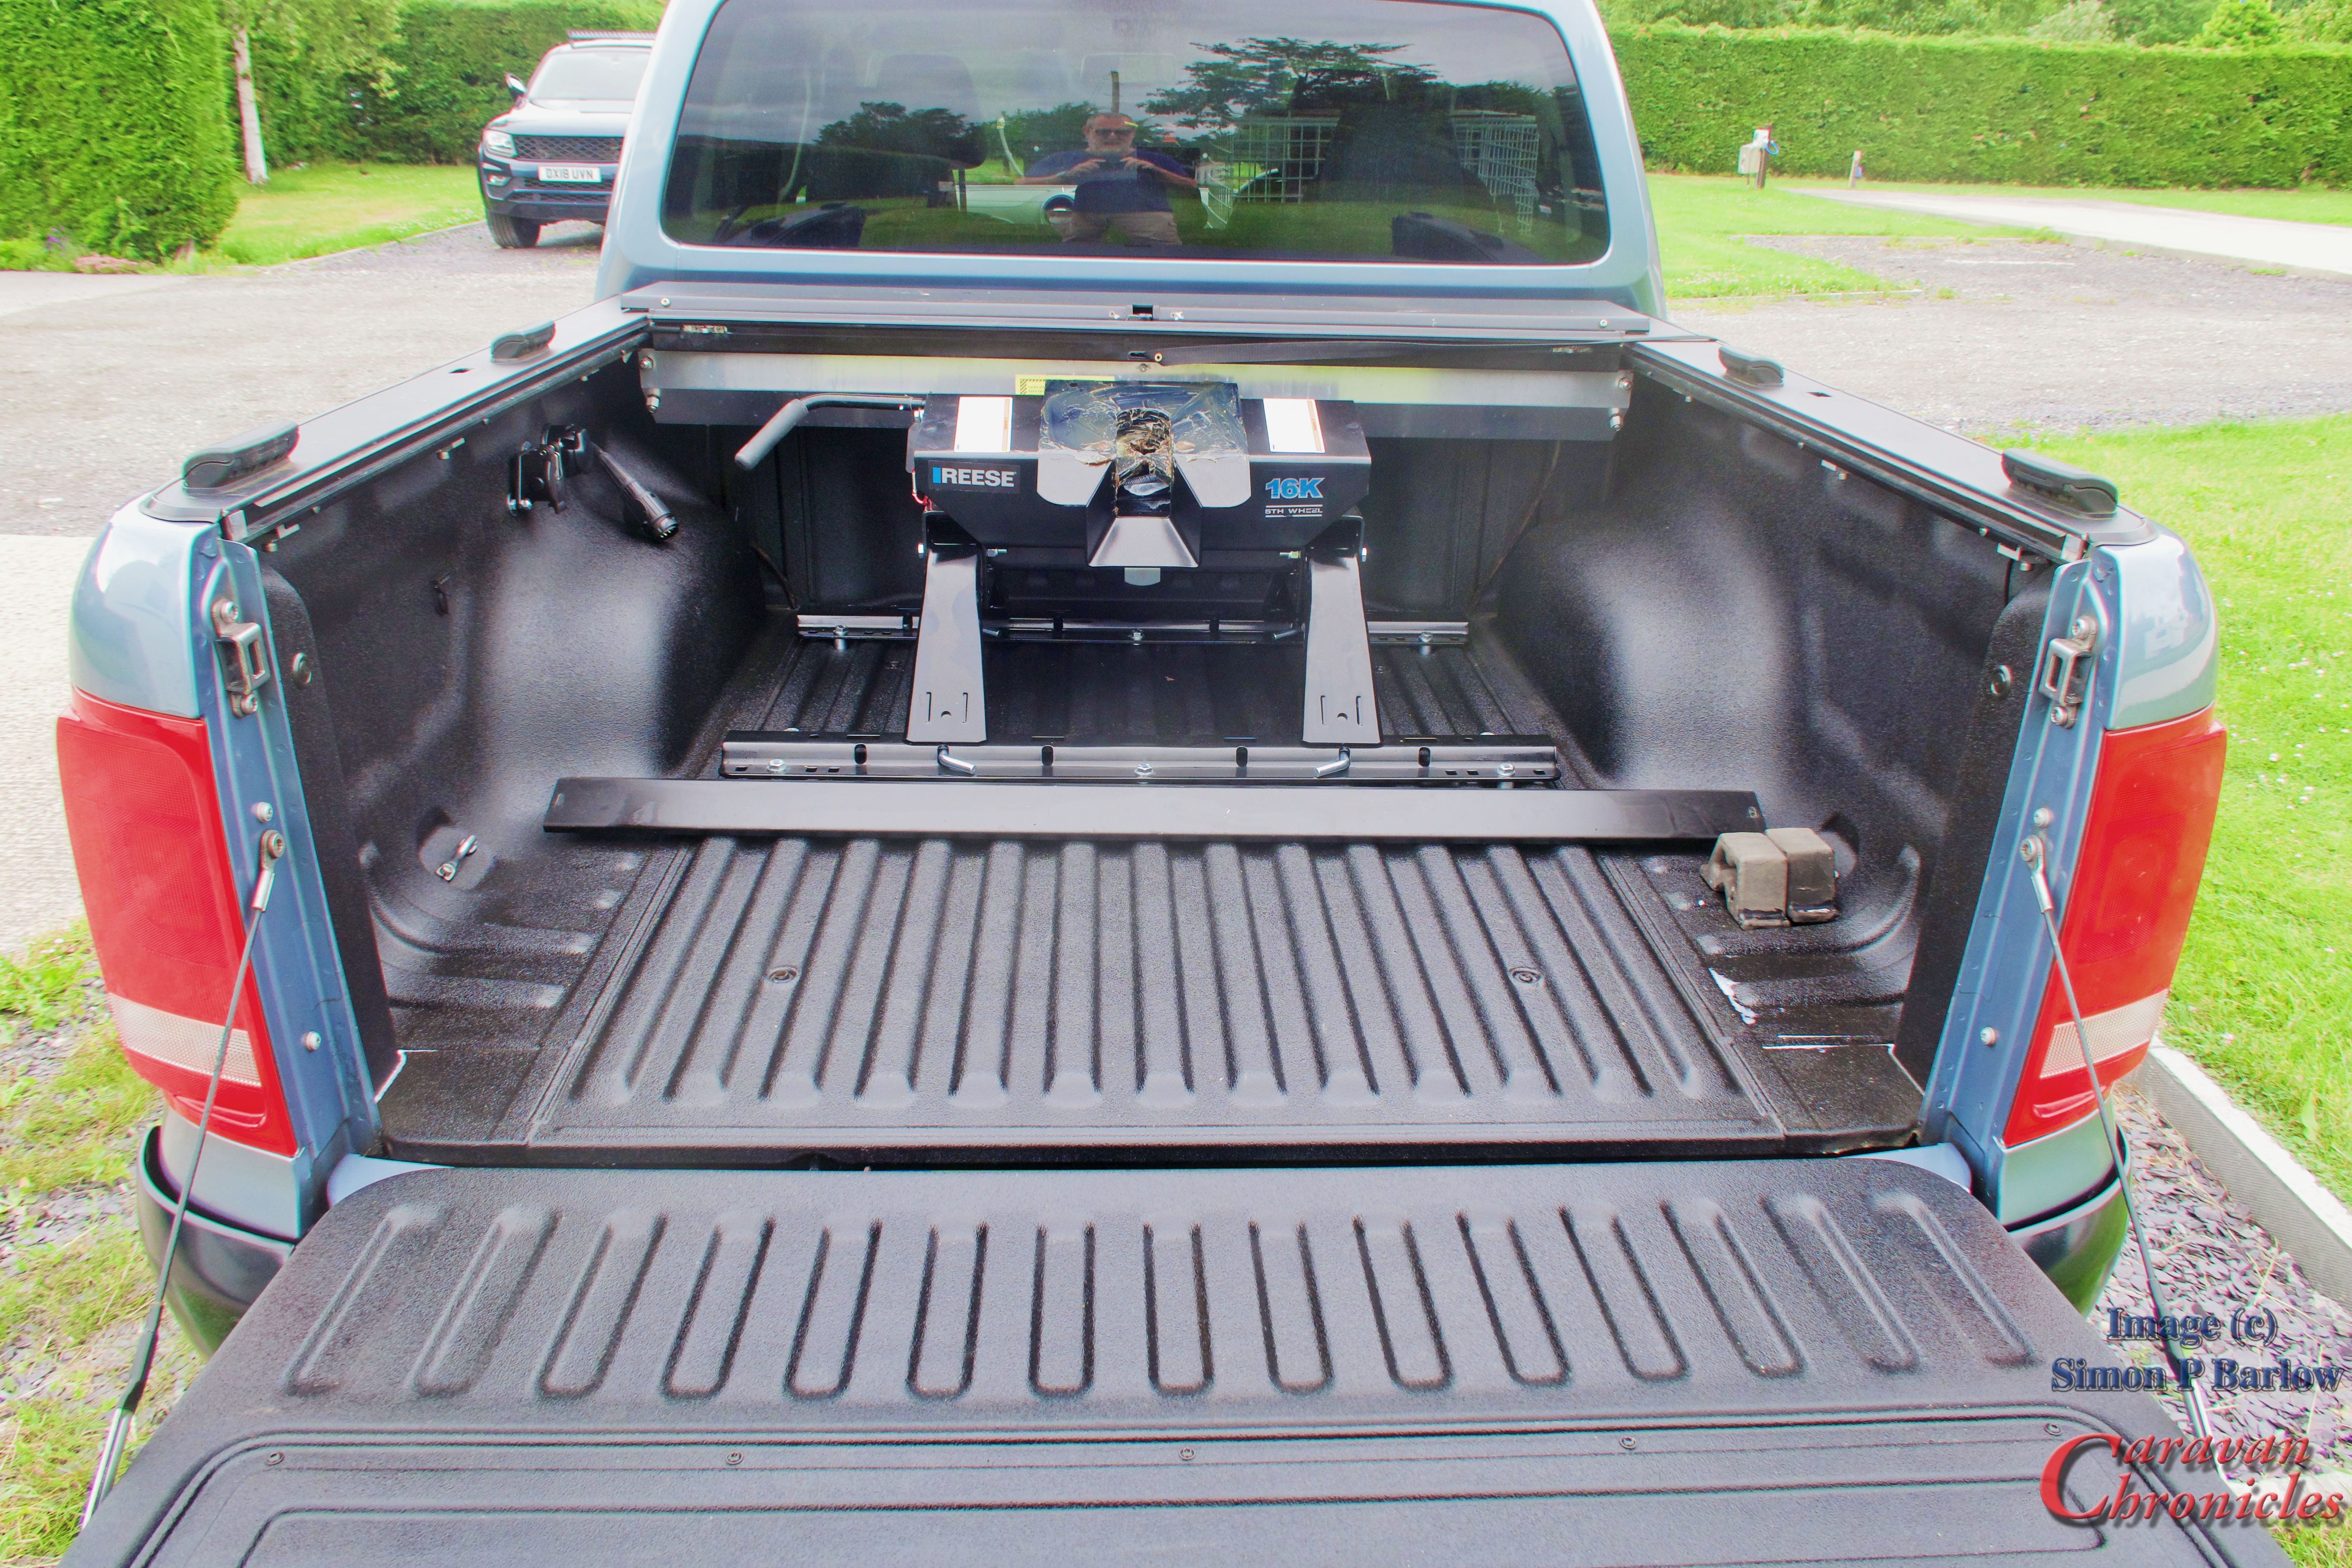
Simon returned late in the afternoon with our Amarok…. all converted, new weight plate fitted and the truck bed was looking really clean. They had managed to install all the connectors in the side of the bed rather than in a box ad it looked really neat.
We still had lots of room in the bed of the truck and one of my future projects is to re-install the slide out tray back in. It will need shortening but I think it will be achievable.
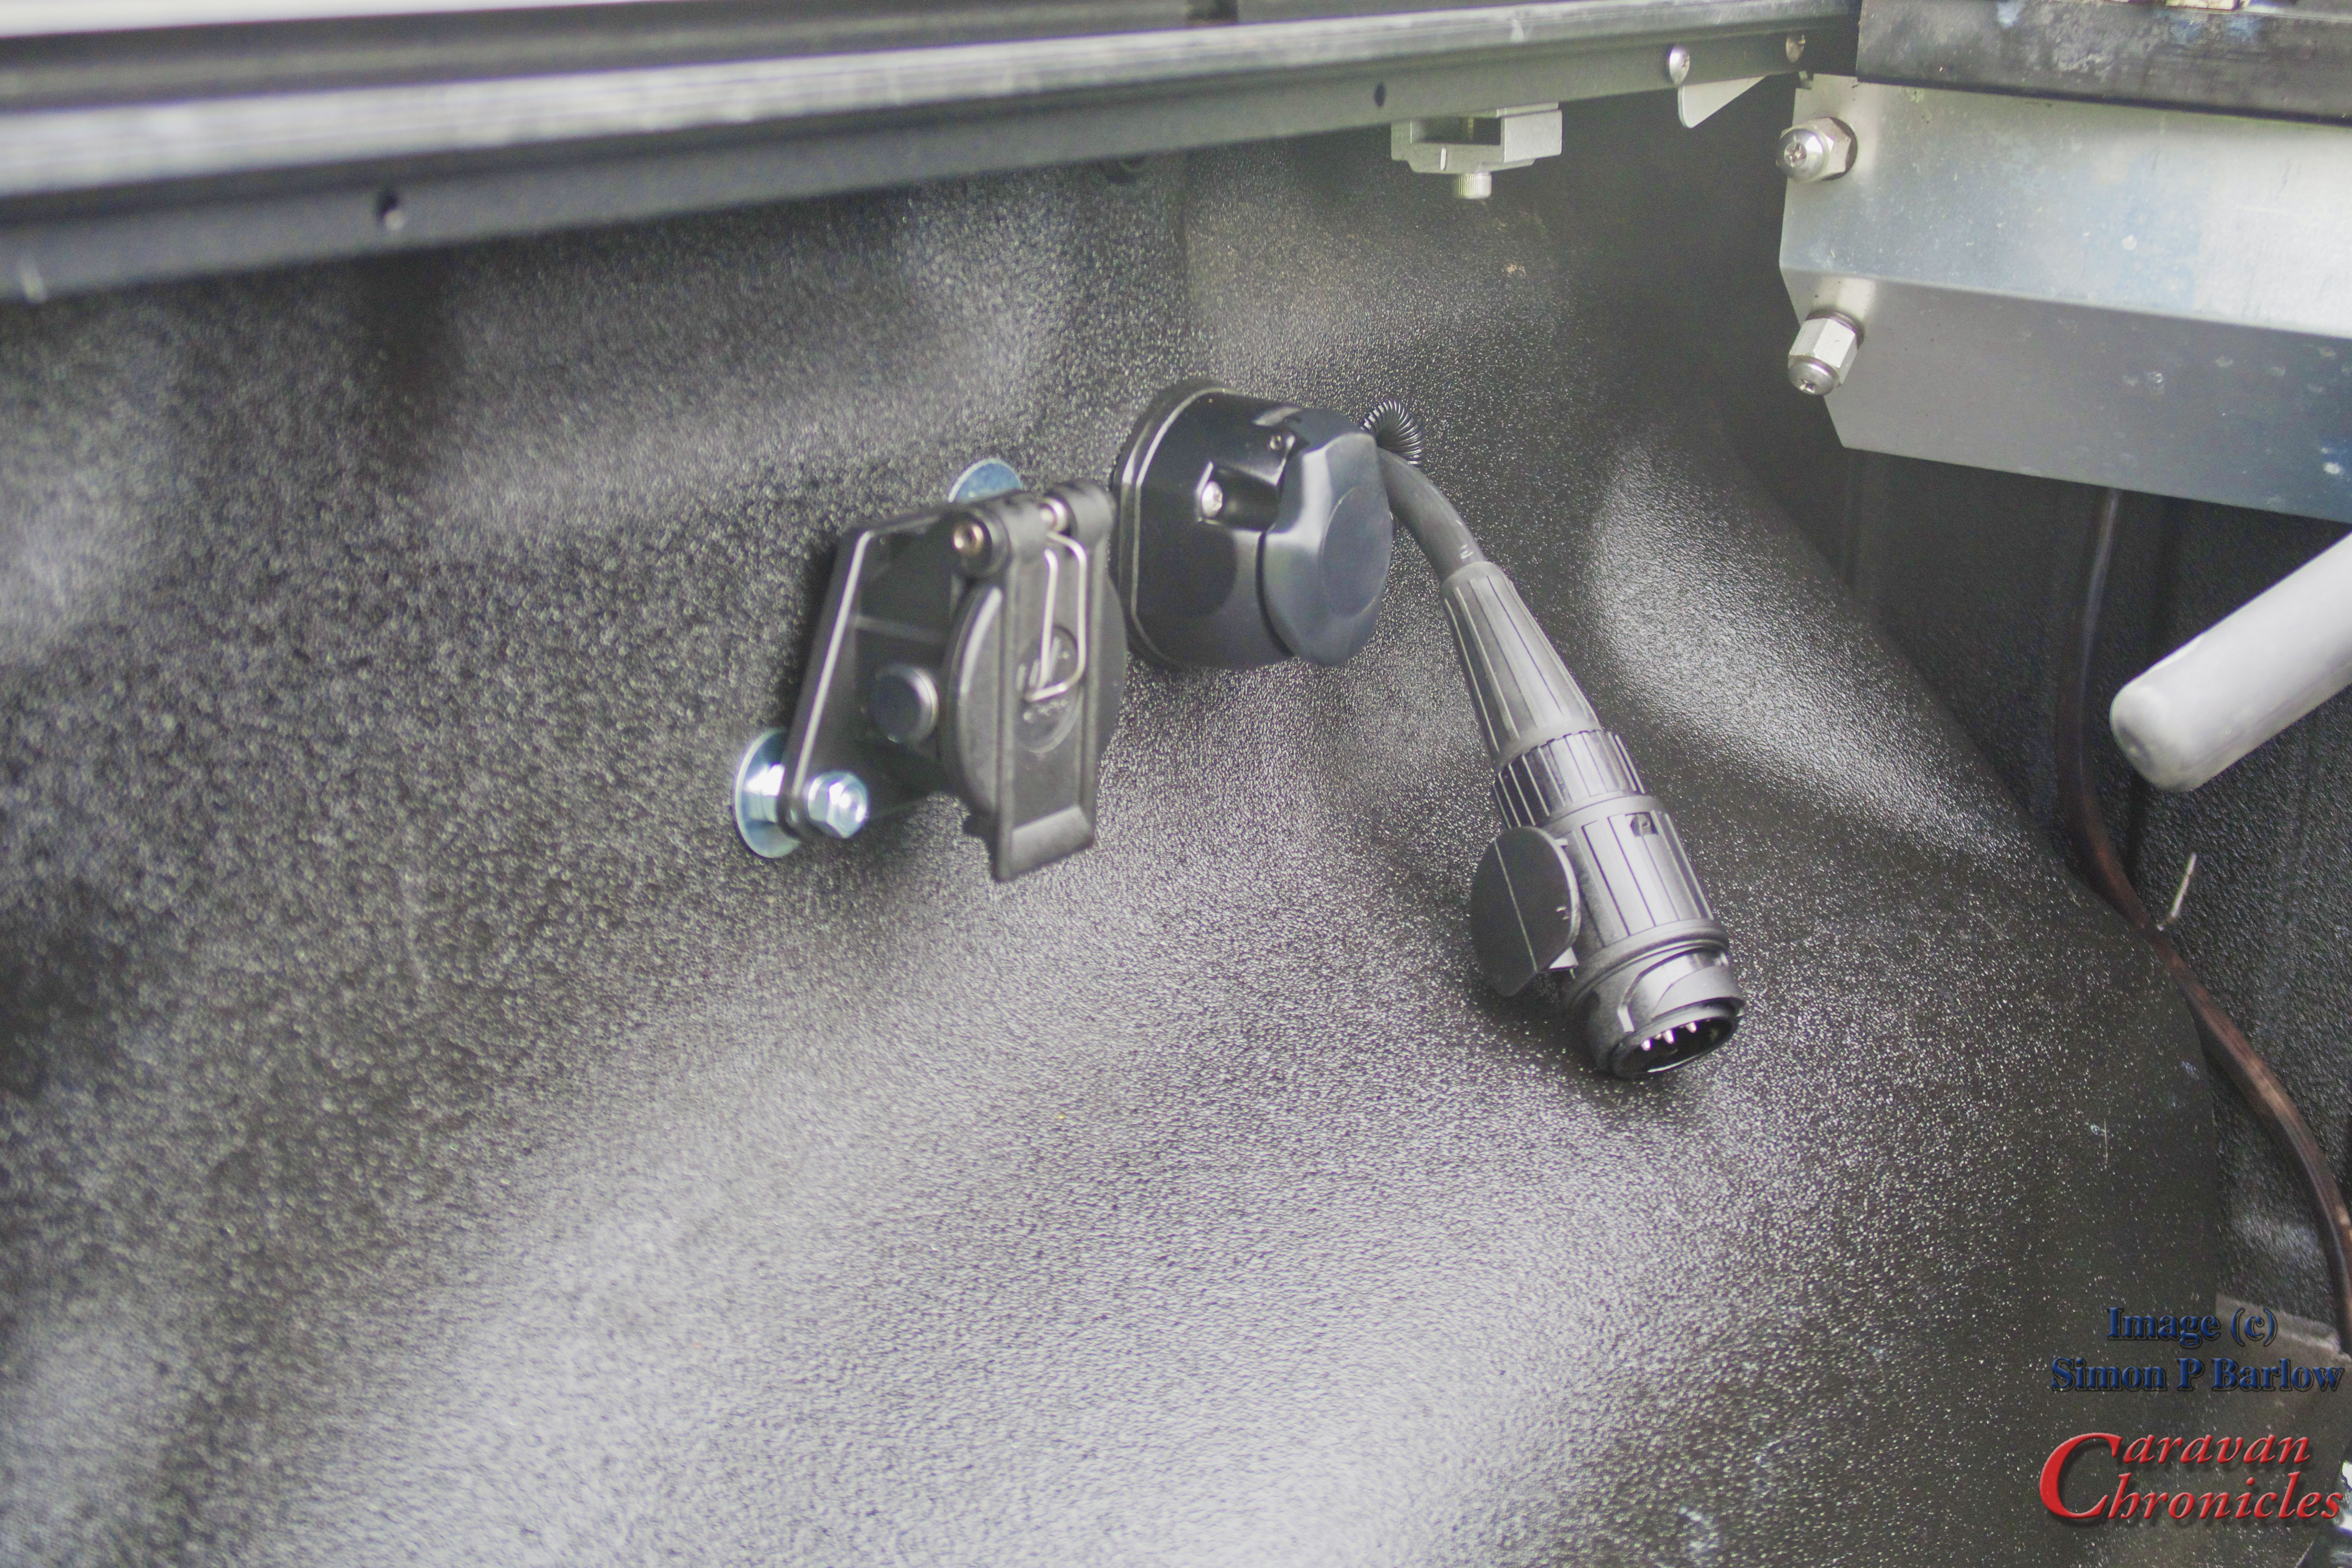
OK, I know you are going to ask….. why is there a 13 pin plug hanging out next to the two sockets? Well part of the installation was to move the connections for the tow bar mounted socket over to the pickup bed so that is the primary connection for the 5th Wheel. The 13 pin plug is effectively a short extension down to the tow bar so I retain all the functions at the ball hitch for towing our trailer. All I have to do is plug it in to the thirteen pin socket in the pickup bed. I have now put a green cap on it and it is secured in a clip.
The installation has also allowed me to continue using our Roll-N-Lock bed cover and as an added bonus, If I want to fit the bike rack on then I can do easily within a few minutes. Obviously we can’t tow the 5th wheel with the bike rack on.
Wagons roll…
Saturday morning arrived…. put the awning away (something that took about 1 minute seriously!) dump the grey and fresh water, turn the gas off. Sue stowed all loose items, bought the slide in, stowed the waste pipe, and dropped the tailgate.
Reversed and aligned up on the hitch adjusted the hitch height using the electrical landing legs, reversed on with a small ‘clunk’ as the jaws closed going the pin. Quick pull test, and as I hooked up the 13 pin plug and the break services plug Sue raised the landing legs. Henry stowed in his carrier… looking quite satisfied with the trip in general as he seems to have found a few new spots to snooze in we were ready to pull out. From the point of us saying “Right shall we make a move” I guess it took less than 30 minutes before we were ready to pull out. It really was easy to break camp.
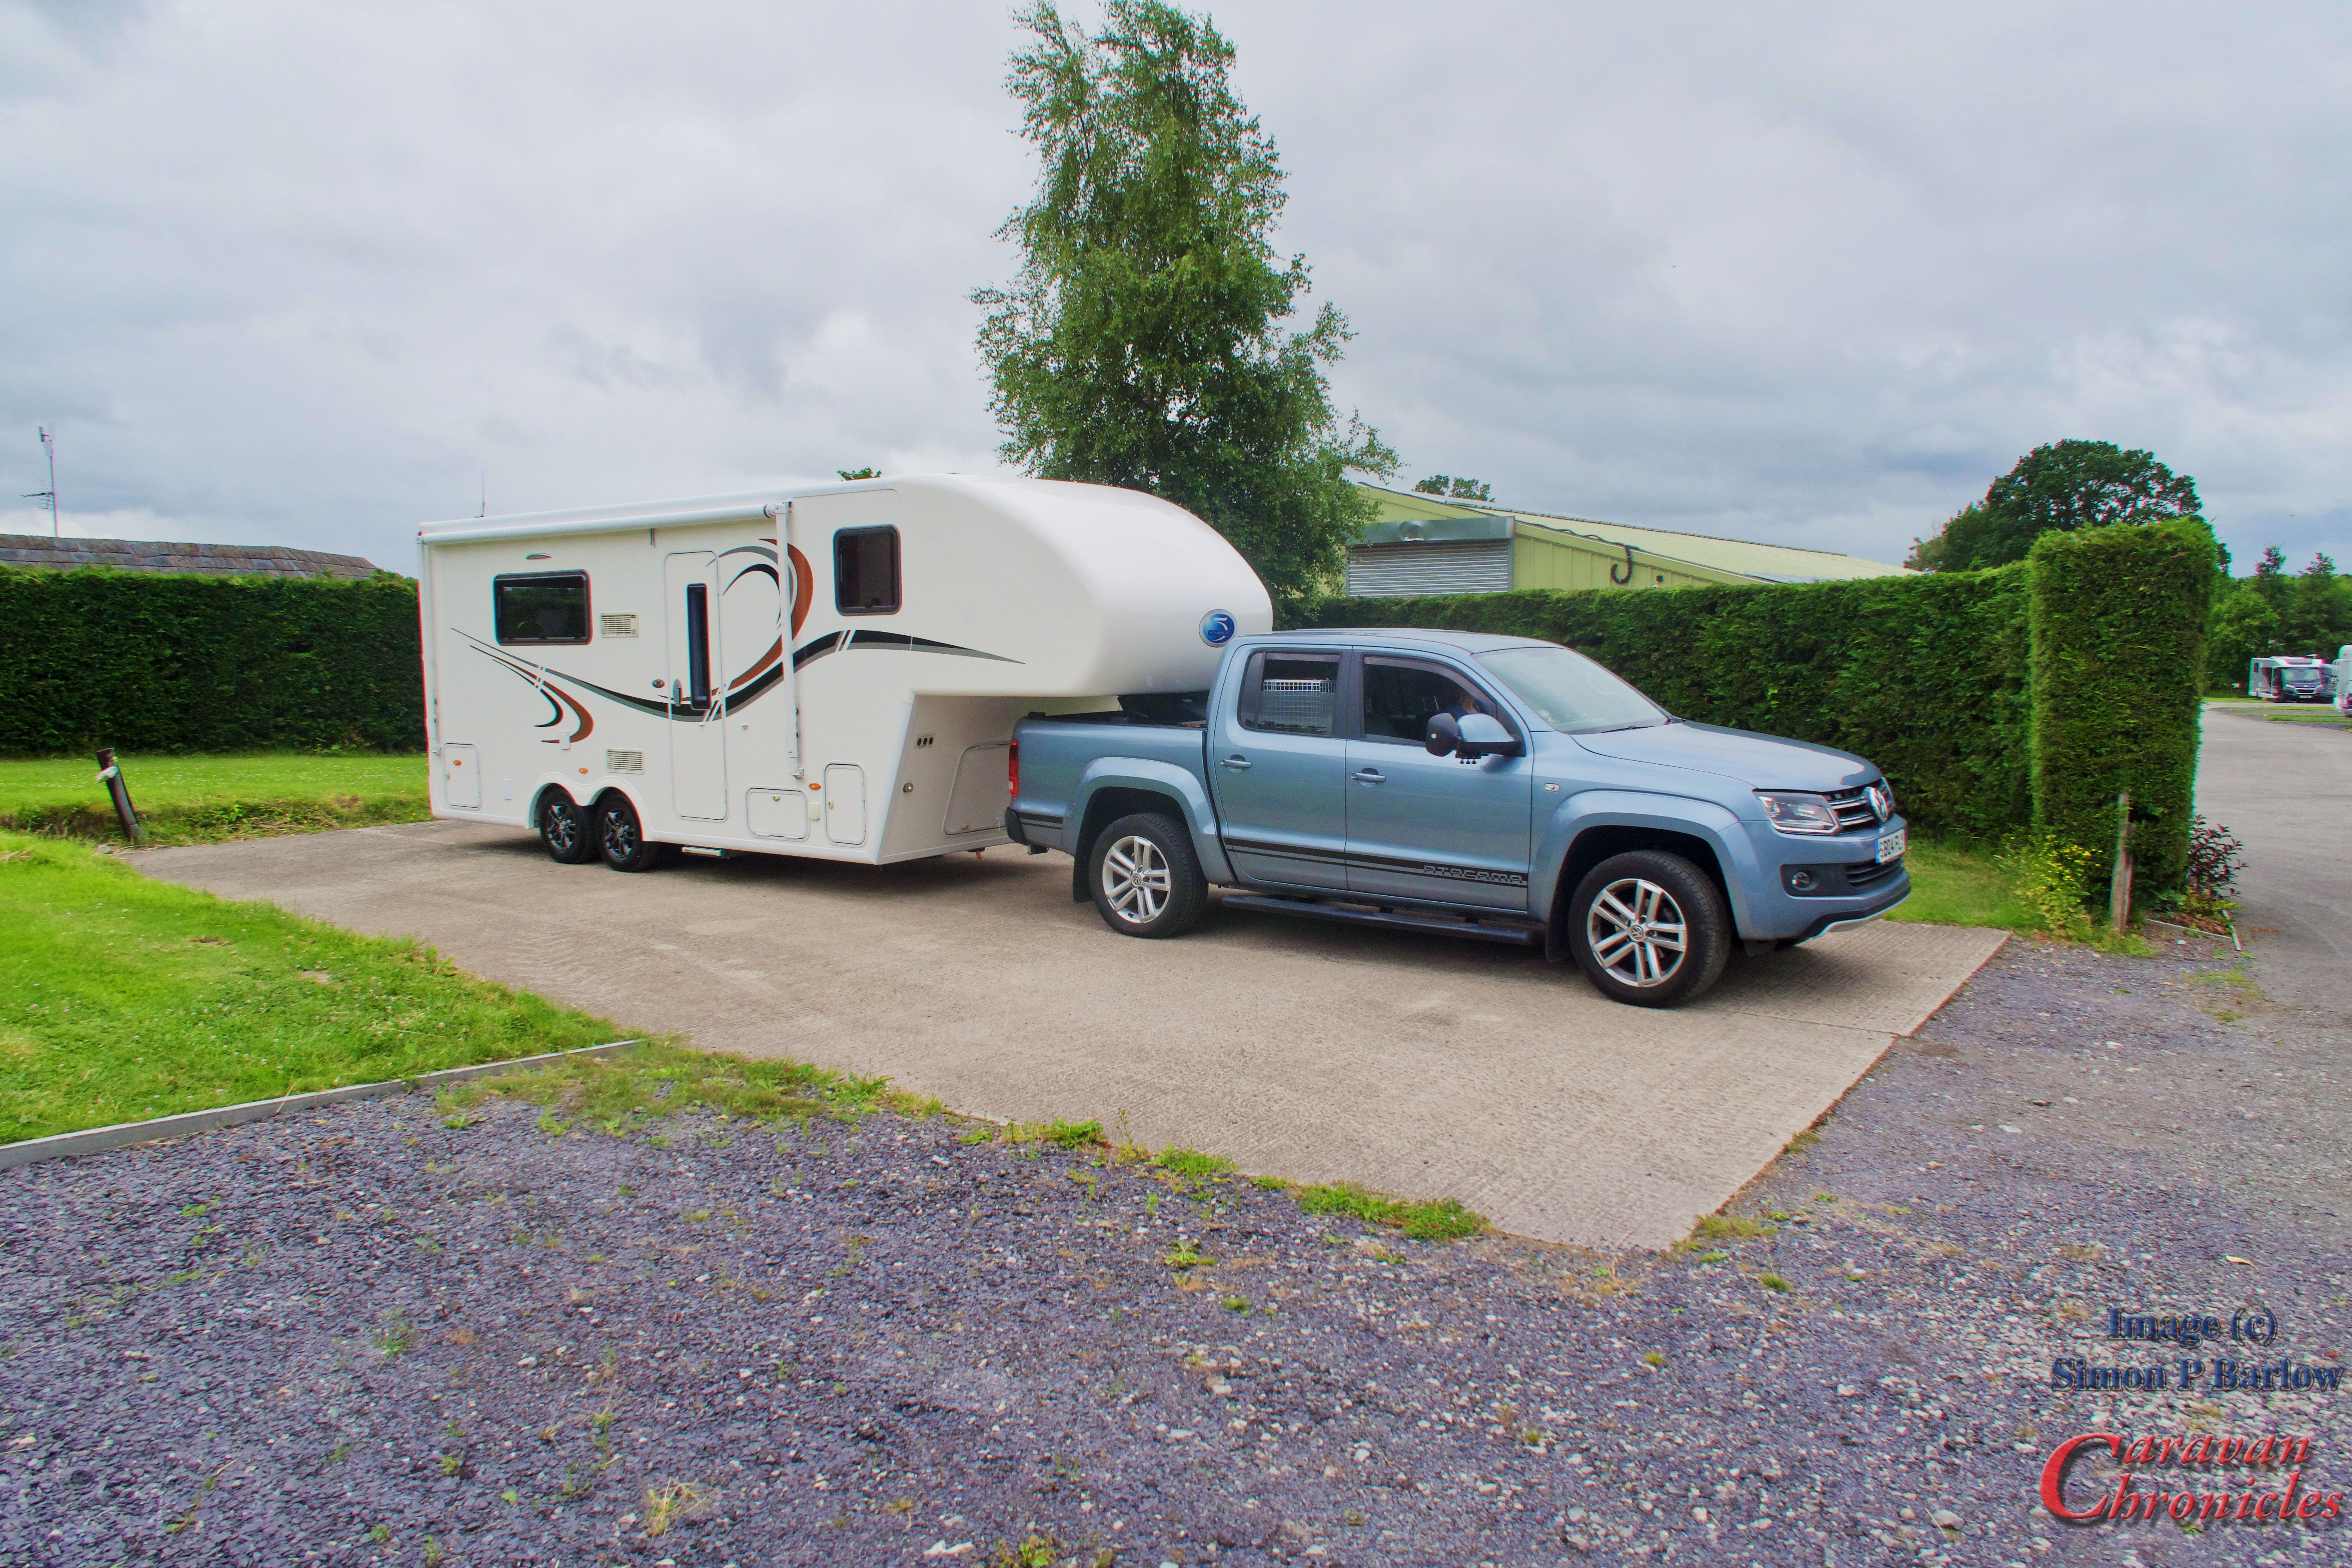
Final walk round and photo
Pulling out of the site onto the road wasn’t difficult. I need to adjust my mirrors slightly as I’d like to see a bit more of the 5th wheels tyres on the road, especially for cornering. The first real test was approaching a small roundabout a few hundred metres up the road…. I didn’t think we were slowing enough and I was going to overshoot onto the roundabout, so I pressed the brake peele a bit harder… then the trailer decided that meant it must be a sign more brakes were required and it obliged… wow those brakes do work well. I don’t think there is a delay as such, you just have to give them a clear sign of what you want them to do. So a little feathering of the foot brake to shed a few miles per hour you don’t really feel them, but add a bit more pressure than that then they come on enthusiastically for a millisecond until they judge just how much you want to slow down by then match you somehow. You feel them come on then ease up to match you. Never had that on a trailer before.
The trip home was rather uneventful…. except for the looks that you get… I don’t think we would have got more looks if we had been driving a bright pink soft top Ferrari with a giraffe in the back seat.
A Huge Thanks…
I’m going to say it again. A huge thanks To Simon, George who we initially dealt with and to all the staff at the 5th Wheel Company. This not sponsored, we didn’t get or receive any special discounts and although Simon was aware I wrote a blog, I really don’t think this influenced the way we were received or treated. We spoke to Gary and Helen (our neighbours) and they said the same. The service and level of commitment to the product and their customers is second to none, especially in this industry.
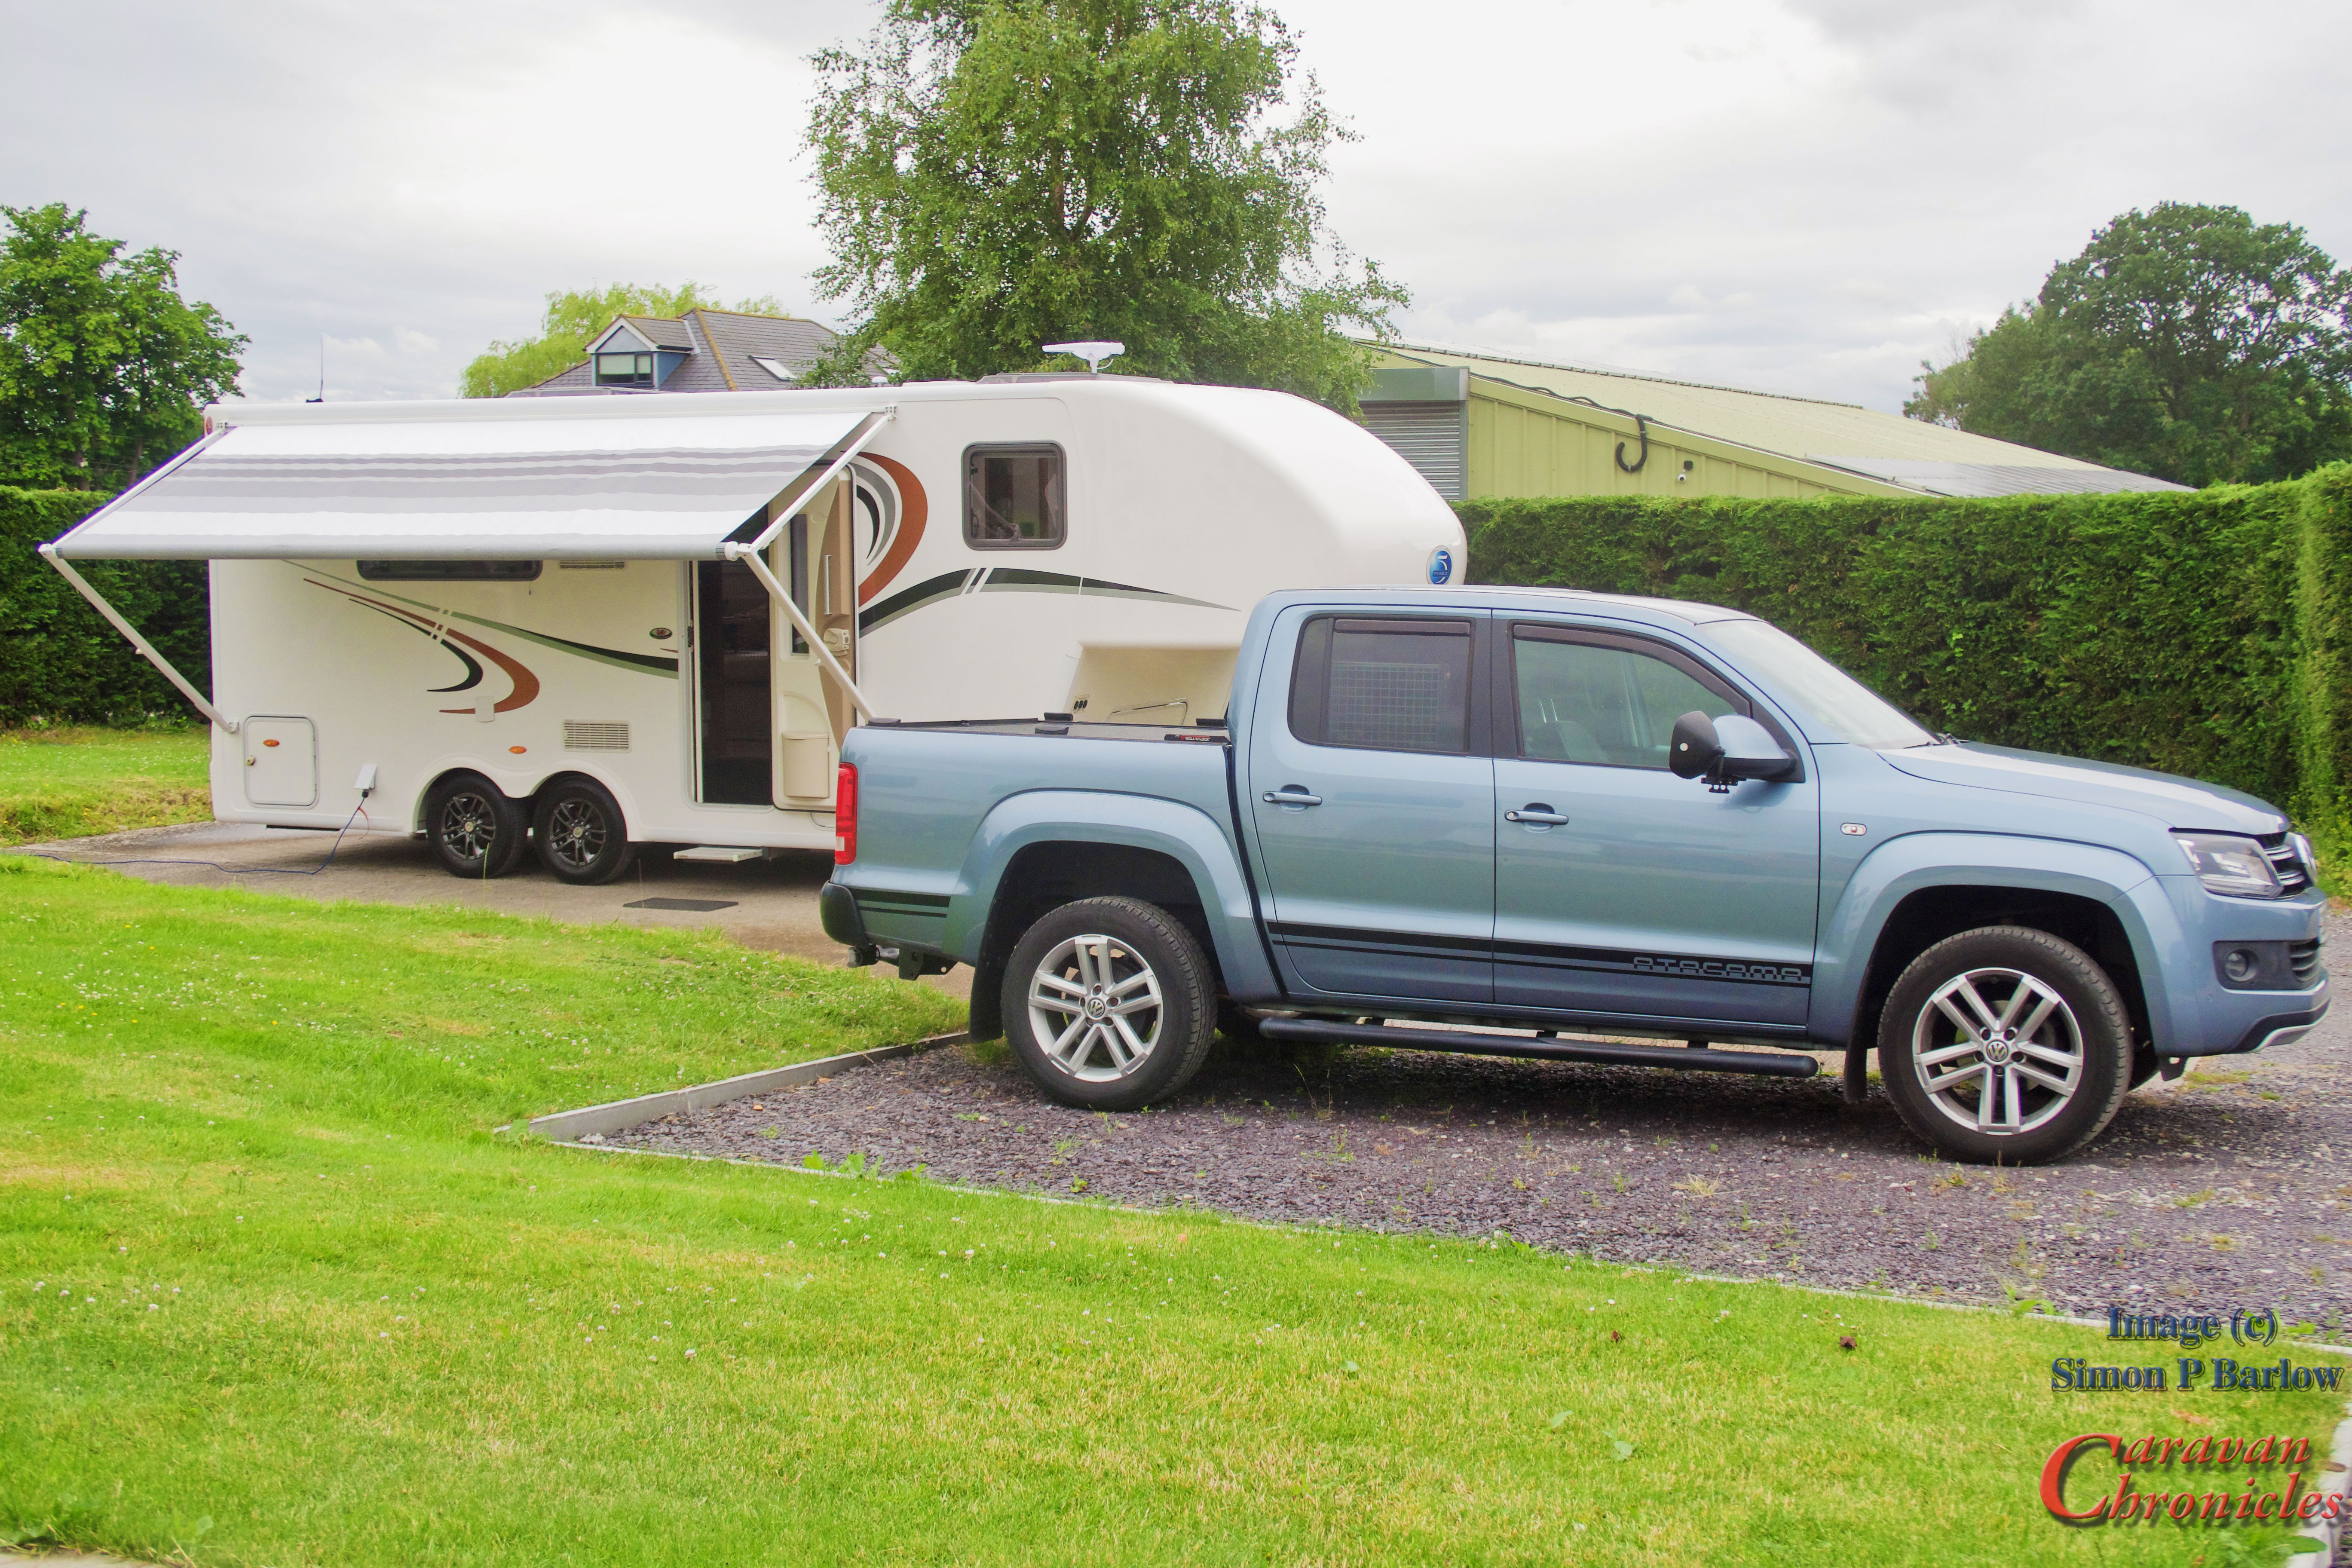
I think one or two of you might have already guessed… we have bought ourselves a 5th wheel caravan. (Was it the pickup that gave it away?) So here it is…
Why a 5th wheel?
We decided that as we have now both fully retired that we would like to change the style of caravanning from a few days in one place then returning home to more of a few days somewhere…. then a wander somewhere else for a while then maybe move on again over a period of a couple of weeks before returning home. We can (and have) done this with our old caravan but packing up and then pitching again was becoming a chore for multiple stops. So we started looking at motorhomes as these had the advantage of more payload and a bit more elbow room. Something else we wanted to do was store our e-bikes inside rather than secure them outside when on site.
However when the cost of a suitable motorhome started to creep well above £100K…. we dismissed all the UK built motorhomes as most are just a caravan dropped on a chassis with an engine. So A-class it was. We looked at Carthago and really liked the c-line but my wallet went into cardiac arrest. We could cut costs a little if we cut some of our requirements and on top of that adding a vehicle that we could tow. It meant we were looking at the thick end of £150K. On top of this would be the cost of a towed vehicle and the decision to either flat tow or trailer. I believe that flat tow can be a bit of an issue in some European countries, but that might be hearsay. The yearly cost of two services, MOT’s, Insurance was also a big factor.
We started looking again at caravans with a new vision. The problem was for me, writing this blog for over 12 years now, I was a little nervous of investing in the mainstream UK offerings. It also left us with the original reason for changing over to a motorhome – the convenience of it all, that was still in our minds.
We had known about the 5th Wheel Company in North Wales for a long time, in fact a few years ago we sat in both a Celtic Rambler and a Dream Seeker at the Yorkshire Caravan Show and I had a bit of an affair moment with them. However back then we were still towing with our Land Rover Freelander (which we still own and is still going strong!) and the cost of a pickup and a 5th wheel was just not within our budget. But my brief dalliance with the 5th wheel remained in the back of my mind.
Just before we went to Sutton-on-Sea we had talked about maybe a 5th wheel instead of a motorhome. It has the load capacity (with this one we have about 950Kg available) plenty of elbow room, storage and it only requires servicing… no MOT or vehicle insurance only caravan insurance, this time we already have a pickup so no need to change vehicles. It is fitted with a 250 litre fresh water tank, grey tank, still uses a Thetford Cassette for the loo (so no issues trying to dump a black tank) so is exactly the same as a motorhome in a lot of ways. Plus it has a slide out for that all important elbow room (I’ll refrain from saying ‘enough room to swing a cat’ as Henry might be lurking around)… I’m getting ahead of myself.
I dropped an email to 5th Wheel Company asking if they could put us on a list just in case they had any pre loved units come in for resale. A few days later George from 5th Wheel emailed me back that they just happened to have both a Celtic Rambler and a Dream Seeker coming in and sent me the details they day we departed for Sutton-on-Sea.
Long story short… we received an email while we were in Sutton-on-Sea from George at the 5th Wheel Company letting us know they were having two opening days and asking if we would like to come along. The first one was Friday the day after we were due to return home from Hanworth Country Park.
5th Wheel Company Open Day
Friday was warm and clear blue skies and the run out from Manchester to Rhuallt was rather pleasant with light traffic. We were a bit early so stopped for a coffee at a service statin that overlooks the North Wales Expressway and parked looking at all the caravans and motorhomes passing by in both directions. I’ve aways wondered why so many caravans and motorhomes only seem to have one bike… there seemed to be a lot more with one bike that two and of course there were camper vans that looked like support vehicles for the Tour de France with six or seven on the roof or hung off the back.
When we arrived we were met by George and shown into the main showroom and offered coffee’s. We chatted to the couple manning the coffee table and discovered they had just sold their 5th wheel and bought an Inos caravan. Sorry I can’t recall their names. We had a look round the Dream Seeker and then the Celtic Rambler. For us, the Dream Seeker seemed the right ‘fit’. Although the Celtic Rambler has a larger bedroom we actually preferred the layout of the main living space.
The previous owners had opted for a few extras, a twin 11 kg Gaslow system with external filling point, twin 110Ah batteries and a 15 foot Carefree awning as well as a leather upgrade, Nature Pure water tap and a few other bits were included. Simon came over and introduced himself and we started chatting, answering my growing list of questions. He asked if we would like a test drive of a unit that had outside. It was a customers unit that they had permission to use. We hopped in and Simon took us out for a short run and then we swopped over and I had chance to get the feel of pulling just over 4 tonnes of Celtic Rambler. The unit was fully loaded with the customers belongings so it was a good test of reality. My honest opinion was to be a bit underwhelmed… I don’t know what I expected but it was such a non event towing it round small welsh backroads, through a couple of small villages and honestly the roundabouts, I didn’t even feel I was towing. OK the performance reflected that there was 4 tones back there but handling was no problem and even accelerating onto the Expressway, put your foot down it still went. Probably a bit better than some of the large motorhomes.
We got back and went and sat in the Dream Seeker again…. with another coffee. We spoke to Simon about figures, weight’s, costs etc and had another wander round.
The Drive Home…
The drive home was a little busier and full of conversations about what to do. Late afternoon and I think the whole of the North West was descending on North Wales. The queue round Shotton and back to the M56… and on the M56 was horrendous. Thankfully we were heading in the opposite direction.
That evening I emailed Simon to ask if he could just check the door opening size of the garage, Sue wasn’t convinced we could get out bikes in, I kind of thought we could but best to make sure.
Saturday morning Simon emailed me back a photo of the door with all the sizes on it.
I emailed him back simply saying…. “Put a Sold sign on it”.