June 3, 2017 10:34 am
OK, so if you read about the bike rack install I guess you might have seen the video of me getting onto the tailgate of the VW Amarok…. akin to a whale wearing a tutu and trying to get on points. I needed something better… well my knees were telling me I better do something about it at least. In the USA, the land of the pickup or Australia the home of the Ute there were plenty of options. The downside was the Amarok has not been released in the USA and shipping charges from Australia are insane. I had to find something closer to home. Doing the usual google searches always ended up with products on sale in different continents so I ended up searching for images that contained the word ‘tailgate’, ‘step’ and ‘Amarok’ and after clicking on various pictures discovered Pegasus 4 x 4 in Bristol. (Note to all the companies out there… spending time correctly tagging and key wording all the photos on your websites pays off!)
I pinged off an email to Pegasus enquiring about the step and how it was fitted. I sent them details of my Amarok and waited for a reply. A great chap called Andrew emailed me back with some details and said unfortunately it can’t be fitted to an Amarok with a tow bracket. Hmm… I had seen some pictures of Australian Amarok’s fitted with steps, time for a bit of research. Long story short, emails and pictures were exchanged with Andrew who was very helpful and we came to the conclusion if the Amarok has the tow bumper option it can be fitted.
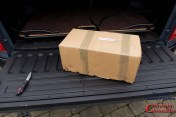
A few days later a box arrived.
Unboxing, everything was very well packed and included everything to complete the install.
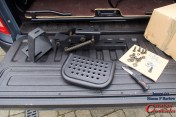
The step came in three sections. The tread plate, the drop down mechanism and the attachment bracket that was unique for each vehicle. (Pegasus 4 x 4 can supply T-Steps for VW, Ford, Toyota, Mitsubishi, Nissan & Isuzu).
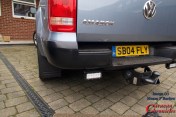
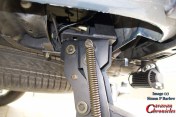
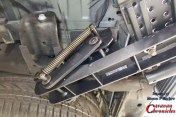
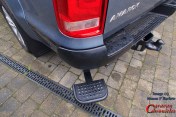
The step is fitted on the rear passenger side just to the left of my auxiliary reversing light. Fitting the unit seemed straightforward on the Amarok. The bracket used one of the chassis truck body mounting points and picked up on an existing hole in the rear spring mounting point.
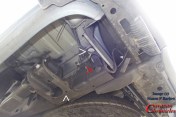
The two white arrows show the mounting points, the red arrow shows one of the bolts that attach the tow bumper to the chassis. If you have a standard bumper on the Amarok with a tow bracket, this position is used to attach the bracket and will not allow the T-Step bracket to locate correctly.
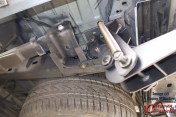
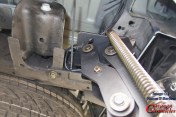
The first step (no pun intended) was to release the electrical cables from the tie down points on the chassis. Easy enough and there was plenty of length in the looms to safely and securely re-route them once the bracket was installed. There is only one bolt to remove and this is reused fitting the bracket. Now what in theory should be a simple and easy job actually was a bit of a sod. Holding the bracket up while trying to align the bracket and hole in the chassis while trying to insert an 18mm bolt with your hand bent backwards while laying on your back evoked a lot of traditional Anglo Saxon cursing.
After an epic battle between me and the bolt. 40 minutes later I emerged the victor, take that you metric threaded stick of high tensile steel. The second bolt (supplied) was easy and dropped into place with flat washers and lock washer. Being from the IKB school of engineering I did also put a spot of locktite on the thread.
Next was to mount the drop down assembly…
This was simple to do and again all the nuts, bolts and washers that are required are supplied in the kit. The design of the main mounting bracket does allow you to align the step slightly so it can be more to the side or more to the rear. I opted for it to be slightly more to the side so that when folded away it clears my auxiliary reversing light.
The last stage was to install the tread plate, again all the required hardware was supplied with the kit and it only took a couple of minutes to get it mounted and the nuts torqued down, again with the application of a spot of locktite.
Heres a few photos showing the mounting…
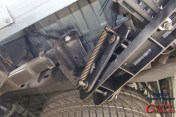
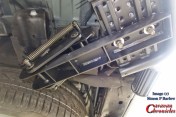
I have given all the pivot points a light application of a dry lithium grease. I used a dry grease so it would not hold any road grit although the positioning when folded is quite high up and protected by a large mud flap. I will give the whole thing a spray of protective wax as well.
In the closed position it’s not really too obvious and it doesn’t protrude past the bumper. The height too is quite good, I’m not going to catch it on anything.
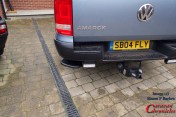
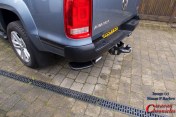
Operation is really easy, simply push down on it and it drops down and extends out giving you plenty of space to step onto it
A video is worth a thousand words (Warning – there are NO cute kitties in this video)
Looking at the general construction, the steel work of the drop down unit is of a heavy enough gauge and all the edges are clean-cut, they haven’t been cheaply guillotined. The welds are neat and precise with little or no spatter and the coating seems to be of a durable quality. All the bolts supplied were marked 8.8 so they aren’t high tensile peanut butter. The main mounting bracket holes lined up with the holes on the Amarok and it didn’t require any fudging to install.
Pegasus 4 x 4 gave me great service and I would have no hesitation in recommending them based on my experience with Andrew
Overall I’m very pleased with it, I can hop up onto the tailgate with the ease of a mountain goat (OK so that MIGHT be pushing it) and looking forward to it giving us long service.
Posted by Simon Barlow
Categories: Accessories, Amarok, General, Modifications, Tow Vehicle, VW Amarok
Tags: Accessories, Pegasus 4 x 4, T-Step, Technical
Mobile Site | Full Site
Get a free blog at WordPress.com Theme: WordPress Mobile Edition by Alex King.
[…] For the full review including video’s and pictures please click https://caravanchronicles.com/2017/06/03/a-step-in-the-right-direction/ […]
By Thank You! - Pegasus 4x4 on December 18, 2019 at 3:33 pm
[…] https://caravanchronicles.com/2017/06/03/a-step-in-the-right-direction/ […]
By News: A STEP IN THE RIGHT DIRECTION…A BLOG FROM ‘THE CARAVEN CHRONICLES’ - Pegasus 4x4 on July 9, 2019 at 10:14 am
[…] Thank you to Simon for this testimonial that he had published in Caravan Chronicles about our “T” Step for Amarok. https://caravanchronicles.com/2017/06/03/a-step-in-the-right-direction/ […]
By Caravan Chronicles – Pegasus4x4 on November 6, 2017 at 2:43 pm
[…] Thank you to Simon for this testimonial that he had published in Caravan Chronicles about our “T” Step for Amarok. https://caravanchronicles.com/2017/06/03/a-step-in-the-right-direction/ […]
By Caravan Chronicles, “T” Step for Amarok – Pegasus4x4 on November 6, 2017 at 12:48 pm
[…] https://caravanchronicles.com/2017/06/03/a-step-in-the-right-direction/ […]
By News: A STEP IN THE RIGHT DIRECTION…A BLOG FROM ‘THE CARAVEN CHRONICLES’ – Pegasus4x4 on November 6, 2017 at 10:58 am
Hello! This is Corina. Great blog. Where could i find your email in order to sent you a proposal for a product review? Who knows, you might be interested. Thank you 🙂 contact me: corina@kuhl.com
By Corina Christina on June 16, 2017 at 2:22 pm
Hi Corina
I have sent you an email.
By Simon Barlow on June 16, 2017 at 2:55 pm
Simon could you send me the link of where you got your extra reversing lights to? As I have a ranger and would love to fit a set of those. Thank you rj.north81@gmail.com
By Rob north on January 23, 2019 at 5:26 pm
Hi Rob
I got them from an Amazon seller… https://amzn.to/2WbX0TA
Iv’e had them on for a couple of years with no problems performance wise or corrosion. No water ingress at all on either of them despite being placed where they are. The light output is fantastic.
By Simon Barlow on January 23, 2019 at 5:32 pm
Very good idea to fit the step, it’s fitted so professionally it looks like it has been factory fitted. I like your idea of using dry lithium grease, it will as you know help to prevent wear & tear as you have said, it stops road grit sticking to the joints and grinding them away over constant use like sand paper would tend to do. Thumbs up and definitely a step in the right direction.
Colin
By Colin on June 15, 2017 at 8:08 pm
Hi Colin
I’m really pleased with the step. It’s a great product, seems really well made and it makes it so much easier for me to hop up into the pickup bed. I can genuinely say as a product it has exceeded my expectations. (its also a handy place to put a cup of coffee while I’m working on the Amarok… I don’t knock it over!)
By Simon Barlow on June 15, 2017 at 10:40 pm
[…] https://caravanchronicles.com/2017/06/03/a-step-in-the-right-direction/ […]
By Caravan Chronicles Amarok Rear Step Blog on June 5, 2017 at 2:35 pm